LangGraph是一个低层级的Agent编排框架,有以下重要特性:持久化运行、流式输出、人工介入循环等。从名字中可以看出来,LangGraph是一个有向图工作流,可以支持循环。
既然我们已经有n8n、Dify等低代码平台了,为什么还需要LangGraph?原因在于,LangGraph的定位在于提供代码级的Agent编排能力:流程清晰、状态可控、人工审批、审计追踪、复杂逻辑控制等,对于生产级复杂的Agent,LangGraph更适合工程化落地。
一、LangGraph基础示例
先来看一下LangGraph的示例代码:
python
from langgraph.graph import StateGraph, MessagesState, START, END

def mock_llm(state: MessagesState):
    return {"messages": [{"role": "ai", "content": "hello world"}]}

graph = StateGraph(MessagesState)
graph.add_node(mock_llm)
graph.add_edge(START, "mock_llm")
graph.add_edge("mock_llm", END)
graph = graph.compile()

graph.invoke({"messages": [{"role": "user", "content": "hi!"}]})
LangGraph中有以下关键的概念:
-
节点(Node):具体执行操作的函数,例如调用LLM、调用工具等
-
边(Edge):定义节点之间连接,可以设置条件分支
-
状态(State):状态指的是整个工作流中共享可传递的数据
-
图(Graph):整个工作流就是一个图,由节点、边及状态组成
从上述代码可以看出,我们创建了一个LangGraph工作流,有一个Node模拟了LLM,添加了两个边,一条是从开始到LLM,另一条是从LLM到结束。
二、安装方法
bash
pip install -U langgraph下边使用Graph API方式构建一个计算器Agent。
三、使用Graph API构建计算器Agent
1. 定义工具和模型
定义之前,我们需要一个模型,我这边用glm-4.5-air,用其他支持Agent的模型都可以,需要将GLM_API_KEY写入到环境变量。
这里定义了三个工具:乘、除、加。
python
import os
from langchain.tools import tool
from langchain.chat_models import init_chat_model

model = init_chat_model(
    "glm-4.5-air",
    model_provider="openai",
    base_url="https://open.bigmodel.cn/api/paas/v4/",
    api_key=os.getenv("GLM_API_KEY"),
    temperature=0
)


# Define tools
@tool
def multiply(a: int, b: int) -> int:
    """Multiply `a` and `b`.

    Args:

        a: First int

        b: Second int

    """
    return a * b

@tool
def add(a: int, b: int) -> int:
    """Adds `a` and `b`.
    Args:

        a: First int

        b: Second int

    """
    return a + b

@tool
def divide(a: int, b: int) -> float:
    """Divide `a` and `b`.

    Args:

        a: First int

        b: Second int

    """
    return a / b

# Augment the LLM with tools
tools = [add, multiply, divide]
tools_by_name = {tool.name: tool for tool in tools}
model_with_tools = model.bind_tools(tools)
2. 定义状态
图的状态用来存储信息,例如消息列表和记录LLM调用次数,状态贯穿整个Agent的执行流程。
其中,Annotated...是Python类型注解写法,意思是在原来的类型上附加一些说明信息,指定messages中字段listAnyMessage使用operator.add操作合并而不是替换原有内容。
python
from langchain.messages import AnyMessage
from typing_extensions import TypedDict, Annotated
import operator


class MessagesState(TypedDict):
    messages: Annotated[list[AnyMessage], operator.add]
    llm_calls: int
3. 定义模型节点
在这个节点中,我们看到节点接收全局状态,返回模型输出的信息。返回结果中,模型调用结果会追加到原来的信息列表中,LLM调用次数加1。
python
from langchain.messages import SystemMessage


def llm_call(state: dict):
    """LLM decides whether to call a tool or not"""

    return {
        "messages": [
            model_with_tools.invoke(
                [
                    SystemMessage(
                        content="You are a helpful assistant tasked with performing arithmetic on a set of inputs."
                    )
                ]
                + state["messages"]
            )
        ],
        "llm_calls": state.get('llm_calls', 0) + 1
    }
4. 定义工具节点
工具节点用来调用工具并返回结果。
在此函数中,首先检查状态的最后一条消息中的tool_calls,如果有的话获取tool对象,然后使用tool_call的参数调用该工具,从而获得observation(即工具执行结果),然后将工具结果封装为ToolMessage,并追加到全局状态的messages里。
python
from langchain.messages import ToolMessage


def tool_node(state: dict):
    """Performs the tool call"""

    result = []
    for tool_call in state["messages"][-1].tool_calls:
        tool = tools_by_name[tool_call["name"]]
        observation = tool.invoke(tool_call["args"])
        result.append(ToolMessage(content=observation, tool_call_id=tool_call["id"]))
    return {"messages": result}
5. 定义路由逻辑
条件边函数用来根据LLM的输出决定下一步是进入工具节点,还是结束工作流。在以下代码中,函数判断消息中最新一条内容是否包含工具调用。如果有工具调用,则返回"tool_node",进入工具节点;如果没有工具调用,就返回END,结束工作流。
python
from typing import Literal
from langgraph.graph import StateGraph, START, END


def should_continue(state: MessagesState) -> Literal["tool_node", END]:
    """Decide if we should continue the loop or stop based upon whether the LLM made a tool call"""

    messages = state["messages"]
    last_message = messages[-1]

    # If the LLM makes a tool call, then perform an action
    if last_message.tool_calls:
        return "tool_node"

    # Otherwise, we stop (reply to the user)
    return END
6. 构建和编译Agent工作流
在LangGraph中,可以使用StateGraph类构建Agent工作流,使用compile方法编译。总体流程如下:1. 定义agent_builder 2. 添加节点 3. 添加边 4. 编译工作流 5. 调用工作流
python
# Build workflow
agent_builder = StateGraph(MessagesState)

# Add nodes
agent_builder.add_node("llm_call", llm_call)
agent_builder.add_node("tool_node", tool_node)

# Add edges to connect nodes
agent_builder.add_edge(START, "llm_call")
agent_builder.add_conditional_edges(
    "llm_call",
    should_continue,
    ["tool_node", END]
)
agent_builder.add_edge("tool_node", "llm_call")

# Compile the agent
agent = agent_builder.compile()

# Show the agent
from IPython.display import Image, display

# Save and show the agent
graph_png = agent.get_graph(xray=True).draw_mermaid_png()
with open("graph.png", "wb") as f:
    f.write(graph_png)

# Invoke
from langchain.messages import HumanMessage
messages = [HumanMessage(content="Add 3 and 4.")]
messages = agent.invoke({"messages": messages})
for m in messages["messages"]:
    m.pretty_print()
执行结果如下:
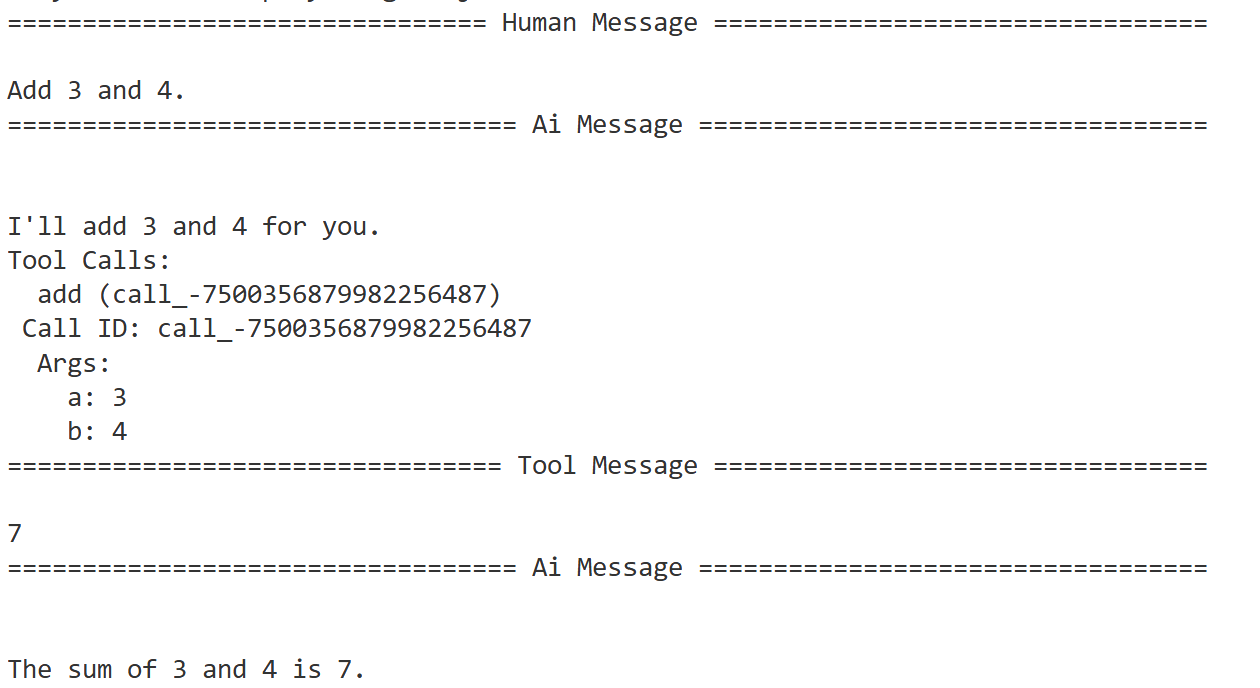
这个工作流可以通过图形展现:
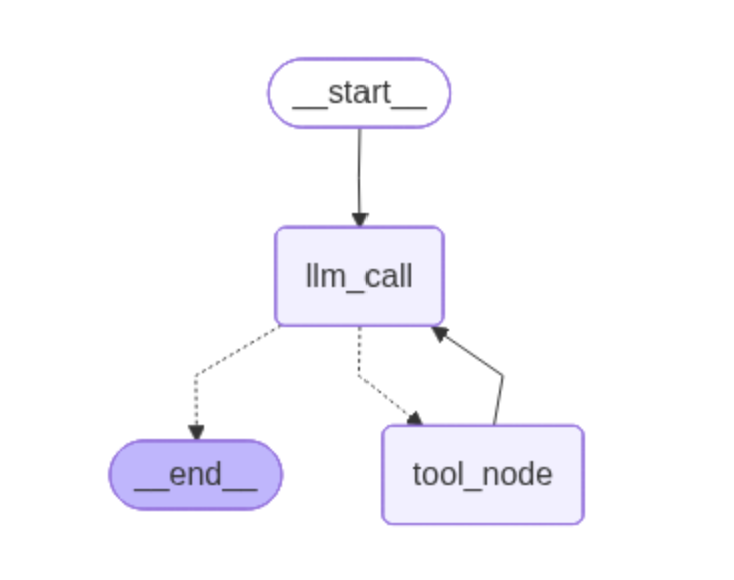
整个执行过程可以理解为:
用户输入问题后,工作流开始运行,首先,LLM根据问题输出了tool_call,然后调用工具获得结果追加到状态中,再次交给LLM分析。LLM分析此时不需要调用工具了,直接输出结果,转到END。
这里贴一下完整的代码下载地址,可直接使用:
https://personal-real-1259203851.cos.ap-shanghai.myqcloud.com/20260625_213732_graph.py
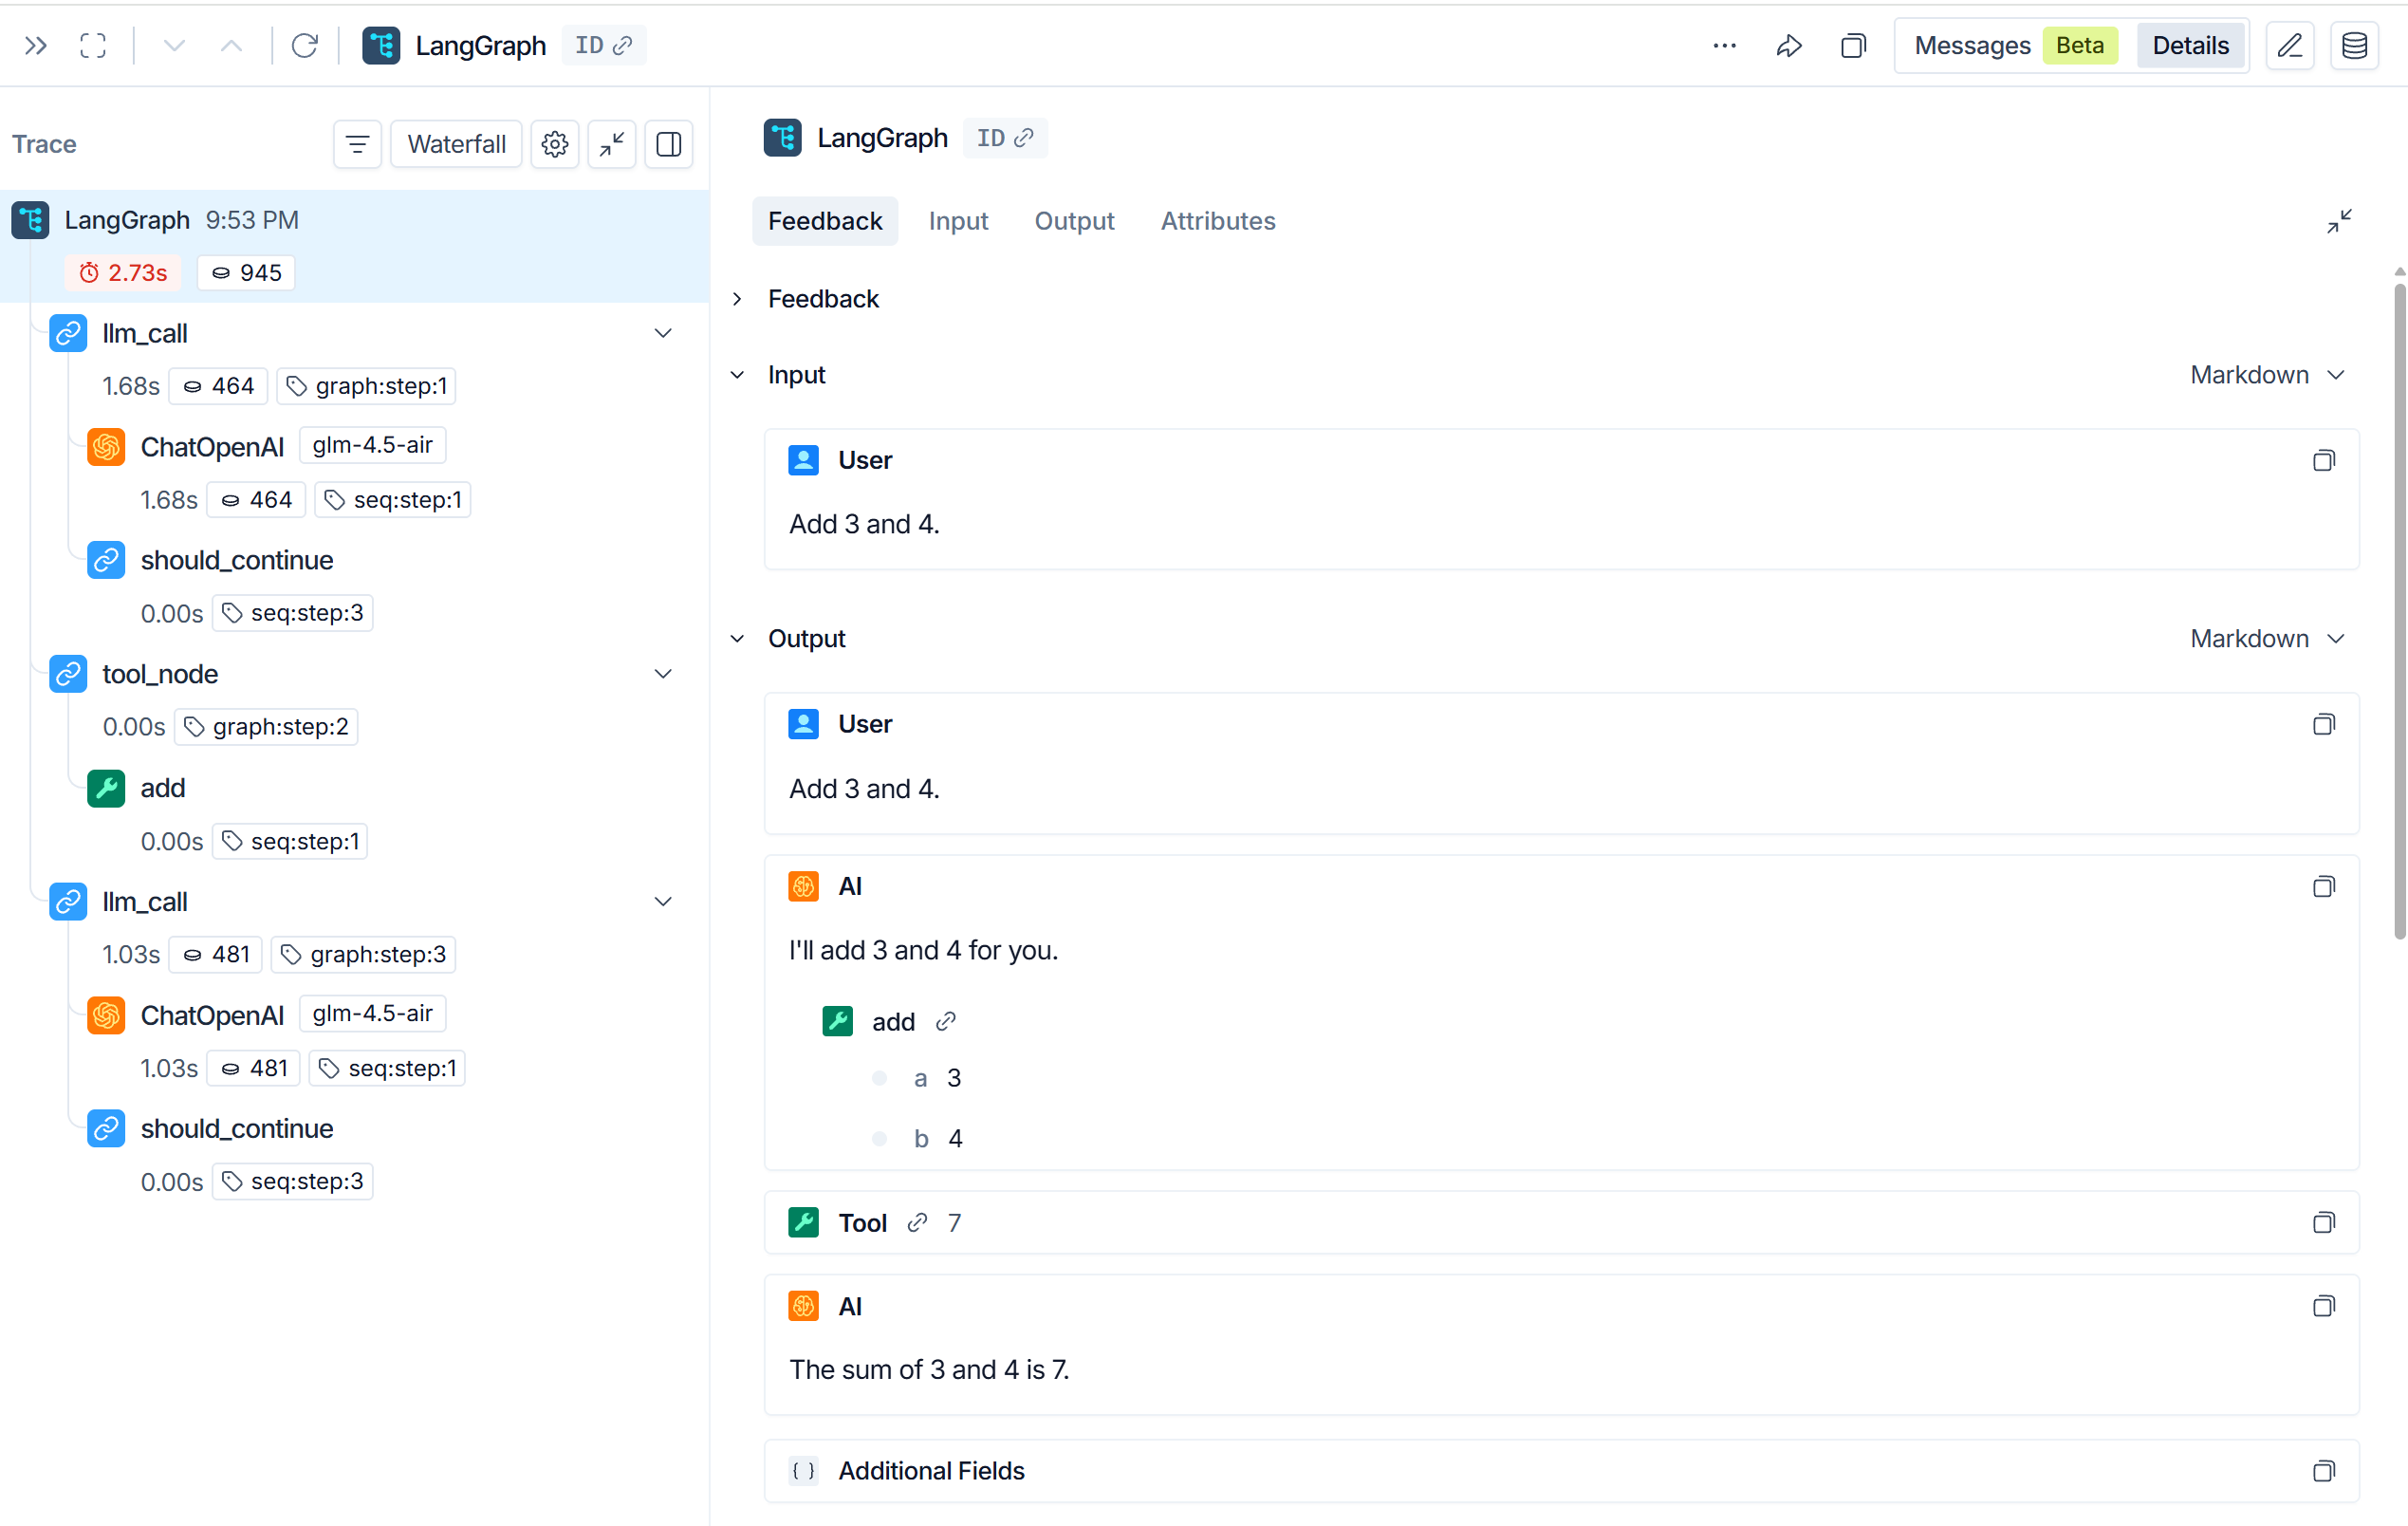
四、使用LangSmith监控工作流
LangGraph生态中还有一个重要的工具:LangSmith,LangSmith可以监控工作流的详情,方便调试工作流。
配置方法:
在环境变量中输入:
bash
export LANGSMITH_TRACING=true
# 从https://smith.langchain.com设置中获取密钥
export LANGSMITH_API_KEY="lsv2_xx"
配置完成后,运行工作流就可以在LangSmith官网中追踪到工作流详情了,在追踪详情中,我们可以了解到工作流运行时调用了哪些节点及工具,调用LLM的输入输出、Token花费等。这对于调试复杂Agent工作流非常有帮助。