需要知道Eclipse Ditto是什么 、怎么安装就点击下面的链接查阅。
Eclipse Ditto 、 Mosquitto MQTT 、 OpenModelica 开发工具-CSDN博客
一、主要内容
本文主要讲解Eclipse Ditto物模型的搭建,及数据传输步骤;供大家参考。
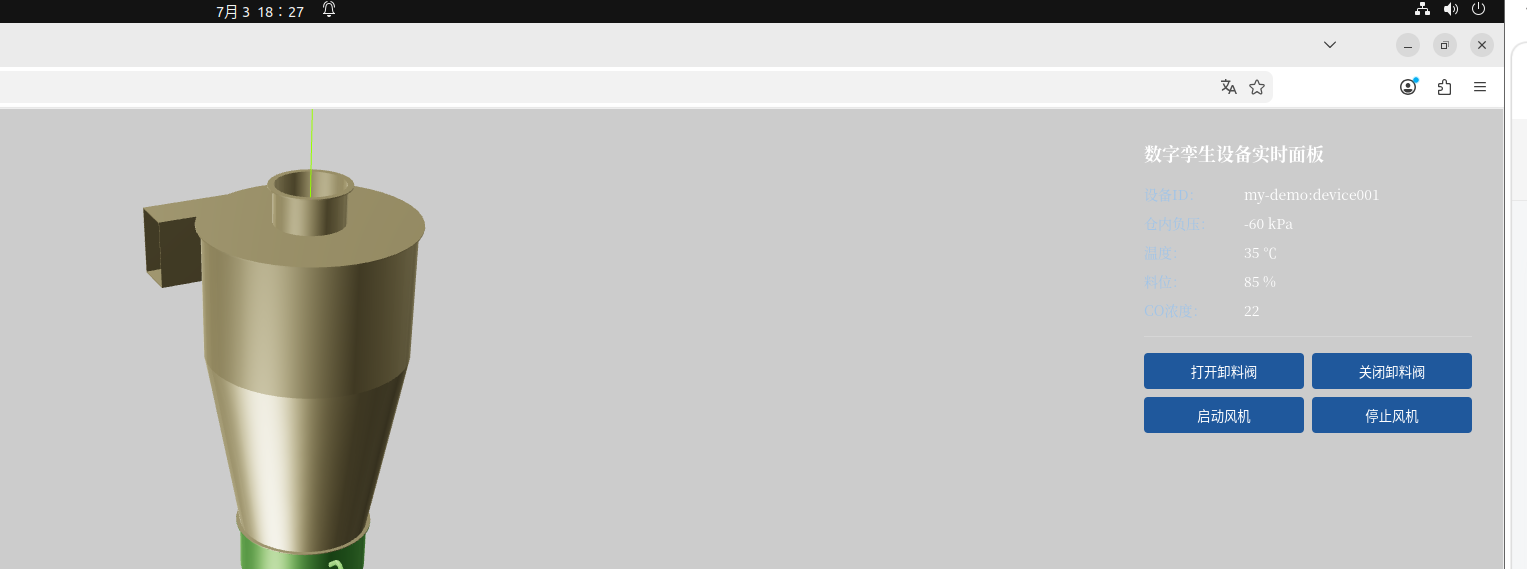
二、界面预览
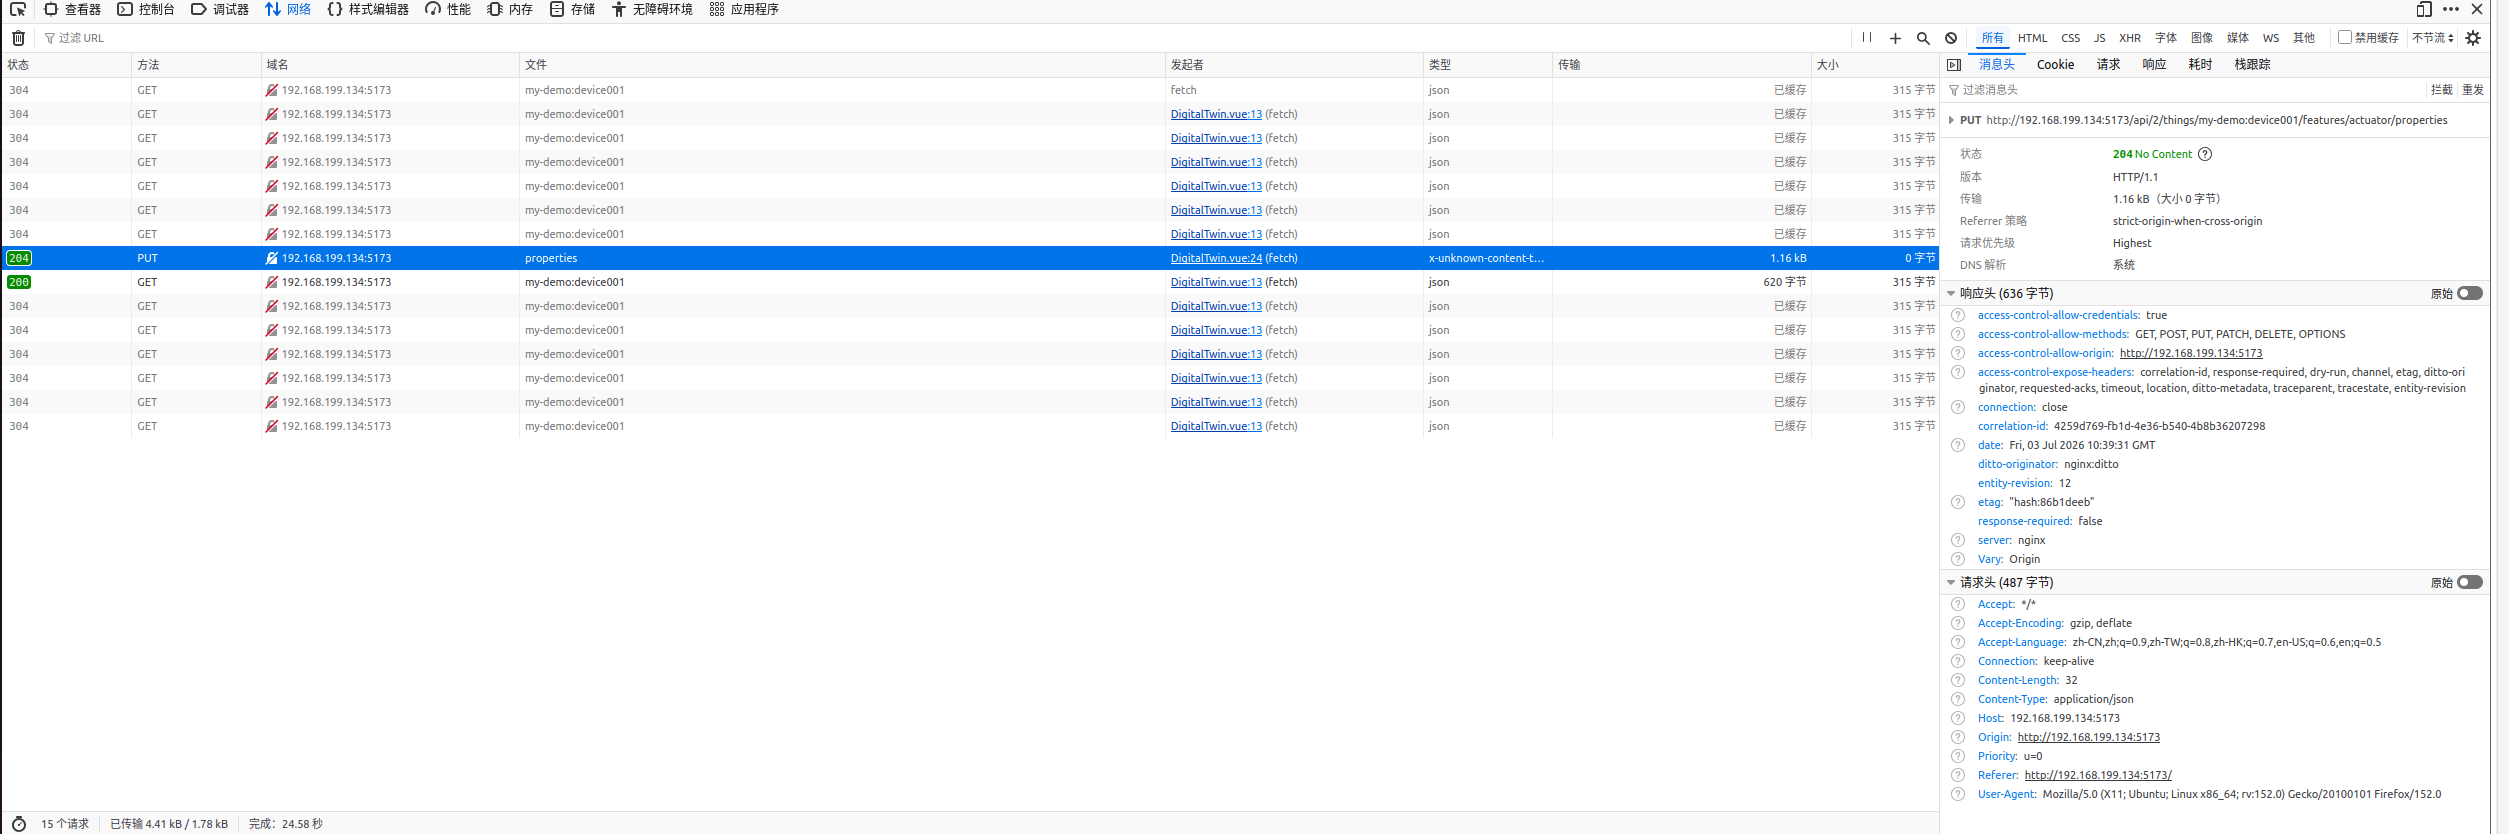
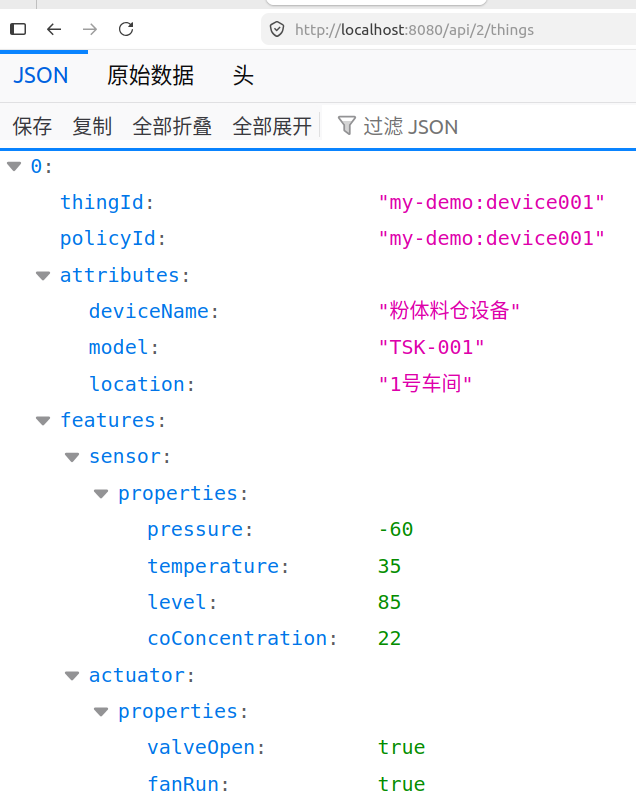
下发的数据:
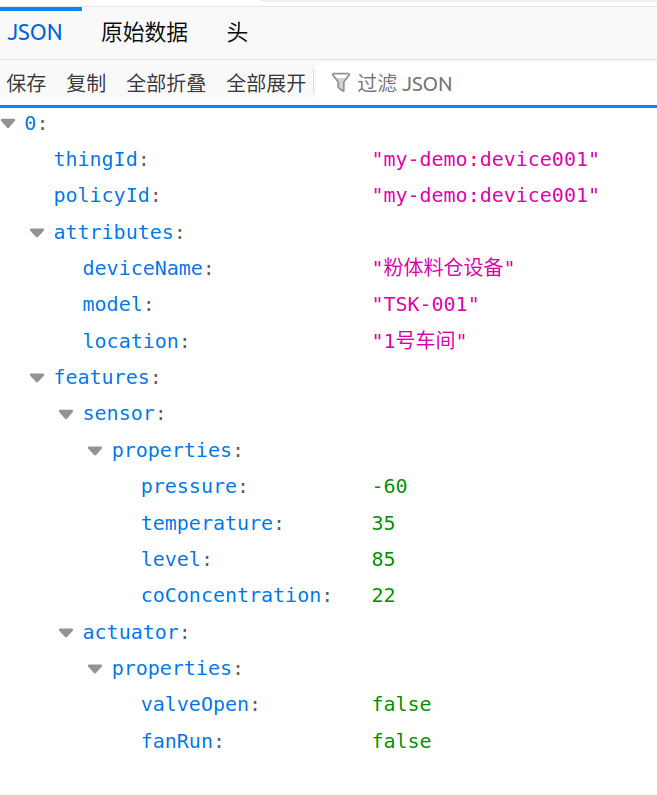
对应的控制面板:
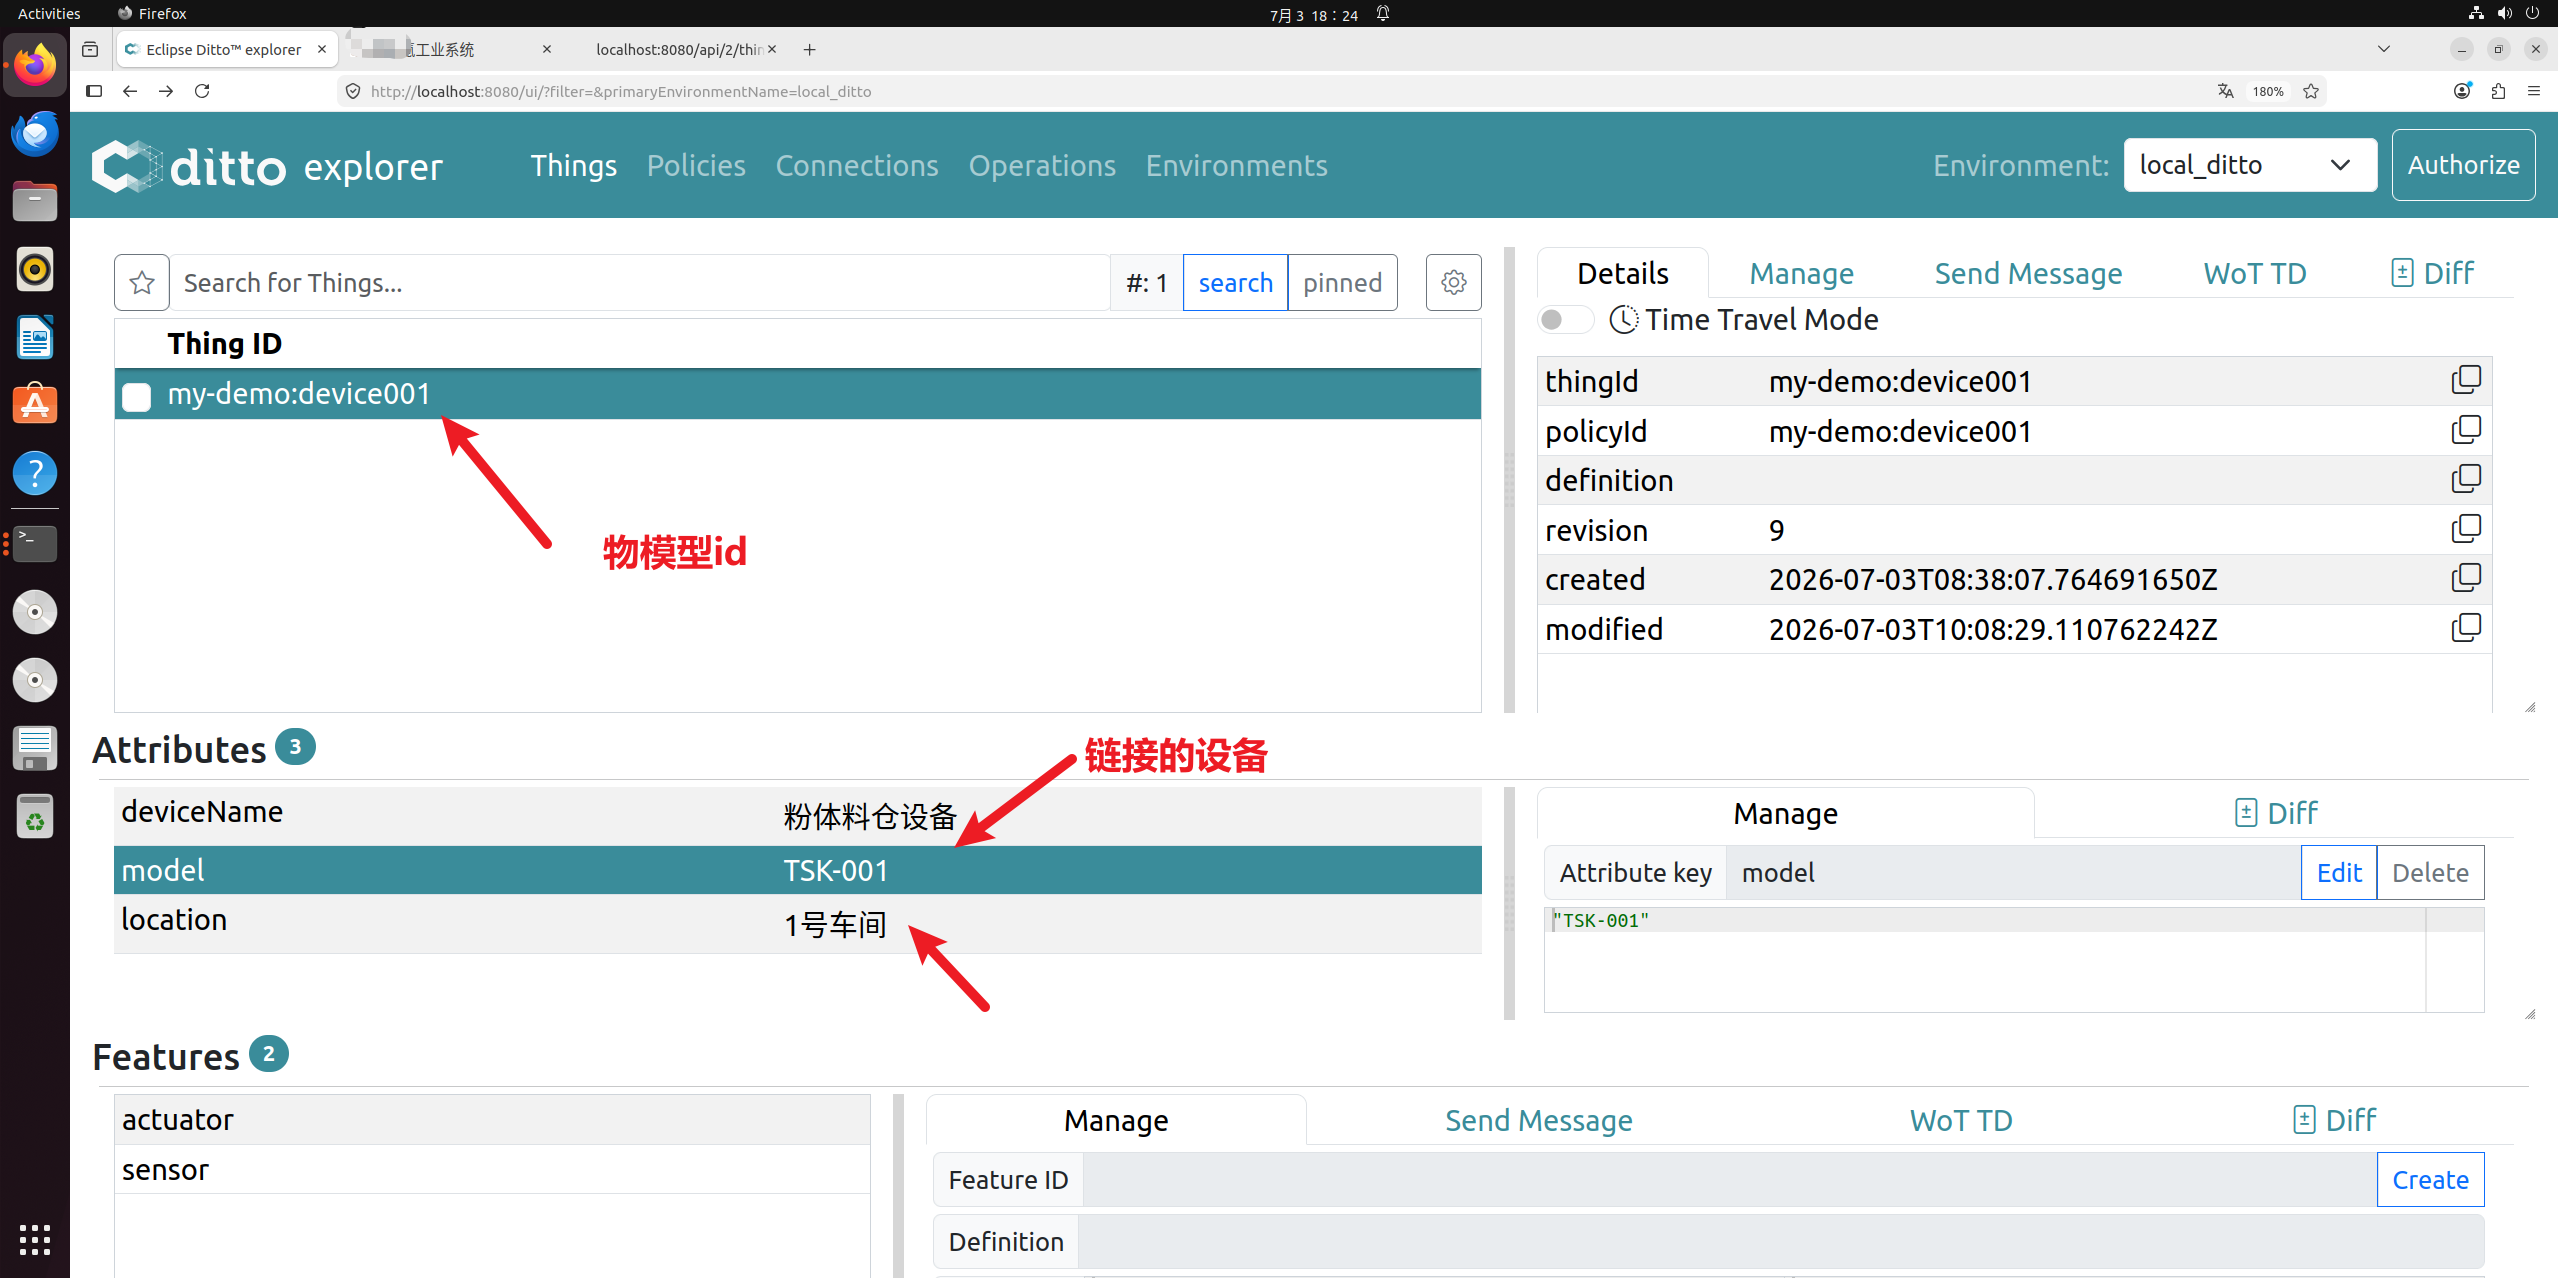
三、Eclipse Ditto 物模型
(1)创建物模型
curl -X PUT http://localhost:8080/api/2/things/my-demo:device001 \
-u ditto:ditto \
-H "Content-Type: application/json" \
-d '{
"attributes": {
"deviceName": "粉体料仓设备",
"model": "TSK-001",
"location": "1号车间"
},
"features": {
"sensor": {
"properties": {
"pressure": 0,
"temperature": 25,
"level": 0,
"coConcentration": 0
}
},
"actuator": {
"properties": {
"valveOpen": false,
"fanRun": false
}
}
}
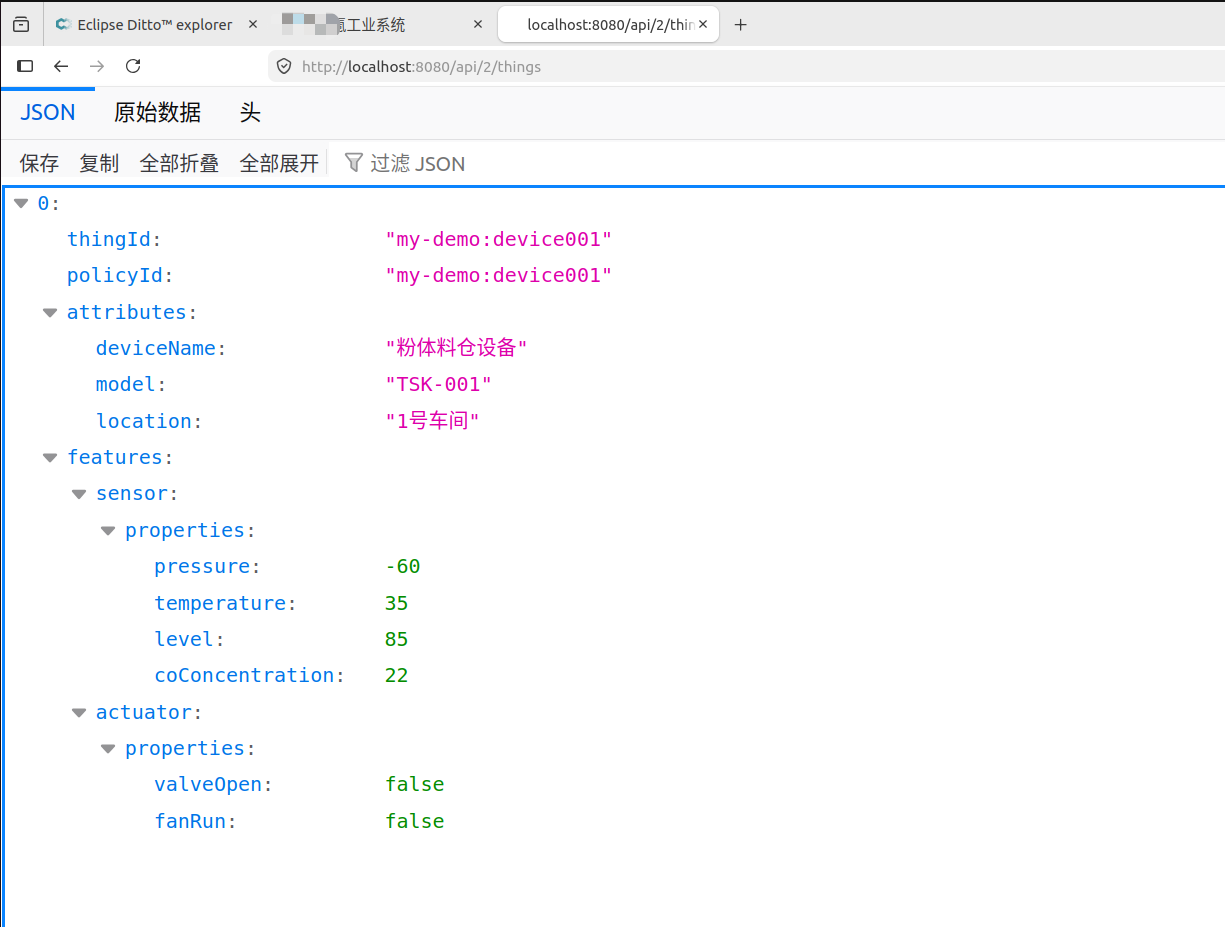
}'(2)测试反馈
ian@hang:~$ curl http://localhost:8080/api/2/things -u ditto:ditto
[{"thingId":"my-demo:device001","policyId":"my-demo:device001","attributes":{"deviceName":"粉体料仓设备","model":"TSK-001","location":"1号车间"},"features":{"sensor":{"properties":{"pressure":-60,"temperature":35,"level":85,"coConcentration":22}},"actuator":{"properties":{"valveOpen":false,"fanRun":false}}}}]
四、代码文件展示
src/utils/dittoWs.ts
type DittoMsgCallback = (msg: Record<string, any>) => void

export class DittoWebSocket {
  private ws: WebSocket | null = null
  private url = '/ditto-ws'
  private msgCallback: DittoMsgCallback | null = null
  private reconnectTimer: number | null = null
  private readonly RECONNECT_DELAY = 3000

  connect() {
    if (this.ws && this.ws.readyState === WebSocket.OPEN) return
    this.ws = new WebSocket(this.url)
    this.bindEvent()
  }

  private bindEvent() {
    if (!this.ws) return
    this.ws.onopen = () => {
      console.log('✅ Ditto WebSocket 代理连接成功')
      this.subscribeAllThings()
    }

    this.ws.onmessage = (ev) => {
      try {
        const data = JSON.parse(ev.data)
        console.log('收到Ditto原始消息:', data)
        // 过滤错误消息,不抛给页面
        if(data.topic && data.topic.includes('errors')) return
        this.msgCallback?.(data)
      } catch (err) {
        console.error('消息解析失败', ev.data, err)
      }
    }

    this.ws.onclose = () => {
      console.warn('WS断开,3s后重连')
      this.reconnect()
    }

    this.ws.onerror = (e) => {
      console.error('WS异常', e)
      this.ws?.close()
    }
  }

  private reconnect() {
    if (this.reconnectTimer) clearTimeout(this.reconnectTimer)
    this.reconnectTimer = window.setTimeout(() => this.connect(), this.RECONNECT_DELAY)
  }

  // ✅ 修正订阅格式(符合 Ditto WebSocket API)
  subscribeAllThings() {
    const subCmd = {
      topic: "_/_/things/twin/commands/subscribe",
      headers: { "response-required": false },
      path: "/"
    }
    this.send(subCmd)
    console.log('✅ 标准订阅报文已发送')
  }

  // ✅ 新增:检索指定 thing 的完整状态
  retrieveThing(thingId: string) {
    const [ns, id] = thingId.split(':')
    const cmd = {
      topic: `${ns}/${id}/things/twin/commands/retrieve`,
      headers: { "response-required": true },
      path: "/"
    }
    this.send(cmd)
    console.log(`✅ 检索报文已发送: ${thingId}`)
  }

  send(data: Record<string, any>) {
    if (!this.ws || this.ws.readyState !== WebSocket.OPEN) {
      console.warn('WS未就绪,发送失败')
      return
    }
    this.ws.send(JSON.stringify(data))
  }

  setMessageCallback(cb: DittoMsgCallback) {
    this.msgCallback = cb
  }

  close() {
    if (this.reconnectTimer) clearTimeout(this.reconnectTimer)
    this.ws?.close()
    this.ws = null
  }

  // 控制执行器(格式正确,未改动)
  controlActuator(thingId: string, valveOpen: boolean, fanRun: boolean) {
    const [ns, id] = thingId.split(':')
    const cmd = {
      topic: `${ns}/${id}/things/twin/commands/modify`,
      path: 'features/actuator/properties',
      value: { valveOpen, fanRun }
    }
    this.send(cmd)
  }
}

export const dittoWs = new DittoWebSocket()


DigitalTwin.vue文件内容
<template>
  <div class="twin-container">
    <h2 class="title">数字孪生设备实时面板</h2>

    <div v-if="deviceData" class="device-card">
      <p class="row">
        <span class="label">设备ID:</span>
        <span class="val">{{ deviceId }}</span>
      </p>
      <p class="row">
        <span class="label">仓内负压:</span>
        <span class="val">{{ deviceData.features?.sensor?.properties?.pressure }} kPa</span>
      </p>
      <p class="row">
        <span class="label">温度:</span>
        <span class="val">{{ deviceData.features?.sensor?.properties?.temperature }} ℃</span>
      </p>
      <p class="row">
        <span class="label">料位:</span>
        <span class="val">{{ deviceData.features?.sensor?.properties?.level }} %</span>
      </p>
      <p class="row">
        <span class="label">CO浓度:</span>
        <span class="val">{{ deviceData.features?.sensor?.properties?.coConcentration }}</span>
      </p>

      <div class="divider"></div>

      <div class="btn-group">
        <button @click="setValve(true)">打开卸料阀</button>
        <button @click="setValve(false)">关闭卸料阀</button>
        <button @click="setFan(true)">启动风机</button>
        <button @click="setFan(false)">停止风机</button>
      </div>
    </div>

    <div v-else class="loading">
      正在加载设备数据...
    </div>
  </div>
</template>

<script setup lang="ts">
import { ref, onMounted, onUnmounted } from 'vue'

const deviceId = 'my-demo:device001'
const deviceData = ref<any>(null)
let pollTimer: number | null = null

// 拉取设备全量数据
async function fetchThing() {
  try {
    const res = await fetch(`/api/2/things/${deviceId}`)
    if (res.ok) {
      deviceData.value = await res.json()
    }
  } catch (err) {
    console.error('拉取设备数据失败', err)
  }
}

// 修改执行器状态
async function updateActuator(data: Record<string, boolean>) {
  try {
    await fetch(`/api/2/things/${deviceId}/features/actuator/properties`, {
      method: 'PUT',
      headers: { 'Content-Type': 'application/json' },
      body: JSON.stringify(data)
    })
    fetchThing()
  } catch (err) {
    console.error('修改执行器失败', err)
  }
}

// 按钮操作
const setValve = (open: boolean) => {
  if (!deviceData.value) return
  const fanRun = deviceData.value.features?.actuator?.properties?.fanRun ?? false
  updateActuator({ valveOpen: open, fanRun })
}
const setFan = (run: boolean) => {
  if (!deviceData.value) return
  const valveOpen = deviceData.value.features?.actuator?.properties?.valveOpen ?? false
  updateActuator({ valveOpen, fanRun: run })
}

onMounted(() => {
  fetchThing()
  // 2秒轮询一次,模拟实时更新
  pollTimer = window.setInterval(fetchThing, 2000)
})

onUnmounted(() => {
  if (pollTimer) clearInterval(pollTimer)
})
</script>

<style scoped>
.twin-container {
  padding: 16px;
  color: #e8f0ff;
}
.title {
  margin: 0 0 16px;
  font-size: 18px;
  color: #ffffff;
}
.device-card {
  font-size: 14px;
}
.row {
  display: flex;
  margin: 8px 0;
}
.label {
  width: 100px;
  color: #a0c4e8;
}
.val {
  color: #fff;
}
.divider {
  height: 1px;
  background: rgba(255,255,255,0.2);
  margin: 16px 0;
}
.btn-group {
  display: grid;
  grid-template-columns: 1fr 1fr;
  gap: 8px;
}
button {
  border: none;
  border-radius: 4px;
  padding: 8px 0;
  background: #1f589c;
  color: white;
  cursor: pointer;
}
button:hover {
  background: #2b72c2;
}
.loading {
  color: #b4cce6;
  text-align: center;
  margin-top: 40px;
}
</style>


vite.config.js文件内容
import { defineConfig } from 'vite'
import vue from '@vitejs/plugin-vue'
import { resolve } from 'path'

export default defineConfig({
  plugins: [vue()],
  resolve: {
    alias: {
      '@': resolve(__dirname, 'src')
    }
  },
  server: {
    proxy: {
      // 直接对齐 Ditto 原生 /api 前缀,自动携带鉴权,无需路径重写
      '/api': {
        target: 'http://localhost:8080',
        changeOrigin: true,
        headers: {
          Authorization: 'Basic ZGl0dG86ZGl0dG8='
        }
      },
      // WebSocket 通道代理(后续升级实时推送备用)
      '/ws/2': {
        target: 'ws://localhost:8080',
        ws: true,
        changeOrigin: true,
        headers: {
          Authorization: 'Basic ZGl0dG86ZGl0dG8='
        }
      }
    }
  }
})
五、数据联动
(1)点击开卸料阀按钮和启动风机按钮后界面
(2)点击关闭卸料阀按钮和关闭风机按钮后界面
(3)检查数据流正常: