从零实现专业分页组件:数学逻辑、边界处理与 Vue 最佳实践
导读:分页组件是前端开发中出现频率最高的基础组件之一,也是中高级前端面试的常考手写题。本文从数学模型出发,推导连续页码的起止计算公式,剖析省略号与首尾页的显示条件,完整实现一个支持边界保护、与 URL 参数双向同步的专业分页组件。同时覆盖品牌/属性筛选联动、阿里 Iconfont 集成、排序功能等电商搜索页核心模块的 Vue 最佳实践,每个知识点附完整可运行示例与面试模型答案,适合有 Vue 基础、希望系统掌握组件设计思想的前端开发者。
目录
- 零、导读与学习价值
- [0.1 功能清单](#0.1 功能清单)
- [0.2 核心名词速查](#0.2 核心名词速查)
- [0.3 为什么分页组件值得深入研究](#0.3 为什么分页组件值得深入研究)
- 一、分页的数学模型
- 二、连续页码的起止计算
- 三、完整分页组件实现
- 四、省略号与首尾页的显示逻辑
- [五、边界条件与 Bug 防护](#五、边界条件与 Bug 防护)
- [六、排序功能与 URL 参数同步](#六、排序功能与 URL 参数同步)
- 七、品牌与属性筛选:搜索参数的联动设计
- [八、阿里 Iconfont 集成](#八、阿里 Iconfont 集成)
- 九、分页组件的最佳实践与扩展设计
- 总结
零、导读与学习价值
0.1 功能清单
本文覆盖以下全部知识点与技术实践:
| 序号 | 知识点 | 章节 |
|---|---|---|
| 1 | 品牌筛选组件:点击品牌跳转搜索 | 七 |
| 2 | 面包屑导航中展示并移除筛选标签 | 七 |
| 3 | 属性筛选:多属性 URL 数组参数传递 | 七 |
| 4 | 阿里 Iconfont 图标库集成 | 八 |
| 5 | 排序功能:综合/价格升降序切换 | 六 |
| 6 | 分页数学模型:总页数公式 | 一 |
| 7 | 连续页码起止位置计算(Math.floor/ceil) | 二 |
| 8 | 边界保护:start<1 / end>totalPage | 五 |
| 9 | 省略号与首尾页显示条件 | 四 |
| 10 | 点击事件 $emit 与上一页/下一页禁用 | 三 |
| 11 | BUG 修复:搜索条件变更时重置 pageNo 为 1 | 五 |
| 12 | 分页组件与 Vuex + Vue Router 联动 | 九 |
0.2 核心名词速查
| 术语 | 一句话解释 |
|---|---|
pageNo |
当前页码,从 1 开始计数 |
pageSize |
每页显示的条目数 |
total |
数据总条数,来自服务端接口 |
totalPage (pageSum) |
总页数,Math.ceil(total / pageSize) |
continue |
连续显示的页码数量(如 5 表示显示 5 个相邻页码) |
start / end |
连续页码区域的起始页和结束页 |
省略号 ··· |
当首页/末页与连续区域不相邻时显示的占位符 |
$emit |
Vue 子组件向父组件发送事件的 API |
$route.query |
Vue Router 中 URL 查询参数对象 |
trademark |
品牌筛选参数,格式为 "id:名称" |
props |
属性筛选参数数组,每项格式为 "attrId:值:属性名" |
order |
排序参数,格式为 "type:flag",如 "1:desc" |
0.3 为什么分页组件值得深入研究
分页看似简单,却是前端组件设计的微缩缩影:
- 数学推导 :需要用
Math.floor/Math.ceil精确计算页码区间,一个符号写错全盘皆错。 - 边界保护:start<1、end>totalPage、连续页数大于总页数------每种情况的处理方式不同,漏一个就出 Bug。
- 状态与 URL 同步:分页参数写入 URL 才能支持刷新保留、分享链接、浏览器前进后退。
- 面试必考手写题:「请手写一个分页组件」在中高级前端面试中出现频率极高,考察算法思维、组件设计能力、边界意识三合一。
一、分页的数学模型
名词解释
- 服务端分页 :每次只请求当前页的数据,后端接收
pageNo和pageSize,返回该页数据及total。 - 前端分页 :一次性拿到所有数据,前端用
slice切割展示。 Math.ceil:向上取整,Math.ceil(10.1) === 11,用于确保最后一页不被遗漏。
前端分页 vs 后端分页:选型的工程权衡
分页组件的「页码 UI 算法」是本文重点,但落地前必须先决定数据在哪里被切分 ,这决定了组件拿到的 total 与 list 从何而来。
| 维度 | 前端分页(一次拉全量,本地 slice) | 后端分页(每页一次请求) |
|---|---|---|
| 首屏体验 | 首次下载量大、白屏久(拉几千条要等) | 首屏只取一页,秒开 |
| 翻页体验 | 切页瞬间完成(本地 slice,零网络) | 每翻一页一次请求,有网络延迟 |
| 内存占用 | 全量数据常驻内存,移动端易卡顿 | 只持有当前页,内存友好 |
| 实时性 | 翻回旧页看到的是旧快照,不更新 | 每次请求都是最新数据 |
| 适用规模 | 数据量小(数百条、约几百 KB 以内) | 大数据量、数据频繁变化 |
| 服务端压力 | 一次查询,后续翻页零压力 | 每页一次查询,压力随翻页累积 |
结论 :业界共识是大数据量优先后端分页 ------避免把成千上万条无用数据压在网络与浏览器内存里;只有「数据量小、无实时性要求、且希望筛选/排序都在本地瞬时完成」的场景(如一份固定的报表、评论区点赞名单),前端分页才更划算(综合 前端分页与后端分页的优缺点)。也存在混合方案:信息流前 10 页用 AJAX 增量分页、更深的页才回退到传统后端分页。
深一层:后端分页的两种实现------偏移分页 vs 游标分页。 一旦选定后端分页,还有第二个决策。最经典的是偏移分页 (LIMIT m OFFSET n,对应本文的 pageNo/pageSize),它支持「跳到第 N 页」,是分页 UI 能显示页码按钮的前提。但它有一个随翻页深度恶化的性能缺陷:OFFSET 999950 时,数据库必须先顺序扫描并丢弃近百万行 才能取到目标页,即使有索引也要沿索引走完这些偏移行,复杂度退化为 O(n);此外「共 47 页」这类总页数需要一次 COUNT(*) 全表扫描,又是额外成本(Offset vs Cursor Pagination)。游标分页 (keyset,WHERE id > 上次最后一条的 id LIMIT n)则直接按游标定位起点,无论翻到多深都是 O(1),PostgreSQL 百万级数据集实测可比偏移分页快约 17 倍,且数据在翻页过程中变化时不会漏行/重复行。代价是:游标分页无法跳页、拿不到总页数 ,因此不适合需要页码导航的界面。选型口径 :数据小而稳、需要页码跳转 → 偏移分页(本文实现的就是它);数据大、有序、频繁更新、用户主要前后翻 → 游标分页(社交信息流、活动流的标配)。本文分页组件展示的「连续页码 + 省略号」UI 本质上是偏移分页 的可视化层,这也解释了为什么它需要 total 来算总页数。
概念与底层原理
分页的核心是一个数学公式:
总页数 = Math.ceil(总条数 / 每页条数)【代码注释】这是分页的基础公式:Math.ceil 向上取整,保证最后不满一页的数据也被纳入计算。两个变量均来自服务端接口返回值,前端无需硬编码。市面应用 :所有服务端分页场景(电商列表、后台数据表格)都以这一行公式为基础,是计算属性 totalPage 的唯一职责。
举例:total = 103,pageSize = 5,则 totalPage = Math.ceil(103/5) = Math.ceil(20.6) = 21。
为什么必须用 Math.ceil 而不是 Math.floor?因为最后一页可能不满 pageSize 条,Math.floor 会把它丢掉,用户永远看不到最后几条数据。这是一个经典的"差一错误"(Off-by-one error)。
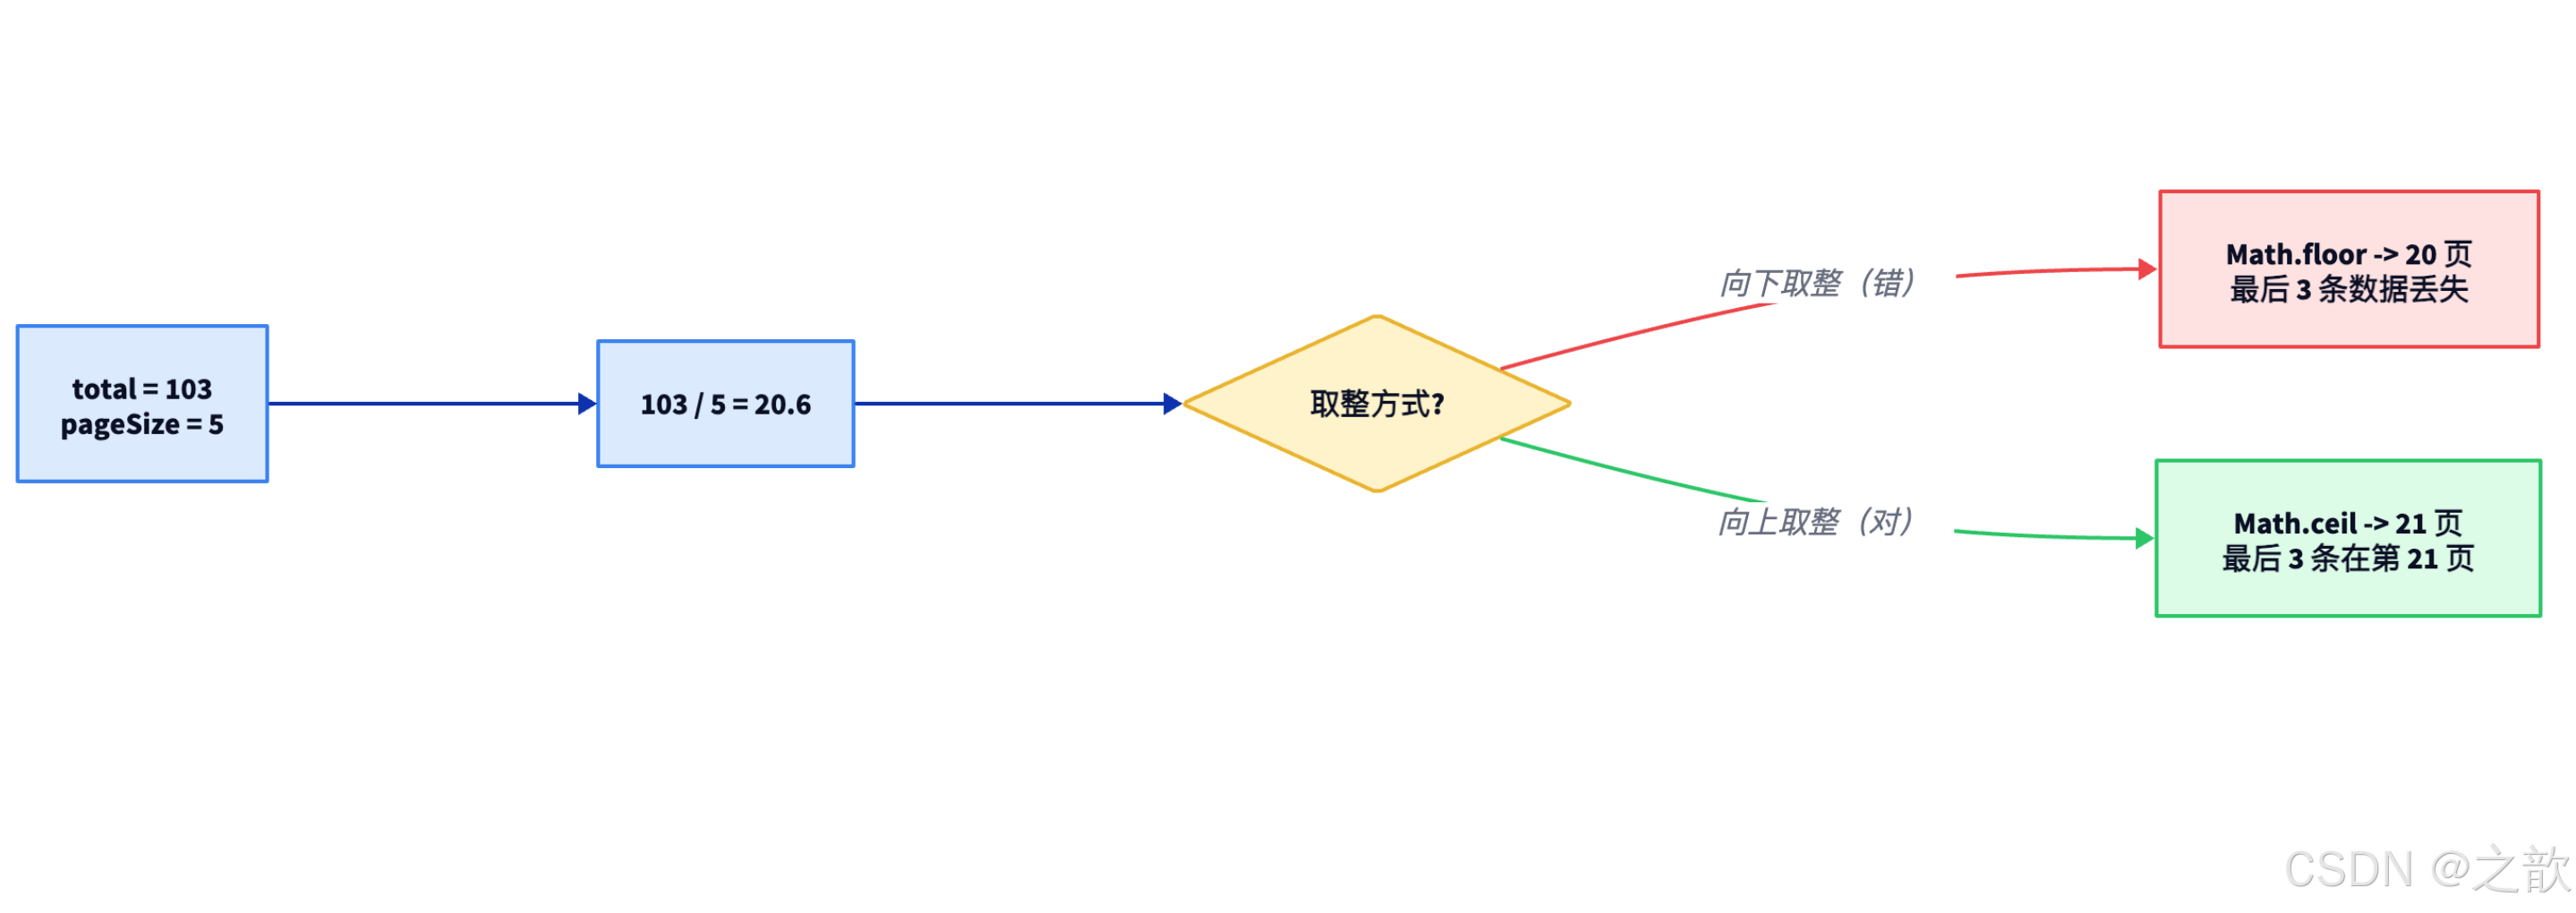
【代码注释】此流程图展示了 Math.floor 与 Math.ceil 在总页数计算中的本质差异。蓝色节点是输入与除法运算,黄色菱形是取整方式分叉:红色路径 Math.floor 截断小数部分(20.6 → 20),导致最后不足一页的 3 条数据被"截断丢弃";绿色路径 Math.ceil 向上取整(20.6 → 21),把零头数据归为一个完整页,确保数据完整性。为什么这是分页第一性原理 :分页的语义是「不遗漏任何一条记录」,只要总条数不能被每页条数整除,最后的余数就必须独占一页------这正是 MDN Math.ceil 在分页场景的唯一正确选择,Math.round(四舍五入)在余数小于半页时同样会丢数据。市面应用 :Element Plus <el-pagination>、Ant Design <Pagination> 计算总页数(Math.ceil(total/pageSize))无一例外采用向上取整。
入门示例:总页数计算
下面的示例展示总页数公式与不同参数组合的结果:
html
<!DOCTYPE html>
<html lang="zh-CN">
<head>
  <meta charset="UTF-8">
  <title>分页数学模型</title>
  <script src="https://cdn.jsdelivr.net/npm/vue@2/dist/vue.js"></script>
  <style>
    body { font-family: Arial, sans-serif; padding: 20px; }
    table { border-collapse: collapse; width: 100%; }
    th, td { border: 1px solid #ddd; padding: 8px 12px; text-align: center; }
    th { background: #c81623; color: #fff; }
    tr:nth-child(even) { background: #f9f9f9; }
    .formula { background: #f0f4ff; padding: 12px; border-radius: 6px; font-family: monospace; }
  </style>
</head>
<body>
<div id="app">
  <h2>分页数学模型演示</h2>
  <div class="formula">totalPage = Math.ceil(total / pageSize)</div>
  <br>
  <table>
    <thead>
      <tr><th>total(总条数)</th><th>pageSize(每页条数)</th><th>总页数</th><th>最后一页实际条数</th></tr>
    </thead>
    <tbody>
      <tr v-for="item in examples" :key="item.total + '-' + item.pageSize">
        <td>{{ item.total }}</td>
        <td>{{ item.pageSize }}</td>
        <td><strong>{{ Math.ceil(item.total / item.pageSize) }}</strong></td>
        <td>{{ item.total % item.pageSize === 0 ? item.pageSize : item.total % item.pageSize }}</td>
      </tr>
    </tbody>
  </table>
</div>
<script>
new Vue({
  el: '#app',
  data: {
    examples: [
      { total: 103, pageSize: 5 },
      { total: 100, pageSize: 10 },
      { total: 101, pageSize: 10 },
      { total: 50,  pageSize: 7  },
      { total: 1,   pageSize: 20 },
    ]
  }
})
</script>
</body>
</html>【代码注释】Math.ceil(item.total / item.pageSize) 是分页组件的基石公式。注意当 total % pageSize === 0 时最后一页恰好满员;否则最后一页实际条数为余数。模板中直接调用 Math.ceil 是合法的,因为 Vue 模板中的表达式运行在组件实例作用域,而 Math 是全局对象可直接访问。
【实战要点】
- 经典应用场景 :服务端分页接口通常返回
{ total, pageSize, pageNo, list },前端用Math.ceil(total/pageSize)在计算属性中得出totalPage,驱动分页渲染。 - 常见坑 :将
pageSize写死在前端但与后端约定不一致,导致最后一页页码偏差。应从接口返回值中读取pageSize,而不是前端硬编码。 - 性能与最佳实践 :将
totalPage封装为computed而非data,Vue 会缓存计算结果,只有total或pageSize变化时才重算,避免重复计算。
【本章小结】
| 公式 | 说明 |
|---|---|
Math.ceil(total / pageSize) |
总页数,向上取整确保最后一页不丢 |
total % pageSize |
最后一页实际条数(为 0 表示末页满员) |
记忆口诀:"总数除页大,向上取整得总页"。
【面试考点】
Q1:为什么计算总页数要用 Math.ceil 而不是 Math.floor 或 Math.round?
A:分页的目标是"不遗漏任何数据"。当总条数不能被每页条数整除时,最后几条数据需要单独一页展示------这页虽然不满,但它真实存在。Math.floor 会截断小数,把这最后一页"去掉",用户因此永远看不到最后几条记录,属于数据丢失。Math.round 在余数超过半数时才进位,同样可能丢失数据。只有 Math.ceil 保证"哪怕只有一条也开一页",这是分页的正确语义。
二、连续页码的起止计算
名词解释
- 连续页码区域 :分页条中间连续显示的若干个页码按钮,如
14 15 [16] 17 18(共 5 个)。 continue(连续页数):连续区域显示几个页码,通常为奇数(3、5、7),让当前页居中。start:连续区域第一个页码。end:连续区域最后一个页码。
概念与底层原理
连续区域以当前页 pageNo 为中心,向两侧各延伸 (continue - 1) / 2 个页码:
start = pageNo - (continue - 1) / 2
end   = pageNo + (continue - 1) / 2
【代码注释】两行核心公式------以 pageNo 为轴心,向两侧各延伸 (continue-1)/2 个页码。continue 为奇数时两侧延伸数相等,当前页精确居中。市面应用 :Element UI <el-pagination> 的 pager-count 属性(即本文的 continue)采用同款算法,默认值 7,显示 7 个连续页码。
以 pageNo = 16,continue = 5 为例:
start = 16 - (5-1)/2 = 16 - 2 = 14
end   = 16 + (5-1)/2 = 16 + 2 = 18
连续区域:14, 15, 16, 17, 18 ✅ 当前页 16 居中【代码注释】带入具体数字验证公式正确性:start=14, end=18,共 5 个页码(end - start + 1 = 5 = continue),当前页 16 恰好在中间位置。验算时可用"首尾相加除以2等于当前页"来快速核对对称性:(14+18)/2 = 16 ✅。
公式前提是 continue 为奇数,(continue-1) 必然为偶数,两边对称,当前页精确居中。
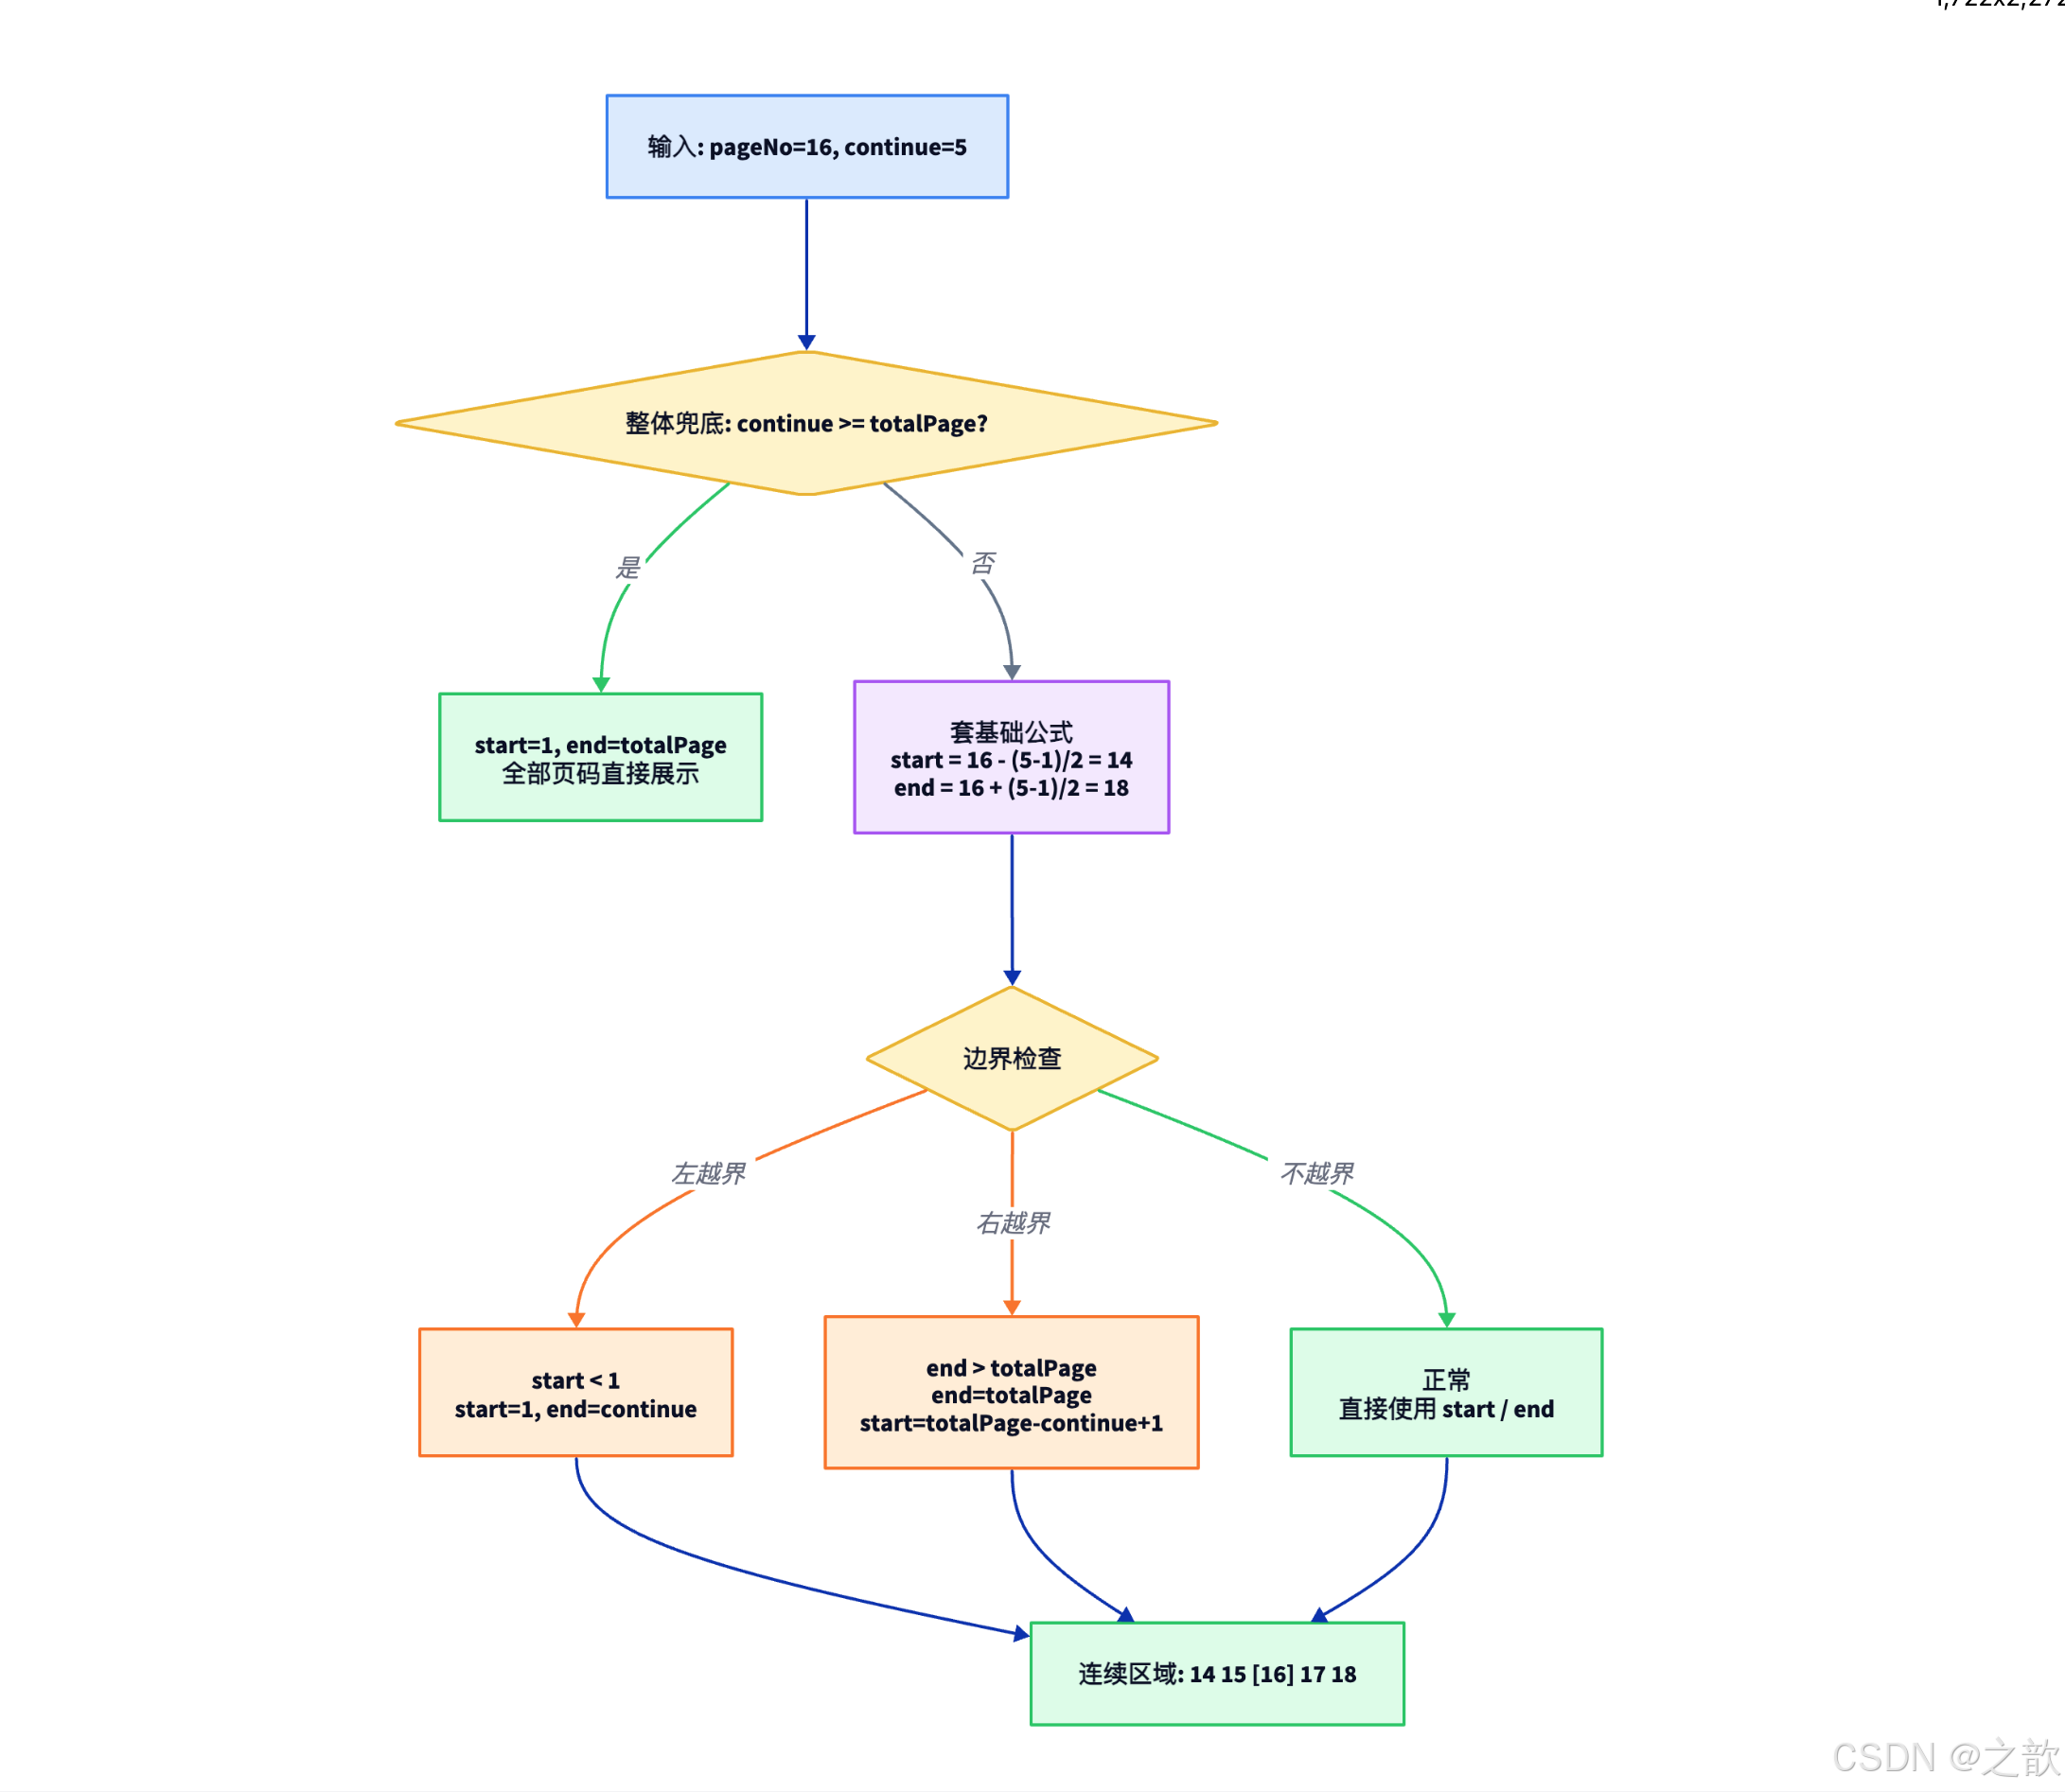
【代码注释】这张流程图展示了连续页码计算的完整决策树:蓝色输入 → 黄色菱形「整体兜底」最先判断 continue >= totalPage(页数太少时全展示,绿色分支提前 return)→ 紫色「套基础公式」以当前页为轴心向两侧对称延伸 → 黄色菱形「边界检查」再分流到橙色的左/右越界修正或绿色的正常路径。边界检查的顺序为什么是「兜底 → 左 → 右」 :这是一个区间约束求解问题,约束之间存在依赖------若先修左边界把 start 钉成 1,此时算出的 end 仍可能 > totalPage,需要二次判断;而把「整体兜底」放最前并用 return 提前退出,能保证后续的左右修正都在「区间确实容得下 continue 个页码」的前提下运行,逻辑闭合无回头。这与业界分页器普遍采用的 half = floor(pagerCount/2) 居中窗口算法是同一思路(一个分页器的逻辑)。市面应用 :Element Plus 的 pager-count(即本文 continue)默认值 7,其折叠算法的越界修正顺序与此完全一致。
入门示例:起止计算函数
html
<!DOCTYPE html>
<html lang="zh-CN">
<head>
  <meta charset="UTF-8">
  <title>连续页码起止计算</title>
  <script src="https://cdn.jsdelivr.net/npm/vue@2/dist/vue.js"></script>
  <style>
    body { font-family: Arial, sans-serif; padding: 20px; }
    .result { background: #e8f5e9; padding: 12px; border-radius: 6px; margin: 10px 0; }
    label { margin-right: 12px; }
    input[type=number] { width: 60px; }
    .page-bar button {
      margin: 2px; padding: 4px 10px; cursor: pointer;
      background: #f4f4f5; border: 1px solid #ddd; border-radius: 3px;
    }
    .page-bar button.active { background: #c81623; color: #fff; }
  </style>
</head>
<body>
<div id="app">
  <h2>连续页码起止计算演示</h2>
  <div>
    <label>total: <input type="number" v-model.number="total" min="1"></label>
    <label>pageSize: <input type="number" v-model.number="pageSize" min="1"></label>
    <label>pageNo: <input type="number" v-model.number="pageNo" min="1" :max="totalPage"></label>
    <label>continue: <input type="number" v-model.number="cont" min="1"></label>
  </div>
  <div class="result">
    <p>总页数 totalPage = Math.ceil({{ total }} / {{ pageSize }}) = <strong>{{ totalPage }}</strong></p>
    <p>start = {{ startAndEnd.start }},end = {{ startAndEnd.end }}</p>
    <p>连续区域覆盖页码:{{ startAndEnd.start }} ~ {{ startAndEnd.end }}</p>
  </div>
  <div class="page-bar">
    <button :disabled="pageNo === 1" @click="pageNo--">上一页</button>
    <button v-show="startAndEnd.start > 1" @click="pageNo = 1">1</button>
    <span v-show="startAndEnd.start > 2">···</span>
    <button
      v-for="(_, index) in (startAndEnd.end - startAndEnd.start + 1)"
      :key="startAndEnd.start + index"
      :class="{ active: pageNo === startAndEnd.start + index }"
      @click="pageNo = startAndEnd.start + index">
      {{ startAndEnd.start + index }}
    </button>
    <span v-show="totalPage > startAndEnd.end + 1">···</span>
    <button v-show="totalPage > startAndEnd.end" @click="pageNo = totalPage">{{ totalPage }}</button>
    <button :disabled="pageNo === totalPage" @click="pageNo++">下一页</button>
    <span>共 {{ total }} 条</span>
  </div>
</div>
<script>
new Vue({
  el: '#app',
  data: {
    total: 103,
    pageSize: 5,
    pageNo: 16,
    cont: 5   // 避免与 JS 关键字 continue 冲突,内部用 cont
  },
  computed: {
    totalPage() {
      return Math.ceil(this.total / this.pageSize)
    },
    startAndEnd() {
      const { pageNo, cont, totalPage } = this
      let start, end
      // 情况1:连续页数 >= 总页数,显示全部页码
      if (cont >= totalPage) {
        return { start: 1, end: totalPage }
      }
      // 基础公式
      start = pageNo - Math.floor((cont - 1) / 2)
      end   = pageNo + Math.floor((cont - 1) / 2)
      // 情况2:start 越界(左边不足)
      if (start < 1) {
        start = 1
        end = cont
      }
      // 情况3:end 越界(右边不足)
      if (end > totalPage) {
        end = totalPage
        start = totalPage - cont + 1
      }
      return { start, end }
    }
  }
})
</script>
</body>
</html>
【代码注释】这个示例有三个关键设计:
- 参数命名用
cont而非continue,因为continue是 JavaScript 的保留字,在对象键中虽然合法(ES5+ 允许),但作为变量名会报错。实际项目中常用pageCount、pageSpan等语义更清晰的命名。 - 三种边界情况按优先级排列:先判断连续页数是否超过总页数,再处理左越界,最后处理右越界。顺序不能颠倒,否则修正后的 start/end 可能再次越界。
- 使用
Math.floor((cont-1)/2)而非直接(cont-1)/2,因为当cont为偶数时结果是小数,Math.floor保证取整向下偏移,使连续区域左侧多一个页码。
【实战要点】
- 经典应用场景:电商搜索结果页、后台管理系统列表页、新闻资讯列表------几乎所有"大数据量列表"都需要分页。连续页码算法是一次封装、到处复用的通用逻辑。
- 常见坑 :
continue传入偶数时,(continue-1)/2不是整数,导致 start/end 出现小数,v-for 渲染出NaN页码。解决方案:Math.floor向下取整,或在文档中约定continue必须为奇数。 - 性能与最佳实践 :将
startAndEnd定义为computed而非method,Vue 会基于响应式依赖缓存结果。pageNo、total、pageSize任何一个变化才重算,否则直接返回缓存值,避免每次渲染重复计算。
【本章小结】
| 场景 | start 计算 | end 计算 |
|---|---|---|
| 正常(不越界) | pageNo - floor((cont-1)/2) |
pageNo + floor((cont-1)/2) |
| start < 1 | 固定为 1 | cont(保证连续数量不变) |
| end > totalPage | totalPage - cont + 1 |
固定为 totalPage |
| cont >= totalPage | 固定为 1 | 固定为 totalPage |
记忆口诀:"先判超界,再算中心,左越归1右归末,保持数量不变动"。
【面试考点】
Q1:分页组件中 continue 为什么推荐用奇数?
A:continue 为奇数时,(continue-1) 必然为偶数,两侧各偏移相同页数,当前页精确居中,视觉上对称美观。若为偶数,(continue-1) 为奇数,除以 2 得小数,需要 Math.floor 向下取整,结果是左边少一个、右边多一个,当前页偏左,用户体验较差。大多数 UI 组件库(Element UI、Ant Design)的分页组件默认展示奇数个连续页码也是这个原因。
Q2:计算连续页码时,三个边界条件的处理顺序是否有要求?
A:有要求。应优先判断 cont >= totalPage(整体兜底),再处理 start < 1(左越界),最后处理 end > totalPage(右越界)。若先处理左越界将 start 固定为 1,此时 end 可能仍超出 totalPage,还需再判断一次;而先做整体兜底可以用 return 提前退出,避免后续判断在无效状态下运行,代码更健壮。
三、完整分页组件实现
名词解释
$emit(eventName, payload):Vue 子组件向父组件发送自定义事件,父组件用@eventName="handler"监听。disabled属性 :HTML 按钮原生属性,设为true时按钮变灰且不可点击,同时@click事件不再触发。:class="{active: condition}":Vue 对象语法动态绑定 class,当condition为真时添加active类。
概念与底层原理
分页组件的通信模型是典型的"受控组件"模式:
- 父组件通过
props传入pageNo、total、pageSize、continue(组件内部不维护当前页状态)。 - 用户点击页码后,组件通过
$emit('change-page-no', newPageNo)通知父组件。 - 父组件更新 URL 查询参数(
$router.push),触发watch,重新发起接口请求,接口返回新数据,Vuex 更新 store,父组件的props被动更新,分页组件重新渲染。
这种"数据向下,事件向上"的单向数据流设计使组件状态完全可预测,避免了"组件内部维护 pageNo 与父组件 pageNo 不同步"的经典 Bug。
受控组件 vs 非受控组件的工程权衡 :Vue 官方文档明确要求「子组件不能直接修改 prop」(直接改会触发 Avoid mutating a prop directly 警告),这是单向数据流的底线。分页组件如果自己用 data 维护一份 currentPage,就成了「非受控组件」------它有两个事实来源(内部 data 与外部 props),一旦父组件因接口返回、URL 回退等原因改了页码,内部副本不会跟着变,视图就和真实状态脱节,这正是 el-pagination 早期最常见的「current-page 绑定值变了但页码不动」问题。受控组件 则把页码状态完全交给父组件,自己只读 props 渲染、靠 $emit 上报意图,永远只有一个事实来源。若确实需要在子组件里「写」页码,Vue 2.3+ 提供了 .sync 语法糖(:page-no.sync="pageNo"),它会被编译为 :page-no + @update:page-no 的组合------本质仍是 props down / events up,只是把样板代码收进了一个修饰符(参见 Vue2 .sync 修饰符)。.sync 与 v-model 的区别在于:v-model 一个组件只能有一个(绑定 value/input),.sync 可对任意命名 prop 使用且能同时存在多个,因此分页这种需要同步「当前页 + 每页条数」两个属性的场景,用两个 .sync 比 v-model 更顺手。
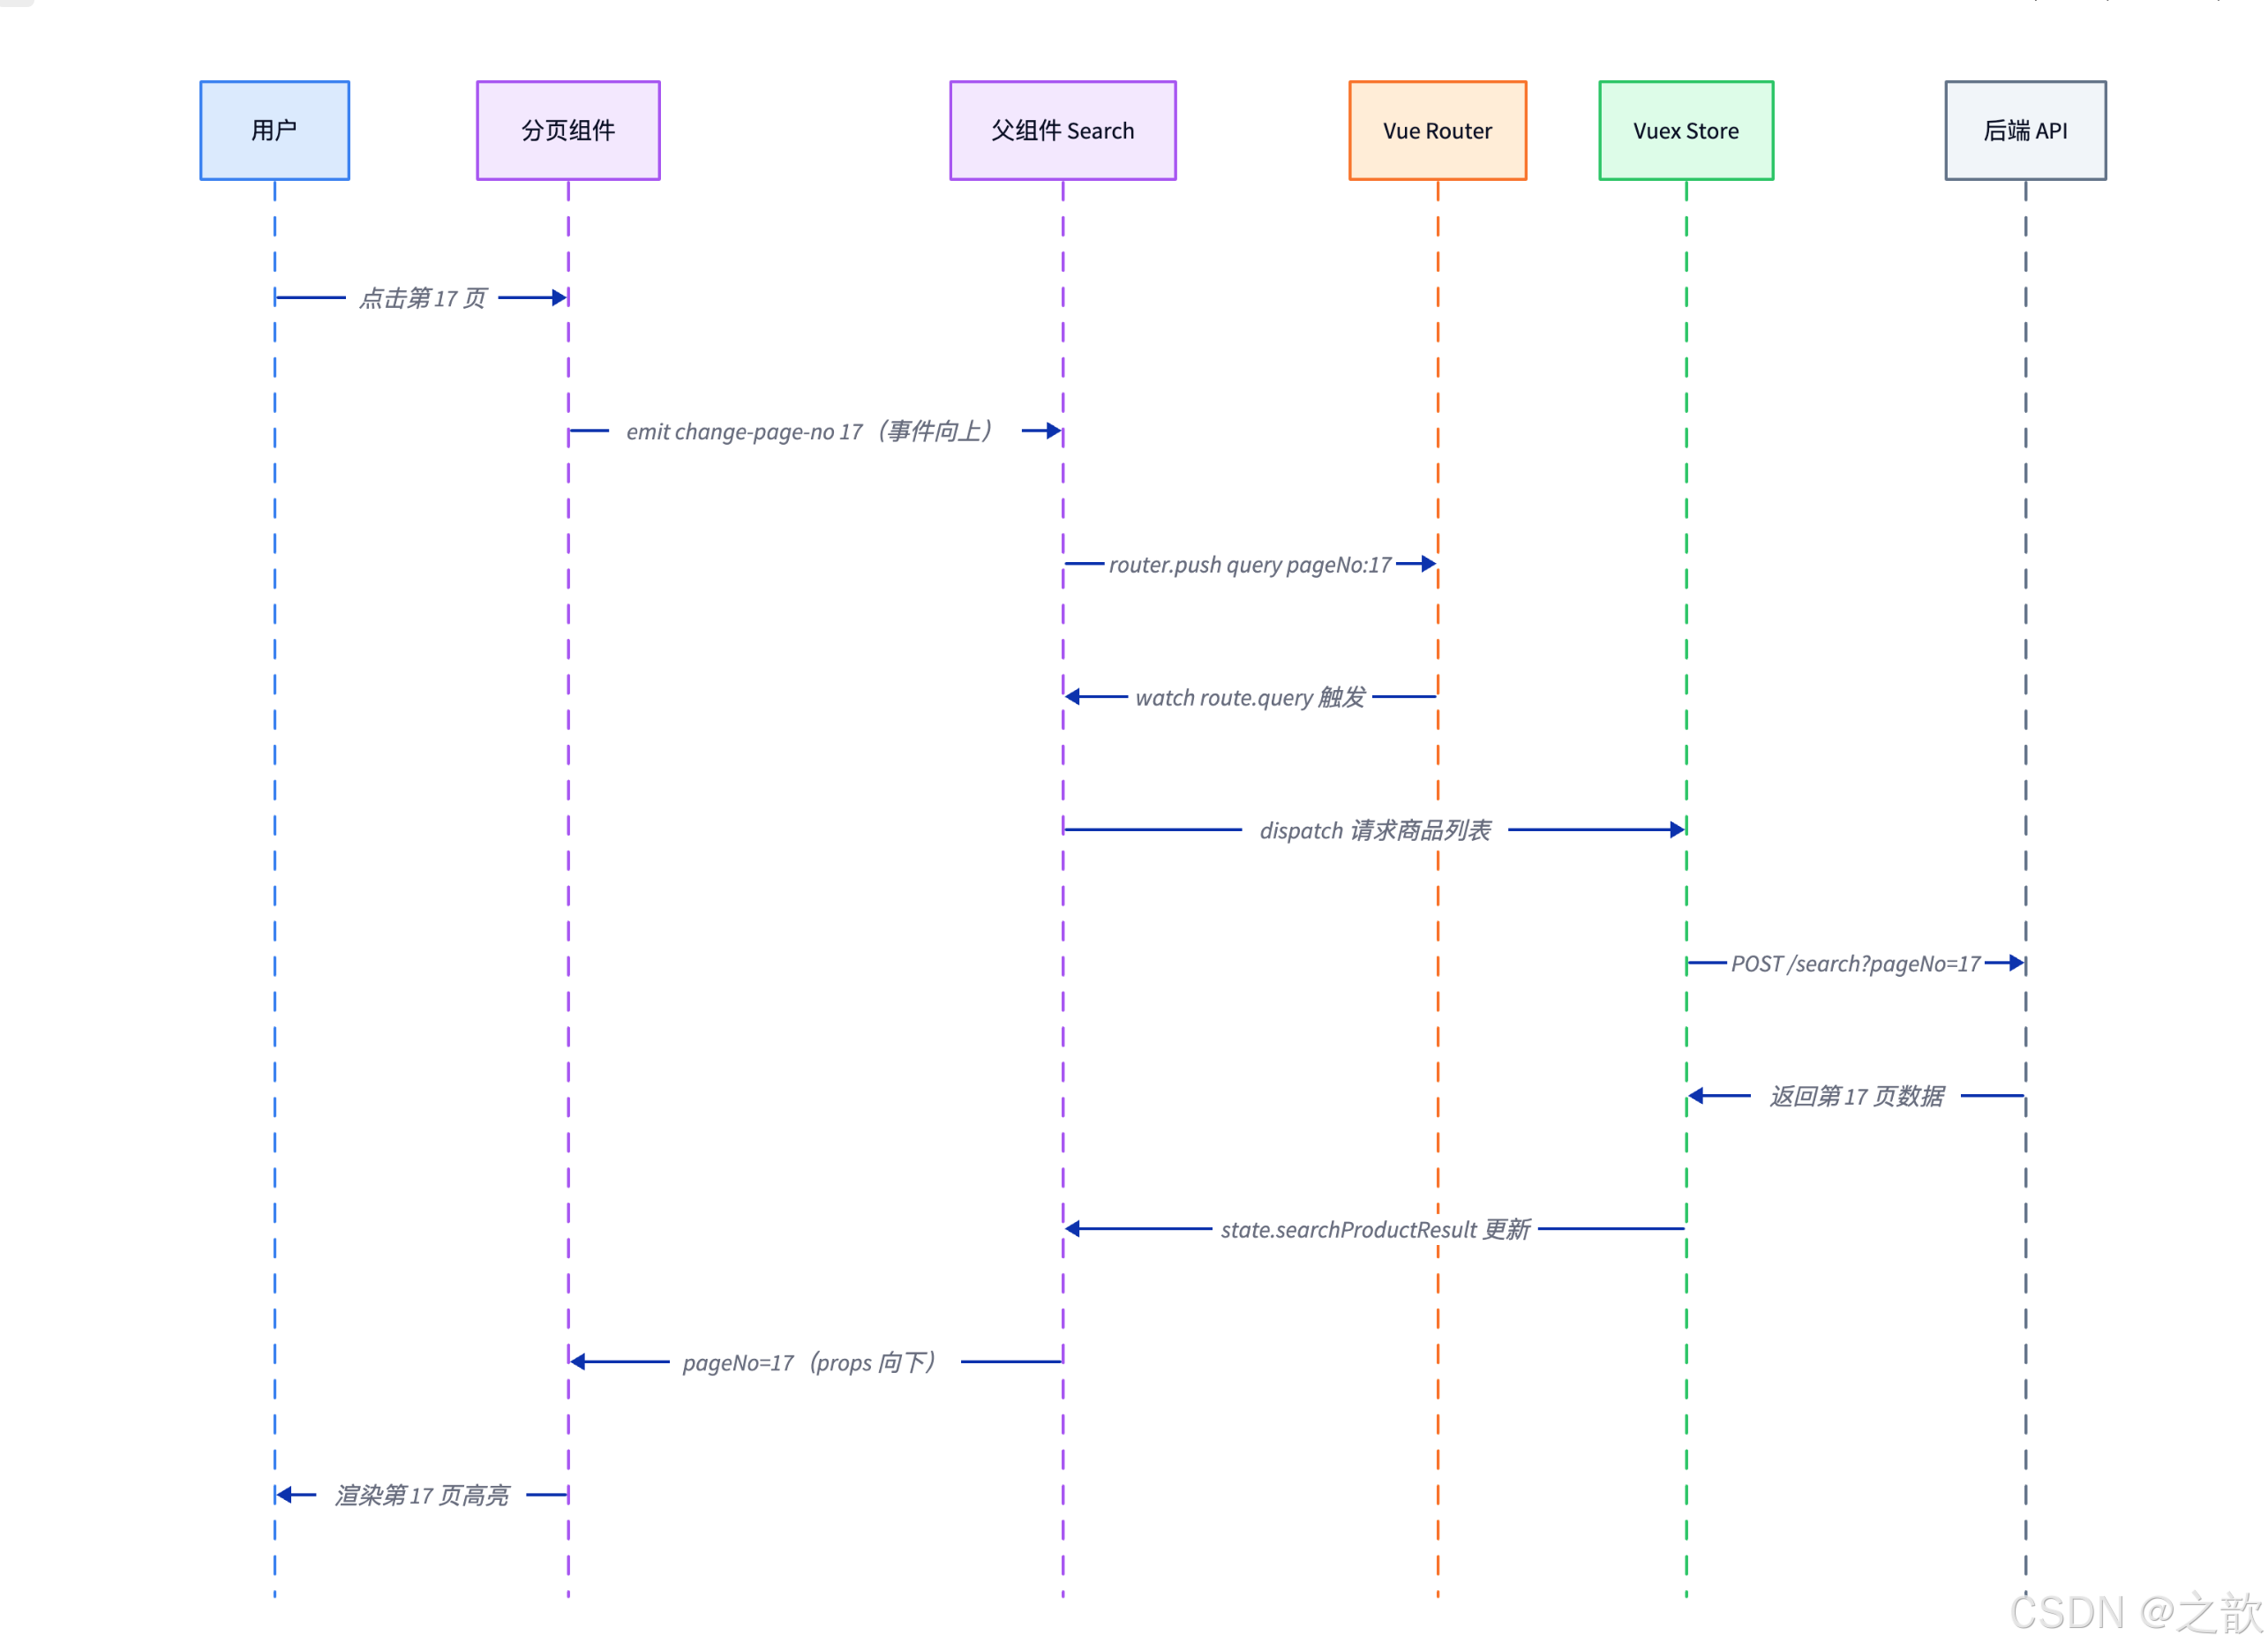
【代码注释】这张时序图展示了分页交互的完整数据流:蓝色用户点击 → 紫色分页组件 $emit 上报事件(事件向上)→ 紫色父组件更新 URL → 橙色路由监听触发请求 → 绿色 Vuex 提交接口数据 → props 回流到分页组件重渲染(数据向下)。关键是 URL 是唯一数据源 :pageNo 始终从 URL 读取,刷新页面不会回到第一页,可以复制 URL 分享当前页。注意整条链路是单向闭环------数据顺时针从 URL 流向视图、事件从视图流回 URL,没有任何一处「子组件直接改自己页码」的逆流,这就是受控组件状态可预测的根本原因。市面应用:vue-element-admin、vben-admin 等中后台框架的列表页,以及京东、考拉海购的商品搜索页,均采用这套 URL 驱动的受控分页架构。
实战示例:完整分页组件(纯 HTML + Vue CDN)
html
<!DOCTYPE html>
<html lang="zh-CN">
<head>
  <meta charset="UTF-8">
  <title>Vue 分页组件完整实现</title>
  <script src="https://cdn.jsdelivr.net/npm/vue@2/dist/vue.js"></script>
  <style>
    body { font-family: Arial, sans-serif; padding: 30px; background: #f5f5f5; }
    .demo-container { background: #fff; padding: 24px; border-radius: 8px; box-shadow: 0 2px 8px rgba(0,0,0,.08); }
    h2 { margin-bottom: 16px; color: #333; }
    .list { min-height: 200px; }
    .list-item { padding: 10px 14px; border-bottom: 1px solid #eee; color: #555; }
    .list-item:hover { background: #fafafa; }
    /* 分页样式 */
    .pagination { text-align: center; margin-top: 20px; padding: 12px 0; }
    .pagination button {
      margin: 0 4px; background: #f4f4f5; color: #666;
      border: none; border-radius: 3px; padding: 0 10px;
      min-width: 36px; height: 30px; line-height: 30px;
      font-size: 13px; cursor: pointer; display: inline-block;
      vertical-align: middle; transition: all .2s;
    }
    .pagination button:hover:not(:disabled):not(.active) { background: #fce8e8; color: #c81623; }
    .pagination button[disabled] { color: #ccc; cursor: not-allowed; }
    .pagination button.active { background: #c81623; color: #fff; cursor: default; }
    .pagination span { display: inline-block; line-height: 30px; margin: 0 4px; color: #888; vertical-align: middle; }
    .params { background: #f0f4ff; padding: 12px; border-radius: 6px; margin-bottom: 16px; font-size: 13px; }
    .params label { margin-right: 16px; }
    .params input[type=number] { width: 60px; }
  </style>
</head>
<body>
<div id="app">
  <div class="demo-container">
    <h2>商品搜索结果</h2>

    <!-- 参数调节 -->
    <div class="params">
      <label>total: <input type="number" v-model.number="total" min="1"></label>
      <label>pageSize: <input type="number" v-model.number="pageSize" min="1"></label>
      <label>pageNo: <input type="number" v-model.number="pageNo" min="1" :max="totalPage"></label>
      <label>continue: <input type="number" v-model.number="cont" min="1"></label>
    </div>

    <!-- 商品列表 -->
    <div class="list">
      <div class="list-item" v-for="item in currentPageItems" :key="item">
        商品 #{{ item }} - 这是第 {{ pageNo }} 页的数据
      </div>
    </div>

    <!-- 分页组件 -->
    <pagination-comp
      :total="total"
      :page-size="pageSize"
      :page-no="pageNo"
      :cont="cont"
      @change-page-no="handlePageChange">
    </pagination-comp>
  </div>
</div>

<script>
// ===== 分页子组件 =====
Vue.component('pagination-comp', {
  props: {
    total:    { type: Number, required: true },   // 总条数
    pageSize: { type: Number, required: true },   // 每页条数
    pageNo:   { type: Number, required: true },   // 当前页
    cont:     { type: Number, default: 5 }        // 连续页码数(奇数)
  },
  computed: {
    // 总页数:向上取整,确保最后一页数据不丢失
    totalPage() {
      return Math.ceil(this.total / this.pageSize)
    },
    // 计算连续页码的起始与结束位置
    startAndEnd() {
      const { pageNo, cont, totalPage } = this
      let start, end
      // 边界1:连续页码数 >= 总页数,全部展示
      if (cont >= totalPage) {
        return { start: 1, end: totalPage }
      }
      // 基础公式:以当前页为中心,两侧均等扩展
      start = pageNo - Math.floor((cont - 1) / 2)
      end   = pageNo + Math.floor((cont - 1) / 2)
      // 边界2:start 越过左边界(当前页靠近第1页)
      if (start < 1) {
        start = 1
        end = cont   // 保持连续数量不变
      }
      // 边界3:end 越过右边界(当前页靠近末页)
      if (end > totalPage) {
        end = totalPage
        start = totalPage - cont + 1   // 保持连续数量不变
      }
      return { start, end }
    }
  },
  methods: {
    // 向父组件发送页码变更事件,由父组件决定如何更新状态
    changePage(newPage) {
      // 防御:不能小于1,不能超过总页数
      if (newPage < 1 || newPage > this.totalPage) return
      // 当前页就是目标页,不重复触发请求
      if (newPage === this.pageNo) return
      this.$emit('change-page-no', newPage)
    }
  },
  template: `
    <div class="pagination">
      <!-- 上一页:当前是第1页时禁用 -->
      <button :disabled="pageNo === 1" @click="changePage(pageNo - 1)">上一页</button>

      <!-- 首页按钮:连续区域起点 > 1 才显示(否则连续区域已包含第1页) -->
      <button v-show="startAndEnd.start > 1" @click="changePage(1)">1</button>

      <!-- 首页省略号:连续区域与首页之间有间隔(start > 2 表示 start 不紧邻 1) -->
      <span v-show="startAndEnd.start > 2">···</span>

      <!-- 连续页码区域 -->
      <button
        v-for="(_, index) in (startAndEnd.end - startAndEnd.start + 1)"
        :key="startAndEnd.start + index"
        :class="{ active: pageNo === startAndEnd.start + index }"
        @click="changePage(startAndEnd.start + index)">
        {{ startAndEnd.start + index }}
      </button>

      <!-- 末页省略号:连续区域与末页之间有间隔 -->
      <span v-show="totalPage > startAndEnd.end + 1">···</span>

      <!-- 末页按钮:连续区域未包含末页才显示 -->
      <button v-show="totalPage > startAndEnd.end" @click="changePage(totalPage)">
        {{ totalPage }}
      </button>

      <!-- 下一页:当前是末页时禁用 -->
      <button :disabled="pageNo === totalPage" @click="changePage(pageNo + 1)">下一页</button>

      <span>共 {{ total }} 条</span>
    </div>
  `
})

// ===== 父组件(模拟搜索结果页) =====
new Vue({
  el: '#app',
  data: {
    total: 103,
    pageSize: 5,
    pageNo: 1,
    cont: 5
  },
  computed: {
    totalPage() {
      return Math.ceil(this.total / this.pageSize)
    },
    // 模拟当前页的商品列表(真实项目中数据来自 Vuex store)
    currentPageItems() {
      const start = (this.pageNo - 1) * this.pageSize + 1
      const end   = Math.min(this.pageNo * this.pageSize, this.total)
      const items = []
      for (let i = start; i <= end; i++) items.push(i)
      return items
    }
  },
  methods: {
    // 接收子组件的页码变更事件
    handlePageChange(newPage) {
      this.pageNo = newPage
      // 真实项目中:this.$router.push({ query: { ...this.$route.query, pageNo: newPage } })
      // 然后 watch $route.query 触发重新请求
      console.log('跳转到第', newPage, '页,发起搜索请求...')
    }
  }
})
</script>
</body>
</html>
【代码注释】这个示例是完整的分页组件实现,有几个设计要点值得关注:
changePage方法内置防御 :if (newPage < 1 || newPage > totalPage) return是双重保险------虽然disabled按钮不会触发点击,但直接调用changePage时仍然需要校验,防止外部误调用或键盘快捷键绕过按钮禁用。- v-for 渲染连续区域 :
v-for="(_, index) in (end - start + 1)"是经典的"按数字范围渲染"写法,_是惯用的占位符变量名表示"不使用此值"。页码计算公式start + index让 index 从 0 开始偏移。 - 省略号条件 :
- 首页省略号:
start > 2(当start === 2时,连续区域紧邻首页,显示省略号反而难看) - 末页省略号:
totalPage > end + 1(逻辑对称)
- 首页省略号:
市面应用 :京东、淘宝、Element UI 的 <el-pagination> 组件、Ant Design 的 <Pagination> 组件均采用同款算法,可以打开任意电商网站的搜索结果页,调整页码,观察连续区域的左右移动验证此算法。
【实战要点】
- 经典应用场景 :电商搜索列表、后台管理数据表格、新闻资讯列表。分页组件作为全局组件注册(
Vue.component('Pagination', ...)),在任意页面直接使用,无需每次 import。 - 常见坑 :子组件内部直接修改
props.pageNo会触发 Vue 警告("Avoid mutating a prop directly"),且父子状态不同步。正确做法是用$emit上报,由父组件统一更新。 - 性能与最佳实践 :为
v-for中的每个页码按钮添加唯一:key(如startAndEnd.start + index),避免 Vue diff 时复用错误的 DOM 节点,导致动画或聚焦状态混乱。
【本章小结】
| 元素 | 显示条件 | 点击行为 |
|---|---|---|
| 上一页按钮 | 始终显示 | pageNo - 1;pageNo === 1 时 disabled |
| 首页(1)按钮 | start > 1 |
跳到第 1 页 |
| 首页省略号 | start > 2 |
无(仅显示) |
| 连续页码 | 始终显示 | 跳到对应页 |
| 末页省略号 | totalPage > end + 1 |
无(仅显示) |
| 末页按钮 | totalPage > end |
跳到末页 |
| 下一页按钮 | 始终显示 | pageNo + 1;pageNo === totalPage 时 disabled |
【面试考点】
Q1:请手写一个分页组件,要求支持连续页码展示、首尾页独立显示、省略号。
A:核心分三步。第一步,props 接收 total、pageSize、pageNo、cont;computed 中用 Math.ceil(total/pageSize) 得到 totalPage。第二步,计算 startAndEnd:start = pageNo - floor((cont-1)/2),end = pageNo + floor((cont-1)/2),再按三种边界条件修正。第三步,模板中:首页按钮条件 start > 1、首页省略号条件 start > 2、连续区域用 v-for 遍历、末页省略号条件 totalPage > end+1、末页按钮条件 totalPage > end。点击时 $emit('change-page-no', newPage) 通知父组件,自身不持有页码状态。
四、省略号与首尾页的显示逻辑
名词解释
- 首页独立按钮:无论当前在哪一页,始终能快速跳到第 1 页的按钮,不属于连续区域。
- 末页独立按钮:始终可快速跳到最后一页的按钮。
- 省略号
···:当连续区域与首/末页之间存在间隔页码时,用省略号示意"还有更多页"。
概念与底层原理
省略号的显示本质上是一个"间隔检测"问题:
首页省略号显示条件:连续区域起点 start 与第 1 页之间有间隔
即:start > 2(若 start === 2,则首页=1 与连续区域=2,3,... 紧邻,不需要省略号)

末页省略号显示条件:连续区域终点 end 与末页 totalPage 之间有间隔
即:totalPage > end + 1(若 totalPage === end+1,末页与连续区域紧邻,不需要省略号)【代码注释】这段伪代码精确描述了省略号的两个显示条件。关键边界值:start > 2(而非 > 1)和 totalPage > end + 1(而非 > end)。边界值差 1 的错误是分页实现中出现频率最高的 Bug,务必用 start=2 和 end = totalPage-1 两个临界值手动验证。市面应用:百度搜索翻页条、京东商品列表翻页条在连续区域紧邻首尾时均会收起省略号,正是这两个条件的体现。
首页按钮的显示条件:start > 1(连续区域不包含第1页时才单独显示)。
末页按钮的显示条件:totalPage > end(连续区域不包含末页时才单独显示)。
底层原理:四个条件构成一张「区间相邻性」真值表,差 1 即是经典 off-by-one。 把这四个判断抽象出来看,它们其实在回答同一个几何问题:连续窗口 [start, end] 与两个端点 1 / totalPage 之间,是否还夹着至少一个未显示的页码 。夹着 → 用省略号占位;紧邻(差 1)→ 直接相连不需占位;包含 → 连按钮都不必单独画。于是「相邻」和「间隔」的临界点天然落在「相差 1」上:start === 2 是「首页与窗口紧邻」、start > 2 才是「中间有缺口」;末页侧 end === totalPage - 1 紧邻、end < totalPage - 1(即 totalPage > end + 1)才有缺口。这种「比较运算符取 > 还是 >=、阈值取 n 还是 n+1」的抉择,正是计算机科学里最著名的 差一错误(Off-by-one error)------它在循环边界、数组下标、区间端点里无处不在,分页折叠只是它最直观的一个舞台。验证手法 :把四个条件列成一张以 start、end 为变量的真值表,逐一代入 start ∈ {1,2,3}、end ∈ {totalPage-1, totalPage} 这几个临界点手算一遍,比盯着代码空想可靠得多。业界分页器(一个分页器的逻辑)普遍用 half = floor(pagerCount/2) 先框出窗口、再用同一组「差 1」判定决定省略号显隐,与此处四条件一一对应。
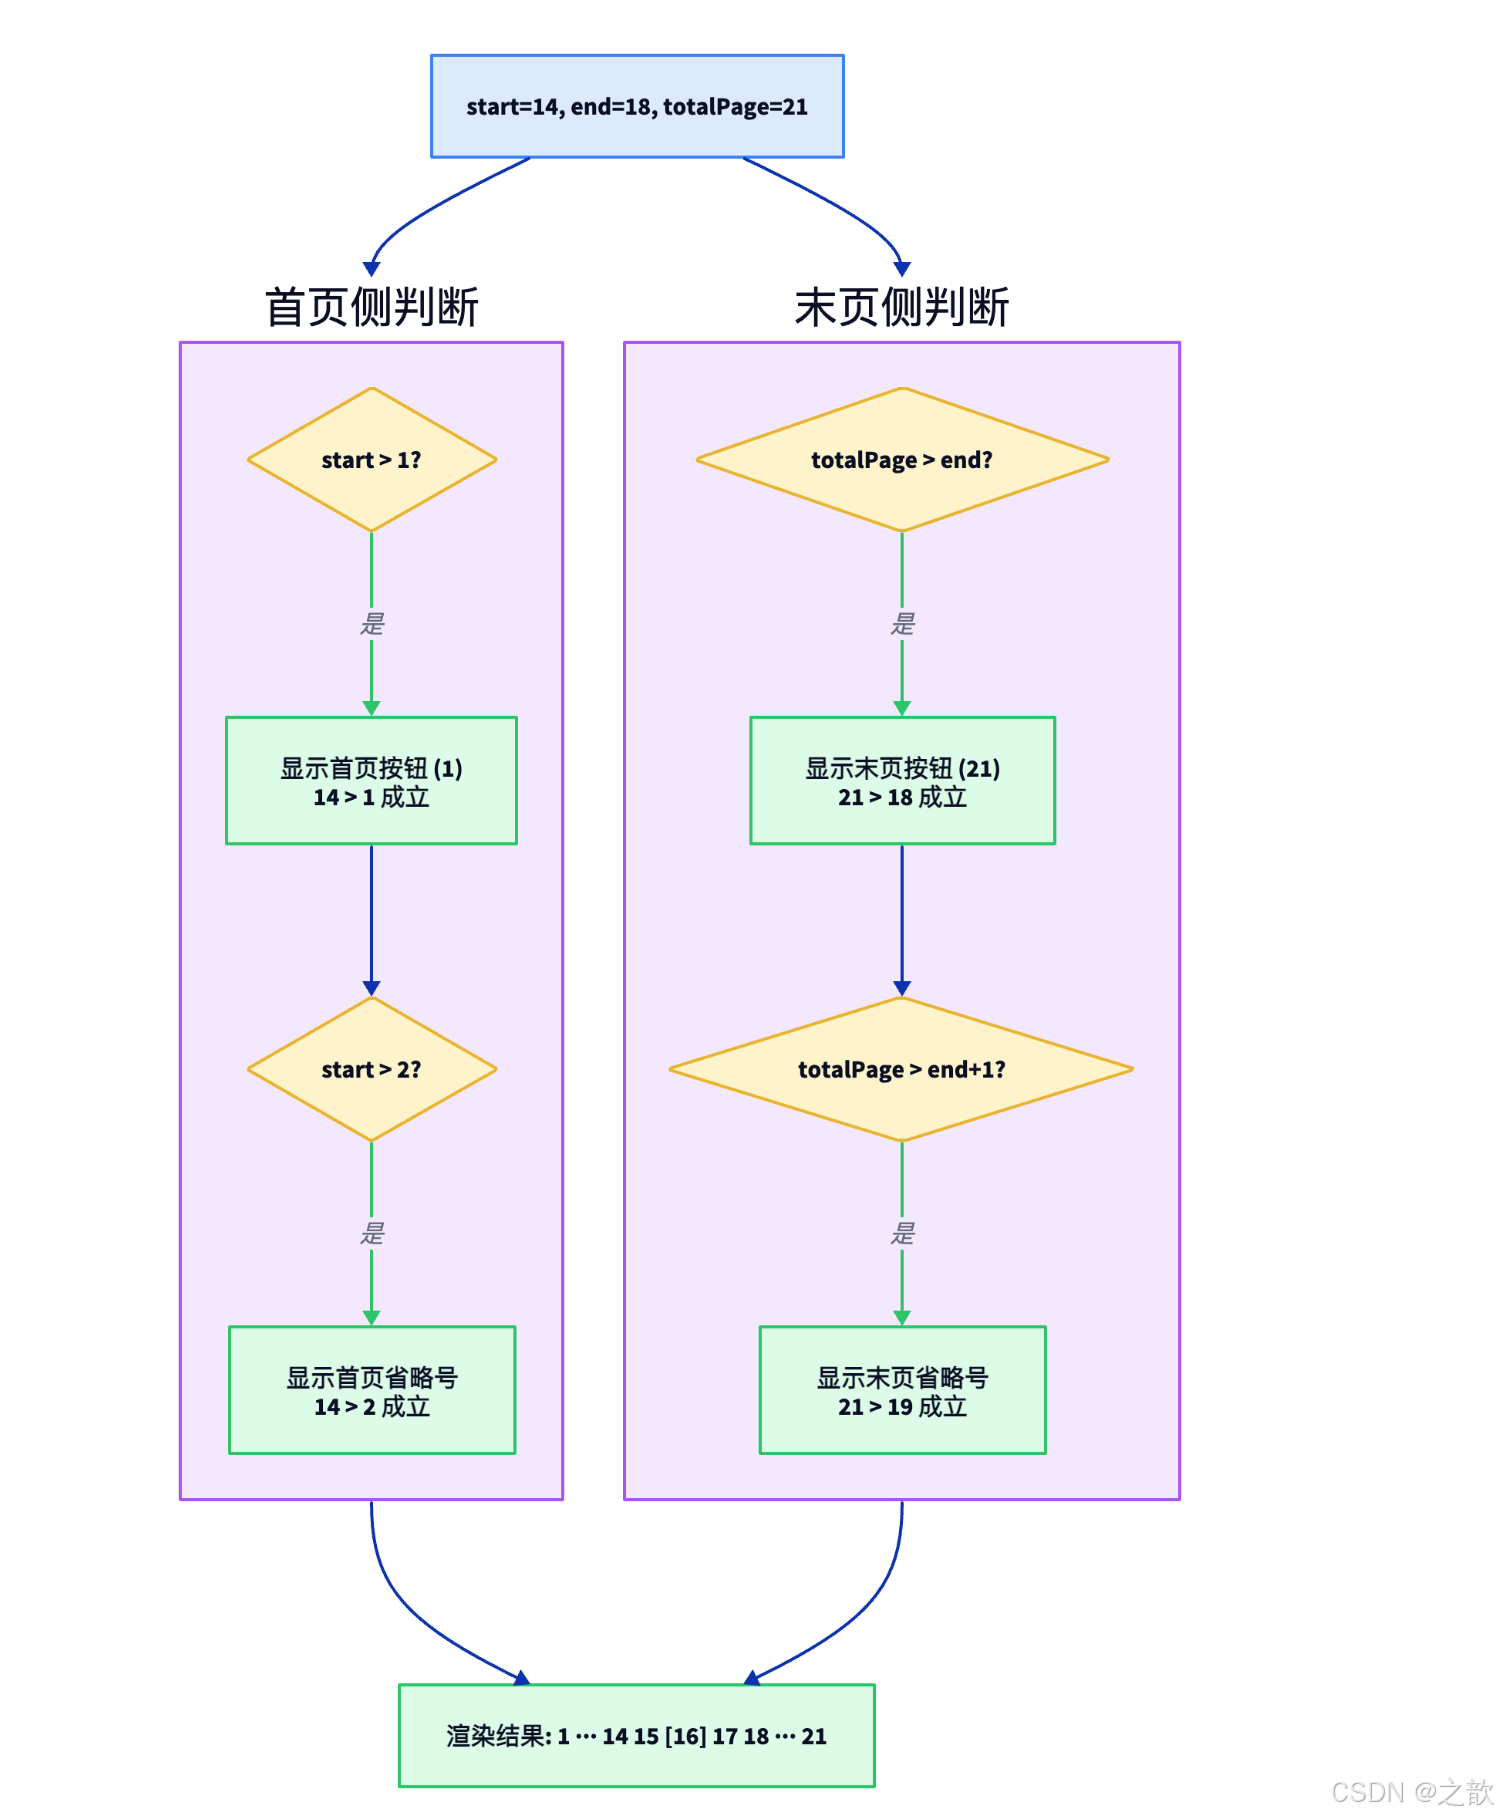
【代码注释】此流程图演示了 start=14, end=18, totalPage=21 时的显示决策,左右两个紫色容器分别处理首页侧和末页侧,黄色菱形是四个判断、绿色节点是判断成立后的渲染动作。所有条件都是简单比较,但边界值(start > 2 vs start > 1,end+1 vs end)需要特别注意:start === 2 时,第 1 页与连续区域紧邻(1 号按钮紧接着 2、3、4、5、6),无需省略号;start > 2 时,连续区域与首页之间至少差了一个页码(如 1 和 4 之间差了 2、3),才需要省略号占位。这一对「相差 1」的临界值正是分页折叠算法的精髓 :业界通用规则是「左省略号当窗口左边界 > 2 时显示、右省略号当窗口右边界 < totalPage-1 时显示」,与本图的 start > 2、totalPage > end+1 完全等价,只是表述角度不同。把这四个条件当作位运算般精确的判定表,是手写分页不出 off-by-one 的关键。市面应用:百度搜索翻页条、京东商品列表翻页条在连续区域紧邻首尾时自动收起省略号,正是这套显示决策的落地。
实战示例:省略号边界可视化
html
<!DOCTYPE html>
<html lang="zh-CN">
<head>
  <meta charset="UTF-8">
  <title>省略号显示逻辑</title>
  <script src="https://cdn.jsdelivr.net/npm/vue@2/dist/vue.js"></script>
  <style>
    body { font-family: Arial, sans-serif; padding: 20px; }
    .scenarios { display: grid; grid-template-columns: 1fr 1fr; gap: 16px; }
    .scenario { background: #fff; border: 1px solid #e8e8e8; border-radius: 8px; padding: 16px; }
    .scenario h4 { margin: 0 0 12px; color: #333; font-size: 14px; }
    .pagination button {
      margin: 2px; padding: 4px 10px; border: 1px solid #ddd;
      border-radius: 3px; background: #f4f4f5; cursor: pointer; font-size: 12px;
    }
    .pagination button.active { background: #c81623; color: #fff; border-color: #c81623; }
    .pagination button[disabled] { color: #ccc; cursor: not-allowed; }
    .pagination span { margin: 0 4px; color: #888; }
    .info { font-size: 11px; color: #666; margin-top: 8px; background: #f9f9f9; padding: 6px; border-radius: 4px; }
  </style>
</head>
<body>
<div id="app">
  <h2>省略号显示的临界情况演示(cont=5, totalPage=21)</h2>
  <div class="scenarios">
    <div class="scenario" v-for="s in scenarios" :key="s.pageNo">
      <h4>当前页:第 {{ s.pageNo }} 页</h4>
      <div class="pagination">
        <button disabled>上一页</button>
        <button v-show="s.start > 1" @click="void 0">1</button>
        <span v-show="s.start > 2">···</span>
        <button
          v-for="(_, i) in (s.end - s.start + 1)"
          :key="s.start + i"
          :class="{ active: s.pageNo === s.start + i }">
          {{ s.start + i }}
        </button>
        <span v-show="21 > s.end + 1">···</span>
        <button v-show="21 > s.end">21</button>
        <button disabled>下一页</button>
      </div>
      <div class="info">
        start={{ s.start }}, end={{ s.end }} |
        首页按钮: {{ s.start > 1 ? '显示' : '隐藏' }} |
        首页省略号: {{ s.start > 2 ? '显示' : '隐藏' }} |
        末页省略号: {{ 21 > s.end + 1 ? '显示' : '隐藏' }} |
        末页按钮: {{ 21 > s.end ? '显示' : '隐藏' }}
      </div>
    </div>
  </div>
</div>
<script>
function calcStartEnd(pageNo, cont, totalPage) {
  let start, end
  if (cont >= totalPage) return { start: 1, end: totalPage, pageNo }
  start = pageNo - Math.floor((cont - 1) / 2)
  end   = pageNo + Math.floor((cont - 1) / 2)
  if (start < 1) { start = 1; end = cont }
  if (end > totalPage) { end = totalPage; start = totalPage - cont + 1 }
  return { start, end, pageNo }
}
new Vue({
  el: '#app',
  data: {
    // 展示几个典型临界值
    scenarios: [1, 2, 3, 10, 16, 19, 20, 21].map(p => calcStartEnd(p, 5, 21))
  }
})
</script>
</body>
</html>
【代码注释】通过展示第 1、2、3、10、16、19、20、21 页的分页条形态,可以清晰观察省略号在临界值处的变化规律:
- 第 1 页:
start=1, end=5,首页按钮隐藏(连续区已包含第1页),首页省略号隐藏。 - 第 2 页:
start=1, end=5(左越界修正),同上。 - 第 3 页:
start=1, end=5(左越界修正),首页省略号仍隐藏(start不超过 2)。 - 第 4 页:
start=2, end=6,首页按钮显示(start > 1),但首页省略号不显示(start <= 2),第 1 页与连续区域紧邻。 - 第 5 页以后:
start >= 3,首页省略号出现。
【实战要点】
- 经典应用场景:当分页总数很大(如 100 页以上),省略号是必须的,否则分页条会占满一整行。京东搜索结果页、百度搜索翻页条都使用这套逻辑。
- 常见坑 :省略号条件写成
start > 1而非start > 2,导致第 2 页时同时显示1 ··· 1 2 3 4 5------首页按钮与连续区域重复,用户看到两个"1"按钮。 - 性能与最佳实践 :省略号用
<span>而非<button>,不需要点击交互,且视觉上应与数字按钮有明显区分(字体颜色灰色、无 hover 效果)。
【本章小结】
| 问题 | 正确条件 | 错误写法及后果 |
|---|---|---|
| 首页按钮何时显示 | start > 1 |
start >= 1 → 永远显示,首页重复 |
| 首页省略号何时显示 | start > 2 |
start > 1 → 第2页时出现多余省略号 |
| 末页省略号何时显示 | totalPage > end + 1 |
totalPage > end → 末页按钮紧邻时多余省略号 |
| 末页按钮何时显示 | totalPage > end |
totalPage >= end → 末页已在连续区时重复显示 |
【面试考点】
Q1:分页中省略号的显示条件,为什么首页省略号是 start > 2 而不是 start > 1?
A:当 start === 2 时,连续区域从第 2 页开始,与首页(第 1 页)紧邻 ,排列是 [1] [2][3][4][5][6],第 1 页按钮与连续区域之间没有跳过任何页码,省略号没有存在意义。只有 start > 2 时,第 1 页与连续区域之间至少差了一个页码(跳过了第 2 页),才需要省略号告知用户"中间还有页码"。这个 off-by-one 的细节是手写分页时最容易写错的地方。
五、边界条件与 Bug 防护
名词解释
- 边界条件(Edge Case):输入值处于极端范围时的特殊情况,如当前页为第1页、末页,或连续页数超过总页数。
- 防御性编程 :在代码中主动检查非预期输入,提前
return或修正,避免脏数据进入业务逻辑。
概念与底层原理
分页组件中有两类 Bug,根源不同但后果相似(页码错乱、数据重复加载):
第一类:数学越界 Bug
连续页码的 start、end 计算可能产生越界(前文已讲),需在 computed 中修正。
第二类:页码未重置 Bug
当用户切换搜索条件(品牌、属性、关键词、排序方式)时,若 URL 中的 pageNo 保持原值(比如 pageNo=16),服务端会从第 16 页开始查询新条件的数据。若新条件总页数只有 5 页,第 16 页是空数据,列表一片空白,用户困惑。
修复方案 :所有会改变搜索结果集的操作(品牌筛选、属性筛选、关键词搜索、排序切换、移除面包屑标签),在执行 $router.push 时强制加入 pageNo: 1,把当前页重置到第 1 页。
底层原理:为什么把重置点收敛进 watch '$route.query' 而非散落在各处。 这两类 Bug 的统一解法都依赖 Vue 的侦听器机制。健壮架构是:组件只监听一处 watch: { '$route.query': { handler, immediate: true, deep: true } },所有筛选/排序/翻页操作都只做一件事------$router.push 改 URL,由 URL 变化驱动 handler 重新发请求(Vue2 侦听器 watch)。三个配置缺一不可:immediate: true 让组件挂载时立刻用当前 URL 跑一次(覆盖首屏/刷新,省掉在 created 里重复写请求);deep: true 因为 $route.query 是对象,浅监听只在引用变化时触发,而 Router 每次导航都会生成新的 query 引用,实践中通常浅监听已够、但筛选维度深时加 deep 更稳;而把 pageNo: 1 固定写进每一次 push 的 query,是用「一处覆盖」替代「在 watch 里逐字段判断该不该重置」的多处补丁------后者随筛选维度增多极易漏判,正是「切条件后看到空页」Bug 的温床。这与官方推荐的「把数据获取放在路由变化的侦听里」是同一思路:URL 是真相,watch 是唯一触发器。
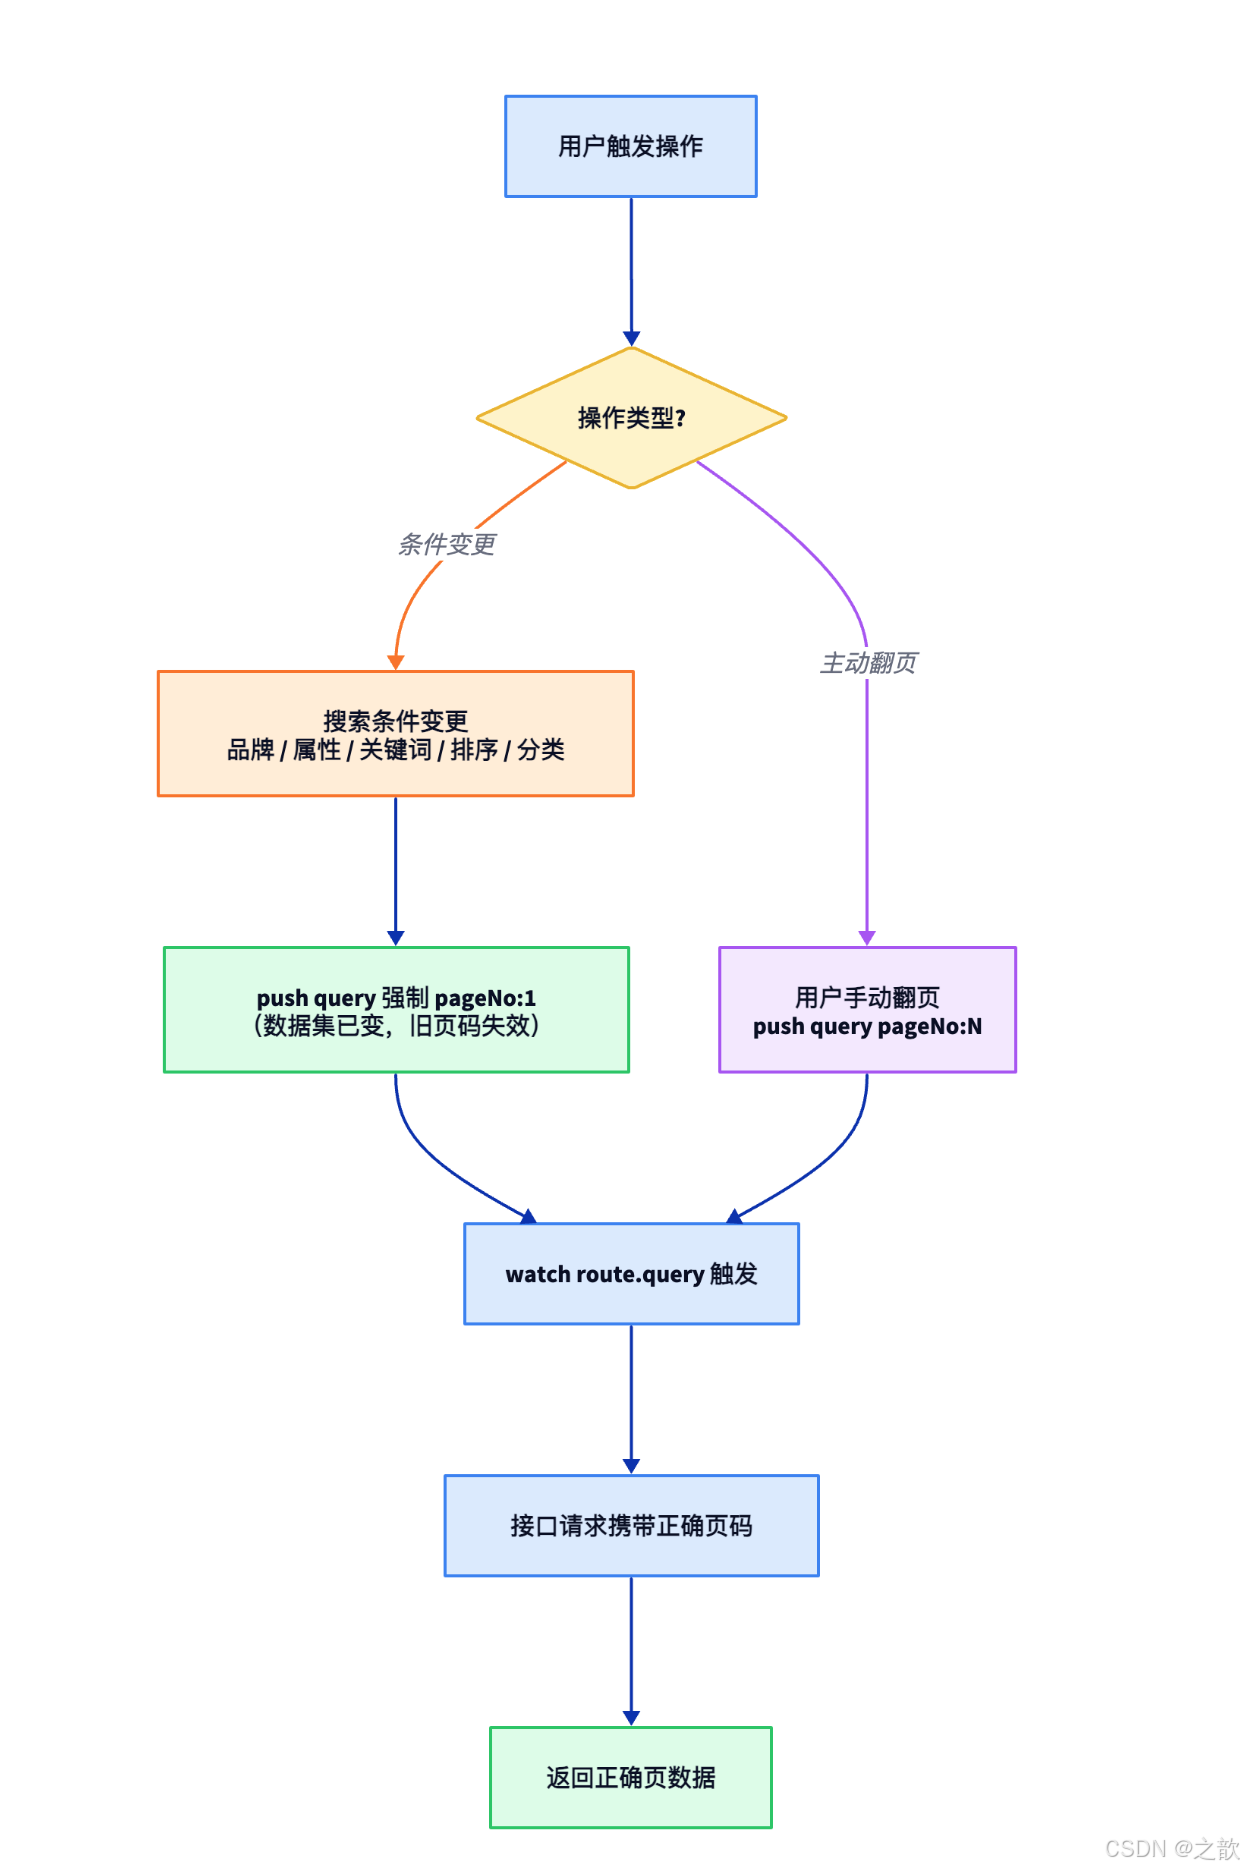
【代码注释】这张流程图展示了两类翻页操作的处理差异:黄色菱形按操作类型分流------橙色「搜索条件变更」(品牌/属性/关键词/排序/分类)强制走绿色 pageNo:1 重置分支;紫色「用户手动翻页」直接带目标页码 N。两条分支随后汇聚到同一个 watch route.query 触发点,统一发起接口请求。为什么把重置点收敛到 push 而非散落在各处 :搜索条件维度多(品牌、属性、关键词、排序、分类),若靠 watch 逐个监听再各自重置,极易漏掉某个维度造成「切条件后看到空页」的 Bug;把 pageNo:1 固定写进每次 $router.push 的 query,是用「一处覆盖」替代「多处补丁」的防御性设计。市面应用:京东、天猫切换品牌或价格区间时,URL 中的页码参数总是回到 1,正是这套统一重置逻辑。
入门示例:条件切换时重置页码
html
<!DOCTYPE html>
<html lang="zh-CN">
<head>
  <meta charset="UTF-8">
  <title>分页 Bug 修复演示</title>
  <script src="https://cdn.jsdelivr.net/npm/vue@2/dist/vue.js"></script>
  <style>
    body { font-family: Arial, sans-serif; padding: 20px; }
    .filter-bar { display: flex; gap: 10px; margin-bottom: 16px; flex-wrap: wrap; }
    .filter-bar button {
      padding: 6px 14px; border: 1px solid #ddd; border-radius: 4px;
      cursor: pointer; background: #f4f4f5; transition: all .2s;
    }
    .filter-bar button.active { background: #c81623; color: #fff; border-color: #c81623; }
    .status { background: #e8f5e9; padding: 10px; border-radius: 6px; margin-bottom: 12px; }
    .bug-demo { background: #fff3cd; padding: 10px; border-radius: 6px; margin-bottom: 12px; }
    .fix-demo { background: #d4edda; padding: 10px; border-radius: 6px; }
    .pagination button { margin: 2px; padding: 4px 10px; border: 1px solid #ddd; border-radius: 3px; cursor: pointer; }
    .pagination button.active { background: #c81623; color: #fff; }
    .pagination button[disabled] { color: #ccc; cursor: not-allowed; }
  </style>
</head>
<body>
<div id="app">
  <h2>分页 Bug:条件切换未重置页码</h2>

  <!-- 品牌筛选 -->
  <div class="filter-bar">
    <span>品牌:</span>
    <button
      v-for="brand in brands"
      :key="brand.id"
      :class="{ active: currentBrand === brand.id }"
      @click="selectBrand(brand.id)">
      {{ brand.name }}
    </button>
    <button @click="selectBrand(null)">全部</button>
  </div>

  <div class="status">
    当前品牌:{{ currentBrand ? brands.find(b=>b.id===currentBrand).name : '全部' }}
    | 当前页:第 {{ pageNo }} 页
    | 总页数:{{ totalPage }}
    | 状态:{{ status }}
  </div>

  <div class="bug-demo">
    ⚠️ <strong>有 Bug 的实现</strong>(切换品牌时 pageNo 不重置):
    <button @click="selectBrandBuggy(1)">切换到"华为"(有Bug)</button>
    <button @click="selectBrandBuggy(2)">切换到"小米"(有Bug)</button>
    <br>
    <small>先翻页到第10页,再切换品牌,观察 pageNo 未重置到1</small>
  </div>

  <div class="fix-demo">
    ✅ <strong>修复后的实现</strong>(切换品牌时强制 pageNo:1):
    <button @click="selectBrand(1)">切换到"华为"(已修复)</button>
    <button @click="selectBrand(2)">切换到"小米"(已修复)</button>
  </div>

  <!-- 简单分页条 -->
  <div class="pagination" style="margin-top:16px">
    <button :disabled="pageNo===1" @click="changePage(pageNo-1)">上一页</button>
    <button v-for="p in Math.min(totalPage, 15)" :key="p"
      :class="{active: pageNo===p}" @click="changePage(p)">{{ p }}</button>
    <span v-if="totalPage>15">...</span>
    <button :disabled="pageNo===totalPage" @click="changePage(pageNo+1)">下一页</button>
    <span>共{{ totalPage }}页</span>
  </div>
</div>
<script>
new Vue({
  el: '#app',
  data: {
    pageNo: 1,
    pageSize: 5,
    currentBrand: null,
    status: '正常',
    brands: [
      { id: 1, name: '华为', total: 23 },
      { id: 2, name: '小米', total: 8 },
    ]
  },
  computed: {
    total() {
      if (!this.currentBrand) return 103
      return this.brands.find(b => b.id === this.currentBrand)?.total || 103
    },
    totalPage() {
      return Math.ceil(this.total / this.pageSize)
    }
  },
  methods: {
    changePage(p) {
      if (p < 1 || p > this.totalPage) return
      this.pageNo = p
    },
    // ❌ 有 Bug 的写法:切换条件时不重置 pageNo
    selectBrandBuggy(brandId) {
      this.currentBrand = brandId
      // 此时 totalPage 可能变小,pageNo 还停留在旧值
      // 例如:pageNo=10,但新品牌总共只有 2 页 → 显示空数据
      if (this.pageNo > this.totalPage) {
        this.status = `❌ Bug!pageNo=${this.pageNo} 超过 totalPage=${this.totalPage},请求第${this.pageNo}页但只有${this.totalPage}页`
      }
    },
    // ✅ 修复后的写法:切换任何搜索条件时强制 pageNo = 1
    selectBrand(brandId) {
      this.currentBrand = brandId
      this.pageNo = 1   // 关键:重置到第1页
      this.status = '✅ 已重置到第1页,数据正常'
    }
  }
})
</script>
</body>
</html>
【代码注释】示例对比了"有 Bug 的实现"和"修复后的实现":
- 有 Bug 的
selectBrandBuggy:只更新currentBrand,不重置pageNo。当用户先翻到第 10 页再切换品牌时,pageNo仍为 10,但新品牌总共可能只有 2 页,服务端返回空数据,用户看到空列表。 - 修复后的
selectBrand:在任何搜索条件变化时,同步 将pageNo重置为 1。真实项目中,这个pageNo: 1写在$router.push的query对象里,确保 URL 参数和页面状态同步。
市面应用 :京东、天猫商城切换品牌、价格区间时,URL 中 pageindex 参数总是重置为 1,是同款修复。
【实战要点】
- 经典应用场景:搜索筛选页(多维度筛选:品牌 + 价格区间 + 属性),任何一个维度变化都需要重置页码,否则会出现"切换条件后看到空数据"的 Bug。
- 常见坑 :用
watch监听各个筛选参数分别重置页码,容易漏掉某个参数。更健壮的方案是在统一的$router.push调用中始终附带pageNo: 1,用一处代码覆盖所有场景。 - 性能与最佳实践 :使用
watch: { '$route.query': { handler, immediate: true } }统一监听 URL 变化触发请求,immediate: true确保页面初始化时也发起请求,不需要在created里再写一次。
【本章小结】
| Bug 类型 | 根因 | 修复方案 |
|---|---|---|
start < 1 |
当前页靠近第1页 | start=1, end=cont |
end > totalPage |
当前页靠近末页 | end=totalPage, start=totalPage-cont+1 |
cont >= totalPage |
连续页数超过总页数 | start=1, end=totalPage 全展示 |
| 条件切换后页码未重置 | 搜索条件变化时 pageNo 未归1 | 所有条件变化时附带 pageNo: 1 |
【面试考点】
Q1:分页组件需要处理哪些边界条件?
A:有四类:(1)start < 1:当前页靠近第1页,连续区域左越界,修正 start = 1, end = cont;(2)end > totalPage:当前页靠近末页,连续区域右越界,修正 end = totalPage, start = totalPage - cont + 1;(3)cont >= totalPage:连续页数超过总页数时,直接显示全部页码;(4)搜索条件变更时必须把 pageNo 重置为 1,否则新条件下第 N 页可能是空数据。
六、排序功能与 URL 参数同步
名词解释
- 排序类型(type) :
1= 综合排序,2= 价格排序(可扩展更多维度)。 - 排序方向(flag) :
asc= 升序,desc= 降序。 - 排序参数(order) :写入 URL 的字段,格式为
"type:flag",如"2:asc"表示价格升序。 - 同一排序类型下切换方向:点击已选中的排序类型时,只切换升降序;点击未选中的类型时,重置为降序。
概念与底层原理
排序状态的初始化有一个微妙的技巧,直接从 URL 参数中解构:
js
const [type, flag] = (this.$route.query.order || '1:desc').split(':')【代码注释】这是 ES6 解构赋值 + 短路默认值的组合技巧:|| 运算符在左侧为 falsy(undefined、空字符串)时取右侧默认值 '1:desc';split(':') 将字符串拆成 ['1', 'desc'] 数组;数组解构 [type, flag] 同时声明并赋值两个变量,一行代码完成"读取参数 → 默认值兜底 → 拆分 → 赋值"四步操作。市面应用 :Vue 项目中从 $route.query 读取复合参数时,这种"默认值 + split 解构"写法极为常见,可读性远优于多行 if 判断。
这行代码用了"默认值 + 解构赋值":若 URL 无 order 参数,默认使用 "1:desc"(综合降序);split(':') 将字符串拆为数组,数组解构同时赋给 type 和 flag。这样组件一初始化就和 URL 状态同步,刷新页面后排序状态不丢失。
深一层:为什么这里能用「短路默认值」而不能用「解构默认值」。 数组解构本身支持默认值语法(const [type = '1', flag = 'desc'] = arr),但它只在对应位置的元素严格等于 undefined 时才生效------而 this.$route.query.order 在参数缺失时整体是 undefined,对它直接 .split(':') 会抛 Cannot read properties of undefined。所以必须先用 || 在「整个字符串层面」兜底成 '1:desc',再 split,解构永远拿到长度为 2 的数组。换句话说,|| 处理的是「order 整体不存在」,解构默认值处理的是「数组某一项缺失」,二者作用层级不同,分页这种「参数要么完整要么完全缺失」的场景天然适合短路兜底。|| 的判定依据是 falsy(undefined、''、0、null、NaN、false),空字符串 ?order= 也会被兜底;若只想兜 undefined/null、保留空串,可换 ES2020 的空值合并 ??(参见 MDN 解构赋值 与 MDN 逻辑或赋值/短路)。市面应用 :Vue 项目从 $route.query 读取「可选的复合参数」时(排序、筛选、tab 选中态),这套「|| 默认串 → split → 数组解构」是社区最常见的健壮写法,比逐字段 if 判空精简得多。
实战示例:排序功能完整实现
html
<!DOCTYPE html>
<html lang="zh-CN">
<head>
  <meta charset="UTF-8">
  <title>排序功能实现</title>
  <script src="https://cdn.jsdelivr.net/npm/vue@2/dist/vue.js"></script>
  <style>
    body { font-family: Arial, sans-serif; padding: 20px; }
    .sort-bar { background: #f5f5f5; padding: 10px 16px; border-radius: 6px; display: flex; align-items: center; gap: 8px; }
    .sort-bar button {
      padding: 6px 16px; border: 1px solid #ddd; border-radius: 3px;
      cursor: pointer; background: #fff; font-size: 13px;
    }
    .sort-bar button.active { background: #c81623; color: #fff; border-color: #c81623; }
    .sort-bar button .arrow { font-size: 10px; margin-left: 4px; }
    .url-display { background: #272822; color: #f8f8f2; padding: 10px 16px; border-radius: 6px; margin-top: 12px; font-family: monospace; font-size: 13px; }
    .log { margin-top: 12px; border: 1px solid #e8e8e8; border-radius: 6px; padding: 10px; max-height: 120px; overflow-y: auto; }
    .log-item { font-size: 12px; color: #555; padding: 2px 0; border-bottom: 1px solid #f5f5f5; }
  </style>
</head>
<body>
<div id="app">
  <h2>搜索排序功能演示</h2>
  <div class="sort-bar">
    <span>排序:</span>
    <!-- 综合排序按钮:active 时显示升降箭头 -->
    <button :class="{ active: type === '1' }" @click="orderSearch('1')">
      综合
      <span class="arrow" v-show="type === '1'">{{ flag === 'desc' ? '↓' : '↑' }}</span>
    </button>
    <!-- 价格排序按钮 -->
    <button :class="{ active: type === '2' }" @click="orderSearch('2')">
      价格
      <span class="arrow" v-show="type === '2'">{{ flag === 'desc' ? '↓' : '↑' }}</span>
    </button>
  </div>

  <div class="url-display">
    模拟 URL:/search?order=<strong>{{ type }}:{{ flag }}</strong>&pageNo=1
  </div>

  <div class="log">
    <div class="log-item" v-for="(entry, i) in logs" :key="i">{{ entry }}</div>
    <div class="log-item" style="color:#aaa" v-if="logs.length === 0">点击排序按钮查看日志...</div>
  </div>
</div>
<script>
new Vue({
  el: '#app',
  data() {
    // 从 URL 参数初始化排序状态(模拟 $route.query.order)
    // 真实项目:const [type, flag] = (this.$route.query.order || '1:desc').split(':')
    const [type, flag] = '1:desc'.split(':')
    return {
      type,   // 排序类型:'1'=综合, '2'=价格
      flag,   // 排序方向:'asc'=升序, 'desc'=降序
      logs: []
    }
  },
  methods: {
    orderSearch(newType) {
      if (this.type === newType) {
        // 点击的是当前已激活的排序类型 → 切换升降序
        this.flag = this.flag === 'desc' ? 'asc' : 'desc'
        this.logs.unshift(`点击已选中的[${newType === '1' ? '综合' : '价格'}],切换方向为: ${this.flag}`)
      } else {
        // 点击的是未激活的类型 → 切换类型,重置为降序(降序是默认值,数据多的在前面)
        this.type = newType
        this.flag = 'desc'
        this.logs.unshift(`切换排序类型为[${newType === '1' ? '综合' : '价格'}],重置方向为: desc`)
      }
      const orderStr = `${this.type}:${this.flag}`
      this.logs.unshift(`→ 路由跳转 pageNo:1 order:${orderStr}(重置页码!)`)
      // 真实项目中:
      // this.$router.push({
      //   path: '/search',
      //   query: { ...this.$route.query, order: orderStr, pageNo: 1 }
      // })
    }
  }
})
</script>
</body>
</html>
【代码注释】排序逻辑的核心是一个"同类型切换方向,跨类型重置方向"的状态机:
this.type === newType:用户再次点击当前激活的排序类型,翻转flag(desc↔asc)。this.type !== newType:用户切换到另一种排序类型,重置flag = 'desc'(默认降序,让高分/高价的商品排前面)。- 切换排序必须附带
pageNo: 1(见日志),理由与搜索条件变更相同:排序改变了数据集顺序,原来的第 N 页意义不再相同。
市面应用 :京东商品搜索页的"综合排序"、"价格↑"、"价格↓" 三个按钮,底层就是这套 type:flag 的编码方式,写入 URL sort_type=2&sort_name=asc 一类参数。
【实战要点】
- 经典应用场景:电商搜索排序、后台表格列头点击排序(点一次降序,再点一次升序)、数据看板指标排序。
- 常见坑 :用
v-show控制箭头时,若箭头元素在 DOM 中已存在但不可见,没有渲染性能问题;但若使用v-if,每次切换排序都会销毁/重建箭头 DOM,且可能触发箭头动画消失。推荐用v-show。 - 性能与最佳实践 :排序参数编码为
"type:flag"格式,一个 URL 参数承载两个维度的信息,比sort=综合&order=desc更简洁,且便于后端直接解析。
【本章小结】
| 操作 | type 变化 | flag 变化 | pageNo 变化 |
|---|---|---|---|
| 点击已激活的排序类型 | 不变 | desc ↔ asc | 重置为 1 |
| 点击未激活的排序类型 | 变为新类型 | 重置为 desc | 重置为 1 |
【面试考点】
Q1:排序参数为何编码为 "1:desc" 而非两个独立参数?
A:将 type 和 flag 合并为一个字符串参数有两个好处:(1)URL 更简洁,?order=2:asc vs ?sort_type=2&sort_flag=asc,减少参数数量;(2)原子性------type 和 flag 总是一起变化,合并为一个参数保证它们不会在 URL 中出现"type 变了但 flag 还是旧的"的不一致状态。解析时用 split(':') 一行即可还原,成本极低。
七、品牌与属性筛选:搜索参数的联动设计
名词解释
- 品牌筛选(trademark) :用品牌限定商品范围,URL 参数格式
"id:名称",如"1:华为"。 - 属性筛选(props) :按商品属性(颜色、尺寸、内存等)过滤,URL 参数为数组,每项格式
"attrId:值:属性名"。 - 面包屑导航(Breadcrumb) :显示当前激活的筛选标签,每个标签带
×删除按钮,点击可移除该筛选条件。 - URL 数组参数 :同名参数多次出现
?a=1&a=2&a=3,Vue Router 将其解析为数组['1','2','3']。
概念与底层原理
品牌筛选是"单选"(同一时间只能选一个品牌),属性筛选是"多选"(可同时选颜色+尺寸+内存)。两者的 URL 参数设计有本质区别:
- 品牌:
trademark=1:华为(单值字符串) - 属性:
props=1:红色:颜色&props=2:128G:内存(多值数组)
Vue Router 中,当 query 对象中某个键的值是数组时,$router.push 会自动将其展开为多个同名查询参数,读取时 this.$route.query.props 是一个字符串数组。
移除品牌的两种方式:
{ ...query, trademark: undefined }---undefined的键在$router.push中会被忽略,等效于删除。- 先
delete query.trademark,再push--- 更显式,意图更清晰。
底层原理:Vue Router 的数组参数序列化与 $route.query 的只读约束。 Vue Router 在执行 $router.push({ query }) 时,内部会把 query 对象交给一个 stringifyQuery 函数序列化成 URL 查询串:遇到值为数组的键,它会为每个数组元素生成一个同名 key=value 对 ({ props: ['a','b'] } → ?props=a&props=b),并对每个值做 encodeURIComponent 转义;反向解析 parseQuery 时,同名键出现一次得到字符串、出现多次则收集成数组(默认行为见 Vue Router 路由信息对象 route.query)。这解释了一个高频坑:单值与多值的类型不对称 ------只选一个属性时 $route.query.props 是字符串,选两个及以上才是数组,直接 .includes() / .filter() 在单值场景会按字符/报错。健壮写法是 [].concat(this.$route.query.props || []) 强制归一成数组。另一个底层约束是 $route 对象是响应式且只读的 :Vue Router 把当前路由信息暴露为不可变快照,直接 this.$route.query.props.push(x) 既不会触发导航、也不符合「URL 是单一数据源」的设计------必须经由 $router.push 生成一条新的导航记录,才能让 URL、历史栈、组件 props 三者同步更新(这也是 Vue 官方推崇的「数据驱动视图,URL 驱动数据」单向流)。
实战示例:品牌筛选与属性筛选联动
html
<!DOCTYPE html>
<html lang="zh-CN">
<head>
  <meta charset="UTF-8">
  <title>品牌与属性筛选联动</title>
  <script src="https://cdn.jsdelivr.net/npm/vue@2/dist/vue.js"></script>
  <style>
    body { font-family: Arial, sans-serif; padding: 20px; background: #f5f5f5; }
    .panel { background: #fff; border-radius: 8px; padding: 20px; margin-bottom: 16px; box-shadow: 0 1px 4px rgba(0,0,0,.08); }
    h3 { margin: 0 0 12px; color: #333; font-size: 15px; }
    .brand-list { display: flex; gap: 10px; flex-wrap: wrap; }
    .brand-item { padding: 5px 14px; border: 1px solid #e8e8e8; border-radius: 3px; cursor: pointer; font-size: 13px; background: #fafafa; }
    .brand-item:hover { border-color: #c81623; color: #c81623; }
    .attr-group { margin-bottom: 10px; }
    .attr-group .attr-name { font-size: 12px; color: #888; margin-bottom: 6px; }
    .attr-values { display: flex; gap: 8px; flex-wrap: wrap; }
    .attr-value { padding: 3px 10px; border: 1px solid #e8e8e8; border-radius: 3px; font-size: 12px; cursor: pointer; background: #fafafa; }
    .attr-value:hover { border-color: #c81623; color: #c81623; }
    .attr-value.selected { background: #c81623; color: #fff; border-color: #c81623; cursor: default; }
    .breadcrumb { display: flex; gap: 8px; flex-wrap: wrap; align-items: center; }
    .tag { display: inline-flex; align-items: center; background: #fff0f0; border: 1px solid #ffcdd2; border-radius: 3px; padding: 3px 8px; font-size: 12px; color: #c81623; gap: 6px; }
    .tag .remove { cursor: pointer; font-weight: bold; }
    .tag .remove:hover { color: #900; }
    .url-bar { background: #272822; color: #66d9e8; padding: 10px; border-radius: 6px; font-family: monospace; font-size: 12px; word-break: break-all; }
  </style>
</head>
<body>
<div id="app">
  <!-- 筛选区域 -->
  <div class="panel">
    <h3>品牌筛选(单选)</h3>
    <div class="brand-list">
      <span class="brand-item" v-for="brand in brands" :key="brand.id"
        @click="selectTrademark(brand)">{{ brand.name }}</span>
    </div>
  </div>

  <div class="panel">
    <h3>属性筛选(多选)</h3>
    <div v-for="attr in attrs" :key="attr.attrId" class="attr-group">
      <div class="attr-name">{{ attr.attrName }}</div>
      <div class="attr-values">
        <span v-for="val in attr.attrValues" :key="val"
          class="attr-value"
          :class="{ selected: isPropSelected(attr.attrId, val, attr.attrName) }"
          @click="addProp(attr.attrId, val, attr.attrName)">{{ val }}</span>
      </div>
    </div>
  </div>

  <!-- 面包屑导航 -->
  <div class="panel">
    <h3>已选筛选条件</h3>
    <div class="breadcrumb">
      <span v-if="!query.trademark && (!query.props || query.props.length === 0)" style="color:#aaa;font-size:13px">暂无筛选条件</span>
      <!-- 品牌标签 -->
      <span class="tag" v-if="query.trademark">
        {{ query.trademark.split(':')[1] }}
        <span class="remove" @click="removeTrademark">×</span>
      </span>
      <!-- 属性标签 -->
      <span class="tag" v-for="prop in (query.props || [])" :key="prop">
        {{ prop.split(':')[1] }}({{ prop.split(':')[2] }})
        <span class="remove" @click="removeProp(prop)">×</span>
      </span>
    </div>
  </div>

  <!-- 模拟 URL -->
  <div class="url-bar">
    /search?{{ urlString || '(无筛选参数)' }}
  </div>
</div>
<script>
new Vue({
  el: '#app',
  data: {
    // 模拟 $route.query
    query: {
      keyword: '',
      trademark: '',
      props: []
    },
    brands: [
      { id: 1, name: '华为' },
      { id: 2, name: '小米' },
      { id: 3, name: '苹果' },
      { id: 4, name: 'OPPO' },
    ],
    attrs: [
      { attrId: 10, attrName: '颜色', attrValues: ['红色', '黑色', '白色', '蓝色'] },
      { attrId: 11, attrName: '内存', attrValues: ['4G', '8G', '12G', '16G'] },
      { attrId: 12, attrName: '屏幕尺寸', attrValues: ['5.5寸', '6.1寸', '6.7寸'] },
    ]
  },
  computed: {
    urlString() {
      const parts = []
      if (this.query.trademark) parts.push(`trademark=${encodeURIComponent(this.query.trademark)}`)
      if (this.query.props && this.query.props.length) {
        this.query.props.forEach(p => parts.push(`props=${encodeURIComponent(p)}`))
      }
      parts.push('pageNo=1')
      return parts.join('&')
    }
  },
  methods: {
    // 选择品牌 → 更新 query.trademark,重置 pageNo
    selectTrademark(brand) {
      // 格式:"id:名称"
      this.query = {
        ...this.query,
        trademark: `${brand.id}:${brand.name}`,
        pageNo: 1   // 重置页码
      }
    },
    // 移除品牌标签
    removeTrademark() {
      const q = { ...this.query }
      delete q.trademark   // 删除 trademark 键
      q.pageNo = 1
      this.query = q
    },
    // 添加属性筛选 → 格式 "attrId:值:属性名"
    addProp(attrId, info, attrName) {
      const propsValue = `${attrId}:${info}:${attrName}`
      const currentProps = this.query.props || []
      // 幂等:已选中的属性值不重复添加
      if (currentProps.includes(propsValue)) return
      this.query = {
        ...this.query,
        props: [...currentProps, propsValue],
        pageNo: 1   // 重置页码
      }
    },
    // 移除属性标签
    removeProp(prop) {
      this.query = {
        ...this.query,
        props: this.query.props.filter(p => p !== prop),
        pageNo: 1
      }
    },
    // 判断某属性值是否已被选中
    isPropSelected(attrId, val, attrName) {
      const key = `${attrId}:${val}:${attrName}`
      return (this.query.props || []).includes(key)
    }
  }
})
</script>
</body>
</html>
【代码注释】这个示例模拟了完整的筛选联动逻辑:
- 品牌筛选 :
trademark编码为"id:name"字符串,面包屑展示时split(':')[1]取名称,移除时用delete删键。 - 属性多选 :
props是数组,每次addProp时用[...currentProps, propsValue]追加(不可变操作,触发 Vue 响应式更新)。使用includes实现幂等(同一属性值不重复选)。 - 移除属性 :
filter(p => p !== prop)返回不含目标项的新数组,Vue 检测到数组引用变化触发重渲染。 - 每次变更都附带
pageNo: 1:无论增加/删除品牌还是属性,都重置页码。
市面应用:淘宝左侧筛选面板(品牌、类目、价格区间)本质上是同款设计,只是用了更复杂的 UI 和更多筛选维度。
【实战要点】
- 经典应用场景:电商搜索页多维度筛选,需要"品牌单选 + 属性多选"组合。品牌单选是因为同一商品只属于一个品牌;属性多选是因为用户可能同时要"红色 + 128G + 6.1寸"。
- 常见坑 :直接
this.$route.query.props.push(...)修改数组不会触发 Vue 响应式。$route.query是只读对象,应通过$router.push创建新的 query 对象。 - 性能与最佳实践 :
isPropSelected每次渲染都会遍历props数组。若属性数量很多,可以将已选属性转为Set,用has()代替includes(),从 O(n) 降到 O(1)。
【本章小结】
| 操作 | 参数格式 | 移除方式 |
|---|---|---|
| 选择品牌 | trademark="id:名称" |
delete query.trademark |
| 选择属性 | props=["attrId:值:属性名", ...] |
filter(p => p !== target) |
| 移除品牌面包屑 | --- | 删除 trademark 键,push 新 query |
| 移除属性面包屑 | --- | filter 过滤,push 新 query |
【面试考点】
Q1:Vue Router 中如何传递和接收数组类型的 URL 参数?
A:使用 $router.push({ query: { props: ['1:红色:颜色', '2:128G:内存'] } }) 时,Vue Router 会自动将数组展开为 ?props=1%3A%E7%BA%A2%E8%89%B2%3A%E9%A2%9C%E8%89%B2&props=2%3A128G%3A%E5%86%85%E5%AD%98(同名参数重复)。接收时 this.$route.query.props 是 ['1:红色:颜色', '2:128G:内存'] 数组。需注意:若只传一个值,Vue Router 解析结果是字符串而非数组,需用 [].concat(this.$route.query.props || []) 强制转数组,防止 props.includes 调用在单值时报错。
八、阿里 Iconfont 集成
名词解释
- Iconfont(阿里巴巴矢量图标库) :阿里巴巴旗下的字体图标平台(iconfont.cn),提供海量矢量图标,支持 font-class、symbol、unicode 三种使用方式。
- font-class 方式 :最常用的使用方式,通过 CSS class 引用图标,如
<i class="iconfont icon-up">。 iconfont.css:图标库生成的样式文件,定义.iconfont基础字体和各图标的 Unicode 编码。
概念与底层原理
Iconfont 的本质是字体 ------将 SVG 图标编码为字体文件(.ttf, .woff, .woff2, .eot),通过 CSS @font-face 加载。渲染时浏览器将特殊字符(Unicode 私有区 PUA)解析为对应的图标字形,视觉上是"图标",本质上是"字"。
这带来两个优势:
- 无损缩放:字体是矢量的,任意尺寸下清晰,图片会模糊。
- CSS 控制 :可用
color、font-size、text-shadow等所有文字 CSS 属性控制图标样式。
底层原理:@font-face + Unicode PUA 的「以字代图」机制。 iconfont.css 里实际只有两段关键代码。第一段是 @font-face 规则,它把图标字体文件注册为一个自定义字体族(font-family: "iconfont"),并通过 src 列出多种格式(woff2 优先、woff/ttf 兜底旧浏览器);.iconfont 基类则把这个字体族应用到元素上。第二段是每个图标类(如 .icon-up::before { content: "\e6a1"; }),它用 ::before 伪元素插入一个 Unicode 私有使用区(PUA,码位 U+E000--U+F8FF) 里的字符。PUA 是 Unicode 标准故意留空、不分配任何标准字形 的码段,正因如此,字体厂商可以把自家图标字形塞进这些码位而不与任何真实文字冲突。浏览器渲染时,先看到 content 是一个 PUA 字符,再按 font-family: iconfont 去图标字体里查字形,最终画出的是图标------所以它在 DOM 里本质是「一个字」,能被 color/font-size 控制,却又长得像图。这也解释了 font-class 的一个固有缺陷 :PUA 字符在字体未加载完成时会显示成「豆腐块」(□) 或错码(FOUT/FOIT),且复制图标会复制出乱码,这是「以字代图」方案与生俱来的代价。symbol(SVG sprite)模式则改用 <svg><use> 引用,绕开了字体加载,因而能多色、无 FOUT。
实战示例:Iconfont 在排序中的应用
html
<!DOCTYPE html>
<html lang="zh-CN">
<head>
<meta charset="UTF-8">
<title>Iconfont 排序图标</title>
<!-- 真实项目中引入本地 iconfont.css:import "@/assets/iconfont/iconfont.css" -->
<!-- 本示例使用 Unicode 内联模拟图标效果 -->
<style>
body { font-family: Arial, sans-serif; padding: 20px; }
.sort-nav { background: #f5f5f5; padding: 10px 16px; display: flex; gap: 12px; align-items: center; border-radius: 6px; }
.sort-nav li { list-style: none; }
.sort-nav a {
display: inline-flex; align-items: center; gap: 4px;
padding: 6px 16px; text-decoration: none; color: #555;
border-radius: 3px; font-size: 14px; cursor: pointer;
}
.sort-nav li.active a { background: #c81623; color: #fff; border-radius: 3px; }
.sort-icon { font-size: 12px; font-style: normal; }
/* 模拟 iconfont 箭头(真实项目用 iconfont 字体图标) */
.icon-up::before { content: "▲"; }
.icon-down::before { content: "▼"; }
.code-block { background: #f8f8f8; padding: 16px; border-radius: 6px; margin-top: 16px; font-family: monospace; font-size: 13px; }
.code-block .comment { color: #6a9955; }
</style>
<script src="https://cdn.jsdelivr.net/npm/vue@2/dist/vue.js"></script>
</head>
<body>
<div id="app">
<h2>阿里 Iconfont 图标在排序中的应用</h2>
<ul class="sort-nav">
<li :class="{ active: type === '1' }">
<a @click="orderSearch('1')">
综合
<!-- iconfont 图标:根据 flag 动态切换上箭头/下箭头 -->
<i v-show="type === '1'" class="sort-icon" :class="flag === 'desc' ? 'icon-down' : 'icon-up'"></i>
</a>
</li>
<li :class="{ active: type === '2' }">
<a @click="orderSearch('2')">
价格
<i v-show="type === '2'" class="sort-icon" :class="flag === 'desc' ? 'icon-down' : 'icon-up'"></i>
</a>
</li>
</ul>
<p style="color:#666;font-size:13px;margin-top:12px">
当前排序:{{ type === '1' ? '综合' : '价格' }} {{ flag === 'desc' ? '↓ 降序' : '↑ 升序' }}
</p>
<div class="code-block">
<div class="comment">/* 真实项目中的 Iconfont 使用步骤 */</div>
<br>
1. 下载 iconfont 项目文件,放到 src/assets/iconfont/<br>
2. 在 src/main.js 全局引入:import "@/assets/iconfont/iconfont.css"<br>
3. 模板中使用:<i class="iconfont icon-icon_up"></i><br>
<div class="comment">// icon-icon_up 是在 iconfont.cn 项目中为图标设置的 class 名</div>
</div>
</div>
<script>
new Vue({
el: '#app',
data: { type: '1', flag: 'desc' },
methods: {
orderSearch(newType) {
if (this.type === newType) {
this.flag = this.flag === 'desc' ? 'asc' : 'desc'
} else {
this.type = newType
this.flag = 'desc'
}
}
}
})
</script>
</body>
</html>【代码注释】Iconfont 在排序中的典型用法:用 :class="flag === 'desc' ? 'icon-down' : 'icon-up'" 动态切换图标 class,配合 v-show="type === '1'" 控制显隐,只在激活的排序类型旁边显示箭头图标。真实项目中 icon-icon_up / icon-icon_down 是在 iconfont.cn 项目中为图标自定义的 class 名,下载字体包后可在 iconfont.css 中找到对应定义。
【实战要点】
- 经典应用场景:排序指示箭头、商品特性标签图标、购物车/收藏/分享等功能图标。一个项目通常将所有需要的图标统一加入 iconfont 项目,下载一个字体文件,比多个 SVG 文件管理更方便。
- 常见坑 :下载 iconfont 文件后忘记在 webpack 配置中添加字体文件的 loader(
url-loader或asset/resource),导致字体无法加载,图标显示为方块。Vue CLI 创建的项目已内置字体文件处理,无需额外配置。 - 性能与最佳实践:仅将项目用到的图标加入 iconfont 项目并下载,避免引入整个图标库(体积可能超过 1MB)。字体文件建议开启 Gzip 压缩,实际传输体积可减少 70%。
【本章小结】
| 方式 | 使用方法 | 优点 | 缺点 |
|---|---|---|---|
| font-class | <i class="iconfont icon-xxx"> |
简单易用,CSS 可控 | 需加载字体文件 |
| symbol(SVG sprite) | <svg><use xlink:href="#icon-xxx"> |
支持多色图标 | 语法稍复杂 |
| 图片(.png/.svg) | <img src="..."> |
无需加载字体 | 尺寸固定或需多套图 |
【面试考点】
Q1:Iconfont 字体图标和 SVG 图标相比有什么优劣势?
A:Iconfont 优势:继承所有 CSS 文字属性(color、font-size、text-shadow),尺寸切换只需改 font-size,HTTP 请求一个字体文件即可加载全部图标。劣势:只能单色(除 symbol 模式外),图标需在 iconfont.cn 平台管理,有一定维护成本,且字体加载有 FOUT(无样式文字闪烁)风险。SVG 内联图标则支持多色、可用 CSS 变量精细控制每个路径颜色,无 FOUT,但每个图标需要单独引入,管理成本高。生产项目中推荐:少量特殊多色图标用内联 SVG,大量单色功能图标用 iconfont 或 SVG sprite。
九、分页组件的最佳实践与扩展设计
名词解释
- 受控组件模式 :组件的状态完全由外部
props控制,自身不维护重复的内部状态。 - 全局组件 :通过
Vue.component()注册,在任意组件模板中无需 import 即可使用。 - 单一数据源(Single Source of Truth):URL 查询参数作为分页状态的唯一数据源,Store 和组件 props 都从 URL 派生。
概念与底层原理
分页组件与 Vue Router + Vuex 的协作遵循以下数据流:
URL ?pageNo=3
      ↓ watch $route.query (immediate:true)
      ↓ dispatch('product/postProductListAsync', { pageNo:3, ... })
      ↓ 接口返回 { total, pageNo, pageSize, list }
      ↓ commit('SET_SEARCH_RESULT', result)
      ↓ state.searchProductResult 更新
      ↓ <Pagination :pageNo="$store.state.product.searchProductResult.pageNo">
      ↓ 分页组件重渲染
【代码注释】这段数据流伪代码描述了 Vue Router + Vuex + 分页组件的协作链路,每一行对应一个技术层的职责:URL 是起点(状态源),watch 是触发器,dispatch 是业务入口,接口是数据来源,commit 是状态更新,props 绑定是 UI 响应。整条链路是单向的------数据从 URL 流向组件,事件从组件流向 URL,没有逆流,因此状态始终可预测。市面应用:基于 Vue 的中后台管理系统(vue-element-admin、vben-admin)的列表页普遍采用此架构。
将 pageNo 作为 URL 参数(而非 Vuex 中的独立状态)有三个好处:
- 刷新保留 :用户刷新浏览器,
watch的immediate: true触发请求,从 URL 恢复当前页。 - 前进后退:浏览器历史记录基于 URL,翻页后按浏览器后退键可回到上一页。
- 分享链接:复制当前 URL 发给别人,对方打开直接看到同一页数据。
底层原理:URL 作为「单一数据源」,与 Vuex 状态的职责切分。 这套架构的理论根基是 Flux/Vuex 的「单一状态树 + 单向数据流」:状态只能由 mutation 修改,组件不直接改状态、只读状态并派发 action/事件。分页把这一原则推进一步------把「页码、排序、筛选」这类可被 URL 表达的页面状态 外置到路由层,让 URL 成为它们的唯一真相,Vuex 只缓存「接口返回的结果集」这种派生数据 。为什么这样切分?因为 Vuex state 存在内存里,刷新即丢失(除非额外做持久化);而 URL 天然由浏览器持久化、可被历史栈记录、可复制分享,三者恰好对应上面三个好处。本质上每次翻页 $router.push 都是往浏览器 History 栈压一条记录,后退键就是 history.back(),这是纯 Vuex 方案无论如何复刻不出来的浏览器原生能力。判定口径:能从一条 URL 完整还原的页面状态(页码/筛选/排序/tab)放路由,跨页面共享且与 URL 无关的状态(购物车、用户信息)放 Vuex。
实战示例:分页与 Vuex + Router 完整联动
html
<!DOCTYPE html>
<html lang="zh-CN">
<head>
  <meta charset="UTF-8">
  <title>分页组件完整联动示例</title>
  <script src="https://cdn.jsdelivr.net/npm/vue@2/dist/vue.js"></script>
  <script src="https://cdn.jsdelivr.net/npm/vuex@3/dist/vuex.js"></script>
  <style>
    body { font-family: Arial, sans-serif; padding: 20px; background: #f0f2f5; }
    .container { max-width: 800px; margin: 0 auto; }
    .card { background: #fff; border-radius: 8px; padding: 24px; margin-bottom: 16px; box-shadow: 0 2px 8px rgba(0,0,0,.06); }
    .list-item { padding: 10px 0; border-bottom: 1px solid #f5f5f5; color: #555; font-size: 14px; }
    .loading { text-align: center; padding: 30px; color: #888; }
    .pagination { text-align: center; padding: 16px 0; }
    .pagination button {
      margin: 0 4px; padding: 5px 12px; border: 1px solid #e8e8e8; border-radius: 3px;
      background: #fff; cursor: pointer; font-size: 13px; min-width: 36px; height: 30px;
      line-height: 18px; transition: all .2s; display: inline-block; vertical-align: middle;
    }
    .pagination button:hover:not(:disabled):not(.active) { border-color: #c81623; color: #c81623; }
    .pagination button.active { background: #c81623; color: #fff; border-color: #c81623; cursor: default; }
    .pagination button:disabled { color: #bbb; cursor: not-allowed; }
    .pagination span { display: inline-block; line-height: 30px; margin: 0 4px; color: #888; vertical-align: middle; }
    .stats { font-size: 12px; color: #999; text-align: right; margin-bottom: 8px; }
  </style>
</head>
<body>
<div id="app">
  <div class="container">
    <div class="card">
      <h2 style="margin:0 0 16px;color:#333">商品搜索结果 <span style="font-size:14px;color:#888;font-weight:normal">(模拟Vuex数据流)</span></h2>

      <div class="stats">共 {{ result.total }} 条数据,每页 {{ result.pageSize }} 条,共 {{ totalPage }} 页</div>

      <div v-if="loading" class="loading">加载中...</div>
      <div v-else>
        <div class="list-item" v-for="item in result.list" :key="item.id">
          📦 商品 ID:{{ item.id }} --- {{ item.name }} --- ¥{{ item.price }}
        </div>
      </div>

      <!-- 分页 -->
      <div class="pagination">
        <button :disabled="result.pageNo === 1" @click="changePage(result.pageNo - 1)">上一页</button>
        <button v-show="startAndEnd.start > 1" @click="changePage(1)">1</button>
        <span v-show="startAndEnd.start > 2">···</span>
        <button
          v-for="(_, index) in (startAndEnd.end - startAndEnd.start + 1)"
          :key="startAndEnd.start + index"
          :class="{ active: result.pageNo === startAndEnd.start + index }"
          @click="changePage(startAndEnd.start + index)">
          {{ startAndEnd.start + index }}
        </button>
        <span v-show="totalPage > startAndEnd.end + 1">···</span>
        <button v-show="totalPage > startAndEnd.end" @click="changePage(totalPage)">{{ totalPage }}</button>
        <button :disabled="result.pageNo === totalPage" @click="changePage(result.pageNo + 1)">下一页</button>
        <span>共 {{ result.total }} 条</span>
      </div>
    </div>
  </div>
</div>
<script>
// ===== 模拟服务端数据 =====
function mockSearch({ pageNo, pageSize }) {
  const total = 103
  const start = (pageNo - 1) * pageSize + 1
  const end   = Math.min(pageNo * pageSize, total)
  const list  = []
  for (let i = start; i <= end; i++) {
    list.push({ id: i, name: `商品名称 ${i}`, price: (Math.random() * 1000 + 100).toFixed(2) })
  }
  return new Promise(resolve => setTimeout(() => resolve({ total, pageNo, pageSize, list }), 300))
}

// ===== Vuex Store =====
const store = new Vuex.Store({
  state: {
    searchProductResult: { total: 103, pageNo: 1, pageSize: 5, list: [] }
  },
  mutations: {
    SET_RESULT(state, result) {
      state.searchProductResult = result
    }
  },
  actions: {
    async fetchProducts({ commit }, params) {
      const result = await mockSearch(params)
      commit('SET_RESULT', result)
    }
  }
})

// ===== Vue 实例(模拟 Search 页面组件)=====
new Vue({
  el: '#app',
  store,
  data: {
    loading: false,
    currentPage: 1,  // 模拟 URL query.pageNo
    cont: 5
  },
  computed: {
    result() { return this.$store.state.searchProductResult },
    totalPage() { return Math.ceil(this.result.total / this.result.pageSize) },
    startAndEnd() {
      const { cont, totalPage } = this
      let pageNo = this.result.pageNo
      let start, end
      if (cont >= totalPage) return { start: 1, end: totalPage }
      start = pageNo - Math.floor((cont - 1) / 2)
      end   = pageNo + Math.floor((cont - 1) / 2)
      if (start < 1) { start = 1; end = cont }
      if (end > totalPage) { end = totalPage; start = totalPage - cont + 1 }
      return { start, end }
    }
  },
  methods: {
    async changePage(newPage) {
      if (newPage < 1 || newPage > this.totalPage) return
      if (newPage === this.result.pageNo) return
      // 模拟 $router.push,然后 watch 触发
      this.loading = true
      await this.$store.dispatch('fetchProducts', {
        pageNo: newPage,
        pageSize: this.result.pageSize
      })
      this.loading = false
    }
  },
  async created() {
    // 模拟 watch $route.query immediate:true
    this.loading = true
    await this.$store.dispatch('fetchProducts', { pageNo: 1, pageSize: 5 })
    this.loading = false
  }
})
</script>
</body>
</html>
【代码注释】这个示例展示了分页与 Vuex 的完整整合:
store.state.searchProductResult存储接口返回的分页元数据(pageNo、total、pageSize)和列表数据list,分页组件的props直接绑定 store 数据。mockSearch模拟 300ms 延迟的异步接口,展示loading状态切换。created中的初始请求模拟watch $route.query immediate:true的行为------组件挂载时立即用当前 URL 参数发起第一次请求。startAndEnd作为computed计算属性,result.pageNo变化时自动重算,驱动分页条正确高亮。
市面应用:基于 Vue 的后台管理系统(如 vue-element-admin)、电商前端(京东、考拉海购)的搜索列表页,普遍采用 Vuex + Vue Router + 分页组件三层协作的这套架构。
【实战要点】
- 经典应用场景 :作为全局组件注册(
Vue.component('Pagination', Pagination)),在main.js中一次注册,全项目任意页面的<template>直接写<Pagination>,无需每次 import。 - 常见坑 :在
watch $route.query的 handler 中拼接请求参数时,使用 store 里的旧pageSize而非 URL 中的pageSize,两者不一致时导致分页错乱。推荐统一以 URL query 为准,store 中只存接口返回值,不存用户主动设置的参数。 - 性能与最佳实践 :对于分页数量极大(>100 页)的场景,可在末页省略号位置改为"跳页输入框"(输入页码直接跳转),Element UI 的
el-pagination组件的jumper属性就是这个功能。
【本章小结】
| 关注点 | 推荐做法 |
|---|---|
| 页码状态存储 | URL 查询参数(?pageNo=3),不单独存 Vuex |
| 组件通信 | props down + $emit up,受控组件模式 |
| 全局注册 | Vue.component('Pagination', Pagination) 在 main.js |
| 触发请求时机 | watch $route.query immediate:true,一处监听覆盖所有情况 |
| 搜索条件变更 | 所有 push 均附带 pageNo: 1 |
【面试考点】
Q1:为什么把 pageNo 存在 URL 而不是存在 Vuex state 里?
A:三个理由。(1)刷新恢复:URL 持久化,用户刷新页面 URL 不变,组件挂载时从 URL 读取 pageNo,发起正确页码的请求,Vuex state 刷新后会重置为初始值。(2)浏览器历史:每次翻页调用 $router.push,生成一条历史记录,用户可点击浏览器后退键回到上一页,这是纯 Vuex 方案做不到的。(3)分享链接:复制 URL 发给他人,对方直接看到相同页码的数据。Vuex 适合存"全局共享的非 URL 状态",页码是 URL 驱动的页面状态,应属于路由层面。
总结
知识点回顾(思维导图)
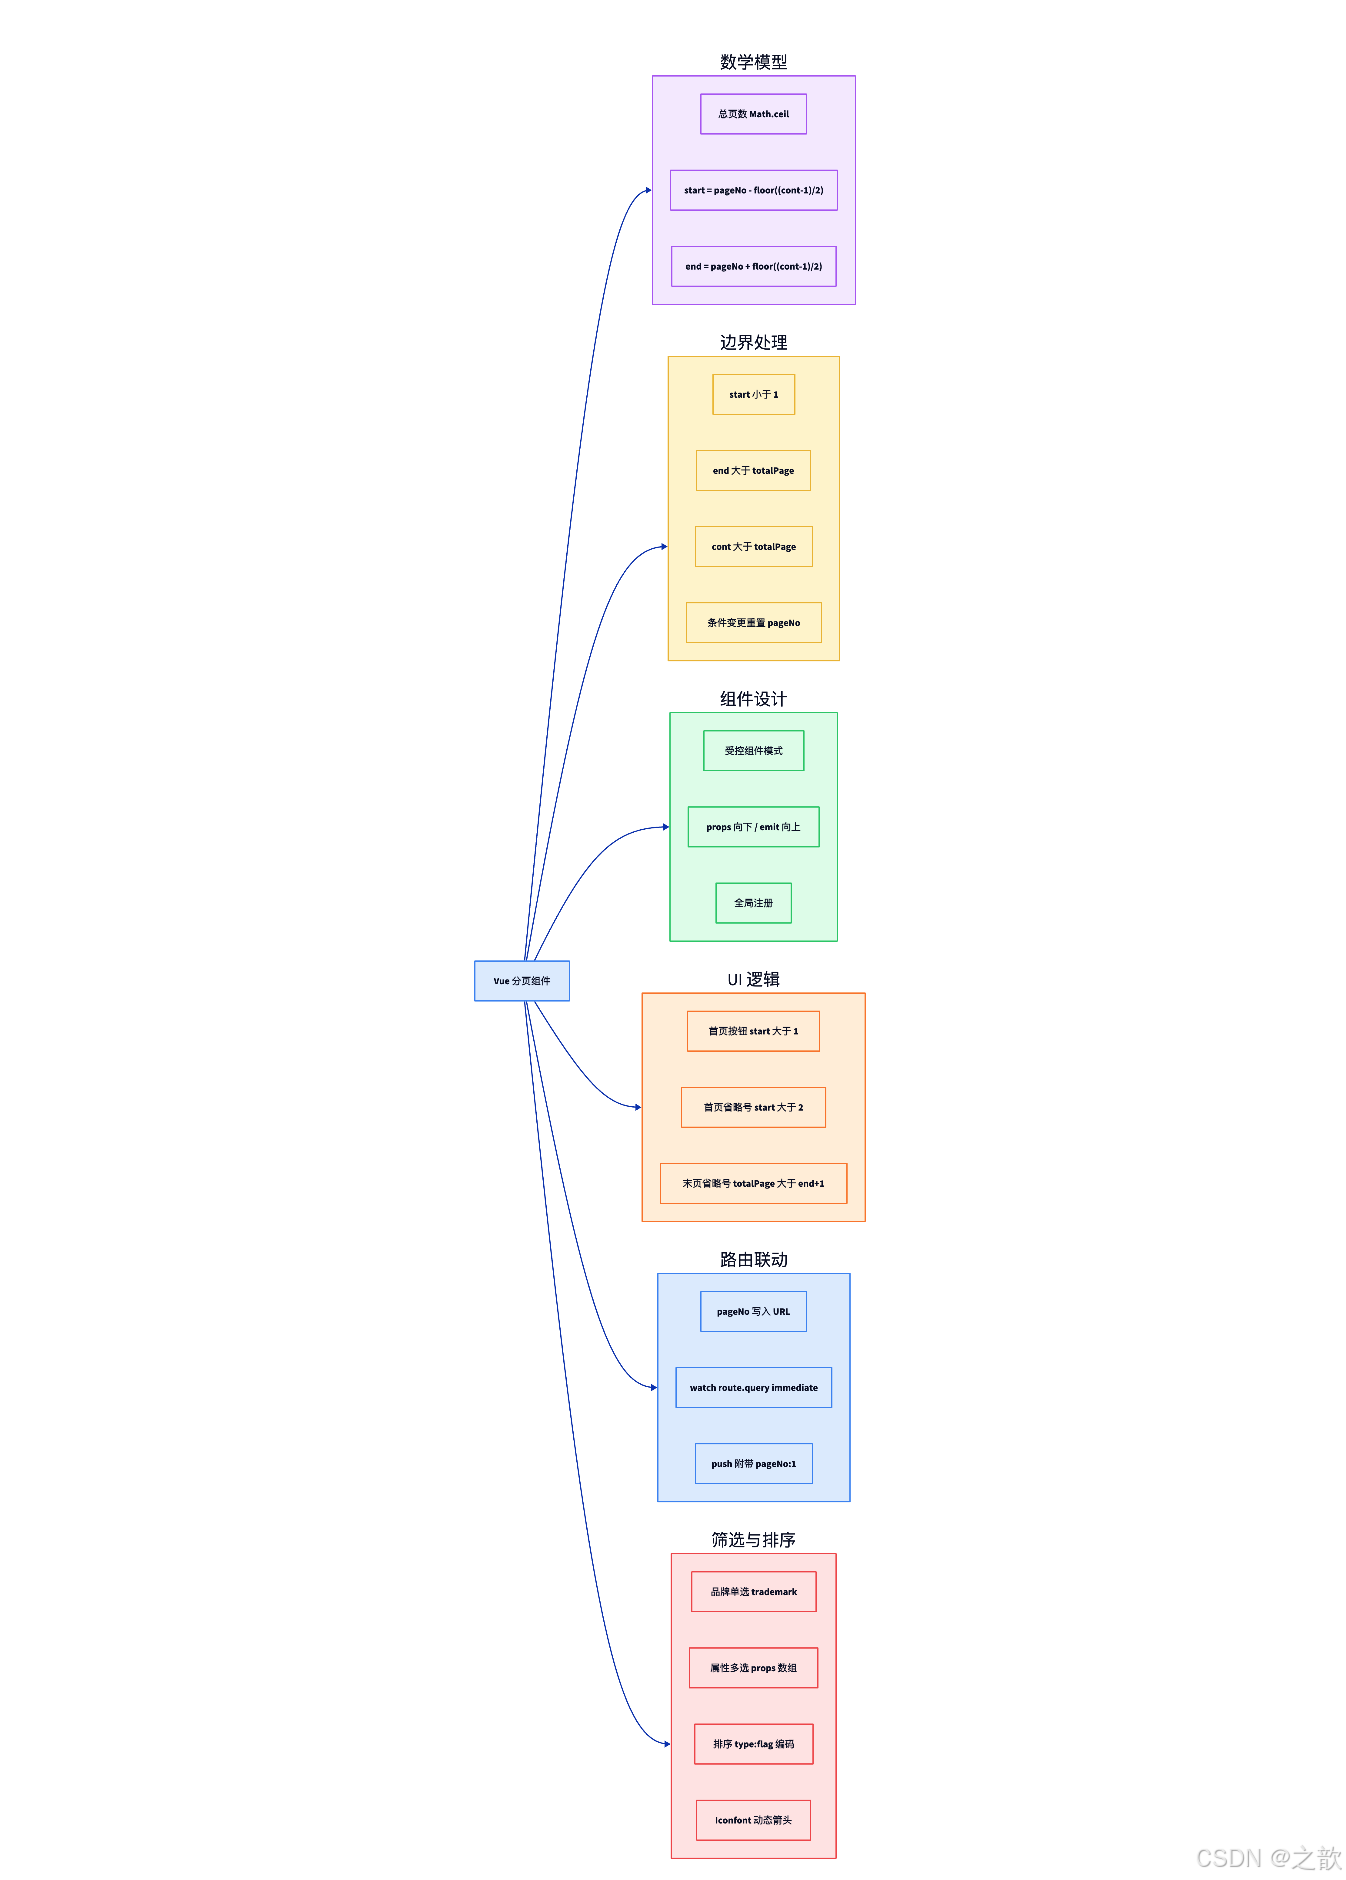
【代码注释】思维导图以蓝色「Vue 分页组件」为中心,向外辐射到六个维度:紫色「数学模型」(总页数与连续页码公式)、黄色「边界处理」(三类越界 + 条件变更重置)、绿色「组件设计」(受控组件 / props 向下 emit 向上 / 全局注册)、橙色「UI 逻辑」(首尾页与省略号显示条件)、蓝色「路由联动」(pageNo 写 URL / watch immediate / push 附带 pageNo:1)、红色「筛选与排序」(品牌单选、属性多选、type:flag 编码、Iconfont 动态箭头)。这六个维度构成了一个完整的电商搜索列表页的技术全景,分页组件是中心,其余功能围绕"搜索参数的增删改查"展开。复习用法:盖住分支只看中心词,能否回忆出每个维度下的关键公式与条件,是检验掌握程度的最快方式。
高频面试题速查
| 题目 | 核心答案要点 |
|---|---|
| 请手写一个分页组件 | props 接收 4 参数 → computed 算总页数和 startAndEnd → 模板渲染首尾页+省略号+连续区域 → 按钮 $emit 上报 |
| 总页数为何用 Math.ceil | 确保末页不满 pageSize 的数据不丢失,Math.floor 会截断 |
| 省略号的显示条件 | 首省略号:start > 2;末省略号:totalPage > end + 1 |
| 三种边界修正 | cont>=total全显;start<1:start=1,end=cont;end>total:end=total,start=total-cont+1 |
| 切换筛选条件为何重置 pageNo | 数据集变化,旧 pageNo 对应的页可能不存在或内容错位 |
| 为何把 pageNo 存 URL | 刷新恢复、浏览器历史、分享链接三大好处 |
| URL 数组参数如何传递 | query: { props: ['a','b'] } → Vue Router 自动展开为 ?props=a&props=b |
| 分页组件的通信模式 | 受控组件:props down(pageNo 等),events up($emit change-page-no) |
| Iconfont 与 SVG 的对比 | Iconfont 单色但 CSS 灵活;SVG 多色但管理复杂 |
| 排序参数为何合并为字符串 | 保证 type 和 flag 原子性更新,避免 URL 中两参数不同步 |
学习建议
-
先动手写一遍:不看代码,从空白 HTML 文件开始,只凭"公式 + 三种边界"写出分页核心逻辑,再对照本文检查,这比阅读 10 遍更有效。
-
用数字验证边界 :拿
total=103, pageSize=5, cont=5为参数,手算pageNo=1, 3, 4, 19, 20, 21时的start和end,验证边界修正是否触发。分页是一道"数学 + 编程"双重题,手算是最快的调试方式。 -
理解"URL 是状态容器":分页、排序、筛选全部以 URL 参数为单一数据源,组件只负责展示和上报事件,不持有业务状态。这是 Vue 与 Vue Router 协作的核心范式,掌握它解决的不只是分页问题。
-
参考优秀实现 :阅读 Element UI Pagination 源码 和 Ant Design Pagination 源码,观察工业级组件如何处理
pager-count(即continue)参数以及更复杂的边界情况。 -
面试准备 :「请手写一个分页组件」是 30 分钟内可以写完的题目,但细节决定成败:
Math.ceilvsMath.floor、省略号的精确条件、$emit而不是修改 props、切换条件时重置 pageNo。把这几个易错点刻意练习两遍,面试时自然流畅。