文章目录
- [Git 分支进阶:分支策略、stash、bugfix 和 feature 开发](#Git 分支进阶:分支策略、stash、bugfix 和 feature 开发)
-
- [一、Fast-forward 模式的问题](#一、Fast-forward 模式的问题)
- [二、使用 --no-ff 保留分支合并记录](#二、使用 --no-ff 保留分支合并记录)
- [三、常见分支策略:master、dev 与临时分支](#三、常见分支策略:master、dev 与临时分支)
- [四、临时修 Bug 前,先用 stash 保存现场](#四、临时修 Bug 前,先用 stash 保存现场)
- [五、使用临时分支修复 Bug](#五、使用临时分支修复 Bug)
- 六、恢复现场并继续开发
- [七、将 Bug 修复同步到开发分支](#七、将 Bug 修复同步到开发分支)
- [八、Feature 分支与未合并分支删除](#八、Feature 分支与未合并分支删除)
- 九、本文总结
Git 分支进阶:分支策略、stash、bugfix 和 feature 开发
上一篇已经把分支的基础操作梳理了一遍,包括创建分支、切换分支、合并分支、删除分支,以及冲突解决。掌握这些命令之后,还需要继续往前走一步:实际开发中应该怎样组织分支,遇到临时 Bug 怎么处理,开发到一半的代码又该怎么临时保存。
这一篇重点整理几个更贴近日常开发的内容:
Fast-forward模式的问题。- 使用
--no-ff保留分支合并记录。 - 常见的
master/dev/临时分支管理方式。 - 使用
git stash保存工作现场。 - 用临时分支修复 Bug。
- 将主分支上的修复同步回开发分支。
- feature 分支开发中止时如何删除未合并分支。
下面还是接着前面的仓库状态继续操作。
一、Fast-forward 模式的问题
通常情况下,合并分支时只要条件允许,Git 会优先采用 Fast-forward 模式,也就是快进合并。
比如 master 分支没有新的提交,而 dev 分支只是在 master 的基础上往前走了几步,那么合并时 Git 不需要额外生成一个合并提交,只要把 master 指针直接移动到 dev 指向的位置即可。
这种方式很快,也很干净:
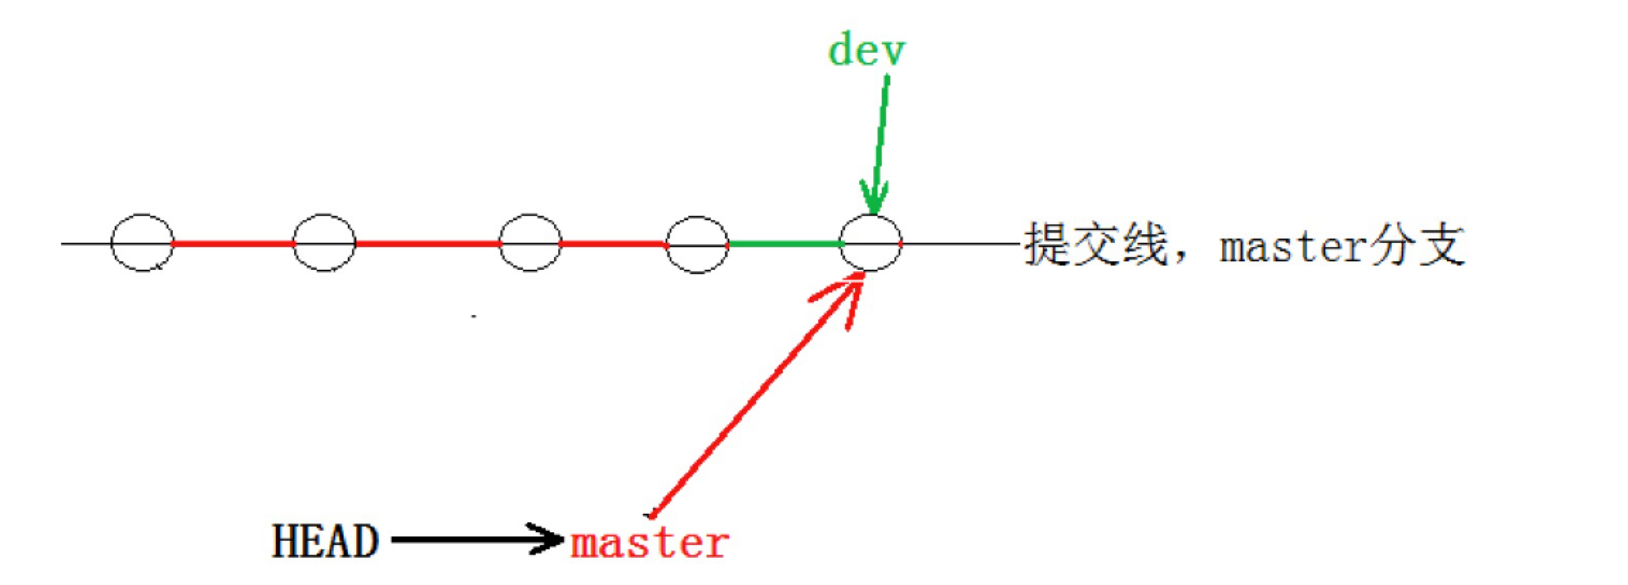
但它也有一个问题:如果合并完成后删除了临时分支,从历史记录里就不容易看出这次提交到底是直接在主分支上做的,还是从某个分支合并进来的。
换句话说,Fast-forward 会让提交历史变成一条直线。直线历史本身没有错,但如果团队希望保留"这个功能曾经在一个独立分支上开发过"的信息,快进合并就不够明显。
对比一下上一篇解决冲突之后的合并历史。因为冲突合并会产生一次新的合并提交,所以历史上能看出分叉与合并:
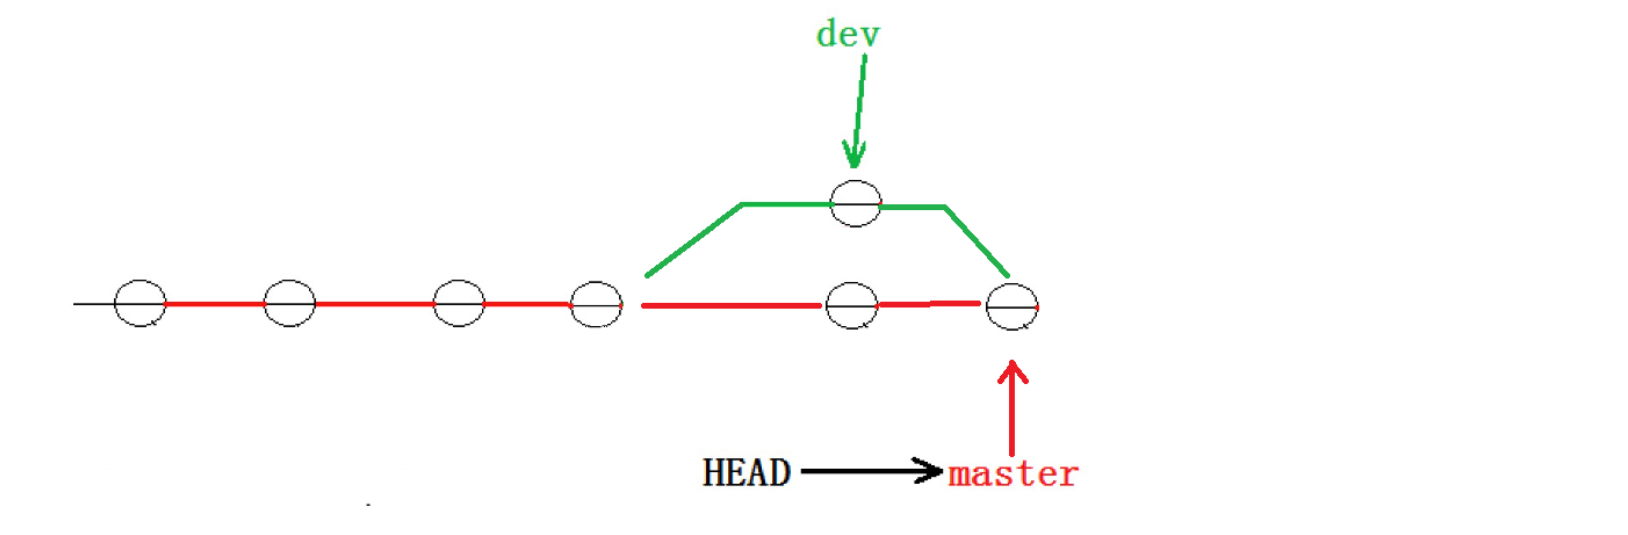
即使后面把 dev1 分支删除,git log --graph 里仍然能看到当时发生过一次分支合并:
cpp
hyb@139-159-150-152:~/gitcode$ git branch
* master

hyb@139-159-150-152:~/gitcode$ git branch -d dev1
Deleted branch dev1 (was c594fd1).

hyb@139-159-150-152:~/gitcode$ git log --graph --pretty=oneline --abbrev-commit
* 2976afc (HEAD -> master) merge ReadMe
|\
| * c594fd1 modify ReadMe
* | c10f6d0 modify ReadMe
|/
这里能看出 master 的最新提交来自一次合并,而不是普通的线性提交。这种历史在回溯问题时更有价值。
二、使用 --no-ff 保留分支合并记录
如果希望即使可以快进,也强制 Git 生成一次合并提交,就可以使用 --no-ff。
--no-ff 的意思是禁用 Fast-forward,让 Git 按普通合并方式处理。这样做的好处是:合并历史里会明确保留一次 merge commit,方便之后知道某个功能分支是什么时候合并进来的。
先创建并切换到一个新的 dev2 分支:
cpp
hyb@139-159-150-152:~/gitcode$ git checkout -b dev2
Switched to a new branch 'dev2'
在 dev2 上修改 ReadMe 并提交:
cpp
hyb@139-159-150-152:~/gitcode$ cat ReadMe
hello bit
hello git
hello world
hello version1
hello version2
hello version3
write bbb for new branch
a,b,c,d

hyb@139-159-150-152:~/gitcode$ git add .
hyb@139-159-150-152:~/gitcode$ git commit -m "modify ReadMe"
[dev2 41b082f] modify ReadMe
然后切回 master,使用 --no-ff 合并:
cpp
hyb@139-159-150-152:~/gitcode$ git checkout master
Switched to branch 'master'

hyb@139-159-150-152:~/gitcode$ git merge --no-ff -m "merge with no-ff" dev2
Merge made by the 'recursive' strategy.
ReadMe | 1 +

hyb@139-159-150-152:~/gitcode$ cat ReadMe
hello bit
hello git
hello world
hello version1
hello version2
hello version3
write bbb for new branch
a,b,c,d
注意这里加了 -m "merge with no-ff"。因为 --no-ff 会生成一次新的合并提交,所以需要写提交说明。
查看提交历史:
cpp
hyb@139-159-150-152:~/gitcode$ git log --graph --pretty=oneline --abbrev-commit
* 5bd16b4 (HEAD -> master) merge with no-ff
|\
| * 41b082f (dev2) modify ReadMe
|/
此时历史结构就很清楚了:
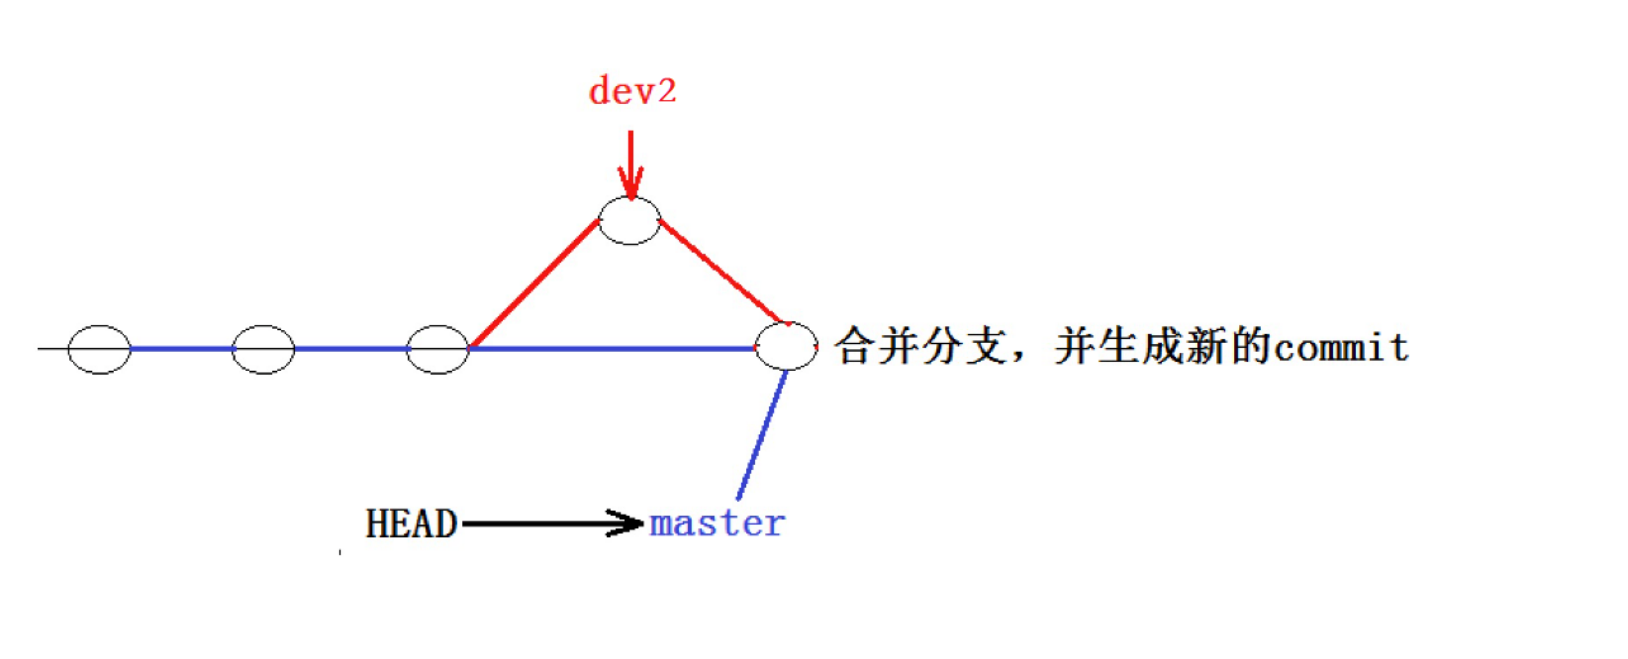
总结一下:
Fast-forward:历史更线性、更简洁,但删除分支后不容易看出分支合并痕迹。--no-ff:会多一次合并提交,但能保留分支开发和合并的轨迹。
实际项目里没有绝对固定的答案。如果是个人小项目,快进合并很清爽;如果是多人协作、功能分支比较多的项目,--no-ff 往往更方便追踪历史。
三、常见分支策略:master、dev 与临时分支
命令学会之后,真正容易出问题的地方反而是:分支到底应该怎么用?
一种常见思路是:
master分支保持稳定,通常只放已经验证过、可以发布的代码。dev分支用于日常开发整合 ,它比master更活跃,也更容易变化。- 每个功能或 Bug 都使用临时分支处理 ,完成后再合并回
dev或master。
这样做的核心目标是:稳定代码和开发中代码分开,公共分支和个人临时修改分开。
比如一个团队里,主分支 master 负责发布版本;开发分支 dev 负责汇总大家正在开发的内容;每个人开发新功能时,再从 dev 上拉出自己的临时分支。等功能完成后,临时分支再合并回 dev。
整体关系大概如下:
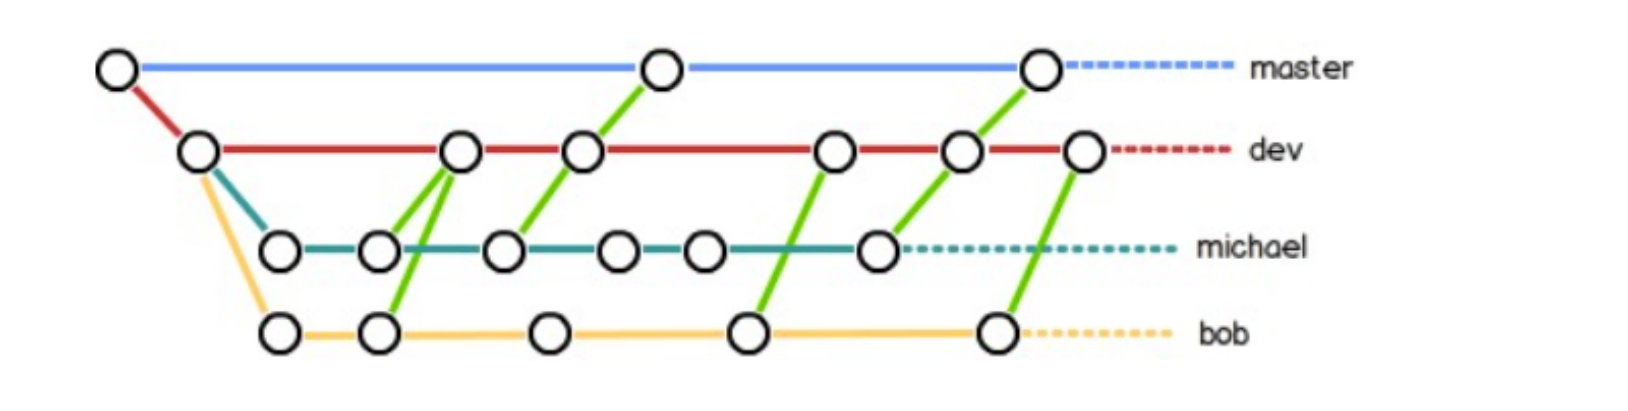
这里先不展开企业级分支模型,后面多人协作部分会更系统地看 feature、release、develop、hotfix 这些分支。当前阶段先记住一句话:不要把所有工作都堆在主分支上,临时任务应该用临时分支承载。
四、临时修 Bug 前,先用 stash 保存现场
实际开发中经常遇到这种场景:我正在 dev2 分支上开发一个功能,代码写到一半,还没到适合提交的程度,突然发现 master 上有一个紧急 Bug 需要马上修。
这时会有一个尴尬点:当前工作区有未提交修改,直接切分支可能不方便;强行提交半成品代码也不好,因为这个提交本身并不完整。
比如当前 dev2 分支上有未提交内容:
cpp
hyb@139-159-150-152:~/gitcode$ git branch
* dev2
    master

hyb@139-159-150-152:~/gitcode$ cat ReadMe
hello bit
hello git
hello world
hello version1
hello version2
hello version3
write bbb for new branch
a,b,c,d
i am coding ...

hyb@139-159-150-152:~/gitcode$ git status
On branch dev2
Changes not staged for commit:
    (use "git add <file>..." to update what will be committed)
    (use "git restore <file>..." to discard changes in working directory)
        modified: ReadMe

no changes added to commit (use "git add" and/or "git commit -a")
这时可以使用 git stash 暂存当前工作现场:
cpp
hyb@139-159-150-152:~/gitcode$ git stash
Saved working directory and index state WIP on dev2: 41b082f modify ReadMe

hyb@139-159-150-152:~/gitcode$ git status
On branch dev2
nothing to commit, working tree clean
git stash 可以把当前工作区和暂存区的修改临时保存起来,让工作区恢复干净。这样就可以放心切换分支去处理别的事情。
注意,stash 适合保存"还不适合作为一次提交"的临时现场。它不是用来替代正常提交的。真正完成的功能还是应该用 commit 固化下来。
五、使用临时分支修复 Bug
现场保存好之后,就可以回到 master,从 master 创建一个专门修 Bug 的分支。
cpp
hyb@139-159-150-152:~/gitcode$ git checkout master
Switched to branch 'master'

hyb@139-159-150-152:~/gitcode$ git checkout -b fix_bug
Switched to a new branch 'fix_bug'
在 fix_bug 分支上修复问题并提交:
cpp
hyb@139-159-150-152:~/gitcode$ vim ReadMe

hyb@139-159-150-152:~/gitcode$ cat ReadMe
hello bit
hello git
hello world
hello version1
hello version2
hello version3
write bbb for new branch
a,b,c,d,e

hyb@139-159-150-152:~/gitcode$ git add ReadMe
hyb@139-159-150-152:~/gitcode$ git commit -m "fix bug"
[fix_bug 4bbc0c4] fix bug
修复完成后,切回 master,把 fix_bug 合并进去,然后删除临时分支:
cpp
hyb@139-159-150-152:~/gitcode$ git checkout master
Switched to branch 'master'

hyb@139-159-150-152:~/gitcode$ git merge --no-ff -m "merge fix_bug branch" fix_bug
Merge made by the 'recursive' strategy.
ReadMe | 2 +-

hyb@139-159-150-152:~/gitcode$ cat ReadMe
hello bit
hello git
hello world
hello version1
hello version2
hello version3
write bbb for new branch
a,b,c,d,e

hyb@139-159-150-152:~/gitcode$ git branch -d fix_bug
Deleted branch fix_bug (was 4bbc0c4).
这套流程的好处是很清晰:
- 未完成的新功能仍然放在原来的开发分支。
- 紧急 Bug 在独立分支修复。
- 修复完成后合并回稳定分支。
- 临时分支完成使命后删除。
六、恢复现场并继续开发
Bug 修复完成后,还要回到 dev2 继续刚才没写完的功能。
cpp
hyb@139-159-150-152:~/gitcode$ git checkout dev2
Switched to branch 'dev2'

hyb@139-159-150-152:~/gitcode$ git status
On branch dev2
nothing to commit, working tree clean
此时工作区是干净的,因为刚才未完成的内容被 stash 保存起来了。可以先查看保存列表:
cpp
hyb@139-159-150-152:~/gitcode$ git stash list
stash@{0}: WIP on dev2: 41b082f modify ReadMe
使用 git stash pop 恢复现场:
cpp
hyb@139-159-150-152:~/gitcode$ git stash pop
On branch dev2
Changes not staged for commit:
    (use "git add <file>..." to update what will be committed)
    (use "git restore <file>..." to discard changes in working directory)
        modified: ReadMe

no changes added to commit (use "git add" and/or "git commit -a")
Dropped refs/stash@{0} (4f873250b3503687b5efd26196776aee7e3724c2)
pop 的含义是:恢复现场,并把这条 stash 记录删除。
再次查看 stash 列表,已经没有可恢复内容:
cpp
hyb@139-159-150-152:~/gitcode$ git stash list
hyb@139-159-150-152:~/gitcode$
还有另一种恢复方式:
cpp
git stash apply stash@{0}apply 只恢复,不删除 stash 记录。如果确认不需要这条记录了,可以再手动删除:
cpp
git stash drop stash@{0}简单区分一下:
git stash pop:恢复并删除,适合最常见的临时保存场景。git stash apply:只恢复不删除,适合想多次尝试恢复的场景。git stash drop:删除指定 stash 记录。git stash list:查看当前保存过的工作现场。
恢复现场后,继续完成开发并提交:
cpp
hyb@139-159-150-152:~/gitcode$ cat ReadMe
hello bit
hello git
hello world
hello version1
hello version2
hello version3
write bbb for new branch
a,b,c,d
i am coding ... Done!

hyb@139-159-150-152:~/gitcode$ git add .
hyb@139-159-150-152:~/gitcode$ git commit -m "modify ReadMe"
[dev2 ed0916d] modify ReadMe到这里,dev2 上的新功能也继续完成了。
七、将 Bug 修复同步到开发分支
现在还有一个问题:刚才 Bug 是在 master 上修好的,而 dev2 是之前从旧的 master 拉出来的,所以 dev2 上并没有这个 Bug 修复。
当前状态可以理解为:
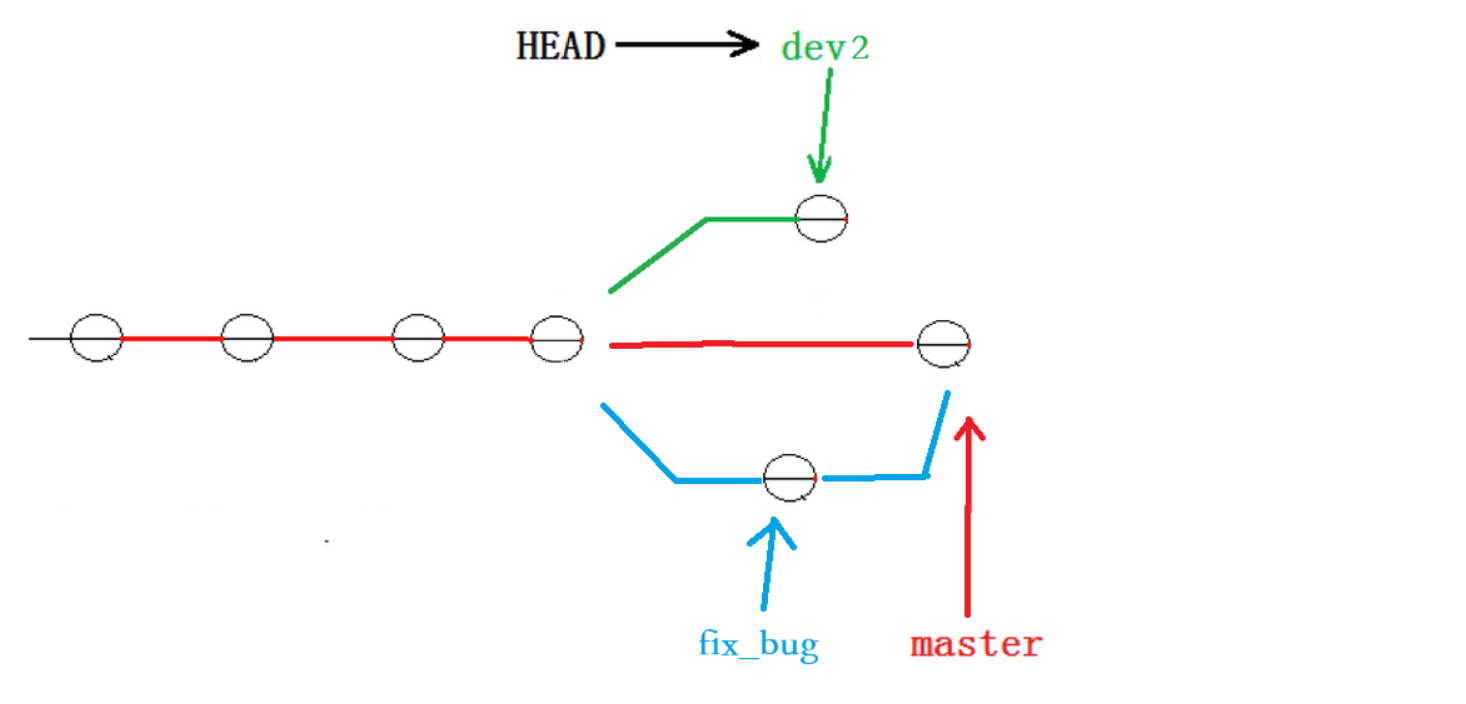
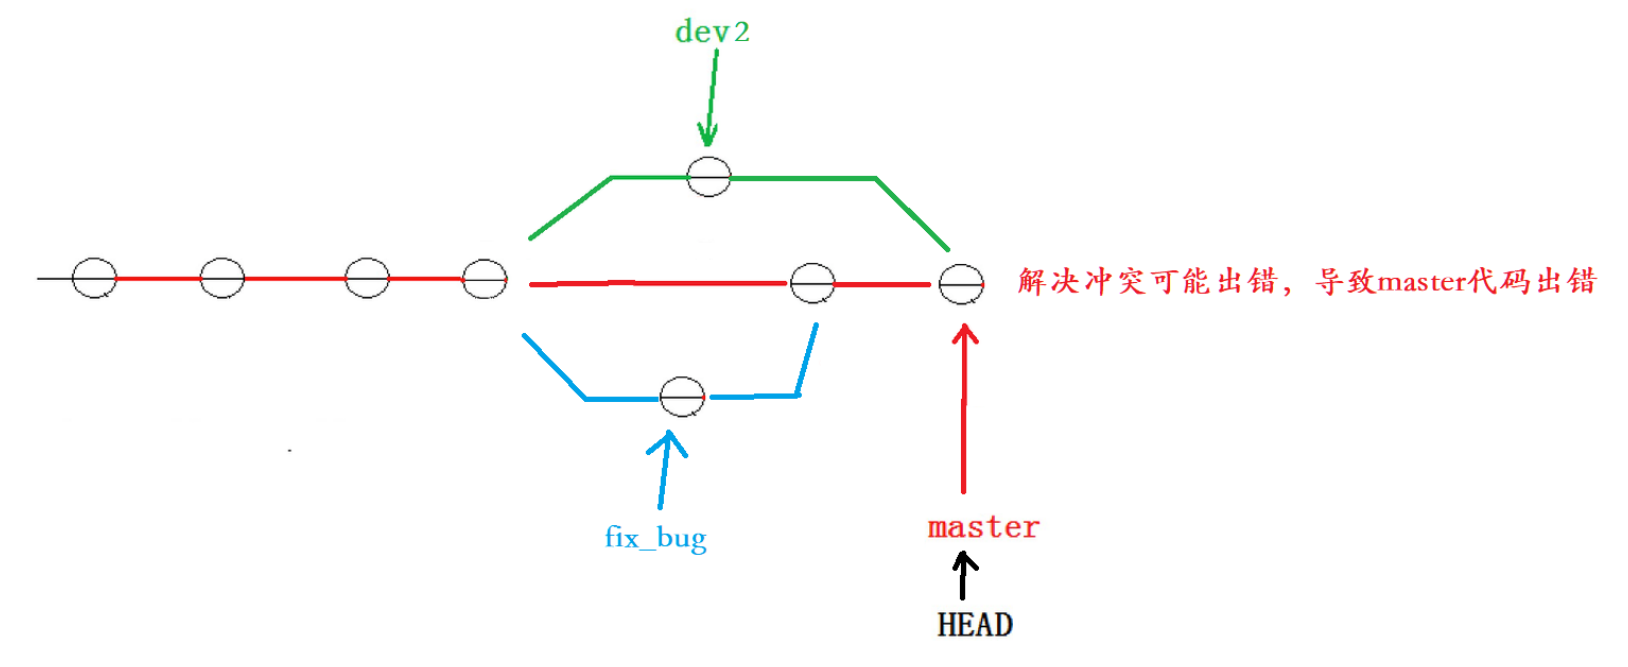
如果最后直接切到 master 合并 dev2,有可能在 master 上遇到冲突。对于重要分支来说,这不是一个好习惯。更推荐的做法是:先在自己的开发分支上合并最新的 master,如果有冲突就在开发分支解决并测试,确认没问题后,再让 master 合并开发分支。
这样可以把风险留在开发分支上,而不是把冲突处理过程直接放到稳定分支上。
直接在 master 上合并开发分支,风险大概是这样:
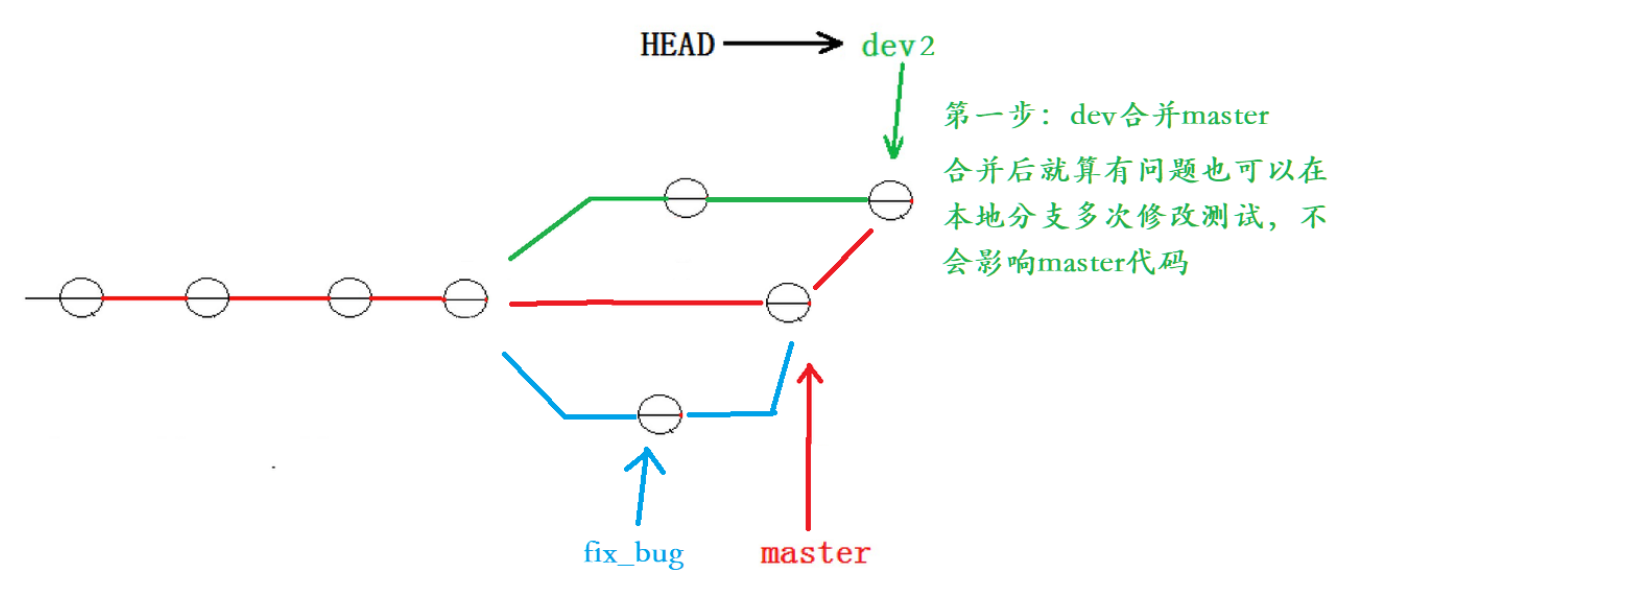
更推荐的流程是先让 dev2 吸收 master 的最新修复:
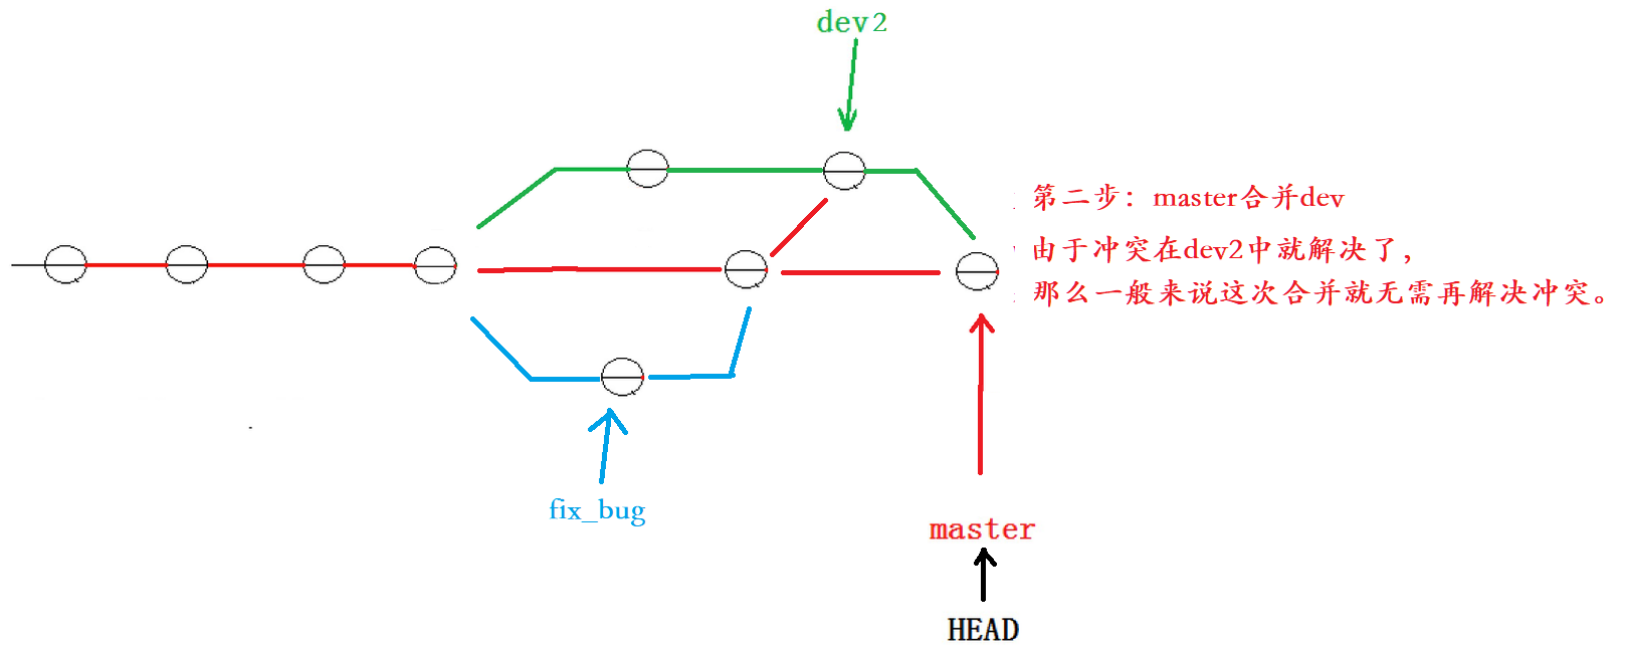
开发分支解决冲突并测试后,再合并回 master:
对应操作如下。当前在 dev2 上,先合并 master:
cpp
hyb@139-159-150-152:~/gitcode$ git branch
* dev2
    master

hyb@139-159-150-152:~/gitcode$ git merge master
Auto-merging ReadMe
CONFLICT (content): Merge conflict in ReadMe
Automatic merge failed; fix conflicts and then commit the result.
出现冲突后查看文件:
cpp
hyb@139-159-150-152:~/gitcode$ cat ReadMe
hello bit
hello git
hello world
hello version1
hello version2
hello version3
write bbb for new branch
<<<<<<< HEAD
a,b,c,d
i am coding ... Done!
=======
a,b,c,d,e
>>>>>>> master
这里的含义是:
HEAD部分是当前dev2分支上的内容。master部分是主分支中修复 Bug 后的内容。- 最终文件应该同时保留 Bug 修复和
dev2上的新功能内容。
手动整理后的文件如下:
cpp
hyb@139-159-150-152:~/gitcode$ vim ReadMe

hyb@139-159-150-152:~/gitcode$ cat ReadMe
hello bit
hello git
hello world
hello version1
hello version2
hello version3
write bbb for new branch
a,b,c,d,e
i am coding ... Done!

hyb@139-159-150-152:~/gitcode$ git add .
hyb@139-159-150-152:~/gitcode$ git commit -m "merge master"
[dev2 447d29f] merge master

hyb@139-159-150-152:~/gitcode$ git status
On branch dev2
nothing to commit, working tree clean
此时 dev2 已经包含 master 上的 Bug 修复,也包含自己的新功能。确认测试没有问题后,再切回 master 合并 dev2:
cpp
hyb@139-159-150-152:~/gitcode$ git checkout master
Switched to branch 'master'

hyb@139-159-150-152:~/gitcode$ git merge dev2
Updating 193421f..447d29f
Fast-forward
ReadMe | 1 +

hyb@139-159-150-152:~/gitcode$ git status
On branch master
nothing to commit, working tree clean
这时 master 合并 dev2 就很顺利了,因为冲突已经在 dev2 上处理过。
最后删除 dev2:
cpp
hyb@139-159-150-152:~/gitcode$ git branch -d dev2
Deleted branch dev2 (was 447d29f).这个流程在多人协作中很重要:不要把冲突解决和验证工作直接压到稳定分支上,先在自己的分支上同步主分支并解决问题,会稳很多。
八、Feature 分支与未合并分支删除
新功能开发时,通常会创建一个独立的 feature 分支。比如要开发一个新需求,就从当前开发分支拉出一个临时分支,在里面开发、提交、测试,完成后再合并。
这类分支的价值是:把一个功能相关的改动集中在一起,不干扰其他分支。
不过实际开发里也会遇到功能中止的情况。比如某个新功能做到一半,需求突然取消了,这个 feature 分支就不需要继续保留。如果这个分支上的提交还没有合并到主线,普通删除会失败。
先创建一个 dev3 分支模拟新功能开发:
cpp
hyb@139-159-150-152:~/gitcode$ git checkout -b dev3
Switched to a new branch 'dev3'
在 dev3 上开发并提交:
cpp
hyb@139-159-150-152:~/gitcode$ vim ReadMe

hyb@139-159-150-152:~/gitcode$ cat ReadMe
hello bit
hello git
hello world
hello version1
hello version2
hello version3
write bbb for new branch
a,b,c,d,e
i am coding ... Done!
i am writing new features ...

hyb@139-159-150-152:~/gitcode$ git add .
hyb@139-159-150-152:~/gitcode$ git commit -m "modify ReadMe for new features"
[dev3 cd2f149] modify ReadMe for new features
现在假设这个功能停止开发,切回 master 准备删除 dev3:
cpp
hyb@139-159-150-152:~/gitcode$ git checkout master
Switched to branch 'master'
使用普通删除:
cpp
hyb@139-159-150-152:~/gitcode$ git branch -d dev3
error: The branch 'dev3' is not fully merged.
If you are sure you want to delete it, run 'git branch -D dev3'.
Git 阻止删除,是因为 dev3 上有提交还没有合并。如果直接删除,这些提交就会变得很难再找回来。这个保护非常有用,可以避免误删有价值的分支。
但如果确认这个功能确实不要了,可以强制删除:
cpp
hyb@139-159-150-152:~/gitcode$ git branch -D dev3
Deleted branch dev3 (was cd2f149).

hyb@139-159-150-152:~/gitcode$ git branch
* master
这里要区分两个命令:
git branch -d 分支名:安全删除。分支已经合并时才允许删除。git branch -D 分支名:强制删除。即使分支没有合并,也会删除。
所以,-D 不要随手用。它适合"明确废弃"的实验分支或需求取消分支,不适合不加确认地清理分支。
九、本文总结
Fast-forward合并会让历史保持线性,但删除分支后不容易看出分支合并痕迹。git merge --no-ff -m "说明" 分支名可以强制生成合并提交,保留分支合并历史。- 常见分支策略里,
master保持稳定,dev承载日常开发,临时分支负责具体功能或 Bug。 - 开发到一半需要切走时,可以用
git stash保存现场,让工作区恢复干净。 git stash pop会恢复并删除 stash 记录,git stash apply只恢复不删除。- 修复紧急 Bug 时,可以从稳定分支创建
fix_bug临时分支,修复后合并回去并删除。 - 主分支有新修复后,建议先在自己的开发分支合并主分支,解决冲突并测试,再合并回主分支。
- feature 分支适合承载独立功能开发,功能完成后合并,功能取消后可以按情况删除。
git branch -d是安全删除,git branch -D是强制删除,后者要谨慎使用。
到这里,分支已经不只是几个命令了,而是逐渐变成一种开发组织方式。后面继续看远程仓库时,分支会和 clone、push、pull、远程分支一起出现,使用场景会更接近真实团队协作。