文章目录
-
- 每日一句正能量
- [一、引言:为什么需要 Skills 机制](#一、引言:为什么需要 Skills 机制)
-
- [1.1 Skills 机制的核心价值](#1.1 Skills 机制的核心价值)
- [1.2 Skills 与 MCP 的关系](#1.2 Skills 与 MCP 的关系)
- [二、Skills 机制原理与 SKILL.md 规范](#二、Skills 机制原理与 SKILL.md 规范)
- [三、第一个 Skill:天气查询插件开发](#三、第一个 Skill:天气查询插件开发)
- 四、参数定义与类型约束
-
- [4.1 支持的参数类型](#4.1 支持的参数类型)
- [4.2 高级参数定义示例](#4.2 高级参数定义示例)
- [4.3 参数校验流程](#4.3 参数校验流程)
- 五、执行逻辑实现与错误处理
-
- [5.1 错误处理机制](#5.1 错误处理机制)
- [5.2 错误类型与处理策略](#5.2 错误类型与处理策略)
- [5.3 执行脚本中的错误处理最佳实践](#5.3 执行脚本中的错误处理最佳实践)
- [六、Skill 的打包与分发](#六、Skill 的打包与分发)
-
- [6.1 打包 Skill](#6.1 打包 Skill)
- [6.2 发布到 AtomGit Skills 市场](#6.2 发布到 AtomGit Skills 市场)
- [6.3 用户安装 Skill](#6.3 用户安装 Skill)
- [6.4 版本管理](#6.4 版本管理)
- [七、与 MCP 的协同使用](#七、与 MCP 的协同使用)
-
- [7.1 Skills 与 MCP 协同架构](#7.1 Skills 与 MCP 协同架构)
- [7.2 模式一:Skill 调用 MCP Tool](#7.2 模式一:Skill 调用 MCP Tool)
- [7.3 模式二:MCP 调用 Skill](#7.3 模式二:MCP 调用 Skill)
- [7.4 模式三:混合架构](#7.4 模式三:混合架构)
- [八、高级 Skill 开发技巧](#八、高级 Skill 开发技巧)
-
- [8.1 多语言支持](#8.1 多语言支持)
- [8.2 上下文记忆](#8.2 上下文记忆)
- [8.3 条件执行](#8.3 条件执行)
- 九、完整工作流与最佳实践
-
- [9.1 Skill 开发清单](#9.1 Skill 开发清单)
- [9.2 性能优化建议](#9.2 性能优化建议)
- 十、总结与展望

每日一句正能量
"人生无法倒序,却可以从此刻清醒。"
时间不可逆,后悔无用。但"清醒"是一种可以随时启动的能力------停止幻想"如果当初",停止抱怨过去,把注意力拉回到当下这一刻的选择。此刻的清醒,就是对未来唯一的改写方式。
一、引言:为什么需要 Skills 机制
在 AI 编程助手日益普及的今天,如何让 AI 工具更好地理解开发者的意图、执行特定任务,成为提升开发效率的关键。AtomCode 作为 AtomGit 平台的核心 AI 代码生成引擎,引入了 Skills(技能) 机制,允许开发者通过简单的声明式配置,为 AI 扩展自定义能力。
1.1 Skills 机制的核心价值
| 痛点 | 传统方案 | Skills 方案 |
|---|---|---|
| AI 能力固定 | 只能使用预置功能 | 按需加载自定义 Skill |
| 上下文理解差 | 每次需重复描述需求 | SKILL.md 预定义上下文 |
| 复用困难 | 提示词散落在各处 | 结构化打包分发 |
| 协作成本高 | 团队成员用法不一致 | 标准化 Skill 共享 |
| 扩展门槛高 | 需修改核心代码 | 零代码/低代码扩展 |
1.2 Skills 与 MCP 的关系
Skills 和 MCP(Model Context Protocol)是当前 AI 工具扩展能力的两大主流方案 :
| 维度 | AtomCode Skills | MCP |
|---|---|---|
| 触发方式 | 斜杠命令 /command |
自然语言 / 工具调用 |
| 配置方式 | SKILL.md 声明式 | JSON Schema + 代码 |
| 运行环境 | AtomCode 进程内 | 独立进程(STDIO/SSE) |
| 开发成本 | 低(Markdown + 脚本) | 中(需实现协议) |
| 适用场景 | 快速扩展、个人/团队 | 企业集成、跨平台 |
| 生态兼容 | AtomCode 专属 | 多平台通用(Claude/Cursor 等) |
最佳实践:Skills 作为轻量级快速扩展入口,复杂场景通过 Skills 调用 MCP Server 实现 。
二、Skills 机制原理与 SKILL.md 规范
2.1 Skills 架构概览
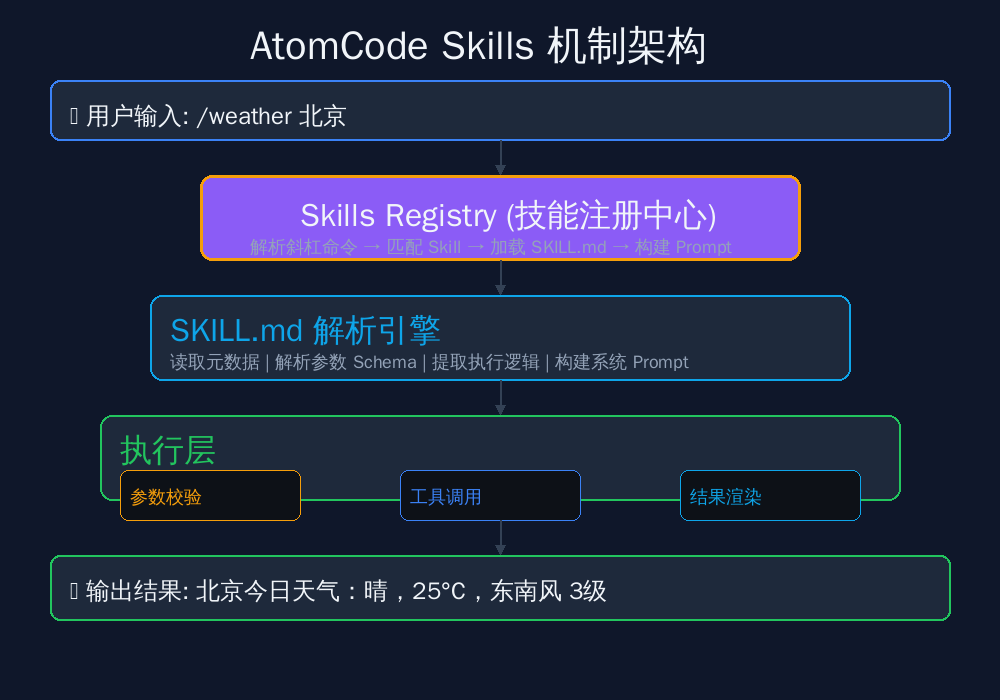
Skills 的工作流程如下:
- 用户输入 :输入斜杠命令,如
/weather 北京 - 命令解析:AtomCode 解析命令名和参数
- Skill 匹配:在 Skills Registry 中查找匹配的 Skill
- SKILL.md 加载:读取 Skill 的元数据、参数定义和执行逻辑
- Prompt 构建:将 SKILL.md 中的系统 Prompt 与用户输入组合
- 执行调用:调用 LLM 或本地脚本执行逻辑
- 结果返回:格式化输出给用户
2.2 SKILL.md 规范详解
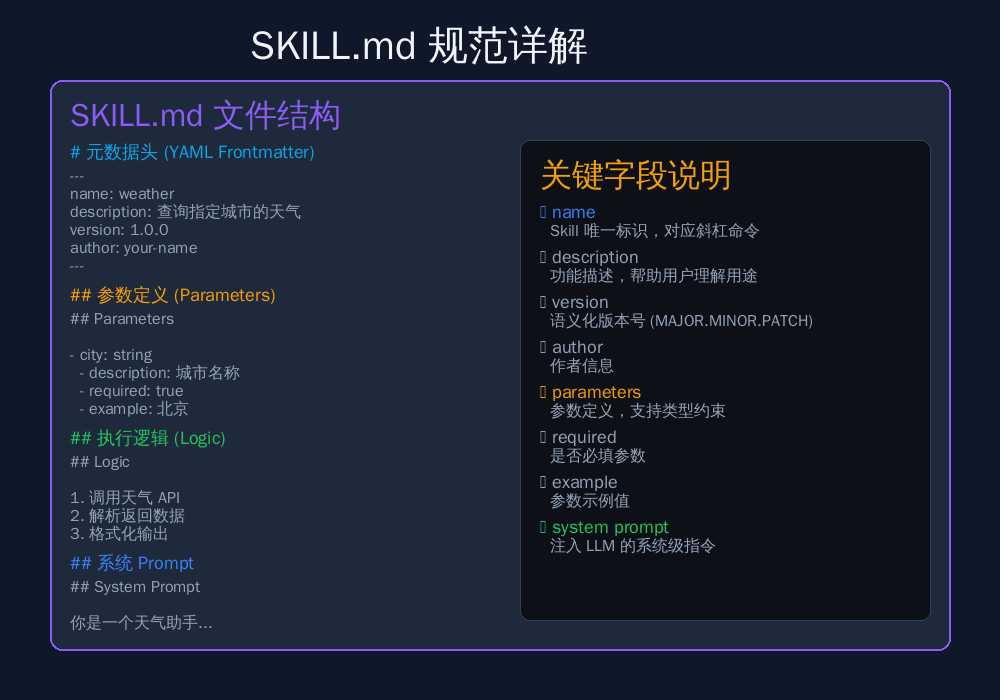
SKILL.md 是 Skills 的核心配置文件,采用 Markdown 格式,包含以下关键部分:
markdown
---
name: weather
description: 查询指定城市的实时天气和天气预报
version: 1.0.0
author: your-name
tags: [weather, tool, api]
---

## Parameters

- city: string
  - description: 要查询天气的城市名称
  - required: true
  - example: 北京
  - minLength: 2
  - maxLength: 50

- days: number
  - description: 预报天数(1-7天)
  - required: false
  - default: 3
  - minimum: 1
  - maximum: 7

- unit: enum
  - description: 温度单位
  - values: [celsius, fahrenheit]
  - default: celsius

## Logic

1. 调用天气 API 获取数据
2. 解析返回的 JSON 数据
3. 格式化输出天气信息

## System Prompt

你是一个专业的天气助手。当用户查询天气时,你需要:
1. 确认城市名称的准确性
2. 提供当前天气状况(温度、湿度、风向等)
3. 提供未来几天的天气预报
4. 给出适当的穿衣和出行建议

输出格式:
🌤️ {城市} 天气
━━━━━━━━━━━━━━
📅 日期: {日期}
🌡️ 温度: {温度}°C
💧 湿度: {湿度}%
🌬️ 风向: {风向} {风力}级
👀 能见度: {能见度}km

💡 建议: {出行建议}
2.3 关键字段说明
| 字段 | 类型 | 必填 | 说明 |
|---|---|---|---|
name |
string | ✅ | Skill 唯一标识,对应斜杠命令名 |
description |
string | ✅ | 功能描述,帮助用户理解用途 |
version |
string | ✅ | 语义化版本号(MAJOR.MINOR.PATCH) |
author |
string | ❌ | 作者信息 |
tags |
array | ❌ | 标签,用于分类和搜索 |
parameters |
object | ❌ | 参数定义列表 |
logic |
string | ❌ | 执行逻辑描述 |
system prompt |
string | ❌ | 注入 LLM 的系统级指令 |
三、第一个 Skill:天气查询插件开发
3.1 开发全流程
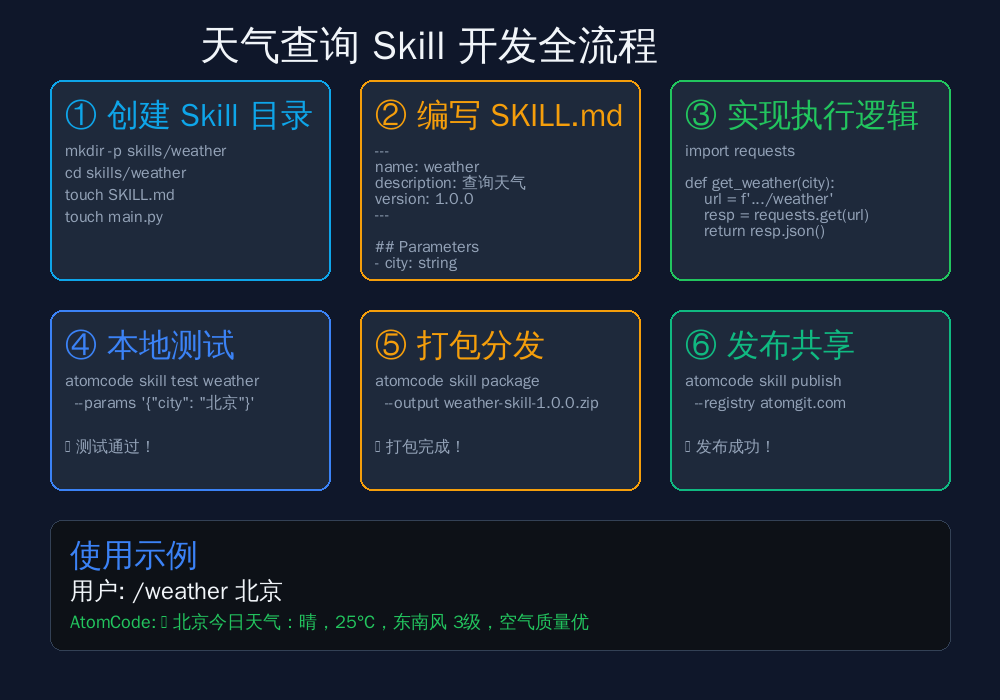
3.2 步骤一:创建 Skill 目录结构
bash
# 创建 Skill 目录
mkdir -p ~/.atomcode/skills/weather
cd ~/.atomcode/skills/weather

# 目录结构
# weather/
# ├── SKILL.md          # Skill 配置文件
# ├── main.py           # 执行脚本(可选)
# └── README.md         # 说明文档
3.3 步骤二:编写 SKILL.md
markdown
---
name: weather
description: 查询指定城市的实时天气和未来天气预报,支持国内外主要城市
version: 1.0.0
author: atomcode-user
tags: [weather, api, tool, daily]
---

## Parameters

- city: string
  - description: 要查询天气的城市名称,支持中文和英文
  - required: true
  - example: 北京
  - minLength: 2
  - maxLength: 50
  - pattern: '^[\u4e00-\u9fa5a-zA-Z\s]+$'

- days: number
  - description: 预报天数,范围 1-7 天
  - required: false
  - default: 3
  - minimum: 1
  - maximum: 7

- unit: enum
  - description: 温度显示单位
  - values: [celsius, fahrenheit]
  - default: celsius

- detail: boolean
  - description: 是否显示详细天气信息(湿度、气压、能见度等)
  - required: false
  - default: false

## Logic

1. 接收用户输入的城市名称
2. 调用天气 API(和风天气 / OpenWeatherMap)
3. 解析返回的 JSON 数据
4. 根据参数格式化输出
5. 提供穿衣和出行建议

## System Prompt

你是 AtomCode 天气助手,专门为用户提供准确的天气查询服务。

## 工作原则:
1. **准确性**:确保城市名称正确,必要时询问用户确认
2. **完整性**:提供当前天气 + 未来预报 + 生活建议
3. **友好性**:使用 emoji 和清晰的格式呈现信息

## 输出格式规范:

🌤️ {城市} 天气预报
━━━━━━━━━━━━━━━━━━━━━━

📍 当前天气
   天气状况: {状况}
   温度: {温度}°{单位}
   体感温度: {体感}°{单位}
   湿度: {湿度}%
   风向: {风向} {风力}级
   空气质量: {AQI} ({等级})

📅 未来 {天数} 天预报
   {日期} | {天气} | {最高}° / {最低}°

💡 生活建议
   👕 穿衣: {建议}
   🚗 出行: {建议}
   🏃 运动: {建议}
   🌂 带伞: {建议}

如果 API 调用失败,请礼貌地告知用户可能的原因,并提供备用建议。
3.4 步骤三:实现执行脚本(可选)
对于需要调用外部 API 的 Skill,可以编写执行脚本:
python
#!/usr/bin/env python3
# weather/main.py
# AtomCode Skill 执行脚本

import sys
import json
import urllib.request
import urllib.parse
from datetime import datetime

# 和风天气 API Key(实际使用时应从环境变量读取)
API_KEY = "${WEATHER_API_KEY}"
BASE_URL = "https://devapi.qweather.com/v7"

def get_location_id(city: str) -> str:
    """根据城市名称获取 Location ID"""
    encoded_city = urllib.parse.quote(city)
    url = f"https://geoapi.qweather.com/v2/city/lookup?location={encoded_city}&key={API_KEY}"

    try:
        with urllib.request.urlopen(url, timeout=10) as response:
            data = json.loads(response.read().decode('utf-8'))
            if data.get("code") == "200" and data.get("location"):
                return data["location"][0]["id"]
            return None
    except Exception as e:
        print(json.dumps({"error": f"获取城市信息失败: {str(e)}"}), file=sys.stderr)
        sys.exit(1)

def get_current_weather(location_id: str) -> dict:
    """获取实时天气"""
    url = f"{BASE_URL}/weather/now?location={location_id}&key={API_KEY}"

    try:
        with urllib.request.urlopen(url, timeout=10) as response:
            data = json.loads(response.read().decode('utf-8'))
            return data.get("now", {})
    except Exception as e:
        print(json.dumps({"error": f"获取天气失败: {str(e)}"}), file=sys.stderr)
        sys.exit(1)

def get_forecast(location_id: str, days: int = 3) -> list:
    """获取天气预报"""
    url = f"{BASE_URL}/weather/{days}d?location={location_id}&key={API_KEY}"

    try:
        with urllib.request.urlopen(url, timeout=10) as response:
            data = json.loads(response.read().decode('utf-8'))
            return data.get("daily", [])[:days]
    except Exception as e:
        return []

def format_output(city: str, current: dict, forecast: list, unit: str = "celsius", detail: bool = False) -> str:
    """格式化天气输出"""

    # 温度单位转换
    temp_suffix = "C" if unit == "celsius" else "F"

    # 天气图标映射
    icon_map = {
        "100": "☀️", "101": "🌤️", "102": "⛅", "103": "☁️",
        "104": "☁️", "150": "🌙", "151": "🌙", "152": "🌙",
        "300": "🌦️", "301": "🌧️", "302": "⛈️", "303": "⛈️",
        "304": "🌨️", "305": "🌧️", "306": "🌧️", "307": "🌧️",
        "400": "🌨️", "401": "🌨️", "402": "❄️", "403": "❄️",
    }
    icon = icon_map.get(current.get("icon", "100"), "🌡️")\n    \n    output = f\"\"\"\n{icon} {city} 天气预报\n━━━━━━━━━━━━━━━━━━━━━━\n\n📍 当前天气\n   天气状况: {current.get('text', '未知')}\n   温度: {current.get('temp', '--')}°{temp_suffix}\n   体感温度: {current.get('feelsLike', '--')}°{temp_suffix}\n   湿度: {current.get('humidity', '--')}%\n   风向: {current.get('windDir', '未知')} {current.get('windScale', '--')}级\n\"\"\"\n    \n    if detail:\n        output += f\"\"\"   气压: {current.get('pressure', '--')} hPa\n   能见度: {current.get('vis', '--')} km\n   云量: {current.get('cloud', '--')}%\n\"\"\"\n    \n    if forecast:\n        output += f\"\\n📅 未来 {len(forecast)} 天预报\\n\"\n        for day in forecast:\n            date = day.get('fxDate', '未知')\n            date_str = datetime.strptime(date, \"%Y-%m-%d\").strftime(\"%m月%d日\")\n            output += f\"   {date_str} | {day.get('textDay', '未知')} | {day.get('tempMax', '--')}° / {day.get('tempMin', '--')}°\\n\"\n    \n    # 生活建议\n    temp = int(current.get('temp', 20))\n    output += f\"\\n💡 生活建议\\n\"\n    \n    if temp > 30:\n        output += \"   👕 穿衣: 天气炎热,建议穿轻薄透气的衣物\\n\"\n    elif temp > 20:\n        output += \"   👕 穿衣: 天气舒适,建议穿短袖或薄外套\\n\"\n    elif temp > 10:\n        output += \"   👕 穿衣: 天气较凉,建议穿外套或毛衣\\n\"\n    else:\n        output += \"   👕 穿衣: 天气寒冷,建议穿羽绒服等保暖衣物\\n\"\n    \n    if current.get('icon') in ['300', '301', '302', '303', '305', '306', '307']:\n        output += \"   🌂 带伞: 有降雨,出门记得带伞\\n\"\n    else:\n        output += \"   🌂 带伞: 无需带伞\\n\"\n    \n    return output\n\ndef main():\n    # 读取 AtomCode 传入的参数\n    params = json.loads(sys.argv[1]) if len(sys.argv) > 1 else {}\n    \n    city = params.get(\"city\", \"北京\")\n    days = params.get(\"days\", 3)\n    unit = params.get(\"unit\", \"celsius\")\n    detail = params.get(\"detail\", False)
    # 获取城市 ID
    location_id = get_location_id(city)
    if not location_id:
       print(json.dumps({\"error\": f\"未找到城市: {city},请检查城市名称\"}), file=sys.stderr)
       sys.exit(1)
       # 获取天气数据
       current = get_current_weather(location_id)
       forecast = get_forecast(location_id, days)
       # 格式化输出
       result = format_output(city, current, forecast, unit, detail)
       # 输出结果(AtomCode 会捕获 stdout)
       print(result)
if __name__ == \"__main__\":
      main()
3.5 步骤四:本地测试
bash
# 注册 Skill 到 AtomCode
atomcode skill register ~/.atomcode/skills/weather

# 查看已注册的 Skills
atomcode skill list
# 输出:
# NAME      VERSION   AUTHOR        DESCRIPTION
# weather   1.0.0     atomcode-user 查询指定城市的实时天气...

# 测试 Skill
atomcode skill test weather --params '{"city": "北京", "days": 3}'

# 预期输出:
# ☀️ 北京 天气预报
# ━━━━━━━━━━━━━━━━━━━━━━
#
# 📍 当前天气
#    天气状况: 晴
#    温度: 25°C
#    体感温度: 27°C
#    湿度: 45%
#    风向: 东南风 3级
#
# 📅 未来 3 天预报
#    07月05日 | 晴 | 32° / 22°
#    07月06日 | 多云 | 30° / 21°
#    07月07日 | 小雨 | 28° / 20°
#
# 💡 生活建议
#    👕 穿衣: 天气炎热,建议穿轻薄透气的衣物
#    🌂 带伞: 无需带伞
四、参数定义与类型约束
4.1 支持的参数类型
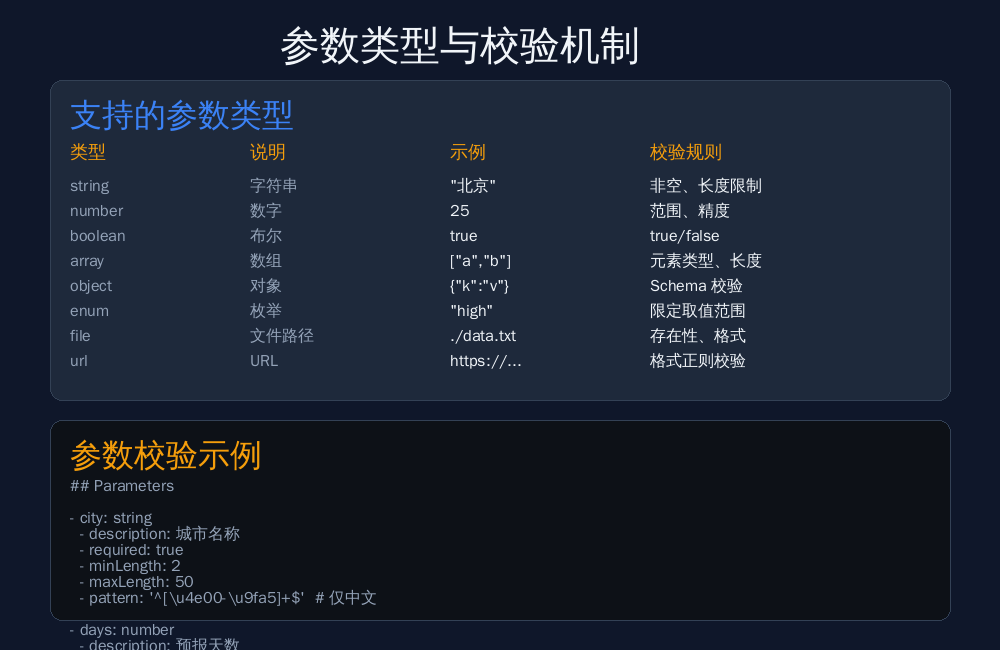
SKILL.md 支持丰富的参数类型和校验规则:
| 类型 | 说明 | 示例 | 可用约束 |
|---|---|---|---|
string |
字符串 | "北京" |
minLength, maxLength, pattern, enum |
number |
数字 | 25 |
minimum, maximum, multipleOf |
boolean |
布尔 | true |
无 |
array |
数组 | ["a", "b"] |
minItems, maxItems, items |
object |
对象 | {"k": "v"} |
properties, required |
enum |
枚举 | "high" |
values |
file |
文件路径 | ./data.txt |
accept, maxSize |
url |
URL | https://... |
protocols, pattern |
4.2 高级参数定义示例
markdown
## Parameters

- city: string
  - description: 城市名称
  - required: true
  - example: 北京
  - minLength: 2
  - maxLength: 50
  - pattern: '^[\u4e00-\u9fa5a-zA-Z\s]+$'

- days: number
  - description: 预报天数
  - required: false
  - default: 3
  - minimum: 1
  - maximum: 7

- unit: enum
  - description: 温度单位
  - values:
    - celsius: 摄氏度
    - fahrenheit: 华氏度
  - default: celsius

- locations: array
  - description: 多个城市批量查询
  - required: false
  - minItems: 1
  - maxItems: 5
  - items:
    - type: string
    - minLength: 2

- options: object
  - description: 高级选项
  - required: false
  - properties:
    - includeHistory: boolean
      - description: 包含历史天气数据
      - default: false
    - alertLevel: enum
      - description: 预警级别过滤
      - values: [all, yellow, orange, red]
      - default: all

- configFile: file
  - description: 自定义配置文件
  - required: false
  - accept: .json, .yaml, .yml
  - maxSize: 1MB
4.3 参数校验流程
AtomCode 在执行 Skill 前,会自动进行参数校验:
yaml
校验流程:
  1. 检查必填参数是否存在
  2. 检查参数类型是否匹配
  3. 检查字符串长度 / 数字范围
  4. 检查正则表达式匹配
  5. 检查枚举值是否合法
  6. 检查文件是否存在 / 大小限制
  7. 应用默认值(对可选参数)

错误处理:
  - 校验失败 → 返回详细错误信息(字段名、错误类型、建议值)
  - 类型不匹配 → 尝试自动转换(如 "3" → 3)
  - 转换失败 → 明确提示用户
五、执行逻辑实现与错误处理
5.1 错误处理机制
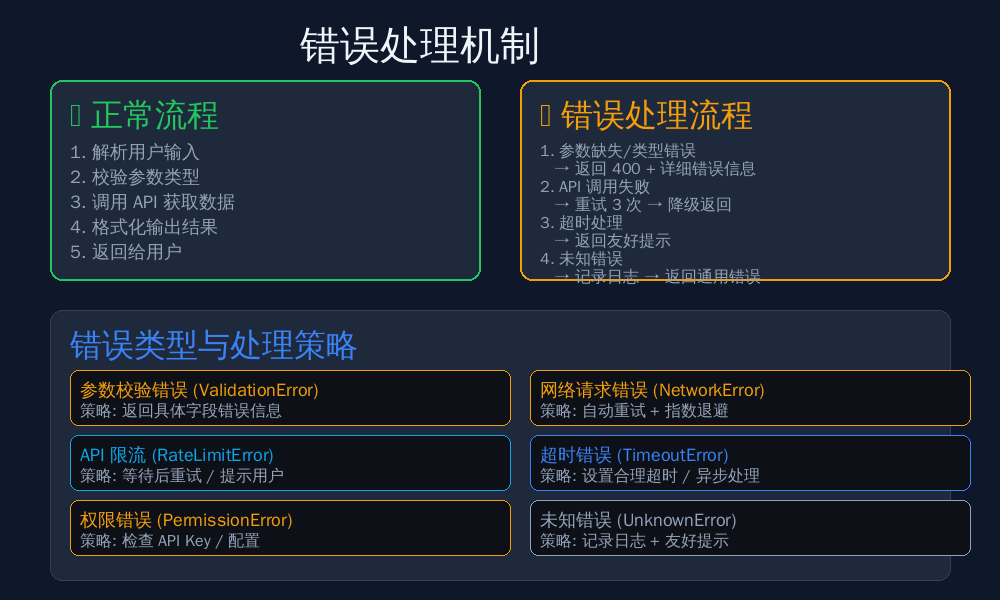
5.2 错误类型与处理策略
| 错误类型 | 错误码 | 触发场景 | 处理策略 |
|---|---|---|---|
| 参数校验错误 | ValidationError |
必填参数缺失、类型不匹配 | 返回具体字段错误信息,提示正确用法 |
| 网络请求错误 | NetworkError |
API 不可达、DNS 失败 | 自动重试 3 次,指数退避 |
| API 限流 | RateLimitError |
请求频率超过限制 | 等待后重试,或提示用户稍后重试 |
| 超时错误 | TimeoutError |
请求超过设定时间 | 设置合理超时,异步处理长任务 |
| 权限错误 | PermissionError |
API Key 无效、无权限 | 检查配置,引导用户设置 |
| 业务逻辑错误 | BusinessError |
城市不存在、数据异常 | 返回友好提示,提供替代方案 |
| 未知错误 | UnknownError |
未预料的异常 | 记录日志,返回通用错误信息 |
5.3 执行脚本中的错误处理最佳实践
python
#!/usr/bin/env python3
# weather/main.py - 增强版(含完整错误处理)

import sys
import json
import urllib.request
import urllib.parse
import urllib.error
import socket
from datetime import datetime

class SkillError(Exception):
    """Skill 基础异常"""
    def __init__(self, code: str, message: str, details: dict = None):
      self.code = code
      self.message = message
      self.details = details or {}
      super().__init__(message)
    def handle_error(error: Exception) -> None:
    """统一错误处理"""
    if isinstance(error, SkillError):
       error_response = {
            \"success\": False,
            \"error\": {
                 \"code\": error.code,
                 \"message\": error.message,
                 \"details\": error.details
                 }
         }
       elif isinstance(error, urllib.error.HTTPError):
         error_response = {
          \"success\": False,
          \"error\": {
               \"code\": \"HTTPError\",
               \"message\": f\"API 请求失败: {error.code} {error.reason}\",
               \"details\": {\"url\": error.url}
                }
           }
      elif isinstance(error, urllib.error.URLError):
       error_response = {
       \"success\": False,
       \"error\": {
             \"code\": \"NetworkError\",
             \"message\": \"网络连接失败,请检查网络设置\",
             \"details\": {\"reason\": str(error.reason)}
             }
         }
     elif isinstance(error, socket.timeout):
      error_response = {\n            \"success\": False,\n            \"error\": {\n                \"code\": \"TimeoutError\",\n                \"message\": \"请求超时,请稍后重试\",\n                \"details\": {\"timeout\": 10}\n            }\n        }\n    elif isinstance(error, json.JSONDecodeError):\n        error_response = {\n            \"success\": False,\n            \"error\": {\n                \"code\": \"ParseError\",\n                \"message\": \"API 返回数据解析失败\",\n                \"details\": {\"position\": error.pos}\n            }\n        }\n    else:\n        error_response = {\n            \"success\": False,\n            \"error\": {\n                \"code\": \"UnknownError\",\n                \"message\": f\"发生未知错误: {str(error)}\",\n                \"details\": {}\n            }\n        }\n    \n    # 输出错误信息到 stderr,AtomCode 会捕获并展示\n    print(json.dumps(error_response, ensure_ascii=False), file=sys.stderr)\n    sys.exit(1)\n\ndef make_request(url: str, max_retries: int = 3, timeout: int = 10) -> dict:\n    \"\"\"带重试机制的 HTTP 请求\"\"\"\n    for attempt in range(max_retries):\n        try:\n            req = urllib.request.Request(\n                url,\n                headers={\n                    'User-Agent': 'AtomCode-Skill/1.0',\n                    'Accept': 'application/json'\n                }\n            )\n            with urllib.request.urlopen(req, timeout=timeout) as response:\n                return json.loads(response.read().decode('utf-8'))\n        except urllib.error.HTTPError as e:\n            if e.code == 429:  # 限流\n                if attempt < max_retries - 1:\n                    import time\n                    time.sleep(2 ** attempt)  # 指数退避\n                    continue\n            raise\n        except socket.timeout:\n            if attempt < max_retries - 1:\n                continue\n            raise\n    \n    raise SkillError(\"MaxRetriesExceeded\", \"超过最大重试次数\")\n\ndef get_weather_data(city: str, days: int) -> dict:\n    \"\"\"获取天气数据(含完整错误处理)\"\"\"\n    try:\n        # 获取城市 ID\n        location_id = get_location_id(city)\n        if not location_id:\n            raise SkillError(\n                \"CityNotFound\",\n                f\"未找到城市: {city}\",\n                {\"suggestion\": \"请检查城市名称是否正确,支持中文和英文\"}\n            )\n        \n        # 获取实时天气\n        current = get_current_weather(location_id)\n        \n        # 获取预报\n        forecast = get_forecast(location_id, days)\n        \n        return {\n            \"success\": True,\n            \"data\": {\n                \"city\": city,\n                \"current\": current,\n                \"forecast\": forecast\n            }\n        }\n    except Exception as e:\n        handle_error(e)\n\ndef main():\n    try:\n        # 解析参数\n        params = json.loads(sys.argv[1]) if len(sys.argv) > 1 else {}\n        \n        city = params.get(\"city\")\n        if not city:\n            raise SkillError(\n                \"MissingParameter\",\n                \"缺少必填参数: city\",\n                {\"usage\": \"/weather <城市名称> [--days=3]\"}\n            )\n        \n        days = params.get(\"days\", 3)\n        unit = params.get(\"unit\", \"celsius\")\n        detail = params.get(\"detail\", False)\n        \n        # 执行业务逻辑\n        result = get_weather_data(city, days)\n        \n        # 格式化输出\n        output = format_output(city, result[\"data\"][\"current\"], result[\"data\"][\"forecast\"], unit, detail)
    # 输出成功结果
    print(json.dumps({
        \"success\": True,
           \"output\": output
           }, ensure_ascii=False))
     except Exception as e:
        handle_error(e)
   if __name__ == \"__main__\":
     main()
六、Skill 的打包与分发
6.1 打包 Skill
bash
# 进入 Skill 目录
cd ~/.atomcode/skills/weather

# 使用 AtomCode CLI 打包
atomcode skill package \
  --input . \
  --output ./weather-skill-1.0.0.zip \
  --include-main \
  --include-readme

# 验证打包内容
unzip -l weather-skill-1.0.0.zip
# 输出:
# Archive: weather-skill-1.0.0.zip
#   Length      Date    Time    Name
# ---------  ---------- -----   ----
#       892  2026-07-04 14:30   SKILL.md
#      3456  2026-07-04 14:30   main.py
#      1234  2026-07-04 14:30   README.md
# ---------                     -------
#      5582                     3 files
6.2 发布到 AtomGit Skills 市场
bash
# 登录 AtomGit
atomcode login

# 发布 Skill
atomcode skill publish \
  --file weather-skill-1.0.0.zip \
  --registry https://skills.atomgit.com \
  --tags weather,tool,api \
  --public

# 输出:
# 🚀 正在发布 weather@1.0.0 ...
# ✅ 发布成功!
# 📦 下载地址: https://skills.atomgit.com/weather/1.0.0
# 🔗 安装命令: atomcode skill install weather@1.0.0
6.3 用户安装 Skill
bash
# 从市场安装
atomcode skill install weather@1.0.0

# 或安装最新版本
atomcode skill install weather

# 查看已安装 Skills
atomcode skill list --installed

# 更新 Skill
atomcode skill update weather

# 卸载 Skill
atomcode skill uninstall weather
6.4 版本管理
markdown
# SKILL.md 中的版本规范

---
name: weather
version: 1.0.0  # 语义化版本
---

# 版本升级规则:
# MAJOR: 不兼容的 API 变更(如参数名修改)
# MINOR: 向下兼容的功能新增(如新增参数)
# PATCH: 向下兼容的问题修复(如 bug 修复)
七、与 MCP 的协同使用
7.1 Skills 与 MCP 协同架构
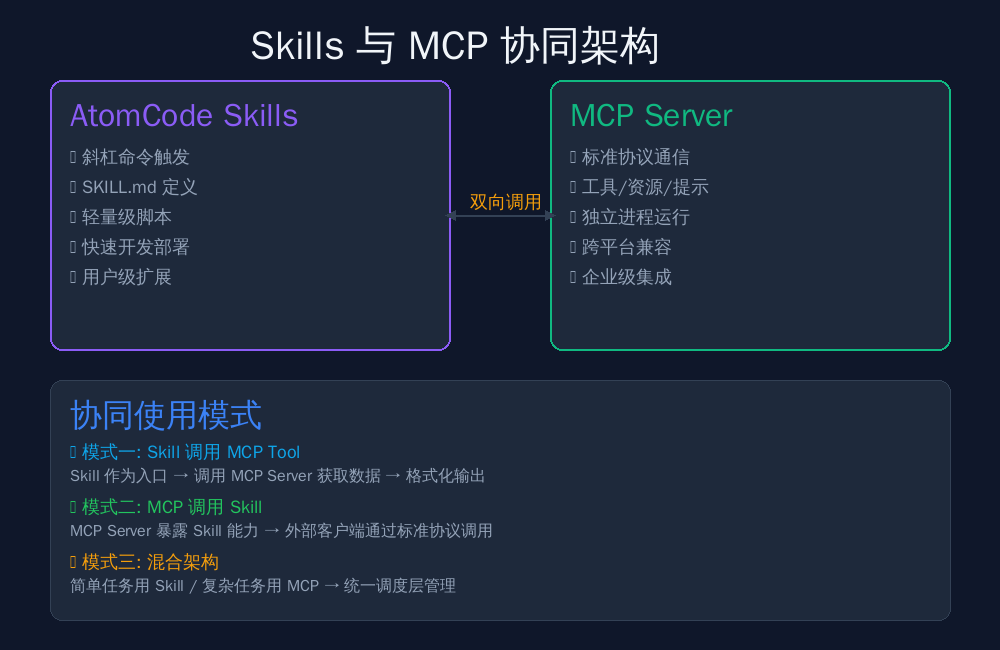
7.2 模式一:Skill 调用 MCP Tool
Skill 作为用户入口,复杂任务通过 MCP 协议调用外部服务:
markdown
---
name: database-query
description: 通过自然语言查询数据库
version: 1.0.0
---

## Parameters

- query: string
  - description: 自然语言查询描述
  - required: true
  - example: "查询最近7天销售额排名前10的商品"

- database: enum
  - description: 目标数据库
  - values: [mysql, postgresql, mongodb]
  - default: mysql

## Logic

1. 解析用户查询意图
2. 调用 MCP Database Server 获取 Schema 信息
3. 生成 SQL/查询语句
4. 通过 MCP 执行查询
5. 格式化返回结果

## MCP Configuration

```json
{
  "mcpServers": {
    "database": {
      "command": "npx",
      "args": ["-y", "@modelcontextprotocol/server-postgres"],
      "env": {
        "DATABASE_URL": "postgresql://localhost/mydb"
      }
    }
  }
}
7.3 模式二:MCP 调用 Skill
将 Skill 能力暴露为 MCP Tool,供其他客户端使用:
python
# mcp_server.py - 将 Skill 包装为 MCP Server
from mcp.server import Server
from mcp.types import Tool, TextContent
import subprocess
import json

app = Server("atomcode-skills")

@app.list_tools()
async def list_tools():
    return [
      Tool(
         name=\"weather\",
         description=\"查询指定城市的天气\",
         inputSchema={
            \"type\": \"object\",
            \"properties\": {
                \"city\": {\"type\": \"string\", \"description\": \"城市名称\"},
                \"days\": {\"type\": \"number\", \"description\": \"预报天数\"}
                     },
                \"required\": [\"city\"]
               }
          )
      ]
@app.call_tool()
async def call_tool(name: str, arguments: dict):
  if name == \"weather\":
    # 调用 AtomCode Skill
    result = subprocess.run(
       [\"atomcode\", \"skill\", \"exec\", \"weather\",
       \"--params\", json.dumps(arguments)],
       capture_output=True,
       text=True
       )
        return [TextContent(type=\"text\", text=result.stdout)]
   if __name__ == \"__main__\":
     app.run(transport='stdio')
7.4 模式三:混合架构
yaml
# atomcode.config.yaml - 混合配置

skills:
  # 本地 Skills(轻量级)
  - name: weather
    source: local
    path: ~/.atomcode/skills/weather

  - name: calculator
    source: local
    path: ~/.atomcode/skills/calculator

mcp:
  # MCP Servers(复杂能力)
  servers:
  - name: filesystem
  transport: stdio
  command: npx
  args: [\"-y\", \"@modelcontextprotocol/server-filesystem\", \"/path/to/allowed/dir\"]
  - name: github
  transport: sse
  url: https://mcp-github.atomgit.com/sse
  headers:
    Authorization: \"Bearer ${GITHUB_TOKEN}\"
    - name: database
    transport: stdio
    command: python
    args: [\"mcp_database_server.py\"]
  # 路由规则:优先使用 Skill,复杂任务降级到 MCP
  routing:
  weather: skill  # /weather → Skill
  file: mcp       # /file → MCP filesystem
  git: mcp        # /git → MCP github
八、高级 Skill 开发技巧
8.1 多语言支持
markdown
---
name: weather
description: 查询天气(支持多语言输出)
version: 1.1.0
---

## Parameters

- city: string
  - description: 城市名称
  - required: true

- lang: enum
  - description: 输出语言
  - values: [zh, en, ja, ko]
  - default: zh

## System Prompt

根据 lang 参数切换输出语言:
- zh: 使用中文输出
- en: 使用 English output
- ja: 日本語で出力
- ko: 한국어로 출력
8.2 上下文记忆
markdown
## Context

- session.memory.lastCity: string
  - description: 上次查询的城市
  - persist: true

## Logic

1. 如果用户未指定 city,使用 session.memory.lastCity
2. 查询完成后,更新 session.memory.lastCity
8.3 条件执行
markdown
## Logic

if: params.city == "当前位置"
then:
  - 调用定位 API 获取当前城市
  - 使用获取到的城市查询天气
else:
  - 直接使用用户指定的城市
九、完整工作流与最佳实践
9.1 Skill 开发清单
| 阶段 | 任务 | 检查项 |
|---|---|---|
| 设计 | 确定 Skill 功能范围 | 功能单一、职责清晰 |
| 配置 | 编写 SKILL.md | 参数完整、描述清晰 |
| 实现 | 编写执行脚本 | 错误处理完善、日志清晰 |
| 测试 | 本地测试 | 正常/异常场景覆盖 |
| 文档 | 编写 README | 使用说明、示例、FAQ |
| 打包 | 生成发布包 | 文件完整、体积合理 |
| 发布 | 上传到市场 | 版本规范、标签准确 |
9.2 性能优化建议
| 优化方向 | 方法 | 效果 |
|---|---|---|
| 减少 API 调用 | 本地缓存结果 | 响应速度提升 10x |
| 异步处理 | 长任务使用异步 | 避免阻塞主线程 |
| 超时设置 | 合理设置超时时间 | 防止无限等待 |
| 资源释放 | 及时关闭文件/连接 | 避免资源泄漏 |
十、总结与展望
本文详细介绍了 AtomCode Skills 开发的完整流程,从SKILL.md 规范、天气查询 Skill 实战、参数类型与校验、错误处理、打包分发到与 MCP 的协同使用。
通过 Skills 机制,开发者可以:
- ✅ 零代码扩展 AI 能力:通过 Markdown 配置即可扩展 AtomCode
- ✅ 标准化能力复用:Skill 可打包分发,团队共享
- ✅ 灵活调用外部服务:通过 MCP 协议集成复杂能力
- ✅ 渐进式复杂度:简单任务用 Skill,复杂任务用 MCP
展望未来,AtomCode Skills 生态将更加丰富:
- Skill 市场:官方 Skill 商店,一键安装数万种能力
- 可视化编辑器:拖拽式 Skill 构建器,无需手写 Markdown
- AI 自动生成 Skill:描述需求,AI 自动生成 SKILL.md 和执行脚本
- 跨平台兼容:Skills 标准向 MCP 靠拢,实现一次编写多平台使用
Skills 机制让每个人都能为 AI 编程助手贡献能力,希望本文能帮助您开启 Skills 开发之旅,打造属于自己的 AI 扩展生态。
转载自:https://blog.csdn.net/u014727709/article/details/162596776
欢迎 👍点赞✍评论⭐收藏,欢迎指正