现在,让我们以上一章为基础,补充缺失的部分,以构成一个完整的安全流程。
获取 username 和 password
我们将使用 FastAPI 的安全工具来获取 username 和 password。
OAuth2 规定,当使用"密码流"(也就是我们正在使用的)时,客户端/用户必须将 username 和 password 字段作为表单数据发送。
并且规范要求这些字段必须这样命名。因此,使用 user-name 或 email 是不行的。
但不用担心,你可以在前端按照自己的意愿向最终用户展示。
并且你的数据库模型可以使用任何你想要的其他名称。
但对于登录的 路径操作,我们需要使用这些名称以兼容规范(例如,能够使用集成的 API 文档系统)。
规范还规定,username 和 password 必须作为表单数据发送(因此,这里不能使用 JSON)。
scope
规范还指出,客户端可以发送另一个名为 "scope" 的表单字段。
该表单字段的名称是 scope(单数形式),但它实际上是一个由空格分隔的包含多个"scope(范围)"的长字符串。
每个"scope"只是一个字符串(不带空格)。
它们通常用于声明特定的安全权限,例如:
users:read或users:write是常见的例子。instagram_basic被 Facebook / Instagram 使用。https://www.googleapis.com/auth/drive被 Google 使用。
注意
在 OAuth2 中,"scope"只是一个声明所需特定权限的字符串。
无论它是否包含诸如
:之类的其他字符,或者它是否是一个 URL,都没有关系。这些细节是特定于实现的。
对于 OAuth2,它们只是字符串。
获取 username 和 password 的代码
现在让我们使用 FastAPI 提供的工具来处理它。
OAuth2PasswordRequestForm
首先,导入 OAuth2PasswordRequestForm,并在 /token 的 路径操作 中将其作为具有 Depends 的依赖项使用:
from typing import Annotated

from fastapi import Depends, FastAPI, HTTPException, status
from fastapi.security import OAuth2PasswordBearer, OAuth2PasswordRequestForm
from pydantic import BaseModel

fake_users_db = {
    "johndoe": {
        "username": "johndoe",
        "full_name": "John Doe",
        "email": "johndoe@example.com",
        "hashed_password": "fakehashedsecret",
        "disabled": False,
    },
    "alice": {
        "username": "alice",
        "full_name": "Alice Wonderson",
        "email": "alice@example.com",
        "hashed_password": "fakehashedsecret2",
        "disabled": True,
    },
}

app = FastAPI()


def fake_hash_password(password: str):
    return "fakehashed" + password


oauth2_scheme = OAuth2PasswordBearer(tokenUrl="token")


class User(BaseModel):
    username: str
    email: str | None = None
    full_name: str | None = None
    disabled: bool | None = None


class UserInDB(User):
    hashed_password: str


def get_user(db, username: str):
    if username in db:
        user_dict = db[username]
        return UserInDB(**user_dict)


def fake_decode_token(token):
    # This doesn't provide any security at all
    # Check the next version
    user = get_user(fake_users_db, token)
    return user


async def get_current_user(token: Annotated[str, Depends(oauth2_scheme)]):
    user = fake_decode_token(token)
    if not user:
        raise HTTPException(
            status_code=status.HTTP_401_UNAUTHORIZED,
            detail="Not authenticated",
            headers={"WWW-Authenticate": "Bearer"},
        )
    return user


async def get_current_active_user(
    current_user: Annotated[User, Depends(get_current_user)],
):
    if current_user.disabled:
        raise HTTPException(status_code=400, detail="Inactive user")
    return current_user


@app.post("/token")
async def login(form_data: Annotated[OAuth2PasswordRequestForm, Depends()]):
    user_dict = fake_users_db.get(form_data.username)
    if not user_dict:
        raise HTTPException(status_code=400, detail="Incorrect username or password")
    user = UserInDB(**user_dict)
    hashed_password = fake_hash_password(form_data.password)
    if not hashed_password == user.hashed_password:
        raise HTTPException(status_code=400, detail="Incorrect username or password")

    return {"access_token": user.username, "token_type": "bearer"}


@app.get("/users/me")
async def read_users_me(
    current_user: Annotated[User, Depends(get_current_active_user)],
):
    return current_user
OAuth2PasswordRequestForm 是一个类依赖项,用于声明包含以下内容的表单体:
username。password。- 一个可选的
scope字段作为长字符串,由空格分隔的字符串组成。 - 一个可选的
grant_type。
提示
OAuth2 规范实际上要求 一个固定值为
password的字段grant_type,但OAuth2PasswordRequestForm并未强制执行此要求。如果你需要强制执行此要求,请使用
OAuth2PasswordRequestFormStrict而不是OAuth2PasswordRequestForm。
- 一个可选的
client_id(我们的示例中不需要它)。 - 一个可选的
client_secret(我们的示例中不需要它)。
注意
OAuth2PasswordRequestForm 并不像 OAuth2PasswordBearer 那样是 FastAPI 的特殊类。
OAuth2PasswordBearer 让 FastAPI 知道这是一个安全方案。因此它以这种方式被添加到 OpenAPI 中。
但是 OAuth2PasswordRequestForm 只是一个你可以自己编写的类依赖项,或者你可以直接声明 Form 参数。
但由于这是一个常见的用例,FastAPI 直接提供了它,以简化操作。
使用表单数据
提示
依赖类
OAuth2PasswordRequestForm的实例将不会拥有包含由空格分隔的长字符串的属性scope,相反,它将拥有一个scopes属性,其中包含发送的每个范围的实际字符串列表。我们在本示例中并未使用
scopes,但如果你需要,该功能已经存在。
现在,使用表单字段中的 username 从(伪)数据库中获取用户数据。
如果不存在这样的用户,我们将返回一个错误,提示"用户名或密码错误"。
对于此错误,我们使用异常 HTTPException:
from typing import Annotated

from fastapi import Depends, FastAPI, HTTPException, status
from fastapi.security import OAuth2PasswordBearer, OAuth2PasswordRequestForm
from pydantic import BaseModel

fake_users_db = {
    "johndoe": {
        "username": "johndoe",
        "full_name": "John Doe",
        "email": "johndoe@example.com",
        "hashed_password": "fakehashedsecret",
        "disabled": False,
    },
    "alice": {
        "username": "alice",
        "full_name": "Alice Wonderson",
        "email": "alice@example.com",
        "hashed_password": "fakehashedsecret2",
        "disabled": True,
    },
}

app = FastAPI()


def fake_hash_password(password: str):
    return "fakehashed" + password


oauth2_scheme = OAuth2PasswordBearer(tokenUrl="token")


class User(BaseModel):
    username: str
    email: str | None = None
    full_name: str | None = None
    disabled: bool | None = None


class UserInDB(User):
    hashed_password: str


def get_user(db, username: str):
    if username in db:
        user_dict = db[username]
        return UserInDB(**user_dict)


def fake_decode_token(token):
    # This doesn't provide any security at all
    # Check the next version
    user = get_user(fake_users_db, token)
    return user


async def get_current_user(token: Annotated[str, Depends(oauth2_scheme)]):
    user = fake_decode_token(token)
    if not user:
        raise HTTPException(
            status_code=status.HTTP_401_UNAUTHORIZED,
            detail="Not authenticated",
            headers={"WWW-Authenticate": "Bearer"},
        )
    return user


async def get_current_active_user(
    current_user: Annotated[User, Depends(get_current_user)],
):
    if current_user.disabled:
        raise HTTPException(status_code=400, detail="Inactive user")
    return current_user


@app.post("/token")
async def login(form_data: Annotated[OAuth2PasswordRequestForm, Depends()]):
    user_dict = fake_users_db.get(form_data.username)
    if not user_dict:
        raise HTTPException(status_code=400, detail="Incorrect username or password")
    user = UserInDB(**user_dict)
    hashed_password = fake_hash_password(form_data.password)
    if not hashed_password == user.hashed_password:
        raise HTTPException(status_code=400, detail="Incorrect username or password")

    return {"access_token": user.username, "token_type": "bearer"}


@app.get("/users/me")
async def read_users_me(
    current_user: Annotated[User, Depends(get_current_active_user)],
):
    return current_user
检查密码
此时,我们已经从数据库中获取了用户数据,但尚未检查密码。
让我们先将该数据放入 Pydantic UserInDB 模型中。
你绝对不应该保存明文密码,因此,我们将使用(伪)密码哈希系统。
如果密码不匹配,我们将返回相同的错误。
密码哈希
"哈希"是指:将某些内容(在本例中为密码)转换为看似乱码的字节序列(仅仅是一个字符串)。
每当你传递完全相同的内容(完全相同的密码)时,你都会得到完全相同的乱码。
但你无法将乱码转换回密码。
为什么使用密码哈希
如果你的数据库被盗,小偷将不会拥有你用户的明文密码,而只有哈希值。
因此,小偷将无法尝试在其他系统中使用这些相同的密码(由于许多用户在所有地方都使用相同的密码,这将是非常危险的)。
from typing import Annotated

from fastapi import Depends, FastAPI, HTTPException, status
from fastapi.security import OAuth2PasswordBearer, OAuth2PasswordRequestForm
from pydantic import BaseModel

fake_users_db = {
    "johndoe": {
        "username": "johndoe",
        "full_name": "John Doe",
        "email": "johndoe@example.com",
        "hashed_password": "fakehashedsecret",
        "disabled": False,
    },
    "alice": {
        "username": "alice",
        "full_name": "Alice Wonderson",
        "email": "alice@example.com",
        "hashed_password": "fakehashedsecret2",
        "disabled": True,
    },
}

app = FastAPI()


def fake_hash_password(password: str):
    return "fakehashed" + password


oauth2_scheme = OAuth2PasswordBearer(tokenUrl="token")


class User(BaseModel):
    username: str
    email: str | None = None
    full_name: str | None = None
    disabled: bool | None = None


class UserInDB(User):
    hashed_password: str


def get_user(db, username: str):
    if username in db:
        user_dict = db[username]
        return UserInDB(**user_dict)


def fake_decode_token(token):
    # This doesn't provide any security at all
    # Check the next version
    user = get_user(fake_users_db, token)
    return user


async def get_current_user(token: Annotated[str, Depends(oauth2_scheme)]):
    user = fake_decode_token(token)
    if not user:
        raise HTTPException(
            status_code=status.HTTP_401_UNAUTHORIZED,
            detail="Not authenticated",
            headers={"WWW-Authenticate": "Bearer"},
        )
    return user


async def get_current_active_user(
    current_user: Annotated[User, Depends(get_current_user)],
):
    if current_user.disabled:
        raise HTTPException(status_code=400, detail="Inactive user")
    return current_user


@app.post("/token")
async def login(form_data: Annotated[OAuth2PasswordRequestForm, Depends()]):
    user_dict = fake_users_db.get(form_data.username)
    if not user_dict:
        raise HTTPException(status_code=400, detail="Incorrect username or password")
    user = UserInDB(**user_dict)
    hashed_password = fake_hash_password(form_data.password)
    if not hashed_password == user.hashed_password:
        raise HTTPException(status_code=400, detail="Incorrect username or password")

    return {"access_token": user.username, "token_type": "bearer"}


@app.get("/users/me")
async def read_users_me(
    current_user: Annotated[User, Depends(get_current_active_user)],
):
    return current_user
关于 user_dict
UserInDB(**user_dict) 意味着:
将 user_dict 的键和值直接作为键值参数传递,相当于:
UserInDB(
    username = user_dict["username"],
    email = user_dict["email"],
    full_name = user_dict["full_name"],
    disabled = user_dict["disabled"],
    hashed_password = user_dict["hashed_password"],
)
注意
有关 user_dict 的更完整说明,请回顾额外模型的文档。
返回令牌
token 端点的响应必须是一个 JSON 对象。
它应该包含一个 token_type。在我们的示例中,由于我们使用的是 "Bearer" 令牌,令牌类型应为 "bearer"。
并且它应该包含一个 access_token,其值为包含我们访问令牌的字符串。
在这个简单的示例中,为了方便,我们将采取完全不安全的方式,直接返回相同的 username 作为令牌。
提示
在下一章中,你将看到一个真正安全的实现,包含密码哈希和 JWT 令牌。
但现在,让我们专注于我们需要的具体细节。
from typing import Annotated

from fastapi import Depends, FastAPI, HTTPException, status
from fastapi.security import OAuth2PasswordBearer, OAuth2PasswordRequestForm
from pydantic import BaseModel

fake_users_db = {
    "johndoe": {
        "username": "johndoe",
        "full_name": "John Doe",
        "email": "johndoe@example.com",
        "hashed_password": "fakehashedsecret",
        "disabled": False,
    },
    "alice": {
        "username": "alice",
        "full_name": "Alice Wonderson",
        "email": "alice@example.com",
        "hashed_password": "fakehashedsecret2",
        "disabled": True,
    },
}

app = FastAPI()


def fake_hash_password(password: str):
    return "fakehashed" + password


oauth2_scheme = OAuth2PasswordBearer(tokenUrl="token")


class User(BaseModel):
    username: str
    email: str | None = None
    full_name: str | None = None
    disabled: bool | None = None


class UserInDB(User):
    hashed_password: str


def get_user(db, username: str):
    if username in db:
        user_dict = db[username]
        return UserInDB(**user_dict)


def fake_decode_token(token):
    # This doesn't provide any security at all
    # Check the next version
    user = get_user(fake_users_db, token)
    return user


async def get_current_user(token: Annotated[str, Depends(oauth2_scheme)]):
    user = fake_decode_token(token)
    if not user:
        raise HTTPException(
            status_code=status.HTTP_401_UNAUTHORIZED,
            detail="Not authenticated",
            headers={"WWW-Authenticate": "Bearer"},
        )
    return user


async def get_current_active_user(
    current_user: Annotated[User, Depends(get_current_user)],
):
    if current_user.disabled:
        raise HTTPException(status_code=400, detail="Inactive user")
    return current_user


@app.post("/token")
async def login(form_data: Annotated[OAuth2PasswordRequestForm, Depends()]):
    user_dict = fake_users_db.get(form_data.username)
    if not user_dict:
        raise HTTPException(status_code=400, detail="Incorrect username or password")
    user = UserInDB(**user_dict)
    hashed_password = fake_hash_password(form_data.password)
    if not hashed_password == user.hashed_password:
        raise HTTPException(status_code=400, detail="Incorrect username or password")

    return {"access_token": user.username, "token_type": "bearer"}


@app.get("/users/me")
async def read_users_me(
    current_user: Annotated[User, Depends(get_current_active_user)],
):
    return current_user
提示
根据规范,你应该返回包含 access_token 和 token_type 的 JSON,与本示例相同。
这是你必须在代码中自己完成的事情,并确保使用这些 JSON 键。
这几乎是你必须记住并正确执行的唯一操作,以符合规范。
至于其余的部分,FastAPI 会为你处理。
更新依赖项
现在我们将更新我们的依赖项。
我们希望仅 在该用户处于活动状态时获取 current_user。
因此,我们创建了一个额外的依赖项 get_current_active_user,它反过来将 get_current_user 用作依赖项。
如果用户不存在或未激活,这两个依赖项都将仅返回一个 HTTP 错误。
因此,在我们的端点中,只有在用户存在、已通过身份验证且处于活动状态时,我们才能获取到用户:
from typing import Annotated

from fastapi import Depends, FastAPI, HTTPException, status
from fastapi.security import OAuth2PasswordBearer, OAuth2PasswordRequestForm
from pydantic import BaseModel

fake_users_db = {
    "johndoe": {
        "username": "johndoe",
        "full_name": "John Doe",
        "email": "johndoe@example.com",
        "hashed_password": "fakehashedsecret",
        "disabled": False,
    },
    "alice": {
        "username": "alice",
        "full_name": "Alice Wonderson",
        "email": "alice@example.com",
        "hashed_password": "fakehashedsecret2",
        "disabled": True,
    },
}

app = FastAPI()


def fake_hash_password(password: str):
    return "fakehashed" + password


oauth2_scheme = OAuth2PasswordBearer(tokenUrl="token")


class User(BaseModel):
    username: str
    email: str | None = None
    full_name: str | None = None
    disabled: bool | None = None


class UserInDB(User):
    hashed_password: str


def get_user(db, username: str):
    if username in db:
        user_dict = db[username]
        return UserInDB(**user_dict)


def fake_decode_token(token):
    # This doesn't provide any security at all
    # Check the next version
    user = get_user(fake_users_db, token)
    return user


async def get_current_user(token: Annotated[str, Depends(oauth2_scheme)]):
    user = fake_decode_token(token)
    if not user:
        raise HTTPException(
            status_code=status.HTTP_401_UNAUTHORIZED,
            detail="Not authenticated",
            headers={"WWW-Authenticate": "Bearer"},
        )
    return user


async def get_current_active_user(
    current_user: Annotated[User, Depends(get_current_user)],
):
    if current_user.disabled:
        raise HTTPException(status_code=400, detail="Inactive user")
    return current_user


@app.post("/token")
async def login(form_data: Annotated[OAuth2PasswordRequestForm, Depends()]):
    user_dict = fake_users_db.get(form_data.username)
    if not user_dict:
        raise HTTPException(status_code=400, detail="Incorrect username or password")
    user = UserInDB(**user_dict)
    hashed_password = fake_hash_password(form_data.password)
    if not hashed_password == user.hashed_password:
        raise HTTPException(status_code=400, detail="Incorrect username or password")

    return {"access_token": user.username, "token_type": "bearer"}


@app.get("/users/me")
async def read_users_me(
    current_user: Annotated[User, Depends(get_current_active_user)],
):
    return current_user
注意
我们在此处返回的值为 Bearer 的附加标头 WWW-Authenticate 也是规范的一部分。
任何 HTTP(错误)状态码 401 "UNAUTHORIZED" 都应该返回一个 WWW-Authenticate 标头。
对于 Bearer 令牌(我们的情况),该标头的值应该是 Bearer。
你实际上可以跳过那个额外的标头,它仍然可以工作。
但这里提供它是为了符合规范。
此外,可能会有工具(现在或将来)期望并使用它,这对你或你的用户(现在或将来)可能很有用。
这就是标准的好处......
查看其实际效果
打开交互式文档:http://127.0.0.1:8000/docs。
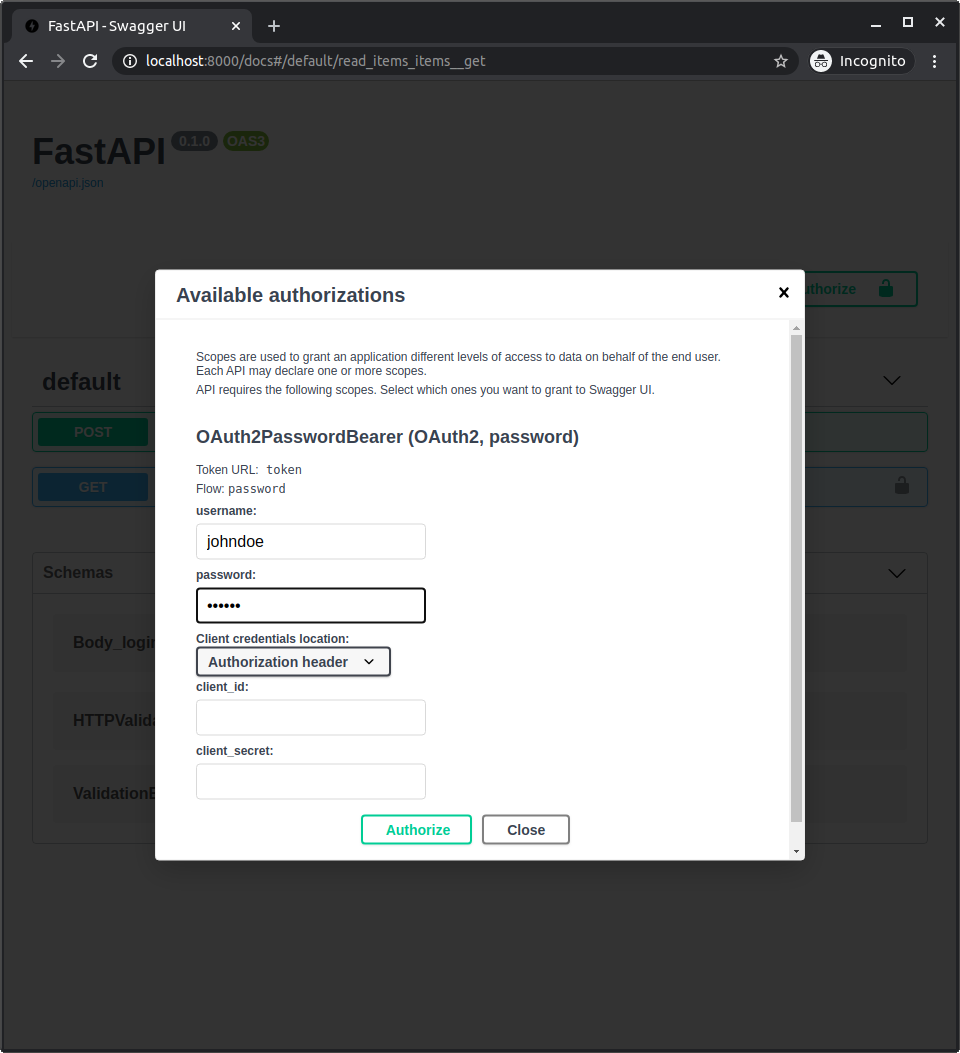
认证
点击"Authorize"按钮。
使用以下凭据:
用户名:johndoe
密码:secret
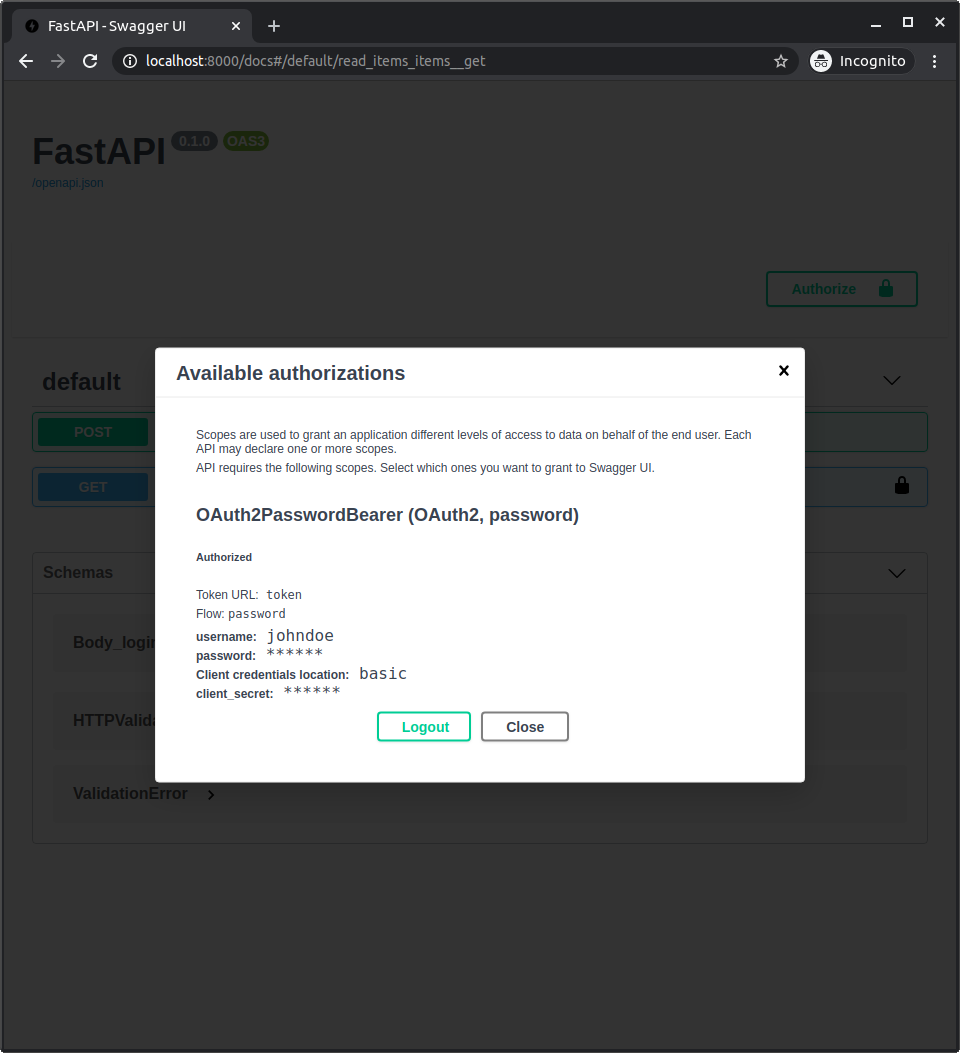
在系统中进行身份验证后,你会看到如下所示:
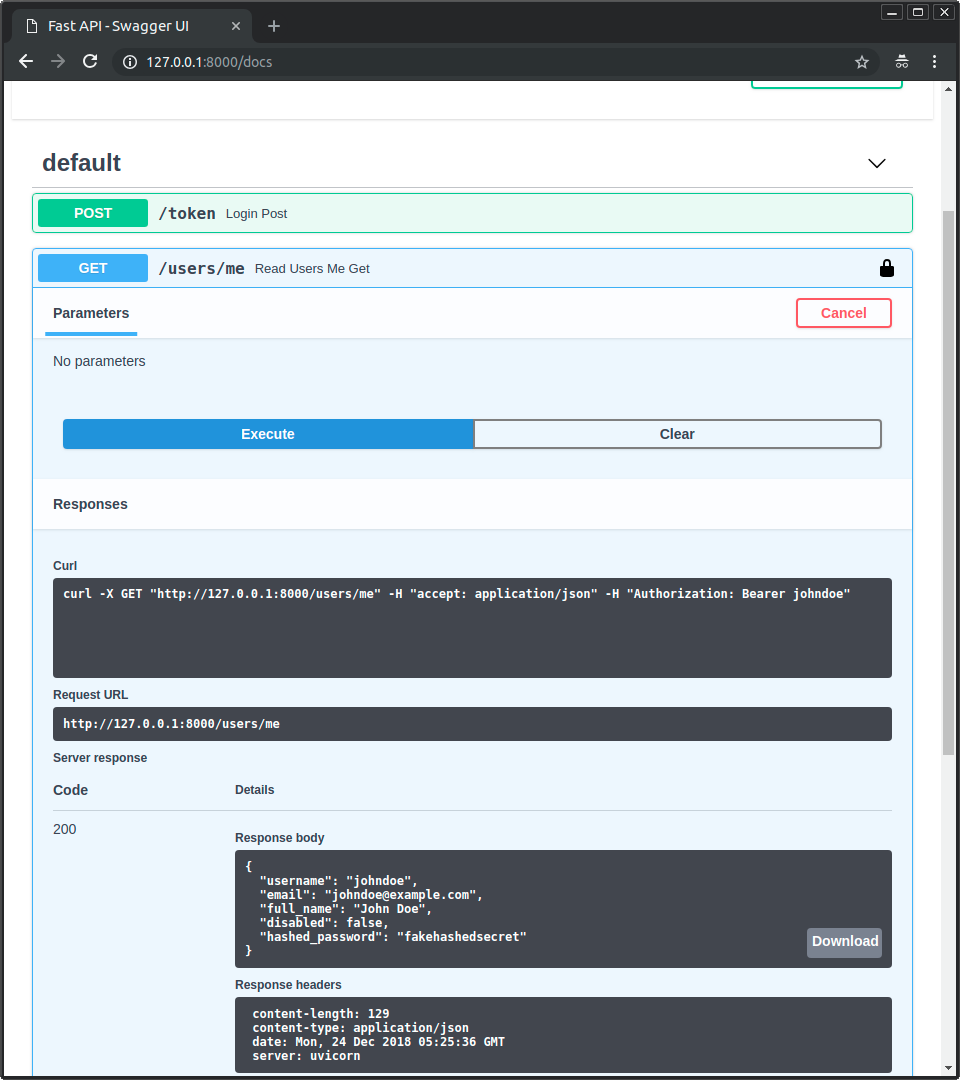
获取你自己的用户数据
现在使用路径为 /users/me 的操作 GET。
你将获得你的用户数据,例如:
{
  "username": "johndoe",
  "email": "johndoe@example.com",
  "full_name": "John Doe",
  "disabled": false,
  "hashed_password": "fakehashedsecret"
}
如果你单击锁形图标并注销,然后再次尝试相同的操作,你将收到以下 HTTP 401 错误:
{
  "detail": "Not authenticated"
}
非活跃用户
现在尝试使用非活跃用户进行身份验证,使用以下凭据:
用户:alice
密码:secret2
并尝试使用路径为 /users/me 的操作 GET。
你将收到一个"非活跃用户"错误,例如:
{
  "detail": "Inactive user"
}
回顾
现在你已经掌握了相关工具,可以为你的 API 实现一个基于 username 和 password 的完整安全系统。
使用这些工具,你可以使安全系统兼容任何数据库以及任何用户或数据模型。
唯一遗漏的细节是它实际上还不是"安全"的。
在下一章中,你将了解如何使用安全的密码哈希库和 JWT 令牌。
https://fastapi.tiangolo.com/tutorial/security/simple-oauth2