
1. 动画拆解
这个UI特效叫做【拍摄器】,它用来模拟相机拍摄时的效果,非常适合程序在进行照片切换时应用的一种转场效果,它看起来和【眨眼】效果比较相似,但是控制时差异性非常大。
我们来看一下它的慢速播放效果,来更好地观察处理细节:

从慢速动画,我们可以看到,它是由最少三类动画来组成,包含:高斯模糊动画、圆形遮罩动画、和线框显隐动画。
高斯模糊动画:

圆形遮罩动画:

线框的显示和隐藏动画:
有了以上三个基础动画之后,最核心的部分,就是如何把它们在准确的时机拼接起来,这一点是最难的,最耗费时间的,它的时间线节点控制,用文字描述出来是比较费解的:
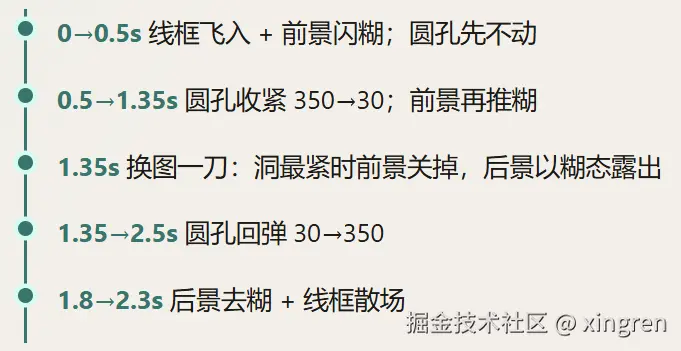
但是我们可以从WPF的xaml处理代码中可以看到,它的控制是非常复杂的,以下是动画处理的核心:
ini
      <!-- 全部动画同时播放 -->
      <Storyboard x:Key="AnimSumStoryboard" >
          <!--初始化-->
          <DoubleAnimationUsingKeyFrames Storyboard.TargetName="img1"
                          Storyboard.TargetProperty="Opacity">
              <LinearDoubleKeyFrame KeyTime="0:0:0" Value="1"/>
          </DoubleAnimationUsingKeyFrames>
          <DoubleAnimationUsingKeyFrames Storyboard.TargetName="img2"
                          Storyboard.TargetProperty="Opacity">
              <LinearDoubleKeyFrame KeyTime="0:0:0" Value="1"/>
          </DoubleAnimationUsingKeyFrames>
          <DoubleAnimationUsingKeyFrames Storyboard.TargetName="img2blur"
                     Storyboard.TargetProperty="Radius">
              <LinearDoubleKeyFrame KeyTime="0:0:0" Value="40"/>
          </DoubleAnimationUsingKeyFrames>


          <!-- 前景图 高斯模糊 -->
          <DoubleAnimationUsingKeyFrames Storyboard.TargetName="img1blur"
                                         Storyboard.TargetProperty="Radius">
              <LinearDoubleKeyFrame KeyTime="0:0:0" Value="0"/>
              <LinearDoubleKeyFrame KeyTime="0:0:0.25" Value="40"/>
              <LinearDoubleKeyFrame KeyTime="0:0:0.5" Value="0"/>
              <LinearDoubleKeyFrame KeyTime="0:0:0.9" Value="0"/>
              <LinearDoubleKeyFrame KeyTime="0:0:1.35" Value="40"/>
          </DoubleAnimationUsingKeyFrames>

          <!-- 后景图 高斯模糊 -->
          <DoubleAnimationUsingKeyFrames Storyboard.TargetName="img2blur"
                                Storyboard.TargetProperty="Radius">
              <LinearDoubleKeyFrame KeyTime="0:0:0" Value="0"/>
              <LinearDoubleKeyFrame KeyTime="0:0:1.35" Value="0"/>
              <LinearDoubleKeyFrame KeyTime="0:0:1.351" Value="40"/>
              <LinearDoubleKeyFrame KeyTime="0:0:2.5" Value="40"/>
          </DoubleAnimationUsingKeyFrames>

          <!--线框出现-->
          <DoubleAnimationUsingKeyFrames Storyboard.TargetName="trans_ln_left"
                              Storyboard.TargetProperty="X">
              <LinearDoubleKeyFrame KeyTime="0:0:0" Value="-85"/>
              <LinearDoubleKeyFrame KeyTime="0:0:0.5" Value="0"/>
          </DoubleAnimationUsingKeyFrames>
          <DoubleAnimationUsingKeyFrames Storyboard.TargetName="trans_ln_right"
                              Storyboard.TargetProperty="X">
              <LinearDoubleKeyFrame KeyTime="0:0:0" Value="85"/>
              <LinearDoubleKeyFrame KeyTime="0:0:0.5" Value="0"/>
          </DoubleAnimationUsingKeyFrames>
          <DoubleAnimationUsingKeyFrames Storyboard.TargetName="trans_ln_top"
                              Storyboard.TargetProperty="Y">
              <LinearDoubleKeyFrame KeyTime="0:0:0" Value="-120"/>
              <LinearDoubleKeyFrame KeyTime="0:0:0.5" Value="0"/>
          </DoubleAnimationUsingKeyFrames>
          <DoubleAnimationUsingKeyFrames Storyboard.TargetName="trans_ln_bottom"
                              Storyboard.TargetProperty="Y">
              <LinearDoubleKeyFrame KeyTime="0:0:0" Value="120"/>
              <LinearDoubleKeyFrame KeyTime="0:0:0.5" Value="0"/>
          </DoubleAnimationUsingKeyFrames>
          <DoubleAnimationUsingKeyFrames Storyboard.TargetName="vbox"
                              Storyboard.TargetProperty="ScaleX">
              <LinearDoubleKeyFrame KeyTime="0:0:0" Value="0.5"/>
              <LinearDoubleKeyFrame KeyTime="0:0:0.5" Value="1"/>
          </DoubleAnimationUsingKeyFrames>
          <DoubleAnimationUsingKeyFrames Storyboard.TargetName="vbox"
                              Storyboard.TargetProperty="ScaleY">
              <LinearDoubleKeyFrame KeyTime="0:0:0" Value="0.5"/>
              <LinearDoubleKeyFrame KeyTime="0:0:0.5" Value="1"/>
          </DoubleAnimationUsingKeyFrames>
          <DoubleAnimationUsingKeyFrames Storyboard.TargetName="gridline"
                              Storyboard.TargetProperty="Opacity">
              <LinearDoubleKeyFrame KeyTime="0:0:0" Value="0"/>
              <LinearDoubleKeyFrame KeyTime="0:0:0.5" Value="1"/>
          </DoubleAnimationUsingKeyFrames>

          <!-- 圆圈:收缩后手动回弹(后半段略慢于收缩,等效 AutoReverse 但非对称时长) -->
          <DoubleAnimationUsingKeyFrames Storyboard.TargetName="ellGeo"
                                         Storyboard.TargetProperty="RadiusX">
              <SplineDoubleKeyFrame KeyTime="0:0:0.5" Value="350"/>
              <!-- 350→30:先慢后加速收紧 -->
              <SplineDoubleKeyFrame KeyTime="0:0:1.35" Value="30"
                                    KeySpline="0.62,0.0 0.82,0.35"/>
              <!-- 30→350:回弹,时长略长、峰值略缓 -->
              <SplineDoubleKeyFrame KeyTime="0:0:2.5" Value="350"
                                    KeySpline="0.22,0.55 0.4,1"/>
          </DoubleAnimationUsingKeyFrames>
          <DoubleAnimationUsingKeyFrames Storyboard.TargetName="ellGeo"
                                         Storyboard.TargetProperty="RadiusY">
              <SplineDoubleKeyFrame KeyTime="0:0:0.5" Value="350"/>
              <SplineDoubleKeyFrame KeyTime="0:0:1.35" Value="30"
                                    KeySpline="0.62,0.0 0.82,0.35"/>
              <SplineDoubleKeyFrame KeyTime="0:0:2.5" Value="350"
                                    KeySpline="0.22,0.55 0.4,1"/>
          </DoubleAnimationUsingKeyFrames>

          <!--更换图片-->
          <DoubleAnimationUsingKeyFrames Storyboard.TargetName="img1"
                                   Storyboard.TargetProperty="Opacity">
              <LinearDoubleKeyFrame KeyTime="0:0:0" Value="1"/>
              <LinearDoubleKeyFrame KeyTime="0:0:1.35" Value="1"/>
              <LinearDoubleKeyFrame KeyTime="0:0:1.351" Value="0"/>
          </DoubleAnimationUsingKeyFrames>
          <DoubleAnimationUsingKeyFrames Storyboard.TargetName="img2blur"
                              Storyboard.TargetProperty="Radius">
              <LinearDoubleKeyFrame KeyTime="0:0:0" Value="40"/>
              <LinearDoubleKeyFrame KeyTime="0:0:1.8" Value="40"/>
              <LinearDoubleKeyFrame KeyTime="0:0:2.3" Value="0"/>
          </DoubleAnimationUsingKeyFrames>


          <!-- 线框消失 -->
          <DoubleAnimationUsingKeyFrames Storyboard.TargetName="trans_ln_left"
                                         Storyboard.TargetProperty="X">
              <LinearDoubleKeyFrame KeyTime="0:0:1.8" Value="0"/>
              <LinearDoubleKeyFrame KeyTime="0:0:2.3" Value="-85"/>
          </DoubleAnimationUsingKeyFrames>
          <DoubleAnimationUsingKeyFrames Storyboard.TargetName="trans_ln_right"
                                         Storyboard.TargetProperty="X">
              <LinearDoubleKeyFrame KeyTime="0:0:1.8" Value="0"/>
              <LinearDoubleKeyFrame KeyTime="0:0:2.3" Value="85"/>
          </DoubleAnimationUsingKeyFrames>
          <DoubleAnimationUsingKeyFrames Storyboard.TargetName="trans_ln_top"
                                         Storyboard.TargetProperty="Y">
              <LinearDoubleKeyFrame KeyTime="0:0:1.8" Value="0"/>
              <LinearDoubleKeyFrame KeyTime="0:0:2.3" Value="-120"/>
          </DoubleAnimationUsingKeyFrames>
          <DoubleAnimationUsingKeyFrames Storyboard.TargetName="trans_ln_bottom"
                                         Storyboard.TargetProperty="Y">
              <LinearDoubleKeyFrame KeyTime="0:0:1.8" Value="0"/>
              <LinearDoubleKeyFrame KeyTime="0:0:2.3" Value="120"/>
          </DoubleAnimationUsingKeyFrames>
          <DoubleAnimationUsingKeyFrames Storyboard.TargetName="vbox"
                                         Storyboard.TargetProperty="ScaleX">
              <LinearDoubleKeyFrame KeyTime="0:0:1.8" Value="1"/>
              <LinearDoubleKeyFrame KeyTime="0:0:2.3" Value="0.5"/>
          </DoubleAnimationUsingKeyFrames>
          <DoubleAnimationUsingKeyFrames Storyboard.TargetName="vbox"
                                         Storyboard.TargetProperty="ScaleY">
              <LinearDoubleKeyFrame KeyTime="0:0:1.8" Value="1"/>
              <LinearDoubleKeyFrame KeyTime="0:0:2.3" Value="0.5"/>
          </DoubleAnimationUsingKeyFrames>
          <DoubleAnimationUsingKeyFrames Storyboard.TargetName="gridline"
                               Storyboard.TargetProperty="Opacity">
    <LinearDoubleKeyFrame KeyTime="0:0:1.8" Value="1"/>
    <LinearDoubleKeyFrame KeyTime="0:0:2.3" Value="0"/>
</DoubleAnimationUsingKeyFrames>


</Storyboard>
我们看到,仅仅是线框的出现和消失,就要分别对4个方向的线框进行外向的动画移动,和透明渐变,以及对中心的线框进行缩放和透明渐变,仅仅这一个图层的控制,就分成了5块区域的控制,所以,这看似简单的动画,其实综合控制到准准点位是非常考验手感的。
2. 五种UI框架
2.1 WPF
声明式:Storyboard 直接改控件属性
画面是真控件树。三类动画分别对应三个 Storyboard(或合并进一个)。框架自己推进时间,你只写关键帧与起播前的属性复位。
模糊Image +BlurEffect+ 完整关键帧
xml
<!-- MainWindow.xaml:模糊挂在前景 Image 上 -->
<Image x:Name="img1" Source="/imgs/2.png" Stretch="UniformToFill">
  <Image.Effect>
    <BlurEffect x:Name="img1blur" KernelType="Gaussian" Radius="0"/>
  </Image.Effect>
</Image>

<Storyboard x:Key="AnimGaussianBlurStoryboard">
  <DoubleAnimationUsingKeyFrames Storyboard.TargetName="img1blur"
                                 Storyboard.TargetProperty="Radius">
    <LinearDoubleKeyFrame KeyTime="0:0:0" Value="0"/>
    <LinearDoubleKeyFrame KeyTime="0:0:0.25" Value="40"/>
    <LinearDoubleKeyFrame KeyTime="0:0:0.5" Value="0"/>
  </DoubleAnimationUsingKeyFrames>
</Storyboard>
说明:WPF 不自己画模糊,而是把高斯核挂在 Image 的 Effect 上。Storyboard 只改 Radius(0→40→0),合成器会跟着刷新像素。把关键帧写全,才能对照工程看出「闪糊」的完整节奏,而不是只剩一个中间值。
圆孔Exclude 挖洞 + RadiusX/Y 双轨关键帧
ini
<Path Fill="Black">
  <Path.Data>
    <CombinedGeometry GeometryCombineMode="Exclude">
      <CombinedGeometry.Geometry1>
        <RectangleGeometry Rect="0,0,400,600"/>
      </CombinedGeometry.Geometry1>
      <CombinedGeometry.Geometry2>
        <EllipseGeometry x:Name="ellGeo" Center="200,300"
                         RadiusX="350" RadiusY="350"/>
      </CombinedGeometry.Geometry2>
    </CombinedGeometry>
  </Path.Data>
</Path>

<Storyboard x:Key="AnimCircleStoryboard">
  <DoubleAnimationUsingKeyFrames Storyboard.TargetName="ellGeo"
                                 Storyboard.TargetProperty="RadiusX">
    <LinearDoubleKeyFrame KeyTime="0:0:0" Value="350"/>
    <LinearDoubleKeyFrame KeyTime="0:0:0.65" Value="30"/>
    <LinearDoubleKeyFrame KeyTime="0:0:1.3" Value="350"/>
  </DoubleAnimationUsingKeyFrames>
  <DoubleAnimationUsingKeyFrames Storyboard.TargetName="ellGeo"
                                 Storyboard.TargetProperty="RadiusY">
    <LinearDoubleKeyFrame KeyTime="0:0:0" Value="350"/>
    <LinearDoubleKeyFrame KeyTime="0:0:0.65" Value="30"/>
    <LinearDoubleKeyFrame KeyTime="0:0:1.3" Value="350"/>
  </DoubleAnimationUsingKeyFrames>
</Storyboard>
说明:黑遮罩用「大矩形 Exclude 椭圆」挖出透明圆洞。动画必须同时改 RadiusX 与 RadiusY,洞才保持正圆并完成 350→30→350 的收紧/回弹。技术核心是几何布尔 + 改半径,而不是每帧重画整张位图。
强调:圆孔动画的技术核心是「几何布尔挖洞 + 改半径」,与 HTML evenodd / Skia EvenOdd / Win2D Alternate 是同一思想。
线框完整 Appear Storyboard + C# 起播复位
ini
<!-- AnimFrameAppearStoryboard:位移 + 缩放 + 整体淡入 -->
<Storyboard x:Key="AnimFrameAppearStoryboard">
  <DoubleAnimationUsingKeyFrames Storyboard.TargetName="trans_ln_left"
                                 Storyboard.TargetProperty="X">
    <LinearDoubleKeyFrame KeyTime="0:0:0" Value="-85"/>
    <LinearDoubleKeyFrame KeyTime="0:0:0.5" Value="0"/>
  </DoubleAnimationUsingKeyFrames>
  <DoubleAnimationUsingKeyFrames Storyboard.TargetName="trans_ln_right"
                                 Storyboard.TargetProperty="X">
    <LinearDoubleKeyFrame KeyTime="0:0:0" Value="85"/>
    <LinearDoubleKeyFrame KeyTime="0:0:0.5" Value="0"/>
  </DoubleAnimationUsingKeyFrames>
  <DoubleAnimationUsingKeyFrames Storyboard.TargetName="trans_ln_top"
                                 Storyboard.TargetProperty="Y">
    <LinearDoubleKeyFrame KeyTime="0:0:0" Value="-120"/>
    <LinearDoubleKeyFrame KeyTime="0:0:0.5" Value="0"/>
  </DoubleAnimationUsingKeyFrames>
  <DoubleAnimationUsingKeyFrames Storyboard.TargetName="trans_ln_bottom"
                                 Storyboard.TargetProperty="Y">
    <LinearDoubleKeyFrame KeyTime="0:0:0" Value="120"/>
    <LinearDoubleKeyFrame KeyTime="0:0:0.5" Value="0"/>
  </DoubleAnimationUsingKeyFrames>
  <DoubleAnimationUsingKeyFrames Storyboard.TargetName="vbox"
                                 Storyboard.TargetProperty="ScaleX">
    <LinearDoubleKeyFrame KeyTime="0:0:0" Value="0.5"/>
    <LinearDoubleKeyFrame KeyTime="0:0:0.5" Value="1"/>
  </DoubleAnimationUsingKeyFrames>
  <DoubleAnimationUsingKeyFrames Storyboard.TargetName="vbox"
                                 Storyboard.TargetProperty="ScaleY">
    <LinearDoubleKeyFrame KeyTime="0:0:0" Value="0.5"/>
    <LinearDoubleKeyFrame KeyTime="0:0:0.5" Value="1"/>
  </DoubleAnimationUsingKeyFrames>
  <DoubleAnimationUsingKeyFrames Storyboard.TargetName="gridline"
                                 Storyboard.TargetProperty="Opacity">
    <LinearDoubleKeyFrame KeyTime="0:0:0" Value="0"/>
    <LinearDoubleKeyFrame KeyTime="0:0:0.5" Value="1"/>
  </DoubleAnimationUsingKeyFrames>
</Storyboard>

// MainWindow.xaml.cs --- Button_Click_FrameAppear
private void Button_Click_FrameAppear(object sender, RoutedEventArgs e)
{
    var storyboard = (Storyboard)FindResource("AnimFrameAppearStoryboard");
    // 必须先卸掉消失动画的 HoldEnd,否则属性仍被占住
    StopAllStoryboards();

    // 出现动画从「已收起」状态开始
    trans_ln_left.BeginAnimation(TranslateTransform.XProperty, null);
    trans_ln_right.BeginAnimation(TranslateTransform.XProperty, null);
    trans_ln_top.BeginAnimation(TranslateTransform.YProperty, null);
    trans_ln_bottom.BeginAnimation(TranslateTransform.YProperty, null);
    trans_ln_left.X = -85;
    trans_ln_right.X = 85;
    trans_ln_top.Y = -120;
    trans_ln_bottom.Y = 120;

    vbox.BeginAnimation(ScaleTransform.ScaleXProperty, null);
    vbox.BeginAnimation(ScaleTransform.ScaleYProperty, null);
    vbox.ScaleX = 0.5;
    vbox.ScaleY = 0.5;

    gridline.BeginAnimation(UIElement.OpacityProperty, null);
    gridline.Opacity = 0; // 子元素保持可见,由父级统一淡入

    storyboard.Begin(this);
}
说明:XAML 负责「飞入 + 放大 + 淡入」的完整时间表;C# 负责起播前清掉上一支 Storyboard 的 HoldEnd,并把位移/缩放/透明度摆到「已收起」初值。缺任一端,线框都会卡在半途或播不出来------这正是 WPF 线框坑点所在。
强调:Stop 后还要 Remove;出现前必须把 left=-85 / right=85 / top=-120 / bottom=120、vbox=0.5、gridline.Opacity=0 设齐。
2.2 HTML
命令式:rAF 采样状态 → Canvas 整帧重画
没有控件属性动画。每帧用 JS 算出 blur / holeRadius / frameOpacity,再画到 canvas。sample 是所有关键帧的公共插值器。
模糊sample+ Blur.apply +drawImageLayer
ini
// anim-timeline.js:关键帧线性插值
function sample(frames, t) {
  if (!frames.length) return 0;
  if (t <= frames[0].t) return frames[0].v;
  if (t >= frames[frames.length - 1].t) return frames[frames.length - 1].v;
  for (let i = 0; i < frames.length - 1; i++) {
    const a = frames[i], b = frames[i + 1];
    if (t >= a.t && t <= b.t) {
      const p = (t - a.t) / (b.t - a.t);
      return a.v + (b.v - a.v) * p;
    }
  }
  return frames[frames.length - 1].v;
}

const Blur = {
  name: "Blur", duration: 0.5,
  apply(s, t) {
    s.blur1 = sample([{ t: 0, v: 0 }, { t: 0.25, v: 40 }, { t: 0.5, v: 0 }], t);
  },
};

// app.js:真正落到像素
function drawImageLayer(target, source, opacity, blur) {
  if (opacity <= 0.001) return;
  target.save();
  target.globalAlpha = opacity;
  if (blur > 0.5) target.filter = `blur(${blur * 0.5}px)`;
  target.drawImage(source, 0, 0);
  target.filter = "none"; // 必须清掉,否则污染后续绘制
  target.restore();
}
说明:时间轴只产出数字 blur1,Canvas 用 ctx.filter 把它变成高斯模糊。把 sample、关键帧表和 drawImageLayer 放在一起,才能看清「参数从哪来、像素怎么糊」。画完清 filter 是必须的,否则线框/遮罩也会被糊掉。
圆孔Circle 关键帧 +render里 evenodd 挖洞
scss
const Circle = {
  name: "Circle", duration: 1.3,
  apply(s, t) {
    s.holeRadius = sample(
      [{ t: 0, v: 350 }, { t: 0.65, v: 30 }, { t: 1.3, v: 350 }], t);
  },
};

function render() {
  // ... clear / 1.1 缩放 ...
  drawImageLayer(octx, cover2, 1, state.blur2);          // 后景
  drawImageLayer(octx, cover1, state.img1Opacity, state.blur1); // 前景

  // 圆孔遮罩:矩形 + 反向圆 → evenodd 挖透明洞
  octx.save();
  octx.fillStyle = "#000";
  octx.beginPath();
  octx.rect(0, 0, W, H);
  octx.arc(W / 2, H / 2, state.holeRadius, 0, Math.PI * 2, true);
  octx.fill("evenodd");
  octx.restore();

  if (state.frameOpacity > 0.001) drawFrame(octx, state); // 线框最上
}
说明:绘制顺序固定为「后景 → 前景 → 黑遮罩挖洞 → 线框」。圆孔半径由 Circle.apply 采样;arc(..., true) 反向加上 evenodd,中间才会镂空。半径变小,可见取景区就收紧------这与 WPF Exclude 是同一几何语义。
线框FrameAppear 全字段 +drawFrame绘制体
ini
const FrameAppear = {
  name: "FrameAppear", duration: 0.5,
  apply(s, t) {
    s.lineLeftX   = sample([{ t: 0, v: -85 }, { t: 0.5, v: 0 }], t);
    s.lineRightX  = sample([{ t: 0, v:  85 }, { t: 0.5, v: 0 }], t);
    s.lineTopY    = sample([{ t: 0, v: -120 }, { t: 0.5, v: 0 }], t);
    s.lineBottomY = sample([{ t: 0, v:  120 }, { t: 0.5, v: 0 }], t);
    s.vboxScale   = sample([{ t: 0, v: 0.5 }, { t: 0.5, v: 1 }], t);
    s.frameOpacity= sample([{ t: 0, v: 0 }, { t: 0.5, v: 1 }], t);
  },
};

function drawFrame(g, s) {
  g.save();
  g.globalAlpha = s.frameOpacity; // 出现/消失都靠它
  drawGuideLine(g, 25 + s.lineLeftX, H / 2, 85 + s.lineLeftX, H / 2);
  drawGuideLine(g, W - 85 + s.lineRightX, H / 2, W - 25 + s.lineRightX, H / 2);
  drawGuideLine(g, W / 2, 30 + s.lineTopY, W / 2, 120 + s.lineTopY);
  drawGuideLine(g, W / 2, H - 120 + s.lineBottomY, W / 2, H - 30 + s.lineBottomY);

  const scale = 0.3 * s.vboxScale;
  g.translate(W / 2, H / 2);
  g.scale(scale, scale);
  g.translate(-100, -120);
  // corners / 缺口圆环 / 中心蓝点 ...
  g.restore();
}
说明:时间轴一次写出四边偏移、中心框缩放和整层透明度;绘制侧用 globalAlpha 统一显隐,坐标里叠加偏移。这样「飞入」和「淡入」共享同一套状态,合并动画才能把线框轨无缝嵌进 Sum。
2.2 Avalonia
关键帧表 + Skia 合成(跨平台)
Timer 采 AnimTimeline 得到状态;真正出画面靠 Skia 画到位图。模糊路径必须「烘到临时位图」,否则去糊会粘住。
模糊AnimTimeline.Blur+ 完整DrawImage
ini
// AnimTimeline.cs
public static readonly AnimDef Blur = new()
{
    Name = "Blur",
    Duration = 0.5f,
    Apply = (s, t) =>
    {
        s.Blur1 = Sample([new(0, 0), new(0.25f, 40), new(0.5f, 0)], t);
    }
};

// CameraScene.cs --- DrawImage
static void DrawImage(SKCanvas canvas, SKBitmap bmp, float opacity, float blurRadius)
{
    if (opacity <= 0.001f) return;

    // 无模糊:直接画原图像素,避免 ImageFilter 残影
    if (blurRadius <= 0.5f)
    {
        using var paint = new SKPaint {
            IsAntialias = true,
            FilterQuality = SKFilterQuality.Medium,
            Color = SKColors.White.WithAlpha((byte)(Math.Clamp(opacity, 0, 1) * 255)),
        };
        canvas.DrawBitmap(bmp, 0, 0, paint);
        return;
    }

    // 有模糊:先烘到临时位图,再以普通 Paint 输出
    var sigma = blurRadius * 0.5f;
    using var temp = new SKBitmap(bmp.Width, bmp.Height, bmp.ColorType, bmp.AlphaType);
    using (var tempCanvas = new SKCanvas(temp))
    using (var blurFilter = SKImageFilter.CreateBlur(sigma, sigma))
    using (var blurPaint = new SKPaint { ImageFilter = blurFilter, IsAntialias = true })
    {
        tempCanvas.Clear(SKColors.Transparent);
        tempCanvas.DrawBitmap(bmp, 0, 0, blurPaint);
    }
    using var outPaint = new SKPaint {
        IsAntialias = true,
        Color = SKColors.White.WithAlpha((byte)(Math.Clamp(opacity, 0, 1) * 255)),
    };
    canvas.DrawBitmap(temp, 0, 0, outPaint);
}
说明:关键帧只负责产出 Blur1;真正值钱的是 DrawImage 的分叉------有糊才走 ImageFilter,且必须烘到临时位图再普通画出。长期把 filter 挂在主绘制链上,去糊阶段容易「糊住不恢复」,这是桌面 Skia 路径最易踩的坑。
强调:无糊必须直出原图;有糊必须 bake-then-blit,两端缺一都会出残影。
圆孔Circle 采样 + 完整DrawHoleMask
ini
public static readonly AnimDef Circle = new()
{
    Name = "Circle",
    Duration = 1.3f,
    Apply = (s, t) =>
    {
        s.HoleRadius = Sample([new(0, 350), new(0.65f, 30), new(1.3f, 350)], t);
    }
};

static void DrawHoleMask(SKCanvas canvas, float radius)
{
    var r = Math.Max(radius, 0.1f);
    using var path = new SKPath { FillType = SKPathFillType.EvenOdd };
    path.AddRect(SKRect.Create(0, 0, Width, Height));
    path.AddOval(SKRect.Create(Width / 2f - r, Height / 2f - r, r * 2, r * 2));
    using var paint = new SKPaint { IsAntialias = true, Color = SKColors.Black };
    canvas.DrawPath(path, paint);
}
说明:Circle 轨只改 HoleRadius;DrawHoleMask 用 EvenOdd「矩形 + 椭圆」铺黑遮罩挖洞。半径来自时间轴,绘制代码本身无动画------把采样与几何写全,才能对照 WPF Exclude / HTML evenodd 看到同一模型。
线框FrameAppear.Apply + DrawFrame + 双描边引导线
ini
public static readonly AnimDef FrameAppear = new()
{
    Name = "FrameAppear", Duration = 0.5f,
    Apply = (s, t) =>
    {
        s.LineLeftX   = Sample([new(0, -85), new(0.5f, 0)], t);
        s.LineRightX  = Sample([new(0, 85), new(0.5f, 0)], t);
        s.LineTopY    = Sample([new(0, -120), new(0.5f, 0)], t);
        s.LineBottomY = Sample([new(0, 120), new(0.5f, 0)], t);
        s.VboxScale   = Sample([new(0, 0.5f), new(0.5f, 1)], t);
        s.FrameOpacity= Sample([new(0, 0), new(0.5f, 1)], t);
    }
};

static void DrawFrame(SKCanvas canvas, AnimTimeline.SceneState s)
{
    using var layerPaint = new SKPaint {
        Color = SKColors.White.WithAlpha((byte)(Math.Clamp(s.FrameOpacity, 0, 1) * 255)),
    };
    canvas.SaveLayer(layerPaint);
    DrawGuideLine(canvas, 25 + s.LineLeftX, Height / 2f, 85 + s.LineLeftX, Height / 2f);
    DrawGuideLine(canvas, Width - 85 + s.LineRightX, Height / 2f, Width - 25 + s.LineRightX, Height / 2f);
    DrawGuideLine(canvas, Width / 2f, 30 + s.LineTopY, Width / 2f, 120 + s.LineTopY);
    DrawGuideLine(canvas, Width / 2f, Height - 120 + s.LineBottomY, Width / 2f, Height - 30 + s.LineBottomY);
    var scale = 0.3f * s.VboxScale;
    canvas.Save();
    canvas.Translate(Width / 2f, Height / 2f);
    canvas.Scale(scale, scale);
    canvas.Translate(-100, -120);
    DrawCornersAndRing(canvas);
    canvas.Restore();
    canvas.Restore();
}

static void DrawGuideLine(SKCanvas canvas, float x1, float y1, float x2, float y2)
{
    // 深色外包裹 + 浅灰白芯(双描边)
    using var wrap = new SKPaint {
        IsAntialias = true, Color = new SKColor(0, 0, 0, 0x28),
        StrokeWidth = 2, Style = SKPaintStyle.Stroke, StrokeCap = SKStrokeCap.Round,
    };
    using var core = new SKPaint {
        IsAntialias = true, Color = new SKColor(0xF0, 0xF0, 0xF0),
        StrokeWidth = 1, Style = SKPaintStyle.Stroke, StrokeCap = SKStrokeCap.Round,
    };
    canvas.DrawLine(x1, y1, x2, y2, wrap);
    canvas.DrawLine(x1, y1, x2, y2, core);
}
说明:SaveLayer 把整层线框乘上 FrameOpacity,位移写在画线坐标里,缩放写在中心框 Scale 上。DrawGuideLine 的双描边决定了取景线在深色照片上的可读性------这是观感细节,不能只留一句「画四条线」。
2.3 WinForms
与 Avalonia 共用画师,壳换成 Timer + SKControl
三类动画的「怎么糊 / 怎么挖洞 / 怎么淡线框」都在共享的 CameraScene + AnimTimeline 里。WinForms 负责推进时钟、播种初始状态与 Invalidate 刷新。
模糊Sample + OnTick Apply(绘制复用 CameraScene)
csharp
// AnimTimeline.Blur --- 只产出数值
public static readonly AnimDef Blur = new()
{
    Name = "Blur", Duration = 0.5f,
    Apply = (s, t) =>
    {
        s.Blur1 = Sample([new(0, 0), new(0.25f, 40), new(0.5f, 0)], t);
    }
};

// Form1.cs --- 时钟推进
void OnTick(object? sender, EventArgs e)
{
    if (_playing is null || _sw is null) return;
    var t = (float)_sw.Elapsed.TotalSeconds;
    if (t > _playing.Duration) t = _playing.Duration;
    AnimTimeline.Apply(_playing, _state, t);
    _sk.Invalidate(); // 触发 OnPaintSurface → CameraScene.DrawImage
    if (t >= _playing.Duration) { _timer.Stop(); _playing = null; }
}

// 真正模糊绘制与 Avalonia 共用:
// CameraScene.DrawImage(... blurRadius) --- bake 临时位图路径
说明:WinForms 不单独实现模糊算法,只保证 Timer 采样后把 Blur1 交给共享 Skia 场景。把 Sample、OnTick 和「绘制在 CameraScene」写清楚,才能证明换壳不换剧本------特效关键在时间轴 + 合成,不在控件年代。
圆孔Circle 采样 + Paint 调共享 DrawHoleMask
csharp
public static readonly AnimDef Circle = new()
{
    Name = "Circle", Duration = 1.3f,
    Apply = (s, t) =>
    {
        s.HoleRadius = Sample([new(0, 350), new(0.65f, 30), new(1.3f, 350)], t);
    }
};

void OnPaintSurface(object? sender, SKPaintSurfaceEventArgs e)
{
    if (_img1 is null || _img2 is null) { e.Surface.Canvas.Clear(SKColors.Black); return; }
    CameraScene.Draw(e.Surface.Canvas, _img1, _img2, _state);
    // Draw 内部顺序:DrawImage(img2) → DrawImage(img1) → DrawHoleMask → DrawFrame
}

// CameraScene.DrawHoleMask(与 Avalonia 同文件逻辑)
static void DrawHoleMask(SKCanvas canvas, float radius)
{
    var r = Math.Max(radius, 0.1f);
    using var path = new SKPath { FillType = SKPathFillType.EvenOdd };
    path.AddRect(SKRect.Create(0, 0, Width, Height));
    path.AddOval(SKRect.Create(Width / 2f - r, Height / 2f - r, r * 2, r * 2));
    using var paint = new SKPaint { IsAntialias = true, Color = SKColors.Black };
    canvas.DrawPath(path, paint);
}
说明:圆孔几何与 Avalonia 完全同一套代码路径,WinForms 只负责把 _state.HoleRadius 喂进去。双端共用 DrawHoleMask,才能避免「一边收孔顺滑、另一边半径表漂移」。
线框FrameAppear + Play 播种 InitialHiddenFrame
ini
public static readonly AnimDef FrameAppear = new()
{
    Name = "FrameAppear", Duration = 0.5f,
    Apply = (s, t) =>
    {
        s.LineLeftX = Sample([new(0, -85), new(0.5f, 0)], t);
        s.LineRightX = Sample([new(0, 85), new(0.5f, 0)], t);
        s.LineTopY = Sample([new(0, -120), new(0.5f, 0)], t);
        s.LineBottomY = Sample([new(0, 120), new(0.5f, 0)], t);
        s.VboxScale = Sample([new(0, 0.5f), new(0.5f, 1)], t);
        s.FrameOpacity = Sample([new(0, 0), new(0.5f, 1)], t);
    }
};

void Play(AnimTimeline.AnimDef def)
{
    Stop();
    if (def == AnimTimeline.Blur) _state.Blur1 = 0;
    else if (def == AnimTimeline.Circle) _state.HoleRadius = 350;
    else if (def == AnimTimeline.FrameAppear)
        _state = AnimTimeline.InitialHiddenFrame(); // Opacity=0, 偏移已收起, Scale=0.5
    // ...
    _playing = def;
    _sw = Stopwatch.StartNew();
    _timer.Start();
    _sk.Invalidate();
}

void OnTick(...) {
  AnimTimeline.Apply(_playing, _state, t);
  _sk.Invalidate();
}
void OnPaintSurface(...) {
  CameraScene.Draw(e.Surface.Canvas, _img1, _img2, _state); // 含 DrawFrame
}
说明:经典 WinForms 节奏------Play 播种收起态 → OnTick 写状态 → Invalidate → Paint 一次合成三轨。若不先 InitialHiddenFrame(),Appear 关键帧会从错误初值插值,线框会「闪一下再飞入」。
强调:换壳不换剧本------证明特效关键在「时间轴 + 合成」,不在控件框架年代。
2.4 WinUI 3
同一关键帧 + Win2D 效果图 / 几何
CanvasAnimatedControl 自带绘制循环;模糊用系统 GaussianBlurEffect;圆孔用几何组合;线框用手绘双描边。
模糊完整DrawLayer(清路径 + 高斯 + 透明度)
ini
private static void DrawLayer(
    CanvasDrawingSession ds, CanvasRenderTarget src, float opacity, float blur)
{
    if (opacity <= 0.001f) return;

    // 无模糊:直接画原图,避免效果图缓存残影
    if (blur <= 0.5f)
    {
        if (opacity >= 0.999f) { ds.DrawImage(src); }
        else
        {
            using var opFx = new OpacityEffect { Source = src, Opacity = opacity };
            ds.DrawImage(opFx);
        }
        return;
    }

    using var blurFx = new GaussianBlurEffect
    {
        Source = src,
        BlurAmount = blur * 0.5f,
        BorderMode = EffectBorderMode.Hard,
    };
    if (opacity >= 0.999f) { ds.DrawImage(blurFx); }
    else
    {
        using var opFx = new OpacityEffect { Source = blurFx, Opacity = opacity };
        ds.DrawImage(opFx);
    }
}
说明:Win2D 把模糊做成效果图节点。有糊才套 GaussianBlurEffect,并按需再套 OpacityEffect;去糊必须回到直出原图。四个分支写全,才能对照工程理解「为什么换图后不会一直糊着」。
圆孔完整DrawHoleMask(半径来自时间轴)
csharp
private static void DrawHoleMask(
    CanvasDrawingSession ds, ICanvasResourceCreator device, float radius)
{
    using var rect = CanvasGeometry.CreateRectangle(device, 0, 0, TexW, TexH);
    using var ellipse = CanvasGeometry.CreateEllipse(
        device, TexW / 2f, TexH / 2f, radius, radius);
    using var hole = CanvasGeometry.CreateGroup(
        device, [rect, ellipse], CanvasFilledRegionDetermination.Alternate);
    ds.FillGeometry(hole, Colors.Black);
}

// Draw 调用处:DrawHoleMask(ds, sender, _state.HoleRadius);
// HoleRadius 由 AnimTimeline.Circle / Sum 按 t 采样(350→30→350)说明:Alternate 等价于 evenodd / Exclude------矩形减椭圆得到黑遮罩圆洞。半径完全由 _state.HoleRadius 驱动,绘制函数本身无时间逻辑;时间轴与几何分层,合并轨才容易接入。
线框DrawFrame实质主体(alpha / Line / 四边 / 变换 / Corner)
scss
private static void DrawFrame(
    CanvasDrawingSession ds, ICanvasResourceCreator device, AnimTimeline.SceneState s)
{
    var alpha = (byte)(Math.Clamp(s.FrameOpacity, 0, 1) * 255);
    var wrap = Color.FromArgb((byte)(0x28 * s.FrameOpacity), 0, 0, 0);
    var core = Color.FromArgb(alpha, 0xF0, 0xF0, 0xF0);

    void Line(float x1, float y1, float x2, float y2)
    {
        ds.DrawLine(x1, y1, x2, y2, wrap, 2f);
        ds.DrawLine(x1, y1, x2, y2, core, 1f);
    }
    Line(25 + s.LineLeftX, TexH / 2f, 85 + s.LineLeftX, TexH / 2f);
    Line(TexW - 85 + s.LineRightX, TexH / 2f, TexW - 25 + s.LineRightX, TexH / 2f);
    Line(TexW / 2f, 30 + s.LineTopY, TexW / 2f, 120 + s.LineTopY);
    Line(TexW / 2f, TexH - 120 + s.LineBottomY, TexW / 2f, TexH - 30 + s.LineBottomY);

    var scale = 0.3f * s.VboxScale;
    var old = ds.Transform;
    ds.Transform = Matrix3x2.CreateTranslation(TexW / 2f, TexH / 2f) *
                   Matrix3x2.CreateScale(scale) *
                   Matrix3x2.CreateTranslation(-100, -120) *
                   old;

    void Corner(float x0, float y0, float x1, float y1, float x2, float y2)
    {
        using var path = new CanvasPathBuilder(device);
        path.BeginFigure(x0, y0);
        path.AddLine(x1, y1);
        path.AddLine(x2, y2);
        path.EndFigure(CanvasFigureLoop.Open);
        using var geo = CanvasGeometry.CreatePath(path);
        ds.DrawGeometry(geo, wrap, 5.5f);
        ds.DrawGeometry(geo, core, 4f);
    }
    Corner(0, 42, 0, 0, 42, 0);
    Corner(158, 0, 200, 0, 200, 42);
    Corner(0, 198, 0, 240, 42, 240);
    Corner(158, 240, 200, 240, 200, 198);
    // 中心圆环 + 蓝点 ...
    ds.Transform = old;
}
说明:出现/消失体现为描边颜色的 alpha;四边线叠加时间轴位移;中心框用矩阵缩放。把 Line / Corner / Transform 写全,才能对照 HTML/Skia 看到同一套取景器视觉规格,而不是只剩一句「按 FrameOpacity 淡出」。
3. 合并动画
单段动画只动一轨。合并动画要在同一时刻产出全套状态 ,再走一次绘制。两条技术路线:
- WPF:一个大 Storyboard 里并排放「模糊 + 圆孔 + 线框 + 换图」多组 KeyFrame,框架并行插值
- HTML / Avalonia / WinForms / WinUI :一个
Sum时间轴函数按 t 写全字段,然后每帧只调用一次合成绘制
合并动画技术处理流程时钟推进得到 t路线 A · WPF同一 Storyboard 多组 KeyFrame路线 B · 其他四端AnimTimeline.Sum.Apply(state, t)同时更新三条轨道(+ 换图)① 模糊Blur1 / Blur2② 圆孔HoleRadius③ 线框Opacity + 位移 + Scale关键剪辑点(约 1.35s)Img1Opacity→0 · 后景以糊态露出一次合成绘制(单帧)后景 → 前景 → 圆孔遮罩 → 线框图 · 合并不是「再发明第四种动画」,而是三轨对齐 + 换图剪辑 + 单次合成
WPF 用 Storyboard 并行插值;其余端用 Sum(t) 写全状态,再统一画一帧
合并时额外要处理的两刀(所有框架都一样)
ini
// 1) 换图:卡在圆孔最紧(约 1.35s)
Img1Opacity = (t < 1.351) ? 1 : 0;
if (Img1Opacity <= 0) Blur1 = 0; // 前景已关,清糊度避免残影

// 2) 后景去糊:换图瞬间拉到 40,再在 1.8→2.3 线性回到 0
if (t < 1.351)      Blur2 = 0;
else if (t <= 1.8)  Blur2 = 40;
else if (t < 2.3)   Blur2 = 40 * (1 - (t - 1.8) / 0.5);
else                Blur2 = 0;

// 绘制顺序始终不变(单帧一次合成)
// DrawImage(img2, Blur2) → DrawImage(img1, Img1Opacity, Blur1)
// → DrawHoleMask(HoleRadius) → DrawFrame(...)
说明:三轨合并后,观感是否「高级」,很大程度取决于这两刀有没有对齐。换图过早会穿帮,后景不去糊会一直发虚;绘制顺序错了则遮罩/线框会盖错层。
4. 汇总
三类动画
模糊改糊度;圆孔改挖洞半径;线框改透明度+位移+缩放。
框架差异
WPF 改属性;HTML 用 Canvas filter/evenodd;Avalonia/WinForms 用 Skia;WinUI 用 Win2D。