HAProxy 知识点总结
一、什么是HAProxy
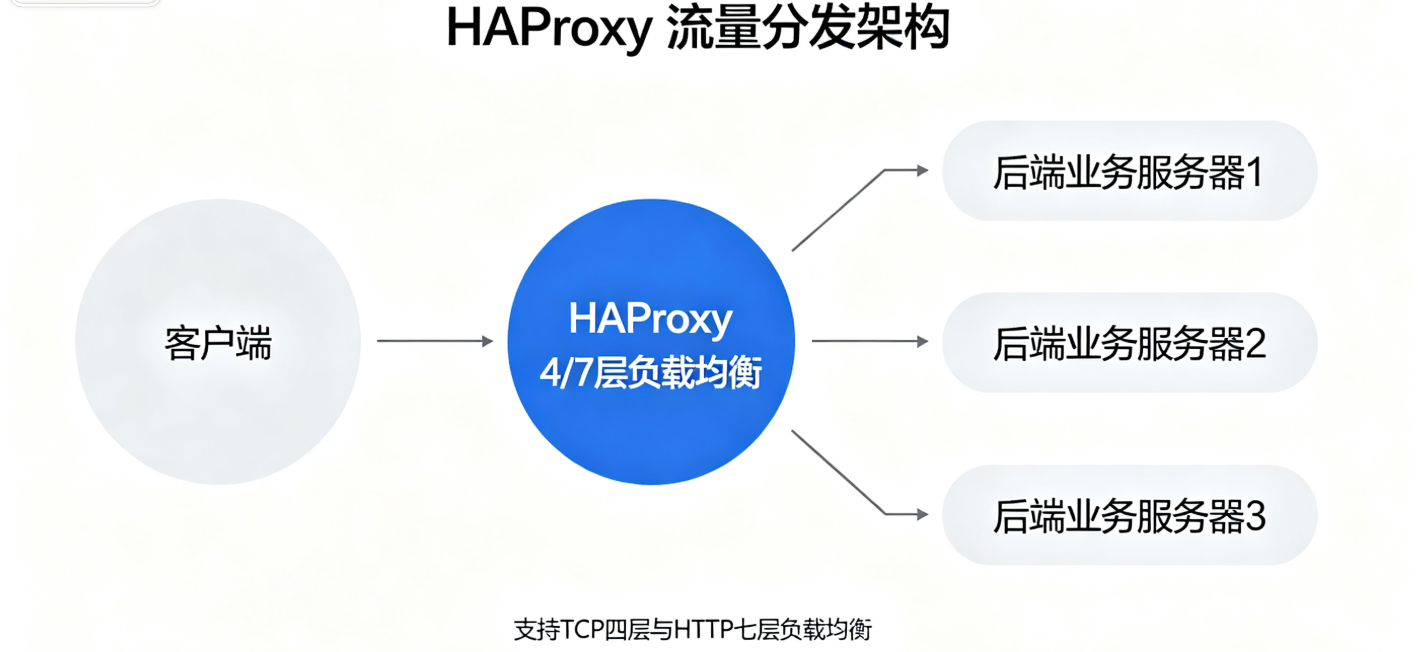
描述 :HAProxy是一款开源、高性能的代理&负载均衡软件,支持**四层(TCP)和七层(HTTP/HTTPS)**负载均衡,用于Web、数据库等业务流量分发,是生产环境主流软负载均衡器。
- 工作模式:TCP四层代理、HTTP七层代理
- 特点:高并发低延迟,支持上万并发连接;自带监控、健康检查、访问控制。
二、HAProxy的作用 和 LVS的区别
HAProxy主要作用
- 流量负载均衡,分发用户请求至多台后端服务器,实现业务扩容
- 后端服务器健康检查,自动剔除故障节点
- 七层能力:HTTP请求修改、URL路由、ACL访问控制、HTTPS加解密、会话保持
- 四层能力:TCP流量转发,支持MySQL、Redis等非HTTP业务
- 监控状态页、自定义错误页面、IP透传获取真实客户端IP
HAProxy VS LVS对比
| 对比项 | HAProxy | LVS |
|---|---|---|
| 工作层级 | 四层TCP + 七层HTTP | 仅四层(内核态) |
| 实现位置 | 用户态程序 | Linux内核模块ipvs |
| 性能 | 万级并发,CPU开销较大 | 极高,十万/百万级并发,内核转发,损耗极小 |
| 七层能力 | 强大,URL、header、cookie、HTTPS、ACL | 无七层能力,只能转发数据包 |
| IP透传 | 多种方案(X‑Forwarded‑For、source) | DR/NAT/TUN模式 |
| 配置难度 | 配置文件,简单 | ipvsadm命令,模式(NAT/DR/TUN)较复杂 |
| 适用场景 | Web、HTTPS、需要七层处理;中小规模集群 | 大流量纯四层TCP业务 |
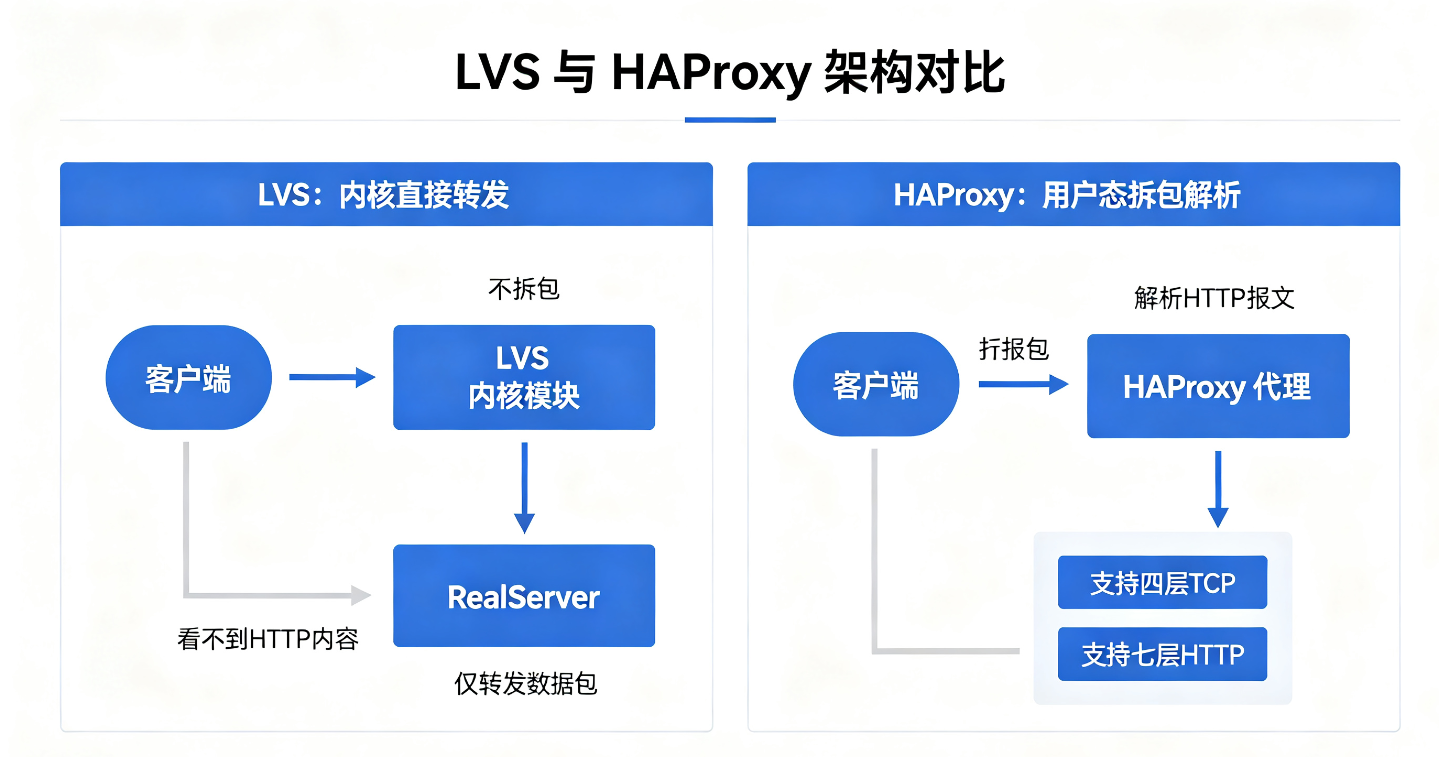
总结:要七层功能选HAProxy;超大流量纯四层选LVS;两者可以组合部署LVS+HAProxy。
三、HAProxy热更新工具
概念
热更新:修改haproxy配置后,不中断业务连接,平滑重载配置,不杀掉现有长连接。
安装socat
bash
[root@haproxy ~]# dnf install socat -y
[root@haproxy ~]# socat  -h
利用socat查看haproxy信息
bash
[root@haproxy ~]# echo "show servers state"  | socat stdio /var/lib/haproxy/stats
1
# be_id be_name srv_id srv_name srv_addr srv_op_state srv_admin_state srv_uweight srv_iweight srv_time_since_last_change srv_check_status srv_check_result srv_check_health srv_check_state srv_agent_state bk_f_forced_id srv_f_forced_id srv_fqdn srv_port srvrecord srv_use_ssl srv_check_port srv_check_addr srv_agent_addr srv_agent_port
2 webcluster 1 haha 192.168.0.10 2 0 1 1 275 6 3 7 6 0 0 0 - 80 - 0 0 - - 0
2 webcluster 2 hehe 192.168.0.20 2 0 1 1 275 6 3 7 6 0 0 0 - 80 - 0 0 - - 0


[root@haproxy ~]# echo "get  weight webcluster/haha" | socat  stdio /var/lib/haproxy/stats
1 (initial 1)

[root@haproxy ~]# echo "get  weight webcluster/hehe" | socat  stdio /var/lib/haproxy/stats
1				 (initial 1)
当前权重值			配置文件里的权重值
利用socat更改haproxy信息
bash
#直接更改报错
[root@haproxy ~]# echo "set  weight  webcluster/haha 2 " | socat stdio /var/lib/haproxy/stats
Permission denied

#对socket进行授权
[root@haproxy ~]# vim /etc/haproxy/haproxy.cfg
stats socket /var/lib/haproxy/stats mode 600 level admin


[root@haproxy ~]# rm -rf /var/lib/haproxy/*

[root@haproxy ~]# systemctl restart haproxy.service
[root@haproxy ~]# ll /var/lib/haproxy/
总用量 0
srw------- 1 root root 0  1月 25 10:04 stats


#执行权重更改
[root@haproxy ~]# echo "get  weight webcluster/hehe" | socat  stdio /var/lib/haproxy/stats
1 (initial 1)

[root@haproxy ~]# echo "set  weight  webcluster/hehe 4 " | socat stdio /var/lib/haproxy/stats

[root@haproxy ~]# echo "get  weight webcluster/hehe" | socat  stdio /var/lib/haproxy/stats
4 (initial 1)

#测试
[Administrator.DESKTOP-VJ307M3] ➤ for i in {1..10}; do curl 172.25.254.100; done
webserver2 - 192.168.0.20
webserver2 - 192.168.0.20
webserver1 - 192.168.0.10
webserver2 - 192.168.0.20
webserver2 - 192.168.0.20
webserver2 - 192.168.0.20
webserver2 - 192.168.0.20
webserver1 - 192.168.0.10
webserver2 - 192.168.0.20
webserver2 - 192.168.0.20


#服务器上线和下线
[root@haproxy ~]# echo "disable server  webcluster/hehe "  | socat stdio /var/lib/haproxy/stats
[Administrator.DESKTOP-VJ307M3] ➤ for i in {1..10}; do curl 172.25.254.100; done
192.168.0.20 - web2
192.168.0.20 - web2
192.168.0.20 - web2
192.168.0.20 - web2
192.168.0.20 - web2
192.168.0.20 - web2
192.168.0.20 - web2
192.168.0.20 - web2
192.168.0.20 - web2
192.168.0.20 - web2

[root@haproxy ~]# echo "enable server  webcluster/hehe "  | socat stdio /var/lib/haproxy/stats

[Administrator.DESKTOP-VJ307M3] ➤ for i in {1..10}; do curl 172.25.254.100; done
192.168.0.20 - web2
192.168.0.10 - web1
192.168.0.20 - web2
192.168.0.10 - web1
192.168.0.20 - web2
192.168.0.10 - web1
192.168.0.20 - web2
192.168.0.10 - web1
192.168.0.20 - web2
192.168.0.10 - web1
四、HAProxy调度算法
配置位置:backend段中 balance xxx
- roundrobin(轮询,默认)
依次轮流分发请求,权重可配置,适合服务器性能相近。
ini
backend web_back
    balance roundrobin
    server web1 192.168.1.10:80 weight 1
server web2 192.168.1.11:80 weight 2 #权重2接收2倍流量-
static-rr静态轮询
权重运行时不可动态修改,性能略高。
-
leastconn 最小连接数
把请求发给当前连接数最少的后端,适合长连接业务(MySQL、Redis)。
- source源地址哈希
根据客户端源IP做hash,同一个客户端IP永远调度到同一台后端,简易会话保持方案。
-
uri哈希
对请求URI做hash;相同url访问同一台后端,适合缓存服务器。
-
url_param
取url中get参数做hash,例如
?userid=123,按userid调度。 -
rdp‑cookie
专门用于windows远程桌面。
选型:短连接web用roundrobin;长连接数据库用leastconn;源IP绑定用source。
五、会话保持
场景:用户登录后,后续请求希望始终落在同一台后端服务器,保证session会话有效。
⚠️ 会话保持不是最优方案;生产优先后端session共享/redis会话存储。
方式1:source源hash算法(四层、七层都可用)
ini
backend web_back
    balance source
根据客户端IP哈希,同一IP固定到同一后端;缺点:NAT出口大量用户同一个IP会全部打到一台机器。
方式2:cookie插入(七层HTTP专用,推荐)
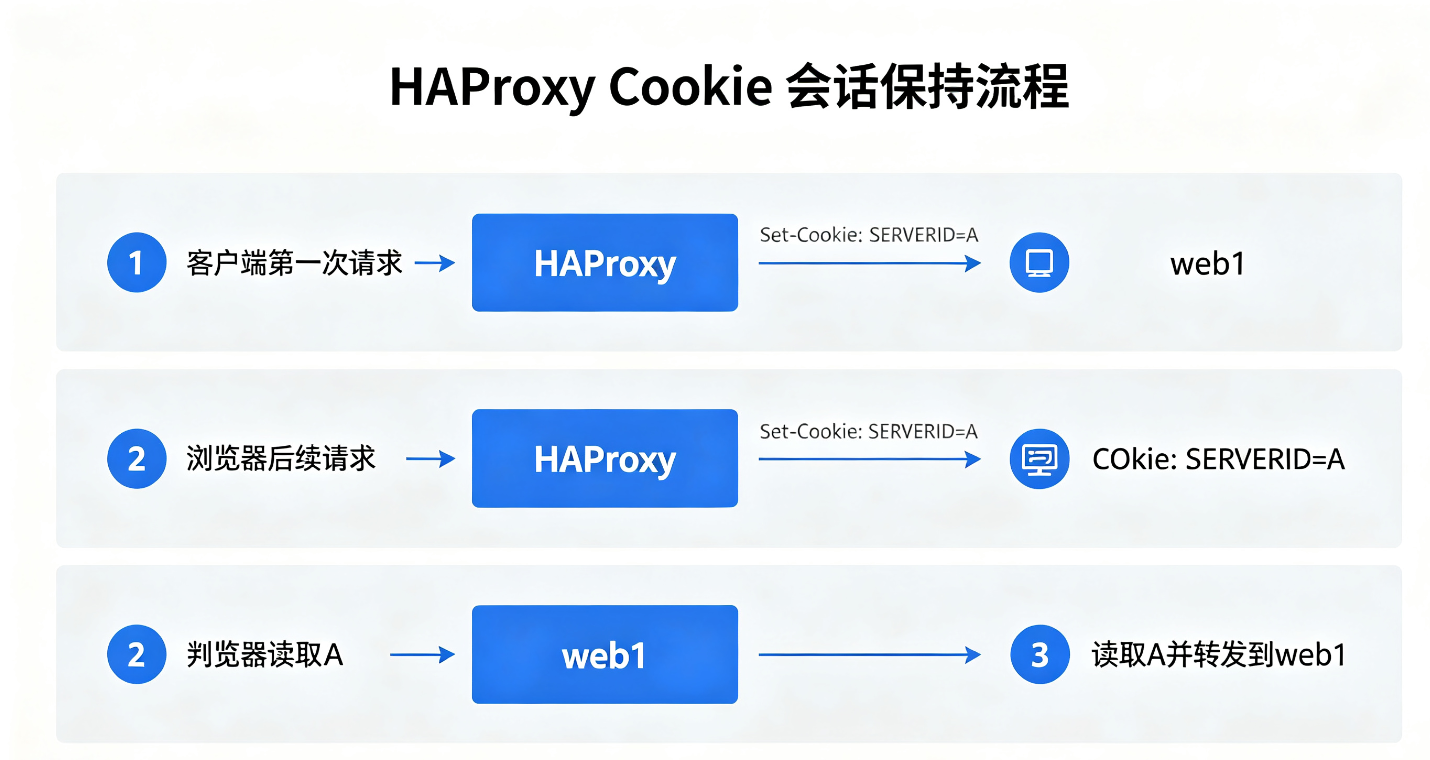
haproxy向下游返回cookie,浏览器携带cookie,haproxy读取cookie,将请求转发给对应后端。
配置示例:
ini
backend web_back
    balance roundrobin
    cookie SERVERID insert indirect nocache
    server web1 192.168.1.10:80 cookie A
    server web2 192.168.1.11:80 cookie B
参数说明
insert:haproxy自动向http响应插入cookieindirect:后端返回的cookie不会被改写nocache:禁止缓存服务器缓存该cookie
六、HAProxy状态页(监控页面stats)
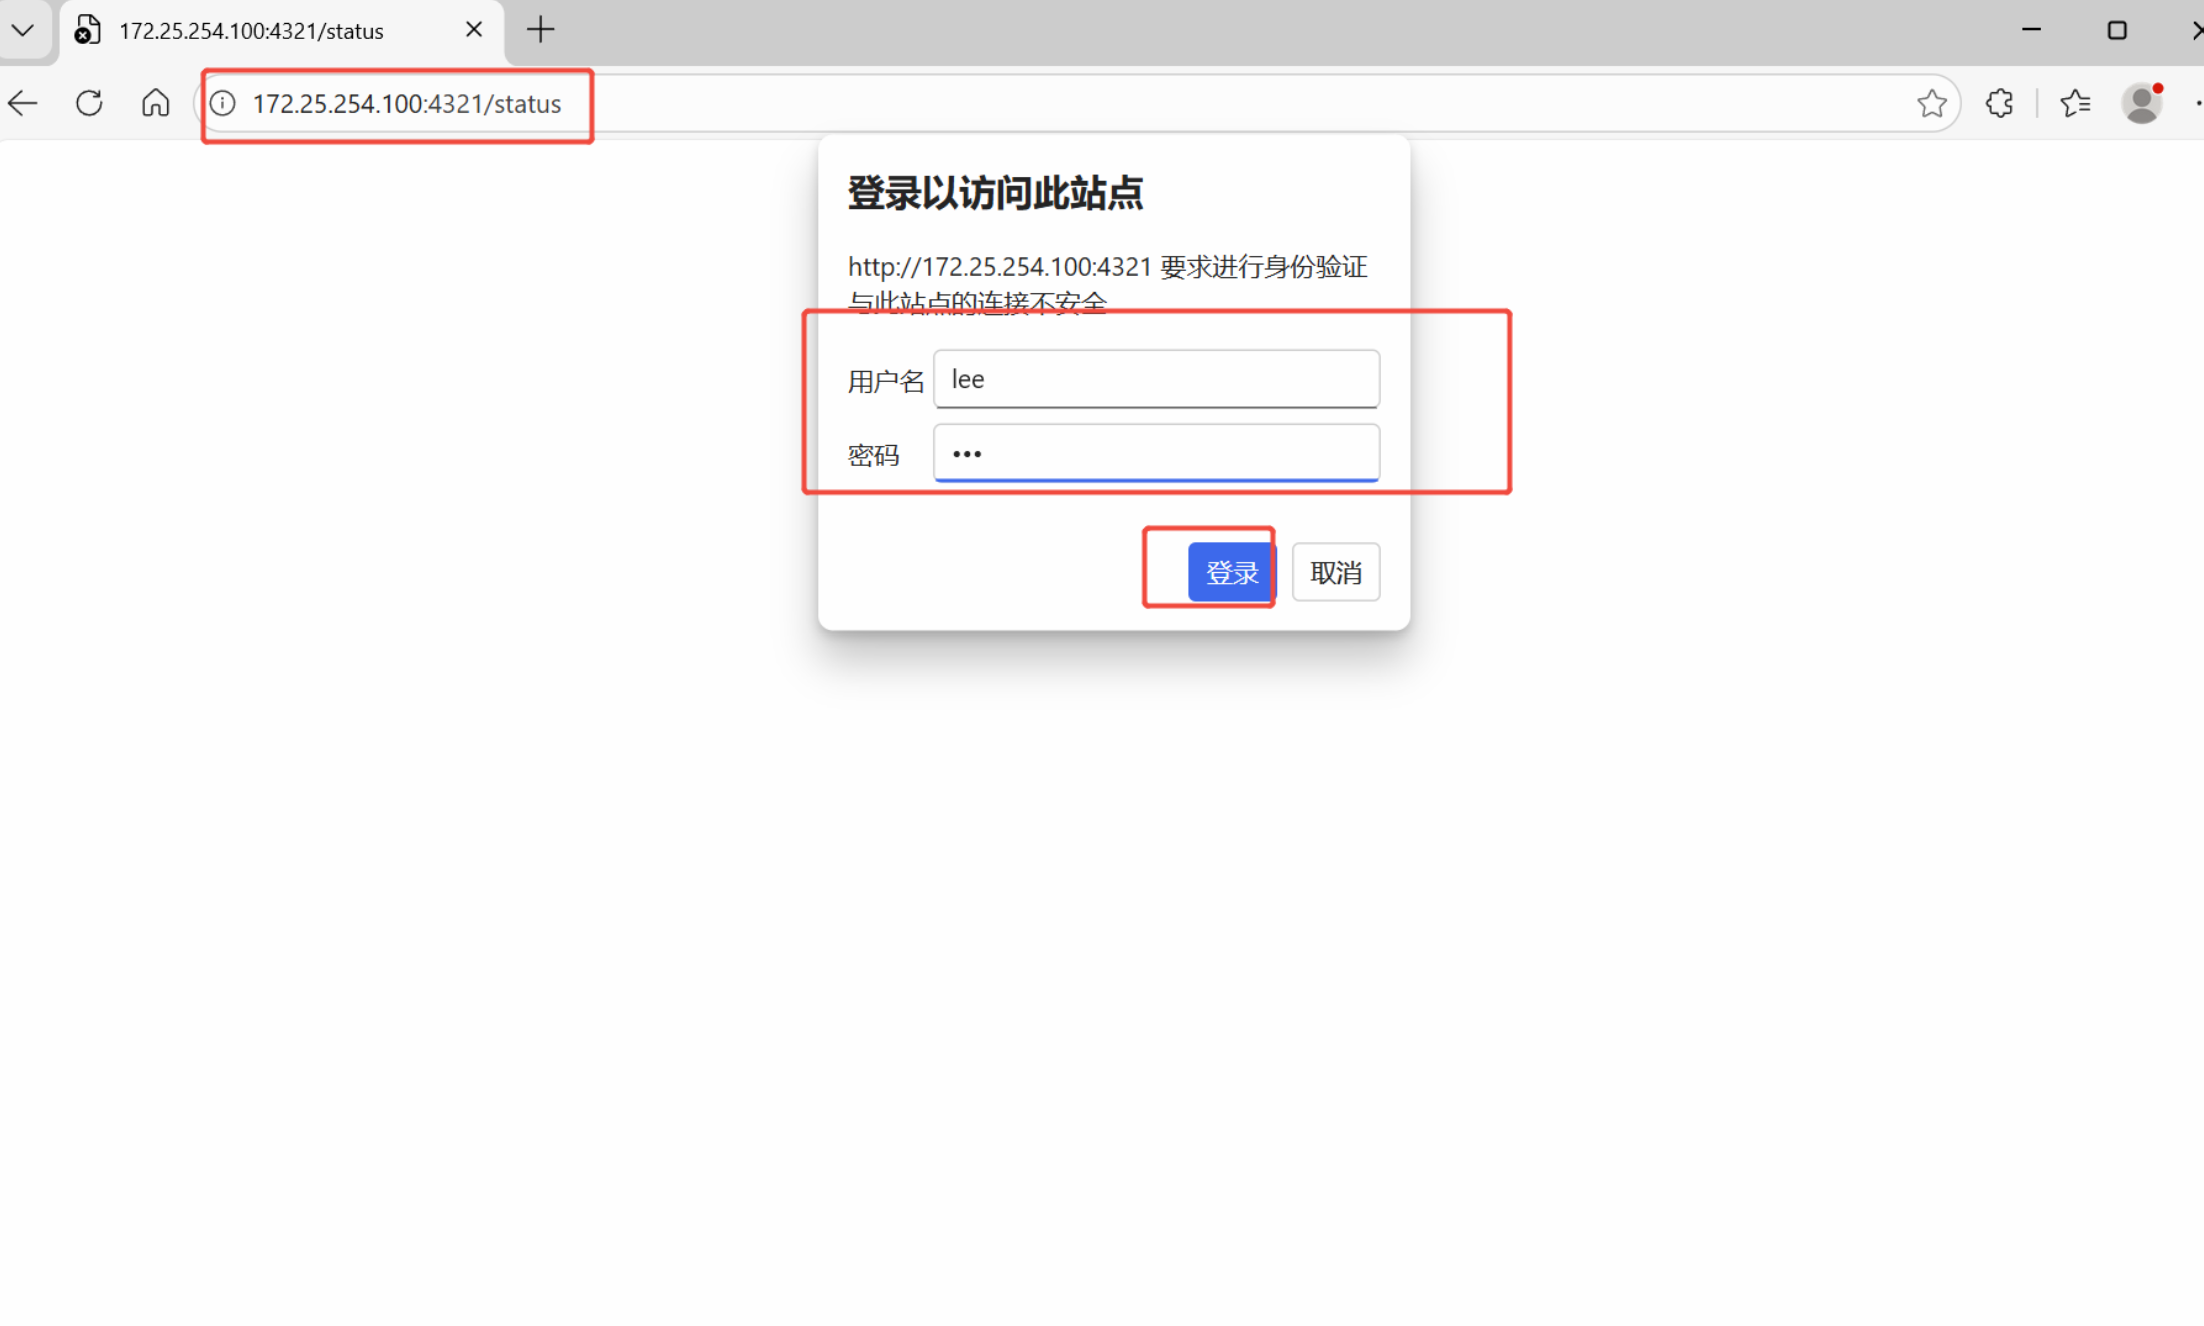
作用:web页面查看后端服务器状态、连接数、会话数、错误统计,可以手动启用/禁用后端节点。
配置示例:
ini
listen stats
    bind 0.0.0.0:4321
    stats enable
    stats uri /stats   #访问url
    stats auth lee:123    #账号密码
    stats refresh 5s           #页面自动刷新
    stats admin if TRUE        #允许网页操作服务器启停
实操步骤:
1.写入配置
2.校验配置 haproxy -c -f xxx.cfg
3.reload热更新
4.浏览器访问 http://ip:4321/stats,输入账号密码查看监控。
七、IP透传(获取真实客户端IP)
默认情况后端服务器拿到的源IP是haproxy服务器IP,不是真实用户IP。需要透传客户端真实IP。
七层HTTP场景(http模式)
使用X‑Forwarded‑For请求头传递真实客户端IP
haproxy配置
ini
#开启ip透传的方式
[root@haproxy ~]# vim /etc/haproxy/haproxy.cfg
。。。忽略。。。。。
defaults
    mode                    http
    log                     global
    option                  httplog
    option                  dontlognull
    option http-server-close
    option forwardfor       except 127.0.0.0/8				#开启haproxy透传功能
    option                  redispatch
    retries                 3
    timeout http-request    10s
    timeout queue           1m
    timeout connect         10s
    timeout client          1m
    timeout server          1m
    timeout http-keep-alive 10s
    timeout check           10s
    maxconn                 3000

#在rs中设定采集透传IP
[root@webserver2 ~]#  vim /etc/httpd/conf/httpd.conf
201     LogFormat "%h %l %u %t \"%r\" %>s %b \"%{X-Forwarded-For}i\" \"%{Referer}i\" \"%{User-Agent}i    \"" combined

[root@webserver2 ~]# systemctl restart httpd

#测试效果
[root@webserver2 ~]# cat /etc/httpd/logs/access_log
192.168.0.100 - - [26/Jan/2026:10:10:29 +0800] "GET / HTTP/1.1" 200 26 "172.25.254.1" "-" "curl/7.65.0"
192.168.0.100 - - [26/Jan/2026:10:10:30 +0800] "GET / HTTP/1.1" 200 26 "172.25.254.1" "-" "curl/7.65.0"
192.168.0.100 - - [26/Jan/2026:10:10:30 +0800] "GET / HTTP/1.1" 200 26 "172.25.254.1" "-" "curl/7.65.0"后端web服务器(Nginx/Apache)读取X‑Forwarded‑For头拿到真实IP。
四层TCP模式(mode tcp)
四层没有http头,forwardfor无效,使用source模式需要开启后端服务器代理协议proxy‑protocol
haproxy侧:
ini
#设定haproxy访问4层
[root@haproxy ~]# vim /etc/haproxy/haproxy.cfg
listen webcluster
    bind        *:80
    mode        tcp				#四层访问
    balance     roundrobin
    server haha 192.168.0.10:80 send-proxy check inter 3s fall 3 rise 5 weight 1
    server hehe 192.168.0.20:80 send-proxy check inter 3s fall 3 rise 5 weight 1

[root@haproxy ~]# systemctl restart haproxy.service

#启用nginx的四层访问控制
[root@webserver2 ~]# vim /etc/nginx/nginx.conf
    server {
        listen       80 proxy_protocol;			#启用四层访问控制
        listen       [::]:80;
        server_name  _;
        root         /usr/share/nginx/html;

        # Load configuration files for the default server block.
        include /etc/nginx/default.d/*.conf;

        error_page 404 /404.html;
        location = /404.html {
        }
[root@webserver2 ~]# systemctl restart nginx.service
#启用apache的四层访问控制
[root@node1 ~]# vim /etc/httpd/conf.modules.d/10-proxy_h2.conf
LoadModule proxy_http2_module modules/mod_proxy_http2.so
LoadModule remoteip_module modules/mod_remoteip.so


[root@node1 ~]# vim /etc/httpd/conf/httpd.conf
RemoteIPProxyProtocol on
RemoteIPTrustedProxy 192.168.0.0/24
[root@node1 ~]# systemctl restart httpd
send‑proxy‑v2:haproxy发送proxy协议报文,携带客户端源IP,后端服务必须支持proxy协议。
八、ACL访问控制
ACL = Access Control List,访问控制列表。七层核心功能:匹配请求条件,做路由、拒绝、跳转。
语法:
acl 名称 匹配条件常用匹配条件:
src 192.168.1.0/24客户端源IPpath_beg /adminurl以/admin开头url_sub /loginurl包含login字符串hdr(host) -i test.comhttp主机头
示例1:拒绝特定IP访问
ini
frontend http_front
    bind *:80
    mode http
    acl deny_ip src 10.0.0.50
    block if deny_ip
示例2:根据url路由,/api转发到api后端,其他转发web后端
ini
frontend http_front
    bind *:80
    mode http
    acl is_api path_beg /api
    use_backend api_back if is_api
    default_backend web_back
示例3:匹配完全域名
bash
frontend webcluster
    bind        *:80
    mode        http
    acl host hdr_dom(host)   www.timinglee.org
    use_backend webserver1 if host
    default_backend webserverdefault
示例4:匹配域名前缀
bash
frontend webcluster
    bind        *:80
    mode        http
    acl host hdr_beg(host)   bbs
    use_backend webserver1 if host
    default_backend webserverdefault
示例5:匹配域名后缀
bash
frontend webcluster
    bind        *:80
    mode        http
    acl host hdr_end(host)   .com
    use_backend webserver1 if host
    default_backend webserverdefault
实操步骤:
1.在frontend段定义acl规则
2.书写判断逻辑if xxx,block/use_backend
3.校验配置,reload,curl测试访问效果。
九、自定义错误页面
haproxy可以自定义返回503、404等错误页面。
注意:mode http下生效。
方式1:errorfile(读取本地html文件)
ini
frontend http_front
    bind *:80
    mode http
    errorfile 503 /etc/haproxy/err/503.html
    errorfile 403 /etc/haproxy/err/403.html
准备html文件:
bash
mkdir -p /etc/haproxy/err
echo "<h1>服务器暂时不可用,请稍后访问</h1>" > /etc/haproxy/err/503.html
十、四层负载均衡 mode tcp
mode tcp:四层负载均衡,不解析HTTP报文,直接转发TCP数据包。适用于MySQL、Redis、SSH等非http业务。
配置示例:MySQL四层负载均衡
ini
listen mysql_proxy
    bind 0.0.0.0:3306
    mode tcp  #四层模式
    balance leastconn
    server mysql1 192.168.1.30:3306 check inter 2000 rise 2 fall 3
    server mysql2 192.168.1.31:3306 check inter 2000 rise 2 fall 3
参数说明
mode tcp:四层TCP代理check:开启后端健康检查inter 2000:2000ms检查一次rise 2:连续2次成功标记为upfall 3:连续3次失败标记down
十一、HAProxy实现HTTPS
1.制作证书
bash
[root@haproxy ~]# mkdir /etc/haproxy/certs/
[root@haproxy ~]# openssl req -newkey rsa:2048 -nodes -sha256  -keyout /etc/haproxy/certs/timinglee.org.key -x509 -days 365 -out /etc/haproxy/certs/timinglee.org.crt


You are about to be asked to enter information that will be incorporated
into your certificate request.
What you are about to enter is what is called a Distinguished Name or a DN.
There are quite a few fields but you can leave some blank
For some fields there will be a default value,
If you enter '.', the field will be left blank.
-----
Country Name (2 letter code) [XX]:CN
State or Province Name (full name) []:Shaanxi
Locality Name (eg, city) [Default City]:Xi'an
Organization Name (eg, company) [Default Company Ltd]:timinglee
Organizational Unit Name (eg, section) []:linux
Common Name (eg, your name or your server's hostname) []:www.timinglee.org
Email Address []:admin@timinglee.org
[root@haproxy ~]# ls /etc/haproxy/certs/
timinglee.org.crt  timinglee.org.key

[root@haproxy ~]# cat /etc/haproxy/certs/timinglee.org.{key,crt} > /etc/haproxy/certs/timinglee.pem
2.全站加密
bash
[root@haproxy ~]# vim /etc/haproxy/haproxy.cfg
frontend webcluster-http
    bind        *:80
    redirect scheme https if ! { ssl_fc }

listen webcluster-https
    bind        *:443 ssl  crt /etc/haproxy/certs/timinglee.pem
    mode        http
    balance     roundrobin
    server haha 192.168.0.10:80  check inter 3s fall 3 rise 5 weight 1
    server hehe 192.168.0.20:80  check inter 3s fall 3 rise 5 weight 1


[root@haproxy ~]# systemctl restart haproxy.service

#测试:
[Administrator.DESKTOP-VJ307M3] ➤ curl -v -k -L http://172.25.254.100
*   Trying 172.25.254.100:80...
* TCP_NODELAY set
* Connected to 172.25.254.100 (172.25.254.100) port 80 (#0)
> GET / HTTP/1.1
> Host: 172.25.254.100
> User-Agent: curl/7.65.0
> Accept: */*
>
* Mark bundle as not supporting multiuse
< HTTP/1.1 302 Found
< content-length: 0
< location: https://172.25.254.100/					#转换信息体现
< cache-control: no-cache
<
* Connection #0 to host 172.25.254.100 left intact
* Issue another request to this URL: 'https://172.25.254.100/'
*   Trying 172.25.254.100:443...
* TCP_NODELAY set
* Connected to 172.25.254.100 (172.25.254.100) port 443 (#1)
* ALPN, offering http/1.1
* Cipher selection: ALL:!EXPORT:!EXPORT40:!EXPORT56:!aNULL:!LOW:!RC4:@STRENGTH
* successfully set certificate verify locations:
*   CAfile: /etc/pki/tls/certs/ca-bundle.crt
  CApath: none
* TLSv1.2 (OUT), TLS header, Certificate Status (22):
* TLSv1.2 (OUT), TLS handshake, Client hello (1):
* TLSv1.2 (IN), TLS handshake, Server hello (2):
* TLSv1.2 (IN), TLS handshake, Certificate (11):
* TLSv1.2 (IN), TLS handshake, Server key exchange (12):
* TLSv1.2 (IN), TLS handshake, Server finished (14):
* TLSv1.2 (OUT), TLS handshake, Client key exchange (16):
* TLSv1.2 (OUT), TLS change cipher, Change cipher spec (1):
* TLSv1.2 (OUT), TLS handshake, Finished (20):
* TLSv1.2 (IN), TLS change cipher, Change cipher spec (1):
* TLSv1.2 (IN), TLS handshake, Finished (20):
* SSL connection using TLSv1.2 / ECDHE-RSA-AES256-GCM-SHA384
* ALPN, server did not agree to a protocol
* Server certificate:
*  subject: C=CN; ST=Shaanxi; L=Xi'an; O=timinglee; OU=linux; CN=www.timinglee.org; emailAddress=admin@timinglee.org
*  start date: Jan 26 08:38:57 2026 GMT
*  expire date: Jan 26 08:38:57 2027 GMT
*  issuer: C=CN; ST=Shaanxi; L=Xi'an; O=timinglee; OU=linux; CN=www.timinglee.org; emailAddress=admin@timinglee.org
*  SSL certificate verify result: self signed certificate (18), continuing anyway.
> GET / HTTP/1.1
> Host: 172.25.254.100
> User-Agent: curl/7.65.0
> Accept: */*
>
* Mark bundle as not supporting multiuse
< HTTP/1.1 200 OK
< date: Mon, 26 Jan 2026 08:48:34 GMT
< server: Apache/2.4.62 (Red Hat Enterprise Linux)
< last-modified: Fri, 23 Jan 2026 03:52:02 GMT
< etag: "1a-64906147d3d6a"
< accept-ranges: bytes
< content-length: 26
< content-type: text/html; charset=UTF-8
<
webserver2 - 192.168.0.20
* Connection #1 to host 172.25.254.100 left intact