文件上传
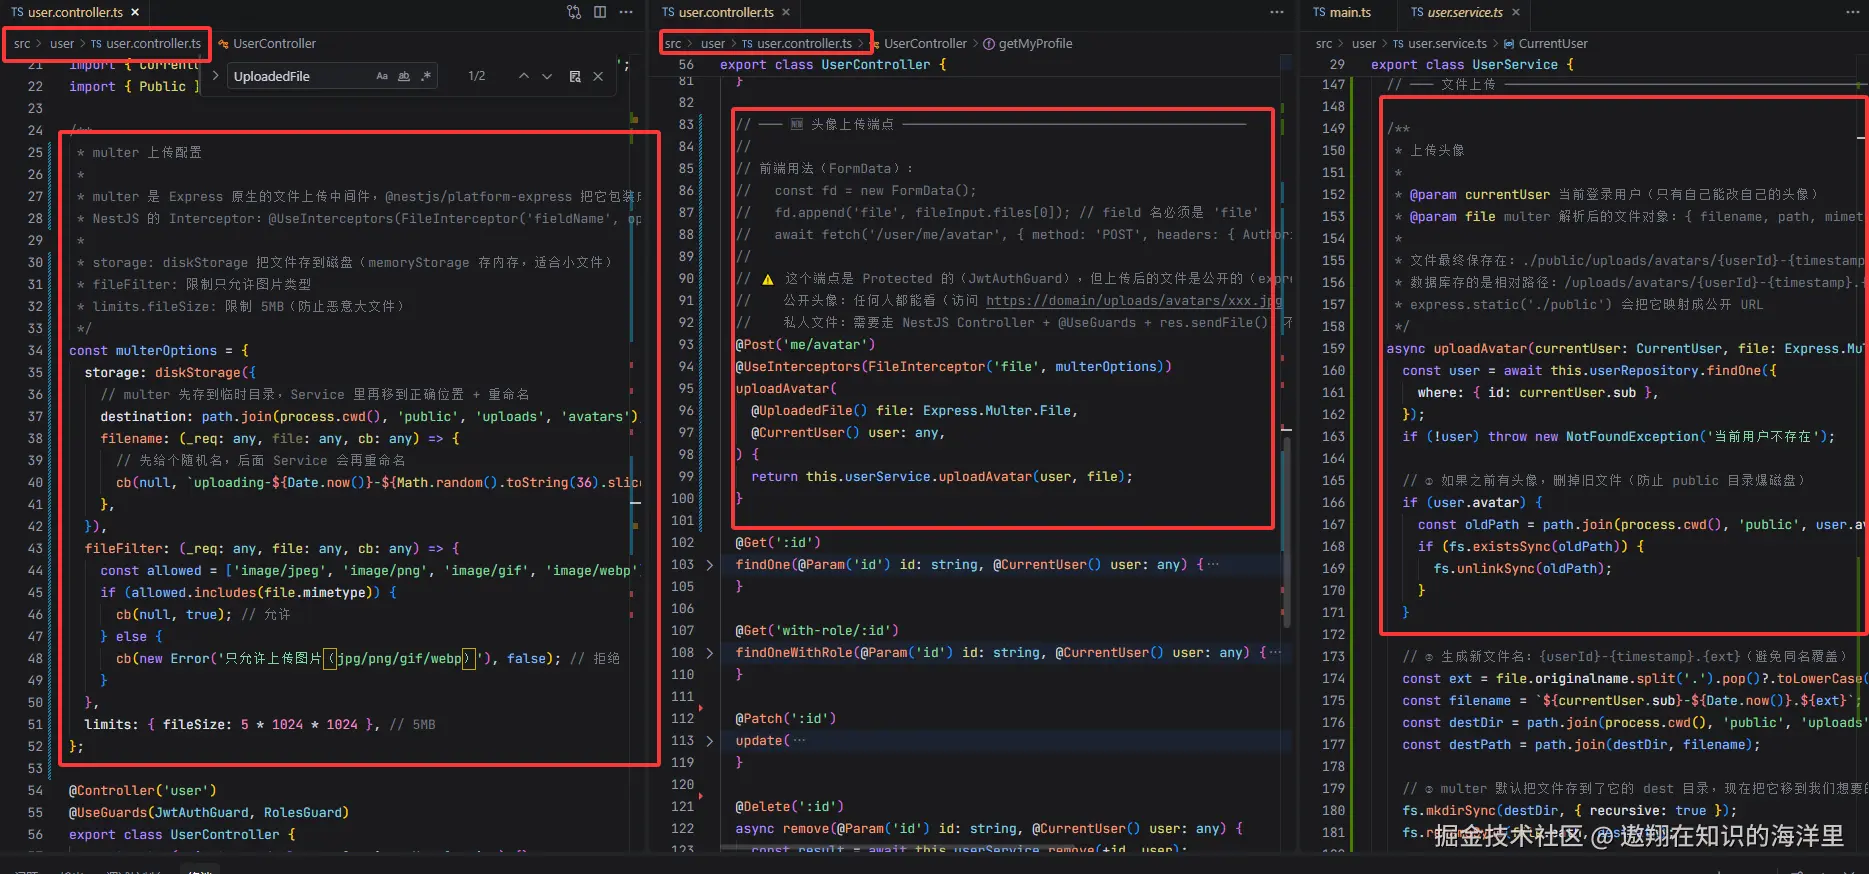
文件预览
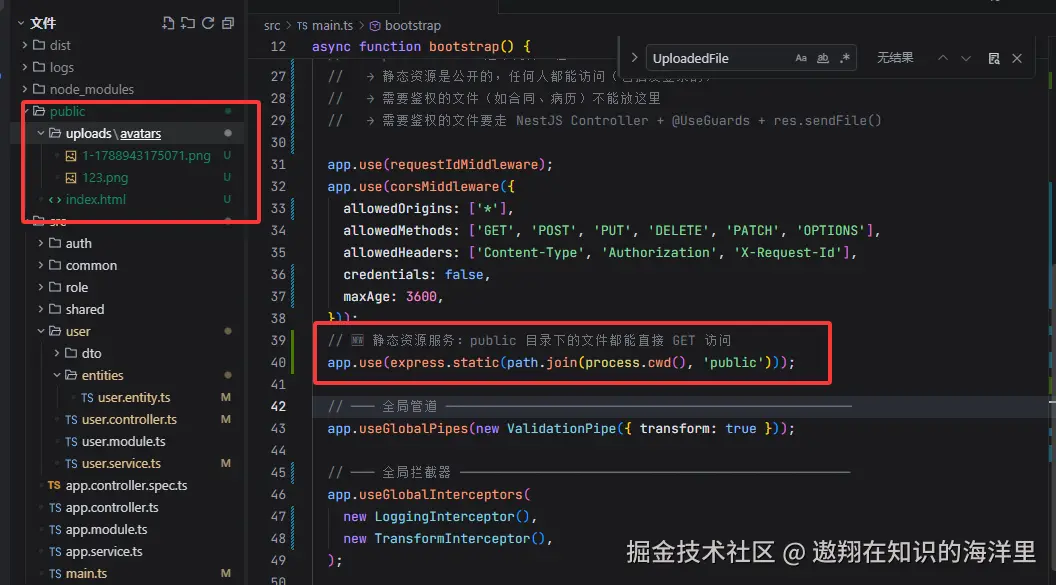
解释
🧪 测试矩阵
| # | 测试 | 结果 |
|---|---|---|
① GET / |
express.static 服务 index.html(不带 token) | ✅ 200 公开访问 |
② POST /user/me/avatar(带 token) |
上传头像 | ✅ {url: "/uploads/avatars/1-xxx.png"} |
③ GET /uploads/avatars/xxx.png(不带 token) |
公开访问图片 | ✅ 200 image/png 70 bytes |
④ GET /user/1(带 token) |
用户 avatar 字段已更新 | ✅ "avatar": "/uploads/avatars/..." |
⑤ POST /user/me/avatar(不带 token) |
上传端点鉴权 | ✅ 401 "请先登录" |
📁 项目结构更新
vbnet
public/                          ← 🆕 静态资源根目录(express.static 映射)
├── index.html                   ← 🆕 验证用
└── uploads/
    └── avatars/
        └── 1-1788943175071.png  ← 上传自动生成 {userId}-{timestamp}.{ext}
                                    每次上传自动重命名 + 删除旧头像

src/
├── user/
│   ├── entities/user.entity.ts  ← 🆕 加了 avatar: string(nullable)
│   ├── user.service.ts          ← 🆕 uploadAvatar() 方法
│   └── user.controller.ts       ← 🆕 POST /user/me/avatar 端点
├── common/
│   └── middleware/              ← 之前创建的 requestId + cors
└── main.ts                      ← 🆕 express.static(path.join(cwd, 'public'))
🔑 回答你的核心问题:静态资源要不要权限?
arduino
┌──────────────────────────────────────────────────────────────────┐
│  express.static 的本质:Middleware 层                            │
│                                                                  │
│  请求 → requestId → cors → express.static → JwtAuthGuard        │
│                         ↑                      ↑                 │
│                         │                      │                 │
│                    如果文件匹配            如果文件不匹配          │
│                    res.sendFile()         继续往下走             │
│                    (不进 NestJS)           → 进 Guard → Controller│
└──────────────────────────────────────────────────────────────────┘
两种策略对应两种资源类型:
| 资源类型 | 例子 | 策略 | 实现方式 |
|---|---|---|---|
| 公开资源 | 头像、帖子图片、商品图 | express.static 直接暴露 | 上传 → public/uploads/xxx.png → 任何人都能 GET |
| 私有资源 | 合同、病历、私密附件 | 不走 express.static | NestJS Controller + @UseGuards + res.sendFile() |
🛡️ 私有文件怎么保护?(了解即可,需要时再做)
ts
// 私有文件的正确姿势:走 NestJS Controller,不用 express.static
@Controller('private')
@UseGuards(JwtAuthGuard)  // ← NestJS Guard 能拦!
export class PrivateFileController {

  @Get(':filename')
  download(@Param('filename') filename: string, @CurrentUser() user: any, res: Response) {
    // ① 数据权限检查:这个文件属于当前用户吗?
    const file = await this.fileRepo.findOne({ where: { filename, ownerId: user.sub } });
    if (!file) throw new ForbiddenException('无权访问');

    // ② 从 private/ 目录读(注意 private 不要放在 public 下面!)
    const filePath = path.join(process.cwd(), 'private', filename);
    res.sendFile(filePath);
  }
}
🎯 你的 NestJS 完整 AOP 体系(现在多了文件上传 + 静态资源)
scss
请求进来
   │
   ▼
┌────────────────────────────────────────────────┐
│  ⬇️ Middleware 层(Express 原生)               │
│    ① requestIdMiddleware  ← 注入 trace id       │
│    ② corsMiddleware       ← 跨域 + 预检短路     │
│    ③ express.static('./public')                  │
│       ├── 匹配到文件 → res.sendFile() 返回       │
│       │              ❌ 不走 NestJS!            │
│       └── 没匹配 → next() 继续往下               │
└──────────────────────┬─────────────────────────┘
                       ▼
┌────────────────────────────────────────────────┐
│  ⬇️ Guard 层(NestJS AOP)                       │
│    JwtAuthGuard → RolesGuard                     │
│    功能权限:能调接口吗?                         │
└──────────────────────┬─────────────────────────┘
                       ▼
┌────────────────────────────────────────────────┐
│  ⬇️ Controller + Service                        │
│    multipart → FileInterceptor → multer          │
│    数据权限:能看/改哪些数据?                    │
│    文件处理:重命名 + 删除旧头像                   │
└──────────────────────┬─────────────────────────┘
                       ▼
┌────────────────────────────────────────────────┐
│  ⬇️ Interceptor → Filter                       │
│    LoggingInterceptor(带 [req=xxx] trace)      │
│    TransformInterceptor({code,msg,data})        │
│    AllExceptionsFilter(统一异常格式)            │
└────────────────────────────────────────────────┘
💡 前端调头像上传的代码长这样
js
// 头像上传
const fileInput = document.querySelector('input[type=file]');
const fd = new FormData();
fd.append('file', fileInput.files[0]); // field 名必须是 'file'

const res = await fetch('/user/me/avatar', {
  method: 'POST',
  headers: { Authorization: `Bearer ${token}` },
  body: fd, // Content-Type 会自动设成 multipart/form-data
});
const data = await res.json();
// data.url = "/uploads/avatars/1-1788943175071.png"

// 显示头像(直接拼接 origin + 路径,不需要 token!)
img.src = `${window.location.origin}${data.url}`;