穿透 IDE 的障眼法:Git 四大工作区与核心数据流转解析
很多开发者每天都在用 Git,但往往过度依赖 VS Code 或 IDEA 等工具提供的可视化快捷操作。日常开发中,点一下"Commit"按钮代码似乎就保存了,整个过程显得异常丝滑。然而,一旦遇到复杂的合并冲突、代码状态异常或是需要回溯历史时,很多人会感到毫无头绪。
究其根本,过度依赖 GUI 的语法糖掩盖了 Git 真实的数据流转模型。要真正掌控代码的版本控制,必须在脑海里建立起准确的底层区域概念,并厘清工具到底在后台替我们做了什么。
核心区域:Git 的"四步走"架构
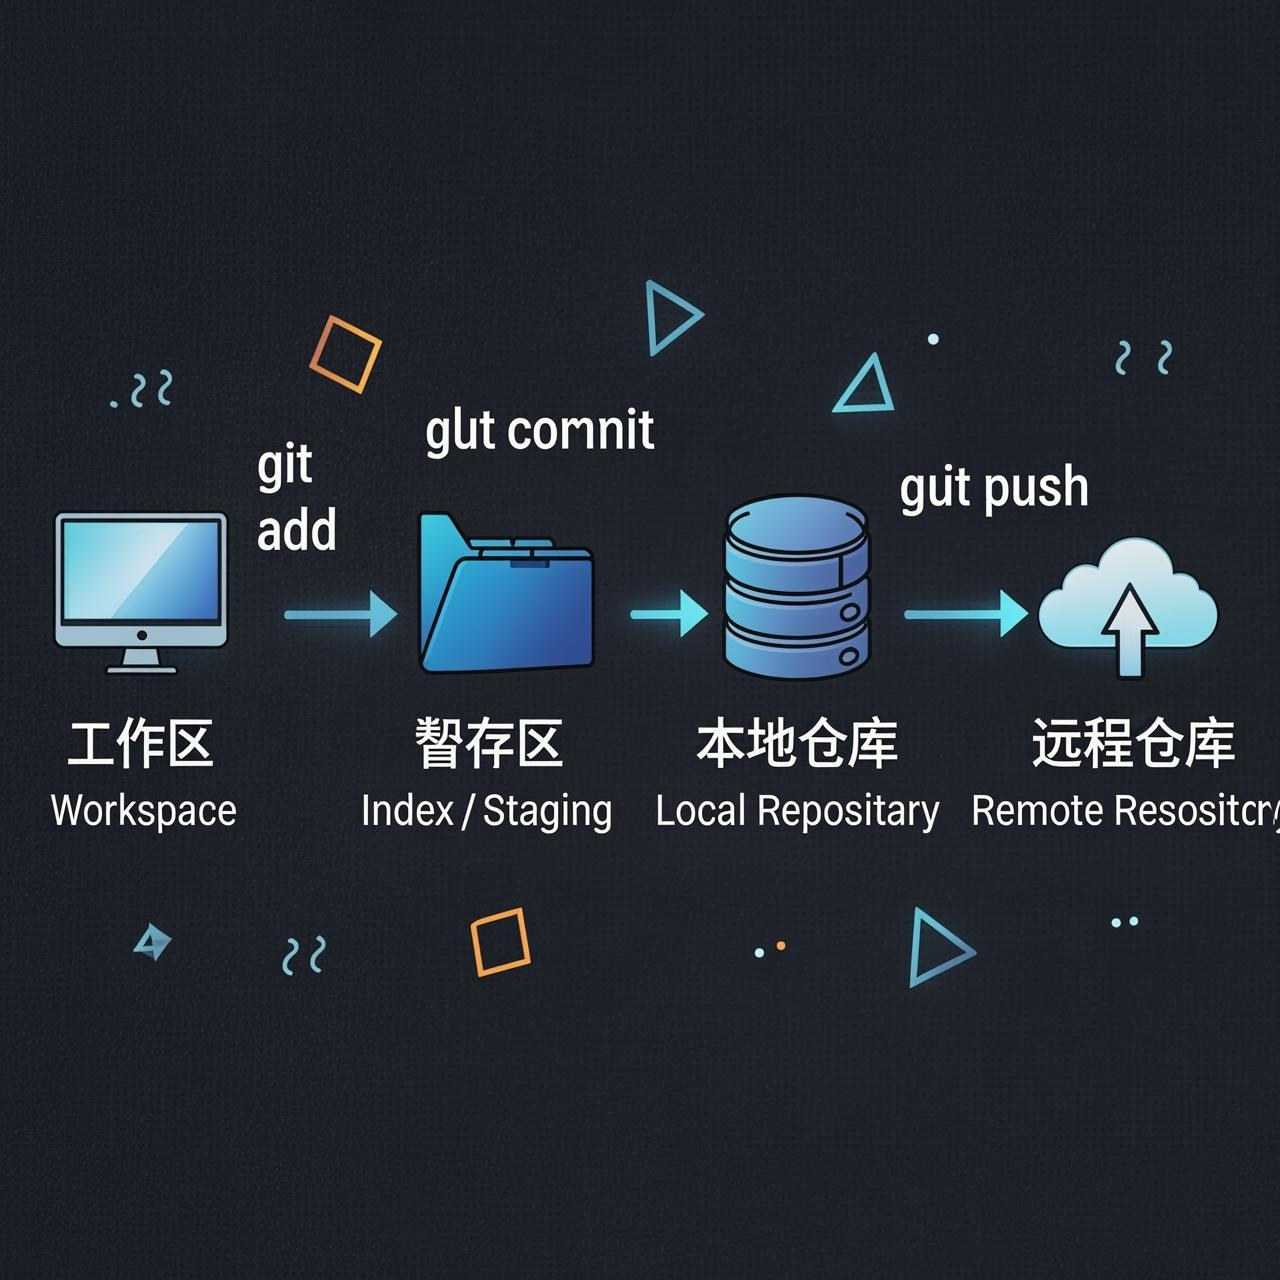
Git 的数据流转不是一步到位的,而是依靠四个核心区域的严格接力。为了直观理解这层关系,我们可以将其抽象为以下流转模型:
代码段
#mermaid-svg-ezHukYtRousKZtRr{font-family:"trebuchet ms",verdana,arial,sans-serif;font-size:16px;fill:#333;}@keyframes edge-animation-frame{from{stroke-dashoffset:0;}}@keyframes dash{to{stroke-dashoffset:0;}}#mermaid-svg-ezHukYtRousKZtRr .edge-animation-slow{stroke-dasharray:9,5!important;stroke-dashoffset:900;animation:dash 50s linear infinite;stroke-linecap:round;}#mermaid-svg-ezHukYtRousKZtRr .edge-animation-fast{stroke-dasharray:9,5!important;stroke-dashoffset:900;animation:dash 20s linear infinite;stroke-linecap:round;}#mermaid-svg-ezHukYtRousKZtRr .error-icon{fill:#552222;}#mermaid-svg-ezHukYtRousKZtRr .error-text{fill:#552222;stroke:#552222;}#mermaid-svg-ezHukYtRousKZtRr .edge-thickness-normal{stroke-width:1px;}#mermaid-svg-ezHukYtRousKZtRr .edge-thickness-thick{stroke-width:3.5px;}#mermaid-svg-ezHukYtRousKZtRr .edge-pattern-solid{stroke-dasharray:0;}#mermaid-svg-ezHukYtRousKZtRr .edge-thickness-invisible{stroke-width:0;fill:none;}#mermaid-svg-ezHukYtRousKZtRr .edge-pattern-dashed{stroke-dasharray:3;}#mermaid-svg-ezHukYtRousKZtRr .edge-pattern-dotted{stroke-dasharray:2;}#mermaid-svg-ezHukYtRousKZtRr .marker{fill:#333333;stroke:#333333;}#mermaid-svg-ezHukYtRousKZtRr .marker.cross{stroke:#333333;}#mermaid-svg-ezHukYtRousKZtRr svg{font-family:"trebuchet ms",verdana,arial,sans-serif;font-size:16px;}#mermaid-svg-ezHukYtRousKZtRr p{margin:0;}#mermaid-svg-ezHukYtRousKZtRr .label{font-family:"trebuchet ms",verdana,arial,sans-serif;color:#333;}#mermaid-svg-ezHukYtRousKZtRr .cluster-label text{fill:#333;}#mermaid-svg-ezHukYtRousKZtRr .cluster-label span{color:#333;}#mermaid-svg-ezHukYtRousKZtRr .cluster-label span p{background-color:transparent;}#mermaid-svg-ezHukYtRousKZtRr .label text,#mermaid-svg-ezHukYtRousKZtRr span{fill:#333;color:#333;}#mermaid-svg-ezHukYtRousKZtRr .node rect,#mermaid-svg-ezHukYtRousKZtRr .node circle,#mermaid-svg-ezHukYtRousKZtRr .node ellipse,#mermaid-svg-ezHukYtRousKZtRr .node polygon,#mermaid-svg-ezHukYtRousKZtRr .node path{fill:#ECECFF;stroke:#9370DB;stroke-width:1px;}#mermaid-svg-ezHukYtRousKZtRr .rough-node .label text,#mermaid-svg-ezHukYtRousKZtRr .node .label text,#mermaid-svg-ezHukYtRousKZtRr .image-shape .label,#mermaid-svg-ezHukYtRousKZtRr .icon-shape .label{text-anchor:middle;}#mermaid-svg-ezHukYtRousKZtRr .node .katex path{fill:#000;stroke:#000;stroke-width:1px;}#mermaid-svg-ezHukYtRousKZtRr .rough-node .label,#mermaid-svg-ezHukYtRousKZtRr .node .label,#mermaid-svg-ezHukYtRousKZtRr .image-shape .label,#mermaid-svg-ezHukYtRousKZtRr .icon-shape .label{text-align:center;}#mermaid-svg-ezHukYtRousKZtRr .node.clickable{cursor:pointer;}#mermaid-svg-ezHukYtRousKZtRr .root .anchor path{fill:#333333!important;stroke-width:0;stroke:#333333;}#mermaid-svg-ezHukYtRousKZtRr .arrowheadPath{fill:#333333;}#mermaid-svg-ezHukYtRousKZtRr .edgePath .path{stroke:#333333;stroke-width:2.0px;}#mermaid-svg-ezHukYtRousKZtRr .flowchart-link{stroke:#333333;fill:none;}#mermaid-svg-ezHukYtRousKZtRr .edgeLabel{background-color:rgba(232,232,232, 0.8);text-align:center;}#mermaid-svg-ezHukYtRousKZtRr .edgeLabel p{background-color:rgba(232,232,232, 0.8);}#mermaid-svg-ezHukYtRousKZtRr .edgeLabel rect{opacity:0.5;background-color:rgba(232,232,232, 0.8);fill:rgba(232,232,232, 0.8);}#mermaid-svg-ezHukYtRousKZtRr .labelBkg{background-color:rgba(232, 232, 232, 0.5);}#mermaid-svg-ezHukYtRousKZtRr .cluster rect{fill:#ffffde;stroke:#aaaa33;stroke-width:1px;}#mermaid-svg-ezHukYtRousKZtRr .cluster text{fill:#333;}#mermaid-svg-ezHukYtRousKZtRr .cluster span{color:#333;}#mermaid-svg-ezHukYtRousKZtRr div.mermaidTooltip{position:absolute;text-align:center;max-width:200px;padding:2px;font-family:"trebuchet ms",verdana,arial,sans-serif;font-size:12px;background:hsl(80, 100%, 96.2745098039%);border:1px solid #aaaa33;border-radius:2px;pointer-events:none;z-index:100;}#mermaid-svg-ezHukYtRousKZtRr .flowchartTitleText{text-anchor:middle;font-size:18px;fill:#333;}#mermaid-svg-ezHukYtRousKZtRr rect.text{fill:none;stroke-width:0;}#mermaid-svg-ezHukYtRousKZtRr .icon-shape,#mermaid-svg-ezHukYtRousKZtRr .image-shape{background-color:rgba(232,232,232, 0.8);text-align:center;}#mermaid-svg-ezHukYtRousKZtRr .icon-shape p,#mermaid-svg-ezHukYtRousKZtRr .image-shape p{background-color:rgba(232,232,232, 0.8);padding:2px;}#mermaid-svg-ezHukYtRousKZtRr .icon-shape .label rect,#mermaid-svg-ezHukYtRousKZtRr .image-shape .label rect{opacity:0.5;background-color:rgba(232,232,232, 0.8);fill:rgba(232,232,232, 0.8);}#mermaid-svg-ezHukYtRousKZtRr .label-icon{display:inline-block;height:1em;overflow:visible;vertical-align:-0.125em;}#mermaid-svg-ezHukYtRousKZtRr .node .label-icon path{fill:currentColor;stroke:revert;stroke-width:revert;}#mermaid-svg-ezHukYtRousKZtRr :root{--mermaid-font-family:"trebuchet ms",verdana,arial,sans-serif;} git add
git commit
git push
git pull / fetch
工作区
Workspace
暂存区
Index / Staging
本地仓库
Local Repository
远程仓库
Remote Repository
1. 工作区 (Workspace)
这是日常编写和修改代码的地方。在项目文件夹里能直接看到、打开的那些文件,都属于工作区。这里的数据是最新的,但如果不主动触发 Git 命令,任何改动都不会被记录。
2. 暂存区 (Staging Area / Index)
暂存区是 Git 设计中非常精妙的一环,本质上是隐藏在 .git 目录下的一个 index 文件。它扮演着"候车室"的角色,允许我们在正式生成历史记录前,精细化地挑选并确认哪些文件的改动应该被打包在一起。
3. 本地仓库 (Local Repository)
这是 Git 在本地保存所有历史版本记录的归宿。数据一旦从暂存区提交至此,就生成了一个不可篡改的"快照"(Commit)。这些快照保存在 .git 目录深处,构成了项目完整的时间线。
4. 远程仓库 (Remote Repository)
托管在服务器(如 GitHub、GitLab)上的仓库,核心职责是团队协作和异地容灾备份。
理清了这四个区域,当代码出现冲突或丢失时,就能精准定位文件目前正卡在哪一个流转环节。
常见协作场景:本地与云端的同步
在实际工程中,最标准的开发工作流通常涉及本地与远程的同步。例如,你在本地完成了两项新功能的开发并进行了两次 Commit,此时你的本地仓库比远程仓库超前了两个版本。
要将这部分增量代码同步到云端,Git 并非全量覆盖,而是通过计算差异,仅将新增的 Commit 推送上去。
在执行推送前,良好的工程习惯是先确认当前状态:
bash
git status终端会明确提示:Your branch is ahead of 'origin/main' by 2 commits. 确认无误后,即可进行推送。
情况 A:常规推送
如果本地分支与远程分支已经建立了追踪关系,直接推送即可:
bash
git push情况 B:首次推送新分支
如果当前所在的是本地新建的分支,需要通过 -u 参数(--set-upstream)来建立本地与远程的映射绑定:
bash
git push -u origin <分支名>推送完成后,远程仓库的时间线会被补齐。团队成员通过 git pull 即可将最新变动拉取到他们的工作区中。
揭开 IDE 的障眼法:被追踪 ≠ 已暂存
在 Git 的使用中,有一个极易混淆的核心误区:认为被追踪(Tracked)的文件就等于在暂存区(Staged)。 加上 IDE 的"智能提示",这种错觉往往会被进一步加深。
新建的未追踪(Untracked)文件确实不在暂存区。但一个"被追踪"的文件(即 Git 曾经记录过它),实际上有三种可能的状态:
| 文件状态 | 含义说明 | 数据目前所在位置 |
|---|---|---|
| 未修改 (Unmodified) | 自上次提交后,文件未被改动。 | 本地仓库有快照,工作区内容一致,不在暂存区。 |
| 已修改 (Modified) | 代码被修改,但未执行 git add。 |
仅停留在工作区,不在暂存区。 |
| 已暂存 (Staged) | 执行了 git add,准备提交。 |
在暂存区,等待被打包成 Commit。 |
IDE 在底层到底做了什么?
当你在 VS Code 或 IDEA 中修改了一个已有的文件,左侧的文件树通常会变色(如蓝色或标记为 M)。这只是 IDE 在读取工作区状态后的视觉提示,并没有自动将文件放入暂存区。
很多开发者习惯在 IDE 里直接填写描述并点击"Commit",误以为文件原本就在暂存区。实际上,这是 IDE 在点击触发的瞬间,后台极速执行了联合命令:
bash
git add .
git commit -m "描述信息"
这种一键提交仅仅是工具封装的"语法糖"。
暂存区:无法绕开的底层海关
有些开发者为了追求效率,会在终端使用类似跳过暂存区的快捷命令:
bash
git commit -a -m "提交描述"表象上看,操作直接从工作区跨越到了本地仓库。但在 Git 的底层实现中,依然是先将所有已追踪文件的修改静默推入暂存区,随后再将其打包固化为 Commit。
无论你使用的是极其智能的图形化界面,还是高级的终端快捷参数,Git 的数据流转必须经过暂存区。暂存区就像是出境的海关,你可以让中介(IDE)帮你快速代办手续,但数据本身,绝无可能绕开海关直接入境下一个节点。
工具的封装剥夺了我们对底层执行逻辑的感知。当你下次在 IDE 中按下那个绿色的 Commit 按钮时,不妨在脑海中回放一下,代码是如何穿过暂存区,最终定格在本地历史树上的。