https://academy.langchain.com/courses/intro-to-langgraph
https://github.com/shangxiang0907/langchain-academy
文章目录
- [Breakpoints 断点](#Breakpoints 断点)
-
- [Review 回顾](#Review 回顾)
- [Goals 目标](#Goals 目标)
- [Breakpoints for human approval 用于人工审批的断点](#Breakpoints for human approval 用于人工审批的断点)
-
- [Breakpoints with LangGraph API 使用 LangGraph API 的断点](#Breakpoints with LangGraph API 使用 LangGraph API 的断点)
Breakpoints 断点
Review 回顾
For human-in-the-loop, we often want to see our graph outputs as its running.
对于 human-in-the-loop(人在回路中),我们通常希望在图运行时实时查看其输出。
We laid the foundations for this with streaming.
我们已通过流式传输(streaming)为此奠定了基础。
Goals 目标
Now, let's talk about the motivations for human-in-the-loop:
现在,让我们探讨 human-in-the-loop 的动机:
(1) Approval - We can interrupt our agent, surface state to a user, and allow the user to accept an action
(1)审批(Approval)------我们可以中断代理执行,将当前状态呈现给用户,并允许用户批准某项操作
(2) Debugging - We can rewind the graph to reproduce or avoid issues
(2)调试(Debugging)------我们可以将图倒回到某一状态,以复现或规避问题
(3) Editing - You can modify the state
(3)编辑(Editing)------您可以修改状态
LangGraph offers several ways to get or update agent state to support various human-in-the-loop workflows.
LangGraph 提供了多种方式来获取或更新代理状态,以支持各类 human-in-the-loop 工作流。
First, we'll introduce breakpoints, which provide a simple way to stop the graph at specific steps.
首先,我们将介绍 断点(breakpoints),它提供了一种在特定步骤处暂停图执行的简便方法。
We'll show how this enables user approval.
我们将展示该机制如何实现用户 审批。
python
%%capture --no-stderr
%pip install --quiet -U langgraph langchain_openai langgraph_sdk langgraph-prebuilt
python
import os, getpass

def _set_env(var: str):
    if not os.environ.get(var):
        os.environ[var] = getpass.getpass(f"{var}: ")

from dotenv import find_dotenv, load_dotenv

load_dotenv(find_dotenv(usecwd=True))
_set_env("OPENAI_API_KEY")
Breakpoints for human approval 用于人工审批的断点
Let's re-consider the simple agent that we worked with in Module 1.
让我们重新审视模块 1 中使用过的简单代理。
Let's assume that are concerned about tool use: we want to approve the agent to use any of its tools.
假设我们对工具调用有所顾虑:我们希望在代理调用任何工具前获得人工审批。
All we need to do is simply compile the graph with interrupt_before=["tools"] where tools is our tools node.
我们只需在编译图时指定 interrupt_before=["tools"] 即可,其中 tools 是我们的工具节点。
This means that the execution will be interrupted before the node tools, which executes the tool call.
这意味着执行将在节点 tools(即执行工具调用的节点)之前被中断。
python
import os
from langchain_openai import ChatOpenAI

def multiply(a: int, b: int) -> int:
    """Multiply a and b.

    Args:
        a: first int
        b: second int
    """
    return a * b

# This will be a tool
def add(a: int, b: int) -> int:
    """Adds a and b.

    Args:
        a: first int
        b: second int
    """
    return a + b

def divide(a: int, b: int) -> float:
    """Divide a by b.

    Args:
        a: first int
        b: second int
    """
    return a / b

tools = [add, multiply, divide]
llm = ChatOpenAI(model=os.getenv("OPENAI_MODEL", "qwen-plus"), base_url=os.getenv("OPENAI_BASE_URL", "https://dashscope.aliyuncs.com/compatible-mode/v1"))
llm_with_tools = llm.bind_tools(tools)
python
from IPython.display import Image, display

from langgraph.checkpoint.memory import MemorySaver
from langgraph.graph import MessagesState
from langgraph.graph import START, StateGraph
from langgraph.prebuilt import tools_condition, ToolNode

from langchain_core.messages import AIMessage, HumanMessage, SystemMessage

# System message
sys_msg = SystemMessage(content="You are a helpful assistant tasked with performing arithmetic on a set of inputs.")

# Node
def assistant(state: MessagesState):
   return {"messages": [llm_with_tools.invoke([sys_msg] + state["messages"])]}

# Graph
builder = StateGraph(MessagesState)

# Define nodes: these do the work
builder.add_node("assistant", assistant)
builder.add_node("tools", ToolNode(tools))

# Define edges: these determine the control flow
builder.add_edge(START, "assistant")
builder.add_conditional_edges(
    "assistant",
    # If the latest message (result) from assistant is a tool call -> tools_condition routes to tools
    # If the latest message (result) from assistant is a not a tool call -> tools_condition routes to END
    tools_condition,
)
builder.add_edge("tools", "assistant")

memory = MemorySaver()
graph = builder.compile(interrupt_before=["tools"], checkpointer=memory)

# Show
display(Image(graph.get_graph(xray=True).draw_mermaid_png()))
python
# Input
initial_input = {"messages": HumanMessage(content="Multiply 2 and 3")}

# Thread
thread = {"configurable": {"thread_id": "1"}}

# Run the graph until the first interruption
for event in graph.stream(initial_input, thread, stream_mode="values"):
event['messages'][-1].pretty_print()================================[1m Human Message [0m=================================
Multiply 2 and 3
==================================[1m Ai Message [0m==================================
Tool Calls:
multiply (call_oFkGpnO8CuwW9A1rk49nqBpY)
Call ID: call_oFkGpnO8CuwW9A1rk49nqBpY
Args:
a: 2
b: 3We can get the state and look at the next node to call.
我们可以获取当前状态并查看下一个待调用的节点。
This is a nice way to see that the graph has been interrupted.
这是一种直观地确认图已被中断的好方法。
python
state = graph.get_state(thread)
state.next('tools',)Now, we'll introduce a nice trick.
现在,我们将介绍一个实用技巧。
When we invoke the graph with None, it will just continue from the last state checkpoint!
当我们以 None 作为输入调用图时,它将直接从上一个状态检查点继续执行!
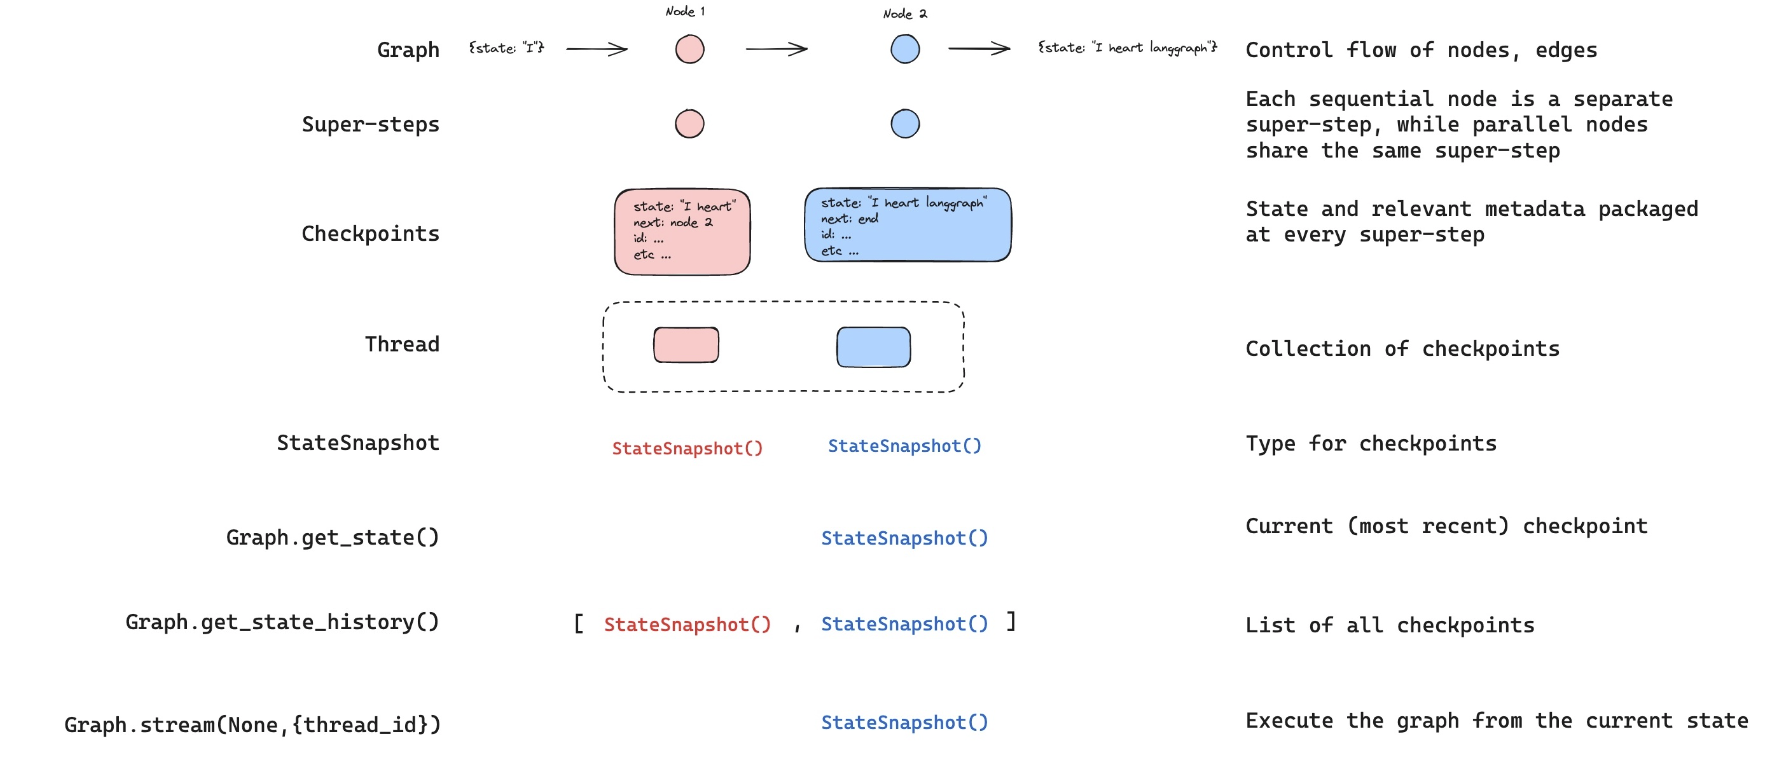
For clarity, LangGraph will re-emit the current state, which contains the AIMessage with tool call.
为清晰起见,LangGraph 将重新发出当前状态,该状态包含带有工具调用的 AIMessage。
And then it will proceed to execute the following steps in the graph, which start with the tool node.
随后,它将继续执行图中的后续步骤,这些步骤以工具节点为起点。
We see that the tool node is run with this tool call, and it's passed back to the chat model for our final answer.
我们看到工具节点使用该工具调用执行,并将结果传回聊天模型以生成最终答案。
python
for event in graph.stream(None, thread, stream_mode="values"):
event['messages'][-1].pretty_print()==================================[1m Ai Message [0m==================================
Tool Calls:
multiply (call_oFkGpnO8CuwW9A1rk49nqBpY)
Call ID: call_oFkGpnO8CuwW9A1rk49nqBpY
Args:
a: 2
b: 3
=================================[1m Tool Message [0m=================================
Name: multiply
6
==================================[1m Ai Message [0m==================================
The result of multiplying 2 and 3 is 6.Now, lets bring these together with a specific user approval step that accepts user input.
现在,让我们将上述内容整合起来,加入一个接受用户输入的具体人工审批步骤。
python
# Input
initial_input = {"messages": HumanMessage(content="Multiply 2 and 3")}

# Thread
thread = {"configurable": {"thread_id": "2"}}

# Run the graph until the first interruption
for event in graph.stream(initial_input, thread, stream_mode="values"):
    event['messages'][-1].pretty_print()

# Get user feedback
user_approval = input("Do you want to call the tool? (yes/no): ")

# Check approval
if user_approval.lower() == "yes":

    # If approved, continue the graph execution
    for event in graph.stream(None, thread, stream_mode="values"):
        event['messages'][-1].pretty_print()

else:
print("Operation cancelled by user.")================================[1m Human Message [0m=================================
Multiply 2 and 3
==================================[1m Ai Message [0m==================================
Tool Calls:
multiply (call_tpHvTmsHSjSpYnymzdx553SU)
Call ID: call_tpHvTmsHSjSpYnymzdx553SU
Args:
a: 2
b: 3
==================================[1m Ai Message [0m==================================
Tool Calls:
multiply (call_tpHvTmsHSjSpYnymzdx553SU)
Call ID: call_tpHvTmsHSjSpYnymzdx553SU
Args:
a: 2
b: 3
=================================[1m Tool Message [0m=================================
Name: multiply
6
==================================[1m Ai Message [0m==================================
The result of multiplying 2 and 3 is 6.Breakpoints with LangGraph API 使用 LangGraph API 的断点
⚠️ Notice
⚠️ 注意
Since filming these videos, we've updated Studio so that it can now be run locally and accessed through your browser.
自录制本视频以来,我们已更新 Studio,使其现在可本地运行并通过浏览器访问。
This is the preferred way to run Studio instead of using the Desktop App shown in the video.
这是运行 Studio 的首选方式,而非视频中演示的桌面应用。
It is now called LangSmith Studio instead of LangGraph Studio.
它现在被称为 LangSmith Studio ,而非 LangGraph Studio。
Detailed setup instructions are available in the "Getting Setup" guide at the start of the course.
详细的安装说明请参阅本课程开头的"环境准备(Getting Setup)"指南。
You can find a description of Studio here, and specific details for local deployment here.
您可在此处查阅 Studio 的说明文档 此处,以及本地部署的具体细节 此处。
To start the local development server, run the following command in your terminal in the /studio directory in this module:
要在本地启动开发服务器,请在本模块的 /studio 目录下于终端中运行以下命令:
langgraph devYou should see the following output:
您应看到如下输出:
- 🚀 API: http://127.0.0.1:2024
- 🎨 Studio UI: https://smith.langchain.com/studio/?baseUrl=http://127.0.0.1:2024
- 📚 API Docs: http://127.0.0.1:2024/docs
Open your browser and navigate to the Studio UI URL shown above.
打开您的浏览器并导航至上方显示的 Studio UI URL。
The LangGraph API supports breakpoints.
LangGraph API 支持断点。
python
if 'google.colab' in str(get_ipython()):
    raise Exception("Unfortunately LangGraph Studio is currently not supported on Google Colab")
python
# This is the URL of the local development server
from langgraph_sdk import get_client
client = get_client(url="http://127.0.0.1:2024")
As shown above, we can add interrupt_before=["node"] when compiling the graph that is running in Studio.
如上所示,我们可在 Studio 中运行的图进行编译时添加 interrupt_before=["node"]。
However, with the API, you can also pass interrupt_before to the stream method directly.
但借助 API,您也可以直接将 interrupt_before 参数传递给 stream 方法。
python
initial_input = {"messages": HumanMessage(content="Multiply 2 and 3")}
thread = await client.threads.create()
async for chunk in client.runs.stream(
    thread["thread_id"],
    assistant_id="agent",
    input=initial_input,
    stream_mode="values",
    interrupt_before=["tools"],
):
    print(f"Receiving new event of type: {chunk.event}...")
    messages = chunk.data.get('messages', [])
    if messages:
        print(messages[-1])
print("-" * 50)Receiving new event of type: metadata...
--------------------------------------------------
Receiving new event of type: values...
{'content': 'Multiply 2 and 3', 'additional_kwargs': {}, 'response_metadata': {}, 'type': 'human', 'name': None, 'id': '2a3b1e7a-f6d9-44c2-a4b4-b7f67aa3691c', 'example': False}
--------------------------------------------------
Receiving new event of type: values...
{'content': '', 'additional_kwargs': {'tool_calls': [{'id': 'call_ElnkVOf1H80dlwZLqO0PQTwS', 'function': {'arguments': '{"a":2,"b":3}', 'name': 'multiply'}, 'type': 'function'}], 'refusal': None}, 'response_metadata': {'token_usage': {'completion_tokens': 18, 'prompt_tokens': 134, 'total_tokens': 152, 'completion_tokens_details': {'accepted_prediction_tokens': 0, 'audio_tokens': 0, 'reasoning_tokens': 0, 'rejected_prediction_tokens': 0}, 'prompt_tokens_details': {'audio_tokens': 0, 'cached_tokens': 0}}, 'model_name': 'gpt-4o-2024-08-06', 'system_fingerprint': 'fp_eb9dce56a8', 'finish_reason': 'tool_calls', 'logprobs': None}, 'type': 'ai', 'name': None, 'id': 'run-89ee14dc-5f46-4dd9-91d9-e922c4a23572-0', 'example': False, 'tool_calls': [{'name': 'multiply', 'args': {'a': 2, 'b': 3}, 'id': 'call_ElnkVOf1H80dlwZLqO0PQTwS', 'type': 'tool_call'}], 'invalid_tool_calls': [], 'usage_metadata': {'input_tokens': 134, 'output_tokens': 18, 'total_tokens': 152, 'input_token_details': {'audio': 0, 'cache_read': 0}, 'output_token_details': {'audio': 0, 'reasoning': 0}}}
--------------------------------------------------Now, we can proceed from the breakpoint just like we did before by passing the thread_id and None as the input!
现在,我们可以通过传入 thread_id 和 None 作为输入,像之前一样从断点处继续执行!
python
async for chunk in client.runs.stream(
    thread["thread_id"],
    "agent",
    input=None,
    stream_mode="values",
    interrupt_before=["tools"],
):
    print(f"Receiving new event of type: {chunk.event}...")
    messages = chunk.data.get('messages', [])
    if messages:
        print(messages[-1])
print("-" * 50)Receiving new event of type: metadata...
--------------------------------------------------
Receiving new event of type: values...
{'content': '', 'additional_kwargs': {'tool_calls': [{'id': 'call_ElnkVOf1H80dlwZLqO0PQTwS', 'function': {'arguments': '{"a":2,"b":3}', 'name': 'multiply'}, 'type': 'function'}], 'refusal': None}, 'response_metadata': {'token_usage': {'completion_tokens': 18, 'prompt_tokens': 134, 'total_tokens': 152, 'completion_tokens_details': {'accepted_prediction_tokens': 0, 'audio_tokens': 0, 'reasoning_tokens': 0, 'rejected_prediction_tokens': 0}, 'prompt_tokens_details': {'audio_tokens': 0, 'cached_tokens': 0}}, 'model_name': 'gpt-4o-2024-08-06', 'system_fingerprint': 'fp_eb9dce56a8', 'finish_reason': 'tool_calls', 'logprobs': None}, 'type': 'ai', 'name': None, 'id': 'run-89ee14dc-5f46-4dd9-91d9-e922c4a23572-0', 'example': False, 'tool_calls': [{'name': 'multiply', 'args': {'a': 2, 'b': 3}, 'id': 'call_ElnkVOf1H80dlwZLqO0PQTwS', 'type': 'tool_call'}], 'invalid_tool_calls': [], 'usage_metadata': {'input_tokens': 134, 'output_tokens': 18, 'total_tokens': 152, 'input_token_details': {'audio': 0, 'cache_read': 0}, 'output_token_details': {'audio': 0, 'reasoning': 0}}}
--------------------------------------------------
Receiving new event of type: values...
{'content': '6', 'additional_kwargs': {}, 'response_metadata': {}, 'type': 'tool', 'name': 'multiply', 'id': '5331919f-a26b-4d75-bf33-6dfaea2be1f7', 'tool_call_id': 'call_ElnkVOf1H80dlwZLqO0PQTwS', 'artifact': None, 'status': 'success'}
--------------------------------------------------
Receiving new event of type: values...
{'content': 'The result of multiplying 2 and 3 is 6.', 'additional_kwargs': {'refusal': None}, 'response_metadata': {'token_usage': {'completion_tokens': 15, 'prompt_tokens': 159, 'total_tokens': 174, 'completion_tokens_details': {'accepted_prediction_tokens': 0, 'audio_tokens': 0, 'reasoning_tokens': 0, 'rejected_prediction_tokens': 0}, 'prompt_tokens_details': {'audio_tokens': 0, 'cached_tokens': 0}}, 'model_name': 'gpt-4o-2024-08-06', 'system_fingerprint': 'fp_eb9dce56a8', 'finish_reason': 'stop', 'logprobs': None}, 'type': 'ai', 'name': None, 'id': 'run-06b901ad-0760-4986-9d3f-a566e0d52efd-0', 'example': False, 'tool_calls': [], 'invalid_tool_calls': [], 'usage_metadata': {'input_tokens': 159, 'output_tokens': 15, 'total_tokens': 174, 'input_token_details': {'audio': 0, 'cache_read': 0}, 'output_token_details': {'audio': 0, 'reasoning': 0}}}
--------------------------------------------------