Rocky Linux 系统 EPEL 软件源配置
一、EPEL 软件源概述
1.1 EPEL 仓库
EPEL 是 Extra Packages for Enterprise Linux 的缩写,代表企业版 Linux 的额外软件包。该仓库由 Fedora 特别兴趣小组(SIG)维护,由一群 Red Hat 工程师和社区成员发起和贡献。
EPEL 仓库中的软件包基于 RHEL 构建,专为 RHEL 衍生版本(如 AlmaLinux、Rocky Linux 和 Oracle Linux 等)提供高质量的附加软件包。EPEL 的目标是通过提供官方软件源中未包含但日常需要的软件包,扩展 Fedora 软件包集合在企业环境中的可用性。
1.2 EPEL 版本说明
在 RHEL 8 及其衍生版本中,提供了标准 EPEL 和 EPEL Next 软件包仓库,后者提供更新版本的软件包,适合开发者和早期采用者。在 RHEL 9 及其衍生版本中,EPEL Next 已经合并到 EPEL 中,可以直接从 EPEL 获取最新版本的软件包。
EPEL 软件源有版本号,如 8 和 9,分别对应 RHEL 8 和 9 的衍生版本。每个版本的 EPEL 都专为对应的 RHEL 衍生版本设计,以确保与该版本的库、软件和依赖项兼容。
- EPEL 8 适用于 RHEL 8 及其衍生版本,如 CentOS Stream 8、AlmaLinux 8、Rocky Linux 8 和 Oracle Linux 8。
- EPEL 9 适用于 RHEL 9 及其衍生版本,如 CentOS Stream 9、AlmaLinux 9、Rocky Linux 9 和 Oracle Linux 9。
在基于 RHEL 8 的 Linux 上使用 EPEL 9 软件包(或反之),可能导致软件无法正常工作,甚至引发系统问题。
二、配置 EPEL 软件源
2.1 确认系统版本
在配置 EPEL 软件源之前,需要确认当前 Linux 发行版的主要版本号。在终端中执行以下命令:
bash
cat /etc/os-release | grep VERSION_ID | cut -d '"' -f 2 | cut -d '.' -f 12.2 添加 EPEL 软件源
2.2.1 CentOS、Rocky Linux 和 AlmaLinux
安装 EPEL 仓库:
bash
sudo dnf install epel-release在 RHEL 衍生版本上添加 EPEL 仓库
在 RHEL 9 衍生版本中,EPEL Next 已经合并到 EPEL 中,不再需要单独安装。
(可选)为 RHEL 8 衍生版本安装 EPEL Next 软件源,以获取新版本软件:
bash
sudo dnf install epel-next-release(可选)启用开发者仓库。PowerTools(RHEL 8)或 CodeReady Builder(RHEL 9)仓库为软件开发者提供额外的开发工具和库,包含用于软件开发、编译和打包的各种组件。
bash
# 启用 PowerTools 仓库
dnf config-manager --set-enabled powertools # 适用于 RHEL 8 及其衍生版本

# 启用 CodeReady Builder 仓库
dnf config-manager --set-enabled crb # 适用于 RHEL 9 及其衍生版本
2.2.2 Oracle Linux
Oracle Linux 需要使用由 Oracle 官方维护的专用 EPEL 仓库:
bash
sudo dnf install oracle-epel-release-el8 # 适用于 Oracle Linux 8
sudo dnf install oracle-epel-release-el9 # 适用于 Oracle Linux 9
在 Oracle Linux 上添加 EPEL 仓库
根据需要启用可选 EPEL 仓库:
bash
# 启用 CodeReady Builder 仓库
sudo dnf config-manager --enable ol8_developer_EPEL # 适用于 Oracle Linux 8
sudo dnf config-manager --enable ol9_codeready_builder # 适用于 Oracle Linux 9

# 启用 Developer EPEL 仓库(默认)
sudo dnf config-manager --enable ol8_developer_EPEL # 适用于 Oracle Linux 8
sudo dnf config-manager --enable ol9_developer_EPEL # 适用于 Oracle Linux 9

# 启用 Distro Builder 仓库
sudo dnf config-manager --enable ol8_distro_builder # 适用于 Oracle Linux 8
sudo dnf config-manager --enable ol9_distro_builder # 适用于 Oracle Linux 9
2.3 验证配置
安装完成后,EPEL 仓库一般会自动启用。通过以下命令验证添加是否成功:
bash
sudo dnf repolist在 RHEL 衍生版本上验证 EPEL 仓库
2.4 更换国内镜像源
国内云计算厂商和高校建立了自己的 EPEL 镜像,可以加快软件包在国内的分发和下载速度。以下镜像站点提供了详细的配置步骤:
- 阿里云:https://developer.aliyun.com/mirror/epel
- 腾讯云:https://mirrors.tencent.com/help/epel.html
- 中科大:https://mirrors.ustc.edu.cn/help/epel.html
- 清华大学:https://mirrors.tuna.tsinghua.edu.cn/help/epel/
各镜像站点提供了详细的配置步骤,可根据需要参考其官方文档更换 EPEL 国内源。
三、使用 EPEL 软件源
3.1 安装软件包
通过 EPEL 仓库安装软件包与其他软件包相同,使用以下命令即可:
bash
dnf install [package_name]通过 EPEL 软件源安装应用,例如,安装 htop(一个交互式的进程查看器):
bash
sudo dnf install htop3.2 查询软件包
查看 EPEL 软件源中提供的所有可用软件包完整列表:
bash
dnf repository-packages epel list列出 EPEL 仓库提供的软件包
查看已从 EPEL 软件源安装的软件包:
bash
dnf repository-packages epel list installed列出通过 EPEL 安装的软件包
四、管理 EPEL 软件源
4.1 启用与禁用
为避免潜在的软件冲突、减少系统更新时的软件包数量,或提高系统安全性,可能需要禁用 EPEL 软件源。
启用或禁用 EPEL 软件源:
bash
sudo dnf config-manager --set-disabled epel # 禁用 EPEL 软件源
sudo dnf config-manager --set-enabled epel  # 启用 EPEL 软件源
4.2 移除 EPEL 软件源
要彻底从系统中移除 EPEL 软件源,可以卸载 EPEL 软件包:
bash
# 适用于 CentOS、Rocky Linux 和 AlmaLinux
sudo dnf remove epel-release        # 适用于 RHEL 9 衍生版本
sudo dnf remove epel-next-release   # 适用于 RHEL 8 衍生版本

# 适用于 Oracle Linux
sudo dnf remove oracle-epel-release-el8  # 适用于 Oracle Linux 8
sudo dnf remove oracle-epel-release-el9  # 适用于 Oracle Linux 9
五、特定发行版配置
5.1 RHEL9 安装 EPEL 扩展源
5.1.1 查看发行版本信息
bash
cat /etc/redhat-release5.1.2 备份已有 EPEL 源配置
如果系统中已配置有其他 EPEL 源,建议先备份:
bash
mv /etc/yum.repos.d/epel.repo /etc/yum.repos.d/epel.repo.backup
mv /etc/yum.repos.d/epel-testing.repo /etc/yum.repos.d/epel-testing.repo.backup
5.1.3 下载并安装 EPEL 配置包
bash
yum install -y https://mirrors.aliyun.com/epel/epel-release-latest-9.noarch.rpm5.1.4 替换镜像源地址
将 repo 配置中的地址替换为阿里云镜像站地址:
bash
sed -i 's|^#baseurl=https://download.example/pub|baseurl=https://mirrors.aliyun.com|' /etc/yum.repos.d/epel*
sed -i 's|^metalink|#metalink|' /etc/yum.repos.d/epel*
5.1.5 验证配置
bash
dnf clean all
dnf makecache
dnf repolist
5.2 麒麟 V10 配置 EPEL 源
麒麟 V10 系统基于 CentOS 系(内核版本介于 CentOS 8 与 9 之间),大部分 EPEL 8 的软件包可以直接使用。
5.2.1 方法一:直接安装官方 EPEL RPM 包
下载并安装 EPEL 源 RPM 包:
bash
wget https://dl.fedoraproject.org/pub/epel/epel-release-latest-8.noarch.rpm
rpm -ivh epel-release-latest-8.noarch.rpm --nodeps --force
清理缓存并生成新缓存:
bash
yum clean all
yum makecache
测试安装软件:
bash
yum install htop -y5.2.2 方法二:使用国内镜像(推荐)
创建 EPEL 仓库配置文件:
bash
cat > /etc/yum.repos.d/epel.repo <<'EOF'
[epel]
name=Extra Packages for Enterprise Linux 8 - $basearch
baseurl=https://mirrors.tuna.tsinghua.edu.cn/epel/8/Everything/$basearch/
enabled=1
gpgcheck=0
countme=1

[epel-debuginfo]
name=Extra Packages for Enterprise Linux 8 - $basearch - Debug
baseurl=https://mirrors.tuna.tsinghua.edu.cn/epel/8/Everything/$basearch/debug/
enabled=0
gpgcheck=0

[epel-source]
name=Extra Packages for Enterprise Linux 8 - $basearch - Source
baseurl=https://mirrors.tuna.tsinghua.edu.cn/epel/8/Everything/source/tree/
enabled=0
gpgcheck=0
EOF
更新缓存并测试:
bash
yum makecache
yum install vnstat -y
5.2.3 验证与配置建议
执行 yum repolist 确认 epel 仓库已启用,并能正常安装来自 EPEL 的软件包。
配置建议:
- 版本选择:麒麟 V10 建议使用 EPEL 8 源。
- 架构适配:对于 ARM 架构,
$basearch会自动匹配 aarch64,无需手动修改。 - 网络优化:若需长期稳定运行,建议优先选择国内镜像以减少网络延迟。
5.3 Rocky Linux 安装 EPEL 并更换国内源
5.3.1 启用并安装 EPEL Repo
bash
# Rocky Linux 9
dnf config-manager --set-enabled crb
dnf install epel-release
5.3.2 备份已有 EPEL 源并替换为国内镜像
bash
cp /etc/yum.repos.d/epel.repo /etc/yum.repos.d/epel.repo.backup
cp /etc/yum.repos.d/epel-testing.repo /etc/yum.repos.d/epel-testing.repo.backup
cp /etc/yum.repos.d/epel-cisco-openh264.repo /etc/yum.repos.d/epel-cisco-openh264.repo.backup
注意:epel-cisco-openh264.repo 库阿里云没有对应镜像,不要修改该文件,如果误改可恢复原版源。
将 repo 配置中的地址替换为阿里云镜像站地址:
bash
sed -e 's!^metalink=!#metalink=!g' \
    -e 's!^#baseurl=!baseurl=!g' \
    -e 's!https\?://download\.fedoraproject\.org/pub/epel!https://mirrors.aliyun.com/epel!g' \
    -e 's!https\?://download\.example/pub/epel!https://mirrors.aliyun.com/epel!g' \
    -i /etc/yum.repos.d/epel{,-testing}.repo
更新仓库缓存:
bash
dnf clean all
dnf makecache
六、Rocky Linux 系统配置
6.1 安装中文输入法
Linux 的常见输入法方案有 fcitx 和 ibus。ibus 提供的智能拼音中文输入法安装简单,以下介绍从安装到配置使用的全流程。
6.1.1 GNOME 桌面环境
Rocky Linux 9.4 的 GNOME 桌面环境已自带 ibus 中文输入法,可从右上角切换使用。
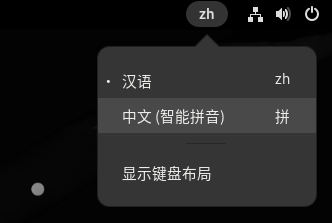
GNOME 桌面环境输入法切换界面
6.1.2 XFCE 桌面环境
XFCE 桌面环境已安装 ibus 中文输入法,但未配置自启动。以下介绍从安装到配置使用的全流程。
步骤 1:安装 ibus 输入法
若系统中没有 ibus-libpinyin 输入法,请执行安装:
bash
sudo dnf install ibus ibus-libpinyin -y步骤 2:添加环境变量
编辑用户目录下的 .bashrc 文件:
bash
vi ~/.bashrc在文件开头新增以下三行:
bash
export GTK_IM_MODULE=ibus
export QT_IM_MODULE=ibus
export XMODIFIERS=@im=ibus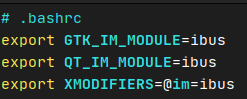
.bashrc 配置文件编辑界面
保存并退出(按 Esc 后输入 :wq)。
步骤 3:将 ibus-daemon 加入自启动
在 XFCE 桌面环境中,打开设置 > 会话和启动,在应用程序自启动中点击"增加"按钮,输入以下信息:
- 名称:ibus
- 命令:
/usr/bin/ibus-daemon - 描述:ibus daemon(可自定义)
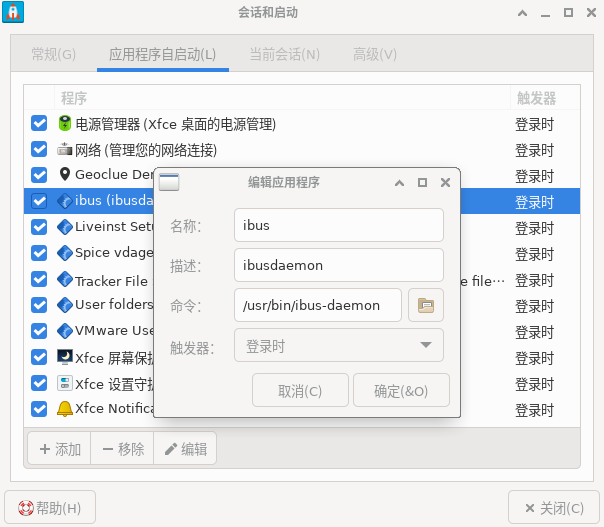
ibus-daemon 自启动配置界面
步骤 4:配置输入法输入源
打开设置 > 键盘 > 输入源,新增"汉语(中国)",选择智能拼音输入法。可将多余输入源删除,仅保留"汉语(中国)"。
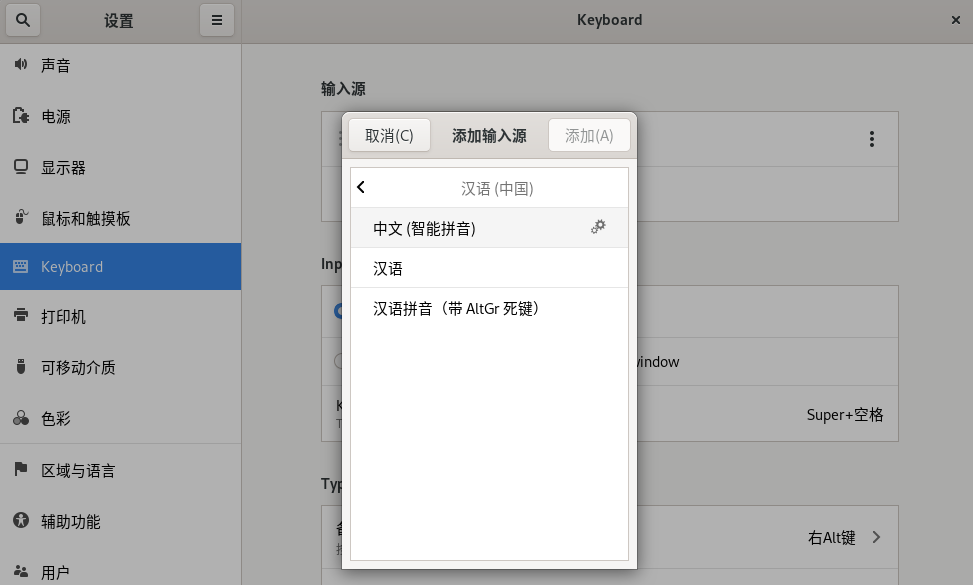
输入法输入源配置界面
步骤 5:重启系统
重启后输入法配置生效。
补充:词典资源
可参考以下词典资源扩展拼音词典:
https://github.com/broly8/libpinyin-dict
6.2 更换国内镜像源
6.2.1 Rocky Linux 官方镜像源
官方镜像管理器地址:
https://mirror.rockylinux.org/mirrormanager/mirrors
6.2.2 Rocky Linux 国内镜像源
6.2.3 替换镜像源配置
终端执行以下命令,将镜像源替换为阿里云:
bash
sed -e 's|^mirrorlist=|#mirrorlist=|g' \
    -e 's|^#baseurl=http://dl.rockylinux.org/$contentdir|baseurl=https://mirrors.aliyun.com/rockylinux|g' \
    -i.bak \
    /etc/yum.repos.d/[Rr]ocky*.repo
修改配置完成后,执行以下命令生成缓存:
bash
dnf clean all
dnf makecache
6.2.4 恢复官方源
如需恢复官方源,可使用备份文件恢复。执行 sed 命令时会在仓库目录 /etc/yum.repos.d/ 下生成 .bak 备份文件。可通过以下方式恢复:
bash
su
# 在图形界面中使用 nautilus 或 xfce 中使用 thunar 打开目录
nautilus /etc/yum.repos.d/
找到 /etc/yum.repos.d/ 目录下以 .bak 结尾的备份文件,重命名去掉 .bak 后缀以替换当前的 .repo 文件。修改配置完成后,执行 dnf clean all 和 dnf makecache 生成新缓存。
6.3 安装 RPM Fusion 仓库
6.3.1 RPM Fusion 简介
RPM Fusion 是一个面向 Fedora 和 Red Hat Enterprise Linux(RHEL)及其衍生版(如 CentOS)的社区维护软件仓库。它由多个第三方仓库(包括 Dribble、Freshrpms 和 Livna)合并而成,旨在为用户提供一个集中的位置来获取那些因许可、法律或政策原因未被官方仓库收录的软件包。
RPM Fusion 分为两个主要部分:
- Free 仓库:包含开源软件以及一些虽然本身免费但由于专利或其他法律限制在某些国家可能受限的软件包。遵循 Fedora 的开放源代码政策。
- Nonfree 仓库:包含闭源或专有软件,如某些硬件驱动程序(NVIDIA 和 AMD 显卡驱动)、多媒体编解码器等。这些软件包不完全符合 Fedora 的开源标准,但对许多用户来说是必要的。
通过启用 RPM Fusion 仓库,用户可以安装一系列额外的应用程序、驱动程序和多媒体支持。
6.3.2 在 Rocky Linux 中启用 RPM Fusion
安装 RPM Fusion 的 Free 仓库:
bash
sudo dnf install https://download1.rpmfusion.org/free/el/rpmfusion-free-release-$(rpm -E %rhel).noarch.rpm安装 RPM Fusion 的 Nonfree 仓库:
bash
sudo dnf install https://download1.rpmfusion.org/nonfree/el/rpmfusion-nonfree-release-$(rpm -E %rhel).noarch.rpm6.3.3 修改为国内镜像
bash
sudo sed -e 's|^metalink=|#metalink=|g' \
         -e 's|^#baseurl=http://download1.rpmfusion.org|baseurl=https://mirrors.aliyun.com/rpmfusion|g' \
         -i.bak \
         /etc/yum.repos.d/rpmfusion*.repo
修改完成后,清除并重建缓存:
bash
sudo dnf clean all
sudo dnf makecache
6.3.4 安装第三方软件
使用 dnf 包管理器安装第三方软件:
bash
sudo dnf install <软件名>安装 VLC 媒体播放器:
bash
sudo dnf install vlc安装 Steam 游戏平台:
bash
sudo dnf install steam附录
相关链接
- EPEL 官方文档(中文):https://docs.fedoraproject.org/zh_CN/epel/
- 阿里云 EPEL 镜像:https://developer.aliyun.com/mirror/epel
- 腾讯云 EPEL 镜像:https://mirrors.tencent.com/help/epel.html
- 中科大 EPEL 镜像:https://mirrors.ustc.edu.cn/help/epel.html
- 清华大学 EPEL 镜像:https://mirrors.tuna.tsinghua.edu.cn/help/epel/
- RPM Fusion 官方:https://rpmfusion.org/
Reference
-
EPEL 软件源详解:如何在 Linux 上的安装和使用 - 系统极客
-
RHEL9 安装 EPEL 扩展源_rhel9 epel-CSDN 博客
https://blog.csdn.net/2301_77300113/article/details/139476810
-
麒麟 V10 配置 EPEL 源 | Chemmy's Blog
https://chengming0916.github.io/2026/02/02/Linux/麒麟V10配置EPEL源/
-
Rocky Linux 捣鼓记录(一):安装使用中文输入法 - lwlnice - 博客园
-
Rocky Linux 捣鼓记录(二):更换国内镜像源 - lwlnice - 博客园
-
Rocky Linux 捣鼓记录(三):安装 epel 软件仓库,更换国内源 - lwlnice - 博客园
-
Rocky Linux 捣鼓记录(四):安装 RPM Fusion 仓库,更换国内源 - lwlnice - 博客园