本文以 GetX 4.7.3 為基準。
第一次進行桌面版開發,就發現常用的Getx一般路由有它的局限性,然而網上關於Getx的巢狀路由(嵌套路由)的相關文章比較少,只能自己下海研究。
多欄佈局只換一欄時,就需要巢狀 Navigator
桌面版常見三欄佈局:左邊是側邊選單,中間是列表,右邊是詳情。點列表裡的一項,只有右欄換頁;點選單切分頁,選單本身不動。GetX 的 Get.toNamed 預設操作 GetMaterialApp 的根 Navigator,每次導航都會蓋掉整個視窗,做不出這種效果。
解法是讓需要獨立換頁的每一區都有自己的 Navigator,路由跟著分層。本文用一個簡化的例子來示範,例子 App 有三層:
- Root 層 :
GetMaterialApp自帶的 Navigator,切換整窗頁面,比如登入頁/login和主框架/shell。 - Shell 層 :在主框架側邊選單的右邊,切換「收件匣」
/inbox和「設定」/settings兩個分頁。 - 分頁子層 :在各分頁列表的右邊顯示詳情。收件匣有
/thread(信件串),往下還能點進/attachment(附件)。
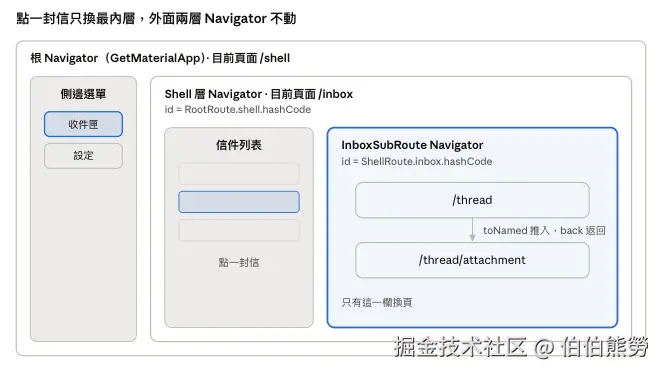
每個巢狀 Navigator 的 id 取自它所在的上一層路由,步驟一會說明原因。
如果你的畫面只是切分頁、分頁內沒有獨立的頁面堆疊,用 IndexedStack 就夠了,不必動到巢狀 Navigator。
步驟一:每個 Navigator 一個 enum
一個 Navigator 對應一個 enum,路徑、階層關係和 Navigator 的 id 都收在裡面。先寫外兩層:
dart
enum RootRoute {
  login('/login'),
  shell('/shell');

  const RootRoute(this.segment);
  final String segment;
  String get path => segment;
}

enum ShellRoute {
  empty('/empty'),
  inbox('/inbox'),
  settings('/settings');

  const ShellRoute(this.segment);
  final String segment;
  String get path => segment;

  static ShellRoute getByPath(String path) =>
      values.firstWhere((r) => r.path == path, orElse: () => empty);

  // Shell 層掛在 RootRoute.shell 底下
  static int get nestedKeyId => RootRoute.shell.hashCode;
  static Key? get nestedKey => Get.nestedKey(nestedKeyId);
}
分頁子層多一個 parent,用來表示同一層裡的上下級頁面:
dart
enum InboxSubRoute {
  empty('/empty'),
  thread('/thread'),
  attachment('/attachment', parent: thread);

  const InboxSubRoute(this.segment, {this.parent});
  final String segment;
  final InboxSubRoute? parent;

  String get path => '${parent?.path ?? ''}$segment';

  static InboxSubRoute getByPath(String path) =>
      values.firstWhere((r) => r.path == path, orElse: () => empty);

  // 收件匣子層掛在 ShellRoute.inbox 底下
  static int get nestedKeyId => ShellRoute.inbox.hashCode;
  static Key? get nestedKey => Get.nestedKey(nestedKeyId);
}
各成員的用途:
path把parent的路徑接在前面,attachment.path會是/thread/attachment,從路徑就看得出頁面是從哪裡點進來的。getByPath把RouteSettings.name轉回 enum,步驟二的switch會用到。找不到時回傳預設頁,這裡是empty。nestedKeyId是這個 Navigator 的 id。取上一層對應路由 的hashCode,id 跟路由樹一致,不用另外維護一份數字常數。enum 的hashCode在同一次執行中固定,這裡只當執行期的 key 用,不寫進磁碟。nestedKey呼叫Get.nestedKey(id),GetX 會依 id 建立並快取一把GlobalKey<NavigatorState>。之後導航時傳同一個 id,GetX 就用這把 key 找到對應的 Navigator。
SettingsSubRoute 照同樣的形狀寫,nestedKeyId 改取 ShellRoute.settings.hashCode。
步驟二:Root 層用 getPages,巢狀層用 onGenerateRoute
Root 層照 GetX 的一般寫法,把 GetPage 清單交給 GetMaterialApp.getPages:
dart
abstract class AppPages {
  static final rootPages = [
    GetPage(
      name: RootRoute.login.path,
      page: () => const LoginPage(),
      binding: LoginBinding(),
    ),
    GetPage(
      name: RootRoute.shell.path,
      page: () => const ShellPage(),
      binding: ShellBinding(),
    ),
  ];
}
巢狀層用的是 Flutter 本來的 Navigator widget,沒有 getPages 可以填,頁面要在 onGenerateRoute 裡自己產生。寫法是先用 getByPath 轉成 enum,再 switch:
dart
static RouteFactory inboxOnGenerateRoute = (settings) {
  switch (InboxSubRoute.getByPath(settings.name ?? '')) {
    case InboxSubRoute.empty:
      return GetPageRoute(page: () => const SizedBox.expand());
    case InboxSubRoute.thread:
      return GetPageRoute(
        page: () => const ThreadPage(),
        binding: ThreadBinding(),
        settings: settings,
      );
    case InboxSubRoute.attachment:
      return GetPageRoute(
        page: () => const AttachmentPage(),
        binding: AttachmentBinding(),
        settings: settings,
      );
  }
};
這段有兩個細節要注意。
- 回傳
GetPageRoute,不要用MaterialPageRoute。GetPageRoute支援binding,巢狀頁面的 Controller 一樣在進入時註冊、離開時回收。 settings要原樣傳進去。導航時帶的arguments放在settings裡,漏傳的話下一頁拿不到參數。
empty 回傳一個空的 SizedBox.expand(),當作右欄還沒選任何項目時的狀態。ShellRoute 和 SettingsSubRoute 各自再寫一個 shellOnGenerateRoute、settingsOnGenerateRoute,形狀相同。
步驟三:在頁面裡放巢狀 Navigator
哪一區要獨立換頁,就在那裡放一個 Navigator。ShellPage 是側邊選單加上右邊的 Shell 層:
dart
class ShellPage extends GetView<ShellController> {
  const ShellPage({super.key});

  @override
  Widget build(BuildContext context) {
    return Row(
      children: [
        SideMenu(onSelected: controller.onRouteSelected),
        Expanded(
          child: Navigator(
            key: ShellRoute.nestedKey,
            initialRoute: ShellRoute.empty.path,
            onGenerateRoute: AppPages.shellOnGenerateRoute,
          ),
        ),
      ],
    );
  }
}
InboxPage 是 Shell 層裡的一頁,結構相同,左邊列表、右邊子層:
dart
Row(
  children: [
    const SizedBox(width: 320, child: ThreadList()),
    Expanded(
      child: Navigator(
        key: InboxSubRoute.nestedKey,
        initialRoute: InboxSubRoute.empty.path,
        onGenerateRoute: AppPages.inboxOnGenerateRoute,
      ),
    ),
  ],
)
key 必須是步驟一的 nestedKey。只有用 Get.nestedKey(id) 取得的 key,GetX 導航時才能用 id 找到這個 Navigator。自己 new 一個 GlobalKey 寫在這裡,畫面看起來正常,但帶 id 的導航會找不到它。
initialRoute 通常放 empty。分頁若有預設要顯示的頁面(比如設定分頁一進來就是個人資料),直接填那一頁的 path。
步驟四:導航一律帶 id
GetX 的 toNamed、offAllNamed、back 都有 id 參數。沒帶 id 時操作的是根 Navigator,該開在右欄的頁面會蓋掉整個視窗,back 則可能把整個 /shell pop 掉。巢狀導航大致分成三種。
切換分頁或切換項目,用 offAllNamed。先清空這個 Navigator 的堆疊再放新頁面,切來切去不會越疊越高。側邊選單是這種,在列表裡點另一封信也是:
dart
class ShellController extends GetxController {
  final currentRoute = ShellRoute.empty.obs;

  void onRouteSelected(ShellRoute route, [dynamic arguments]) {
    if (route == currentRoute.value) return;
    currentRoute.value = route;
    Get.offAllNamed(
      route.path,
      id: ShellRoute.nestedKeyId,
      arguments: arguments,
    );
  }
}

// 列表點擊
Get.offAllNamed(
  InboxSubRoute.thread.path,
  arguments: thread,
  id: InboxSubRoute.nestedKeyId,
);
往下點進詳情,用 toNamed 。上一頁留在堆疊裡,方便返回。通常就是 enum 裡有 parent 的那些路由:
dart
Get.toNamed(
  InboxSubRoute.attachment.path,
  arguments: file,
  id: InboxSubRoute.nestedKeyId,
);
返回,用 back ,同樣要帶 id;需要把資料帶回上一頁時加 result:
dart
Get.back(result: updatedFile, id: InboxSubRoute.nestedKeyId);同一個頁面如果同時掛在兩個 Navigator 底下(比如收件匣和設定都能打開的聯絡人頁),id 就不能寫死。假設 InboxSubRoute 和 SettingsSubRoute 都加了一個 contact,在 onGenerateRoute 裡把 id 由建構子傳進去,頁面裡用 Get.back(id: widget.nestedKeyId),從哪個分頁開的就回到哪個分頁:
dart
case InboxSubRoute.contact:
  return GetPageRoute(
    page: () => ContactPage(nestedKeyId: InboxSubRoute.nestedKeyId),
    settings: settings,
  );
步驟五:替巢狀層準備自己的 Routing
到這裡導航已經正常,但在 ThreadPage 裡讀 Get.arguments 拿不到剛傳進來的 thread。Get.arguments 讀的是 Get.routing.args,這份 Routing 只由 GetMaterialApp 掛在根 Navigator 上的 GetObserver(routingCallback, Get.routing) 更新。巢狀 Navigator 的 push、pop 不會經過它,所以讀到的是根層 /shell 的參數。
沿用同一個機制就能解決:替每個巢狀 Navigator 準備一份 Routing,掛一個寫入它的 GetObserver。這些 Routing 集中放在一個全域 Service,任何 Controller 都拿得到:
dart
class RouteContextService extends GetxService {
  static RouteContextService get to => Get.find();

  final Routing shellRouting = Routing();
  final Routing inboxSubRouting = Routing();
  final Routing settingsSubRouting = Routing();

  dynamic get shellArguments => shellRouting.args;
  dynamic get inboxSubArguments => inboxSubRouting.args;
  dynamic get settingsSubArguments => settingsSubRouting.args;
}
在 App 啟動時註冊一次,要早於任何巢狀 Navigator 建立:
dart
Get.put(RouteContextService());然後把對應的 Routing 交給步驟三那個 Navigator:
dart
Navigator(
  key: InboxSubRoute.nestedKey,
  initialRoute: InboxSubRoute.empty.path,
  onGenerateRoute: AppPages.inboxOnGenerateRoute,
  observers: [
    GetObserver(null, RouteContextService.to.inboxSubRouting),
  ],
)
GetObserver 的第一個參數是路由變化時的回呼,用不到就傳 null;第二個是要寫入的 Routing。之後這個 Navigator 每次換頁,inboxSubRouting 的 current、args 就會跟著更新。
頁面端改讀自己那一層的 arguments,建議在 onInit 讀一次存起來。Routing 只記錄該 Navigator 目前頁面的參數,等使用者往下點進別頁後再讀,就是別頁的參數了:
dart
class ThreadController extends GetxController {
  late final Thread thread;

  @override
  void onInit() {
    super.onInit();
    thread = RouteContextService.to.inboxSubArguments as Thread;
  }
}
要知道某一層現在停在哪一頁,也是讀同一份 Routing,比如 RouteContextService.to.shellRouting.current。
跨層跳轉:先切外層,內層等掛上再導
常見需求是從一個分頁跳到另一個分頁的某個詳情,比如從設定分頁點「查看系統信」,要先把 Shell 層切到收件匣,再把收件匣子層導到 /thread。問題在時序:外層的 offAllNamed 返回時,InboxPage 還沒 build,裡面的巢狀 Navigator 也還不存在,這時帶 InboxSubRoute.nestedKeyId 導航會找不到目標。
有兩種寫法,看目標分頁的 Controller 會不會重建。
Controller 隨頁面建立(一般的 lazyPut) :參數跟著外層導航帶過去,目標分頁在 onReady 讀 Shell 層的 arguments,再導自己的子層。onReady 在第一幀畫完之後才執行,這時子層 Navigator 已經掛上:
dart
// 設定分頁
Get.find<ShellController>().onRouteSelected(ShellRoute.inbox, thread);

// InboxController
@override
void onReady() {
  super.onReady();
  final args = RouteContextService.to.shellArguments;
  if (args is Thread) {
    Get.offAllNamed(
      InboxSubRoute.thread.path,
      arguments: args,
      id: InboxSubRoute.nestedKeyId,
    );
  }
}
Controller 是 permanent 或已經存在 :第二次進分頁時 onReady 不會再觸發,上面的做法失效。改由發起跳轉的一方主動轉交,用 addPostFrameCallback 等下一幀子層掛上再呼叫:
dart
void onRouteSelected(ShellRoute route, [dynamic arguments]) {
  if (route != currentRoute.value) {
    currentRoute.value = route;
    Get.offAllNamed(route.path, id: ShellRoute.nestedKeyId, arguments: arguments);
  }
  if (route == ShellRoute.inbox && arguments is Thread) {
    // 等收件匣的巢狀 Navigator 掛上
    WidgetsBinding.instance.addPostFrameCallback((_) {
      Get.find<InboxController>().openThread(arguments);
    });
  }
}
注意這裡把判斷放在 if (route != currentRoute.value) 外面。使用者已經在收件匣時,外層不會重導,但內層仍然要切到指定的信。