文章目录
- 依赖管理
- 一、WebMvcAutoConfiguration
-
- [1.1 Filter](#1.1 Filter)
- [1.2 Interceptor](#1.2 Interceptor)
- 二、源码解析
-
- [2.1 SpringApplication](#2.1 SpringApplication)
-
- [2.1.1 构造方法](#2.1.1 构造方法)
- [2.1.2 run(args)](#2.1.2 run(args))
- [2.2 SpringApplicationRunListeners](#2.2 SpringApplicationRunListeners)
- [2.3 prepareEnvironment](#2.3 prepareEnvironment)
- [2.4 createApplicationContext](#2.4 createApplicationContext)
- [2.5 prepareContext](#2.5 prepareContext)
- [2.6 refreshContext](#2.6 refreshContext)
-
- 自动装配
-
-
- getAutoConfigurationMetadata
- [去重 + 排除 + @conditional](#去重 + 排除 + @conditional)
- 自定义自动装配类
-
- [2.7 tomcat组件](#2.7 tomcat组件)
-
- 2.7.1定义
- [2.7.2 tomcat组件](#2.7.2 tomcat组件)
-
- Server
- Service
- Connector
-
- [3.1 Endpoint](#3.1 Endpoint)
- [3.2 Processor](#3.2 Processor)
- [3.3 Adapter](#3.3 Adapter)
- Container
-
- **Engine**
- [**Host 虚拟主机**](#Host 虚拟主机)
- **Context上下文**
- **Wrapper包装器**
- [2.7.3 组件Lifecycle](#2.7.3 组件Lifecycle)
- [2.8 内嵌tomcat](#2.8 内嵌tomcat)
-
- [2.8.1 getWebServerFactory](#2.8.1 getWebServerFactory)
- [2.8.2 getWebServer](#2.8.2 getWebServer)
- [2.9 finishRefresh](#2.9 finishRefresh)
-
- [2.9.1 startWebServer-NioEndpoint启动](#2.9.1 startWebServer-NioEndpoint启动)
- [2.9.2 publishEvent](#2.9.2 publishEvent)
- [2.10 stop-tomcat](#2.10 stop-tomcat)
- 注解
依赖管理
pom依赖管理
1)在SpringBoot项目中,根pom内容
xml
<parent>
    <groupId>org.springframework.boot</groupId>
    <artifactId>spring-boot-starter-parent</artifactId>
    <version>2.1.6.RELEASE</version>
</parent>
2)此spring-boot-starter-parent-2.1.6.RELEASE.pom中仍有父pom
xml
<parent>
    <groupId>org.springframework.boot</groupId>
    <artifactId>spring-boot-dependencies</artifactId>
    <version>2.1.6.RELEASE</version>
    <relativePath>../../spring-boot-dependencies</relativePath>
</parent>
3)spring-boot-dependencies-2.1.6.RELEASE.pom
java
<properties>
    <!-- 指定了我们常用中间件的版本号-->
	<spring.version>5.1.8.RELEASE</spring.version>
	<byte-buddy.version>1.9.13</byte-buddy.version>
	<commons-lang3.version>3.8.1</commons-lang3.version>
    <elasticsearch.version>6.4.3</elasticsearch.version>
    <gson.version>2.8.5</gson.version>
    <jedis.version>2.9.3</jedis.version>
    <kafka.version>2.0.1</kafka.version>
    <lombok.version>1.18.8</lombok.version>
    <mysql.version>8.0.16</mysql.version>
    <netty.version>4.1.36.Final</netty.version>
    <rabbit-amqp-client.version>5.4.3</rabbit-amqp-client.version>
    <spring-amqp.version>2.1.7.RELEASE</spring-amqp.version>
    <spring-kafka.version>2.2.7.RELEASE</spring-kafka.version>
	----
</properties>


<!-- SpringBoot支持提供的场景启动器starter-->
<dependencyManagement>
    <dependencies>
      <dependency>
        <groupId>org.springframework.boot</groupId>
        <artifactId>spring-boot</artifactId>
        <version>2.1.6.RELEASE</version>
      </dependency>

      <dependency>
        <groupId>org.springframework.boot</groupId>
        <artifactId>spring-boot-test-autoconfigure</artifactId>
        <version>2.1.6.RELEASE</version>
      </dependency>

     <!-- 指定了我们常用中间件的版本号-->
  </dependencies>
</dependencyManagement>
这样我们在项目根pom中引入中间件时,就无需再指定version。当然如果指定version,则以我们指定的version版本为主
Web依赖
1、我们在项目根pom中,引入了web依赖
<dependency>
     <groupId>org.springframework.boot</groupId>
     <artifactId>spring-boot-starter-web</artifactId>
     <version>3.0.6</version>
</dependency>
2、spring-boot-starter-web-3.0.6.pom中
xml
<dependencies>
    <dependency>
      <groupId>org.springframework.boot</groupId>
      <artifactId>spring-boot-starter-tomcat</artifactId>
      <version>3.0.6</version>
      <scope>compile</scope>
    </dependency>

    <dependency>
      <groupId>org.springframework</groupId>
      <artifactId>spring-web</artifactId>
      <version>6.0.8</version>
      <scope>compile</scope>
    </dependency>

    <dependency>
      <groupId>org.springframework</groupId>
      <artifactId>spring-webmvc</artifactId>
      <version>6.0.8</version>
      <scope>compile</scope>
    </dependency>

  </dependencies>
又引入了tomcat 和 spring-webmvc
3、依赖传递
- 因为spring-boot-starter-web-3.0.6.pom中有spring-webmvc的依赖
- 又因为我们项目根pom中,依赖了spring-boot-starter-web-3.0.6
- 所以根pom有spring-webmvc的依赖
- 所以,在我们项目中,就可以使用@Controller注解(org.springframework.web.bind.annotation)是spring-web下的内容
4、其它场景的starter
除了spring-boot-starter-web引入Web,还可以引入其它场景的依赖启动器
自定义starter
1、背景
有些中间件,SpringBoot没有为其提供启动器,如mybatis、Druid。这些中间件自己主动与SpringBoot完成整合,提供了启动器
java
<dependency>
    <groupId>org.mybatis.spring.boot</groupId>
    <artifactId>mybatis-spring-boot-starter</artifactId>
    <version>2.1.4</version>
</dependency>
所以,从名称上看,mybaits不是spring-boot-starter-mybatis,而是mybatis-spring-boot-starter。
说明了mybaits不是SpringBoot本身就提供的启动器
注意:
- SpringBoot提供的starter,在引入时,可以不指定版本号,因为parsent的parent:spring-boot-dependencies-2.1.6.RELEASE.pom中指定了默认版本号
- 但是SpringBoot没有提供的starter就必须自己指定版本号
2、整合redis
1)starter
xml
<!-- https://mvnrepository.com/artifact/org.springframework.boot/spring-boot-starter-data-redis -->
<dependency>
    <groupId>org.springframework.boot</groupId>
    <artifactId>spring-boot-starter-data-redis</artifactId>
</dependency>

<dependency>
     <groupId>org.springframework.data</groupId>
     <artifactId>spring-data-redis</artifactId>
     <version>2.1.9.RELEASE</version>
</dependency>
2)配置redis
-
applicaiton.properties
spring.redis.host=127.0.0.1
spring.redis.port=6379
3)测试
java
@Resource
private StringRedisTemplate stringRedisTemplate;//或者RedisTemplate

@Test
public void t() {
    String name = "mjp";
    Integer age = 18;

    String key = stringRedisTemplate.opsForValue().get(name);
    if (StringUtils.isBlank(key)) {
        stringRedisTemplate.opsForValue().set(name, String.valueOf(age));
    }
}- 去redis客户端工具中
redis的安装,参考我另一篇:redis安装
java
get name一、WebMvcAutoConfiguration
在SpringBoot中主要作用于Web MVC的自动配置,包括视图解析器、静态资源配置、MVC配置、消息转换器和异常处理等。
1.1 Filter
1、背景
参考我设计模式:设计模式Java实战
2、使用
- Filter1
java
public class MyFilter1 implements Filter{
    @Override
    public void doFilter(ServletRequest request, ServletResponse response, FilterChain chain) throws IOException, ServletException {
        // 先拦截req
		System.out.println("======================filter-req");
        HttpServletRequest httpRequest = (HttpServletRequest) request;
        String uri = httpRequest.getRequestURI();
        if (StringUtils.isNoneBlank(uri)) {
            String[] split = uri.split("/");
            if (split.length > 2) {
                String firstParam = split[2]; // 第一个参数
                //return;//终止执行业务逻辑
            }

        }
        chain.doFilter(request, response);//执行目标方法
        // 再拦截resp
        System.out.println("======================filter1-resp");
    }
}- Filter2
java
public class MyFilter2 implements Filter{
    @Override
    public void doFilter(ServletRequest request, ServletResponse response, FilterChain chain) throws IOException, ServletException {
        System.out.println("===========================filter2-req");
        chain.doFilter(request, response);
        System.out.println("===========================filter2-resp");
    }
}- 注入Spring
java
@Configuration
public class WebConfig {

    @Bean
    public FilterRegistrationBean<MyFilter> myFilter1 (){
        FilterRegistrationBean<MyFilter> bean = new FilterRegistrationBean<>(new MyFilter());
        bean.setOrder(2);//指定生效顺序
        bean.setUrlPatterns(Sets.newHashSet("/query/*"));//指定拦截的请求路径
        return bean;
    }

    @Bean
    public FilterRegistrationBean<MyFilter2> myFilter2 (){
        FilterRegistrationBean<MyFilter2> bean = new FilterRegistrationBean<>(new MyFilter2());
        bean.setOrder(1);
        bean.setUrlPatterns(Sets.newHashSet("/query/*"));// 不指定,则默认"/*"
        return bean;
    }
}
3、补充
- 作用域是Tomcat容器级别的。所以默认对所有的Servlet进行Filter
1.2 Interceptor
1、作用域
MVC框架的一部分
2、自定义拦截器
java
@Component
public class MyHandlerInterceptor implements HandlerInterceptor {
    public boolean preHandle(HttpServletRequest request, HttpServletResponse response, Object handler)
            throws Exception {
        // 为false会拦截请求,true会放行
        // 业务逻辑
        // eg:根据req内容查询,请求是否合法、用户是否存在等。如果不满足,则请求被拦截掉,return false
        System.out.println("=====================MyHandlerInterceptor-req符合,放行");
        return true;
    }

    public void postHandle(HttpServletRequest request, HttpServletResponse response, Object handler,
                            @Nullable ModelAndView modelAndView) throws Exception {
        System.out.println("=====================MyHandlerInterceptor-resp");
    }

    public void afterCompletion(HttpServletRequest request, HttpServletResponse response, Object handler,
                                 @Nullable Exception ex) throws Exception {
        // 一定会执行,类似finally
        System.out.println("finally==============================");
    }
}
3、将自定义拦截器添加到拦截器链
java
@Configuration
public class WebConfig implements WebMvcConfigurer {
    @Resource
    private MyHandlerInterceptor myHandlerInterceptor;

    @Override
    public void addInterceptors(InterceptorRegistry registry) {
        // 添加自定义拦截器,并指定要拦截的路径
        registry.addInterceptor(myHandlerInterceptor)
//                .addPathPatterns("/**") // 拦截所有路径,或者指定具体的路径
                .addPathPatterns("/query/*") // 拦截所有路径,或者指定具体的路径
                .excludePathPatterns("/login"); // 排除某些路径
    }
}
4、Filter + HandlerInterceptor整体执行流程
java
=====================filter-req
=====================MyHandlerInterceptor-req符合,放行
=====do业务方法=======
=====================MyHandlerInterceptor-resp
=====================MyHandlerInterceptor-finally
=====================filter-resp
1)http请求 -->> Filter1#doFilter
- 过滤req1
- chain.doFilter -->> ApplicationFilterChain#doFilter ,找到下一个Filter2,Filter2#doFilter
- 过滤req2
- chain.doFilter -->> ApplicationFilterChain#doFilter,找不到下一个Filter了,执行servlet.service
2)servlet.service
java
父->子关系 以及 各自方法

HttpServlet(3.service、4.doGet)
	FrameworkServlet(2.service、5.doGet、6.processRequest 、7.doService)
		DispatcherServlet(1.service 、8.doService、9.doDispatch)
servlet.service-- >> DispatcherServlet#service -->>父类FrameworkServlet#service -->> super.service即HttpServlet#service
-
获取方法类型GET(或Post) -->>doGet(或doPost) -->> 子类FrameworkServlet重写#doGet
-->>processRequest -->> doService
-->> 子类DispatcherServlet#doService -->> doDispatch
3)doDispatch
java
// Determine handler for the current request.
// 1.找到我们的Controller
mappedHandler = getHandler(processedRequest);

// 2.适配
HandlerAdapter ha = getHandlerAdapter(mappedHandler.getHandler());

// 3.是否前置拦截applyPreHandle,ture则放行,false则拦截。不执行后续的业务方法
// 执行拦截器链的一系列applyPreHandle
if (!mappedHandler.applyPreHandle(processedRequest, response)) {
	return;
}

// 4.执行业务方法,即本次请求的方法
mv = ha.handle(processedRequest, response, mappedHandler.getHandler());

// 5.后置方法
mappedHandler.applyPostHandle(processedRequest, response, mv);
二、源码解析
2.1 SpringApplication
java
SpringApplication.run(ApplicationLoader.class, args);内部代码等价
java
SpringApplication springApplication = new SpringApplication(ApplicationLoader.class);
springApplication.run(args);
SpringApplication类定义
执行以下步骤来启动Spring应用程序
- 创建ApplicationContext-Spring上下文
- 刷新应用上下文,加载所有单例bean
2.1.1 构造方法
1、填充webApplicationType
属性:REACTIVE、NONE、SERVLET(这里是SERVLET)
2、自动装配Initializers
1)读取spring.factories内容
spring-boot-2.1.6.RELEASE.jar!/META-INF/spring.factories,封装为map
补充:springboot中总共有2个spring.factories文件,一个为上述路径,还有一个路径为:
spring-boot-autoconfigure-2.1.6.RELEASE.jar!\META-INF\spring.factories,这个和自动装配@Import(AutoConfigurationImportSelector.class)注解有关
2)根据key,获取val集合
- key:ApplicationContextInitializer
- val:spring.factories中key是ApplicationContextInitializer类对应的val
3)将val集合List<String全类名>实例化
- 通过ClassForName实例化
4)将上述自动装配map,存cache,便于下一此直接从缓存中读取,避免再次加载
3、自动装配Listeners
过程同2,不过map根据key获取val,此map注解从cache中获取。
key为:ApplicationListener
2.1.2 run(args)
java
springApplication.run(args);其中,可以定义args:在IDEA中设置方式如图3所示

这样在启动时,args就为"--debug"
作用:可以人为设置参数,比如"--debug",可以打印自动装配过程日志信息
2.2 SpringApplicationRunListeners
1、内容
1)从spring-boot-2.1.6.RELEASE.jar!/META-INF/spring.factories中
获取key:SpringApplicationRunListener
对应的val:org.springframework.boot.context.event.EventPublishingRunListener
这里可以直接从cache中读取,无需从spring.factories中加载了
2)创建SpringApplicationRunListeners
将val:EventPublishingRunListener作为属性,通过构造方法,填充给SpringApplicationRunListeners
2、启动监听
java
SpringApplicationRunListeners listeners = getRunListeners(args);
listeners.starting();
-->> EventPublishingRunListener#starting
java
this.initialMulticaster.multicastEvent(
	new ApplicationStartingEvent(this.application, this.args)
);
这里发布的第一个事件:1、ApplicationStartingEvent
Spring观察者模式内容参考我另一篇:Spring源码剖析-Spring观察者模式
-
创建一个事件:应用程序启动事件
-
获取多播器initialMulticaster
- 内含监听器listener
- 这些监听器就是SpringApplication构造方法中,自动装配Listeners
- 然后执行supportsEvent过滤,留下能够监听ApplicationStartingEvent事件的监听器
-
进行广播事件:multicastEvent
- 循环获取监听器
- 执行invokeListener(listener, event) -->> listener.onApplicationEvent(event)
多播器会循环调用监听器的处理方法,将应用程序启动此事件,进行了广播给监听器进行处理。
2.3 prepareEnvironment
方法内容:加载环境变量、配置文件等
java
private ConfigurableEnvironment prepareEnvironment(SpringApplicationRunListeners listeners,ApplicationArguments applicationArguments) {
	//1.创建environment,加载propertySources
	ConfigurableEnvironment environment = getOrCreateEnvironment();

	//2.填充activeProfiles属性:spring.profiles.active
	configureEnvironment(environment, applicationArguments.getSourceArgs());

    // 3.读取properties、xml、yaml后缀文件
	listeners.environmentPrepared(environment);

	bindToSpringApplication(environment);
	if (!this.isCustomEnvironment) {
		environment = new EnvironmentConverter(getClassLoader())
		.convertEnvironmentIfNecessary(environment,deduceEnvironmentClass());
	}

	ConfigurationPropertySources.attach(environment);
	return environment;
}
加载propertySources
getOrCreateEnvironment
- 根据webApplicationType类型SERVLET,new StandardServletEnvironment()
- 调用其爷爷的构造方法,执行customizePropertySources --> 孙子StandardServletEnvironment#customizePropertySources
- 完成servletContextInitParams、servletConfigInitParams两个ProertySource的加载
- 再调用父类customizePropertySources ,完成systemEnvironment和systemProperties两个PropertySource的加载
至此environment中propertySources属性中有4和资源配置
填充activeProfiles属性
configureEnvironment
主要内容就是,填充activeProfiles属性。
假如我们在IDEA的 在VM Options中:-Dspring.profiles.active = prod,则此时
environment中activeProfiles属性中有一个值"prod"
读取properties、xml、yaml后缀文件
listeners.environmentPrepared
-->> EventPublishingRunListener#environmentPrepared -->> multicastEvent
- 获取所有listener,并过滤监留下听ApplicationEnvironmentPreparedEvent事件的监听器
这里发布的第二个事件:2、ApplicationEnvironmentPreparedEvent
- 其中最重要的监听器ConfigFileApplicationListener
-- >>invokeListener(listener, event) -->> doInvokeListener -->> listener.onApplicationEvent(event)-->>onApplicationEnvironmentPreparedEvent
java
private void onApplicationEnvironmentPreparedEvent(ApplicationEnvironmentPreparedEvent event) {
    // 从spring.factories中找到key:EnvironmentPostProcessor对应的val集合
	List<EnvironmentPostProcessor> postProcessors = loadPostProcessors();
    // 将ConfigFileApplicationListener监听器本身也加入val集合
	postProcessors.add(this);
	AnnotationAwareOrderComparator.sort(postProcessors);
    // 遍历val集合,最重要的是:执行ConfigFileApplicationListener#postProcessEnvironment
	for (EnvironmentPostProcessor postProcessor : postProcessors) {
		postProcessor.postProcessEnvironment(event.getEnvironment(), event.getSpringApplication());
	}
}
-->> ConfigFileApplicationListener#postProcessEnvironment -->> addPropertySources
java
new Loader(environment, resourceLoader).load()1、new Loader
java
this.propertySourceLoaders = SpringFactoriesLoader.loadFactories(
	PropertySourceLoader.class,getClass().getClassLoader()
);
从spring.factories读取key:PropertySourceLoader对应的val集合
java
# PropertySource Loaders
org.springframework.boot.env.PropertySourceLoader=\
org.springframework.boot.env.PropertiesPropertySourceLoader,\
org.springframework.boot.env.YamlPropertySourceLoader- PropertiesPropertySourceLoader:读取.properties文件 和 .xml文件
- YamlPropertySourceLoader:读取.yaml文件 和 .yml文件
2、laod
-->> addLoadedPropertySources
将application.properties文件中内容加载到propertySources集合中(同理加载yml),至此propertySources中有五个元素
- servletContextInitParams
- servletConfigInitParams
- systemEnvironment
- systemProperties
- classpath:/application.properties
2.4 createApplicationContext
1、方法内容
- 根据webApplicationType类型获取对应的上下文class类:Class.forName(AnnotationConfigServletWebServerApplicationContext)
- 通过反射ctor.newInstance(),创建上下文对象
2、构造函数
java
public AnnotationConfigServletWebServerApplicationContext() {
	this.reader = new AnnotatedBeanDefinitionReader(this);
	this.scanner = new ClassPathBeanDefinitionScanner(this);
}
创建DefaultListableBeanFactory
java
父子关系
GenericApplicationContext
	GenericWebApplicationContext
		ServletWebServerApplicationContext
AnnotationConfigServletWebServerApplicationContext- 执行AnnotationConfigServletWebServerApplicationContext构造方法之前,会先调用父类的构造方法,一层一层直到GenericApplicationContext
java
public GenericApplicationContext() {
    // 创建了beanFactory
	this.beanFactory = new DefaultListableBeanFactory();
}
AnnotationBeanDefinitionReader
加载5个internalXxxProcessor(bfpp)到bdMap中,如图1所示

ClassPathBeanDefinitionScanner
后续invokeBfpp时,会使用此Scanner,对配置类进行解析,生成对应的beanDefinition
2.5 prepareContext
方法内容:为context上下文对象填充属性
applyInitializers
- 获取模块2.1中Initializers,即从spring.factories中读取到的7个Initializer
- 依次遍历执行他们的initialize
- 完成对context上下文的属性填充
主要填充了context的BeanFactoryPostProcessors属性、applicationListeners属性
为beanFactory设置属性
allowBeanDefinitionOverriding = false
Spring 容器中有相同名称的多个 Bean 定义时,是否允许后续的 Bean 定义覆盖先前的定义
- false:如果尝试注册一个已经存在的 Bean 定义,将会抛出一个异常
创建启动类beanDefinition
java
// 获取primarySource,即启动类
Set<Object> sources = getAllSources();

// 将启动类抽取为BeanDefinition,存入bdMap
load(context, sources.toArray(new Object[0]));
listeners.contextLoaded
这里发布的第三个事件:3、ApplicationPreparedEvent
至此三个事件:
- ApplicationStartingEvent
- ApplicationEnvironmentPreparedEvent
- ApplicationPreparedEven
均被多播器SimpleApplicationEventMulticaster广播了出去,对此三个事件感兴趣的监听器,也完成了监听处理动作
2.6 refreshContext
对应Spring中的refresh方法。即IOC
此部分的源码剖析,参考我另一篇:Spring源码剖析
自动装配
具体流程参考我的另一篇:Spring源码剖析中第二章节IOC的法五中的@Import注解解析
这里只补充下,自动装配后的过滤逻辑:
java
getAutoConfigurationEntry(getAutoConfigurationMetadata(), annotationMetadata)getAutoConfigurationMetadata
1、方法内容
从META-INF/spring-autoconfigure-metadata.properties路径下读取配置类的依赖类信息,封装成map
-
文件内容如图15所示

-
封装的map即autoConfigurationMetadata(自动装配类.条件=值)
2、方法作用
为了后续将自动装配的类,进行Filter操作,只留下符合项目需要的自动装配类
1)autoConfigurationMetadata中内容
k1:org.springframework.boot.autoconfigure.aop.AopAutoConfiguration.ConditionalOnClass
v1:
org.aspectj.lang.annotation.Aspect,
org.aspectj.lang.reflect.Advice,
org.aspectj.weaver.AnnotatedElement,
org.springframework.context.annotation.EnableAspectJAutoProxy
2)我们看下AopAutoConfiguration此自动装配类的内容
java
@Configuration
@ConditionalOnClass({ EnableAspectJAutoProxy.class, Aspect.class, Advice.class, AnnotatedElement.class })
public class AopAutoConfiguration {
}
@ConditionalOnClass注解中属性:EnableAspectJAutoProxy、Aspect、Advice。
去重 + 排除 + @conditional
java
protected AutoConfigurationEntry getAutoConfigurationEntry(AutoConfigurationMetadata autoConfigurationMetadata,
AnnotationMetadata annotationMetadata) {
AnnotationAttributes attributes = getAttributes(annotationMetadata);
//1.自动装配-120个
List<String> configurations = getCandidateConfigurations(annotationMetadata, attributes);
//2.去重后,仍为120个
configurations = removeDuplicates(configurations);
// 3.排除后,119个
Set<String> exclusions = getExclusions(annotationMetadata, attributes);
configurations.removeAll(exclusions);//排除
// 4.自动装配类@conditional注解修饰后,还剩下
configurations = filter(configurations, autoConfigurationMetadata);
// 返回最终剩下的
return new AutoConfigurationEntry(configurations, exclusions);
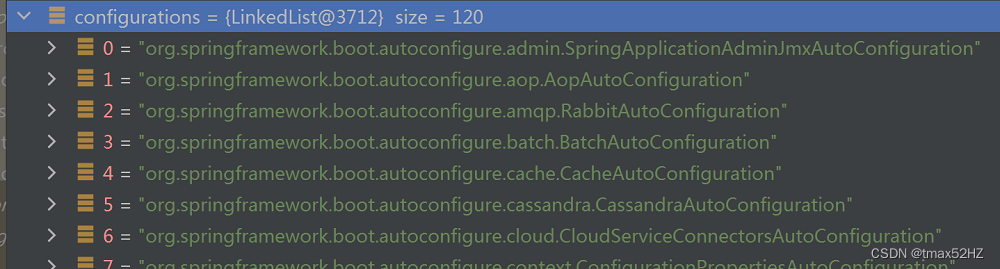
}在自动装配完成后,key:,对应的val集合中有装配类 120个,如图4所示
1、去重-getExclusions
2、排除-getExclusions
java
// 这个要被排除的类的全路径org.springframework.boot.autoconfigure.jdbc.类名;
@SpringBootApplication(exclude = DataSourceAutoConfiguration.class)
public class ApplicationLoader {
    public static void main(String[] args) {
        SpringApplication springApplication = new SpringApplication(ApplicationLoader.class);
        springApplication.run(args);
    }
}-
排除前:自动装配类,如图5所示

-
排除后:自动装配,没有此类了,剩下119个自动装配类,如图6所示

3、@conditional-filter
3.1 步骤一:从spring.factories中获取key:AutoConfigurationImportFilter对应的val集合:用于filter
java
g.springframework.boot.autoconfigure.AutoConfigurationImportFilter=\

org.springframework.boot.autoconfigure.condition.OnBeanCondition,\
org.springframework.boot.autoconfigure.condition.OnClassCondition,\
org.springframework.boot.autoconfigure.condition.OnWebApplicationCondition
三折共同的父类FilteringSpringBootCondition 实现了Condition接口,重写了match方法,用于匹配
3.2 使用这三个Filter,过滤候选的119个自动装配类
java
//依次遍历Filter
// 使用Filter,在autoConfigurationMetadata内容下,判断候选装配类在classpath路径下是否有指定的(Condition)的bean、class等
// 需要的,则留下,不需要的则skipped = true
for (AutoConfigurationImportFilter filter : getAutoConfigurationImportFilters()) {
	invokeAwareMethods(filter);
	boolean[] match = filter.match(candidates, autoConfigurationMetadata);
	for (int i = 0; i < match.length; i++) {
		if (!match[i]) {
			skip[i] = true;
			candidates[i] = null;
			skipped = true;
		}
	}
}
filter.match(candidates, autoConfigurationMetadata)
1)candidates:就119个候选装配类
2)autoConfigurationMetadata,即map:自动装配的类.条件 = 值
根据下面的条件注解@ConditionalOnXxx和元数据autoConfigurationMetadata进行筛选,如果其条件满足(即所有条件注解和元数据条件都通过),则将其标记为匹配成功。
3.3这里以2个自动装配类为例,
-
(这里参考2.1.2 run(args),配置--debug参数,便于观察自动装配filter日志信息)
-
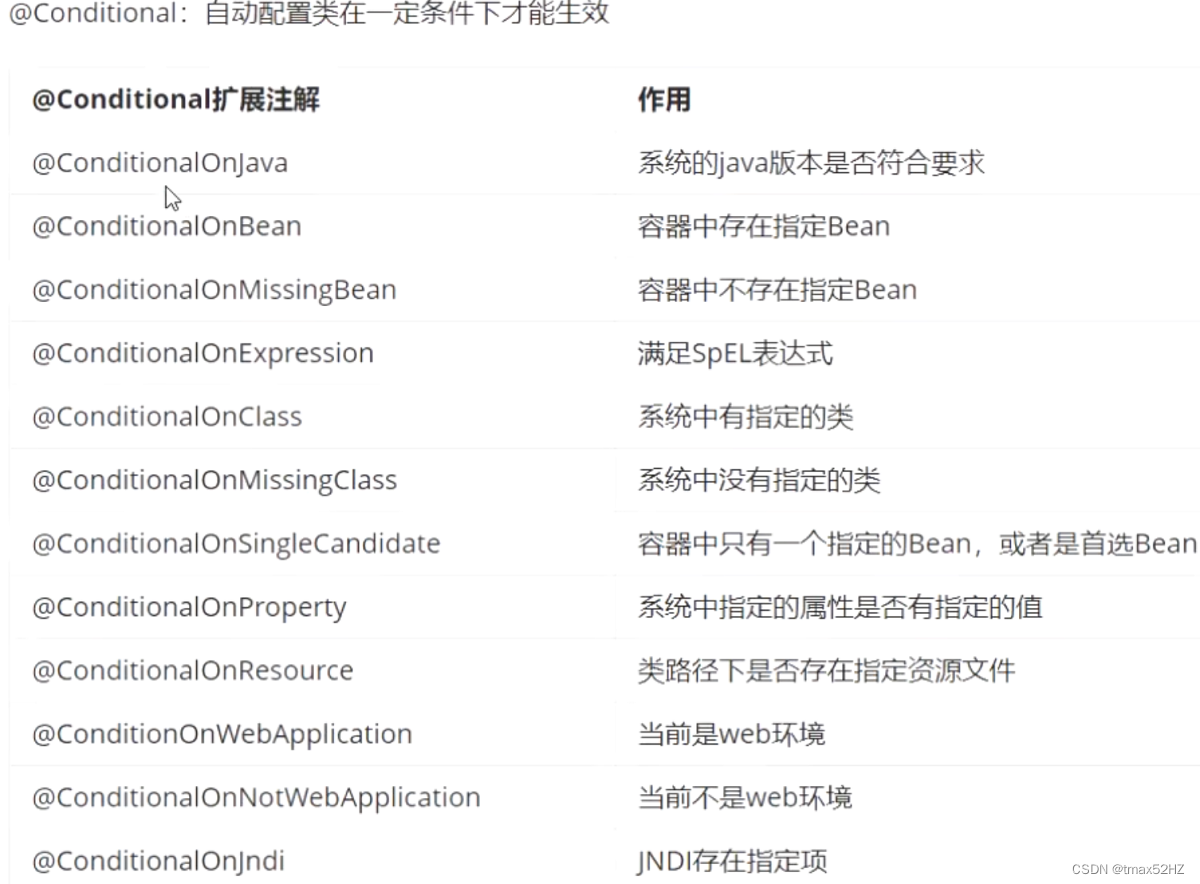
@ConditionalOnXxx相关注解含义如图2所示:即系统中满足指定的条件,才会去实例化此对象
作用:配置类中某些地方会使用到Xxx.方法,这就要求Xxx必须存在,否则npe
其中
- 类org.springframework.boot.autoconfigure.jdbc.DataSourceAutoConfiguration因符合条件被留下来
java
matched:
- @ConditionalOnClass found required classes 'javax.sql.DataSource', 'org.springframework.jdbc.datasource.embedded.EmbeddedDatabaseType' (OnClassCondition)- 类org.springframework.boot.autoconfigure.kafka.KafkaAutoConfiguration因为不符合条件被过滤掉
java
Did not match:
    - @ConditionalOnClass did not find required class 	'org.springframework.kafka.core.KafkaTemplate' (OnClassCondition)
3.1)DataSourceAutoConfiguration
java
// 和@Conditional相关注解如下
@Configuration
@ConditionalOnClass({ DataSource.class, EmbeddedDatabaseType.class })
public class DataSourceAutoConfiguration {

}-
自动装配类DataSourceAutoConfiguration被@ConditionalOnClass注解修饰
-
此注解的作用:系统中有指定的类时,自动装配生效
-
获取@ConditionalOnClass注解内容:DataSource和EmbeddedDatabaseType
-
我pom文件中,引入了mysql-connector-java相关依赖,所以beanFactory中有DataSource类
3.2)KafkaAutoConfiguration
java
// 和@Conditional相关注解如下
@Configuration
@ConditionalOnClass(KafkaTemplate.class)
public class KafkaAutoConfiguration {

}-
自动装配类KafkaAutoConfiguration被@ConditionalOnClass注解修饰
-
此注解的作用:系统中有指定的类时,自动装配生效
-
我的pom文件中,未引入任何与kafak相关的依赖
-
所以filter.match(candidates, autoConfigurationMetadata) -->>
filter.match(KafkaAutoConfiguration, autoConfigurationMetadata)不符合条件,会过滤掉
自定义自动装配类
java
@Configuration
@ConditionalOnBean(UserController.class)
public class MyAutoConfig {
}- @Configuration
- @ConditionalXxx相关注解
java
MyAutoConfig matched:
      - @ConditionalOnBean (types: com.mjp.tx.UserController; SearchStrategy: all) found bean 'userController' (OnBeanCondition)
自定义的装配类被加载了
2.7 tomcat组件
因为Springboot内嵌了tomcat。这里前置先分析下tomcat的源码,为后续getWebServer方法剖析作铺垫
2.7.1定义
-
tomcat是web服务器,本质是Servlet容器
-
Servlet容器是一个接口规则,定义了Java类被Tomcat服务器识别的规则
2.7.2 tomcat组件
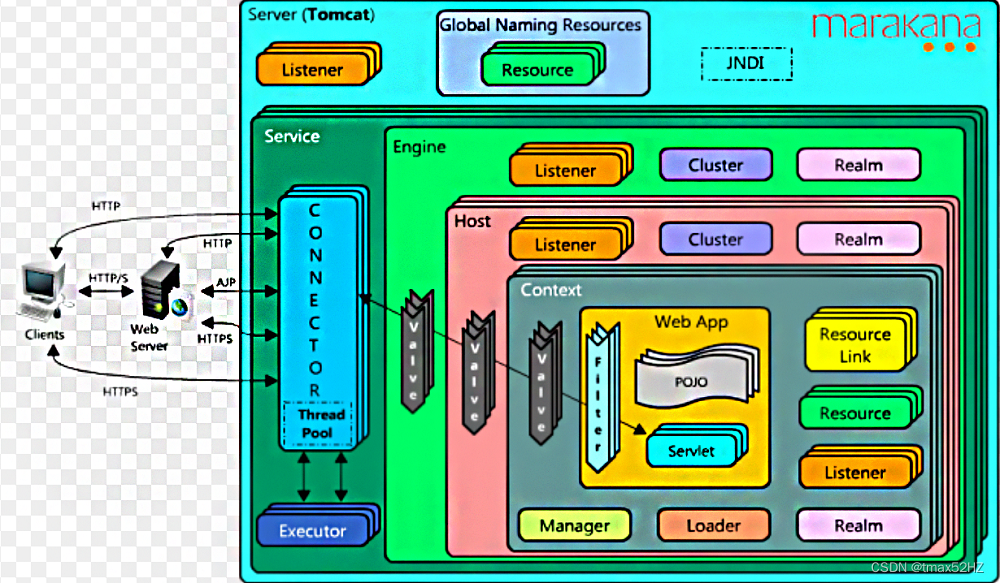
整体组件架构图如图7所示

Server
1、定义
表示一个Tomcat实例
2、结构
包括多个Service服务
Service
1、定义
提供服务来处理请求的组件
2、结构
包括多个Connector和一个Container
Connector
1、定义
-
是客户端连接到Tomcat容器的服务点 ,使得客户端可以通过Connector与服务器建立连接、发送请求并接收响应
-
每个连接器监控一个指定的IP及端口,并通过指定的协议做出响应
java
<Service name="Catalina">
    <Connector port="8080" protocol="HTTP/1.1"
               connectionTimeout="20000"
               redirectPort="8443"/>

    <Connector port="8009" protocol="AJP/1.3" redirectPort="8443"/>
    ...
<Service/>
2、具体实现
Coyote
3、结构
如图8所示

3.1 Endpoint
1)定义
- 通信端点即通信监听的接口,是具体的Socket接收处理类
2)具体实现
- Tomcat并没Endpoint接口,而是一个抽象类AbstractEndpoint其默认实现类NioEndpoint
3)AbstractEndpoint(具体实现Nio2Endpoint)结构
- 属性Acceptor(默认实现):用于监听请求
- 内部接口Handler(默认实现ConnectionHandler): 用于处理接收到的Socket,在内部调用Processor进行处理。
3.2 Processor
1)定义
- Processor是协议处理接口
2)具体实现类
Http11Processor
3)功能
- 将tcp/IP请求转为http1.1协议请求
- 将http请求封装成request对象
3.3 Adapter
1)定义
适配器,request对象转换为ServletRequest交给Container进行处理
4、总结
- Nio2Endpoint中Acceptor监听请求
- ConnectionHandler处理接收到的Socket,交由Processor
- Processor将tcp/ip协议转为http1.1请求,并封装request
- Adapter将request换为ServletRequest,交由Container
Container
Container用于封装和管理Servlet,以及具体处理Request请求;
整体结构如图9所示
Container-Engine:
- host1:127.0.0.1
- context1:/login
- Wrapper
- context2:/query
- Wrapper
- context1:/login
- host2:123.456.78.90
Engine
将传入请求委托给适当的虚拟主机处理
Host 虚拟主机
- 一个虚拟主机下都可以部署一个或者多个Web App,每个Web App对应于一个Context
- 当Host获得一个请求时,将把该请求匹配到某个Context上
Context上下文
表示Web应用程序本身 ,即Servlet上下文
Wrapper包装器
- 代表一个 Servle。负责管理一个 Servlet的装载、初始化、执行以及资源回收 :如init()、service()和destroy()方法 。
总结
来自客户的请求为:http://localhost:8080/user/login 请求被发送到本机端口8080
1、Connection
- Nio2Endpoint中Acceptor监听请求
- ConnectionHandler处理接收到的Socket,交由Processor
- Processor将tcp/ip协议转为http1.1请求,并封装request
- Adapter将request换为ServletRequest,交由Container
2、Container
Engine来处理,并等待Engine的回应
-
Engine获得请求localhost:8080/user/login,匹配到名为localhost的Host
-
localhost Host获得请求/user/login,匹配它所拥有的所有Context
-
Context获得请求,寻找对应的servlet
匹配到HttpServlet类,构造HttpServletRequest对象和HttpServletResponse对象
-
调用HttpServlet的doGet或doPost方法
2.7.3 组件Lifecycle
1、内容
将所有组件的生命周期抽象为一个接口
2、生命周期 以及 结构
java
父子关系以及方法图
Lifecycle(全抽象方法init、start、stop、destroy、getState)
    LifecycleBase(init、抽象initInternal、start、抽象startInternal)
    	LifecycleMBeanBase(initInternal、destroyInternal)
			StandardServer(操作Server相关方法、initInternal、startInternal)
			StandardService(操作Container、Connector相关方法、initInternal、	startInternal、destroyInternal)
2.8 内嵌tomcat
onFeresh
2.8.1 getWebServerFactory
1、方法作用
根据ServletWebServerFactory.class找到对应的WebServerFactory:tomcatServletWebServerFactory
2、方法调用流程
onRefresh -->> createWebServer -->> getWebServerFactory -->> getBeanNamesForType -->> DefaultListableBeanFactory#getBeanNamesForType -->> doGetBeanNamesForType -->>
3、bdMap中为什么会存在tomcatServletWebServerFactory
1)SpringBoot自动装配,将ServletWebServerFactoryAutoConfiguration类从spring.factories文件中读取出来。
类结构如下
java
@Configuration
@ConditionalOnClass(ServletRequest.class)
@ConditionalOnWebApplication(type = Type.SERVLET)
@EnableConfigurationProperties(ServerProperties.class)
@Import({ ServletWebServerFactoryAutoConfiguration.BeanPostProcessorsRegistrar.class,
		ServletWebServerFactoryConfiguration.EmbeddedTomcat.class,
		ServletWebServerFactoryConfiguration.EmbeddedJetty.class,
		ServletWebServerFactoryConfiguration.EmbeddedUndertow.class })
public class ServletWebServerFactoryAutoConfiguration {

	@Bean
	@ConditionalOnClass(name = "org.apache.catalina.startup.Tomcat")
	public TomcatServletWebServerFactoryCustomizer tomcatServletWebServerFactoryCustomizer(
			ServerProperties serverProperties) {
		return new TomcatServletWebServerFactoryCustomizer(serverProperties);
	}
}
内含TomcatServletWebServerFactoryCustomizer此bean
2)pom中引入了starter-web依赖
java
<dependency>
     <groupId>org.springframework.boot</groupId>
     <artifactId>spring-boot-starter-web</artifactId>
     <version>3.0.6</version>
</dependency>
所以,在自动装配过滤的时候,不会将ServletWebServerFactoryAutoConfiguration此装配类过滤掉。
原因:
@ConditionalOnClass(ServletRequest.class):web服务
@ConditionalOnWebApplication(type = Type.SERVLET):从2.1.1中可知,类型为SERVLET
4、getBean("tomcatServletWebServerFactory", ServletWebServerFactory.class)
创建tomcatServletWebServerFactory此bean对象
2.8.2 getWebServer
tomcat-所有组件init
java
public WebServer getWebServer(ServletContextInitializer... initializers) {
    // 1.创建tomcat
	Tomcat tomcat = new Tomcat();
	File baseDir = (this.baseDirectory != null) ? this.baseDirectory : createTempDir("tomcat");
	tomcat.setBaseDir(baseDir.getAbsolutePath());

    // 2.创建connector
	Connector connector = new Connector(this.protocol);//Http11NioProtocol
	tomcat.getService().addConnector(connector);
	customizeConnector(connector);
	tomcat.setConnector(connector);

    // 3.创建Engine、Host、Service
	tomcat.getHost().setAutoDeploy(false);
	configureEngine(tomcat.getEngine());

    // 4.创建Wrapper、Servlet
	prepareContext(tomcat.getHost(), initializers);

    // 5.创建TomcatWebServer:完成组件的init
	return getTomcatWebServer(tomcat);
}
1、tomcalt属性
- hostname:"localhost"
- port:8080
2、connector属性
protocolHandler:Http11NioProtocol
- maxHttpHeaderSize:8192
- endpoint
- handler:ConnectionHandler
- proto:Http11NioProtocol
- acceptor:在最后2.9.1中完成创建
- selectorPool
- maxSelector:200
- nioChannel:
- maxConnection:10000
- port:8080
- maxThreads:200
- handler:ConnectionHandler
- **adapter:**init时会创建CoyoteAdapter
3、Engine属性
-
children:standardHost
- contextClass:standardContext
- appBase:webApps
-
defaultHost:"localhost"
-
service:standardService
- connectors:ConnectorHTTP/1.1-8080
- engineer:StandardEngineTomcat
-
state:LifeCycleState:new
4、Wrapper属性
new StandardWrapper
- servletClass:org.apache.catalina.servlets.DefaultServlet
5、创建TomcatWebServer:完成组件的init初始化
new TomcatWebServer -->> initialize -->> this.tomcat.start() -->>
Tomcat#start -->> server.start(StandardServer)-- >> LifecycleBase#start
java
if (state.equals(LifecycleState.NEW)) {//显然Engine属性state是NEW
    // 步骤一:init
    init();
}

// 步骤二:启动
startInternal();
=======================步骤一:init开始-=------------------------------
LifecycleBase#init -- initInternal -->> 孙子StandardServer #initInternal -->> servicesi.init() -->>LifecycleBase#init
-
engineer#init
-
connector#init
- adapter完成初始化
javaadapter = new CoyoteAdapter(this); protocolHandler.setAdapter(adapter);- protocolHandler#init
- endpoint#init
=======================步骤一:init结束-=------------------------------
tomcat-engine-启动
=======================步骤二:启动-=------------------------------
java
父子关系以及方法图
Lifecycle(全抽象方法init、start、stop、destroy、getState)
    LifecycleBase(init、抽象initInternal、start、抽象startInternal)
    	LifecycleMBeanBase(initInternal、destroyInternal)
			StandardServer(操作Server相关方法、initInternal、startInternal)
			StandardService(操作Container、Connector相关方法、initInternal、	startInternal、destroyInternal)
LifecycleBase#startInternal-->>StandardServer#startInternal -->> servicesi.start()
-- >> LifecycleBase#start -->> startInternal -->> StandardService#startInternal
java
engine.start();//child.start,一系列Host、Context等start 2.9 finishRefresh
2.9.1 startWebServer-NioEndpoint启动
webServer.start -->> TomcatWebServer#start -->> addPreviouslyRemovedConnectors -->>
service.addConnector -->> connector.start -->>LifecycleBase#start -->> startInternal -->>
Connector#startInternal -->>
AbstractProtocol#start -->>
AbstractEndpoint#start -->>
java
public final void start() throws Exception {
	// 步骤一.创建Socket
    if (bindState == BindState.UNBOUND) {
        bindWithCleanup();
        bindState = BindState.BOUND_ON_START;
    }
    // 步骤二.NioEndpoint#startInternal
    startInternal();
}
步骤一:bindWithCleanup
java
ServerSocketChannel serverSock = ServerSocketChannel.open();
serverSock.socket().bind(addr,getAcceptCount());//绑定8081端口,acceptCount = 100

// NioSelectorPool==》》BlockPoller.start阻塞轮询器启动
selectorPool.open(getName());
步骤二:NioEndpoint#startInternal
java
// 1.创建Executor
createExecutor()

// 2.创建Poller
poller = new Poller();

Thread pollerThread = new Thread(poller, getName() + "-ClientPoller");
pollerThread.setPriority(threadPriority);
pollerThread.setDaemon(true);
pollerThread.start();

// 3.创建Thread并start-Acceptor!!!
startAcceptorThread();
1、createExecutor
- keepAlive:60000000000ns即60s
- workers:10个ThreadPoolExecutor
- coolPoolSize:10
- maximumPoolSize:200
2、创建poller
- selector
- 同步队列
3、startAcceptorThread
java
protected void startAcceptorThread() {
    // 3.1 创建acceptor
    acceptor = new Acceptor<>(this);
    String threadName = getName() + "-Acceptor";
    acceptor.setThreadName(threadName);
    // 3.2 创建线程
    Thread t = new Thread(acceptor, threadName);
    t.setPriority(getAcceptorThreadPriority());
    t.setDaemon(getDaemon());
    // 3.3启动
    t.start();
}-
name:http-nio-8080-Acceptor
-
tid:
-
target:Acceprot
- endpoint:nioEndpoint
-
group
- name:"main"
- nThreads:16
如图10所示
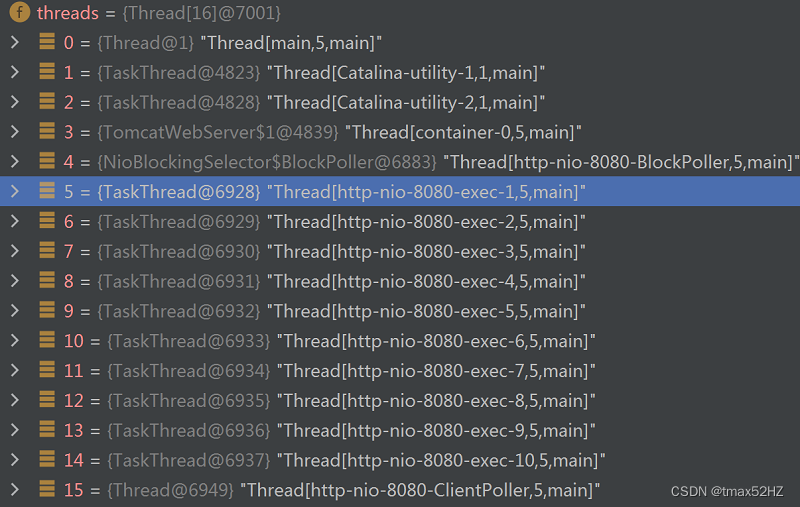
至此整个tomcat容器完成启动,控制台打印日志:Tomcat started on port(s): 8080 (http) with context path。SpringBoot启动完成
4、Thread.run:Acceptor监听
Acceptor会一直监听,随时准备accept请求
-->> target.run -->> Acceptor#run -->>
java
Acceptor implements Runnable{
}
run方法内容
java
public void run() {
    int errorDelay = 0;
    // 一直循环监听
    while (endpoint.isRunning()) {
    	// 1.当前状态设置为Running
        state = AcceptorState.RUNNING;
        try {
            //if we have reached max connections, wait
            // 2.当到达了最大连接,则等待
            endpoint.countUpOrAwaitConnection();

            // Endpoint might have been paused while waiting for latch
            // If that is the case, don't accept new connections
            if (endpoint.isPaused()) {
                continue;
            }

            U socket = null;
            try {
                // Accept the next incoming connection from the server
                // socket
                //!!!接收来自客户端的请求
                socket = endpoint.serverSocketAccept();
            } catch (Exception ioe) {

            }
            // Successful accept, reset the error delay
            errorDelay = 0;

            // 其它closeSocket、destroySocket
    }
}
-- >> endpoint.serverSocketAccept -->> NioEndpoint#serverSocketAccept -->>accept -->> ServerSocketChannelImpl#accept -->> accept -->> accept0
java
private native int accept0() {
}
5.处理请求:Handler处理请求
1、客户端发起请求:http://localhost:8080/query/18
2、服务器端
Thread#run -->> target.run -->> TaskThread内部类WrappingRunnable#run-->>wrappedRunnable.run
-->> ThreadPoolExecutor#run -->> runWorker -->> task.run -->> SocketProcessorBase#run -->> doRun -->> NioEndpoint#doRun -->> getHandler().process -->> AbstractProtocol(继承ProtocolHandler)#process
java
// 创建Processor,new Http11Processor
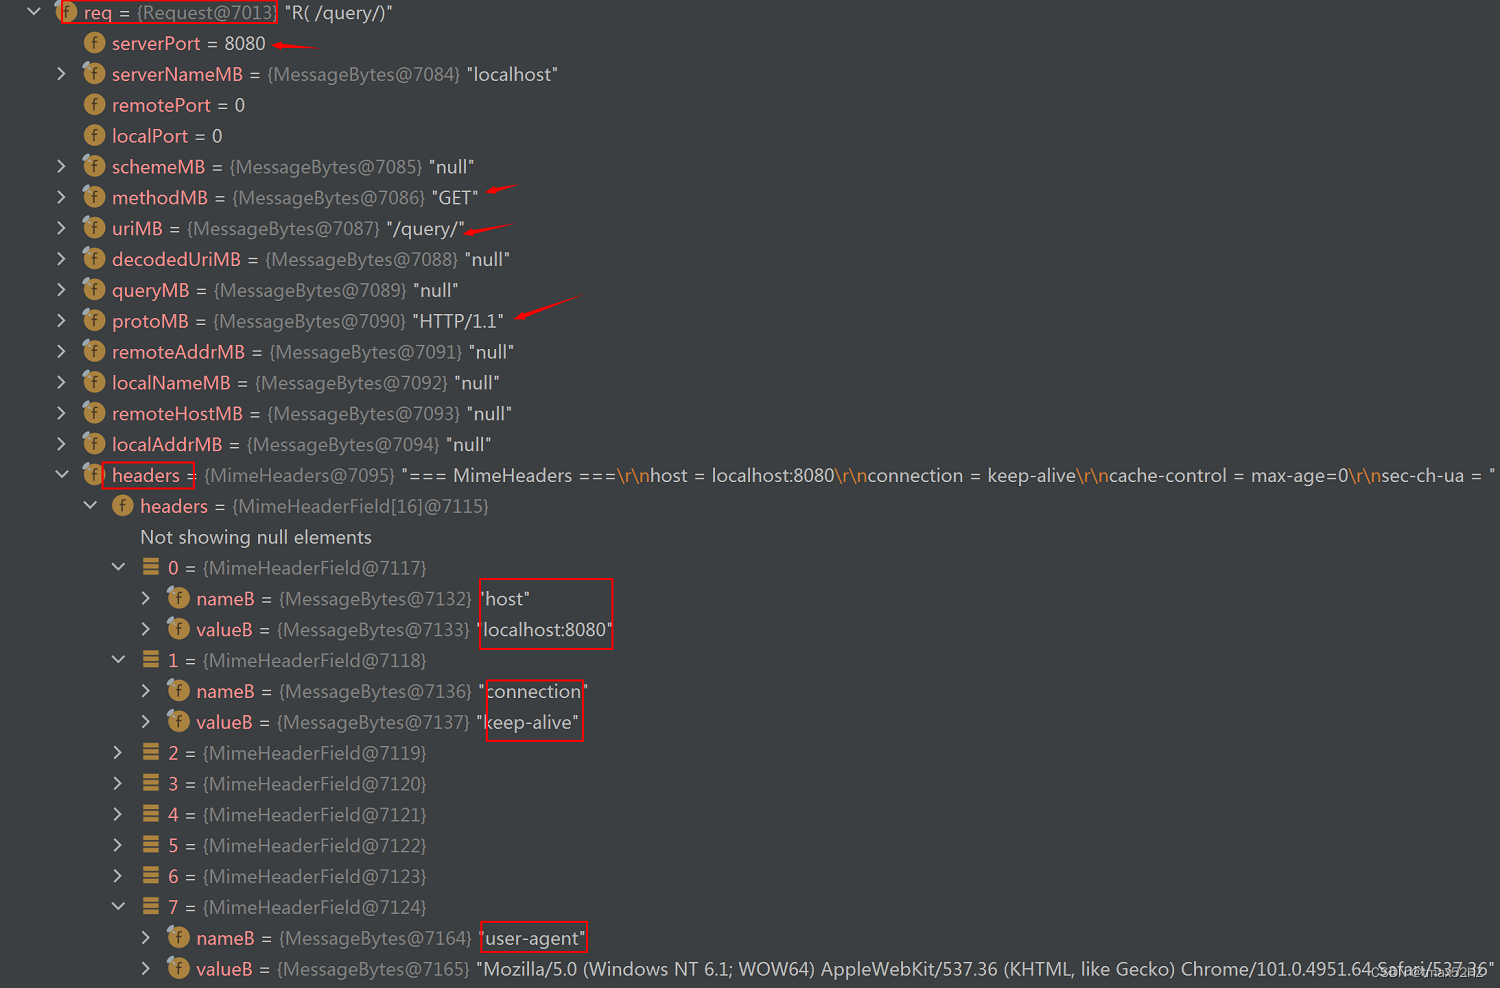
Processor processor = getProtocol().createProcessor();6、processor.process
-- AbstractProcessorLight#process -->> service -->> Http11Processor#service
- 将tcp/IP请求转为http1.1协议请求
- 将http请求封装成request对象
Request对象属性如图11所示
getAdapter().service(request, response)
- 获取CoyoteAdapter
- 执行service
7、CoyoteAdapter.service
1、方法作用
适配器,request对象转换为ServletRequest交给Container进行处理
2、内容
java
connector.getService().getContainer().getPipeline().getFirst().invoke(
request, response);- getContainer获取container即StandardEngineer
-- >> StandardEngineValve#invoke
8、Container-Engineer
StandardEngineer -->> StandardEngineValve#invoke -->>
java
host.getPipeline().getFirst().invoke(request, response);9、Container-Host
StandardHost -->> ErrorReportValve#invoke -->> StandardHostValve#invoke
java
context.getPipeline().getFirst().invoke(request, response);10、Container-Context
-->> AuthenticatorBase#invoke -->> getNext().invoke(request, response) -->>StandardContextValve#invoke
java
wrapper.getPipeline().getFirst().invoke(request, response);pipleLine结构图如图12所示

11、Container-Wrapper
-->> StandardWrapperValve#invoke -->>
- 属性requestCount,用于记录请求次数
java
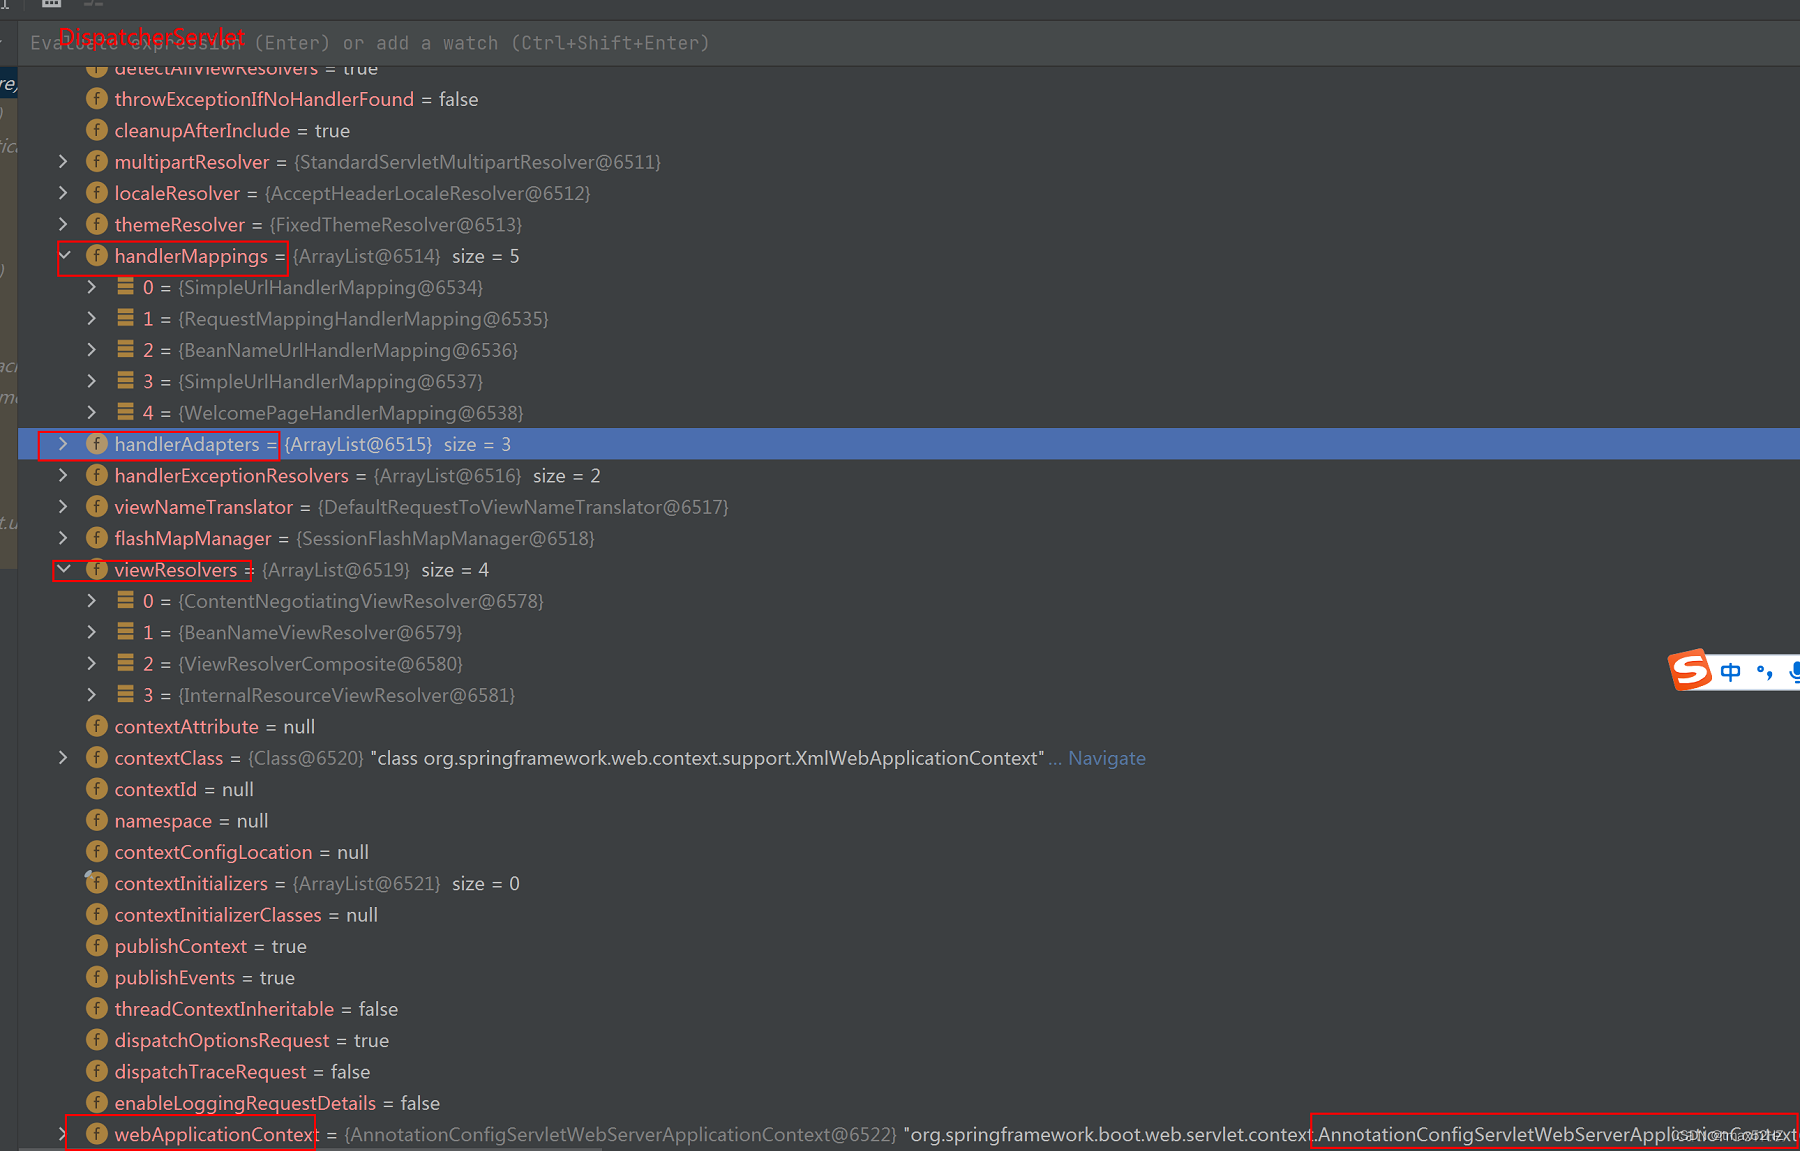
// 步骤一.获取Servlet
Servlet servlet = wrapper.allocate();
DispatcherServlet属性如图13所示
java
//步骤二:为本次请求,创建Filter过滤器链
ApplicationFilterChain filterChain =
ApplicationFilterFactory.createFilterChain(request, wrapper, servlet);- filterChain = new ApplicationFilterChain()
- filterChain .add(系统自带的 和 用户定义的)
java
// 步骤三:执行Filter过滤器链
filterChain.doFilter
          (request.getRequest(), response.getResponse());
过滤器链如图14所示
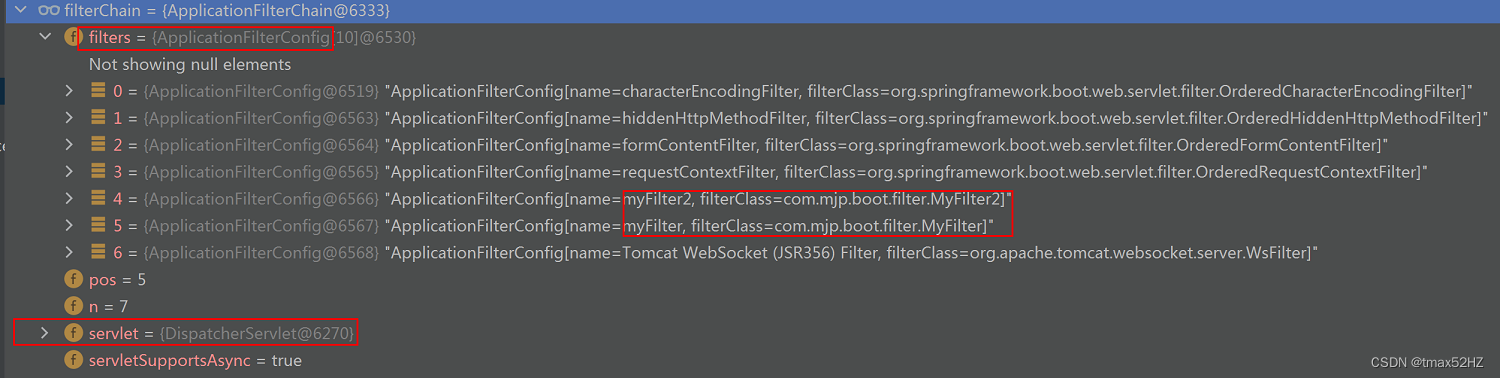
其中MyFilter和MyFilter2是模块一中1.1 我们自定义的Filter
12、后续内容
-->> XxxFilter#doFilter
上接模块一中1.1 Filer,具体执行流程可参考1.2 Interceptor中执行流程
2.9.2 publishEvent
广播第四个事件:ServletWebServerInitializedEvent。ServletWeb容器已经完成实例化了,至此四个事件都已广播出去,并被相关监听器监听处理
2.10 stop-tomcat
java
private void refreshContext(ConfigurableApplicationContext context) {
	//1.spring的refresh方法
	refresh(context);
	//2.注册钩子函数
	context.registerShutdownHook();
	}
上文执行完成整个Spring的refresh方法后,会注册一个钩子函数
1、钩子函数
refreshContext -->> AbstractApplicationContext#registerShutdownHook
java
public void registerShutdownHook() {
		if (this.shutdownHook == null) {
			this.shutdownHook = new Thread() {
				@Override
				public void run() {
					synchronized (startupShutdownMonitor) {
						doClose();
					}
				}
			};
			Runtime.getRuntime().addShutdownHook(this.shutdownHook);
		}
	}
1、将shutdownHook此线程注入hooks
2、当上下文AbstractApplicationContext关闭时,则会
执行ApplicationShutdownHooks#静态代码块
java
class ApplicationShutdownHooks {

    private static IdentityHashMap<Thread, Thread> hooks;

    static {
        try {
            Shutdown.add(1 /* shutdown hook invocation order */,
                false /* not registered if shutdown in progress */,
                new Runnable() {
                    public void run() {
                        runHooks();
                    }
                }
            );
            hooks = new IdentityHashMap<>();
        }
     }
}
3、runHooks
java
for (Thread hook : threads) {
    hook.start();
}
遍历所有的钩子线程,执行start。此时我们AbstractApplicationContext中的shutdownHook线程就会执行run
-->> doClose
java
// Destroy all cached singletons in the context's BeanFactory.
destroyBeans();

// Close the state of this context itself.
closeBeanFactory();

// Let subclasses do some final clean-up if they wish...
// stop-tomcat
onClose();
onClose -->>ServletWebServerApplicationContext#onClose -->> stopAndReleaseWebServer -->> webServer.stop -->> TomcatWebServer#stop
java
stopTomcat();//停止
this.tomcat.destroy();//销毁
注解
@SpringBootApplication
使用@SpringBootApplication注解后,就无需使用@ComponentScan注解。因为@SpringBootApplication默认会扫描同级别下的所有包
如果想单独指定扫描路径,则可以使用@ComponentScan