GitLab是仓库管理系统,使用Git作为代码管理工具。GitLab提供了多个版本,包括社区版(Community Edition)和企业版(Enterprise Edition)。实际应用场景中要求CPU最小4核、内存最小8GB,非虚拟环境。
以下是在虚拟机中安装社区版步骤:
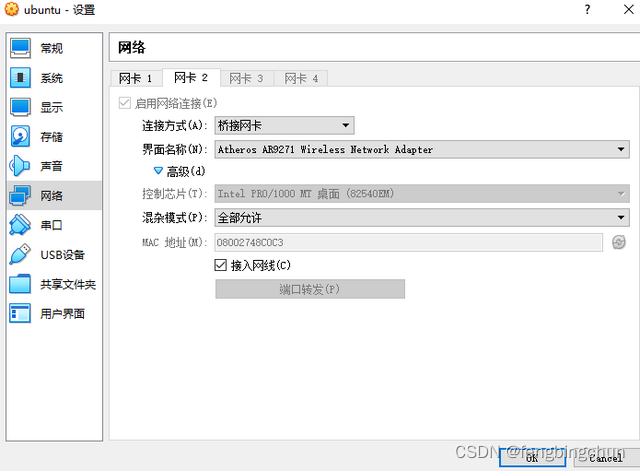
1.为了可以在局域网内其他电脑上可访问GitLab服务,需在ubuntu中设置ip:首先关闭ubuntu虚拟机;然后:打开Oracle VM VirtualBox管理器:依次点击:设置、网络、网卡2:勾选"启用网络连接";连接方式选择"桥接网卡";高级中混杂模式:选择"全部允许",点击OK,如下图所示:
2.安装依赖项:postfix是可选的,这里没有安装,在安装postfix过程中,会出现一个配置窗口,选择"Internet Site"并输入服务器的主机名(hostname)作为邮件服务器名称。这将允许GitLab发送电子邮件通知
bash
sudo apt update
sudo apt install -y curl openssh-server ca-certificates postfix
3.安装GitLab:
bash
curl -sS https://packages.gitlab.com/install/repositories/gitlab/gitlab-ce/script.deb.sh | sudo bash
sudo apt install gitlab-ce
执行完第一条语句后,输出结果如下图所示:The repository is setup! You can now install packages

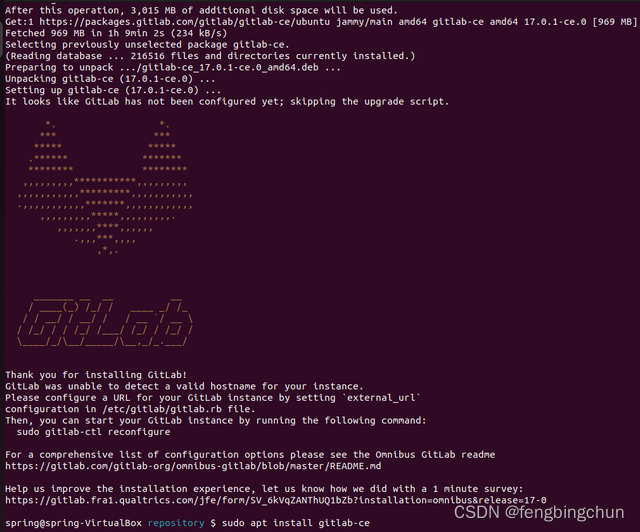
第二条语句是安装gitlab-ce,输出结果如下图所示:
4.防火墙ufw常用命令如下所示:
bash
sudo ufw status # 查看防火墙当前状
sudo ufw enable # 启用ufw,默认情况下,ufw是禁用的
sudo ufw disable # 禁用ufw
sudo ufw reload # 重启ufw
启用防火墙,允许80和443端口,执行如下命令:在配置GitLab之前,需要确保防火墙规则
bash
sudo ufw allow http
sudo ufw allow https
sudo ufw allow OpenSSH
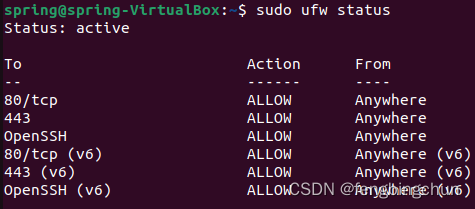
执行完如上命令,再次查看防火墙状态,结果如下所示:
5.配置GitLab:使用sudo vim打开/etc/gitlab/gitlab.rb,将external_url的值调整为http://gitlab.fengbingchun.com,保存并退出该文件,重新配置GitLab,执行如下命令:
bash
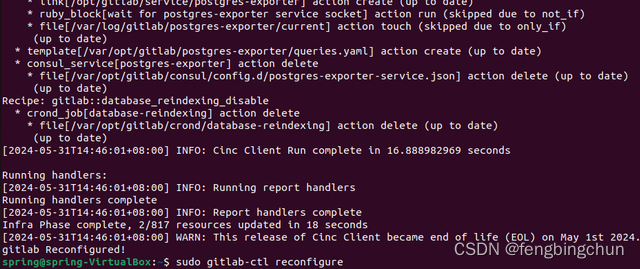
sudo gitlab-ctl reconfigure执行完后若没有错误,会显示"gitlab Reconfigured!",如下图所示:
6.重新启动GitLab服务,执行如下命令,结果如下图所示:
bash
sudo gitlab-ctl restart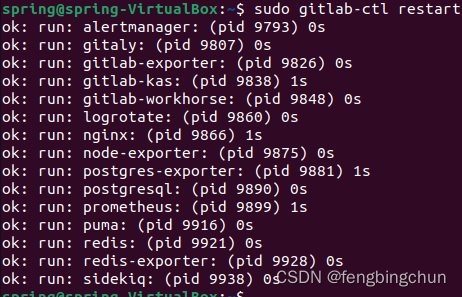
7.访问GitLab Web界面:
(1).打开Web浏览器并输入服务器IP地址或主机名:http://<Server-IP-Address-or-Hostname> 或 http://localhost
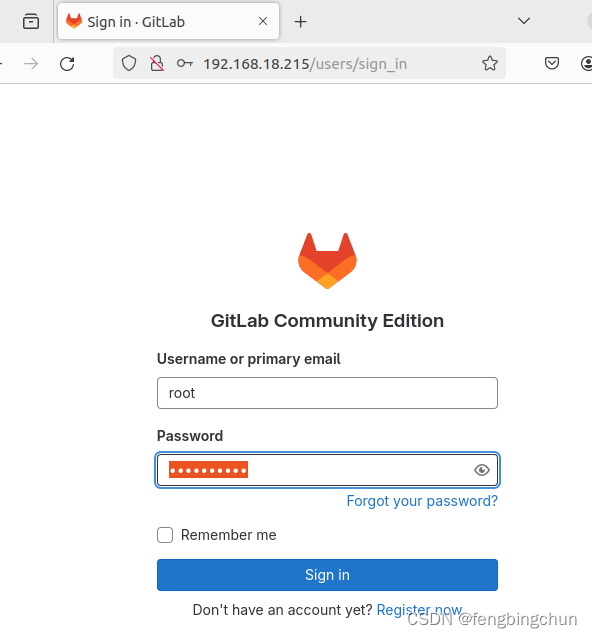
(2).GitLab Web界面的用户名是root ,密码存储在:/etc/gitlab/initial_root_password ,如下图所示:
注意:
(1).登入GitLab Web页面的第一件事就是更改密码,/etc/gitlab/initial_root_password文件中的密码24小时后将被清理
(2).进入gitlab后:"Check your sign-up restrictions",点击"Deactivate",禁止其他人注册账号
(3).192.168.18.215为ubuntu的ip,其他同一网段的电脑输入此地址也可登入GitLab
(4).clone代码时:使用ip地址而不能是url,还未定位原因
bash
git clone http://192.168.18.215/root/test.git # 使用ip地址clone
git clone http://gitlab.fengbingchun.com/root/test.git # 不能使用url clone
8.启用Let's Encrypt SSL:未成功
(1).安装letsencrypt,执行如下命令:
bash
sudo apt install letsencrypt(2).再次打开/etc/gitlab/gitlab.rb,调整的内容如下:letsencrypt['enable']文件中已存在,取消注释即可
bash
external_url 'https://gitlab.fengbingchun.com'
letsencrypt['enable'] = true
(3).保存退出该文件,重新配置GitLab时,一直报错:"Acme::Client::Error::Timeout: letsencrypt_certificate[gitlab.fengbingchun.com] (letsencrypt::http_authorization line 6) had an error: Acme::Client::Error::Timeout: acme_certificate[staging] (letsencrypt::http_authorization line 43) had an error: Acme::Client::Error::Timeout: Acme::Client::Error::Timeout" ,原因还未知
9.常用命令如下:
bash
sudo gitlab-rake gitlab:check # 验证GitLab配置
sudo gitlab-rake 'gitlab:password:reset[root]' # 重置GitLab root密码
sudo gitlab-ctl status # 查看GitLab状态
sudo gitlab-ctl stop # 停止GitLab
sudo gitlab-ctl restart # 重新启动GitLab
sudo gitlab-ctl start # 启动GitLab服务
sudo systemctl list-units --type=service | grep gitlab # 确定GitLab服务的名称
sudo systemctl status gitlab-runsvdir # 查看GitLab服务的状态
sudo systemctl is-enabled gitlab-runsvdir # 检查是否设置了开机禁用GitLab服务:应该返回disabled
sudo systemctl stop gitlab-runsvdir # 停止当前运行的GitLab服务
sudo systemctl disable gitlab-runsvdir # 禁用GitLab服务:在下次启动时不会自动运行
10.卸载GitLab:先停止GitLab服务,依次执行如下命令
bash
sudo gitlab-ctl stop # Shutdown Gitlab
sudo gitlab-ctl uninstall # Remove Gitlab services
sudo gitlab-ctl cleanse # Clean any data generated by usage of the package
sudo gitlab-ctl remove-accounts # Remove any Gitlab accounts on your system
sudo dpkg -P gitlab-ce # sudo apt-get purge gitlab-ce # Remove the package
sudo rm -rf /opt/gitlab /etc/gitlab /var/opt/gitlab # Remove all Gitlab paths
sudo apt update
sudo apt-get autoremove
sudo apt-get clean