1.重采样
1.1 为什么要重采样?
为什么要重采样?当然是原有的⾳频参数不满⾜我们的需求。
⽐如在FFmpeg解码⾳频的时候,不同的⾳源有不同的格式,采样率等,在解码后的数据中的这些参数也会不⼀致。
(最新FFmpeg 解码⾳频后,⾳频格 式为AV_SAMPLE_FMT_FLTP,这个参数应该是⼀致的),
如果我们接下来需要使⽤解码后的⾳频数据做 其他操作,⽽这些参数的不⼀致导致会有很多额外⼯作,此时直接对其进⾏重采样,获取我们制定的⾳频 参数,这样就会⽅便很多。
再⽐如在将⾳频进⾏SDL播放时候,因为当前的SDL2.0不⽀持planar格式,也不⽀持浮点型的,⽽最新的 FFMPEG 16年会将⾳频解码为AV_SAMPLE_FMT_FLTP格式,因此此时就需要我们对其重采样,使之可 以在SDL2.0上进⾏播放。
1.2 什么是重采样
所谓的重采样,就是改变⾳频的 采样率、sample format、声道数 等参数,使之按照我们期望的参数输出。这里的改变是指 只要 上述三者的其中一个变化,就叫做重采样。
1.3 可调节的参数
通过重采样,我们可以对:
- sample rate(采样率)
- sample format(采样格式)
- channel layout(通道布局,可以通过此参数获取声道数
2 对应参数解析
2.1 采样率
采样设备每秒抽取样本的次数 例如48000,44100,对应的是 AVFrame 结构体中的 sample_rate
2.2 采样格式及量化精度(位宽)
每种⾳频格式有不同的量化精度(位宽),位数越多,表示值就越精确,声⾳表现⾃然就越精准。
FFMpeg中⾳频格式有以下⼏种,每种格式有其占⽤的字节数信息(libavutil/samplefmt.h):
enum AVSampleFormat {
    AV_SAMPLE_FMT_NONE = -1,
    AV_SAMPLE_FMT_U8,          ///< unsigned 8 bits
    AV_SAMPLE_FMT_S16,         ///< signed 16 bits
    AV_SAMPLE_FMT_S32,         ///< signed 32 bits
    AV_SAMPLE_FMT_FLT,         ///< float
    AV_SAMPLE_FMT_DBL,         ///< double

    AV_SAMPLE_FMT_U8P,         ///< unsigned 8 bits, planar
    AV_SAMPLE_FMT_S16P,        ///< signed 16 bits, planar
    AV_SAMPLE_FMT_S32P,        ///< signed 32 bits, planar
    AV_SAMPLE_FMT_FLTP,        ///< float, planar
    AV_SAMPLE_FMT_DBLP,        ///< double, planar
    AV_SAMPLE_FMT_S64,         ///< signed 64 bits
    AV_SAMPLE_FMT_S64P,        ///< signed 64 bits, planar

    AV_SAMPLE_FMT_NB           ///< Number of sample formats. DO NOT USE if linking dynamically
};
2.3 平面模式和交错模式 - 分⽚(plane)和打包(packed)
以双声道为例,
带P(plane)的数据格式在存储时,其左声道和右声道的数据是分开存储的,左声道的 数据存储在data0,右声道的数据存储在data1,每个声道的所占⽤的字节数为linesize0和 linesize1;
不带P(packed)的⾳频数据在存储时,是按照LRLRLR...的格式交替存储在data0中,linesize0
表示总的数据量。
2.4 声道分布(channel_layout)
声道分布在FFmpeg\libavutil\channel_layout.h中有定义,⼀般来说⽤的⽐较多的是
AV_CH_LAYOUT_MONO (单声道)
AV_CH_LAYOUT_STEREO(双声道)
AV_CH_LAYOUT_SURROUND(三声道)
#define AV_CH_LAYOUT_MONO              (AV_CH_FRONT_CENTER)
#define AV_CH_LAYOUT_STEREO            (AV_CH_FRONT_LEFT|AV_CH_FRONT_RIGHT)
#define AV_CH_LAYOUT_2POINT1           (AV_CH_LAYOUT_STEREO|AV_CH_LOW_FREQUENCY)
#define AV_CH_LAYOUT_2_1               (AV_CH_LAYOUT_STEREO|AV_CH_BACK_CENTER)
#define AV_CH_LAYOUT_SURROUND          (AV_CH_LAYOUT_STEREO|AV_CH_FRONT_CENTER)
2.5 ⾳频帧的数据量计算
⼀帧⾳频的数据量(字节)= channel数 * 每个channel的样本数 * 每个样本占⽤的字节数
对应从AVFrame 中的数据为
avframe->ch_layout.nb_channels * avframe->nb_samples * av_get_bytes_per_sample((AVSampleFormat)avframe->format);
如果该⾳频帧是FLTP格式的PCM数据,包含1024个样本,双声道,那么该⾳频帧包含的⾳频数据量是 2*1024*4=8192字节。
FLTP 对应的数据大小可以通过 ffmpeg -sample_fmts 查看:
u8        8
s16      16
s32      32
flt      32
dbl      64
u8p       8
s16p     16
s32p     32
fltp     32
dblp     64
s64      64
s64p     64
如果是 AV_SAMPLE_FMT_DBL ,大小为: 2*1024*8 = 16384
2.6 ⾳频播放时间计算
以采样率44100Hz来计算,也就是每秒44100个样本,
因此 播放一个样本的时间为 1÷44100 秒 。
⽽aac正常⼀帧为1024个sample,可知aac每帧播放时间:
1÷44100 x 1024 秒 = 1÷44100 x 1024 x 1000 毫秒 = 23.21995464852608毫秒
即:⼀帧播放时间(毫秒) = nb_samples样本数 *1000 ÷ 采样率
(1)1024*1000/44100=23.21995464852608ms ->约等于 23 .2ms,精度损失了
0.011995464852608ms,如果累计10万帧,误差>1199毫秒,如果有视频⼀起的就会有⾳视频同步的问 题。 如果按着23.2去计算pts(0 23.2 46.4 )就会有累积误差。
(2)1024*1000/48000= 21.3 3333333333333ms
3 FFmpeg重采样API
3.1 分配⾳频重采样的上下⽂
struct SwrContext *swr _alloc (void);
/**
 * Allocate SwrContext.
 *
 * If you use this function you will need to set the parameters (manually or
 * with swr_alloc_set_opts2()) before calling swr_init().
 *
 * @see swr_alloc_set_opts2(), swr_init(), swr_free()
 * @return NULL on error, allocated context otherwise
 */
struct SwrContext *swr_alloc(void);
3.2 给音频重采样上下文设置参数
    /* set options */
    // 输入参数
    int64_t src_ch_layout = AV_CH_LAYOUT_STEREO;
    int src_rate = 48000;
    enum AVSampleFormat src_sample_fmt = AV_SAMPLE_FMT_DBL;

    // 设置输入参数
    av_opt_set_int(swr_ctx, "in_channel_layout",    src_ch_layout, 0);
    av_opt_set_int(swr_ctx, "in_sample_rate",       src_rate, 0);
    av_opt_set_sample_fmt(swr_ctx, "in_sample_fmt", src_sample_fmt, 0);


    // 输出参数
    int64_t dst_ch_layout = AV_CH_LAYOUT_STEREO;
    int dst_rate = 44100;
    enum AVSampleFormat dst_sample_fmt = AV_SAMPLE_FMT_S16;

    // 设置输出参数
    av_opt_set_int(swr_ctx, "out_channel_layout",    dst_ch_layout, 0);
    av_opt_set_int(swr_ctx, "out_sample_rate",       dst_rate, 0);
    av_opt_set_sample_fmt(swr_ctx, "out_sample_fmt", dst_sample_fmt, 0);
3.1.2 上述两步可以直接弄成一步
/**
 * Allocate SwrContext if needed and set/reset common parameters.
 *
 * This function does not require *ps to be allocated with swr_alloc(). On the
 * other hand, swr_alloc() can use swr_alloc_set_opts2() to set the parameters
 * on the allocated context.
 *
 * @param ps              Pointer to an existing Swr context if available, or to NULL if not.
 *                        On success, *ps will be set to the allocated context.
 * @param out_ch_layout   output channel layout (e.g. AV_CHANNEL_LAYOUT_*)
 * @param out_sample_fmt  output sample format (AV_SAMPLE_FMT_*).
 * @param out_sample_rate output sample rate (frequency in Hz)
 * @param in_ch_layout    input channel layout (e.g. AV_CHANNEL_LAYOUT_*)
 * @param in_sample_fmt   input sample format (AV_SAMPLE_FMT_*).
 * @param in_sample_rate  input sample rate (frequency in Hz)
 * @param log_offset      logging level offset
 * @param log_ctx         parent logging context, can be NULL
 *
 * @see swr_init(), swr_free()
 * @return 0 on success, a negative AVERROR code on error.
 *         On error, the Swr context is freed and *ps set to NULL.
 */
int swr_alloc_set_opts2(struct SwrContext **ps,
                        const AVChannelLayout *out_ch_layout, enum AVSampleFormat out_sample_fmt, int out_sample_rate,
                        const AVChannelLayout *in_ch_layout, enum AVSampleFormat  in_sample_fmt, int  in_sample_rate,
                        int log_offset, void *log_ctx);
3.3 当设置好相关的参数后,使⽤此函数来初始化SwrContext结构体
int swr_init(struct SwrContext *s);
 * Initialize context after user parameters have been set.
 * @note The context must be configured using the AVOption API.
 *
 * @see av_opt_set_int()
 * @see av_opt_set_dict()
 *
 * @param[in,out]   s Swr context to initialize
 * @return AVERROR error code in case of failure.
 */
int swr_init(struct SwrContext *s);
3.4 创建输入缓冲区 - 这时候理论上是就要通过SwrContext 转化了,那么这里就有一个问题了,转化的数据应该放在哪里呢?--- 因此这一步 是 创建输入缓冲区
如何创建这个输入缓冲区呢?又根据哪些参数创建这个输入缓冲区呢?
很显然,输入缓冲区是要根据 输入的音频的三要素 来创建的。创建出来的缓冲区放在哪里呢?
int av_samples_alloc_array_and_samples(uint8_t ***audio_data,
int *linesize,
int nb_channels,
int nb_samples,
enum AVSampleFormat sample_fmt,
int align);
第一个参数audio_data为:输入缓冲区的首地址,是个三级指针,本质上是对于 一个二级指针的 取地址,out参数
这里要说明一下为什么 audio_data 是个三级指针,首先是一个输出参数,那么意味着,我们传递进来的要改动的就是二级指针,这个二级指针确切来说应该是一个 uint8_t * audiodata8, 每一个audiodatai 都是指向的 每个planar的具体数据。实际上这里就是为了兼容planar才弄了个三级指针。如果不考虑planar 的,二级指针就够了。
第二个参数linesize为:输入缓冲区对齐的音频缓冲区大小,可能为 NULL,out参数
第三个参数nb_channels为:输入源的 声道数
第四个参数nb_samples为:输入源每个声道的样本数,aac 为1024。也就是说,aac每一帧有1024个样本帧,还记得采样率吗?采样率是44100的话,就说明1秒钟采集44100个样本帧。这里不要搞混淆了。
第五个参数sample_fmt为:输入源的AVSampleFormat -- 类似AV_SAMPLE_FMT_DBL
第六个参数align为:是否要字节对齐,0为对齐,1为不对齐,一般都要对齐
为什么通过3,4,5参数,就能计算出来 输入缓存大小呢?
还记得这个吗? 每一帧的大小 = 声道 * 每个声道的样本数量 * 每个样本的大小
这就对应着,参数3,4,5呀。通过5可以得到每个样本的大小。因此这么设计的内部实现,估计也就是这几个参数相乘得到的。再加上是否需要字节对齐。
/**
 * Allocate a samples buffer for nb_samples samples, and fill data pointers and
 * linesize accordingly.
 * The allocated samples buffer can be freed by using av_freep(&audio_data[0])
 * Allocated data will be initialized to silence.
 *
 * @see enum AVSampleFormat
 * The documentation for AVSampleFormat describes the data layout.
 *
 * @param[out] audio_data  array to be filled with the pointer for each channel
 * @param[out] linesize    aligned size for audio buffer(s), may be NULL
 * @param nb_channels      number of audio channels
 * @param nb_samples       number of samples per channel
 * @param sample_fmt       the sample format
 * @param align            buffer size alignment (0 = default, 1 = no alignment)
 * @return                 >=0 on success or a negative error code on failure
 * @todo return the size of the allocated buffer in case of success at the next bump
 * @see av_samples_fill_arrays()
 * @see av_samples_alloc_array_and_samples()
 */
int av_samples_alloc(uint8_t **audio_data, int *linesize, int nb_channels,
                     int nb_samples, enum AVSampleFormat sample_fmt, int align);

/**
 * Allocate a data pointers array, samples buffer for nb_samples
 * samples, and fill data pointers and linesize accordingly.
 *
 * This is the same as av_samples_alloc(), but also allocates the data
 * pointers array.
 *
 * @see av_samples_alloc()
 */
int av_samples_alloc_array_and_samples(uint8_t ***audio_data, int *linesize, int nb_channels,
                                       int nb_samples, enum AVSampleFormat sample_fmt, int align);
3.5 创建输出缓冲区
3.5.1 计算输出缓冲区的 每个声道的样本数
前面我们在计算输入缓冲区大小的时候,用到了 三个要素,如下
第三个参数nb_channels为:输入源的 声道数
第四个参数nb_samples为:输入源每个声道的样本数,aac 一帧为1024个样本。
第五个参数sample_fmt为:输入源的AVSampleFormat -- 类似AV_SAMPLE_FMT_DBL
为什么需要这三个参数也讲清楚了。那么问题来了,在 创建输出缓冲区 的时候这三个参数应该是多少呢?
第三个参数nb_channels为:输出源的 声道数,这个是我们写代码前就规定的,
比如说我们的目的就是将一个 -ar 44100 -ac 2 -f f32le 变成 -ar 48000 -ac 1 -f s16le 的.
那么这个 输出源的nb_channels 就是1,输出源的 sample_fmt就是 AV_SAMPLE_FMT_S16。
第四个参数nb_samples为:输出源每个声道的样本数,aac一帧 为1024个样本。
不管怎么变化,你将一首2分钟的歌曲,转化后应该还是2分钟的歌曲,时间是不能变化的。
有了这个认识,我们再来看,下面就比较好理解了。
我们要从 44100 ---- 变成 48000,也就是说,之前1秒钟,采集的样本数量是44100个,我们一帧是1024个样本,花费的时间是 1000/44100*1024 单位是毫秒。
那么我们知道了时间是没有办法变化的,48000又是我们规定的,输出后的时间应该是:
1000/48000 * x = 1000/44100*1024, 转化后得到
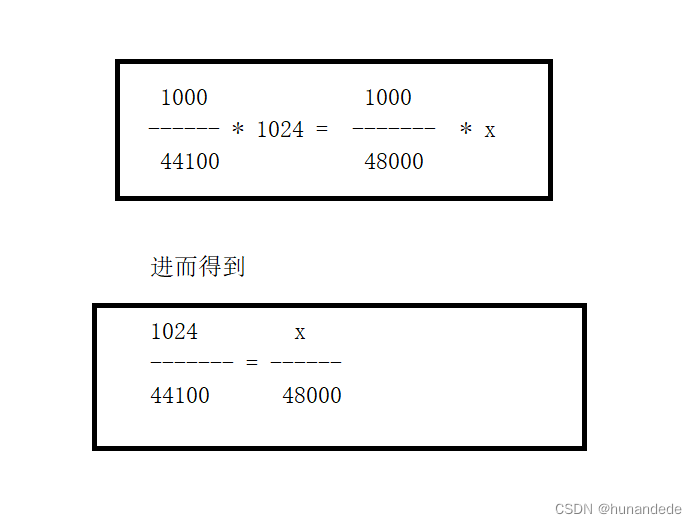
计算公式为:
输出源每个声道的样本个数 =
输出源采样率 * 输入源每个声道的样本数 / 输入源每个声道的样本个数
ffmpeg 已经贴心的给我们准备了函数,因为上述计算可能有计算溢出,等各种问题
/**
 * Rescale a 64-bit integer with specified rounding.
 *
 * The operation is mathematically equivalent to `a * b / c`, but writing that
 * directly can overflow, and does not support different rounding methods.
 * If the result is not representable then INT64_MIN is returned.
 *
 * @see av_rescale(), av_rescale_q(), av_rescale_q_rnd()
 */
int64_t av_rescale_rnd(int64_t a, int64_t b, int64_t c, enum AVRounding rnd) av_const;
第五个参数sample_fmt为:输出源的AVSampleFormat -- 类似AV_SAMPLE_FMT_DBL
同第三个参数的说明,也是在代码前就规定好的。
3.5.2 根据上述计算出来的 输出缓冲区的每个声道的样本数,创建缓冲区
int av_samples_alloc_array_and_samples(uint8_t ***audio_data,
int *linesize,
int nb_channels, //在代码写之前就规定了的
int nb_samples, //通过 3.5.1 计算出来的
enum AVSampleFormat sample_fmt, //在代码写之前就规定了的
int align);