前言:在给大家分享这块内容之前,先给大家简单的介绍一下,iOS目前主流的布局方式,便于后面对方案选择的理解。
1.AutoLayout
自动布局(AutoLayout)是iOS6引入的关系布局,实现动态位置和多视图关系的布局方式,是对frame布局和AutoresizingMask的不足进行补充的一种方式,现在已经成为主流的布局方案,由于原始创建方式比较复杂,可以使用优秀的第三方框架方便创建约束比如Masonry。
-
frame布局就不用讲了,就是相对于父视图,origin,size,确定视图的位置和大小。
-
AutoresizingMask是iOS6之前主流的一个布局方式,是在iphone设备尺寸相对比较单一时候适用,已不适用现在这个多设备尺寸的布局了。
AutoLayout是目前iOS开发最主流的布局方式,没有之一。
下面用实际代码给大家解释一下,AutoLayout的布局。
objectivec
//设置背景颜色

self.view.backgroundColor = [UIColor redColor];

//创建子view

UIView *subView = [[UIView alloc]init];

//设置子view背景颜色

subView.backgroundColor = [UIColor blackColor];

//将子view添加到父视图上

[self.view addSubview:subView];

//使用Auto Layout约束,禁止将Autoresizing Mask转换为约束

[subView setTranslatesAutoresizingMaskIntoConstraints:NO];

//layout 子view

//子view的上边缘离父view的上边缘40个像素

NSLayoutConstraint *contraint1 = [NSLayoutConstraint constraintWithItem:subView attribute:NSLayoutAttributeTop relatedBy:NSLayoutRelationEqual toItem:self.view attribute:NSLayoutAttributeTop multiplier:1.0 constant:40.0];

//子view的左边缘离父view的左边缘40个像素

NSLayoutConstraint *contraint2 = [NSLayoutConstraint constraintWithItem:subView attribute:NSLayoutAttributeLeft relatedBy:NSLayoutRelationEqual toItem:self.view attribute:NSLayoutAttributeLeft multiplier:1.0 constant:40.0];

//子view的下边缘离父view的下边缘40个像素

NSLayoutConstraint *contraint3 = [NSLayoutConstraint constraintWithItem:subView attribute:NSLayoutAttributeBottom relatedBy:NSLayoutRelationEqual toItem:self.view attribute:NSLayoutAttributeBottom multiplier:1.0 constant:-40.0];

//子view的右边缘离父view的右边缘40个像素

NSLayoutConstraint *contraint4 = [NSLayoutConstraint constraintWithItem:subView attribute:NSLayoutAttributeRight relatedBy:NSLayoutRelationEqual toItem:self.view attribute:NSLayoutAttributeRight multiplier:1.0 constant:-40.0];

//把约束添加到父视图上

NSArray *array = [NSArray arrayWithObjects:contraint1,contraint2,contraint3,contraint4, nil];

[self.view addConstraints:array];
当然实际项目中的AutoLayout不会使用这么多代码去布局,大多使用Masonry等第三方框架链式编程的方式去布局页面。
go
    [self.containerView addSubview:pageModel.canvas];

    [self.containerView mas_updateConstraints:^(MASConstraintMaker *make) {

        make.center.mas_equalTo(self);

        make.size.mas_equalTo(scaledSize);

    }];


    [pageModel.canvas mas_updateConstraints:^(MASConstraintMaker *make) {

        make.center.mas_equalTo(self.containerView);

        make.size.mas_equalTo(paperSize);

    }];
2.如果聊天页面使用AutoLayout
-
聊天页面使用AutoLayout,会方便开发者对气泡页面的布局,减少对页面层级以及布局的关注
-
由于聊天气泡类型不固定,聊天文本高度不固定,气泡数量可能会很大,AutoLayout的使用,会增加布局计算的时间,导致页面卡顿
业务场景:聊天页面,有着大量的不同类型,不同高度的聊天气泡,用户在滑动聊天页面的时候需要做到流畅,顺滑,不卡顿。
那么,什么叫流畅、顺滑、不卡顿呢?
也就是需要我们应用的视图保持在60FPS左右的刷新频率,那么想要让 iOS 应用的视图保持 60 FPS 的刷新频率,我们必须在 1/60 = 16.67 ms 之内完成包括布局、绘制以及渲染等操作。
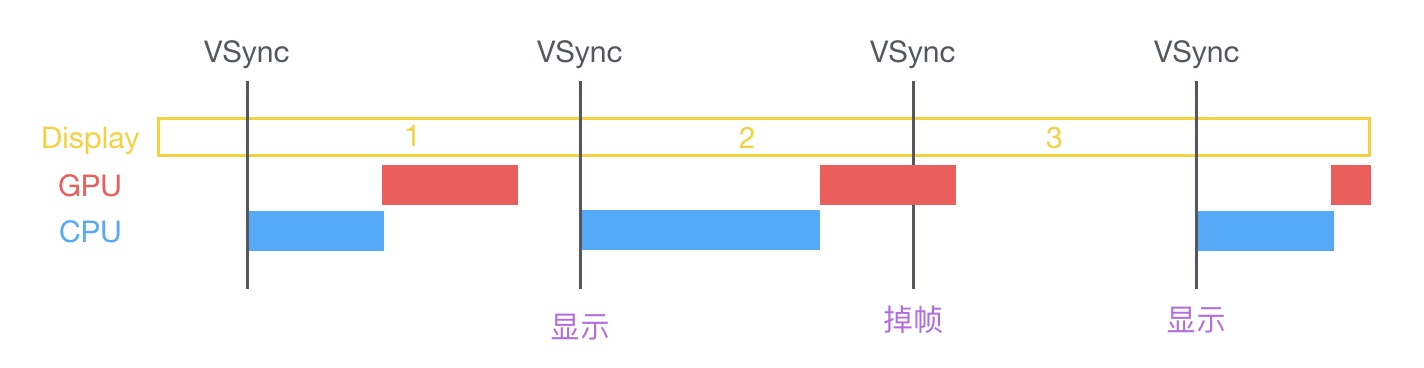
当主线程启动时会先有CPU处理好需要显示的数据,然后交付给GPU,然后GPU通过合成、渲染等操作将处理结果提交到帧缓存中,当垂直同步信号到达时将处理结果显示到屏幕上。每个垂直同步信号到达的间隔约为16.67ms(1秒60帧),如果在CPU和GPU在垂直同步信号到达直接就交付处理结果到帧缓存中则不会产生卡顿,而当CPU和GPU两者处理时间大于16.67ms则会出线掉帧的情况,如上图所示,第二帧处理的时间过长,垂直同步信号已经到达GPU依然没有将数据提交到帧缓存中,则该次计算的处理结果将在下一个垂直同步信号结果到达时再显示到屏幕上,这就是卡顿的原因。
所以,不论是CPU处理时间过长还是GPU处理时间过长都会出现卡顿的情况,如何给这二位兄弟减负就是解决卡顿的方案,因为聊天页面暂时还没有涉及到发送图片视频等操作,所以暂时不需要考虑GPU优化,本文将重点讲如何优化CPU的处理。
之所以舍弃AutoLayout的原因也就在于,在这样的业务场景下,使用AutoLayout布局,达不到流畅、顺滑的效果。
3.AutoLayout布局原理
Auto Layout 的原理其实非常简单,在这里通过一个例子先简单的解释一下:

iOS 中视图所需要的布局信息只有两个,分别是 origin/center 和 size,在这里我们以 origin & size 为例,也就是 frame 时代下布局的需要的两个信息;这两个信息由四部分组成:
-
x&y -
width&height
以左上角的 (0, 0) 为坐标的原点,找到坐标 (x, y),然后绘制一个大小为 (width, height) 的矩形,这样就完成了一个最简单的布局。而 Auto Layout 的布局方式与上面所说的 frame 有些不同,frame 表示与父视图之间的绝对距离,但是 Auto Layout 中大部分的约束都是描述性的,表示视图间相对距离,以上图为例:
objectivec
A.left = Superview.left + 50

A.top  = Superview.top + 30

A.width  = 100

A.height = 100


B.left = (A.left + A.width)/(A.right) + 30

B.top  = A.top

B.width  = A.width

B.height = A.height
虽然上面的约束很好的表示了各个视图之间的关系,但是 Auto Layout 实际上并没有改变原有的 Hard-Coded 形式的布局方式,只是将原有没有太多意义的 (x, y) 值,变成了描述性的代码。
我们仍然需要知道布局信息所需要的四部分 x、y、width 以及 height。换句话说,我们要求解上述的八元一次 方程组,将每个视图所需要的信息解出来;Cocoa 会在运行时求解上述的方程组,最终使用 frame 来绘制视图。

在上世纪 90 年代,一个名叫 Cassowary 的布局算法解决了用户界面的布局问题,它通过将布局问题抽象成线性等式和不等式约束来进行求解。
Auto Layout 其实就是对 Cassowary 算法的一种实现,这里不对它展开介绍。
Auto Layout 的原理就是对线性方程组或者不等式的求解。
4.解决方案
当获取到数据的同时,对气泡的高度进行人工手动计算,提前计算显示气泡的高度,在气泡View中,对子View的布局,采用Frame的方式,进行布局,并且减少View之间层级的嵌套。
swift
        case .Interview:

            self.interviewInfo = self.data?.kj.model(HiChatInterviewModel.self)

            let bubluWidth = max(kChatTextMaxWidth + kChatBubbleWidthBuffer, kChatBubbleImageViewWidth)

            let contentViewWidth = bubluWidth - 2*kChatInterviewContentSpace

            let labelWidth = contentViewWidth - kChatInterviewContentSpace - kChatInterviewContentSpace/2 - kChatInterviewContentTitleLabelWidth

            let timeLabelBottom = kChatInterviewTimeLabelTop + kChatInterviewContentTitleLabelHeight

            let contactLabelHeight = self.interviewInfo?.contact?.height(forConstrainedWidth: labelWidth, font: kChatInterviewContentLabelFont) ?? 0

            let contactNoLabelHeight = self.interviewInfo?.phone?.height(forConstrainedWidth: labelWidth, font: kChatInterviewContentLabelFont) ?? 0

            let addressLabelHeight = self.interviewInfo?.address?.height(forConstrainedWidth: labelWidth, font: kChatInterviewContentLabelFont) ?? 0

            self.interviewInfo?.contactLabelHeight = contactLabelHeight

            self.interviewInfo?.contactNoLabelHeight = contactNoLabelHeight

            self.interviewInfo?.addressLabelHeight = addressLabelHeight

            var height: CGFloat = 2*kChatSystemNoticeLabelMarginTop

            if self.interviewInfo?.type == 1 {//线上

                height = height + timeLabelBottom  + (kChatInterviewStatusSpace/2)*2 + contactLabelHeight + contactNoLabelHeight + kChatInterviewStatusSpace + kChatInterviewAcceptTopSpace*2 + kChatInterviewdeclineButtonHeight

                self.interviewInfo?.actionBottomHeight = kChatInterviewAcceptTopSpace*2 + kChatInterviewdeclineButtonHeight

                if self.interviewInfo?.status == 4 {// 已接受

                   height = height + kChatInterviewAcceptTopSpace + kChatInterviewdeclineButtonHeight

                   self.interviewInfo?.actionBottomHeight = kChatInterviewAcceptTopSpace*3 + kChatInterviewdeclineButtonHeight*2

                }

            }else{//线下

                height = height + timeLabelBottom  + (kChatInterviewStatusSpace/2)*3 + contactLabelHeight + contactNoLabelHeight + addressLabelHeight + kChatInterviewStatusSpace + kChatInterviewAcceptTopSpace*2 + kChatInterviewdeclineButtonHeight

                self.interviewInfo?.actionBottomHeight = kChatInterviewAcceptTopSpace*2 + kChatInterviewdeclineButtonHeight

            }

            self.cellHeight = height
swift
        //设置气泡的宽

        bubbleImageView.width = max(kChatTextMaxWidth + kChatBubbleWidthBuffer, kChatBubbleImageViewWidth)

        //设置气泡的高度

        bubbleImageView.height = max(model.cellHeight - kChatBubbleBottomTransparentHeight, kChatBubbleImageViewHeight)

        //value = 头像的底部 - 气泡透明间隔值

    bubbleImageView.top = nicknameLabel.bottom - kChatBubblePaddingTop


//        //valeu = 气泡顶部 + 文字和气泡的差值

        InterviewBgView.top = bubbleImageView.top

        //valeu = 气泡左边 + 文字和气泡的差值

        InterviewBgView.left = bubbleImageView.left + kChatInterviewMarginLeft

        InterviewBgView.width = bubbleImageView.width

        InterviewBgView.height = bubbleImageView.height


        //topView

        InterviewTopView.left = InterviewBgView.left

        InterviewTopView.top = InterviewBgView.top

        InterviewTopView.width = InterviewBgView.width

        InterviewTopView.height = kChatInterviewTopViewHeight


        InterviewTopTitleLabel.left = InterviewTopView.left + kChatInterviewContentSpace

        InterviewTopTitleLabel.top = InterviewTopView.top + kChatInterviewContentSpace

        InterviewTopTitleLabel.width = 150

        InterviewTopTitleLabel.height = 22

        InterviewTopStatusLabel.left = InterviewTopTitleLabel.right + kChatInterviewStatusSpace

        InterviewTopStatusLabel.top = InterviewTopTitleLabel.top

        InterviewTopStatusLabel.width = 53

        InterviewTopStatusLabel.height = 20


        //contentView

        InterviewContentView.left = InterviewBgView.left + kChatInterviewContentSpace

        InterviewContentView.top = InterviewBgView.top + kChatInterviewContentPadding

        InterviewContentView.width = InterviewBgView.width - 2*kChatInterviewContentSpace

        InterviewContentView.height =  InterviewBgView.height - kChatInterviewContentPadding - (model.interviewInfo?.actionBottomHeight ?? kChatInterviewContentPadding)


        dateTitleLabel.top = InterviewContentView.top + kChatInterviewStatusSpace

        dateTitleLabel.left = InterviewContentView.left + kChatInterviewStatusSpace

        dateTitleLabel.width = kChatInterviewContentTitleLabelWidth

        dateTitleLabel.height = kChatInterviewContentTitleLabelHeight


        dateLabel.top = dateTitleLabel.top

        dateLabel.left = dateTitleLabel.right + kChatInterviewContentSpace

        dateLabel.width = InterviewContentView.width - kChatInterviewContentSpace - kChatInterviewContentSpace/2 - kChatInterviewContentTitleLabelWidth

        dateLabel.height = kChatInterviewContentTitleLabelHeight