目录
写在前面
这是Nginx第四篇,内容为LNMP流程详解、排错思路、Nginx代理等。
Nginx04
LNMP流程详解
Nginx处理静态资源流程
- 用户与服务端的
端口进行连接,报文携带请求方法、请求页面、http协议、host等信息 - 服务端接收到请求,到nginx后
先匹配http区域(nginx主配置文件) - 根据用户请求的
域名和配置文件的server_name进行匹配,匹配到了对应的域名,根据对应域名的配置进行处理(子配置文件) - 根据用户请求的页面
uri,结合站点目录,寻找到对应的文件,返回给客户端 - 返回的报文携带
http响应码、请求文件等信息
Nginx处理动态资源流程
- 用户与服务端的
端口进行连接,报文携带请求方法、请求页面、http协议、host等信息 - 服务端接收到请求,到nginx后
先匹配http区域(nginx主配置文件) - 根据用户请求的
域名和配置文件的server_name进行匹配,匹配到了对应的域名,根据对应域名的配置进行处理(子配置文件) - 根据用户请求的页面
uri,发现是动态资源(location ~* .php$),nginx将该请求交由php-fpm处理,传递的是该文件绝对路径- fastcgi_pass 127.0.0.1:9000; 将请求传递给本机的哪个服务处理(
php-fpm监听9000) - fastcgi_index index.php;
- fastcgi_param SCRIPT_FILENAME d o c u m e n t r o o t document_root documentrootfastcgi_script_name;
设置变量,$document_root是location中的root部分、$fastcgi_script_name是请求的文件uri - include fastcgi_params;
- fastcgi_pass 127.0.0.1:9000; 将请求传递给本机的哪个服务处理(
- php-fpm进程根据收到的SCRIPT_FILENAME进行处理,将处理结果传回给nginx
- nginx将php的结果通过响应报文传回给用户
- 返回的报文携带
http响应码、请求文件等信息
LNMP排错
Linux
- 检查防火墙
- 检查selinux
Nginx
- 检查端口
ss -tunlp | grep nginx - 检查进程
ps -ef | grep nginx - 检查配置
nginx.conf conf.d/*.conf - 创建测试目录后curl测试
PHP
- 创建测试文件
php
//站点目录下(root指定的路径)
cat testinfo.php
<?php
        phpinfo();
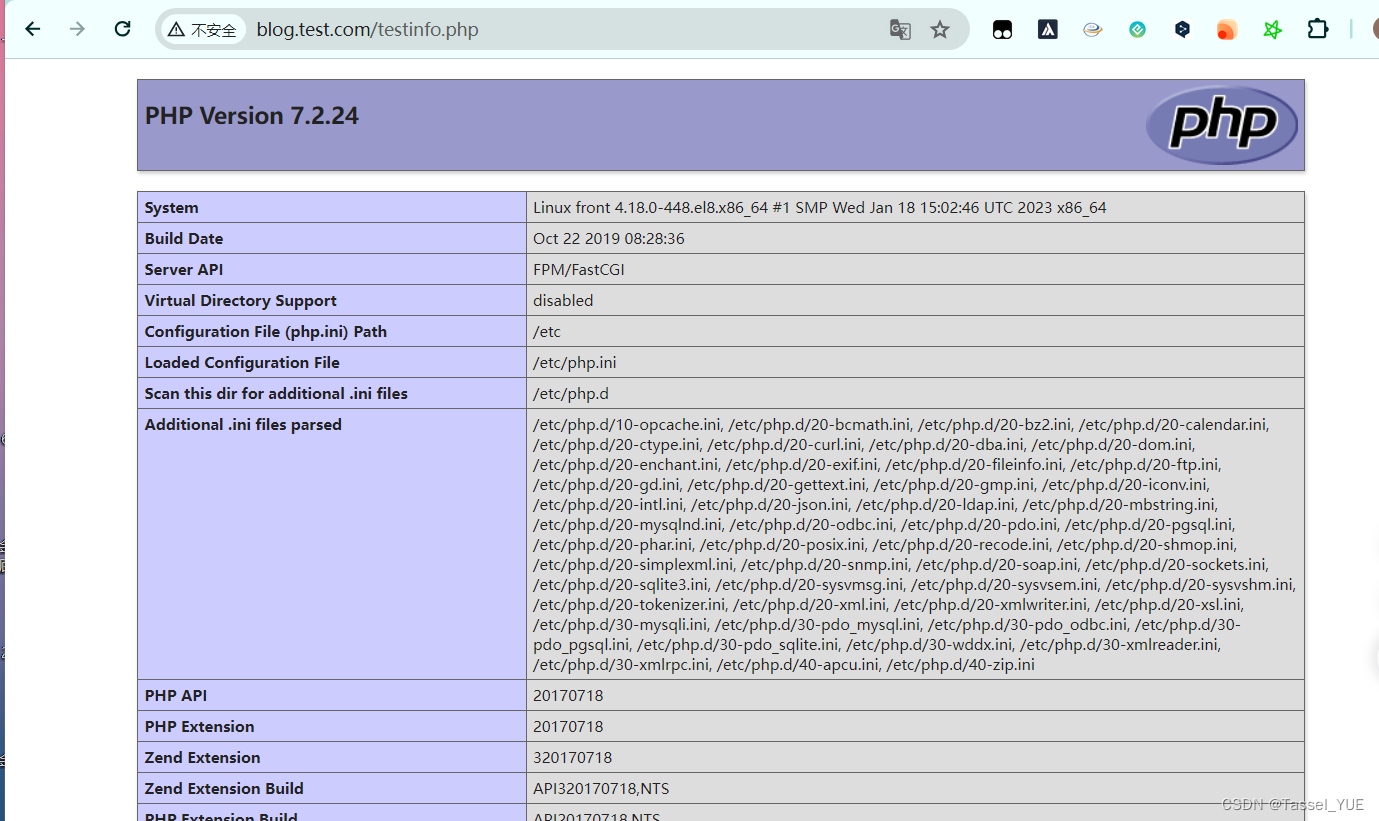
?>- 访问测试文件

注意:这个测试文件会记录很多信息,不能泄露,测试完即删除
Mysql
- mysql -u用户 -p密码 -h 数据库ip
- 书写页面测试php
php
<?php
//
数据库地址
$db_host='192.168.100.152';
//
数据库用户名
$db_user='test';
$db_pass='test';
//
数据库名字
$db_name='test';
$link_id=mysqli_connect($db_host,$db_user,$db_pass,$db_name);
if($link_id){
 echo "successful by oldboy lidao996! 库名字:$db_name 库用户:$db_user 库密码:$db_pass" ;
}else{
 echo "connection failed! 库名字:$db_name 库用户:$db_user 库密码:$db_pass" ;
}
?>
shell
# nginx子配置文件
location ~* (testinfo|testmysq).php$ {
   allow 192.168.100.0/24;
   deny all; #仅允许内网访问
   fastcgi_pass 127.0.0.1:9000;
   fastcgi_param SCRIPT_FILENAME $document_root$fastcgi_script_name;
   include fastcgi_params;
}
Nginx 代理
概述
官网的文档:https://nginx.org/en/docs/http/ngx_http_proxy_module.html#proxy_pass
正向代理
正向代理代表客户端向服务器发送请求。它通常位于客户端和互联网之间,帮助客户端访问受限资源或提高访问效率。类似跳板机的功能,转发流量。
-
应用
-
突破网络访问限制
-
加速数据传输
-
隐藏客户端真实IP地址
-
-
举例
-
网络加速
-
私有代理服务器
-
反向代理
反向代理代表服务器接收来自客户端的请求。它通常位于服务器和互联网之间,帮助服务器管理和分配客户端请求,提高服务器安全性和效率。有点类似防火墙的功能,隔离内外。
-
应用
-
负载均衡
-
SSL加密和解密
-
防止DDoS攻击
-
-
举例
-
Nginx
-
Apache Traffic Server
-
AWS CloudFront
-
区别
| 特征 | 正向代理 | 反向代理 |
|---|---|---|
| 代理对象 | 客户端 | 服务器 |
| 位置 | 客户端和互联网之间 | 服务器和互联网之间 |
| 功能 | 帮助客户端访问互联网 | 帮助服务器管理和分配客户端请求 |
| 安全性 | 隐藏客户端真实IP地址 | 保护服务器免受恶意攻击 |
| 应用场景 | 突破网络访问限制、加速数据传输 | 负载均衡、SSL加密和解密、防止DDoS攻击 |
| 常见实现技术 | 网络加速、私有代理服务器 | Nginx、Apache Traffic Server、AWS CloudFront |
反向代理实验(Proxy模块)
环境准备
shell
role    主机名
-------------
proxy   lb01
web     front

域名:proxy.test.com
index:/app/code/proxy/index.html

所需nginx模块:
location模块    虚拟站点
proxy模块   代理
upstream模块    负载均衡
front配置
- 子配置文件和站点文件
shell
[root@front conf.d]# cat proxy.test.com.conf
server {
        listen 80;
        server_name proxy.test.com;
        root /app/code/proxy;
        error_log /var/log/nginx/proxy-error.log notice;
        access_log /var/log/nginx/proxy-access.log main;

        location / {
                index index.html;
        }
}
[root@front conf.d]# mkdir -p /app/code/proxy
[root@front conf.d]# echo proxy > /app/code/proxy/index.html
lb01配置
- 安装nginx
shell
[root@lb01 ~]# cat /etc/yum.repos.d/nginx.repo
[nginx-stable]
name=nginx stable repo
baseurl=http://nginx.org/packages/centos/$releasever/$basearch/
gpgcheck=1
enabled=1
gpgkey=https://nginx.org/keys/nginx_signing.key
module_hotfixes=true

[root@lb01 ~]# yum install -y nginx

[root@lb01 ~]# nginx -v
nginx version: nginx/1.26.1- 创建子配置文件
shell
[root@lb01 conf.d]# cat proxy.test.com.conf
#lb01
server {
        listen 80;
        server_name proxy.test.com;
        # 不用写站点目录
        error_log /var/log/nginx/proxy-error.log notice;
        access_log /var/log/nginx/proxy-access.log main;

        location / {
                #收到的所有uri转发给192.168.100.148
                proxy_pass http://192.168.100.148:80;

                #proxy_set_header 请求头字段 内容(变量)
                #转发proxy时,保留host头
                proxy_set_header Host $http_host;
                #转发proxy时,保留用户的真实ip
                proxy_set_header X-Forwarded-For $proxy_add_x_forwarded_for;
        }
}
测试
shell
# 测试 访问的是lb01的ip
[root@lb01 conf.d]# curl -H Host:proxy.test.com http://192.168.100.153
proxy
流程梳理
-
客户端访问proxy.test.com,访问的ip是
lb01的ip。 -
lb01收到用户发来的请求头,匹配子配置文件中的location,根据
proxy模块转发到front主机 -
lb01在转发时,根据proxy模块的设置
proxy_set_header Host,将host也保留转发到front-
报头可以携带
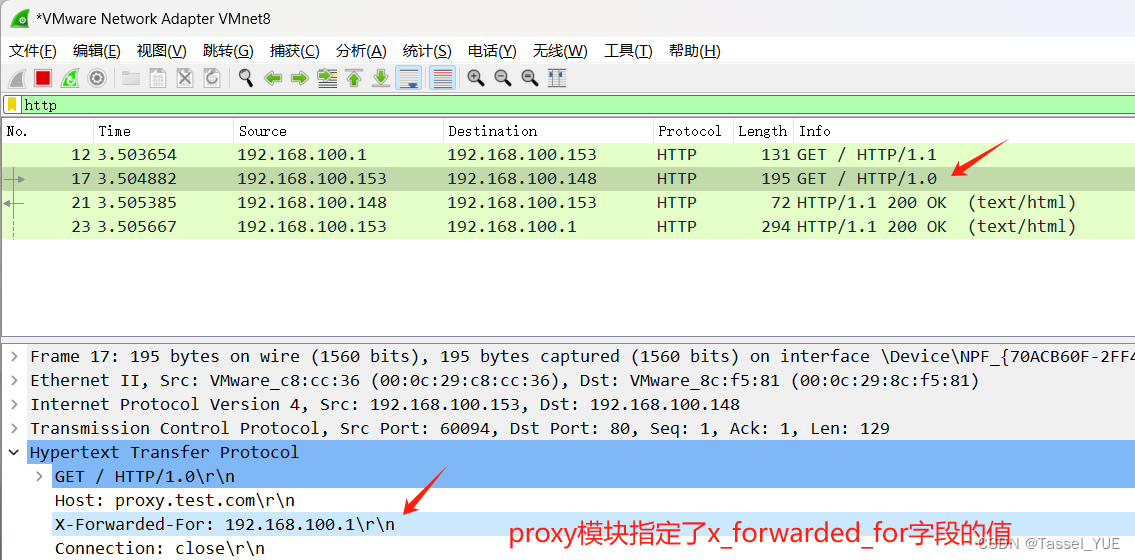
X-Forwarded-For这个内容。这个内容不写默认传递是lb01ip,但可以通过proxy模块修改为用户的真实ip。proxy_set_header X-Forwarded-For -
这个字段可以用两个变量:
-
$remote_addr是客户端ip -
$proxy_add_x_forwarded_for是记录每个代理的ip,用于多层代理,类似多个$remote_addr
-
-
front收到请求后,匹配对应子配置文件,访问到站点目录的index.html,放回结果给lb01
-
lb01 收到结果后,再次转发给用户。
-
整个请求过程,是
两次http请求和两次http响应 -
不添加
x_forwarded_for
shell
[root@front conf.d]# cat /var/log/nginx/proxy-access.log
192.168.100.148 - - [09/Jun/2024:11:02:48 +0800] "GET / HTTP/1.1" 200 6 "-" "curl/7.61.1" "-"
- 添加
x_forwarded_for
shell
[root@front conf.d]# cat /var/log/nginx/proxy-access.log
192.168.100.153 - - [09/Jun/2024:17:05:30 +0800] "GET / HTTP/1.0" 200 6 "-" "curl/7.65.0" "192.168.100.1"
总结
- 生产中建议
proxy模块指定以下参数:
shell
proxy_pass              服务端ip url如http://192.168.100.148:80
proxy_set_header        Host            $http_host;
proxy_set_header        X-Real-IP       $remote_addr;
proxy_set_header        X-Forwarded-For $proxy_add_x_forwarded_for;