代办事件案例
-
该案例,综合了前面所学的知识,列入点击事件绑定,双向绑定,v-for循环语句,v-model双向绑定,以及input标签的不同type形式。
演示代码如下:
vue
<template >
<div id="kuagjia">
    <div >
        <div class="top"><span style="margin-left: -700px;">学习计划表</span></div>
        <div class="hang1">
            <div>学习科目<input type="text" placeholder="请输入学习科目" v-model="addSj"></div>
            <div>学习内容<textarea placeholder="请输入学习内容" v-model="addContent" ></textarea></div>
            <div>学习地点
                <select v-model="addPlace">
                    <option>自习室</option>
                    <option>教室</option>
                    <option>图书馆</option>
                </select>
            </div>
            <div><button @click="addImg">添加</button></div>
        </div>
    </div>
    <div>
        <table id="table" border="1px" cellspacing="0">
            <thead>
                <tr>
                    <th>序号</th>
                    <th>学习科目</th>
                    <th>学习内容</th>
                    <th>学习地点</th>
                    <th>完成状态</th>
                    <th>操作</th>
                </tr>
            </thead>
            <tbody  >
                <tr v-for="(i,index) in arrImg">
                    <td>{{ index+1 }}
                    </td>
                    <td>{{ i.sj }}</td>
                    <td>{{ i.content }}</td>
                    <td>{{ i.place }}</td>
                    <td >

                        <label class="switch">
	                    <input type="checkbox"   v-model="i.status"     >
	                    <span class="slider round"></span>
                        </label>{{ i.status ? "完成":"未完成" }}
                    </td>
                    <td @click="delImg(i.id, i.status)">删除</td>
                </tr>
            </tbody>
        </table>
    </div>
</div>


</template>

<script setup>
import {ref}  from  'vue';
const addSj = ref('')
const addContent = ref('')
const addPlace = ref('')
const ids = ref(1)
const arrImg =ref([])


const addImg = () =>{
    if (addSj.value === '' || addContent.value === ''){
        alert('学习科目和学习内容都不能为空')}else{

    var addSjIs = addSj.value
    var addContentIs = addContent.value
    var addPlaceIs = addPlace.value
    var idss = ids.value++
    var a = {id : idss, sj : addSjIs, content : addContentIs, place : addPlaceIs, status: false}
    arrImg.value.push(a)

}
}
const delImg = (id, status) =>{
    if (status) {
        arrImg.value = arrImg.value.filter(x => x.id != id )
    }else{
        alert('没有做完是不会被删除的')
    }

    }
</script>

<style>
#kuagjia{

    width: 800px;
    height: 400px;
    border: 1xp solid;
    background-color: antiquewhite;
}
.top{
    width: 800px;
    height: 30px;
    background-color: gray;
    padding-left: 0px;

}
.hang1{
    display: flex;


}
#table{
    border: 1px solid;
    width: 800px;
    margin-top: 20px;

}
/* 开关 */
/* 开关 - 滑块周围的框 */
.switch {
	--width:22px;
	position: relative;
	display: inline-block;
	width: calc(var(--width) * 2);
	height: var(--width);
}

/* 隐藏默认 HTML 复选框 */
.switch input {
	opacity: 0;
	width: 0;
	height: 0;
}

/* 滑块 */
.slider {
	position: absolute;
	top: 0;
	left: 0;
	right: 0;
	bottom: 0;
	cursor: pointer;
	background-color: #ccc;
	transition: .4s;
}

/* 轨道*/
.slider.round {
	border-radius: 34px;
}
/* 圆形滑块 */
.slider.round::before {
	border-radius: 50%;
}

.slider::before {
	position: absolute;
	content: "OFF";
	height: var(--width);
	width: var(--width);
	left: 0px;
	bottom: 0px;
	background-color: white;
	-webkit-transition: .4s;
	transition:all .4s;
	font-size: 10px;
	text-align: center;
	line-height: var(--width);
	color: #ccc;
}

input:checked+.slider {
	background-color: #2196F3;
}

input:checked+.slider:before {
	transform: translateX(var(--width));
	content: "ON";
	color: #2196F3;
}
button{
    background-color: #ccc;
    margin-left: 20px;
}
</style>-
效果如下
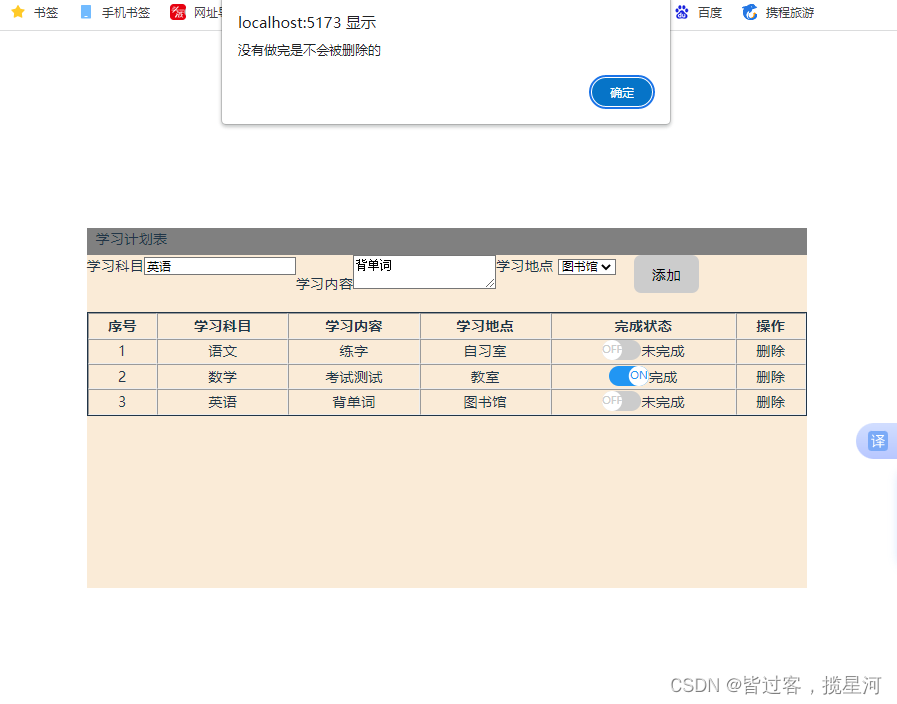
在输入框的提示下输入内容,点击添加按钮就会自动添加代办任务,还有完成状态的调整功能,若任务未完成,点击删除是不会有效果的!!!如果第2次添加的内容已经在表中存在,会提示用户,无需重复添加。

-
当代办案例邂逅统计完成的个数,则会出现另一个版本的代办案例
代码如下:
vue
<template>

    <div class="main">
        <h2>代办事项</h2>
        <input id="task" type="text" placeholder="请填写任务" @keyup.enter.exact="add" v-model="content">
        <ul>
            <li v-for="item in display" @mouseover="flag = true" @mouseleave="flag = false">

                <div  id="list">

                    <input type="checkbox" v-model="item.status">
                    <span v-if="!item.status">{{ item.name }}</span>
                    <span v-else> <del> {{ item.name }} </del></span>

                    <div>

                        <i v-show="flag" @click="del(item.id)">X</i>

                    </div>
                </div>
                <hr>
            </li>
        </ul>

        <div id="footer">
            <div id="tips">共有{{ display.length }} {{ which }}条任务 </div>
            <div>
                <button @click="which = '全部'">全部</button>
                <button @click="which = '待办'">待办</button>
                <button @click="which = '已办'">已办</button>
            </div>
        </div>
    </div>
</template>
<script setup>

import { ref, computed } from 'vue';

const flag = ref(false);
const content = ref("");
const which = ref("全部")

const arr = ref([
    { name: '晨练', id: 1, status: false },
    { name: '练书法', id: 2, status: false }
])

const display = computed(() => {
    if (which.value == "全部") {
        return arr.value;
    } else if (which.value == "待办") {
        return arr.value.filter(x => !x.status);
    } else {
        return arr.value.filter(x => x.status);
    }
})

const add = () => {
    let item = { name: content.value, id: arr.value.length + 1, status: false };
    arr.value.push(item);
    content.value = "";
}

const del = (id) => {
    arr.value = arr.value.filter(x => x.id != id)
}

</script>


<style scoped>
.main {

    display: flex;
    flex-direction: column;
    align-items: flex-start;
}

h2 {
    align-self: center
}

ul {
    list-style-type: none;
    padding: 0px;
}

#list {
    display: flex;
    justify-content: space-between;
    min-width: 500px;
}

ul li div {
    min-width: 50px;
    margin: 0px;
}

#task {
    min-width: 500px;
}

#footer {

    display: flex;
    min-width: 500px;
    justify-content: space-between;

}

#tips {
    display: flex;
    align-items: center;
}

#footer button {
    border: 0px;

    background-color: transparent;
}

#footer button:active {
    background-color: aqua;
}
</style>-
案例效果如下
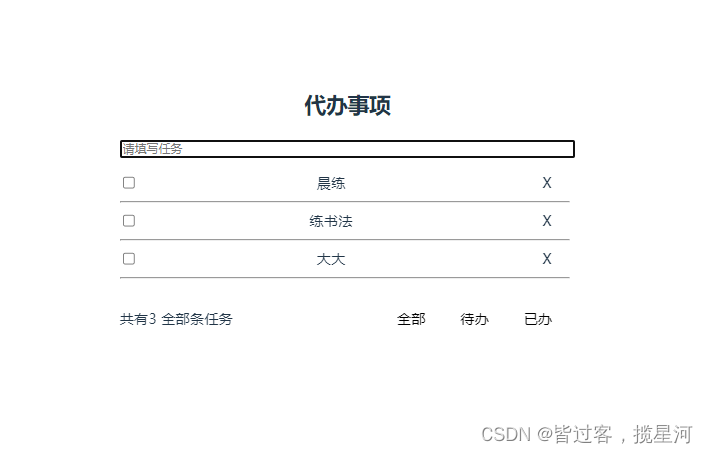
同理根据提示在输入框内输入想要完成的任务,按下Enter键就会添加到列表队伍当中,当鼠标移动到任务条上时右侧会显示一个×,点击x即可删除此条任务!在列表的最后一栏,点击不同状态,会过滤相应的任务,并做出相应的统计。
