实现效果:
鼠标悬浮到头像上,下方出现修改头像

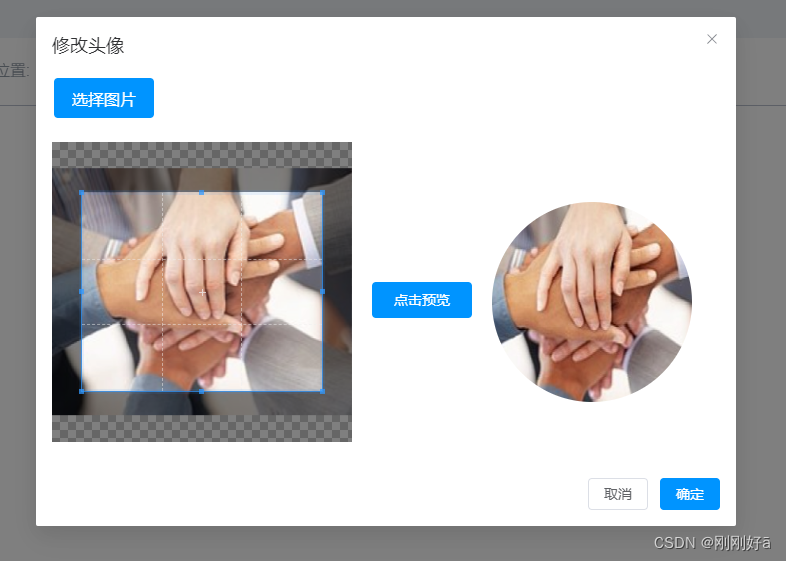
点击修改头像出现弹框,弹框中可上传头像,并支持头像的裁剪及预览
实现方式:
1.tempalte中
<div class="img-box">
				<img v-if="avatarImgUrl" :src="avatarImgUrl" class="avatar" />
				<div class="text" @click="toFixImg()">修改头像</div>
			</div>
注意:用服务端做渲染的同学v-if="avatarImgUrl"必须添加,不然会因水合作用图片出现问题。
<el-dialog
			v-model="dialogVisible"
			title="修改图片"
			width="700"
			@close="cancelFixAvatar"
			:close-on-click-modal="false"
		>
			<input
				type="file"
				accept="image/*"
				@change="onFileChange"
				id="myFileInput"
				style="display: none"
				ref="fileInput"
			/>
			<!-- 触发文件选择的按钮 -->
			<button type="button" class="change-img" @click="triggerFileInput">
				选择图片
			</button>
			<!-- 图片裁剪区域 -->
			<div v-if="imageUrl" class="cropper-img">
				<vue-cropper
					:key="imageKey"
					ref="cropper"
					:src="imageUrl"
					style="width: 300px; height: 300px"
					:options="cropperOptions"
				/>
				<div @click="cropImage" class="confirm-btn">点击预览</div>
				<!-- 显示裁剪后的图片(可选) -->
				<div v-if="croppedImageUrl" class="cropped">
					<img
						:src="croppedImageUrl"
						alt="Cropped Image"
						style="width: 200px; height: 200px; border-radius: 50%"
					/>
				</div>
			</div>
			<template #footer>
				<div class="dialog-footer">
					<el-button @click="cancelFixAvatar">取消</el-button>
					<el-button type="primary" @click="fixAvatar"> 确定 </el-button>
				</div>
			</template>
		</el-dialog>
以上为点击修改头像出现的弹框,实现裁剪图片主要使用的是cropperjs插件,需先安装此插件。
npm install cropperjs --save2.script中
引入相关文件及定义变量
import 'cropperjs/dist/cropper.css';
import VueCropper from 'vue-cropperjs';

const dialogVisible = ref(false);
const avatarImgUrl = ref('');
const imageUrl = ref('');
const croppedImageUrl = ref('');
const cropperOptions = ref({
	aspectRatio: 1, // 设置裁剪框的比例
	viewMode: 1, // 限制图片的拖动范围
	// ...其他选项
});
const token = ref('');
const croppedImg = ref('');
const imageKey = ref(0); // 使用 key 来强制重新渲染
const cropper = ref(null);
定义使用的相关方法
// 点击"修改头像"
const toFixImg = () => {
	dialogVisible.value = true;
	nextTick(() => {
		document
			.getElementById('myFileInput')
			.addEventListener('change', onFileChange);
	});
};


// 监听上传的头像变化
const onFileChange = (e) => {
	const file = e.target.files[0];
	if (!file) return;
	const reader = new FileReader();
	reader.onload = (e) => {
		imageUrl.value = e.target.result;
		imageKey.value += 1;
	};
	reader.readAsDataURL(file);
};
// 再次点击"选择图片"替换
const triggerFileInput = () => {
	fileInput.value.click();
};
// 裁剪图片
const cropImage = () => {
	cropper.value.getCroppedCanvas().toBlob((blob) => {
		croppedImageUrl.value = URL.createObjectURL(blob);
		let file = new File([blob], 'test.png', { type: blob.type });
		// 这里添加将blob发送到服务器的逻辑,根据个人情况,此处调用的后端接口
		const formData = new FormData();
		formData.append('files', file);
		formData.append('folder', 'avatarArr');
		let uploadFileRequest = new Request(
			config.public.baseUrl +
				'xxxx',
			{
				method: 'post',
				headers: {
					Authorization: token.value,
				},
				body: formData,
			},
		);
		fetch(uploadFileRequest).then((response) => {
			let result = response.text();
			result.then((res) => {
				const resdata = JSON.parse(res);
				if (resdata.code == 200) {
					croppedImg.value = resdata.data[0].fileAddr;
				}
			});
		});
	}, 'image/jpeg');
};

// 修改头像弹框的确定按钮
const fixAvatar = () => {
	if (!croppedImg.value || croppedImg.value == '') {
		ElMessage({
			message: '请预览效果后点击保存',
			type: 'warning',
			customClass: 'mzindex',
		});
		return;
	}
// 此处调用后端提供的保存接口

};
// 修改弹框的取消按钮
const cancelFixAvatar = () => {
	imageUrl.value = '';
	croppedImageUrl.value = '';
	imageKey.value = 0;
	dialogVisible.value = false;
};


// 监听头像的改变
watch(
	() => store.fetchImage(),
	(newVal) => {
		if (newVal) {
			avatarImgUrl.value = `${config.public.baseUrl}/digit-trade-platform-system/file/${newVal}`;
		}
	},
	{ immediate: true },
	{ deep: true },
);
3.style中
.img-box {
			position: relative;
			display: inline-block;
			width: 100px; /* 或者你需要的大小 */
			height: 100px; /* 和宽度相同,形成圆形 */
			.avatar {
				width: 100%;
				height: 100%;
				object-fit: cover;
				border-radius: 50%;
				cursor: pointer;
			}
            .icon{
                position: absolute;
                bottom: 0;
                right: 0;
            }
			.text {
				position: absolute;
				bottom: 0; /* 文本定位在底部 */
				left: 50%; /* 水平居中 */
				width: 60%;
				padding: 5px 0;
				transform: translateX(-50%); /* 文本水平居中 */
				background-color: rgba(0, 0, 0, 0.5); /* 半透明背景 */
				color: white;
				text-align: center;
				border-radius: 0 0 50% 50% / 50%; /* 底部平直的圆角 */
				opacity: 0;
				transition: opacity 0.3s ease; /* 添加过渡效果 */
				font-size: 11px;
				cursor: pointer;
			}
			/* 鼠标悬浮在头像上时显示文本 */
			.avatar:hover + .text,
			.text:hover {
				opacity: 1; /* 鼠标悬浮时显示文本 */
			}
		}


.change-img {
		background-color: $mainColor; /* Green */
		border: none;
		color: white;
		text-align: center;
		text-decoration: none;
		display: inline-block;
		font-size: 16px;
		margin: 4px 2px;
		cursor: pointer;
		border-radius: 4px;
		width: 100px;
		height: 40px;
		line-height: 40px;
	}
	.cropper-img {
		width: 100%;
		margin: 20px 0;
		display: flex;
		.confirm-btn {
			margin: 140px 20px 0 20px;
			width: 100px;
			height: 36px;
			background-color: $mainColor;
			color: #fff;
			text-align: center;
			line-height: 36px;
			border-radius: 4px;
			cursor: pointer;
		}
		.cropped {
			margin-top: 60px;
		}
	}