文章目录
cell的复用
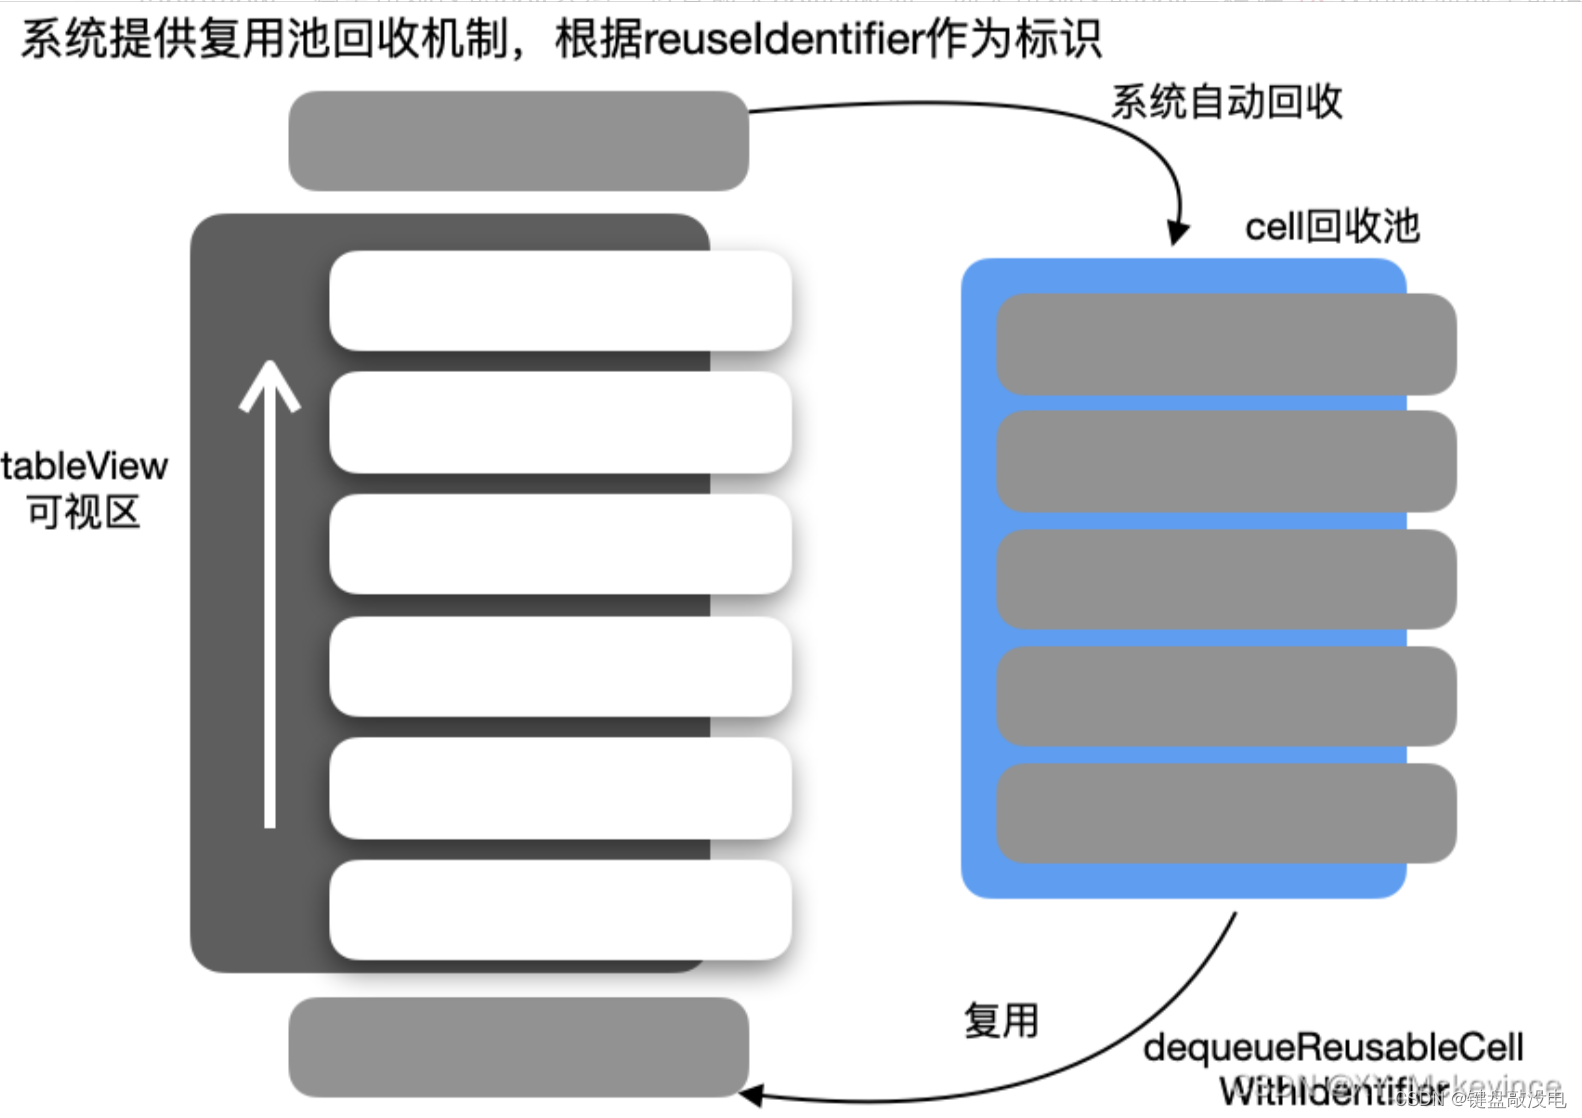
当用户滚动 UITableView 或 UICollectionView 时,只有少量可见的 cell 会被实际创建和显示。对于那些暂时不可见的 cell,系统会将它们缓存起来以备将来复用。这就是所谓的 cell 复用机制。
为什么需要cell的复用:
- 提高性能: 不需要为每个 cell 都创建一个新的实例,减少了创建 cell 的开销,从而提高了滚动的流畅度。
- 节省内存: 只维护少量可见 cell 的实例,而不是为整个数据集创建 cell,从而大大节省了内存使用。
- 简化代码: 通过复用 cell,我们只需要更新 cell 的内容,而不需要频繁地创建和销毁 cell 实例。
实现cell的复用有两种方法,一种是手动判空实现,一种是使用cell的注册机制
注册
- 注册单元格是在viewDidLoad中使用register(_:forCellReuseIdentifier:)方法来完成的
- 在创建cell的函数中使用dequeueReusableCellWithIdentifier获取可复用的cell。(如果没有可复用的cell,就自动利用注册cell时提供的类创建一个新的cell并返回)
示例程序:
objectivec
- (void)viewDidLoad
{
    [super viewDidLoad];

    // 使用代码自定义 Cell
    [self.tableView registerClass:[CustomCell class] forCellReuseIdentifier:@"id"];
}

- (UITableViewCell*)tableView:(UITableView *)tableView cellForRowAtIndexPath:(NSIndexPath *)indexPath {
    static NSString *strID = @"id";
    MyTableViewCell *cell = [self.tableView dequeueReusableCellWithIdentifier: strID];
    return cell;
}
非注册
- 非注册方法是直接通过实例化单元格对象,并在需要时手动创建和配置每个单元格
- 每次需要显示新的单元格时,都会实时创建新的单元格对象,不会尝试重用已存在的单元格
示例程序:
objectivec
- (UITableViewCell *)tableView:(UITableView *)tableView cellForRowAtIndexPath:(NSIndexPath *)indexPath
{
    static NSString *identifier = @"mycell";
    UITableViewCell *cell = [tableView dequeueReusableCellWithIdentifier:identifier];
    if (!cell) {
        cell = [[UITableViewCell alloc] initWithStyle:UITableViewCellStyleDefault reuseIdentifier:identifier];
    }
    return cell;
}
两者的区别
- 注册方法的代码更简洁,不需要手动检查 cell 是否为 nil,非注册方法需要更多的判断和创建新 cell 的代码。
- 注册方法在获取可复用 cell 时更高效,因为系统可以直接从复用池中获取,非注册方法需要手动检查 cell 是否为 nil,并在需要时创建新的 cell,会稍微慢一些。
自定义cell
自定义 cell 可以让你更好地控制 cell 的外观和行为,提高代码的可读性和可维护性。同时,合理的复用机制也可以显著提高滚动性能。
自定义cell的具体步骤:
- 创建自定义cell类
- 添加UI元素
- 实现初始化方法
- 设置cell的布局
- 在TableView中使用自定义cell
示例程序 :
**先自己创建一个MyCell类,继承于UITableViewCell类,在该类中定义自己将使用的控件,并规定他们的位置等信息
MyCell.h
objectivec
#import <UIKit/UIKit.h>

NS_ASSUME_NONNULL_BEGIN

@interface MyCell : UITableViewCell
@property UIButton* btn;
@property UILabel* label;
@property (nonatomic, strong) UISwitch* swt;
@end
MyCell.m
objectivec
#import "MyCell.h"

@implementation MyCell

-(instancetype)initWithStyle:(UITableViewCellStyle)style reuseIdentifier:(NSString *)reuseIdentifier
{
    self = [super initWithStyle:style reuseIdentifier:reuseIdentifier];
    if([self.reuseIdentifier isEqualToString:@"mycell"]) {
        _label = [[UILabel alloc] init];
        [self.contentView addSubview:_label];

        _swt = [[UISwitch alloc] init];


        _btn = [[UIButton alloc] init];
        [self.contentView addSubview:_btn];
    }
    return self;
}

-(void)layoutSubviews{
    _btn.frame = CGRectMake(0, 0, 50, 50);
    _label.frame = CGRectMake(60, 0, 100, 50);
}


@endViewContreller.m:
objectivec
#import "ViewController.h"
#import "MyCell.h"
@interface ViewController ()
@end
@implementation ViewController
- (void)viewDidLoad {
[super viewDidLoad];
// Do any additional setup after loading the view.
self.view.backgroundColor = [UIColor whiteColor];
self.tableView = [[UITableView alloc] initWithFrame:self.view.bounds style:UITableViewStylePlain];
[self.view addSubview: self.tableView];
self.tableView.dataSource = self;
self.tableView.delegate = self;
[self.tableView registerClass:[MyCell class] forCellReuseIdentifier:@"mycell"];
}
- (NSInteger)numberOfSectionsInTableView:(UITableView *)tableView
{
return 2;
}
- (NSInteger)tableView:(UITableView *)tableView numberOfRowsInSection:(NSInteger)section
{
return 4;
}
- (CGFloat)tableView:(UITableView *)tableView heightForRowAtIndexPath:(NSIndexPath *)indexPath
{
return 120;
}
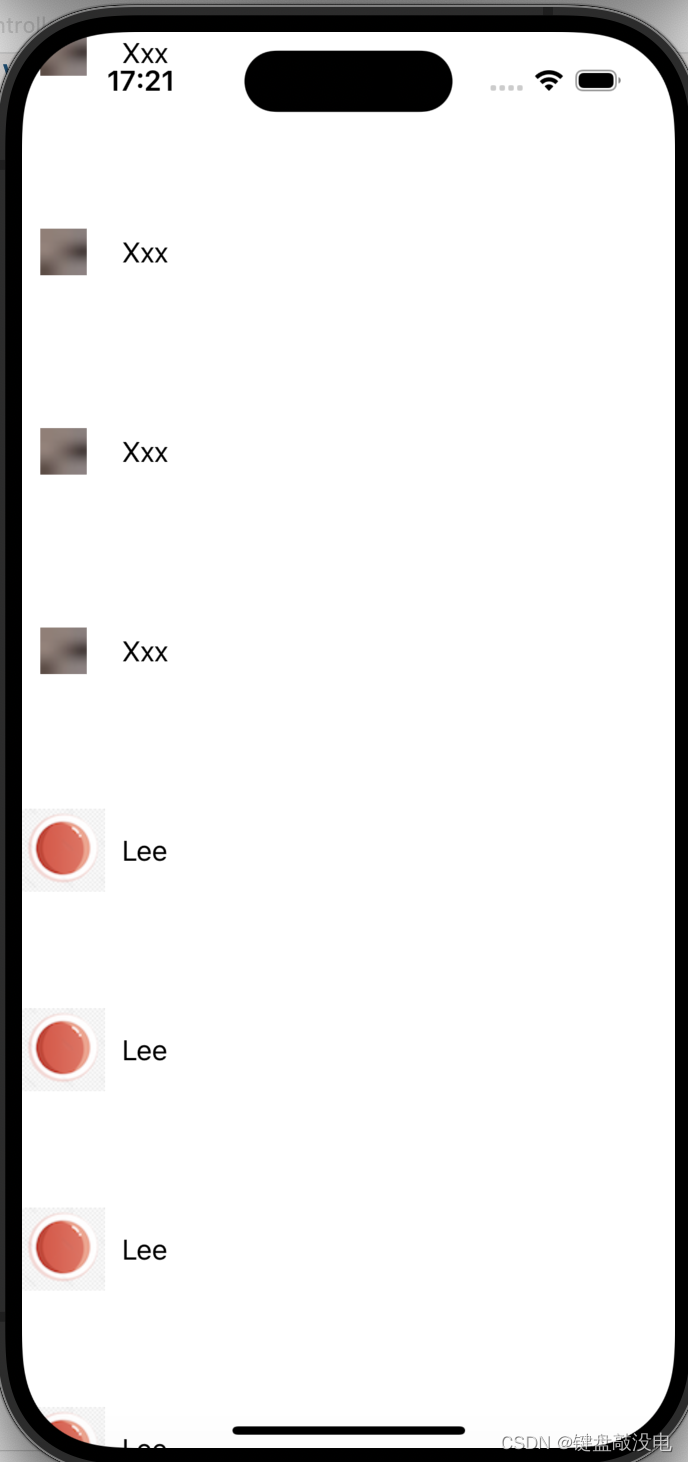
- (UITableViewCell *)tableView:(UITableView *)tableView cellForRowAtIndexPath:(NSIndexPath *)indexPath
{
MyCell* cell = [self.tableView dequeueReusableCellWithIdentifier:@"mycell" forIndexPath:indexPath];
if(indexPath.section == 1) {
cell.label.text = @"Lee";
[cell.btn setImage:[UIImage imageNamed:@"12.png"] forState:UIControlStateNormal];
} else {
cell.label.text = @"Xxx";
[cell.btn setImage:[UIImage imageNamed:@"im1.jpg"] forState:UIControlStateNormal];
}
return cell;
}
@end运行结果