目录
[a.pull request(实际工作中的合并)](#a.pull request(实际工作中的合并))
一Git初识
1现象
在工作中,你或许会遇到过:
你的老板对你说:小王啊,公司产品快要研发出来了,现在想让你制作出一份产品设计文档,设计得好升职加薪不会亏待你的!
你就很高兴地回到岗位上吭哧吭哧地完成老板交给的任务;
第二天拿着文档交给老板,老板看来后不是很满意:这样吧小王,你拿下去继续修改再拿给我看吧!于是你拿回文档继续吭哧吭哧地修改;
第三天信心满满地递交到老板面前,老板对着你说:还是有亿点没达到我的预期,你再好好改改吧;就这样,你的这份设计文档被你该了N遍,但还是没能让老板满意...
最后一次提交给老板,老板发话了:小王啊,我觉得你第一次拿给我的设计文档就很好,你把它拿给我吧!此刻你连刀了他的心都有了但有不好说什么就简单回了一句就回去找看看电脑上有没有第一次的文档...
那在这种情况中有没有什么办法来帮助我们来进行对不同版本进行保存呢??
2解决问题
为了能够更⽅便我们管理这些不同版本的⽂件,
便有了版本控制器:用来记录每次的修改以及版本迭代的一个管理系统
⽬前最主流的版本控制器就是:Git。Git可以控制电脑上所有格式的⽂件 ,例如doc、excel,dwg、dgn、rvt等等。而对于我们开发⼈员来说,Git最重要的就是可以帮助我们管理软件开发项⽬中的源代码⽂件 !
它不仅能够进行对不同版本的保存,也能对文件的修改信息做出追踪:
如文本文件:第10行新增单词"Git",删除单词"Windows"
而二进制文件(图片,视频)就无法进行追踪,只能把文件每次改动串起来(图片从100Kb该为120Kb)
二下载Git
Git是开放源代码的代码托管⼯具,最早是在Linux下开发的。开始也只能应⽤于Linux平台,后⾯慢慢的被移植到windows下,现在,Git可以在Linux、Unix、Mac和Windows这⼏⼤平台上正常运⾏..
1Linux-Centos
如果你的的平台是centos:
首先查看当前环境是否下载了Git:
zzj@localhost \~$ git --version
bash: /usr/bin/git: No such file or directory
出现像上⾯的结果,Linux会友好地告诉你Git没有安装。
安装Git:
zzj@localhost \~$ sudo yum -y install git
在进行查看:
zzj@localhost \~$ git --version
git version 1.8.3.1
出现上面的结果就说明git安装好了!
2Linux-Ubuntu
如果你的的平台是Ubuntu:
首先查看当前环境是否下载了Git:(以虚拟机为例)
zzj@localhost \~$ git --version
bash: git: command not found...
出现像上⾯的结果,Linux会友好地告诉你Git没有安装。
安装Git:
zzj@localhost \~$ sudo yum -y install git
如果是云服务器的话:sudo apt-get install git -y
三Git基本操作
1创建本地仓库
仓库是进⾏版本控制的⼀个**⽂件⽬录**。我们要想对⽂件进⾏版本控制,就必须先创建⼀个目录:
进入该目录,进行初始化为Git仓库:
zzj@localhost \~$ mkdir GitCode
zzj@localhost \~$ cd GitCode
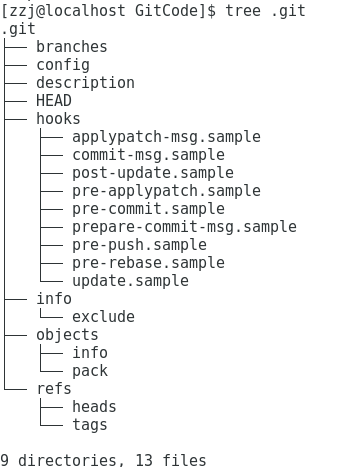
zzj@localhost GitCode$git init
Initialized empty Git repository in /home/zzj/GitCode/.git/
关于.git里面包含着很多文件,建议不要随意进行修改!!
2配置Git
初始化工作完成后,接下来要做的事情是设置**⽤⼾名称和e-mail地址**,这是⾮常重要的!!
zzj@localhost GitCode$ pwd
/home/zzj/GitCode #要在当前目录下执行
zzj@localhost GitCode$ git config user.name "Your Name"
zzj@localhost GitCode$ git config user.email "Your email"
zzj@localhost GitCode$ git config -l #查看配置情况
core.repositoryformatversion=0
core.filemode=true
core.bare=false
core.logallrefupdates=true
user.name=Your Name
user.email=Your email
一台机器可以创建多个仓库;如果要要把全部仓库都进行相同的设置:
在git config加上选项 --global
删除对应的配置:
zzj@localhost GitCode$ git config --unset user.name
zzj@localhost GitCode$ git config -l
core.repositoryformatversion=0
core.filemode=true
core.bare=false
core.logallrefupdates=true
user.email=Your email
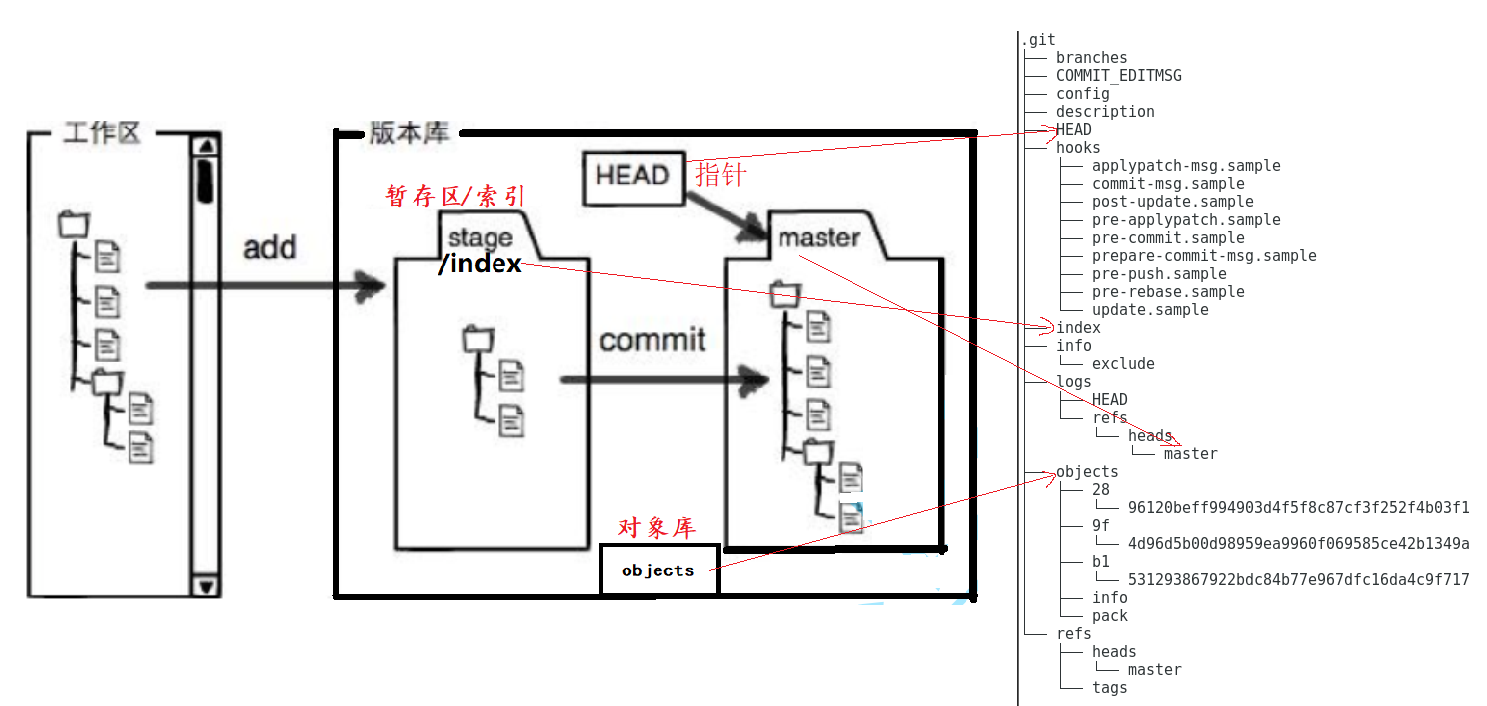
3两区一库
工作区:是电脑上你要写代码或⽂件的⽬录
暂存区/索引:存放在.git⽬录下的index⽂件;对工作区进行新增/修改/删除文件后,所有发生改动的文件通过某种手段暂时地放到暂存区中
版本库:⼯作区有⼀个隐藏⽬录.git ,它不算⼯作区,⽽是Git的版本库。
这个版本库⾥⾯的所有⽂件都被Git管理起来,每个⽂件的修改、删除,Git都能跟踪,以便任何时刻都可以追踪历史,或者在将来某个时刻可以"还原"!
有了这三个概念:我们才能知道新建文件到Git仓库时不能称之为向仓库新增文件,只是向工作区新增文件而已,还要在通过某种手段才能真正向Git仓库提交文件!!
4提交文件
现在工作区(当前目录)中创建file1,file2文件,在两个文件中写上:Hello Git(只有有内容就行)
zzj@localhost GitCode$ touch file1 file2
zzj@localhost GitCode$ vim file1
zzj@localhost GitCode$ vim file2
zzj@localhost GitCode$ cat file1
Hello Git
zzj@localhost GitCode$ cat file2
Hello Git
将(改动的)文件从工作区添加到暂存区中:
zzj@localhost GitCode$ git add file1 #git add file1 file2...
zzj@localhost GitCode$ git add . #添加当前所有的文件
将暂存区的文件添加到本地仓库中:
zzj@localhost GitCode$ git commit -m "First commit"
master (root-commit) 2896120 First commit Files
2 files changed, 2 insertions(+)
create mode 100644 file1
create mode 100644 file2
注意 git commit 后⾯的 -m 选项,要跟上描述本次提交的message,由⽤⼾⾃⼰完成,这部分内容绝对不能省略,并要好好描述,是⽤来记录你的提交细节,是给别人看的!!
提交之后我们应该进行提交历史查看:
zzj@localhost GitCode$ git log --pretty=oneline
2896120beff994903d4f5f8c87cf3f252f4b03f1 First commit Files
5对比
有了提交后,再来把.git与两区一库对比:
6master分支
commit后的会把文件添加到master分支下被git进行管理,那master分支里有什么呢??
zzj@localhost GitCode$ cat .git/refs/heads/master
2896120beff994903d4f5f8c87cf3f252f4b03f1
zzj@localhost GitCode$ git cat-file -p 2896120beff994903d4f5f8c87cf3f252f4b03f1
tree b1531293867922bdc84b77e967dfc16da4c9f717 #是什么?
author zzj <2909678831@qq.com> 1719034374 +0800 #提交者name和email
committer zzj <2909678831@qq.com> 1719034374 +0800
First commit Files #commit的细节
zzj@localhost GitCode$ git cat-file -p b1531293867922bdc84b77e967dfc16da4c9f717
100644 blob 9f4d96d5b00d98959ea9960f069585ce42b1349a file1 #提交的文件
100644 blob 9f4d96d5b00d98959ea9960f069585ce42b1349a file2 #提交的文件
zzj@localhost GitCode$ git cat-file -p 9f4d96d5b00d98959ea9960f069585ce42b1349a
Hello Git #文件改动的描述
zzj@localhost GitCode$ git cat-file -p 9f4d96d5b00d98959ea9960f069585ce42b1349a
Hello Git #文件改动的描述
答案是:放着我们最近一次提交的各种细节信息
四修改文件
Git⽐其他版本控制系统设计得优秀,因为Git跟踪并管理的是修改,⽽⾮⽂件!
什么是修改? 新增,删除(文件信息)(文件)都算是修改
让我们对file1进行一次新增:
zzj@localhost GitCode$ vim file1
zzj@localhost GitCode$ cat file1
Hello Git
Hello Warld#新增一行zzj@localhost GitCode$ git status #查看当前状态
On branch master
Changes not staged for commit:
(use "git add <file>..." to update what will be committed)
(use "git checkout -- <file>..." to discard changes in working directory)
modified: file1
no changes added to commit (use "git add" and/or "git commit -a")
zzj@localhost GitCode$ git differ file1 #工作区与暂存区文件的区别
git: 'differ' is not a git command. See 'git --help'.
Did you mean this?
diff-tree
zzj@localhost GitCode$ git diff file1
diff --git a/file1 b/file1
index 9f4d96d..b3f65d4 100644
--- a/file1
+++ b/file1
@@ -1 +1,2 @@
Hello Git
+Hello Warld
zzj@localhost GitCode$ git diff HEAD -- file1 #工作区与版本库文件的区别
diff --git a/file1 b/file1
index 9f4d96d..b3f65d4 100644
--- a/file1
+++ b/file1
@@ -1 +1,2 @@
Hello Git
+Hello Warld
zzj@localhost GitCode$ git add file1
zzj@localhost GitCode$ git status
On branch master
Changes to be committed:
(use "git reset HEAD <file>..." to unstage)
modified: file1
zzj@localhost GitCode$ git commit -m "Modify file1"
master cc1b155 Modify file1
1 file changed, 1 insertion(+)
zzj@localhost GitCode$ git status
On branch master
nothing to commit, working directory clean
五版本回退
如果有⼀天你发现之前的⼯作做的出现了很⼤的问题,需要在某个特定的历史版本重新开始,这个时候,就需要版本回退的功能了。
执行版本回退的指令:git reset
语法格式为: git reset --soft \| --mixed \| --hard HEAD
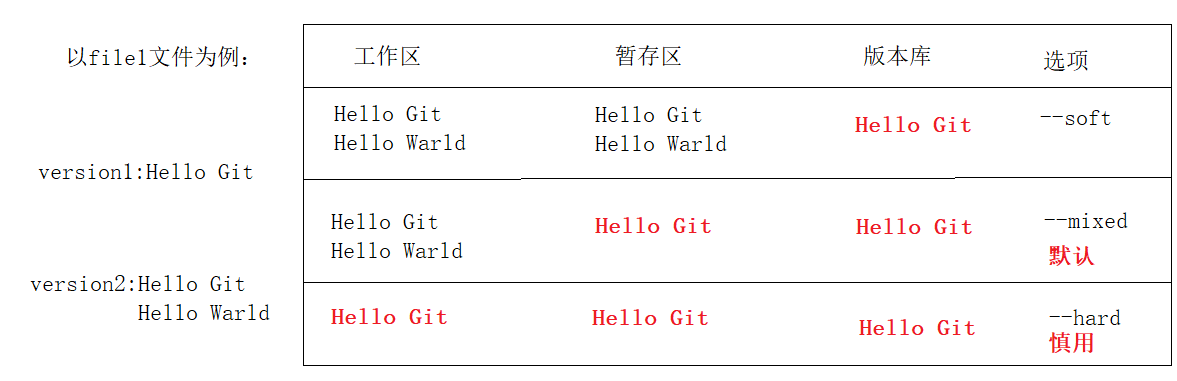
HEAD 说明:
◦ 可直接写成:commit id,表⽰指定退回的版本
◦ HEAD:表⽰当前版本;
◦ HEAD^:表示上⼀个版本
◦ HEAD^^:表示上上⼀个版本
◦ 以此类推...
• 可以使⽤〜数字表⽰:
◦ HEAD~0:表示当前版本
◦ HEAD~1:表示上⼀个版本
◦ 以此类推...
用--head进行测试:
zzj@localhost GitCode$ cat file1
Hello Git
Hello Warldzzj@localhost GitCode$ git log --pretty=oneline
cc1b1553db57caa054c97b0443849a534bcf6b79 Modify file1
2896120beff994903d4f5f8c87cf3f252f4b03f1 First commit Fileszzj@localhost GitCode$ git reset --hard2896120beff994903d4f5f8c87cf3f252f4b03f1
HEAD is now at 2896120 First commit Files
zzj@localhost GitCode$ cat file1
Hello Gitzzj@localhost GitCode$ git log --pretty=oneline #后悔了要返回到上次的版本
2896120beff994903d4f5f8c87cf3f252f4b03f1 First commit Files
#虽然没了HEAD但有上次的查询痕迹
zzj@localhost GitCode$ git reset --hard cc1b1553db57caa054c97b0443849a534bcf6b79
HEAD is now at cc1b155 Modify file1
zzj@localhost GitCode$ cat file1 #有后悔药吃!!
Hello Git
Hello Warldzzj@localhost GitCode$ git reflog #另一种方式查HEAD
2896120 HEAD@{0}: reset: moving to 2896120beff994903d4f5f8c87cf3f252f4b03f1
cc1b155 HEAD@{1}: reset: moving to cc1b1553db57caa054c97b0443849a534bcf6b79
2896120 HEAD@{2}: reset: moving to 2896120beff994903d4f5f8c87cf3f252f4b03f1
cc1b155 HEAD@{3}: commit: Modify file1
2896120 HEAD@{4}: commit (initial): First commit Files
zzj@localhost GitCode$ git reset --hard 2896120 #可以用部分的HEAD
HEAD is now at 2896120 First commit Files
zzj@localhost GitCode$ cat file1
Hello Git
六撤销的三种情况
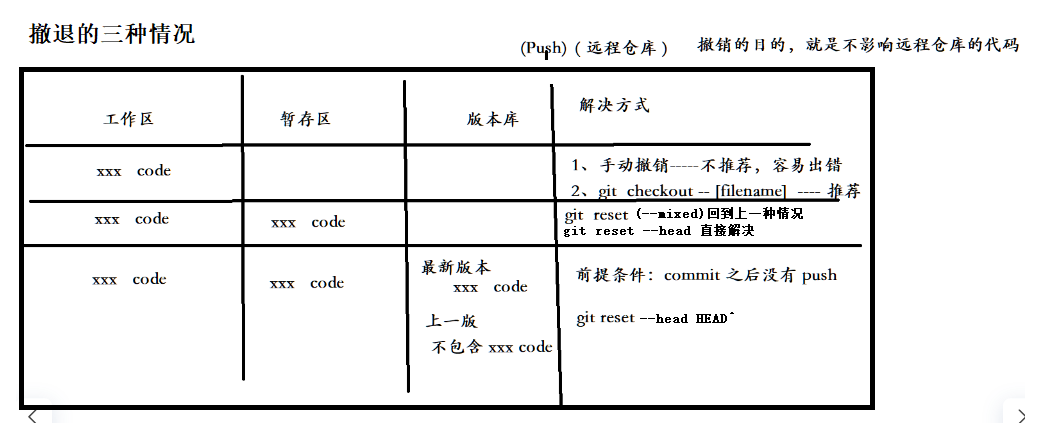
第一种情况:
zzj@localhost GitCode$ cat file1
Hello Git
Hello Warld
zzj@localhost GitCode$ vim file1
zzj@localhost GitCode$ cat file1
Hello Git
Hello Warld
xxx Codezzj@localhost GitCode$ git status
On branch master
Changes not staged for commit:
(use "git add <file>..." to update what will be committed)
(use "git checkout -- <file>..." to discard changes in working directory)
modified: file1
no changes added to commit (use "git add" and/or "git commit -a") #只在工作区进行了修改
zzj@localhost GitCode$ git checkout -- file1
zzj@localhost GitCode$ cat file1
Hello Git
Hello Warld
zzj@localhost GitCode$ git status
On branch master
nothing to commit, working directory clean
第二种情况:
zzj@localhost GitCode$ cat file1
Hello Git
Hello Warld
zzj@localhost GitCode$ vim file1
zzj@localhost GitCode$ cat file1
Hello Git
Hello Warld
xxx Codezzj@localhost GitCode$ git add . #工作区与暂存区都进行了修改
zzj@localhost GitCode$ git reset --mixed HEAD file1 #回退到第一种情况
warning: --mixed with paths is deprecated; use 'git reset -- <paths>' instead.
Unstaged changes after reset:
M file1
zzj@localhost GitCode$ git status
On branch master
Changes not staged for commit:
(use "git add <file>..." to update what will be committed)
(use "git checkout -- <file>..." to discard changes in working directory)
modified: file1
no changes added to commit (use "git add" and/or "git commit -a") #只有在工作区有修改
zzj@localhost GitCode$ git checkout -- file1
zzj@localhost GitCode$ cat file1
Hello Git
Hello Warld
zzj@localhost GitCode$ git status
On branch master
nothing to commit, working directory clean
或者使用--head直接进行对暂存区和工作区进行与版本库进行'同步'(实现删除新增代码):
zzj@localhost GitCode$ git reset --hard HEAD
HEAD is now at cc1b155 Modify file1
zzj@localhost GitCode$ cat file1
Hello Git
Hello Warld
zzj@localhost GitCode$ git status
On branch master
nothing to commit, working directory clean
第三种情况:
zzj@localhost GitCode$ cat file1
Hello Git
Hello Warld
xxx Code
zzj@localhost GitCode$ git add .
zzj@localhost GitCode$ git commit -m "Modify file1"
master 0544cc0 Modify file1
1 file changed, 1 insertion(+)
zzj@localhost GitCode$ git reset --hard HEAD^ #版本回退
HEAD is now at cc1b155 Modify file1
zzj@localhost GitCode$ cat file1
Hello Git
Hello Warld
zzj@localhost GitCode$ git status
On branch master
nothing to commit, working directory clean
七删除文件
如果我们想对文件进行删除,怎么办呢??
zzj@localhost GitCode$ git rm -f file2 #rm 和add合成一步
rm 'file2'
zzj@localhost GitCode$ git commit -m "delete file2"
master 30f4853 delete file2
1 file changed, 1 deletion(-)
delete mode 100644 file2
zzj@localhost GitCode$ git status
On branch master
nothing to commit, working directory clean
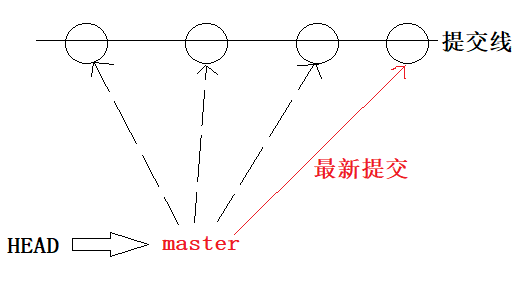
八分支管理
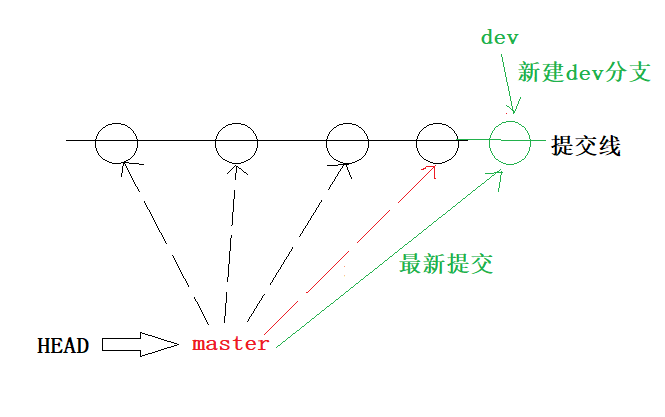
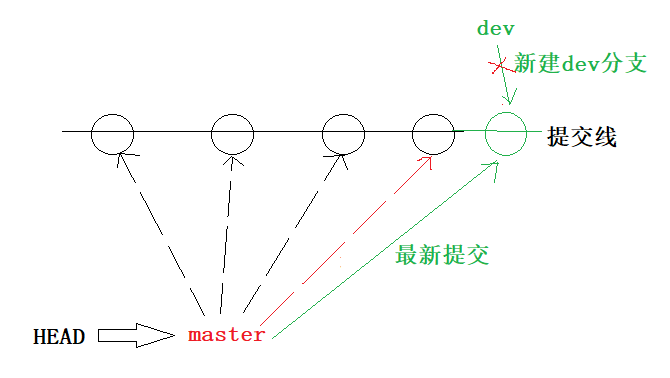
在版本回退⾥,你已经知道,每次提交,Git都把它们串成⼀条时间线,这条时间线就可以理解为是⼀个分⽀。截⽌到⽬前,只有⼀条时间线,在Git⾥,这个分⽀叫主分⽀,即:master分⽀。
再来理解⼀下HEAD,HEAD严格来说不是指向提交,⽽是指向master,master才是指向提交的,所以HEAD指向的就是当前分⽀。
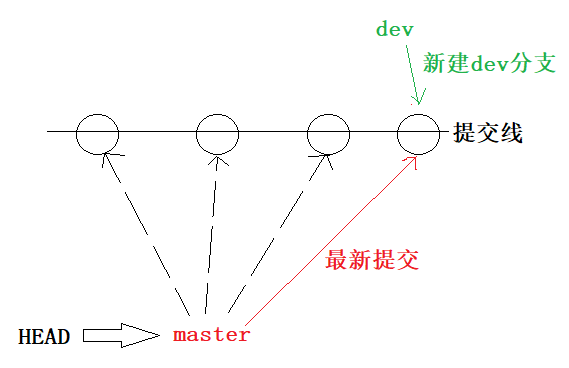
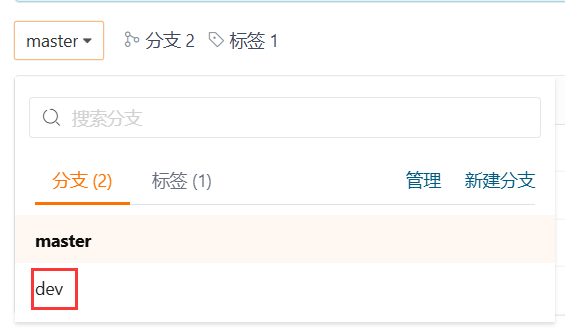
1新建分支
zzj@localhost GitCode$ git branch dev #新建分支
zzj@localhost GitCode$ git branch
dev
* master
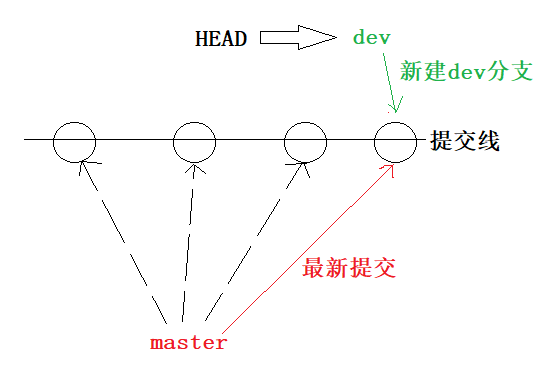
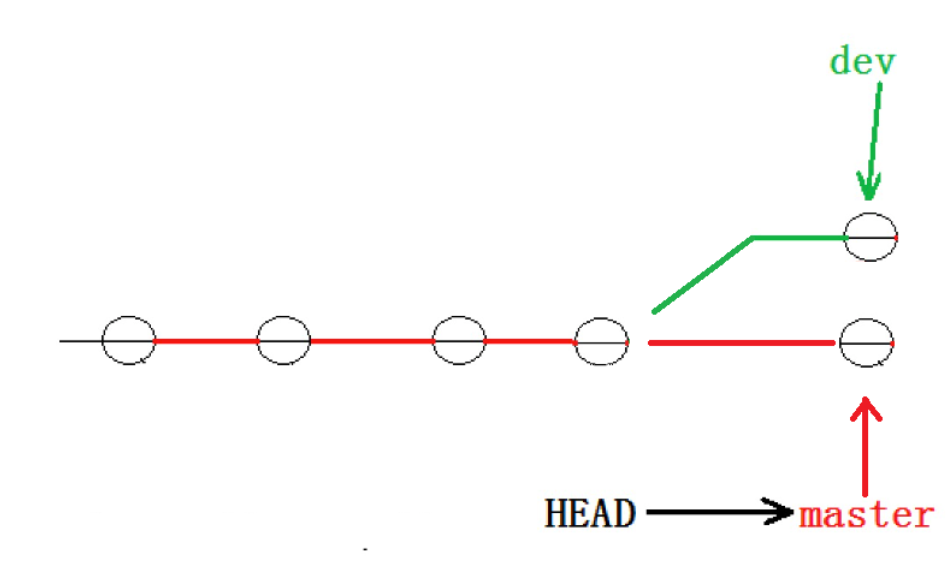
zzj@localhost GitCode$ git checkout dev #切换分支
Switched to branch 'dev'
zzj@localhost GitCode$ git branch
* dev
master
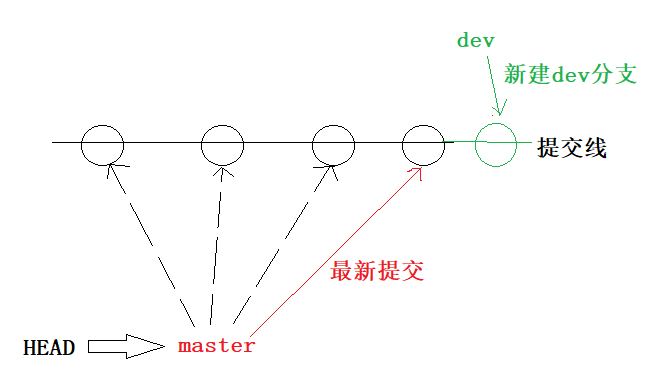
zzj@localhost GitCode$ vim file1
zzj@localhost GitCode$ cat file1
Hello Git
Hello Warld
Git On Devzzj@localhostGitCode$ git add .
zzj@localhost GitCode$ git commit -m "Modify file1"
dev 6919237 Modify file1
1 file changed, 1 insertion(+)
zzj@localhost GitCode$ git branch #以上操作是我在dev分支下进行的
* dev
master
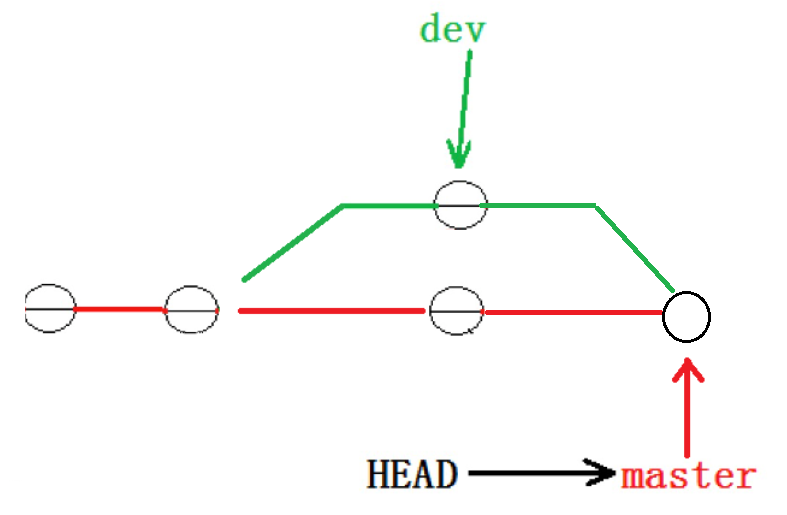
zzj@localhost GitCode$ git checkout master #切换到master分支
Switched to branch 'master'
zzj@localhost GitCode$ cat file1 #master分支下的file1文件是不受影响的
Hello Git
Hello Warld
zzj@localhost GitCode$ git branch #要在master分支下进行合并!
dev
* master
zzj@localhost GitCode$ git merge dev #在master分支下将dev分支进行合并
Updating cc1b155..6919237
Fast-forward
file1 | 1 +
1 file changed, 1 insertion(+)
zzj@localhost GitCode$ cat file1
Hello Git
Hello Warld
Git On Dev
2删除分支
zzj@localhost GitCode$ git branch #不能在要删除的分支下删除该分支
dev
* master
zzj@localhost GitCode$ git branch -d dev #删除dev分支
Deleted branch dev (was 6919237).
zzj@localhost GitCode$ git branch
* master
3分支冲突
可是,在实际分⽀合并的时候,并不是想合并就能合并成功的,有时候可能会遇到代码冲突的问题
zzj@localhost GitCode$ git checkout -b dev #新增分支后跳转到该分支
Switched to a new branch 'dev'
zzj@localhost GitCode$ vim file #对file进行修改
zzj@localhost GitCode$ cat file
Hello Git
Git On Dev
zzj@localhost GitCode$ git add .
zzj@localhost GitCode$ git commit -m "Add Some Wold On File" #提交
dev e90cf3c Add Some Wold On File
1 file changed, 1 insertion(+)
zzj@localhost GitCode$ git checkout master #切换到master分支
Switched to branch 'master'
zzj@localhost GitCode$ vim file #进行修改
zzj@localhost GitCode$ cat file
Hello Git
Git On Master
zzj@localhost GitCode$ git add .
zzj@localhost GitCode$ git commit -m "Add Some World On File" #进行提交
master c38c51b Add Some World On File
1 file changed, 1 insertion(+)
zzj@localhost GitCode$ git merge dev #进行分支合并
Auto-merging file
CONFLICT (content): Merge conflict in file
Automatic merge failed; fix conflicts and then commit the result.
zzj@localhost GitCode$ cat file
Hello Git
<<<<<<< HEAD 以下是master分支的内容
Git On Master
======= #分割线
Git On Dev 以下是dev分支的内容
>>>>>>> devzzj@localhost GitCode$ vim file #分支冲突要手动解决
zzj@localhost GitCode$ cat file
Hello Git
Git On Devzzj@localhost GitCode$ git add . #再进行提交
zzj@localhost GitCode$ git commit -m "Solove Merge Conflicts"
master 9669186 Solove Merge Conflicts
zzj@localhost GitCode$ git log --graph --pretty=oneline --abbrev-commit #打印现象
* 9669186 (HEAD -> master) Solove Merge Conflicts #进行提示
|\
| * e90cf3c Add Some Wold On File
* | c38c51b Add Some World On File
|/
* 0bd03ab Modify file
zzj@localhost GitCode$ git branch -d dev #使用完要记得删除
Deleted branch dev (was e90cf3c).
4分支模式
在新建分支中:进行合并分支不会出现分支冲突(git默认采用Fast Forward模式)
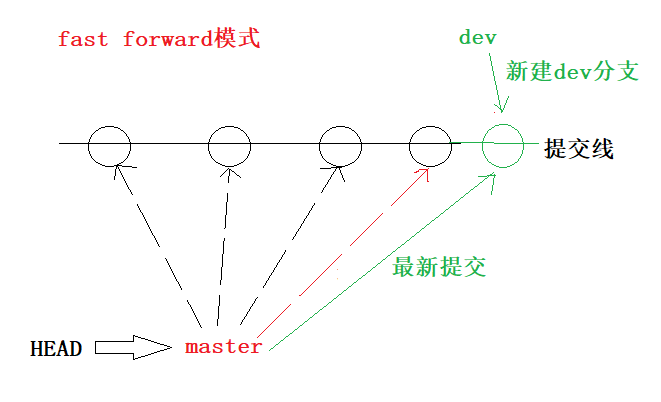
在这种 Fast Forward 模式下,删除分⽀后,查看分⽀历史时,会丢掉分⽀信息,看不出来最新提交到底是merge进来的还是正常提交的!!
如果是正常合并但又不想要Fast Forward模式时:git merge**--no-ff****-m "描述"** 要合并的分支名

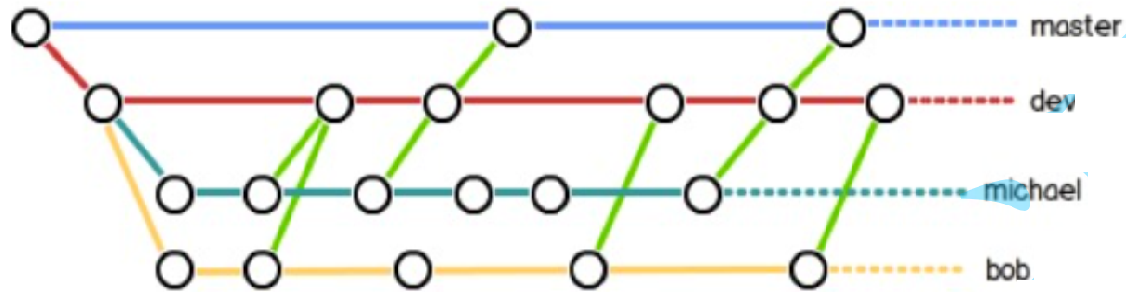
5分支原则
在实际开发中,我们应该按照⼏个基本原则进⾏分⽀管理:
⾸先,master分⽀应该是⾮常稳定的,也就是仅⽤来发布新版本,平时不能在上⾯⼲活;
⼲活都在dev分⽀上:到某个时候,⽐如1.0版本发布时,再把dev分⽀合并到master上,在master分⽀发布1.0版本;
你和你的⼩伙伴们每个⼈都在dev分⽀上⼲活,每个⼈都有⾃⼰的分支:
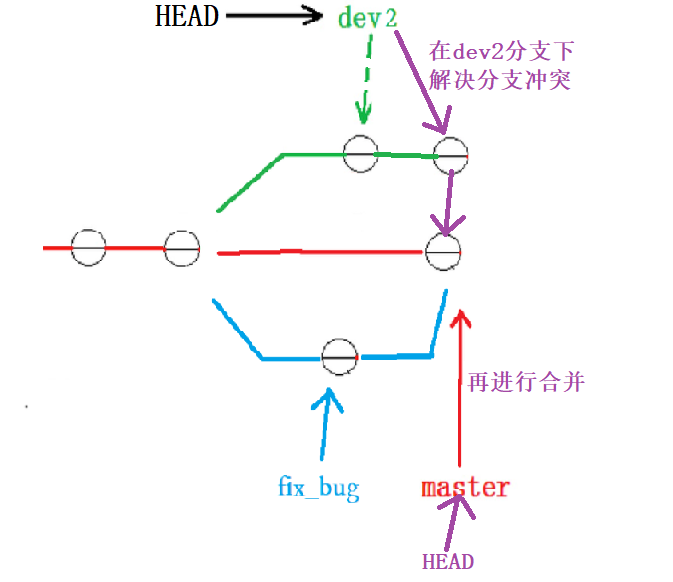
6bug分支
假如我们现在正在dev2分⽀上进⾏开发,开发到⼀半突然发现 master 分⽀上⾯有bug要解决:
在Git中,每个bug都可以通过**⼀个新的临时分⽀**来修复,修复后合并分⽀,然后将临时分⽀删除。
zzj@localhost GitCode$ cat Code
Hello Git
This is a bug!zzj@localhost GitCode$ git checkout -b dev2
Switched to a new branch 'dev2'
zzj@localhost GitCode$ vim Code
zzj@localhost GitCode$ cat Code
Hello Git
This is a bug!
I am writing code...zzj@localhost GitCode$ git checkout master
M CodeSwitched to branch 'master'
zzj@localhost GitCode$ cat Code
Hello Git
This is a bug!
I am writing code... #当前master分支工作区内容被修改了!!zzj@localhost GitCode$ git checkout dev2
M Code
Switched to branch 'dev2'
zzj@localhost GitCode$ git stash #在refs目录下创建stash储存修改的内容
Saved working directory and index state WIP on dev2: 2c8a313 Add World On Code
HEAD is now at 2c8a313 Add World On Code
zzj@localhost GitCode$ git stash list #查看stash内容
stash@{0}: WIP on dev2: 2c8a313 Add World On Code
zzj@localhost GitCode$ git checkout master
Switched to branch 'master'
zzj@localhost GitCode$ cat Code
Hello Git
This is a bug!zzj@localhost GitCode$ git checkout -b fix_bug #创建分支修改master的bug
Switched to a new branch 'fix_bug'
zzj@localhost GitCode$ vim Code
zzj@localhost GitCode$ cat Code
Hello Git
zzj@localhost GitCode$ git add .
zzj@localhost GitCode$ git commit -m "Solove Bug" #修改完内容进行提交
fix_bug 409ecc4 Solove Bug
1 file changed, 1 deletion(-)
zzj@localhost GitCode$ git checkout master
Switched to branch 'master'
zzj@localhost GitCode$ git merge fix_bug #切换为master分支进行合并
Updating 2c8a313..409ecc4
Fast-forward
Code | 1 -
1 file changed, 1 deletion(-)
zzj@localhost GitCode$ cat Code
Hello Gitzzj@localhost GitCode$ git checkout dev2
Switched to branch 'dev2'
zzj@localhost GitCode$ cat Code
Hello Git
This is a bug! #在开发中bug没解决

zzj@localhost GitCode$ git stash pop #进行开发到一半内容的恢复
On branch dev2
Changes not staged for commit:
(use "git add <file>..." to update what will be committed)
(use "git checkout -- <file>..." to discard changes in working directory)
modified: Code
no changes added to commit (use "git add" and/or "git commit -a")
Dropped refs/stash@{0} (0f73eaf03fce822b69e7e695ffdb80bf8e254133)
zzj@localhost GitCode$ cat Code
Hello Git
This is a bug!
I am writing code...
zzj@localhost GitCode$ vim Code
zzj@localhost GitCode$ cat Code #开发完成!!
Hello Git
This is a bug!
I am writing code..
Done!!
zzj@localhost GitCode$ git add .
zzj@localhost GitCode$ git commit -m "Finish Code" #先进行提交
dev2 fb112f6 Finish Code
1 file changed, 2 insertions(+)
zzj@localhost GitCode$ git merge master #开发完成注意先在dev2分支进行合并
Auto-merging Code
CONFLICT (content): Merge conflict in Code
Automatic merge failed; fix conflicts and then commit the result.
zzj@localhost GitCode$ cat Code
Hello Git
<<<<<<< HEAD
This is a bug!
I am writing code..
Done!!
=======
>>>>>>> master
zzj@localhost GitCode$ vim Code #进行分支冲突解决(测试)
zzj@localhost GitCode$ cat Code
Hello Git
I am writing code..
Done!!zzj@localhost GitCode$git add .
zzj@localhost GitCode$ git commit -m "Solove Conflicts" #测试完后再提交
dev2 ddf582b Solove Conflicts
zzj@localhost GitCode$ git checkout master
Switched to branch 'master'
zzj@localhost GitCode$ git merge dev2 #最后跳到master分支进行合并
Updating 409ecc4..ddf582b
Fast-forward
Code | 2 ++
1 file changed, 2 insertions(+)
zzj@localhost GitCode$ cat Code #完美!!
Hello Git
I am writing code..
Done!!zzj@localhost GitCode$ git branch
dev2
fix_bug
* master
zzj@localhost GitCode$ git branch -d dev2 fix_bug #最后别忘了要进行删除分支!
Deleted branch dev2 (was ddf582b).
Deleted branch fix_bug (was 409ecc4).
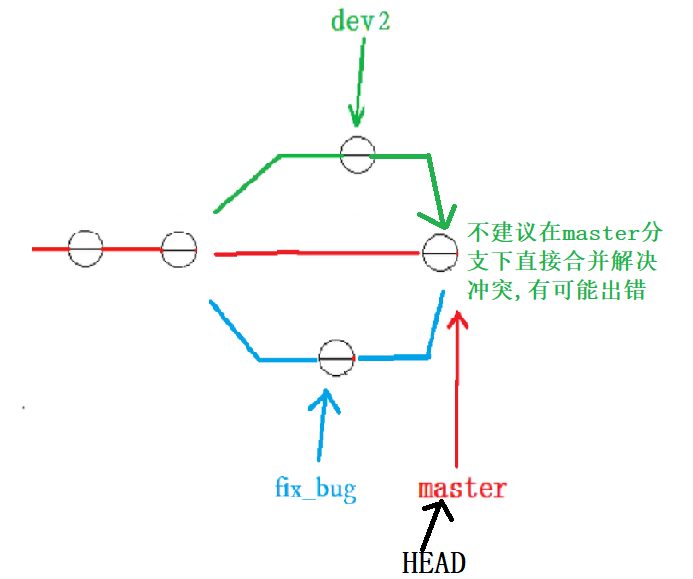
非常不建议在dev2开发完成后自己在master分支进行合并!!(保证master分支是稳定的)
如果这样做,较容易出现新的bug!!
7删除临时分支
在进行开发时,我们通常是要创建临时分支进行开发的(为了主分支的稳定安全)
但有可能开发完某个功能要进行合并时:突然你的产品经理跟你说:我们要取消这个功能
虽然有点白干了,但又为了不影响多分支的干扰,决定来进行删除临时分支:
zzj@localhost GitCode$ git checkout -b dev
Switched to a new branch 'dev'
zzj@localhost GitCode$ vim Code
zzj@localhost GitCode$ cat Code
Hello Git
I am writing code..
Done!!
I'm implementing a function #增加新功能并进行提交zzj@localhost GitCode$ git add .
zzj@localhost GitCode$git commit -m "Add a function"
dev 398931e Add a function
1 file changed, 1 insertion(+)
zzj@localhost GitCode$ git checkout master
Switched to branch 'master'
zzj@localhost GitCode$ git branch -d dev
error: The branch 'dev' is not fully merged.
If you are sure you want to delete it, run 'git branch -D dev'.
zzj@localhost GitCode$ git branch -D dev #这个功能不要了!!
Deleted branch dev (was 398931e).
zzj@localhost GitCode$ git branch
* master
九远程操作
我们⽬前所说的所有内容(⼯作区,暂存区,版本库等等),都是在本地!也就是在你的笔记本或者计算机上。⽽我们的Git其实是分布式版本控制系统!
我们每个⼈的电脑上都是⼀个完整的版本库,这样⼯作的时候,就不需要联⽹了。
那多个⼈如何协作呢?
⽐⽅说你在⾃⼰电脑上改了⽂件A,你的同事也在他的电脑上改了⽂件A;
这时,你们俩之间只需把各⾃的修改推送给对⽅,就可以互相看到对⽅的修改了
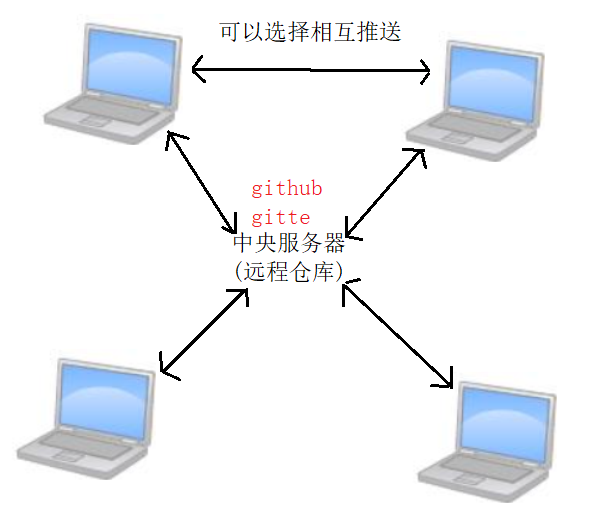
但两个人之间的相互推送极有可能出现问题(电脑问题,网络问题...)
Git是分布式版本控制系统,同⼀个Git仓库可以分布到不同的机器上:我们可以继续搭建运行git服务器来,让全部人的都推送到这里;想知道其他人的修改就继续仓库克隆就行!!
但这个工作目前对我们来说为时过早(搭建服务器)也并不需要做!
这个世界上有个叫GitHub的神奇的⽹站,提供Git仓库托管服务
GitHub是国外的⽹站,速度⽐较慢,我们可以使用国内的Gitee来平替它!!
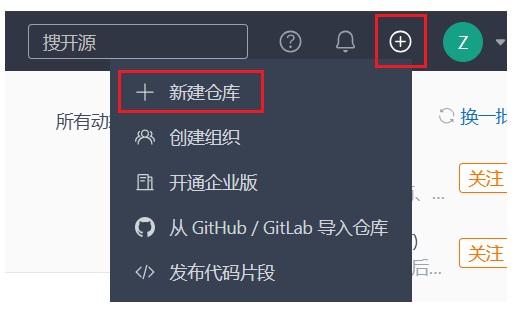
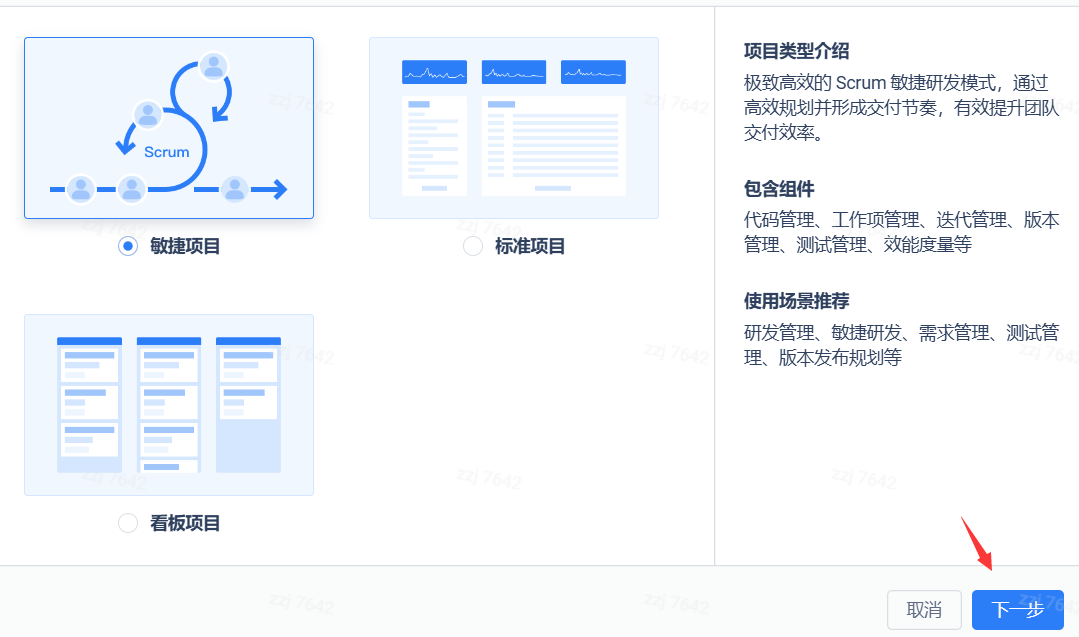
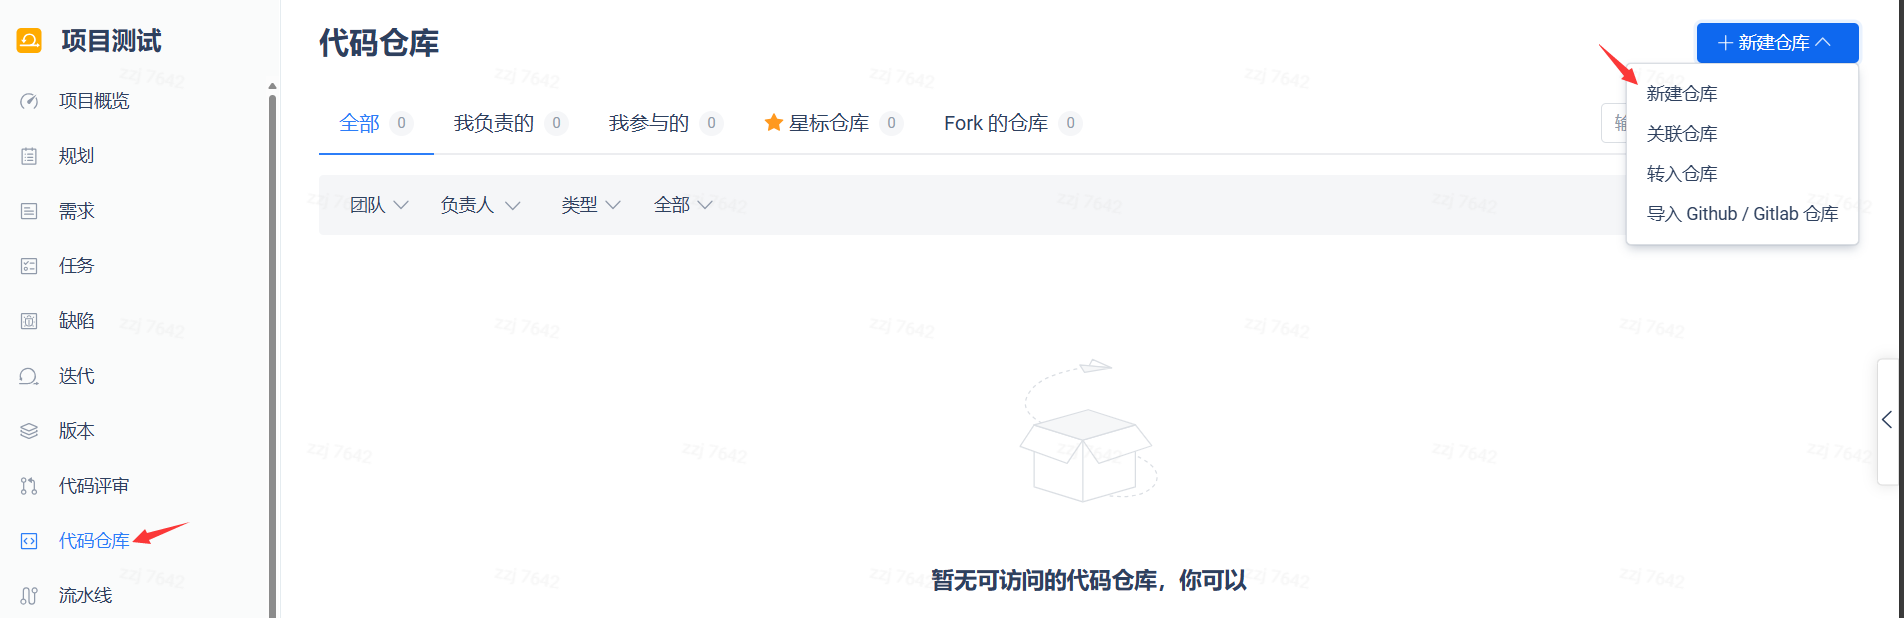
1新建
新建远程项目仓库
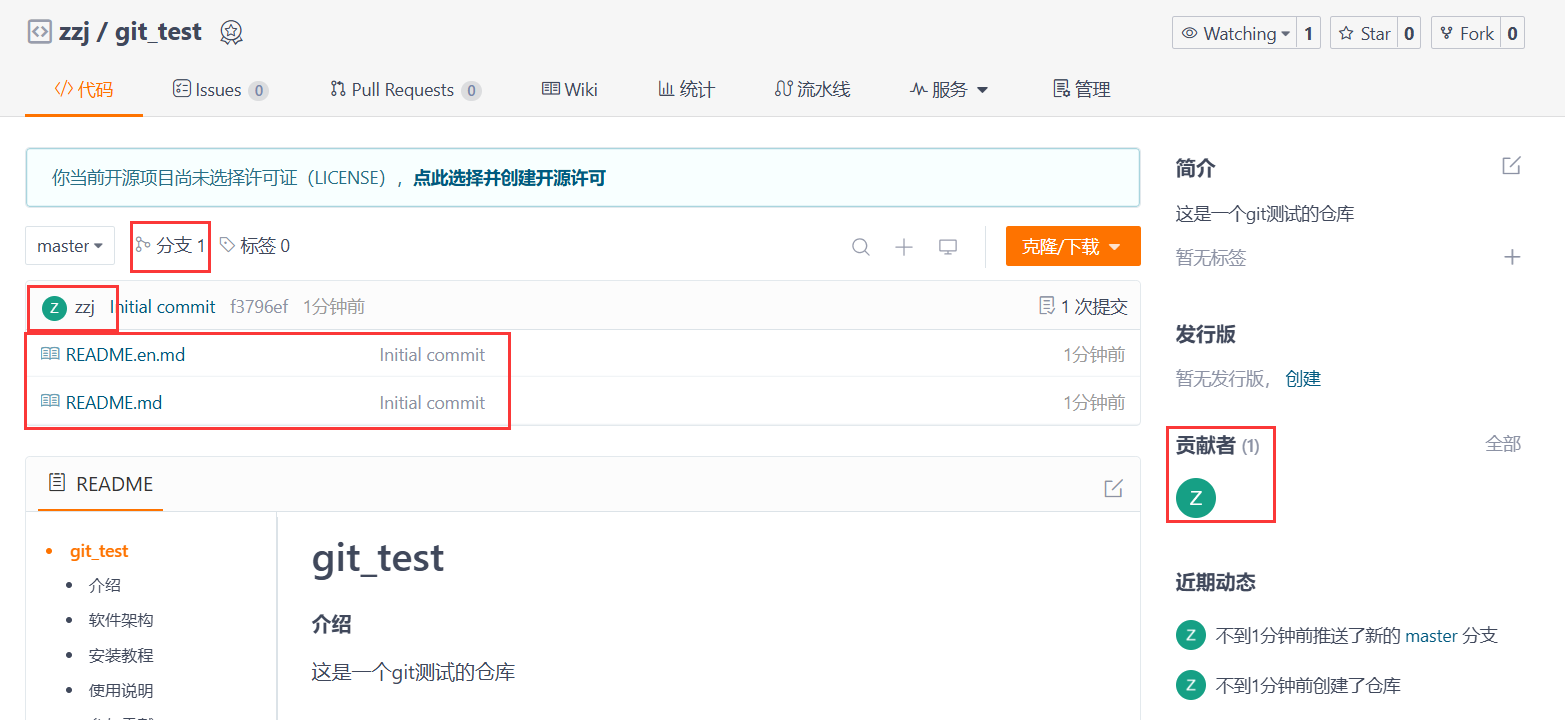
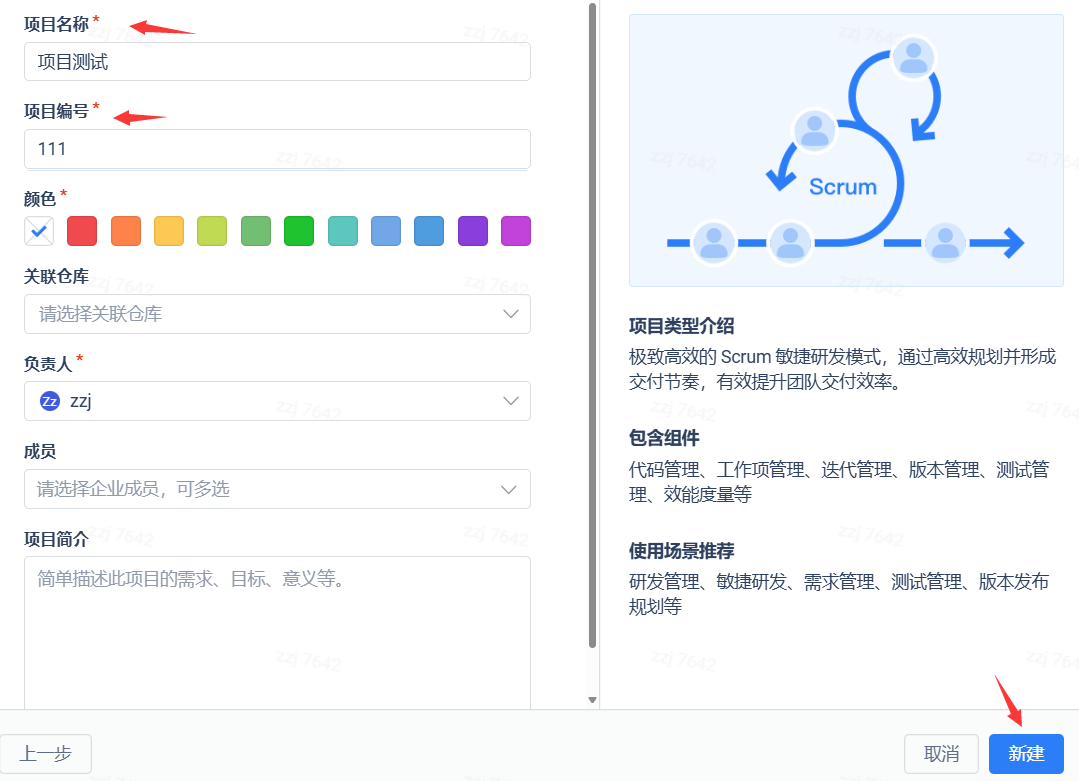
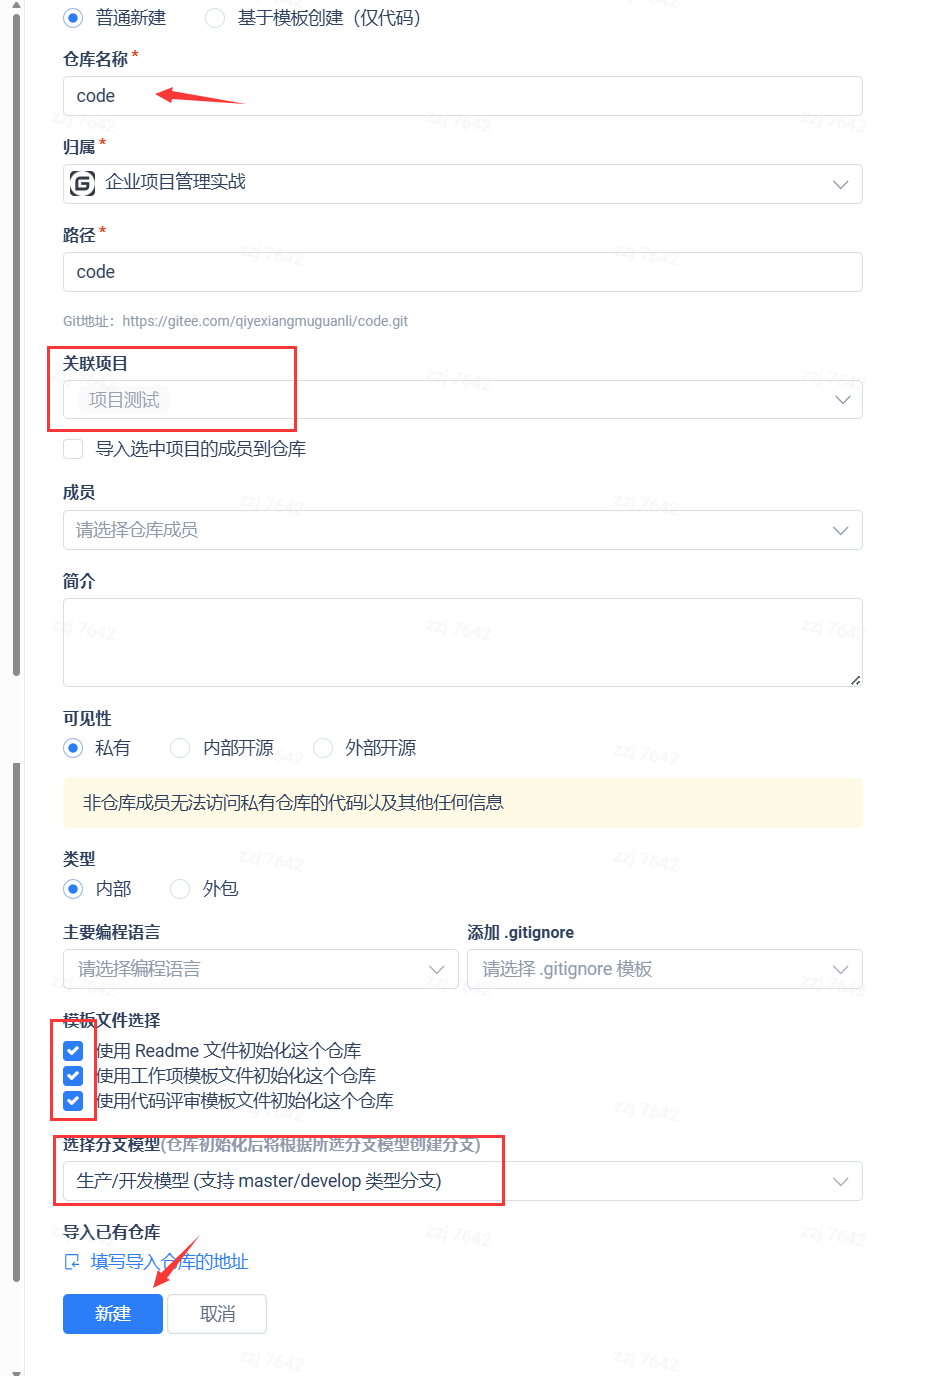
填写基本信息

创建成功
2克隆
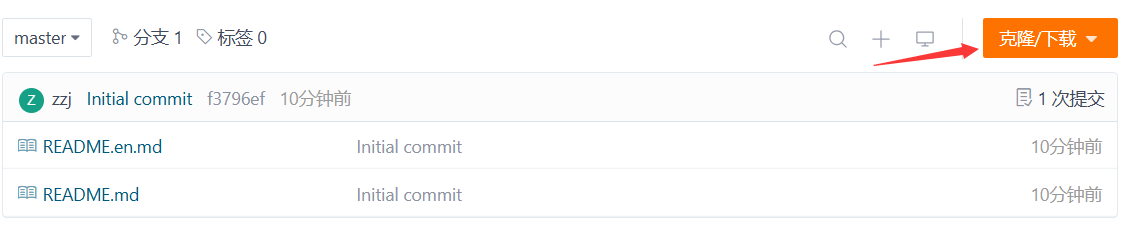

SSH协议和HTTPS协议是Git最常使⽤的两种数据传输协议。
SSH协议使⽤了公钥加密和公钥登陆机制,体现了其实⽤性和安全性,使⽤此协议需要将我们的公钥放上服务器,由Git服务器进⾏管理。
使⽤HTTPS⽅式时,没有要求,可以直接克隆下来即可
zzj@localhost \~$ git clone https://gitee.com/zzj_new/git_test.git
Cloning into 'git_test'...
remote: Enumerating objects: 4, done.
remote: Counting objects: 100% (4/4), done.
remote: Compressing objects: 100% (4/4), done.
remote: Total 4 (delta 0), reused 0 (delta 0), pack-reused 0
Unpacking objects: 100% (4/4), done.
zzj@localhost \~$ cd git_test
zzj@localhost git_test$ ll -a
total 12
drwxrwxr-x. 3 zzj zzj 55 Jun 25 10:42 .
drwx------. 20 zzj zzj 4096 Jun 25 10:42 ..
drwxrwxr-x. 8 zzj zzj 163 Jun 25 10:42 .git
-rw-rw-r--. 1 zzj zzj 836 Jun 25 10:42 README.en.md
-rw-rw-r--. 1 zzj zzj 925 Jun 25 10:42 README.md
使用SSH方式时
zzj@localhost \~$ git clone git@gitee.com:zzj_new/git_test.git #直接进行clone
Cloning into 'git_test'...
The authenticity of host 'gitee.com (180.76.198.77)' can't be established.
不能直接使用,要配置公钥:
第一步生成id_rsa和id_rsa_pub文件(.ssh目录有的话就不用)
zzj@localhost \~$ cd .ssh #在用户主目录下找到.ssh
zzj@localhost .ssh$ ll
total 0
zzj@localhost .ssh$ ssh-keygen -t rsa -C "gitee的邮箱" #后面一路Enter
Generating public/private rsa key pair.
Enter file in which to save the key (/home/zzj/.ssh/id_rsa):
Enter passphrase (empty for no passphrase):
Enter same passphrase again:
Your identification has been saved in /home/zzj/.ssh/id_rsa.
Your public key has been saved in /home/zzj/.ssh/id_rsa.pub.
The key fingerprint is:
SHA256:Hs8Lzhkz3cT3bNXvFJN8zeCLMlBSZmmybHhaKWPtLUE 2909678831@qq.com
The key's randomart image is:
+---RSA 2048----+
| +. |
| E+o |
| =.=. . |
| = Xo . ..o+|
| . OSo o o=*|
| ..o*.o o +*|
| *.* o . *|
| o * + + |
| + . .|
+----SHA256-----+
zzj@localhost .ssh$ ls -a
. .. id_rsa id_rsa.pub
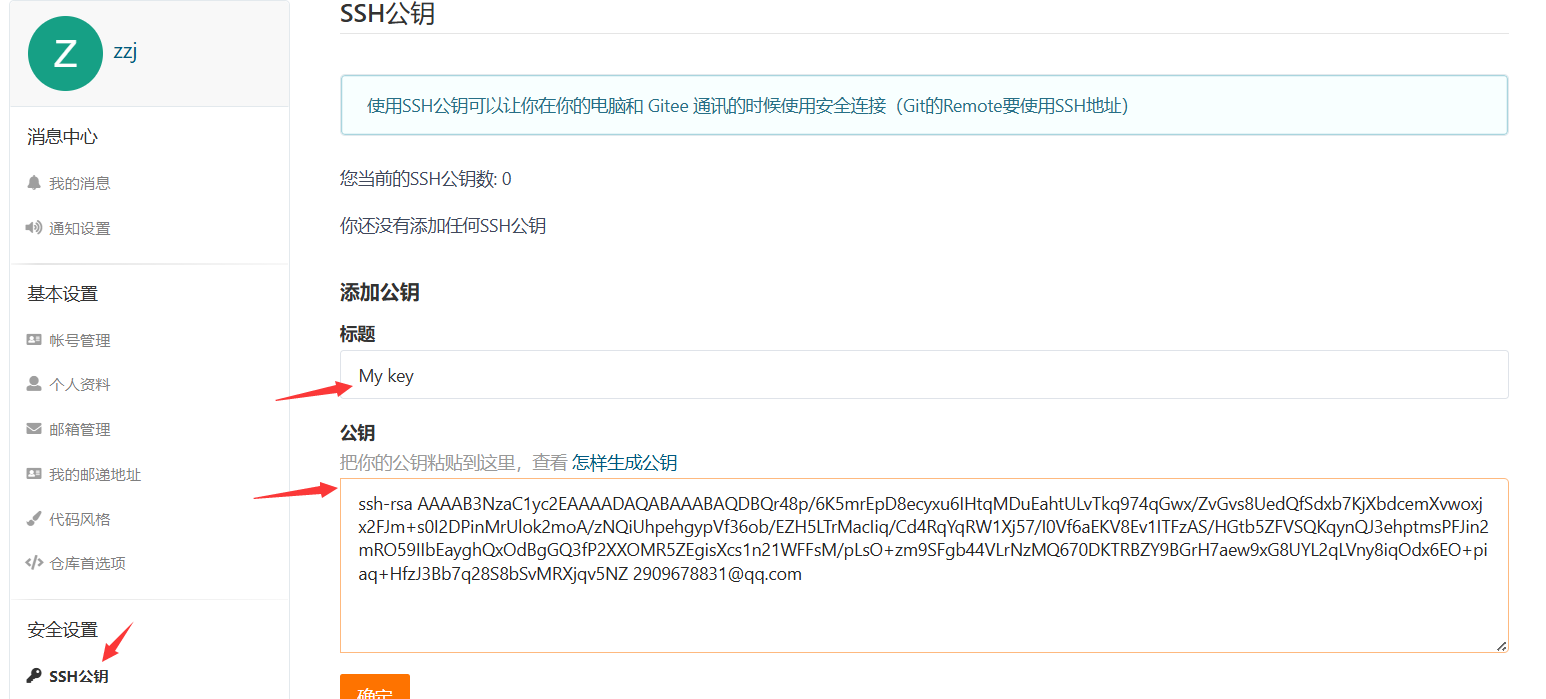
zzj@localhost .ssh$ cat id_rsa.pub #将该文件的内容配置到gitee上
第⼆步:添加⾃⼰的公钥到远端仓库

点击ssh公钥 选项,进⾏设置:标题随意~
最后进行克隆
zzj@localhost \~$ git clone git@gitee.com:zzj_new/git_test.git
Cloning into 'git_test'...
The authenticity of host 'gitee.com (180.76.198.77)' can't be established.
ECDSA key fingerprint is SHA256:FQGC9Kn/eye1W8icdBgrQp+KkGYoFgbVr17bmjey0Wc.
ECDSA key fingerprint is MD5:27:e5:d3:f7:2a:9e:eb:6c:93:cd:1f:c1:47:a3:54:b1.
Are you sure you want to continue connecting (yes/no)? yes
Warning: Permanently added 'gitee.com,180.76.198.77' (ECDSA) to the list of known hosts.
remote: Enumerating objects: 4, done.
remote: Counting objects: 100% (4/4), done.
remote: Compressing objects: 100% (4/4), done.
remote: Total 4 (delta 0), reused 0 (delta 0), pack-reused 0
Receiving objects: 100% (4/4), done.
3推送
zzj@localhost git_test$ git config user.email "2909678831@qq.com"
zzj@localhost git_test$ git config user.name "zzj" #与gitee要一致
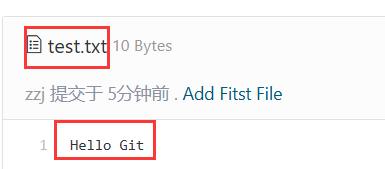
zzj@localhost git_test$ touch test.txt #创建文件来演示提交
zzj@localhost git_test$ vim test.txt
zzj@localhost git_test$ cat test.txt
Hello Git
zzj@localhost git_test$ git add .
zzj@localhost git_test$ git commit -m "Add Fitst File"
master e4bccee Add Fitst File
1 file changed, 1 insertion(+)
create mode 100644 test.txt
**git push <远程主机名> <本地分⽀名>:<远程分⽀名>
如果本地分⽀名与远程分⽀名相同,则可以省略冒号:
git push <远程主机名> <本地分⽀名>**
zzj@localhost git_test$git push origin master:master #提交到origin主机的master分支
Counting objects: 4, done.
Delta compression using up to 4 threads.
Compressing objects: 100% (2/2), done.
Writing objects: 100% (3/3), 311 bytes | 0 bytes/s, done.
Total 3 (delta 0), reused 0 (delta 0)
remote: Powered by GITEE.COM GNK-6.4
To git@gitee.com:zzj_new/git_test.git
f3796ef..e4bccee master -> master
推送成功!这⾥由于我们使⽤的是SSH协议,是不⽤每⼀次推送都输⼊密码的,⽅便了我们的推送操作。如果你使⽤的是HTTPS协议,有个⿇烦地⽅就是每次推送都必须输⼊。
回到远端仓库上进行查看
4远程推送
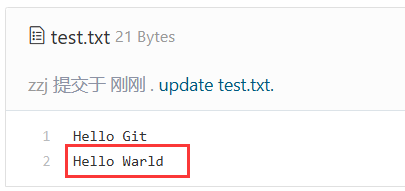
如果远程仓库更新了,要把本地仓库进行更新,怎么办?
演示场景(直接在gitee仓库上进行修改文件):

**git pull <远程主机名> <远程分⽀名>:<本地分⽀名>
如果远程分⽀是与当前分⽀合并,则冒号后⾯的部分可以省略。
git pull <远程主机名> <远程分⽀名>**
zzj@localhost git_test$ git pull origin master:master #拉取并进行合并
remote: Enumerating objects: 5, done.
remote: Counting objects: 100% (5/5), done.
remote: Compressing objects: 100% (2/2), done.
remote: Total 3 (delta 1), reused 0 (delta 0), pack-reused 0
Unpacking objects: 100% (3/3), done.
From gitee.com:zzj_new/git_test
e4bccee..0ed629a master -> master
Warning: fetch updated the current branch head.
Warning: fast-forwarding your working tree from
Warning: commit e4bcceefd8678abdc33a36a4eb0cca58f94f6a8f.
Already up-to-date.
zzj@localhost git_test$ cat test.txt
Hello Git
Hello Warld
十git配置
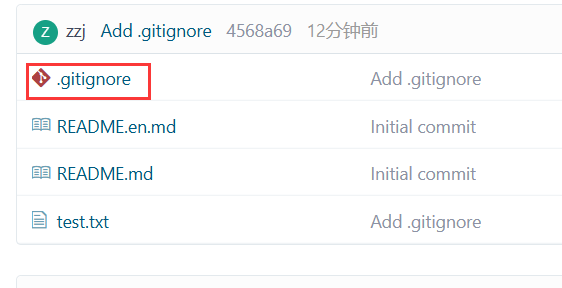
1.gitignore文件
zzj@localhost git_test$ vim .gitignore
zzj@localhost git_test$ cat .gitignore #没有.gitignore直接写一个
#File
*.so #忽略以so为后缀的文件
*.lib#No Ignore File
!b.so #不想被忽略的文件zzj@localhost git_test$ git add .
zzj@localhost git_test$git commit -m "Add .gitignore"
master 4568a69 Add .gitignore
1 file changed, 7 insertions(+)
create mode 100644 .gitignore
zzj@localhost git_test$ git push origin master
Counting objects: 4, done.
Delta compression using up to 4 threads.
Compressing objects: 100% (2/2), done.
Writing objects: 100% (3/3), 369 bytes | 0 bytes/s, done.
Total 3 (delta 0), reused 0 (delta 0)
remote: Powered by GITEE.COM GNK-6.4
To git@gitee.com:zzj_new/git_test.git
beb58a4..4568a69 master -> master
zzj@localhost git_test$ touch a.so #创建文件进行测试
zzj@localhost git_test$ git status
On branch master
nothing to commit, working directory clean #果然a.so被忽略了!
zzj@localhost git_test$ touch b.so #不想被忽略的文件
zzj@localhost git_test$ git status
On branch master
Untracked files:
(use "git add <file>..." to include in what will be committed)
b.so #git进行了追踪
nothing added to commit but untracked files present (use "git add" to track)
zzj@localhost git_test$ git add -f a.so #我们不想对a.so进行忽略
zzj@localhost git_test$ git status
On branch master
Changes to be committed:
(use "git reset HEAD <file>..." to unstage)
new file: a.so
Untracked files:
(use "git add <file>..." to include in what will be committed)
b.so
zzj@localhost git_test$ touch d.so
zzj@localhost git_test$ git check-ignore -v d.so #不知道d.so为什么被忽略
.gitignore:3:*.so d.so #打印在.gitignore的位置
2配置git指令
在我们使⽤Git期间,有些命令敲的时候着实让⼈头疼(太⻓了~)
幸运的是,git⽀持对命令进⾏简化!
zzj@localhost git_test$ git config --global alias.ststatus****给git指令起别名
zzj@localhost git_test$git st
On branch master
nothing to commit, working directory clean
zzj@localhost git_test$ git status #原来的也能用
On branch master
nothing to commit, working directory clean
但在初学时还是不推荐出修改它,多敲敲git指令才能更好地学习与理解git的使用!!
3操作标签
zzj@localhost git_test$ git tag v1.0 #创建v1.0的标签默认是最近提交的标签
zzj@localhost git_test$ git tag
v1.0
zzj@localhost git_test$ git show v1.0 #查看标签的属性
commit c23bf5541bf0c8eaea92d5eb240406f1dfa94338
Author: zzj <2909678831@qq.com>
Date: Tue Jun 25 05:47:20 2024 +0000
删除文件 a.so
diff --git a/a.so b/a.so
deleted file mode 100644
index e69de29..0000000
zzj@localhost git_test$ git log --pretty=oneline --abbrev-commit #进行验证
c23bf55 删除文件 a.so4215bff update
4568a69 Add .gitignore
beb58a4 删除文件 .gitignore
f7aa032 Add .gitignore
0ed629a update test.txt.
e4bccee Add Fitst File
f3796ef Initial commit
提交创建带说明标签的方式 :git tag -a name -m "XXX" commit_id
zzj@localhost git_test$ git tag -a v0.9 -m "Update" 4215bff
zzj@localhost git_test$ git show v0.9
tag v0.9Tagger: zzj <2909678831@qq.com>
Date: Thu Jun 27 09:20:22 2024 +0800
Update
commit 4215bffec060aee151dd1aab1e67ea1238fa6ff6
Author: zzj <2909678831@qq.com>
Date: Tue Jun 25 13:46:34 2024 +0800
update
diff --git a/a.so b/a.so
new file mode 100644
index 0000000..e69de29
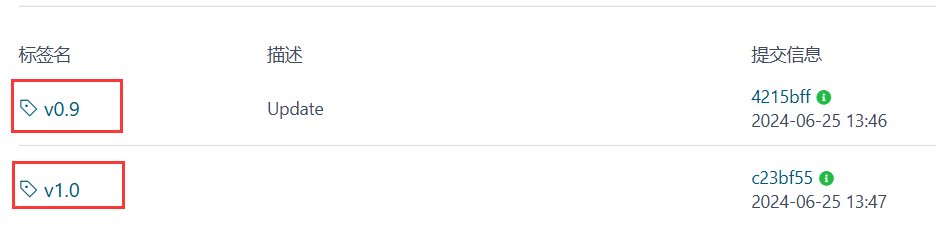
zzj@localhost git_test$ git push origin v1.0 #提交标签到远程仓库
Total 0 (delta 0), reused 0 (delta 0)
remote: Powered by GITEE.COM GNK-6.4
To git@gitee.com:zzj_new/git_test.git
* new tag v1.0 -> v1.0
zzj@localhost git_test$ git push origin --tags 一次性提交所以标签
Counting objects: 1, done.
Writing objects: 100% (1/1), 152 bytes | 0 bytes/s, done.
Total 1 (delta 0), reused 0 (delta 0)
remote: Powered by GITEE.COM GNK-6.4
To git@gitee.com:zzj_new/git_test.git
* new tag v0.9 -> v0.9
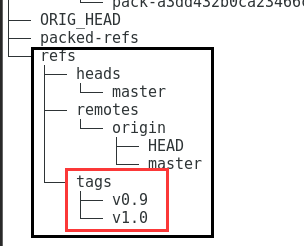
在.git中有标签的存在吗?
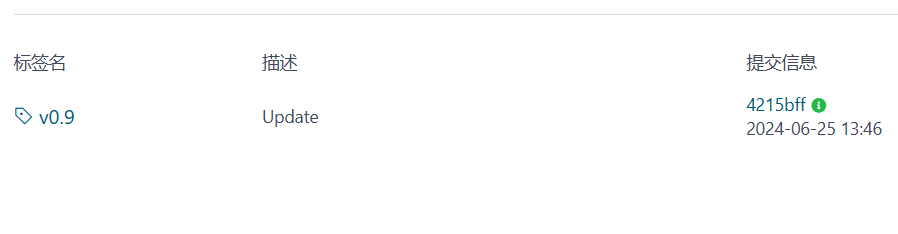
删除标签虽然可以在远程仓库进行,但不推荐怎么做;推荐在本地进行
zzj@localhost git_test$ git tag -d v1.0 #删除标签
Deleted tag 'v1.0' (was c23bf55)
zzj@localhost git_test$ git push origin :refs/tags/v1.0 #删除标签要带路径麻烦~
remote: Powered by GITEE.COM GNK-6.4
To git@gitee.com:zzj_new/git_test.git
- deleted v1.0
十一多人协作
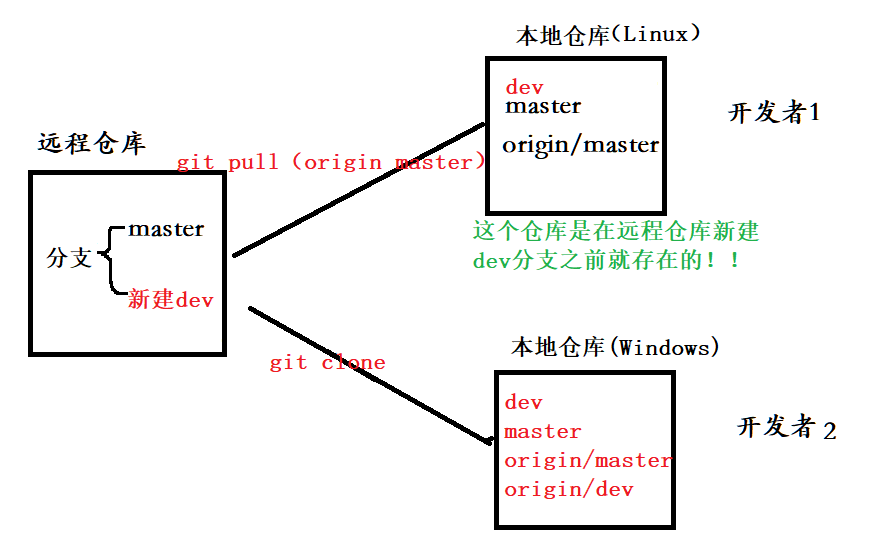
场景1:同一分支下开发
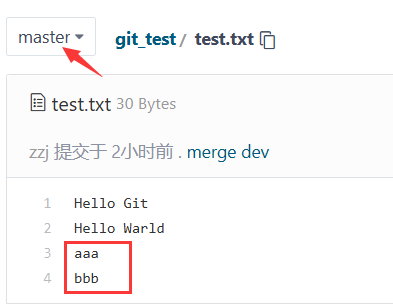
目标:将远程仓库中的master分支下的test.txt新增"aaa""bbb"两行
实现:在dev分支下,开发者1新增"aaa",开发者2新增"bbb",再与master分支进行合并
a准备工作
在远程仓库中进行新增dev分支

由于开发者1(Linux系统)在新建分支之前就已经克隆了仓库,所以只需要进行分支更新即可
zzj@localhost git_test$ git branch -a #查看本地分支与远程分支
* master
remotes/origin/HEAD -> origin/master
remotes/origin/master
zzj@localhost git_test$git pull 指定远程仓库分支 #同一分支下会建立连接(取消指定)
From gitee.com:zzj_new/git_test
* new branch dev -> origin/dev
Already up-to-date.
zzj@localhost git_test$ git branch -a
* master
remotes/origin/HEAD -> origin/master
remotes/origin/dev
remotes/origin/master
开发者2(Windows)
PS C:\Users\29096\Desktop> git clone https://gitee.com/zzj_new/git_test.git
Cloning into 'git_test'...
remote: Enumerating objects: 35, done.
remote: Counting objects: 100% (35/35), done.
remote: Compressing objects: 100% (26/26), done.
remote: Total 35 (delta 9), reused 0 (delta 0), pack-reused 0
Receiving objects: 100% (35/35), 7.08 KiB | 805.00 KiB/s, done.
Resolving deltas: 100% (9/9), done.
PS C:\Users\29096\Desktop> cd git_test
PS C:\Users\29096\Desktop\git_test> git branch -a
* master
remotes/origin/HEAD -> origin/master
remotes/origin/dev
remotes/origin/master
此时对应的模型
b进行开发
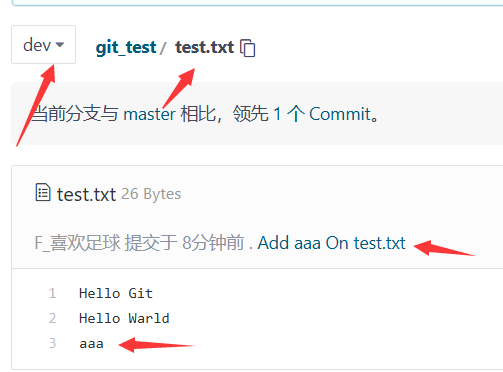
开发者1在dev分支的test.txt文件下新增"aaa"并进行提交
zzj@localhost git_test$ git checkout -b devorigin/dev#创建分支的同时git进行追踪
Branch dev set up to track remote branch dev from origin.Switched to a new branch 'dev'
zzj@localhost git_test$ vim test.txt
zzj@localhost git_test$ cat test.txt
Hello Git
Hello Warld
aaa
zzj@localhost git_test$ git add test.txt
zzj@localhost git_test$ git commit -m "Add aaa On test.txt"
dev 676492b Add aaa On test.txt
1 file changed, 2 insertions(+), 1 deletion(-)
zzj@localhost git_test$ git push
Compressing objects: 100% (1/1), done.
Writing objects: 100% (3/3), 271 bytes | 0 bytes/s, done.
Total 3 (delta 1), reused 2 (delta 1)
remote: Powered by GITEE.COM GNK-6.4
To git@gitee.com:zzj_new/git_test.git
1d5b89d..676492b dev -> dev
开发者2也在dev分支的test.txt文件下新增"bbb"并进行提交
PS C:\Users\29096\Desktop\git_test> git checkout -b dev #直接创建分支(没有连接)
Switched to a new branch 'dev'
PS C:\Users\29096\Desktop\git_test> git branch -vv #本地分支与远端分支连接情况
* dev 1d5b89d update test.txt.master 1d5b89d origin/master update test.txt.
PS C:\Users\29096\Desktop\git_test> git pull #测试本地dev分支有没有被git追踪
remote: Enumerating objects: 5, done.
remote: Counting objects: 100% (5/5), done.
remote: Compressing objects: 100% (2/2), done.
remote: Total 3 (delta 1), reused 0 (delta 0), pack-reused 0
Unpacking objects: 100% (3/3), 251 bytes | 22.00 KiB/s, done.
From https://gitee.com/zzj_new/git_test
1d5b89d..676492b dev -> origin/dev
There is no tracking information for the current branch.Please specify which branch you want to merge with.
See git-pull(1) for details.
git pull <remote> <branch>
If you wish to set tracking information for this branch you can do so with:
git branch --set-upstream-to=origin/<branch> dev #解决问题(本地与远端进行连接)
PS C:\Users\29096\Desktop\git_test> git branch --set-upstream-to=origin/dev dev
branch 'dev' set up to track 'origin/dev'.
PS C:\Users\29096\Desktop\git_test> git branch -vv #再次查看
* dev 1d5b89d origin/dev: behind 1 update test.txt.
master 1d5b89d origin/master update test.txt.
PS C:\Users\29096\Desktop\git_test> cat test.txt
Hello Git
Hello Warld
bbbPS C:\Users\29096\Desktop\git_test> git add test.txt
PS C:\Users\29096\Desktop\git_test> git commit -m "Add bbb on test.txt"
dev c9a1bff Add bbb on test.txt
1 file changed, 2 insertions(+), 1 deletion(-)
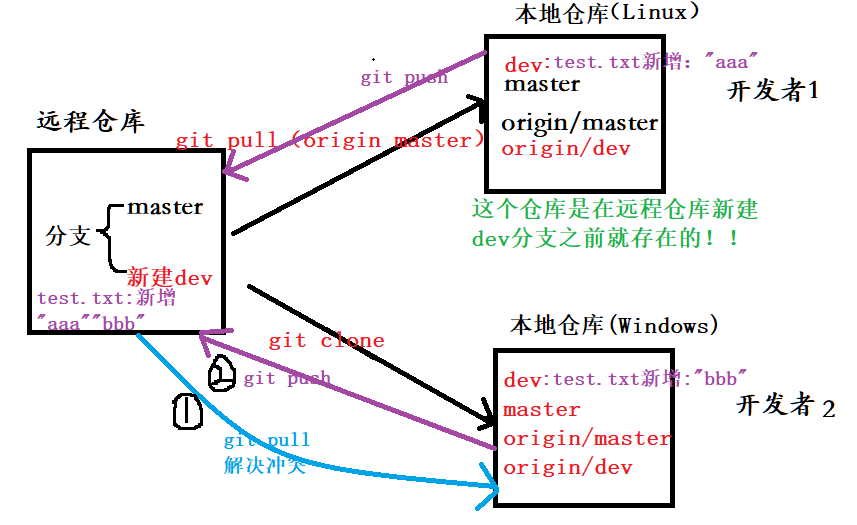
PS C:\Users\29096\Desktop\git_test> git push #该文件被开发者1修改,提交产生冲突
To https://gitee.com/zzj_new/git_test.git
! rejected dev -> dev (non-fast-forward)
error: failed to push some refs to 'https://gitee.com/zzj_new/git_test.git'
hint: Updates were rejected because the tip of your current branch is behind
hint: its remote counterpart. If you want to integrate the remote changes,
hint:use 'git pull' before pushing again . #解决问题
hint: See the 'Note about fast-forwards' in 'git push --help' for details.
PS C:\Users\29096\Desktop\git_test> git pull
Auto-merging test.txt
CONFLICT (content): Merge conflict in test.txt
Automatic merge failed; fix conflicts and then commit the result.
PS C:\Users\29096\Desktop\git_test> cat test.txt
Hello Git
Hello Warld
<<<<<<< HEAD
bbb
=======
aaa
>>>>>>> 676492bad5ad00fae436780958b8f7eabcf9b7fd
PS C:\Users\29096\Desktop\git_test> cat test.txt #手动进行解决(同一分支开发的弊端~~)
Hello Git
Hello Warld
aaa
bbb
PS C:\Users\29096\Desktop\git_test> git add test.txt
PS C:\Users\29096\Desktop\git_test> git commit -m "merge dev"
dev 9b2777e merge dev
PS C:\Users\29096\Desktop\git_test> git push
Enumerating objects: 10, done.
Counting objects: 100% (10/10), done.
Delta compression using up to 8 threads
Compressing objects: 100% (3/3), done.
Writing objects: 100% (6/6), 539 bytes | 179.00 KiB/s, done.
Total 6 (delta 2), reused 2 (delta 1), pack-reused 0 (from 0)
remote: Powered by GITEE.COM GNK-6.4
To https://gitee.com/zzj_new/git_test.git
676492b..9b2777e dev -> dev
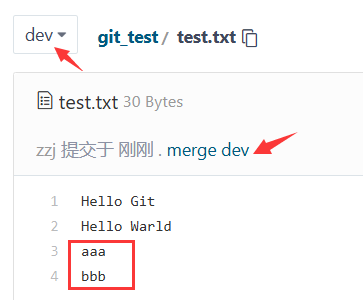
此时对应的模型
c进行合并
在dev分支开发完后,要进行合并到master分支
以开发者2为例
PS C:\Users\29096\Desktop\git_test> git branch
* dev
master
PS C:\Users\29096\Desktop\git_test> git checkout master
Switched to branch 'master'
Your branch is up to date with 'origin/master'.
PS C:\Users\29096\Desktop\git_test> git pull**#预防master分支更新过**
Already up to date.
PS C:\Users\29096\Desktop\git_test> git checkout dev #在dev分支下进行合并解决冲突
Switched to branch 'dev'
Your branch is up to date with 'origin/dev'.
PS C:\Users\29096\Desktop\git_test> git pull
Already up to date.
PS C:\Users\29096\Desktop\git_test> git merge master
Already up to date.
PS C:\Users\29096\Desktop\git_test> git checkout master
Switched to branch 'master'
Your branch is up to date with 'origin/master'.
PS C:\Users\29096\Desktop\git_test> git merge dev
Updating 1d5b89d..9b2777e
Fast-forward
test.txt | 4 +++-
1 file changed, 3 insertions(+), 1 deletion(-)
PS C:\Users\29096\Desktop\git_test> cat test.txt
Hello Git
Hello Warld
aaa
bbb
PS C:\Users\29096\Desktop\git_test> git push
Total 0 (delta 0), reused 0 (delta 0), pack-reused 0 (from 0)
remote: Powered by GITEE.COM GNK-6.4
To https://gitee.com/zzj_new/git_test.git
1d5b89d..9b2777e master -> master
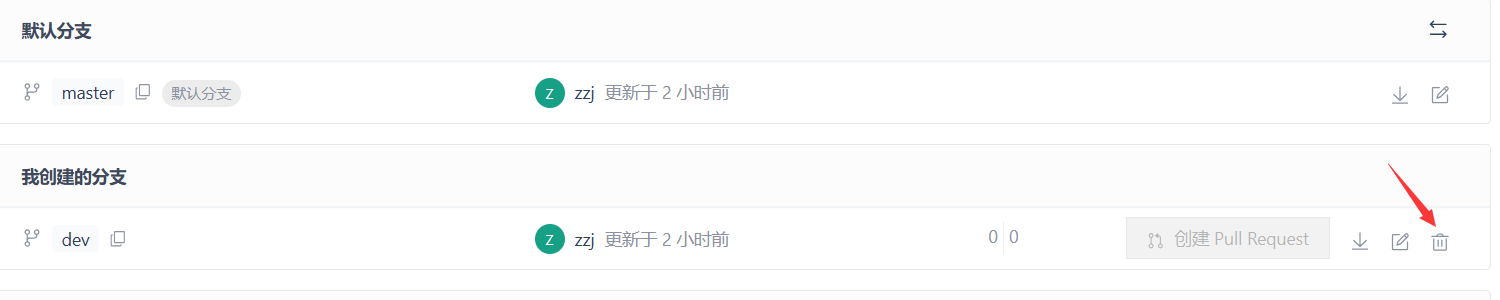
合并完后删除已经没用的分支
总结
⾸先,可以试图⽤git push origin branch-name推送⾃⼰的修改;
• 如果推送失败,则因为远程分⽀⽐你的本地更新,需要先⽤git pull 试图合并;
• 如果合并有冲突,则解决冲突,并在本地提交;(有可能改错且过程麻烦~)
• 没有冲突或者解决掉冲突后,再进行提交就成功啦!
• 功能开发完毕,将分⽀merge进master,最后删除分⽀。
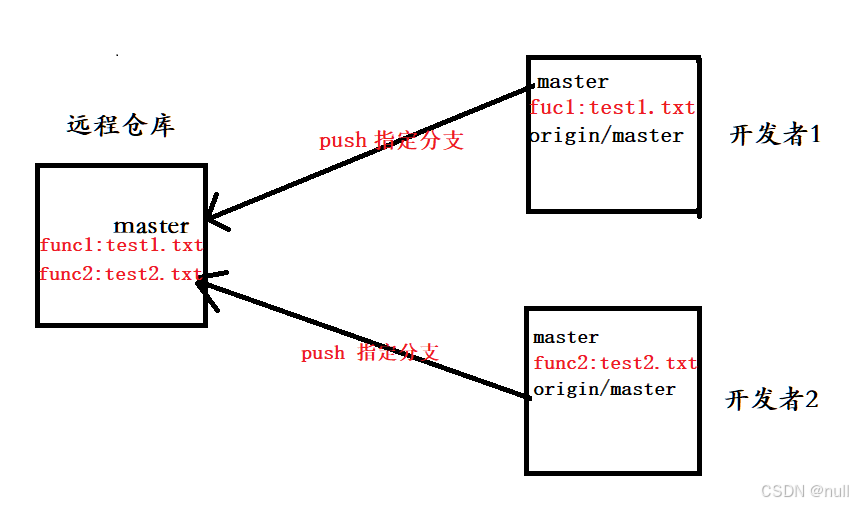
场景2:不同分支下开发
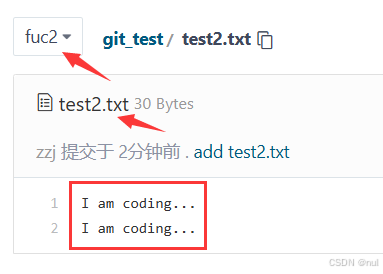
目标:远程master分支下新增test1.txt文件和test2.txt文件
实现:开发者1新增test1.txt文件,开发者2新增test2.txt文件
1进行开发
开发者1
zzj@localhost git_test]$ git branch
* master
zzj@localhost git_test$ git checkout -b fuc1 #创建分支fuc1
Switched to a new branch 'fuc1'
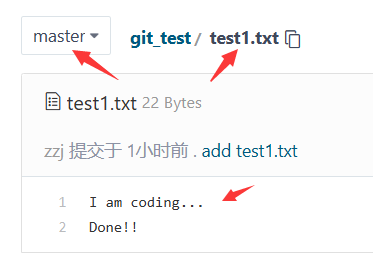
zzj@localhost git_test$ vim test1.txt
zzj@localhost git_test$ cat test1.txt
I am coding...
Done!!
zzj@localhost git_test$ git add .
zzj@localhost git_test$ git commit -m "add test1.txt"
fuc1 6cde2a7 add test1.txt
1 file changed, 2 insertions(+)
create mode 100644 test1.txt
zzj@localhost git_test$ git push #远程没有fuc1分支
Everything up-to-date
zzj@localhost git_test$ git push origin fuc1 #指定分支进行提交
Counting objects: 4, done.
Delta compression using up to 4 threads.
Compressing objects: 100% (2/2), done.
Writing objects: 100% (3/3), 287 bytes | 0 bytes/s, done.
Total 3 (delta 1), reused 0 (delta 0)
remote: Powered by GITEE.COM GNK-6.4
remote: Create a pull request for 'fuc1' on Gitee by visiting:
remote: https://gitee.com/zzj_new/git_test/pull/new/zzj_new:fuc1...zzj_new:master
To git@gitee.com:zzj_new/git_test.git
* new branch fuc1 -> fuc1

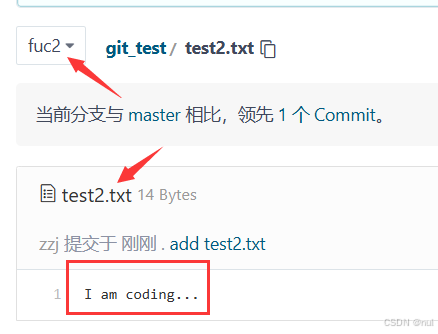
开发者2
PS C:\Users\29096\Desktop\git_test> git branch
* master
PS C:\Users\29096\Desktop\git_test> git checkout -b fuc2
Switched to a new branch 'fuc2'
PS C:\Users\29096\Desktop\git_test> cat test2.txt #开发了1/3后进行提交
I am coding...
PS C:\Users\29096\Desktop\git_test> git add test2.txt
PS C:\Users\29096\Desktop\git_test> git commit -m "add test2.txt"
fuc2 e125215 add test2.txt
1 file changed, 1 insertion(+)
create mode 100644 test2.txt
PS C:\Users\29096\Desktop\git_test> git push origin fuc2
Enumerating objects: 4, done.
Counting objects: 100% (4/4), done.
Delta compression using up to 8 threads
Compressing objects: 100% (2/2), done.
Writing objects: 100% (3/3), 276 bytes | 276.00 KiB/s, done.
Total 3 (delta 1), reused 0 (delta 0), pack-reused 0 (from 0)
remote: Powered by GITEE.COM GNK-6.4
remote: Create a pull request for 'fuc2' on Gitee by visiting:
remote: https://gitee.com/zzj_new/git_test/pull/new/zzj_new:fuc2...zzj_new:master
To https://gitee.com/zzj_new/git_test.git
* new branch fuc2 -> fuc2
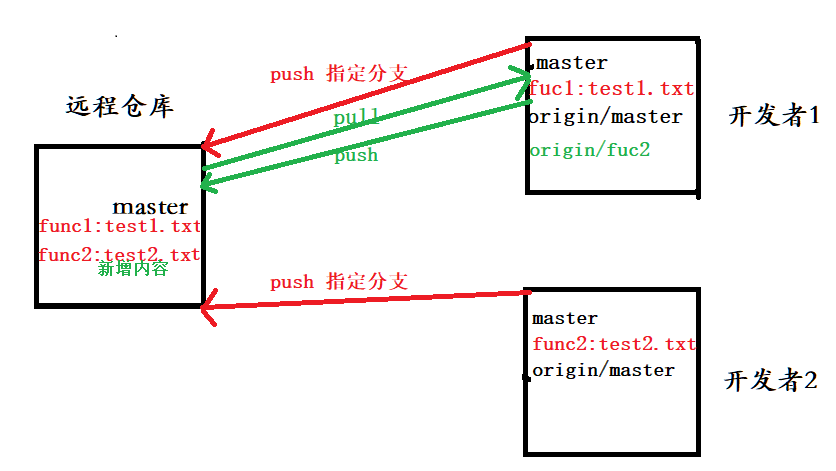
2替代开发
此时开发者2生病了,要开发者1来完成fuc2的开发
zzj@localhost git_test$ git pull #拉取远程仓库分支
remote: Enumerating objects: 4, done.
remote: Counting objects: 100% (4/4), done.
remote: Compressing objects: 100% (2/2), done.
remote: Total 3 (delta 1), reused 0 (delta 0), pack-reused 0
Unpacking objects: 100% (3/3), done.
From gitee.com:zzj_new/git_test
* new branch fuc2 -> origin/fuc2There is no tracking information for the current branch.
Please specify which branch you want to merge with.
See git-pull(1) for details
git pull <remote> <branch>
If you wish to set tracking information for this branch you can do so with:
git branch --set-upstream-to=origin/<branch> fuc1
zzj@localhost git_test$ git branch -a
*fuc1
master
remotes/origin/HEAD -> origin/master
remotes/origin/fuc1
remotes/origin/fuc2
remotes/origin/master
zzj@localhost git_test$git checkout -b fuc2 origin/fuc2
Branch fuc2 set up to track remote branch fuc2 from origin.
Switched to a new branch 'fuc2'
zzj@localhost git_test$ vim test2.txt
zzj@localhost git_test$ cat test2.txt #test2.txt进行开发到2/3后进行提交
I am coding...
I am coding...zzj@localhost git_test$ git add test2.txt
zzj@localhost git_test$ git commit -m "add test2.txt"
fuc2 dce40f8 add test2.txt
1 file changed, 2 insertions(+), 1 deletion(-)
zzj@localhost git_test$ git push
Counting objects: 5, done.
Delta compression using up to 4 threads.
Compressing objects: 100% (2/2), done.
Writing objects: 100% (3/3), 266 bytes | 0 bytes/s, done.
Total 3 (delta 1), reused 0 (delta 0)
remote: Powered by GITEE.COM GNK-6.4
To git@gitee.com:zzj_new/git_test.git
e125215..dce40f8 fuc2 -> fuc2
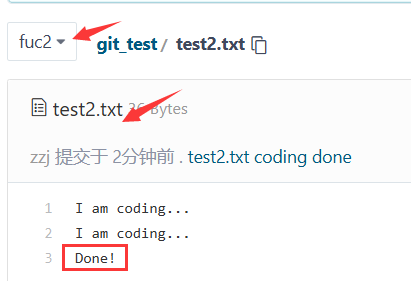
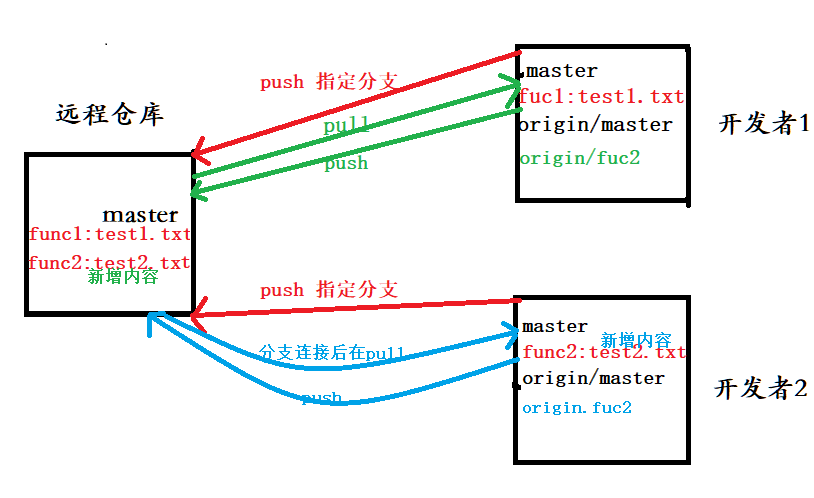
后来开发者2生病好了后继续完成剩下的开发工作
PS C:\Users\29096\Desktop\git_test> git branch
* fuc2
master
PS C:\Users\29096\Desktop\git_test> git pull #失败:本地与远程分支没有进行连接
remote: Enumerating objects: 5, done.
remote: Counting objects: 100% (5/5), done.
remote: Compressing objects: 100% (2/2), done.
remote: Total 3 (delta 1), reused 0 (delta 0), pack-reused 0
Unpacking objects: 100% (3/3), 246 bytes | 15.00 KiB/s, done.
From https://gitee.com/zzj_new/git_test
e125215..dce40f8 fuc2 -> origin/fuc2
There is no tracking information for the current branch.
Please specify which branch you want to merge with.
See git-pull(1) for details.
git pull <remote> <branch>
If you wish to set tracking information for this branch you can do so with:
git branch --set-upstream-to=origin/<branch> fuc2
PS C:\Users\29096\Desktop\git_test> git branch --set-upstream-to=origin/fuc2 fuc2
branch 'fuc2' set up to track 'origin/fuc2'.
PS C:\Users\29096\Desktop\git_test> git pull
Updating e125215..dce40f8
Fast-forward
test2.txt | 3 ++-
1 file changed, 2 insertions(+), 1 deletion(-)
PS C:\Users\29096\Desktop\git_test> cat test2.txt
I am coding...
I am coding...PS C:\Users\29096\Desktop\git_test> cat test2.txt
I am coding...
I am coding...
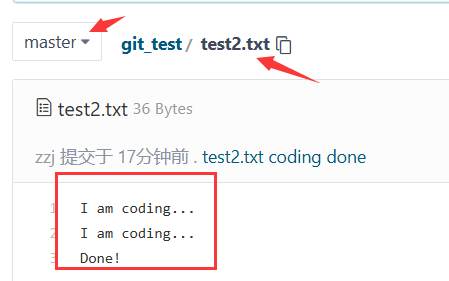
Done!PS C:\Users\29096\Desktop\git_test> git add .
PS C:\Users\29096\Desktop\git_test> git commit -m "test2.txt coding done"
fuc2 d530e3b test2.txt coding done
1 file changed, 1 insertion(+)
PS C:\Users\29096\Desktop\git_test>git push
Enumerating objects: 5, done.
Counting objects: 100% (5/5), done.
Delta compression using up to 8 threads
Compressing objects: 100% (2/2), done.
Writing objects: 100% (3/3), 277 bytes | 277.00 KiB/s, done.
Total 3 (delta 1), reused 0 (delta 0), pack-reused 0 (from 0)
remote: Powered by GITEE.COM GNK-6.4
To https://gitee.com/zzj_new/git_test.git
dce40f8..d530e3b fuc2 -> fuc2
3进行合并
要进行合并到master分支时有以下操作:
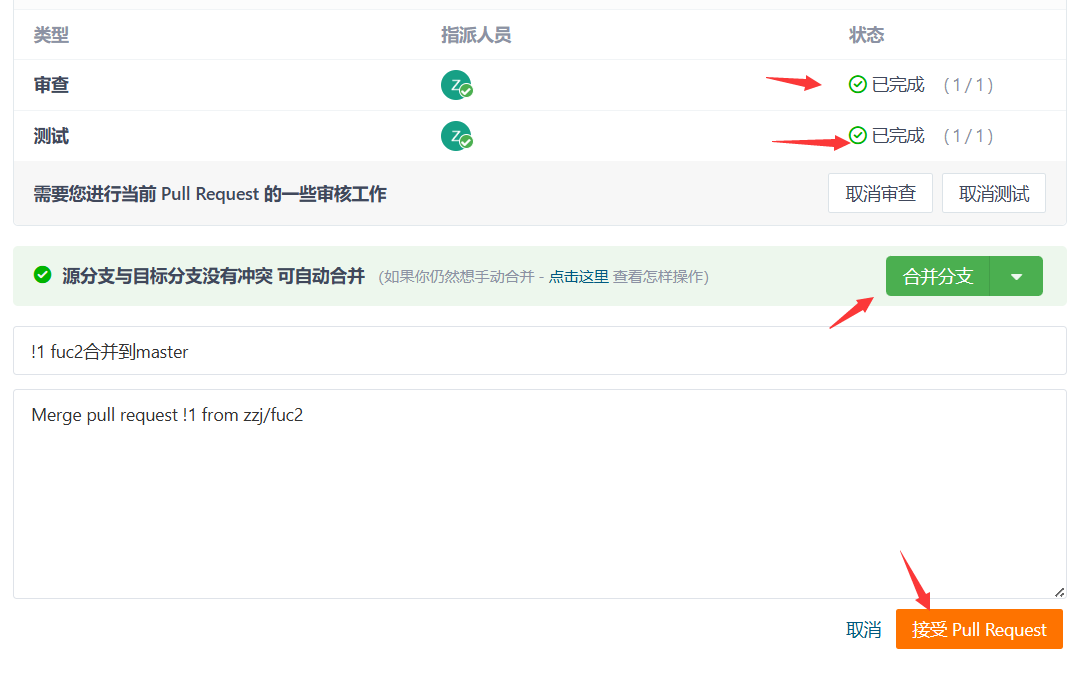
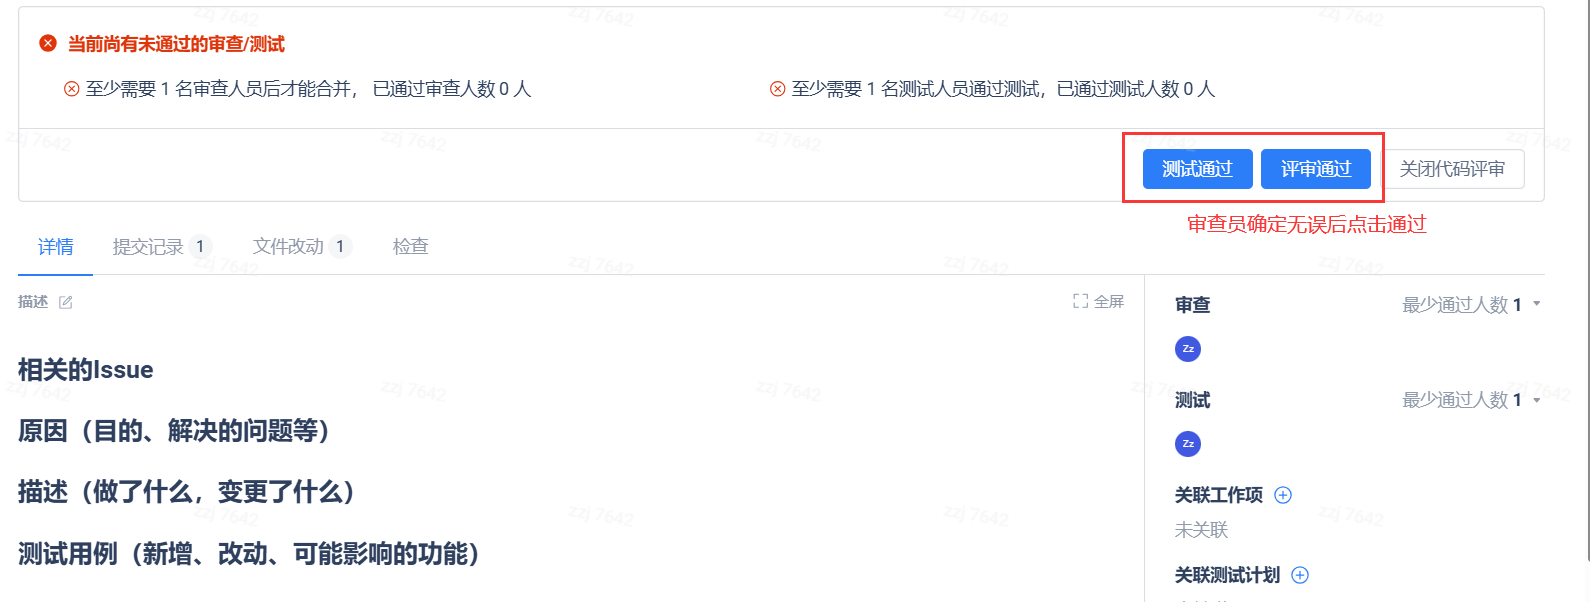
a.pull request(实际工作中的合并)

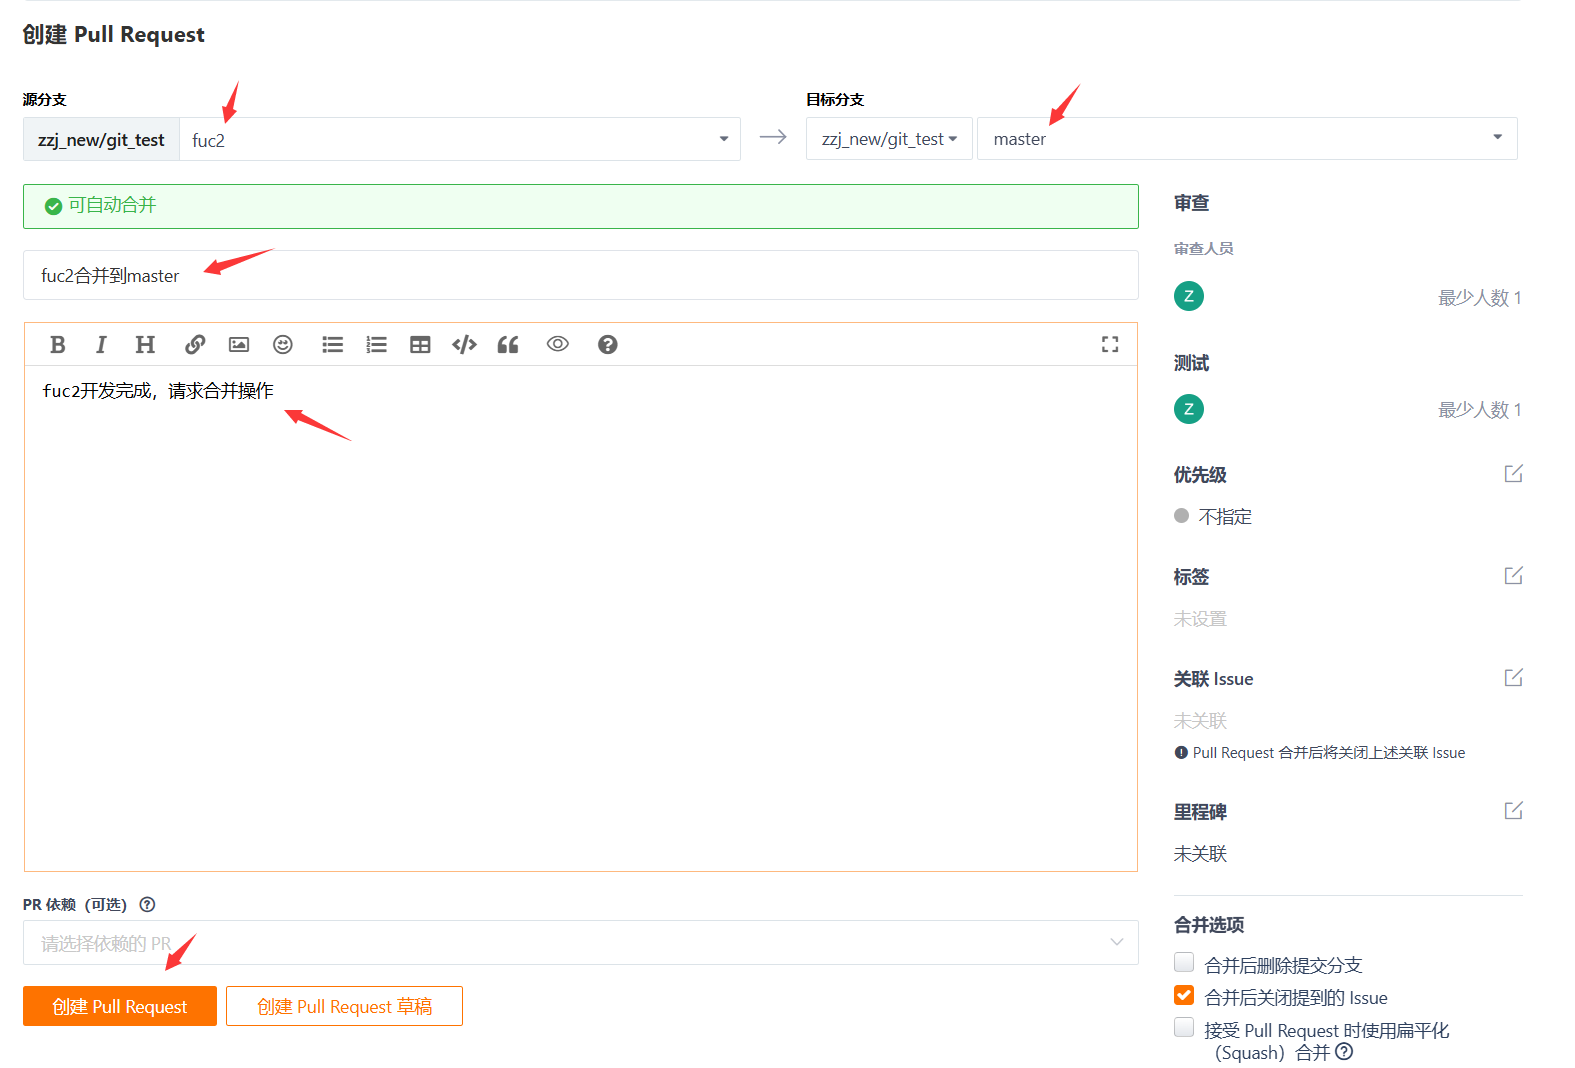
审查人员,测试人员界面
b.自己进行合并(模拟实现)
有开发者1进行fuc1的合并
zzj@localhost git_test$ git branch
fuc1
* fuc2
master
zzj@localhost git_test$ git checkout master
Switched to branch 'master'
zzj@localhost git_test$ git pull #保证master时最新的!!
remote: Enumerating objects: 7, done.
remote: Counting objects: 100% (7/7), done.
remote: Compressing objects: 100% (3/3), done.
remote: Total 4 (delta 1), reused 0 (delta 0), pack-reused 0
Unpacking objects: 100% (4/4), done.
From gitee.com:zzj_new/git_test
9b2777e..26e2347 master -> origin/master
dce40f8..d530e3b fuc2 -> origin/fuc2
Updating 9b2777e..26e2347
Fast-forward
test2.txt | 3 +++
1 file changed, 3 insertions(+)
create mode 100644 test2.txt
zzj@localhost git_test$ git checkout fuc1
Switched to branch 'fuc1'
zzj@localhost git_test$ git merge master #在fuc1合并master
Merge made by the 'recursive' strategy.
test2.txt | 3 +++
1 file changed, 3 insertions(+)
create mode 100644 test2.txt
zzj@localhost git_test$ git checkout master
Switched to branch 'master'
zzj@localhost git_test$ git merge fuc1
Updating 26e2347..3b9d5ba
Fast-forward
test1.txt | 2 ++
1 file changed, 2 insertions(+)
create mode 100644 test1.txt
zzj@localhost git_test$ git status #查看当前状态
On branch master
Your branch is ahead of 'origin/master' by 2 commits.
(use "git push" to publish your local commits)
nothing to commit, working directory clean
zzj@localhost git_test$ git push origin master #指定master分支进行提交
Counting objects: 4, done.
Delta compression using up to 4 threads.
Compressing objects: 100% (2/2), done.
Writing objects: 100% (2/2), 298 bytes | 0 bytes/s, done.
Total 2 (delta 1), reused 0 (delta 0)
remote: Powered by GITEE.COM GNK-6.4
To git@gitee.com:zzj_new/git_test.git
26e2347..3b9d5ba master -> master
完成合并后就可以在远程直接删除不需要的分支了!!
c.在远程分支已被删除而本地分支还存在的问题解决
zzj@localhost git_test$ git branch -a
func1
func2* master
remotes/origin/HEAD -> origin/master
remotes/origin/fuc1remotes/origin/fuc2
remotes/origin/master
zzj@localhost git_test$ git remote show origin
* remote origin
Fetch URL: git@gitee.com:zzj_new/git_test.git
Push URL: git@gitee.com:zzj_new/git_test.git
HEAD branch: master
Remote branches:
master tracked
refs/remotes/origin/fuc1 stale (use 'git remote prune' to remove)
refs/remotes/origin/fuc2 stale (use 'git remote prune' to remove)
Local branches configured for 'git pull':
fuc2 merges with remote fuc2
master merges with remote master
Local ref configured for 'git push':
master pushes to master (up to date)
zzj@localhost git_test$git remote prune origin #对远程已经删除的分支本地进行同步
Pruning origin
URL: git@gitee.com:zzj_new/git_test.git
* pruned origin/fuc1
* pruned origin/fuc2
zzj@localhost git_test$ git branch -a
fuc1
fuc2
* master
remotes/origin/HEAD -> origin/master
remotes/origin/masterzzj@localhost git_test$ git branch -d fuc1 fuc2
Deleted branch fuc1 (was 3b9d5ba).
Deleted branch fuc2 (was dce40f8).
十二企业开发模型
故事
我们知道,⼀个软件从零开始到最终交付,⼤概包括以下⼏个阶段:
规划、编码、构建、测试、发布、部署和维护。
最初,程序⽐较简单,⼯作量不⼤,程序员⼀个⼈可以完成所有阶段的⼯作。
但随着软件产业的⽇益发展壮⼤,软件的规模也在逐渐变得庞⼤。软件的复杂度不断攀升,⼀个⼈已经hold不住了,就开始出现了精细化分⼯。如下图所⽰:

但在传统的IT组织下,开发团队(Dev)和运维团队(Ops)之间诉求不同:
• 开发团队(尤其是敏捷团队)追求变化
• 运维团队追求稳定
双⽅往往存在利益的冲突。⽐如,精益和敏捷的团队把持续交付作为⽬标,⽽运维团队则为了线上的稳定⽽强调变更控制。部⻔墙由此建⽴起来,这当然不利于IT价值的最⼤化。
为了弥合开发和运维之间的鸿沟,需要在⽂化、⼯具和实践⽅⾯的系列变⾰⸺DevOps 正式登上舞台。
DevOps(Development和Operations的组合词)是⼀种重视"软件开发⼈员(Dev)"和"IT运维技
术⼈员(Ops)"之间沟通合作的⽂化、运动或惯例。透过⾃动化"软件交付"和"架构变更"的流
程,来使得构建、测试、发布软件能够更加地快捷、频繁和可靠。在DevOps的软件开发过程包含**计划、编码、构建、测试、预发布、发布、运维、监控:**由此可⻅DevOps的强⼤。
讲了这么多,这个故事和Git有什么关系呢?
举⼀个很简单的例⼦就能说明这个问题~
⼀个软件的迭代,在我们开发⼈员看来,说⽩了就是对代码进⾏迭代,那么就需要对代码进⾏管理。如何管理我们的代码呢,那不就是Git(分布式版本控制系统)!
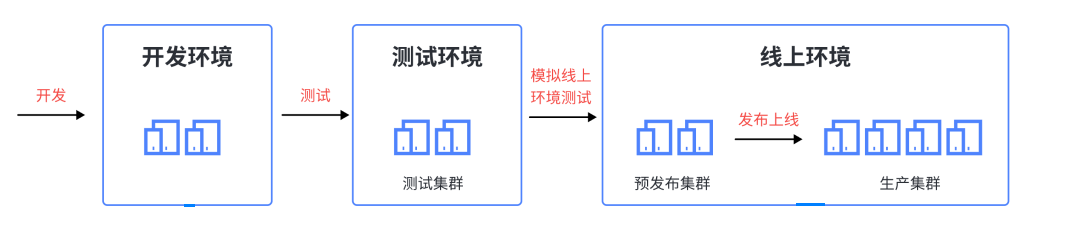
系统开发环境
开发环境:开发环境是程序猿们专⻔⽤于⽇常开发的服务器。为了开发调试⽅便,⼀般打开全部错误报告和测试⼯具,是最基础的环境。
测试环境:⼀个程序在测试环境⼯作不正常,那么肯定不能把它发布到⽣产机上。该环境是开发环境到⽣产环境的过渡环境。
预发布环境:该环境是为避免因测试环境和线上环境的差异等带来的缺陷漏测⽽设⽴的⼀套环境。其配置等基本和⽣产环境⼀致,⽬的是能让我们发正式环境时更有把握!所以预发布环境是你的产品质量最后⼀道防线 ,因为下⼀步你的项⽬就要上线了。要注意预发布环境服务器不在线上集成服务器范围之内,为单独的⼀些机器。
⽣产环境:是指正式提供对外服务的线上环境,例如我们⽬前在移动端或PC端能访问到的APP都是⽣产环境。
Git分支设计
对于开发⼈员来说,⼀般会针对不同的环境来设计分⽀
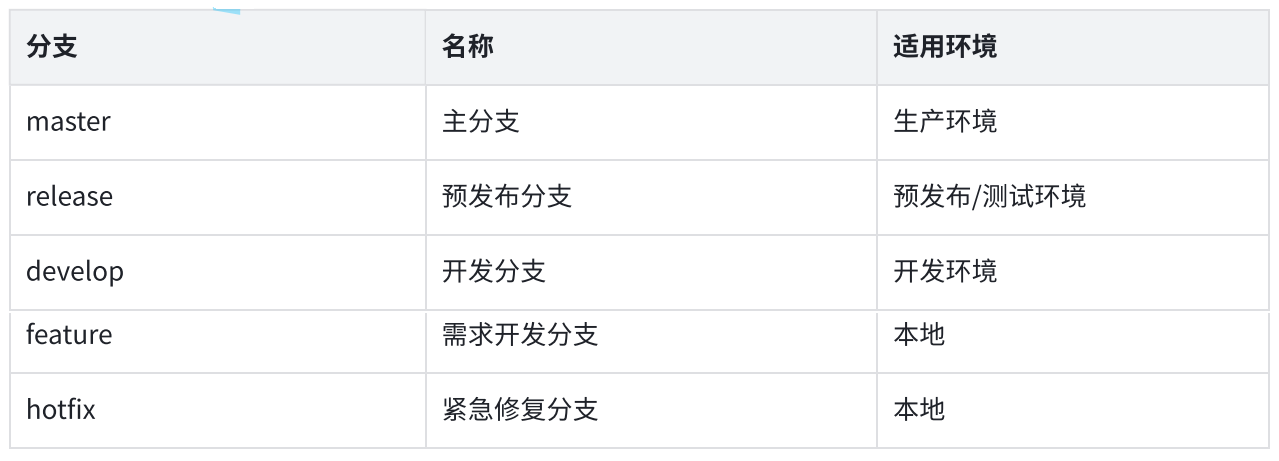
master分⽀
• master 为主分⽀,该分⽀为**只读且唯⼀**分⽀。⽤于部署到正式发布环境,⼀般由合并
release 分⽀得到。
• 主分⽀作为稳定的唯⼀代码库,任何情况下不允许直接在master分⽀上修改代码。
• 产品的功能全部实现后,最终在master分⽀对外发布,另外所有在master分⽀的推送应该打标签(tag)做记录,⽅便追溯。
• master分⽀不可删除。
develop分⽀
• develop 为开发分⽀,基于master分⽀创建的**只读且唯⼀**分⽀,始终保持最新完成以及bug修复后的代码。可部署到开发环境对应集群。
• 可根据需求⼤⼩程度确定是由feature分⽀合并,还是直接在develop分支开发(⾮常不建议 )
feature分支• feature 为新功能或新特性开发分⽀,以 develop 分⽀为基础创建 feature 分⽀。
• 命名以 feature/ 开头,建议的命名规则: feature/user_createtime_feature 。
• 新特性或新功能开发完成后,开发⼈员将feature分支合到 develop 分⽀。
• ⼀旦该需求发布上线,便将其删除。
release分⽀• release 为预发布分⽀,基于本次上线所有的 feature 分⽀合并到 develop 分⽀之后,基
于 develop 分⽀创建。可以部署到测试或预发布集群。• 命名以 release/ 开头,建议的命名规则: release/version_publishtime 。
• release 分⽀主要⽤于提交给测试⼈员进⾏功能测试。发布提测阶段,会以 release 分⽀代码为基准进⾏提测。
• 如果在release分⽀测试出问题,需要**回归验证develop分⽀**看否存在此问题。
• release 分⽀属于临时分⽀,产品上线后可选删除
hotfix分⽀
• hotfix 为线上bug修复分⽀或叫补丁分⽀,主要⽤于对线上的版本进⾏bug修复。当线上出现紧急问题需要⻢上修复时,需要基于 master 分⽀创建。
• 命名以 hotfix/ 开头,建议的命名规则:hotfix/user_createtime_hotfix
• 当问题修复完成后,需要合并到 master 分⽀和 develop 分⽀并推送远程。⼀旦修复上线,便将其删除。
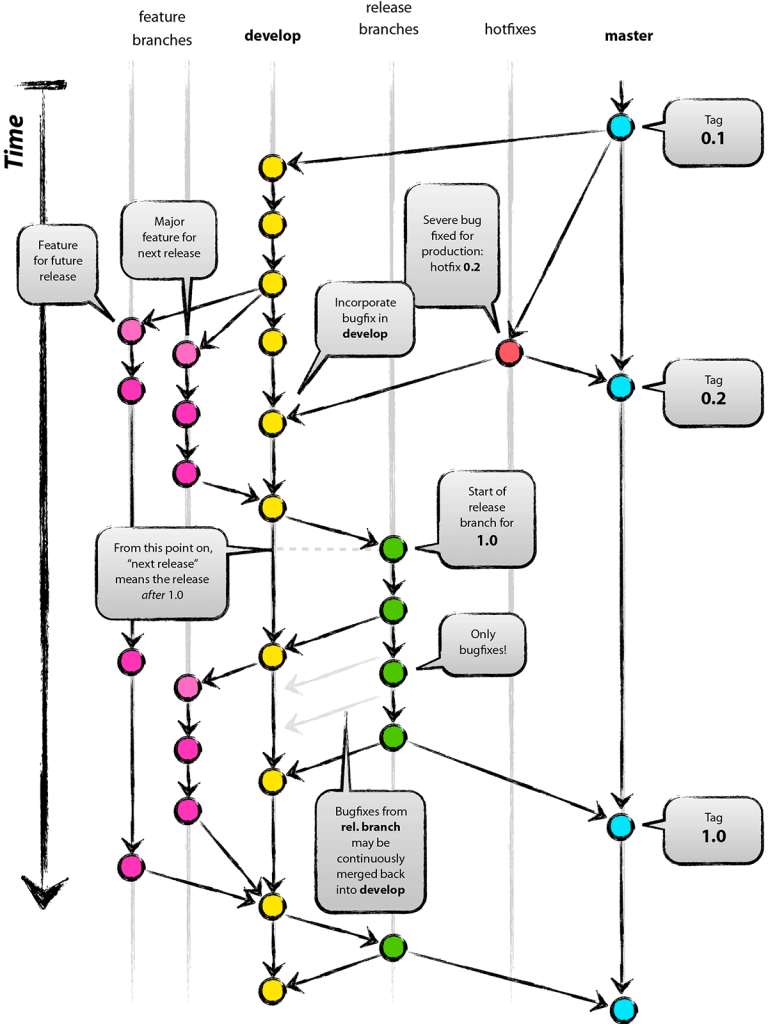
以上跟⼤家讲解的是企业级常⽤的⼀种:GitFlow模型。
但要说的是,该模型并不是适⽤于所有的团队、所有的环境和所有的⽂化!!
选择什么模型,在于站在你的团队或项⽬的⻆度思考:
这种分⽀模型可以帮助你们解决哪些问题?它会带来哪些问题?这种模式为哪种开发提供更好的⽀持?你们想要⿎励这种⾏为吗?
选择的分⽀模型目的都是为了让⼈们更容易地进⾏软件协作开发。
所以对于不同公司,规范是会有些许差异,但万变不离其宗:是为了开发效率与稳定!
项目管理实战
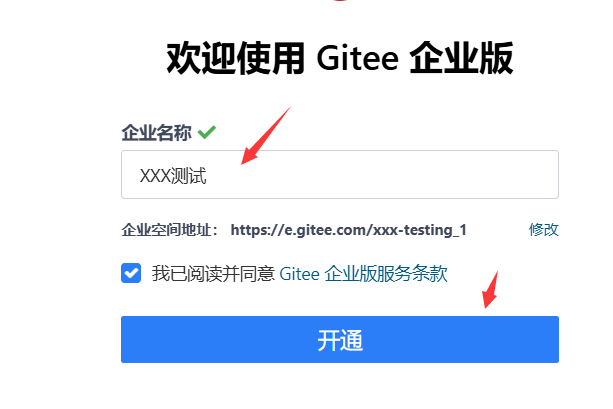
准备工作
先在Gitee上进行注册

名字随便填,通过即可

注:
• 创建的仓库可以关联到某个项⽬中被管理
开发场景
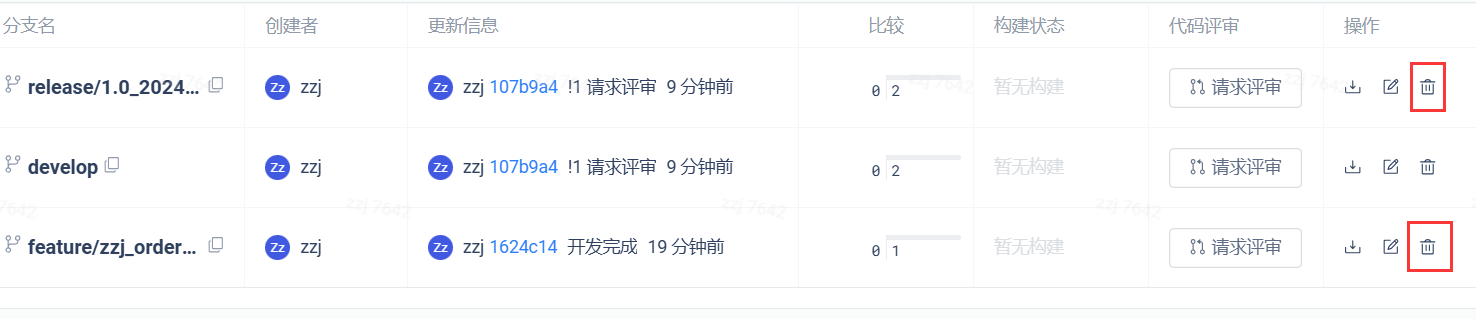
1现有⼀个订单管理的新需求需要开发,⾸先可以基于 develop 分⽀创建一个feature/xxx分支
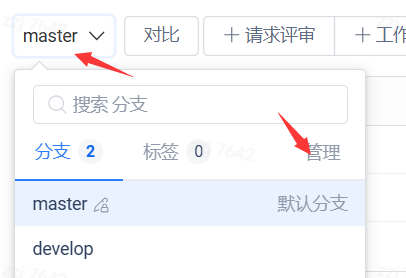

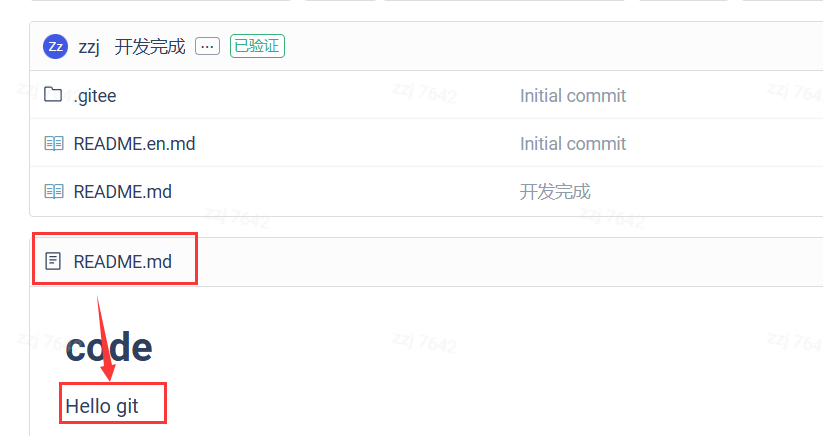
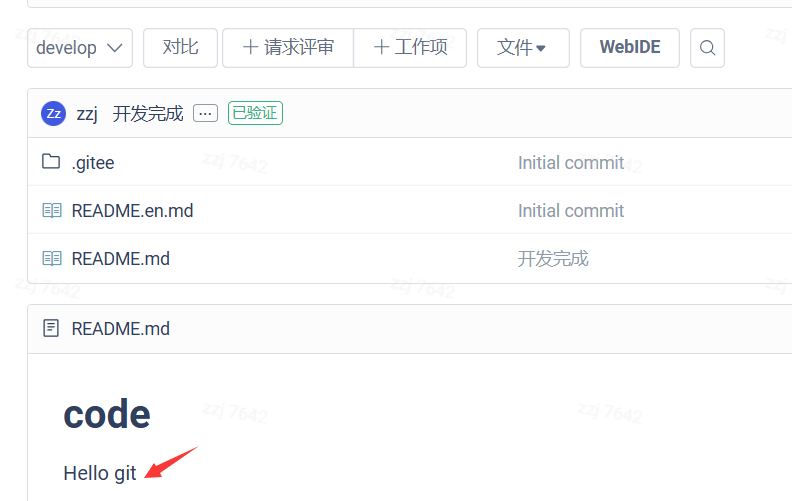
在该分支下进行开发,开发完成(为了演示,只是在README.md文件进行新增Hello git而已~)
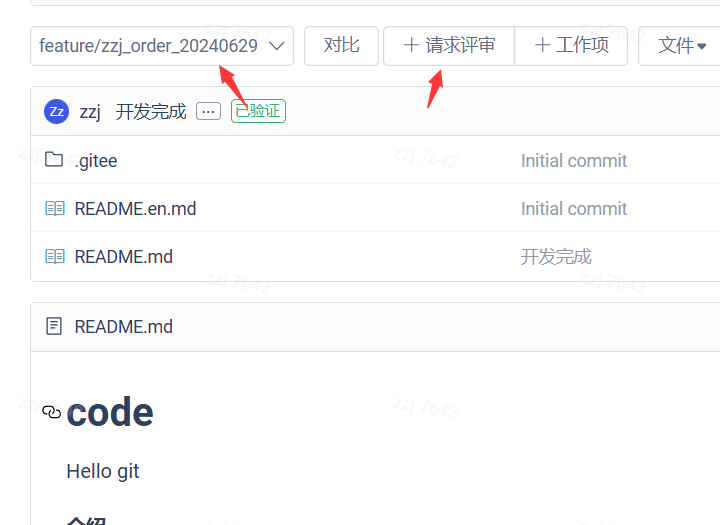
需求在 feature/zzj_order_20240629 分⽀开发完毕,这时研发⼈员可以将代码合并到
develop 分⽀,将其部署在开发环境的服务器中,⽅便开发⼈员进⾏测试和调试。
开发者在 feature 分⽀下发起请求评审
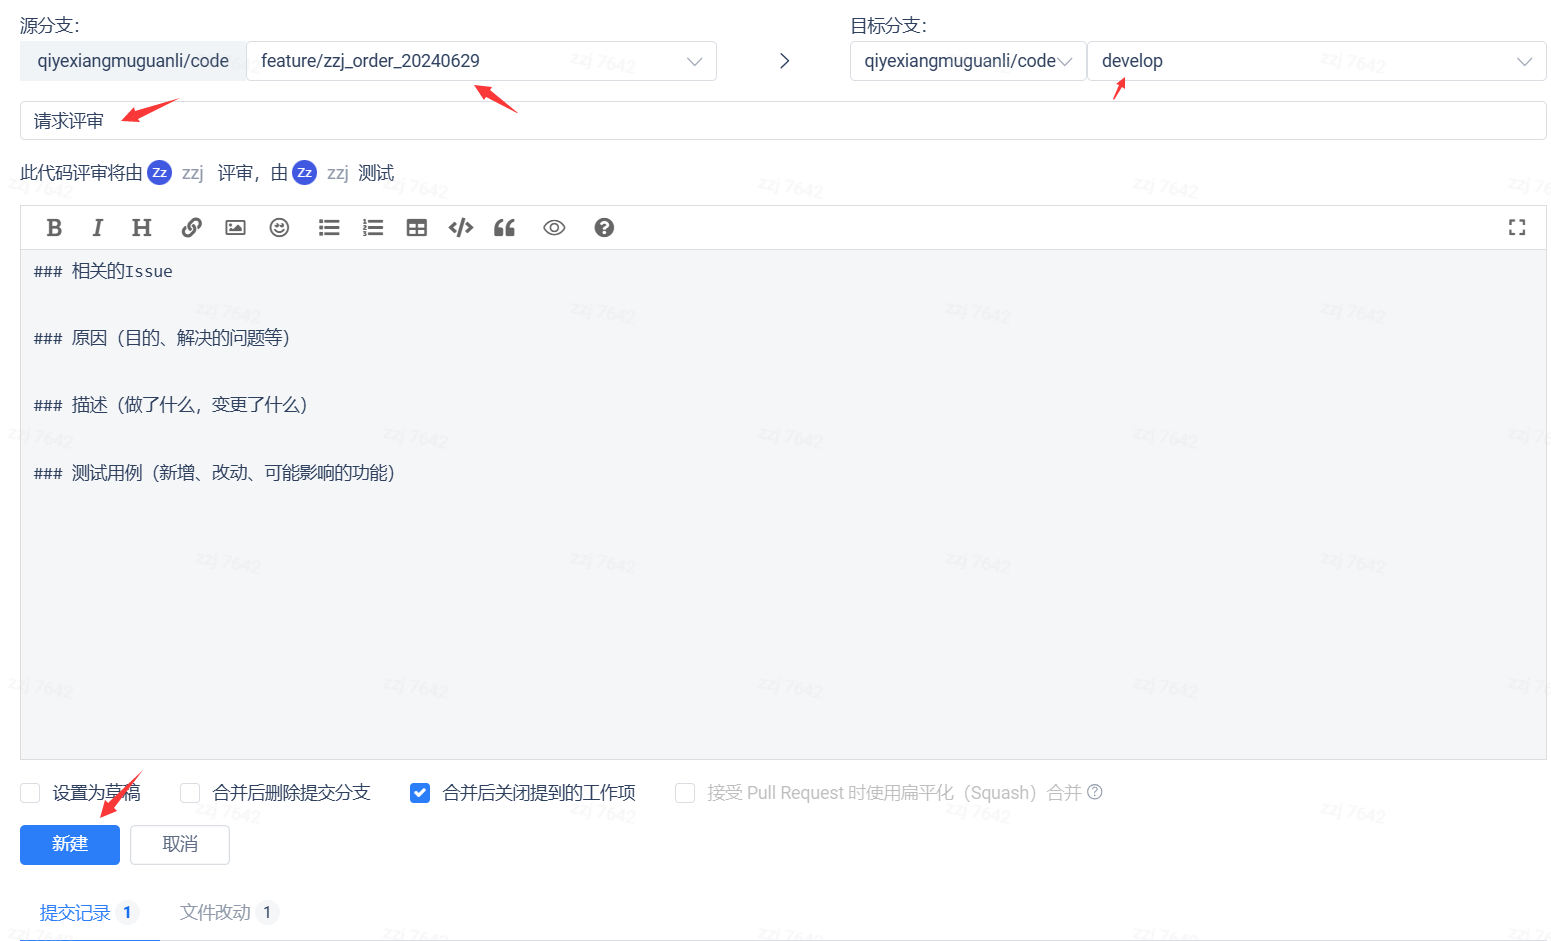
审评员审查代码
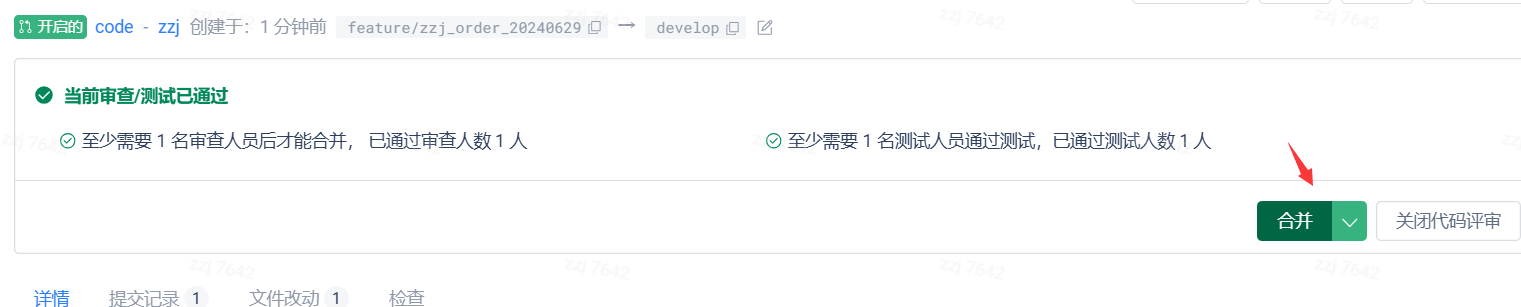
合并成功,查看结果
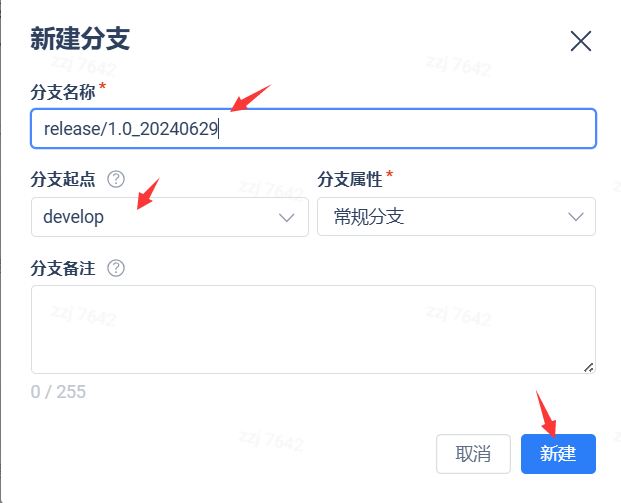
- 在develop下开发⼈员⾃测通过后,先确定下develop不存在未测试完毕的需求,然后研发
⼈员可基于 develop 分⽀创建⼀个 release/xxx 分⽀出来,可交由测试⼈员进⾏测试。
测试⼈员测试通过后(包含测试环境和预发布环境的测试),就可将代码合并⼊master

测试⼈员在master(正式环境)测试通过后,便可删除feature/xxx 分⽀ (feature/xxx也一样)
 关于修复问题
1修复测试环境Bug
在develop测试出现了Bug,建议⼤家直接在 feature 分⽀上进⾏修复。
修复后的提测上线流程与新需求加⼊的流程⼀致。
2修改预发布环境Bug
在release测试出现了Bug,⾸先要回归下develop分⽀是否同样存在这个问题。
如果存在,修复流程与修复测试环境Bug流程⼀致。
如果不存在,这种可能性⽐较少,⼤部分是数据兼容问题,环境配置问题等。
3修改正式环境Bug
在master测试出现了Bug,⾸先要回归下release和develop分⽀是否同样存在这个问题。
如果存在,修复流程与修复测试环境Bug流程⼀致。
如果不存在,这种可能性也⽐较少,⼤部分是数据兼容问题,环境配置问题等。
4紧急修复正式环境Bug
需求在测试环节未测试出Bug,上线运⾏⼀段时候后出现了Bug,需要紧急修复的。
有的企业⾯对紧急修复时,⽀持不进⾏测试环境的验证,但还是建议验证下预发布环境 。
可基于master 创建hotfix/xxx分⽀,修复完毕后发布到master验证,验证完毕后,将master代码合并到develop分⽀,同时删掉hotfix/xxx分⽀。
拓展阅读
其他DevOps研发平台
腾讯云DevOps
拓展实践
阿⾥⻜流flow分⽀模型,及项⽬版本管理实践
项目版本管理的最佳实践:飞流Flow(阿里AoneFlow)篇-CSDN博客
本文关于git的原理与使用就写到这里。有错误欢迎在评论区指正,感谢~