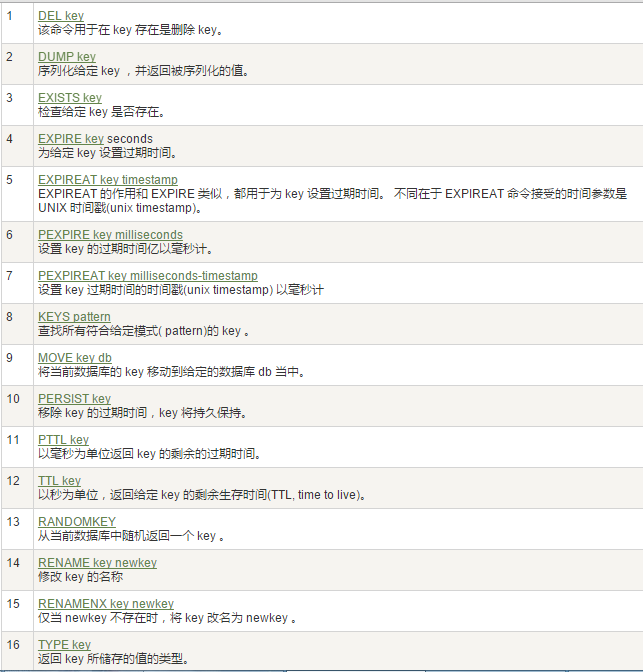
1 课程概述

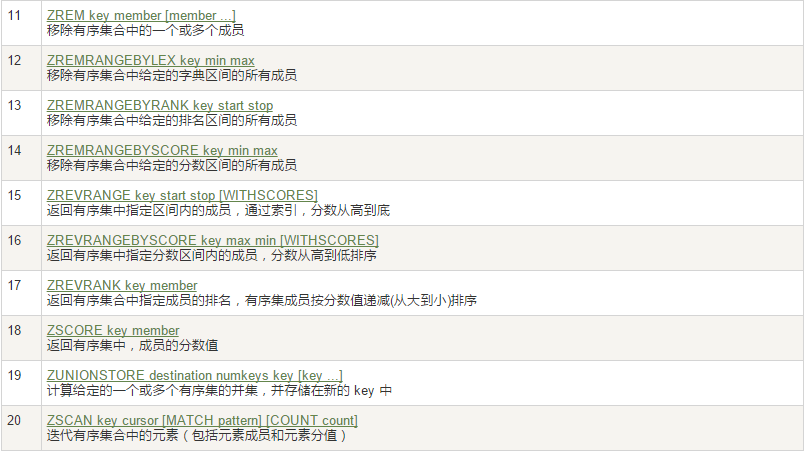
2 Redis入门概述
2.1 是什么
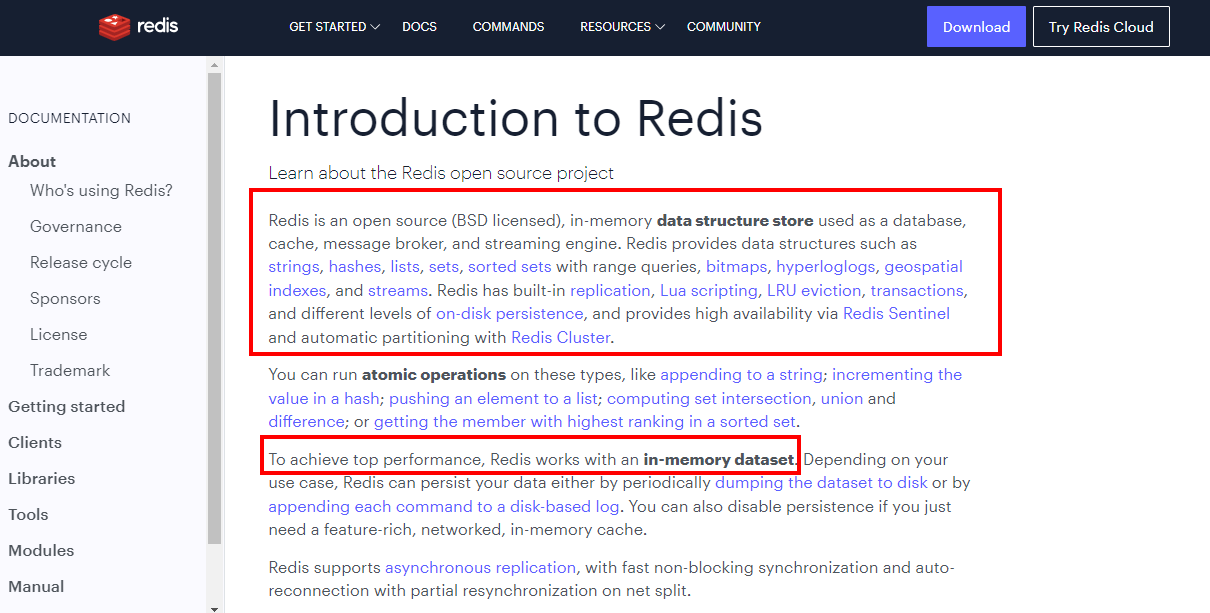
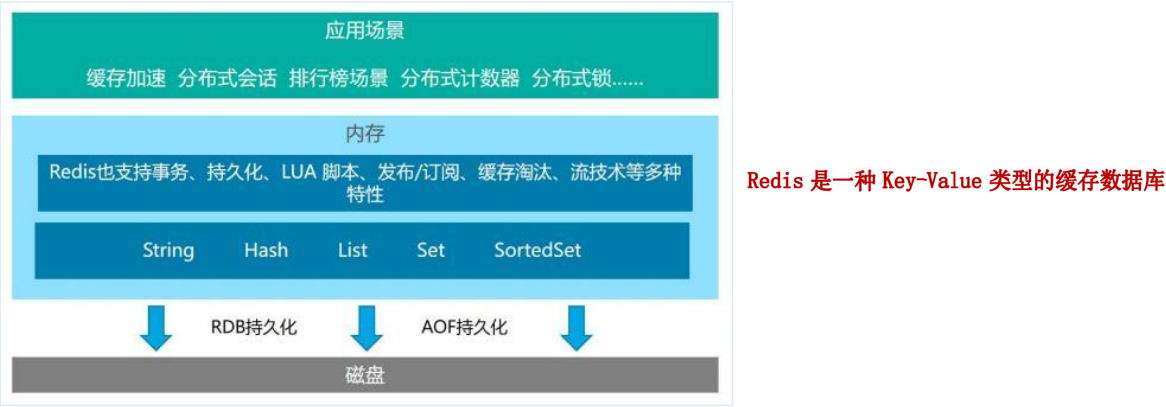
Redis是基于内存的KV键值对内存数据库
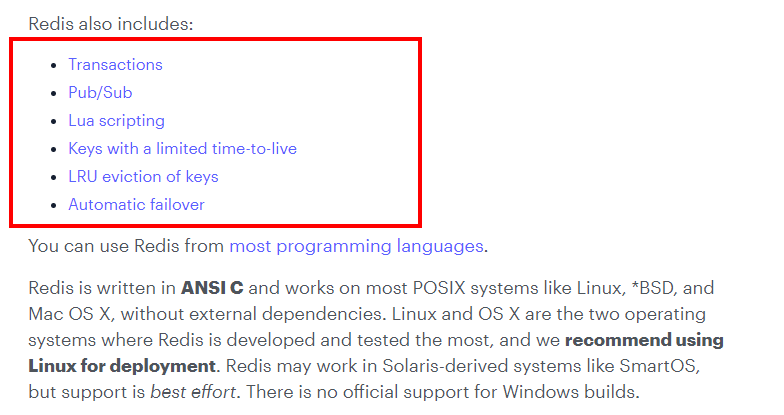
Redis:Remote Dictionary Server(远程字典服务)是完全开源的,使用ANSIC语言编写遵守BSD协议,是一个高性能的Key-Value数据库提供了丰富的数据结构,例如String、Hash、List、Set、SortedSet等等。数据是存在内存中的,同时Redis支持事务、持久化、LUA脚本、发布/订阅、缓存淘汰、流技术等多种功能特性提供了主从模式、Redis Sentinel和Redis Cluster集群架构方案

Redis之父Salvatore Sanfilippo,一名意大利程序员,大家更习惯称呼他Antirez

Github:https://github.com/antirez
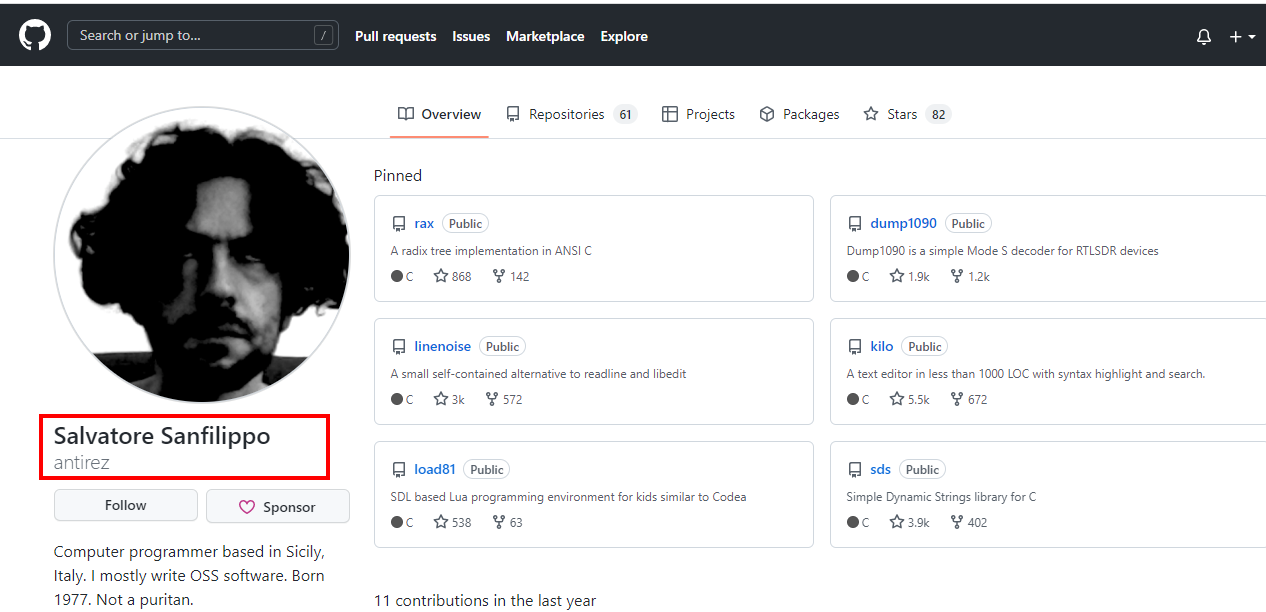
个人博客:http://antirez.com/latest/0
2.2 能干嘛
2.2.1 主流功能与应用
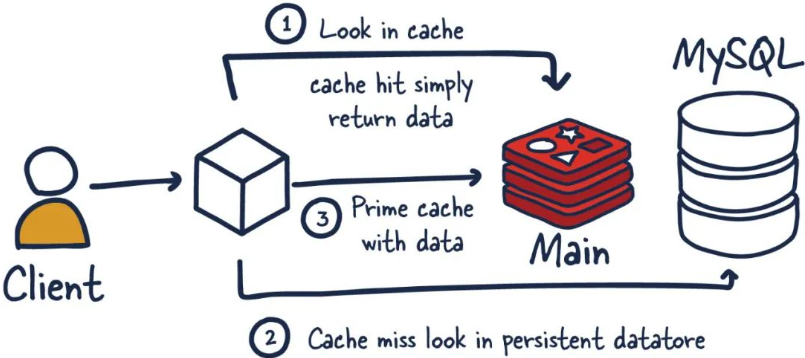
1 分布式缓存,挡在mysql数据库之前的带刀护卫
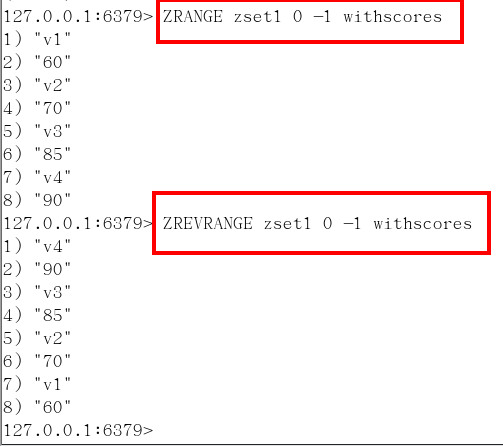
Redis与传统关系型数据库(mysql)相比的区别:
Redis是key-value数据库(NoSQL一种),mysql是关系数据库
Redis数据操作主要在内存,而mysql主要存储在磁盘
Redis在某一些场景使用中要明显优于mysql,比如计数器、排行榜等方面
Redis通常用于一些特定场景,需要与Mysql一起配合使用
两者并不是相互替换和竞争关系,而是共用和配合使用
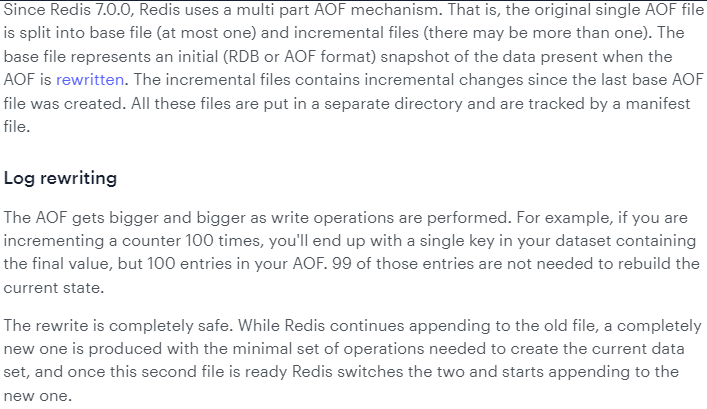
2 内存存储和持久化(RDB+AOF)
redis支持异步将内存中的数据写到硬盘上,同时不影响继续服务
3 高可用架构搭配
单机、主从、哨兵、集群
4 缓存穿透、击穿、雪崩
5 分布式锁
6 队列
Reids提供list和set操作,这使得Redis能作为一个很好的消息队列平台来使用。
我们常通过Reids的队列功能做购买限制。比如到节假日或者推广期间,进行一些活动,
对用户购买行为进行限制,限制今天只能购买几次商品或者一段时间内只能购买一次。也比较适合适用。
7 排行榜+点赞
在互联网应用中,有各种各样的排行榜,如电商网站的月度销量排行榜、社交APP的礼物排行榜、小程序的投票排行榜等等。Redis提供的zset数据类型能够快速实现这些复杂的排行榜。
比如小说网站对小说进行排名,根据排名,将排名靠前的小说推荐给用户
8 。。。。。。
2.2.2 一图,总体功能概述

2.2.3 优势
a)性能极高-Redis能读的速度是110000次/秒,写的速度是81000次/秒
b)Redis数据类型丰富,不仅仅支持简单的key-value类型的数据,同时还提供list,set,zset,hash等数据结构的存储
c)Redis支持数据的持久化,可以将内存中的数据保持在磁盘中,重启的时候可以再次加载进行使用
d)Redis支持数据的备份,即master-slave模式的数据备份
2.2.4 小总结
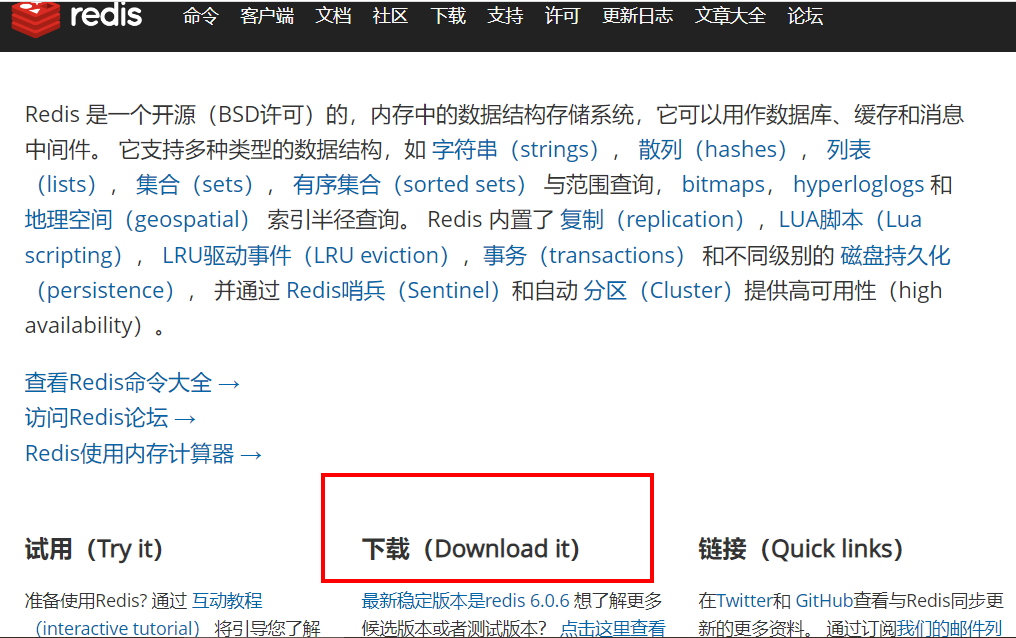
2.3 去哪下
2.3.1 官网地址
https://www.redis.com.cn/documentation.html
2.3.2 下载安装包
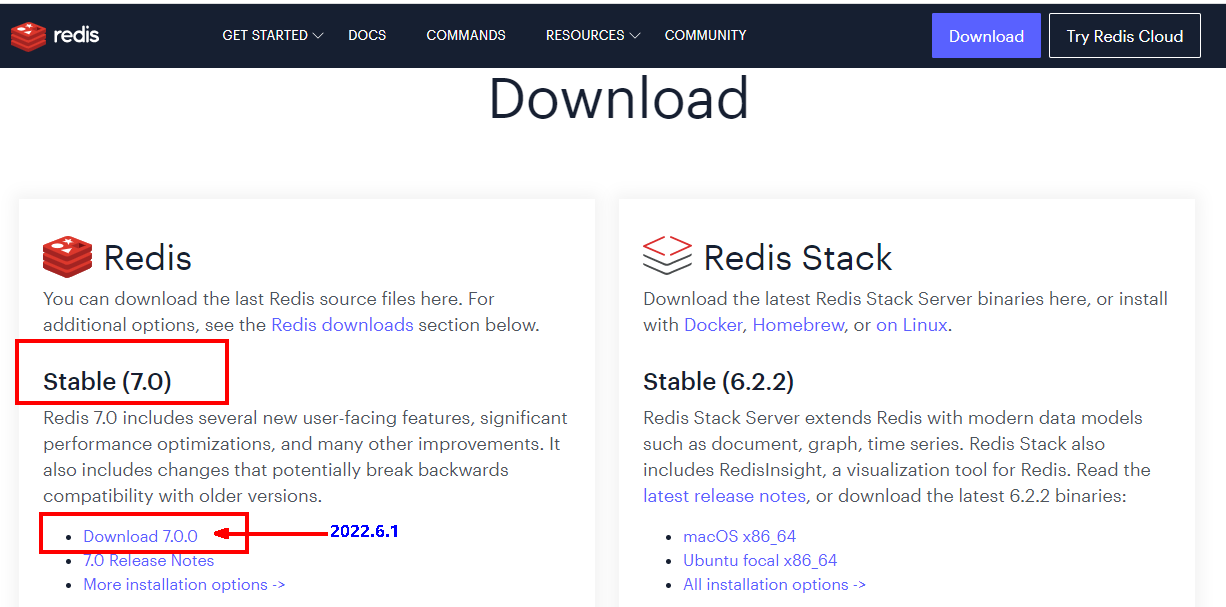
本次Redis7:redis-7.0.0.tar.gz
Redis6:

2.3.3 其他文档资料
2.3.3.1 Redis源码地址
https://github.com/redis/redis
2.3.3.2 Redis在线测试
2.3.3.3 Redis命令参考
2.4 怎么玩
官网:
多种数据类型基本操作和配置
持久化和复制,RDB/AOF
事务的控制
复制,集群等
。。。。。。
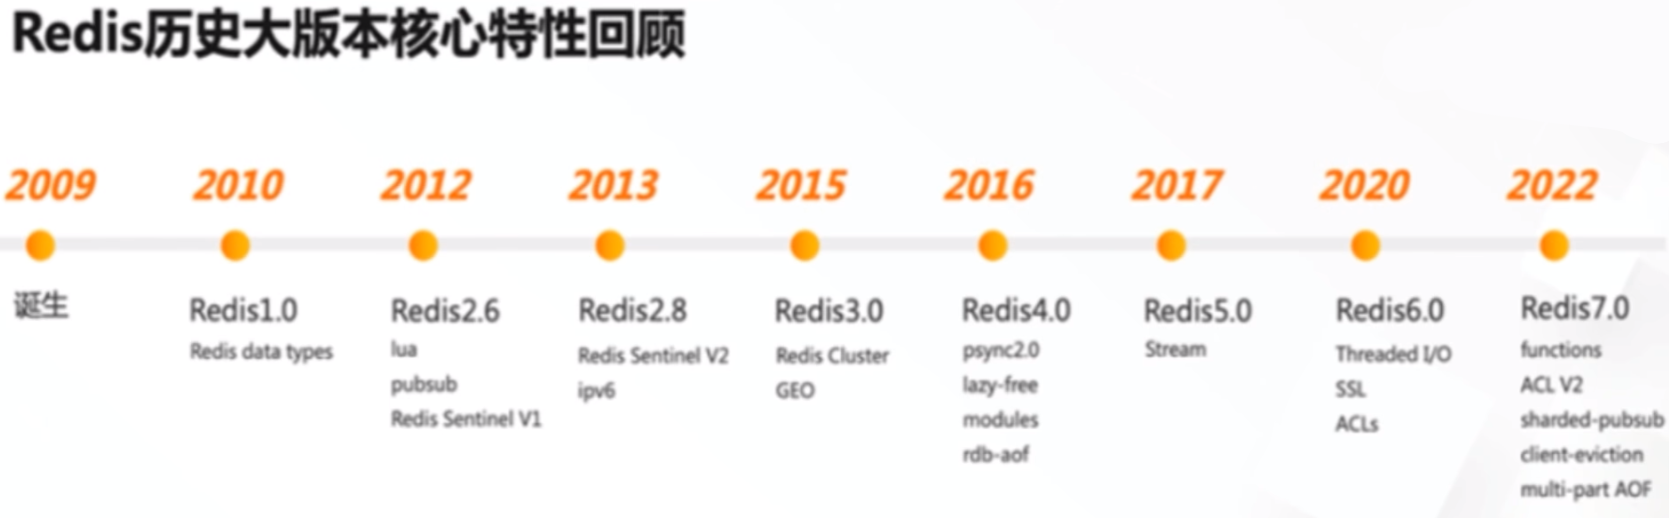
2.5 Redis迭代演化和Redis7新特性浅谈
2.5.1 Redis版本迭代推演介绍
2.5.1.1 几个里程碑式的重要版本

5.0版本是直接升级到6.0版本,对于这个激进的升级,Redis之父antirez表现得很有信心和兴奋,
所以第一时间发文来阐述6.0的一些重大功能"Redis 6.0.0 GA is out!":
随后Redis再接再厉,直接王炸Redis7.0---2023年爆款
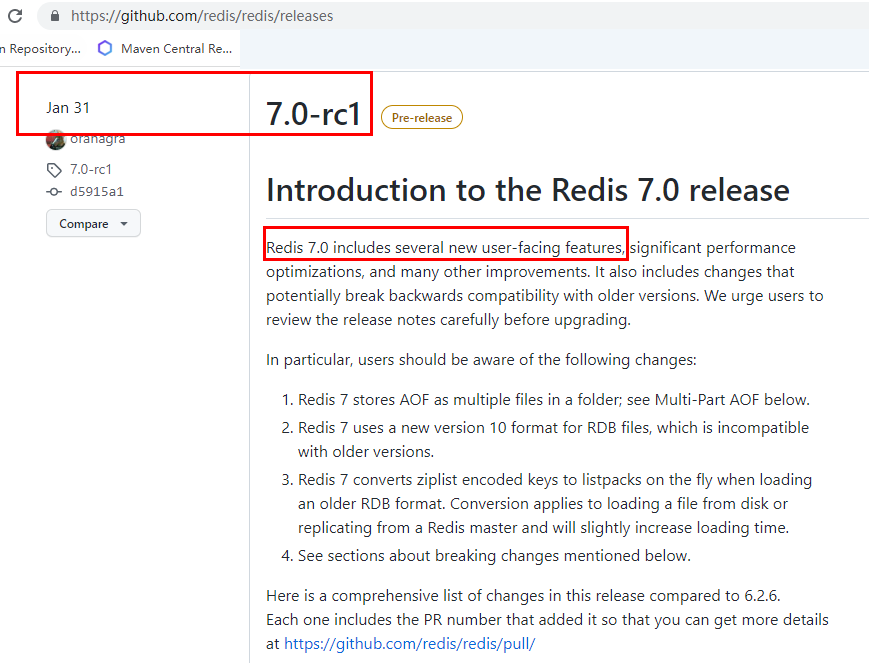
2022年4月27日Redis正式发布了7.0更新
(其实早在2022年1月31日,Redis已经预发布了7.0rc-1,经过社区的考验后,确认没重大Bug才会正式发布)
2.5.1.2 命名规则
Redis从发布至今,已经有十余年的时光了,一直遵循着自己的命名规则:
版本号第二位如果是奇数,则为非稳定版本 如2.7、2.9、3.1
版本号第二位如果是偶数,则为稳定版本 如2.6、2.8、3.0、3.2
当前奇数版本就是下一个稳定版本的开发版本,如2.9版本是3.0版本的开发版本
我们可以通过redis.io官网来下载自己感兴趣的版本进行源码阅读:
历史发布版本的源码:https://download.redis.io/releases/
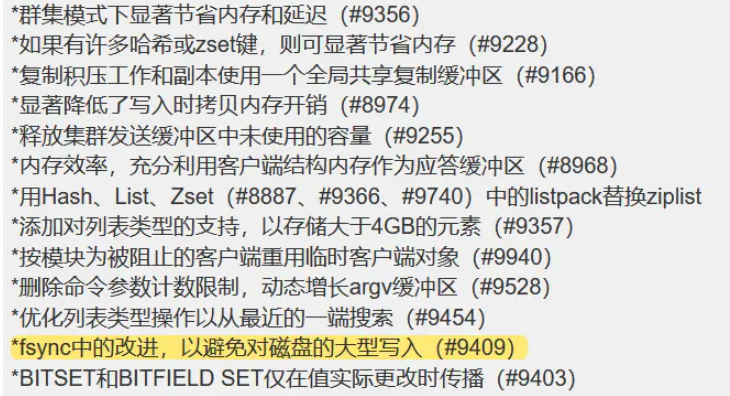
2.5.2 Redis7.0新特性概述
2.5.2.1 https://github.com/redis/redis/releases
2.5.2.2 部分新特性总览
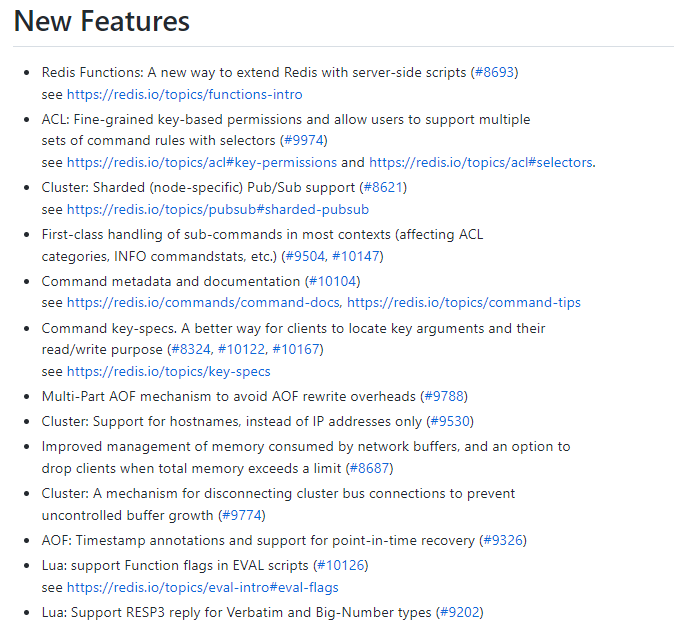
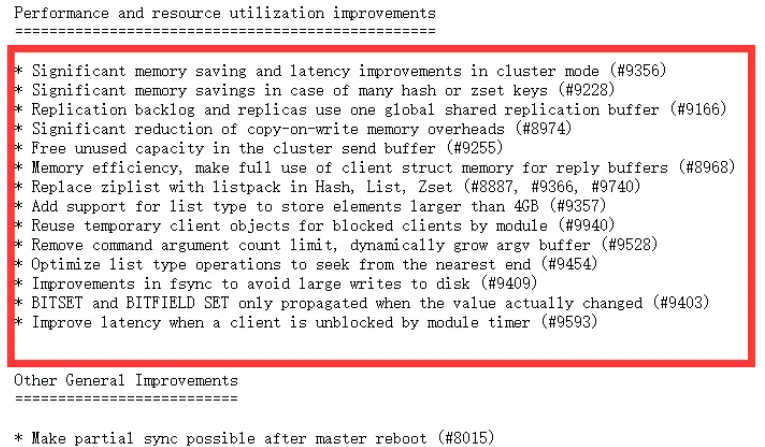
2022 年 4 月正式发布的 Redis 7.0 是目前 Redis 历史版本中变化最大的版本。
首先,它有超过 50 个以上新增命令;其次,它有大量核心特性的新增和改进。
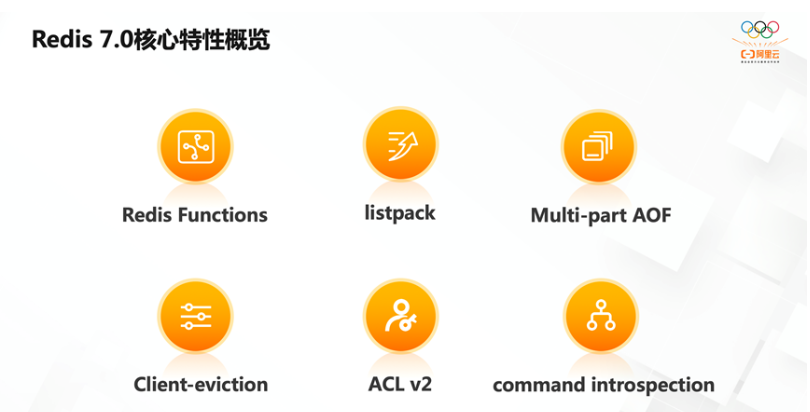
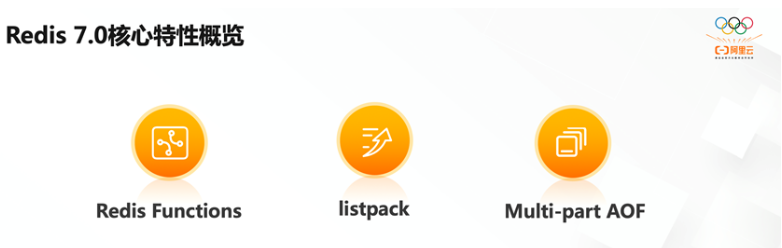
Redis Functions
Client-eviction

Multi-part AOF
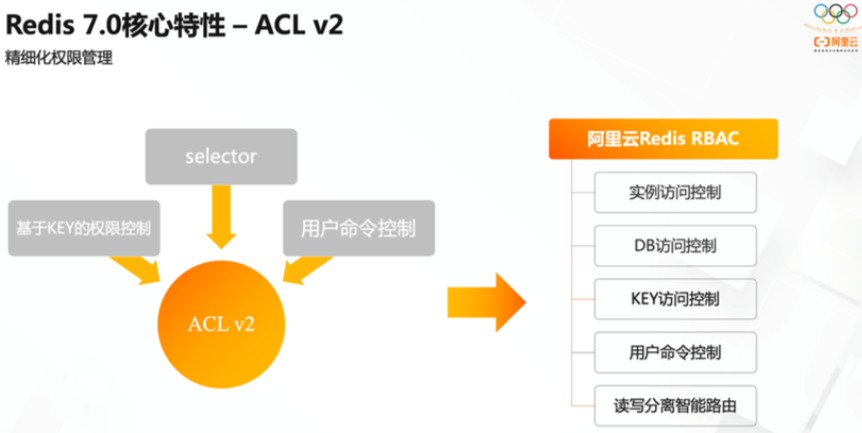
ACL V2
新增命令

listpack替代ziplist
listpack 是用来替代 ziplist 的新数据结构,在 7.0 版本已经没有 ziplist 的配置了(6.0版本仅部分数据类型作为过渡阶段在使用)
底层性能提升(和编码关系不大)
2.5.3 本次将对Redis7的一部分新特性做说明(not all)
总体概述:
大体和之前的redis版本保持一致和稳定,主要是自身底层性能和资源利用率上的优化和提高,如果你生产上系统稳定,不用着急升级到最新的redis7版本,当然,O(∩∩)O哈哈~,如果你是从零开始的新系统,直接上Redis7.0-GA版。^^
|---------------------------|-------------------------------------------------------------------------------------------------------------------------------------------------------------------------------------------------|
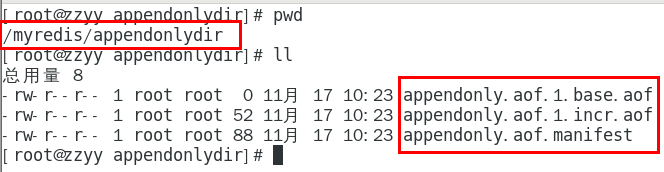
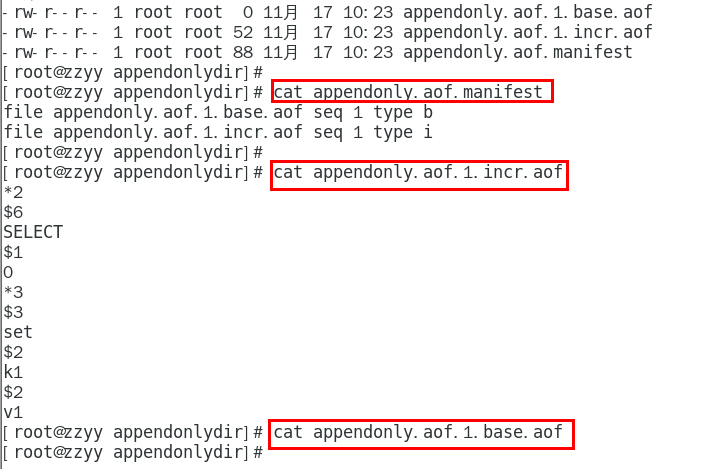
| 多AOF文件支持 | 7.0 版本中一个比较大的变化就是 aof 文件由一个变成了多个,主要分为两种类型:基本文件(base files)、增量文件(incr files),请注意这些文件名称是复数形式说明每一类文件不仅仅只有一个。在此之外还引入了一个清单文件(manifest) 用于跟踪文件以及文件的创建和应用顺序(恢复) |
| config命令增强 | 对于Config Set 和Get命令,支持在一次调用过程中传递多个配置参数。例如,现在我们可以在执行一次Config Set命令中更改多个参数: config set maxmemory 10000001 maxmemory-clients 50% port 6399 |
| 限制客户端内存使用 Client-eviction | 一旦 Redis 连接较多,再加上每个连接的内存占用都比较大的时候, Redis总连接内存占用可能会达到maxmemory的上限,可以增加允许限制所有客户端的总内存使用量配置项,redis.config 中对应的配置项 // 两种配置形式:指定内存大小、基于 maxmemory 的百分比。 maxmemory-clients 1g maxmemory-clients 10% |
| listpack紧凑列表调整 | listpack 是用来替代 ziplist 的新数据结构,在 7.0 版本已经没有 ziplist 的配置了(6.0版本仅部分数据类型作为过渡阶段在使用)listpack 已经替换了 ziplist 类似 hash-max-ziplist-entries 的配置 |
| 访问安全性增强ACLV2 | 在redis.conf配置文件中,protected-mode默认为yes,只有当你希望你的客户端在没有授权的情况下可以连接到Redis server的时候可以将protected-mode设置为no |
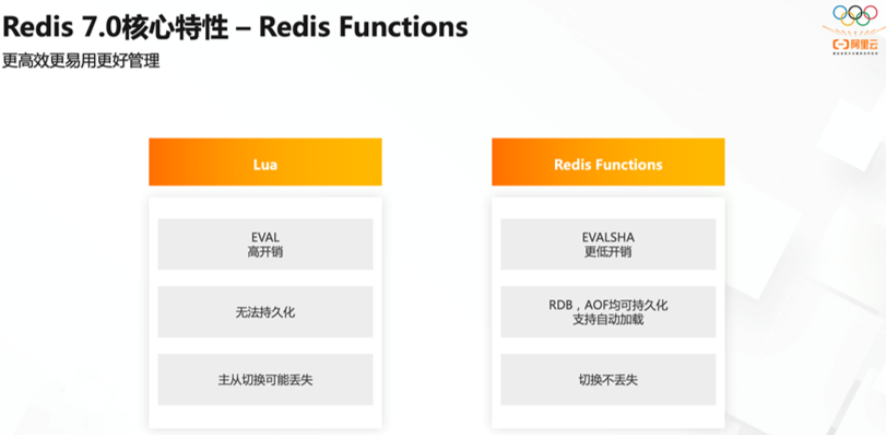
| Redis Functions | Redis函数,一种新的通过服务端脚本扩展Redis的方式,函数与数据本身一起存储。 简言之,redis自己要去抢夺Lua脚本的饭碗 |
| RDB保存时间调整 | 将持久化文件RDB的保存规则发生了改变,尤其是时间记录频度变化 |
| 命令新增和变动 | Zset (有序集合)增加 ZMPOP、BZMPOP、ZINTERCARD 等命令 Set (集合)增加 SINTERCARD 命令 LIST (列表)增加 LMPOP、BLMPOP ,从提供的键名列表中的第一个非空列表键中弹出一个或多个元素。 |
| 性能资源利用率、安全、等改进 | 自身底层部分优化改动,Redis核心在许多方面进行了重构和改进 主动碎片整理V2:增强版主动碎片整理,配合Jemalloc版本更新,更快更智能,延时更低 HyperLogLog改进:在Redis5.0中,HyperLogLog算法得到改进,优化了计数统计时的内存使用效率,7更加优秀 更好的内存统计报告 如果不为了API向后兼容,我们将不再使用slave一词......(政治正确) |
3 Redis安装配置
3.1 Windows版安装
Window 下安装
下载地址:https://github.com/dmajkic/redis/downloads
下载到的Redis支持32bit和64bit。根据自己实际情况选择,将64bit的内容cp到自定义盘符安装目录取名redis。 如 C:\reids
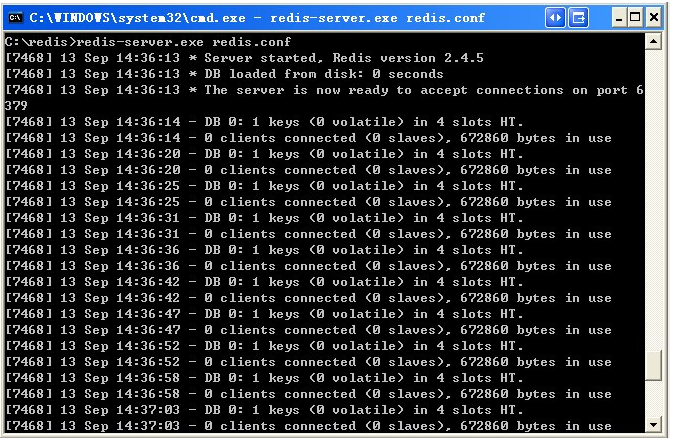
打开一个cmd窗口 使用cd命令切换目录到 C:\redis 运行 redis-server.exe redis.conf 。
如果想方便的话,可以把redis的路径加到系统的环境变量里,这样就省得再输路径了,后面的那个redis.conf可以省略,
如果省略,会启用默认的。输入之后,会显示如下界面:
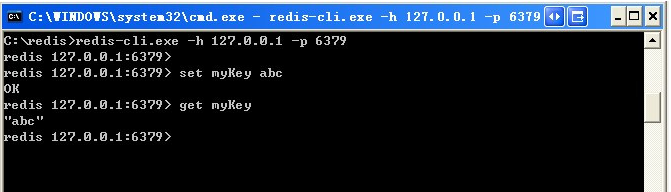
这时候另启一个cmd窗口,原来的不要关闭,不然就无法访问服务端了。
切换到redis目录下运行 redis-cli.exe -h 127.0.0.1 -p 6379 。
设置键值对 set myKey abc
取出键值对 get myKey
3.2 Linux版安装
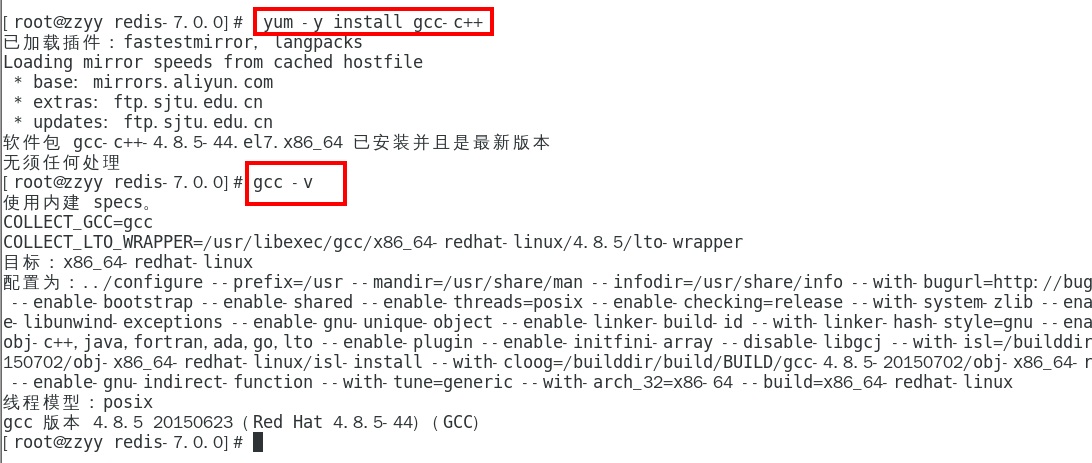
3.2.1 Linux环境安装Redis必须先具备gcc编译环境
什么是gcc?
gcc是linux下的一个编译程序,是C程序的编译工具。
GCC(GNU Compiler Collection) 是 GNU(GNU's Not Unix) 计划提供的编译器家族,它能够支持 C, C++, Objective-C, Fortran, Java 和 Ada 等等程序设计语言前端,同时能够运行在 x86, x86-64, IA-64, PowerPC, SPARC和Alpha 等等几乎目前所有的硬件平台上。鉴于这些特征,以及 GCC 编译代码的高效性,使得 GCC 成为绝大多数自由软件开发编译的首选工具。虽然对于程序员们来说,编译器只是一个工具,除了开发和维护人员,很少有人关注编译器的发展,但是 GCC 的影响力是如此之大,它的性能提升甚至有望改善所有的自由软件的运行效率,同时它的内部结构的变化也体现出现代编译器发展的新特征。
查看gcc命令
gcc-v
安装
安装redis之前需要具备c++库环境
yum -y install gcc-c++
命令案例
3.2.2 版本选择
查看自己redis版本的命令
redis-server -v

安全Bug按照官网提示,升级成为6.0.8及以上
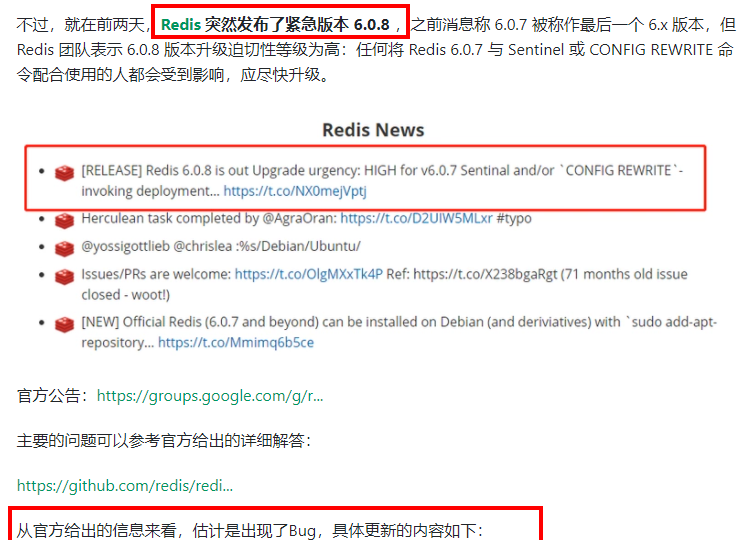
目前建议都需要升级到6.0.8版本以上
3.2.3 Redis7安装步骤
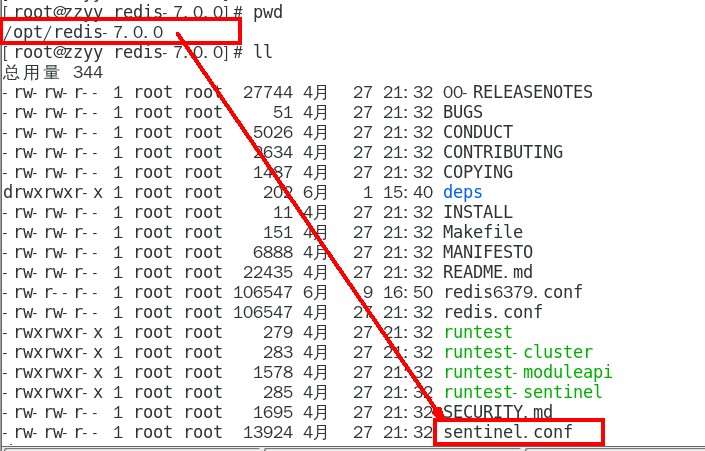
3.2.3.1 下载获得redis-7.0.0.tar.gz后将它放入我们的Linux目录/opt
下载命令:
|------------------------------------------------------------|
| wget https://download.redis.io/releases/redis-7.0.0.tar.gz |
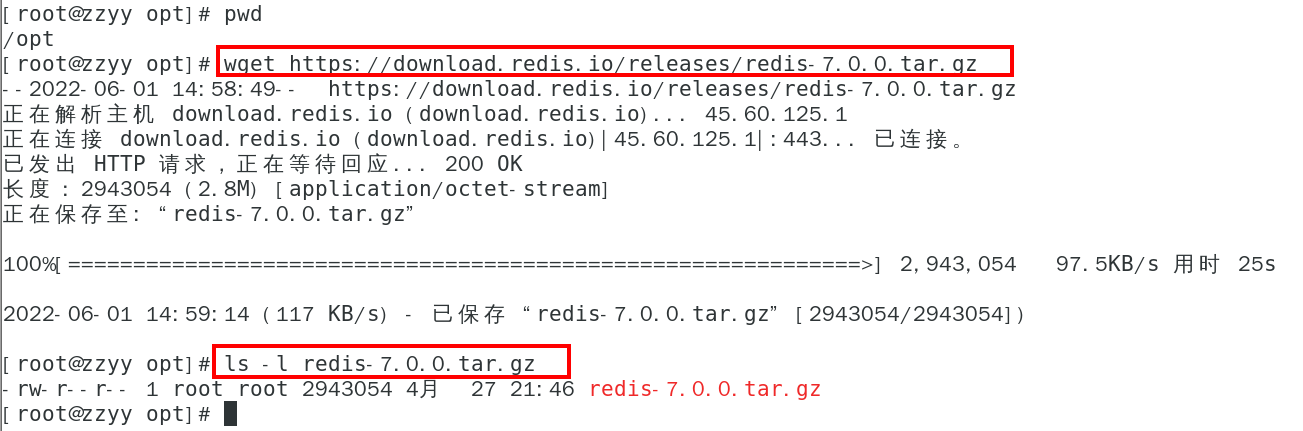
3.2.3.2 /opt目录下解压redis
tar -zxvf redis-7.0.0.tar.gz
解压后:

3.2.3.3 进入目录
cd redis-7.0.0
3.2.3.4 在redis-7.0.0目录下执行make命令


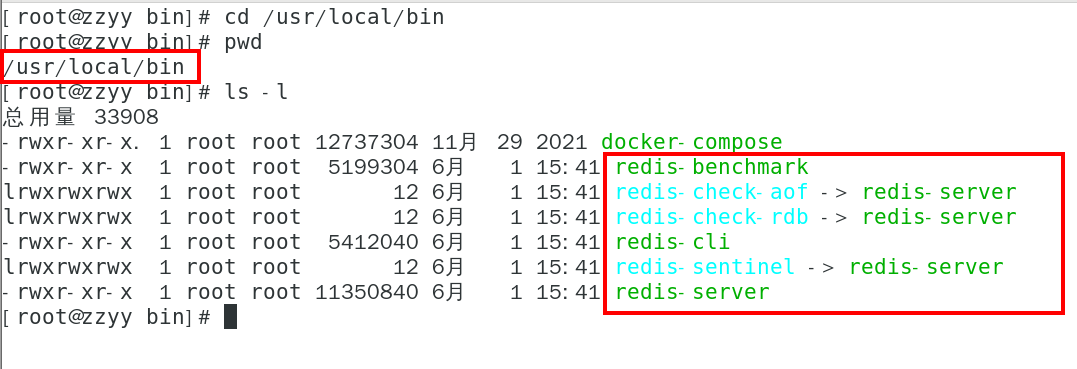
3.2.3.5 查看默认安装目录:usr/local/bin
Linux下的/usr/local类似windows系统的C:\Program Files
安装完后查看
3.2.3.6 将默认的redis.conf拷贝到自己定义好的下一个路径下,比如/myredis
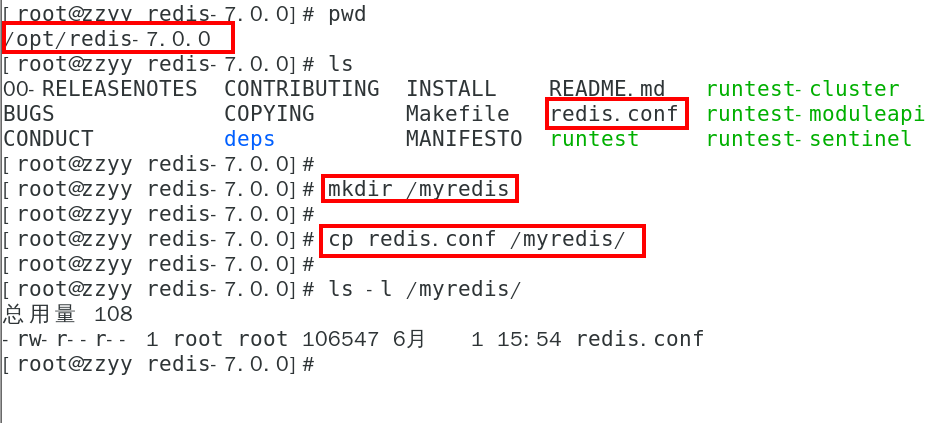
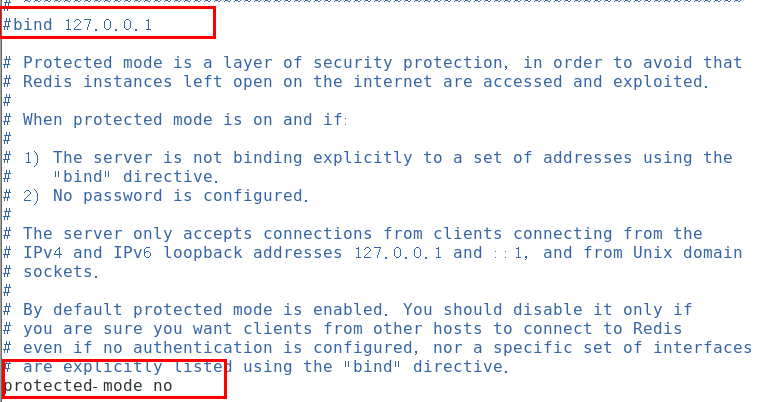
3.2.3.7 修改/myredis目录下redis.conf配置文件做初始化设置
redis.conf配置文件,改完后确保生效,记得重启,记得重启
1 默认daemonize no 改为 daemonize yes
2 默认protected-mode yes 改为 protected-mode no
3 默认bind 127.0.0.1 改为 直接注释掉(默认bind 127.0.0.1只能本机访问)或改成本机IP地址,否则影响远程IP连接
4 添加redis密码 改为 requirepass 你自己设置的密码


3.2.3.8 启动服务
/usr/local/bin目录下运行redis-server,启用/myredis目录下的redis.conf文件
3.2.3.9 连接服务
redis-cli连接和"乒乓球"
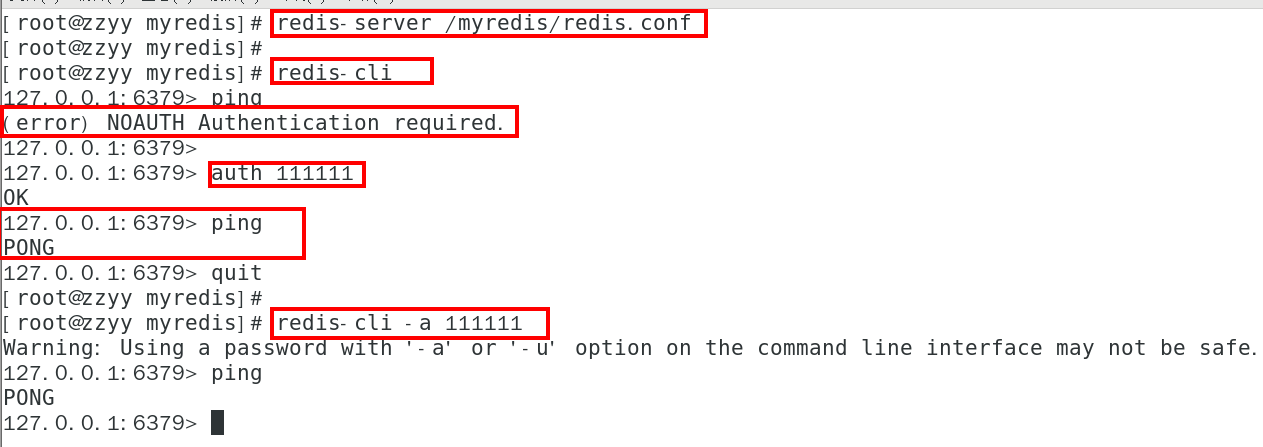
备注说明
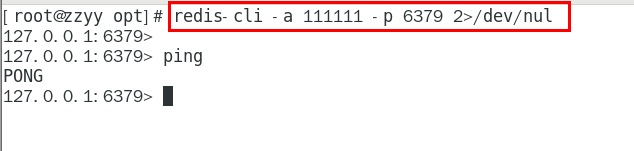
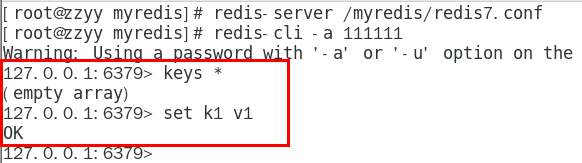
Warning: Using a password with '-a' or '-u' option on the command line interface may not be safe.
我看着不爽,怎么办?
warning 这串输出并不是普通输出,
shell的标准输出包含两种:
1(标准输出)
2(标准错误)我们的命令,即包含1也包含2,2即是我们想要去除的提示。
解决办法将标准错误去除即可,追加2>/dev/null,将标准错误丢弃即可,就没有烦人的警告了。
如果不配置Requirepass就不用密码这一步麻烦了
3.2.3.10 Redis端口为啥是6379?
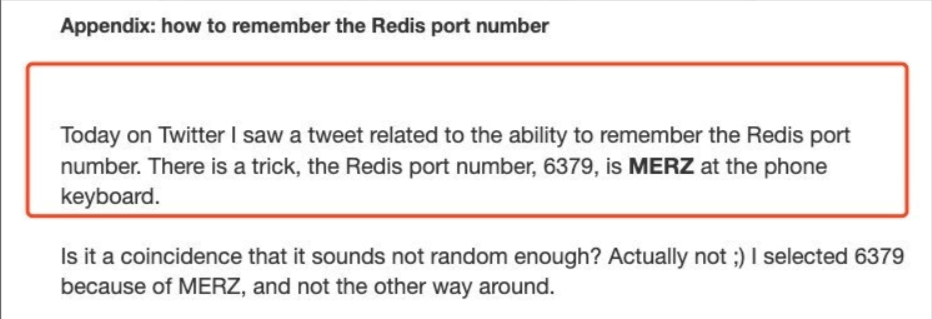
Redis的默认端口是6379,是由手机键盘字母MERZ的位置决定的。MERZ在Antirez的朋友圈语言中是"愚蠢和傻B"的代名词,它源于意大利广告女郎Alessia Merz在电视节目上说了一堆愚蠢的话,redis之父对她有"特殊"印象,就给她弄成端口号了
3.2.3.11 永远的helloworld
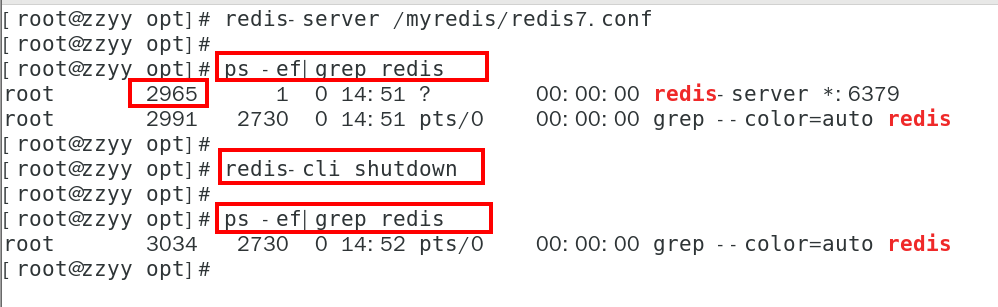
3.2.3.12 关闭
单实例关闭:redis-cli -a 111111 shutdown
多实例关闭,指定端口关闭:redis-cli -p 6379 shutdown
3.2.4 Redis7卸载步骤
3.2.4.1 停止redis-server服务
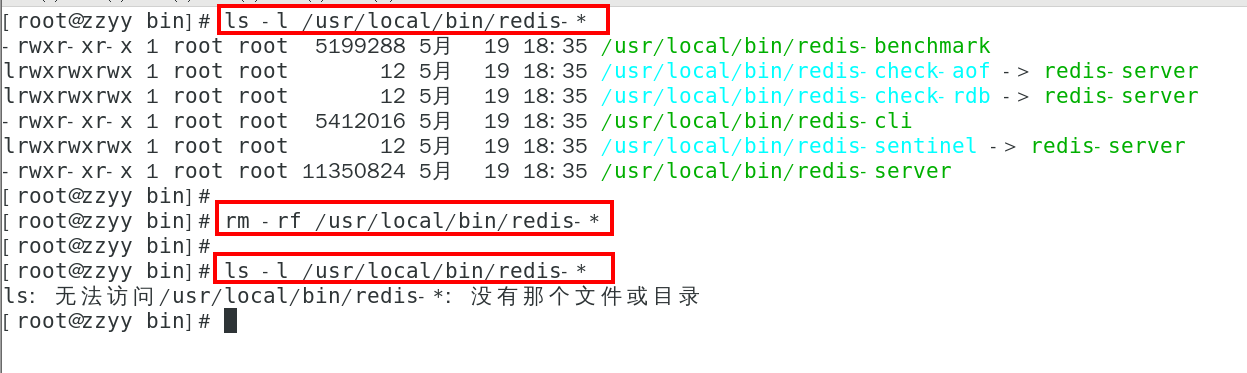
3.2.4.2 删除/usr/local/lib目录下与redis相关的文件
|--------------------------------|
| ls -l /usr/local/bin/redis-* |
| rm -rf /usr/local/bin/redis-* |
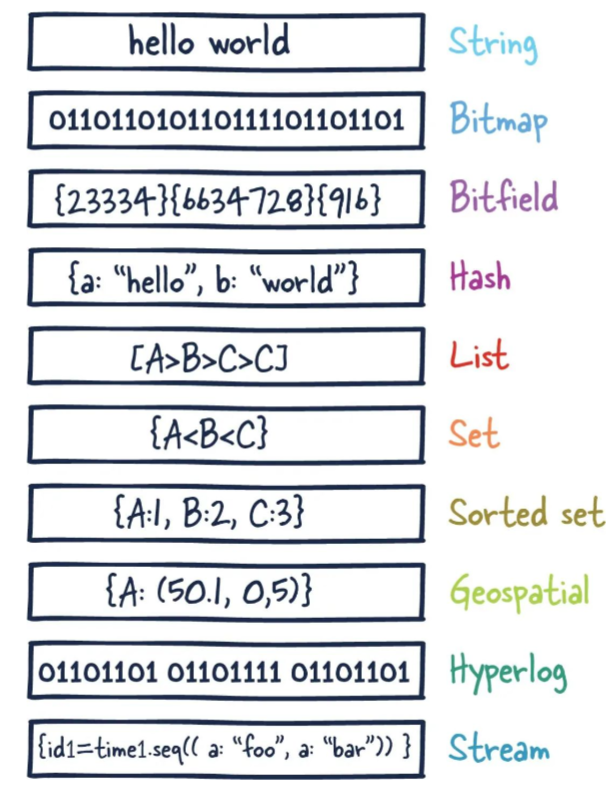
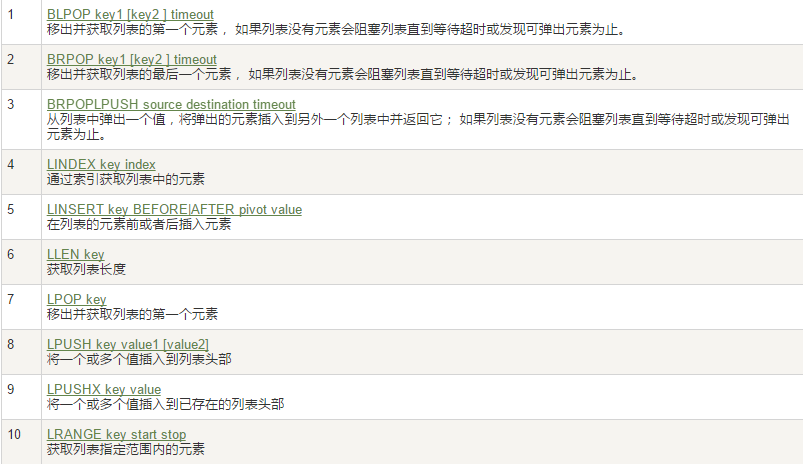
4 Redis10大数据类型
4.1 which 10
4.1.1 一图

声明:这里说的数据类型是value的数据类型,key的类型都是字符串
4.1.2 redis字符串(String)
string是redis最基本的类型,一个key对应一个value。
string类型是二进制安全的,意思是redis的string可以包含任何数据,比如jpg图片或者序列化的对象 。
string类型是Redis最基本的数据类型,一个redis中字符串value最多可以是512M
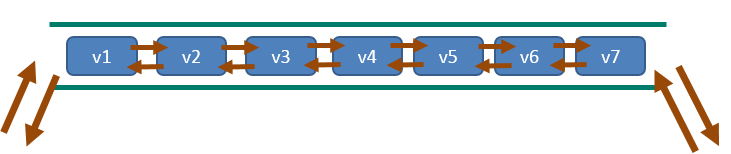
4.1.3 redis列表(List)
Redis列表是简单的字符串列表,按照插入顺序排序。你可以添加一个元素到列表的头部(左边)或者尾部(右边)
它的底层实际是个双端链表,最多可以包含 2^32 - 1 个元素 (4294967295, 每个列表超过40亿个元素)
4.1.4 redis哈希表(Hash)
Redis hash 是一个 string 类型的 field(字段) 和 value(值) 的映射表,hash 特别适合用于存储对象。
Redis 中每个 hash 可以存储 2^32 - 1 键值对(40多亿)
4.1.5 redis集合(Set)
Redis 的 Set 是 String 类型的无序集合。集合成员是唯一的,这就意味着集合中不能出现重复的数据,集合对象的编码可以是 intset 或者 hashtable。
Redis 中Set集合是通过哈希表实现的,所以添加,删除,查找的复杂度都是 O(1)。
集合中最大的成员数为 2^32 - 1 (4294967295, 每个集合可存储40多亿个成员)
4.1.6 redis有序集合(ZSet)
Redis zset 和 set 一样也是string类型元素的集合,且不允许重复的成员。
不同的是每个元素都会关联一个double类型的分数,redis正是通过分数来为集合中的成员进行从小到大的排序。
zset的成员是唯一的,但分数(score)却可以重复。
zset集合是通过哈希表实现的,所以添加,删除,查找的复杂度都是 O(1)。 集合中最大的成员数为 2^32 - 1
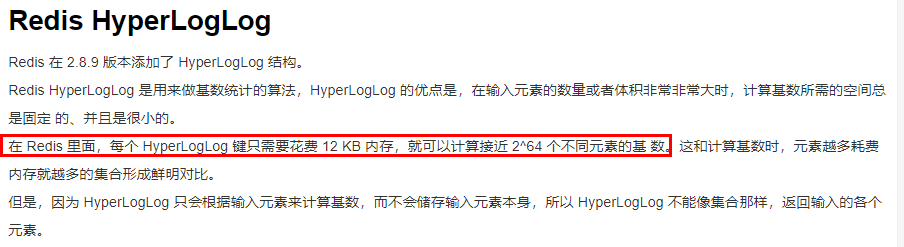
4.1.7 redis基数统计(HyperLogLog)
HyperLogLog 是用来做基数统计的算法,HyperLogLog 的优点是,在输入元素的数量或者体积非常非常大时,计算基数所需的空间总是固定且是很小的。
在 Redis 里面,每个 HyperLogLog 键只需要花费 12 KB 内存,就可以计算接近 2^64 个不同元素的基 数。这和计算基数时,元素越多耗费内存就越多的集合形成鲜明对比。
但是,因为 HyperLogLog 只会根据输入元素来计算基数,而不会储存输入元素本身,所以 HyperLogLog 不能像集合那样,返回输入的各个元素。
4.1.8 redis位图(bitmap)
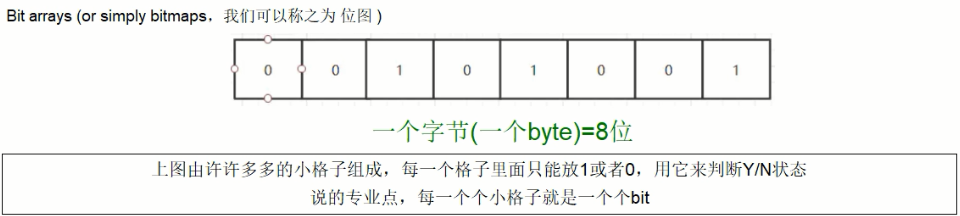
由0和1状态表现的二进制位的bit数组
4.1.9 redis位域(bitfield)
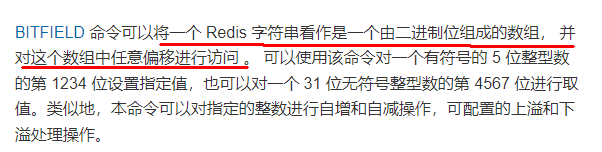
通过bitfield命令可以一次性操作多个比特位域(指的是连续的多个比特位),它会执行一系列操作并返回一个响应数组,这个数组中的元素对应参数列表中的相应操作的执行结果。
说白了就是通过bitfield命令我们可以一次性对多个比特位域进行操作。
4.1.10 redis流(Stream)
Redis Stream 是 Redis 5.0 版本新增加的数据结构。
Redis Stream 主要用于消息队列(MQ,Message Queue),Redis 本身是有一个 Redis 发布订阅 (pub/sub) 来实现消息队列的功能,但它有个缺点就是消息无法持久化,如果出现网络断开、Redis 宕机等,消息就会被丢弃。
简单来说发布订阅 (pub/sub) 可以分发消息,但无法记录历史消息。
而 Redis Stream 提供了消息的持久化和主备复制功能,可以让任何客户端访问任何时刻的数据,并且能记住每一个客户端的访问位置,还能保证消息不丢失
4.2 哪里去获得redis常见数据类型操作命令
官网英文:https://redis.io/commands/
中文:http://www.redis.cn/commands.html
4.3 Redis键(key)
4.3.1 常用
4.3.2 案例
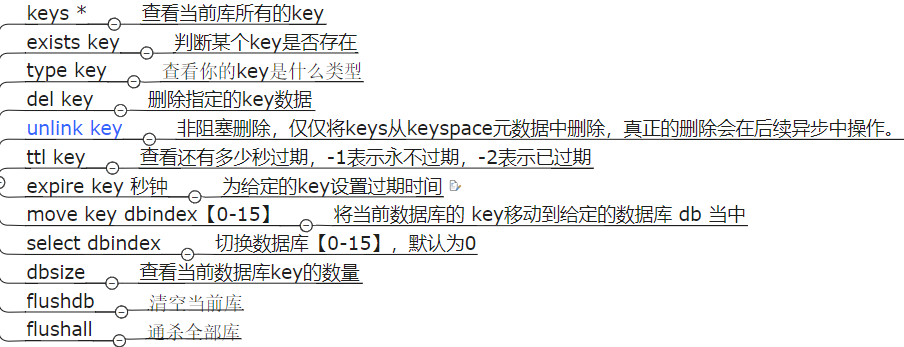
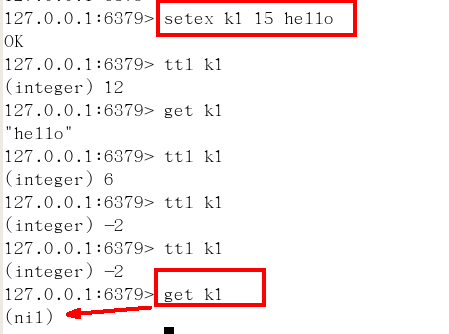
expire key 秒钟(为给定的key设置过期时间)
设置 Key 过期时间,默认-1表示永不过期,-2表示已过期
Redis 的过期时间设置有四种形式:
• EXPIRE 秒------设置指定的过期时间(秒),表示的是时间间隔。
• PEXPIRE 毫秒------设置指定的过期时间,以毫秒为单位,表示的是时间间隔。
• EXPIREAT 时间戳-秒------设置指定的 Key 过期的 Unix 时间,单位为秒,表示的是时间/时刻。
• PEXPIREAT 时间戳-毫秒------设置指定的 Key 到期的 Unix 时间,以毫秒为单位,表示的是时间/时刻。
expire key seconds NX\|XX\|GT\|LT
4.4 数据类型命令及落地运用
官网英文:https://redis.io/commands/
中文:http://www.redis.cn/commands.html
命令不区分大小写,而key是区分大小写的
帮助命令,help @类型
4.4.1 Redis字符串(String)
单值单value
官网地址:https://redis.io/docs/data-types/strings/
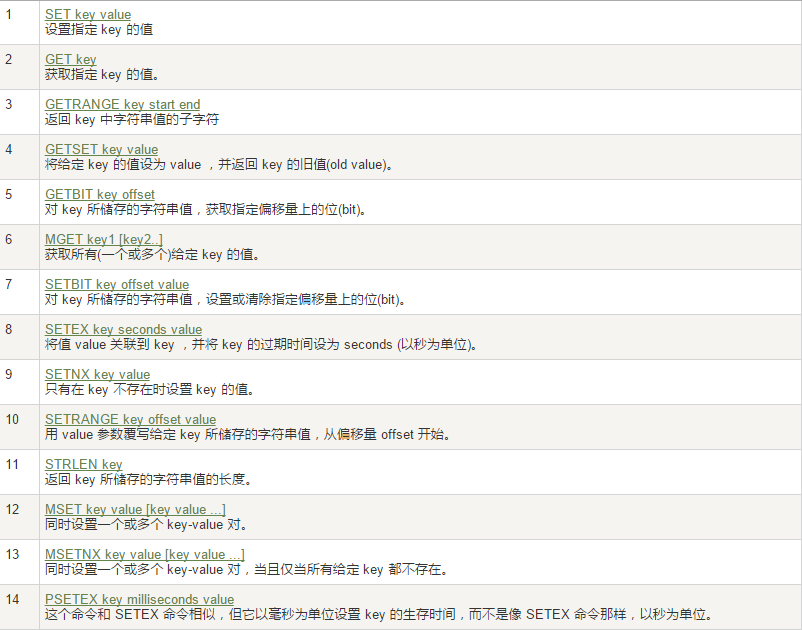
4.4.1.1 最常用
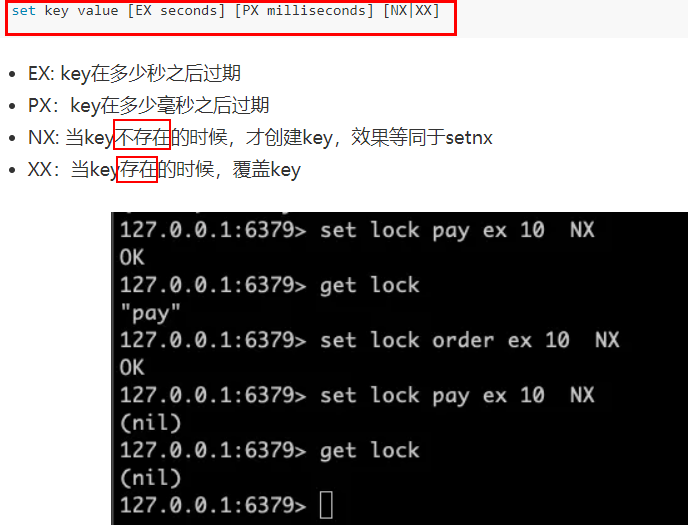
set key value
set key value NX\|XX GET EX seconds\|PX milliseconds\|EXAT unix-time-seconds\|PXAT unix-time-milliseconds\|KEEPTTL
如何获得设置指定的 Key 过期的 Unix 时间,单位为秒
|--------------------------------------------------------------------------------------|
| System. out.println(Long. toString (System. currentTimeMillis ()/ 1000L)); |
keepttl
get key
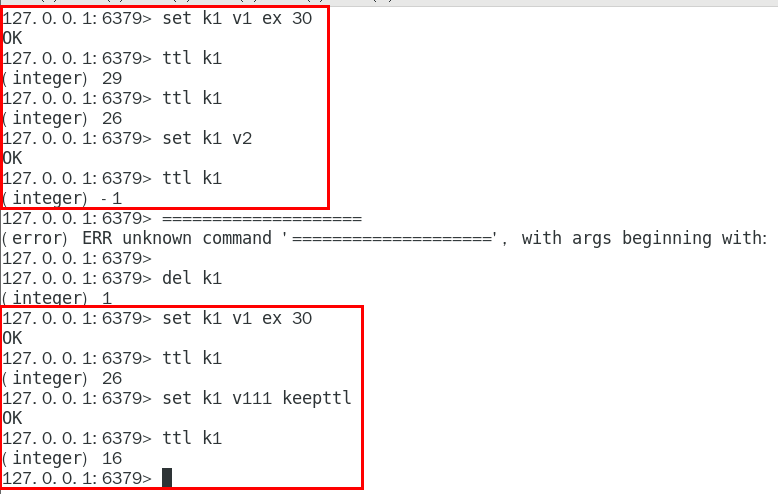
4.4.1.2 同时设置/获取多个键值
MSET key value
MGET key key ...
mset/mget/msetnx
mset:同时设置一个或多个 key-value 对。
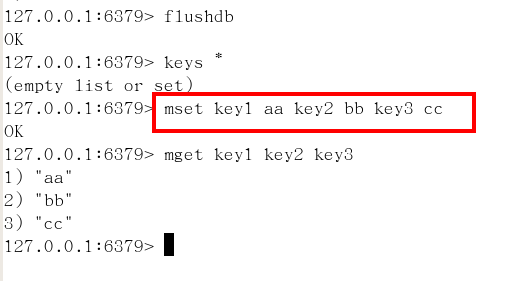
mget:获取所有(一个或多个)给定 key 的值。
msetnx:同时设置一个或多个 key-value 对,当且仅当所有给定 key 都不存在。

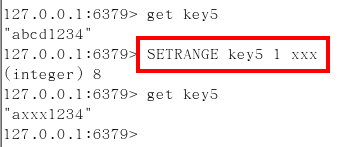
4.4.1.3 获取指定区间范围内的值
getrange/setrange
getrange:获取指定区间范围内的值,类似between......and的关系
从零到负一表示全部
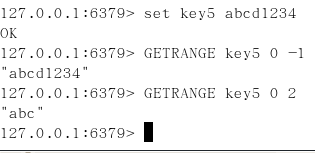
setrange设置指定区间范围内的值,格式是setrange key值 具体值
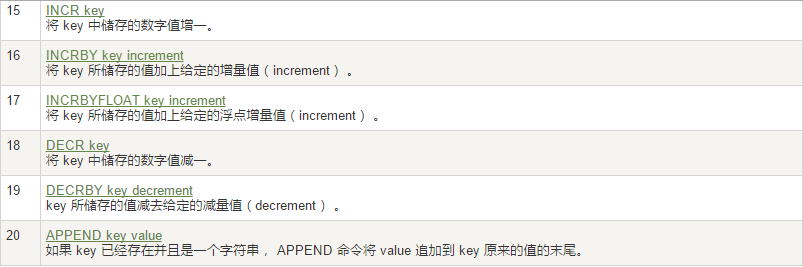
4.4.1.4 数值增减
一定要是数字才能进行加减
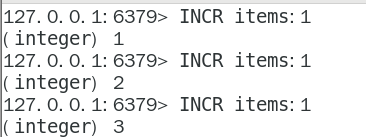
递增数字 INCR
增加指定的整数 INCRBY key increment
递减数值 DECR key
减少指定的整数 DECRBY key decrement
4.4.1.5 获取字符串长度和内容追加
STRLEN key
APPEND key value
4.4.1.6 分布式锁
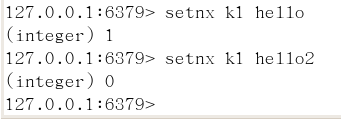
setnx key value
setex(set with expire)键秒值/setnx(set if not exist)
setex:设置带过期时间的key,动态设置。
setex 键 秒值 真实值
setnx:只有在 key 不存在时设置 key 的值。
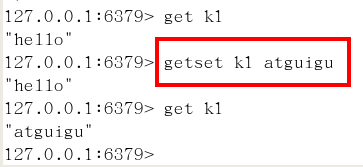
4.4.1.7 getset(先get后set)
getset:将给定 key 的值设为 value ,并返回 key 的旧值(old value)。
简单一句话,先get然后立即set
4.4.1.8 应用场景
抖音无限点赞某个视频或者某个商品,点一次加一次
是否喜欢的文章
阅读数:只要点击了rest地址,直接可以使用incr key 命令增加一个数字1,完成记录数字。

4.4.2 Redis列表(List)
单key多value


4.4.2.1 简单说明
一个双端链表的结构,容量是2的32次方减1个元素,大概40多亿,主要功能有push/pop等,一般用在栈、队列、消息队列等场景。
left、right都可以插入添加;
如果键不存在,创建新的链表;
如果键已存在,新增内容;
如果值全移除,对应的键也就消失了。
它的底层实际是个双向链表,对两端的操作性能很高,通过索引下标的操作中间的节点性能会较差
4.4.2.2 案例
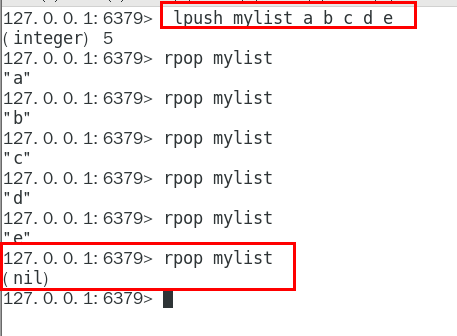
lpush/rpush/lrange
lpop/rpop
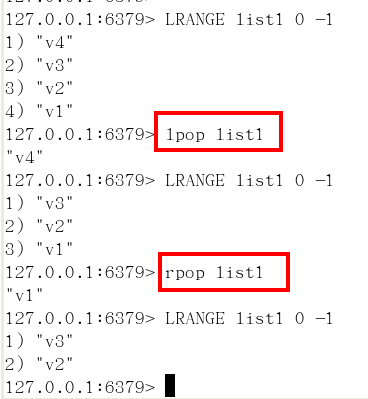
lindex,按照索引下标获得元素(从上到下)
通过索引获取列表中的元素 lindex key index
llen,获取列表中元素的个数
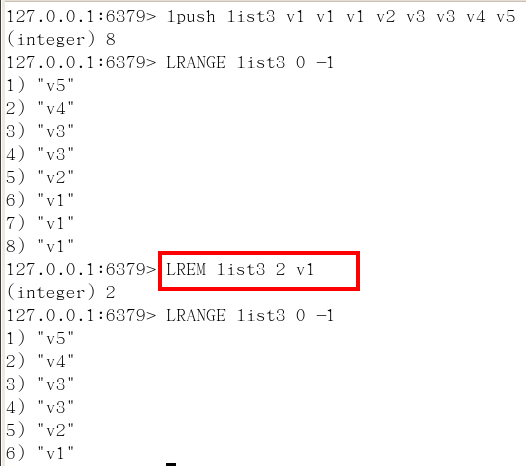
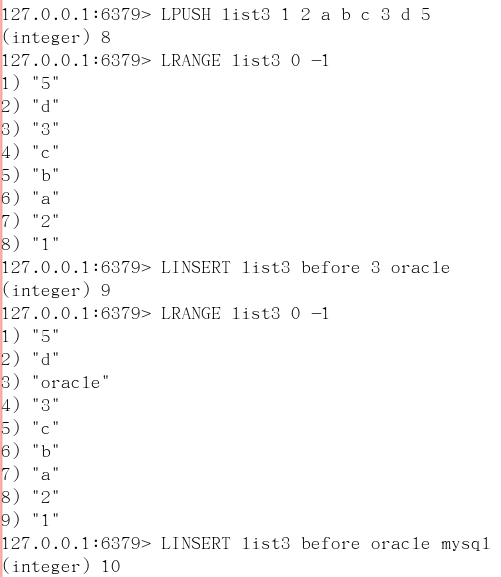
lrem key 数字N 给定值v1 解释(删除N个值等于v1的元素)
从left往right删除2个值等于v1的元素,返回的值为实际删除的数量
LREM list3 0 值,表示删除全部给定的值。零个就是全部值
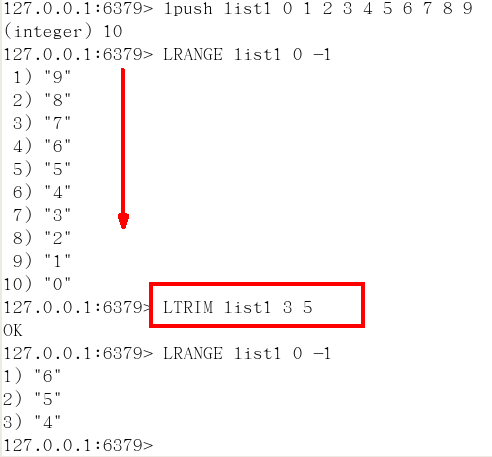
ltrim key 开始index 结束index,截取指定范围都值后再赋值给key
ltrim:截取指定索引区间的元素,格式是ltrim list的key 起始索引 结束索引
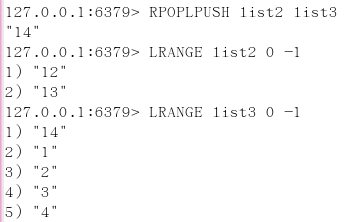
rpoplpush 源列表 目的列表
移除列表的最后一个元素,并将该元素添加到另一个列表并返回
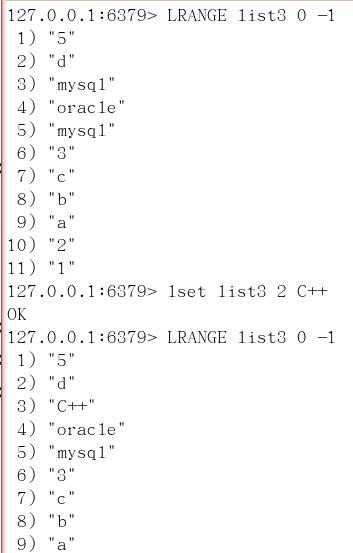
lset key index value
linsert key before/after 已有值 插入的新值
在list某个已有值的前后再添加具体值
应用场景
微信公众号订阅的消息
1 大V作者李永乐老师和CSDN发布了文章分别是 11 和 22
2 阳哥关注了他们两个,只要他们发布了新文章,就会安装进我的List
lpush likearticle:阳哥id 11 22
3 查看阳哥自己的号订阅的全部文章,类似分页,下面0~10就是一次显示10条
lrange likearticle:阳哥id 0 9

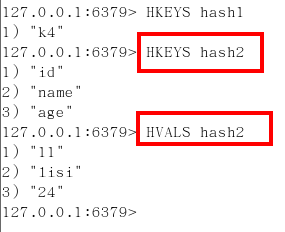
4.4.3 Redis哈希(Hash)
KV模式不变,但V是一个键值对
Map<String,Map<Object,Obejct>>
4.4.3.1 案例
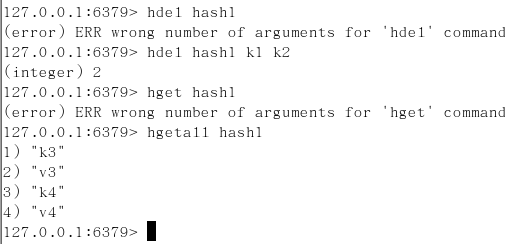
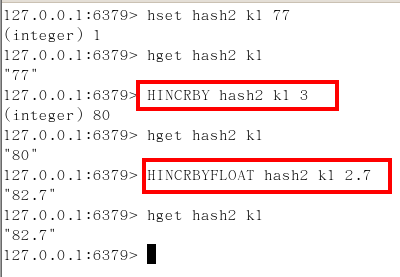
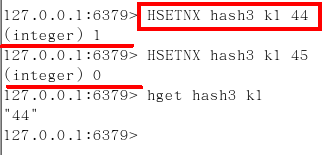
hset/hget/hmset/hmget/hgetall/hdel
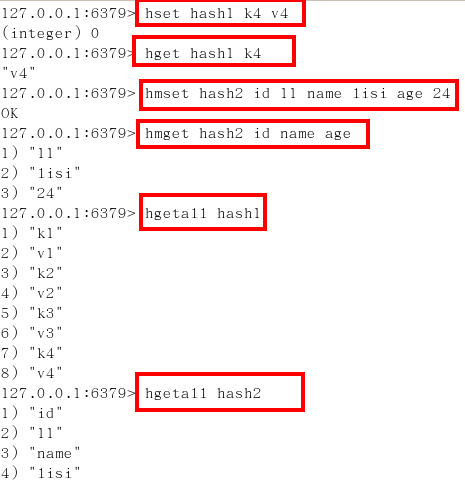
hlen 获取某个key内的全部数量
hexists key 在key里面的某个值的key
hkeys/hvals
hincrby/hincrbyfloat
hsetnx
不存在赋值,存在了无效。
应用场景
JD购物车早期设计,目前不再采用,当前中小厂可用
新增商品 → hset shopcar:uid1024 334488 1
新增商品 → hset shopcar:uid1024 334477 1
增加商品数量 → hincrby shopcar:uid1024 334477 1
商品总数 → hlen shopcar:uid1024
全部选择 → hgetall shopcar:uid1024

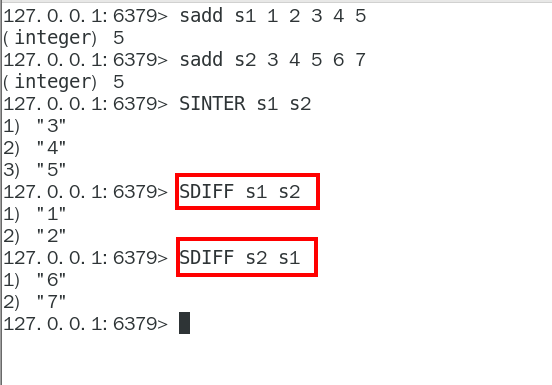
4.4.4 Redis集合(Set)
单值多value,且无重复
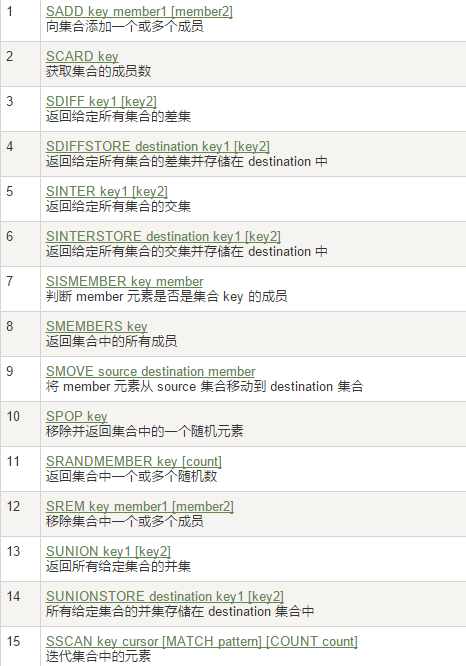
4.4.4.1 案例
SADD key member member ... 添加元素
SMEMBERS key遍历集合中的所有元素
SISMEMBER key member判断元素是否在集合中
**SREM key member member ...**删除元素
scard,获取集合里面的元素个数

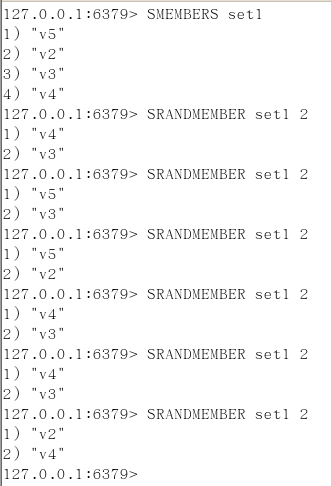
SRANDMEMBER key 数字 从集合中随机展现设置的数字个数元素,元素不删除
从set集合里面随机取出2个
如果超过最大数量就全部取出,
如果写的值是负数,比如-3 ,表示需要取出3个,但是可能会有重复值。
SPOP key 数字 从集合中随机弹出一个元素,出一个删一个

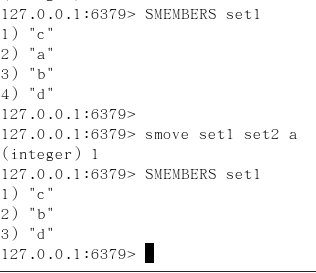
smove key1 key2 在key1里已存在的某个值将key1里已存在的某个值赋给key2
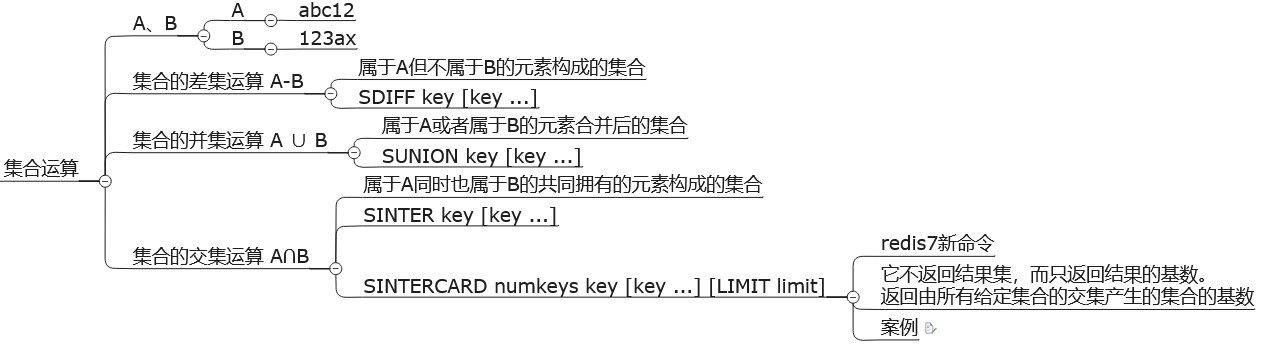
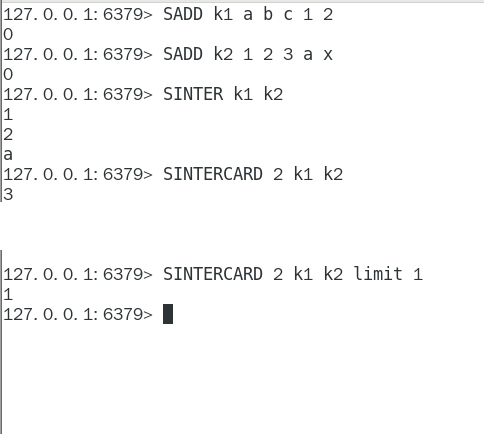
集合运算
应用场景
a) 微信抽奖小程序

微信抽奖小程序
|--------------------------|-----------------------------------------------------------|
| 1 用户ID,立即参与按钮 | sadd key 用户ID |
| 2 显示已经有多少人参与了,上图23208人参加 | SCARD key |
| 3 抽奖(从set中任意选取N个中奖人) | SRANDMEMBER key 2 随机抽奖2个人,元素不删除 SPOP key 3 随机抽奖3个人,元素 会删除 |
b) 微信朋友圈点赞查看同赞朋友

微信朋友圈点赞
|-----------------------|--------------------------------|
| 1 新增点赞 | sadd pub:msgID 点赞用户ID1 点赞用户ID2 |
| 2 取消点赞 | srem pub:msgID 点赞用户ID |
| 3 展现所有点赞过的用户 | SMEMBERS pub:msgID |
| 4 点赞用户数统计,就是常见的点赞红色数字 | scard pub:msgID |
| 5 判断某个朋友是否对楼主点赞过 | SISMEMBER pub:msgID 用户ID |
c) QQ内推可能认识的人
4.4.5 Redis有序集合Zset(sorted set)
在set基础上,每个val值前加一个score分数值。
之前set是k1 v1 v2 v3,
现在zset是k1 score1 v1 score2 v2
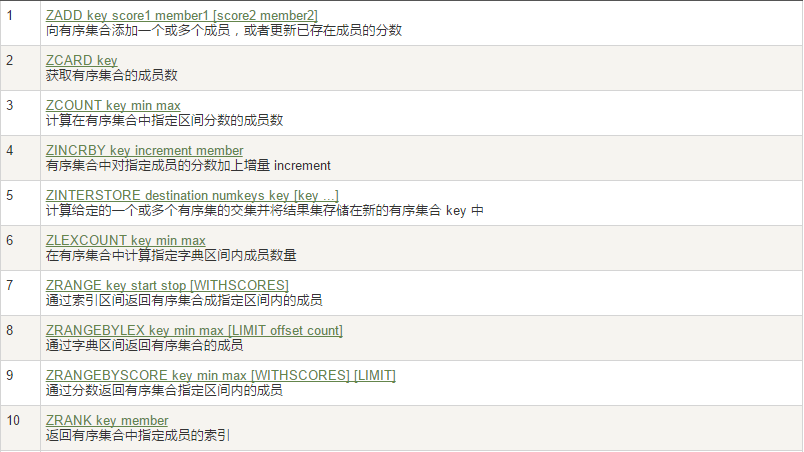
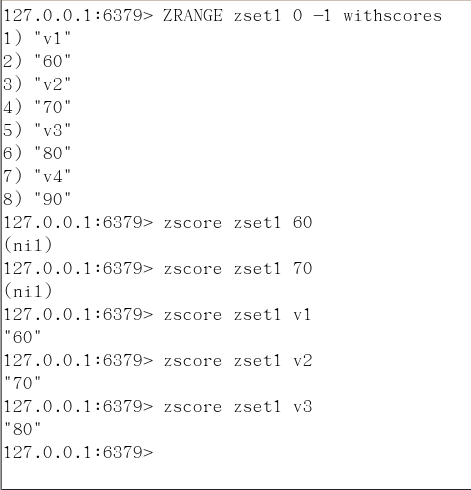
 4.4.5.1 案例
向有序集合中加入一个元素和该元素的分数
ZADD key score member score member ... 添加元素

ZRANGE key start stop WITHSCORES
按照元素分数从小到大的顺序,返回索引从start到stop之间的所有元素
ZREVRANGE
ZRANGEBYSCORE key min max WITHSCORES LIMIT offset count
获取指定分数范围的元素
withscores
( 不包含,开区间的意思
limit 作用是返回限制
limit 开始下标步 多少步
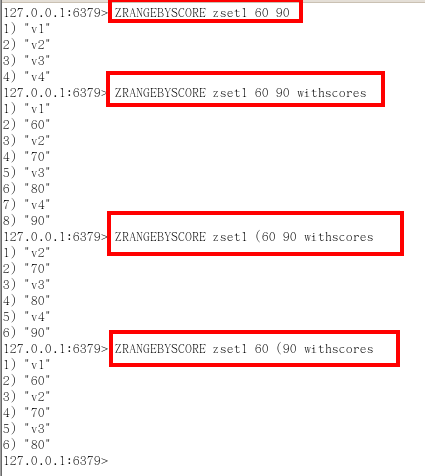
ZSCORE key member 获取元素的分数
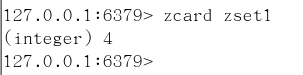
zcard :获取集合中元素个数
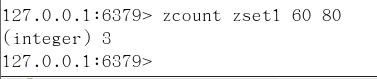
zcount :获取分数区间内元素个数,zcount key 开始分数区间 结束分数区间
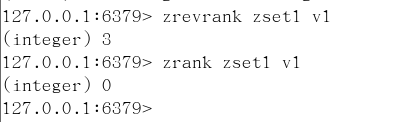
zrank: 获取value在zset中的下标位置
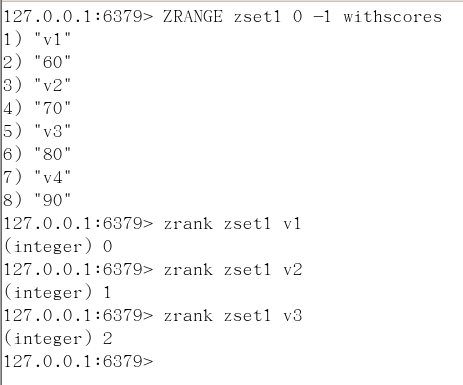
zscore:按照值获得对应的分数
ZCARD key 获取集合中元素的数量
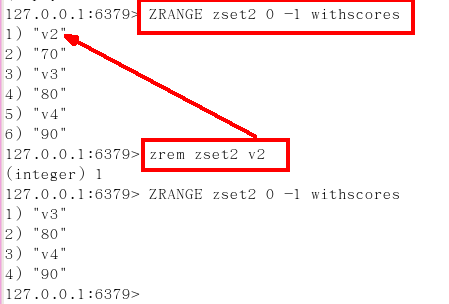
zrem key 某score下对应的value值,作用是删除元素
删除元素,格式是zrem zset的key 项的值,项的值可以是多个
zrem key score某个对应值,可以是多个值
ZINCRBY key increment member 增加某个元素的分数
ZCOUNT key min max 获得指定分数范围内的元素个数
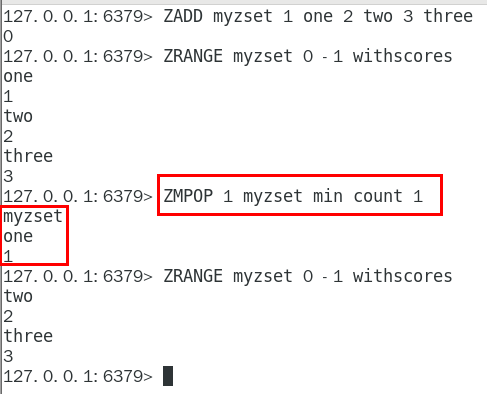
ZMPOP 从键名列表中的第一个非空排序集中弹出一个或多个元素,它们是成员分数对
zrank key values值,作用是获得下标值
zrevrank key values值,作用是逆序获得下标值
正序、逆序获得下标索引值
应用场景
根据商品销售对商品进行排序显示
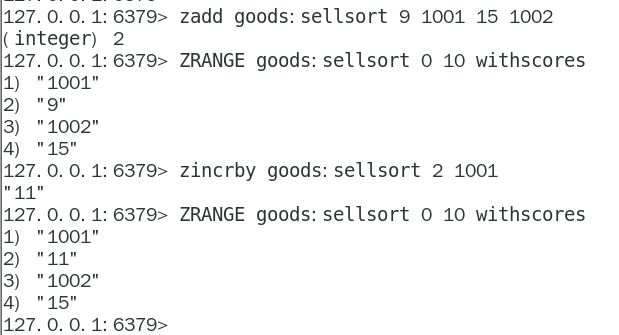
思路:定义商品销售排行榜(sorted set集合),key为goods:sellsort,分数为商品销售数量。
|-------------------------------|--------------------------------------|
| 商品编号1001的销量是9,商品编号1002的销量是15 | zadd goods:sellsort 9 1001 15 1002 |
| 有一个客户又买了2件商品1001,商品编号1001销量加2 | zincrby goods:sellsort 2 1001 |
| 求商品销量前10名 | ZRANGE goods:sellsort 0 9 withscores |
4.4.6 Redis位图(bitmap)
一句话:由0和1状态表现的二进制位的bit数组
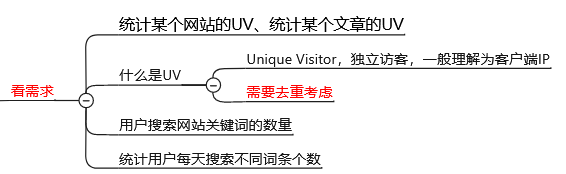
看需求:
用户是否登陆过Y、N,比如京东每日签到送京豆
电影、广告是否被点击播放过
钉钉打卡上下班,签到统计
4.4.6.1 是什么

说明:用String类型作为底层数据结构实现的一种统计二值状态的数据类型
位图本质是数组,它是基于String数据类型的按位的操作。该数组由多个二进制位组成,每个二进制位都对应一个偏移量(我们称之为一个索引)。
Bitmap支持的最大位数是2^32位,它可以极大的节约存储空间,使用512M内存就可以存储多达42.9亿的字节信息(2^32 = 4294967296)
4.4.6.2 能干嘛
用于状态统计
Y、N,类似AtomicBoolean
4.4.6.3 基本命令
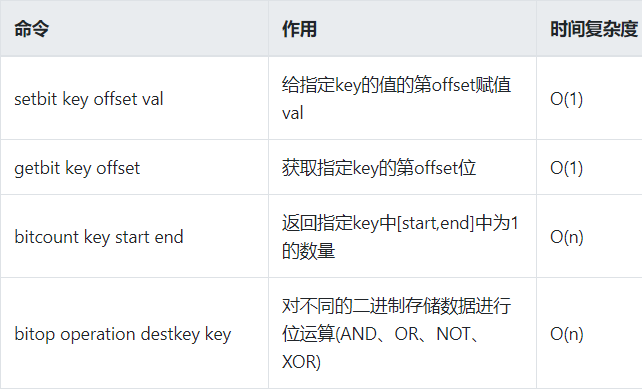
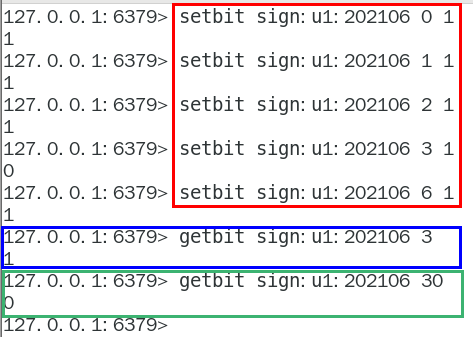
setbit
setbit key offset value
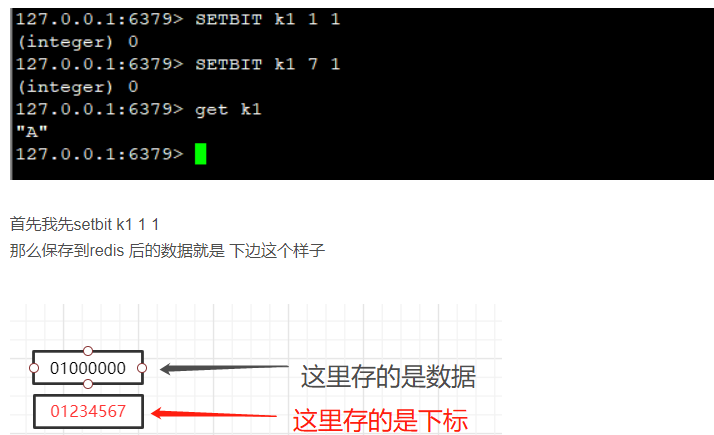
setbit 键 偏移位 只能零或者1
Bitmap的偏移量是从零开始算的
getbit
getbit key offset
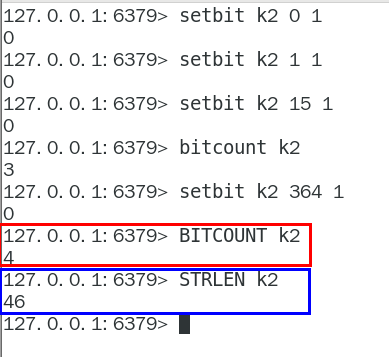
strlen 统计字节数占用多少
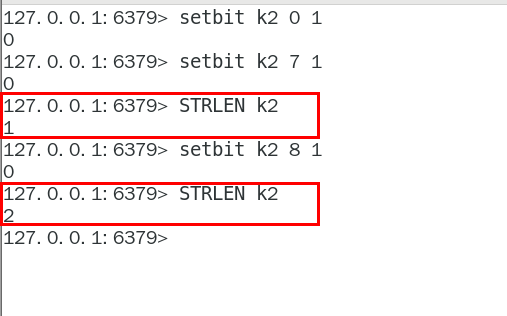
不是字符串长度而是占据几个字节,超过8位后自己按照8位一组一byte再扩容
bitcount 全部键里面含有1的有多少个?
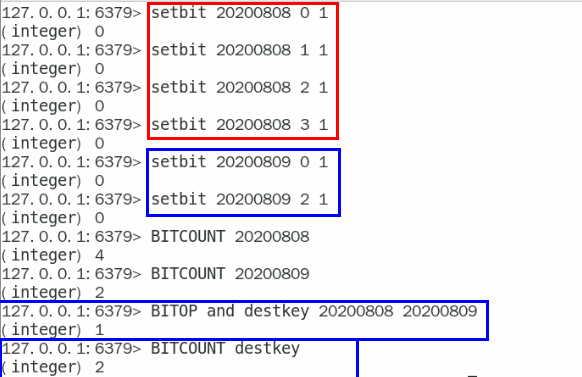
bitop
连续2天都签到的用户
加入某个网站或者系统,它的用户有1000W,做个用户id和位置的映射
比如0号位对应用户id:uid-092iok-lkj
比如1号位对应用户id:uid-7388c-xxx
。。。。。。
setbit和getbit案例说明
按照天

4.4.6.4 应用场景
一年365天,全年天天登陆占用多少字节
按照年
按年去存储一个用户的签到情况,365 天只需要 365 / 8 ≈ 46 Byte,1000W 用户量一年也只需要 44 MB 就足够了。
假如是亿级的系统,
每天使用1个1亿位的Bitmap约占12MB的内存(10^8/8/1024/1024),10天的Bitmap的内存开销约为120MB,内存压力不算太高。
此外,在实际使用时,最好对Bitmap设置过期时间,让Redis自动删除不再需要的签到记录以节省内存开销。
4.4.7 Redis基数统计(HyperLogLog)

4.4.7.1 是什么
去重复统计功能的基数估计算法-就是HyperLogLog
基数
是一种数据集,去重复后的真实个数
案例Case:
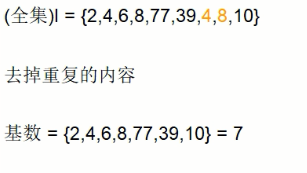
基数统计
用于统计一个集合中不重复的元素个数,就是对集合去重复后剩余元素的计算
一句话
去重脱水后的真实数据
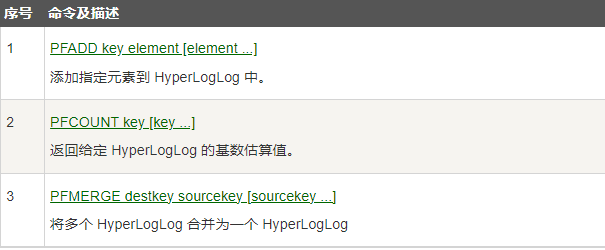
4.4.7.2 基本命令
案例见最下:

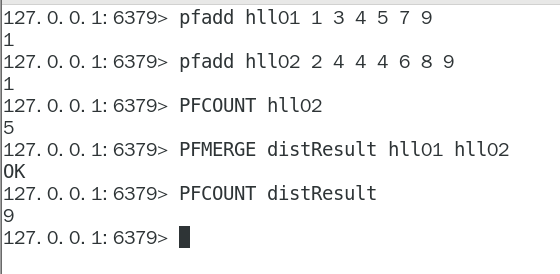
4.4.7.3 应用场景
天猫网站首页亿级
4.4.8 Redis地理空间(GEO)
4.4.8.1 简介
移动互联网时代LBS应用越来越多,交友软件中附近的小姐姐、外卖软件中附近的美食店铺、高德地图附近的核酸检查点等等,那这种附近各种形形色色的XXX地址位置选择是如何实现的?
地球上的地理位置是使用二维的经纬度表示,经度范围 (-180, 180],纬度范围 (-90, 90],只要我们确定一个点的经纬度就可以名取得他在地球的位置。
例如滴滴打车,最直观的操作就是实时记录更新各个车的位置,
然后当我们要找车时,在数据库中查找距离我们(坐标x0,y0)附近r公里范围内部的车辆
使用如下SQL即可:
|---------------------------------------------------------------------------|
| select taxi from position where x0-r < x < x0 + r and y0-r < y < y0+r |
但是这样会有什么问题呢?
1.查询性能问题,如果并发高,数据量大这种查询是要搞垮数据库的
2.这个查询的是一个矩形访问,而不是以我为中心r公里为半径的圆形访问。
3.精准度的问题,我们知道地球不是平面坐标系,而是一个圆球,这种矩形计算在长距离计算时会有很大误差
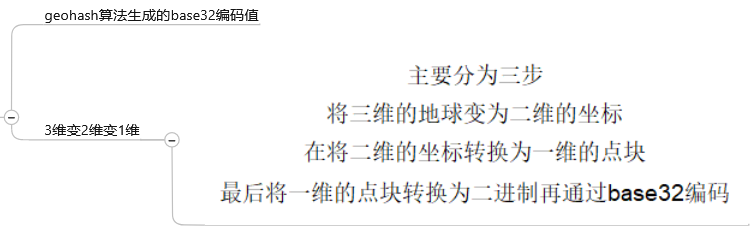
4.4.8.2 原理
核心思想就是将球体转换为平面,区块转换为一点

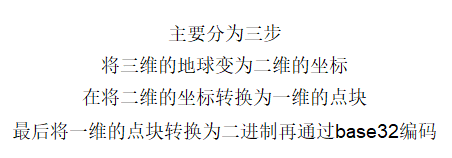
地理知识说明
Redis在3.2版本以后增加了地理位置的处理
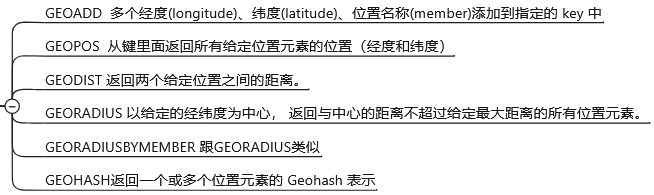
4.4.8.3 命令
4.4.8.4 命令实操
如何获得某个地址的经纬度
GEOADD添加经纬度坐标


命令如下:
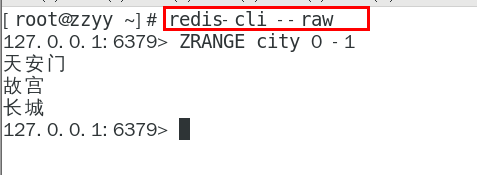
GEOADD city 116.403963 39.915119 "天安门" 116.403414 39.924091 "故宫" 116.024067 40.362639 "长城"
中文乱码如何处理
GEOPOS返回经纬度


GEOPOS city 天安门 故宫 长城
GEOHASH返回坐标的geohash表示


GEODIST 两个位置之间距离

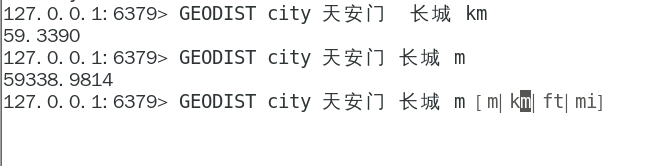
GEODIST city 天安门 故宫 km
后面参数是距离单位:
m 米
km 千米
ft 英尺
mi 英里
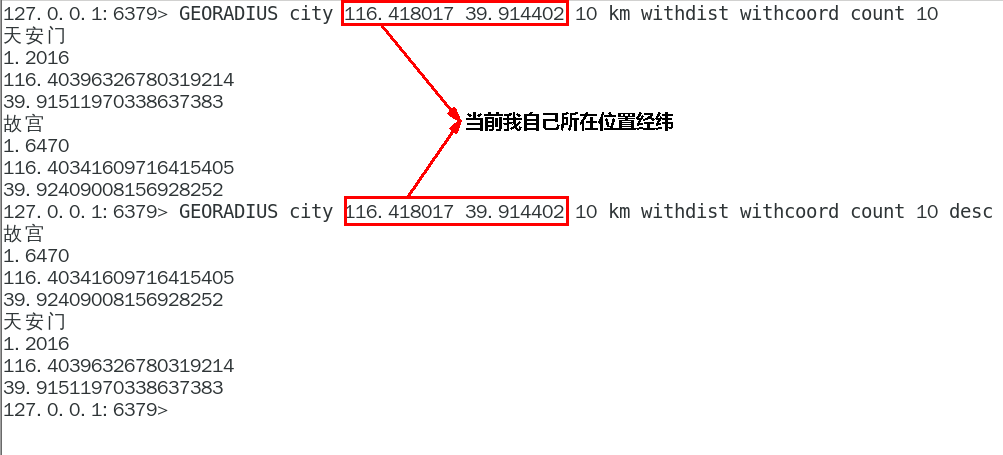
GEORADIUS 以半径为中心,查找附近的XXX
georadius 以给定的经纬度为中心, 返回键包含的位置元素当中, 与中心的距离不超过给定最大距离的所有位置元素。
GEORADIUS city 116.418017 39.914402 10 km withdist withcoord count 10 withhash desc
GEORADIUS city 116.418017 39.914402 10 km withdist withcoord withhash count 10 desc
|-------------------------------------------------------------------------------------------------------------------------------------------------------------------------------------------------|
| WITHDIST: 在返回位置元素的同时, 将位置元素与中心之间的距离也一并返回。 距离的单位和用户给定的范围单位保持一致。 WITHCOORD: 将位置元素的经度和维度也一并返回。 WITHHASH: 以 52 位有符号整数的形式, 返回位置元素经过原始 geohash 编码的有序集合分值。 这个选项主要用于底层应用或者调试, 实际中的作用并不大 COUNT 限定返回的记录数。 |
当前位置(116.418017 39.914402),阳哥在北京王府井
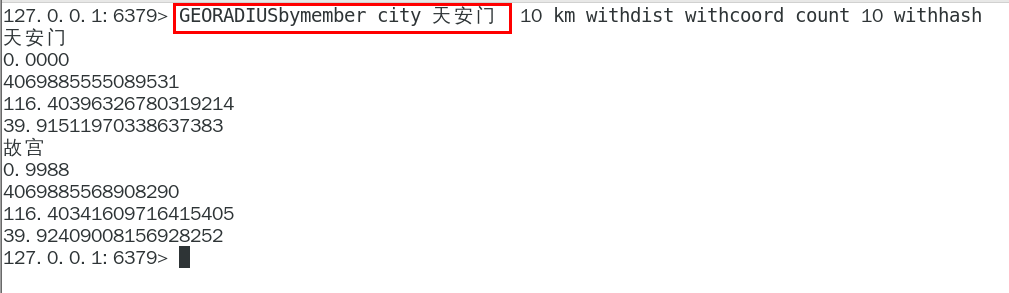
GEORADIUSBYMEMBER

4.4.8.5 应用场景
美团地图位置附近的酒店推送
高德地图附近的核酸检查点
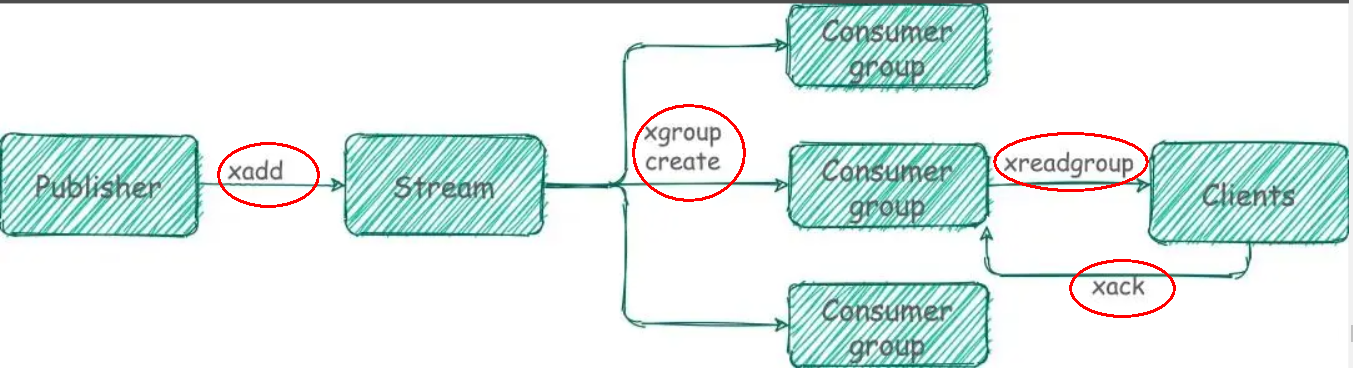
4.4.9 Redis流(Stream)
List 实现消息队列
按照插入顺序排序,你可以添加一个元素到列表的头部(左边)或者尾部(右边)。
所以常用来做异步队列使用,将需要延后处理的任务结构体序列化成字符串塞进 Redis 的列表,另一个线程从这个列表中轮询数据进行处理。

LPUSH、RPOP 左进右出 RPUSH、LPOP 右进左出
(Pub/Sub)
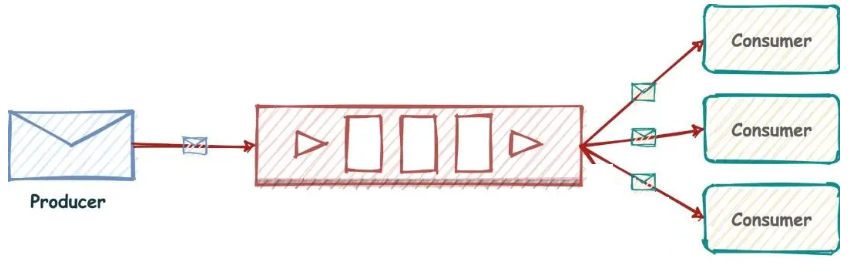
Redis 发布订阅 (pub/sub) 有个缺点就是消息无法持久化,如果出现网络断开、Redis 宕机等,消息就会被丢弃。而且也没有 Ack 机制来保证数据的可靠性,假设一个消费者都没有,那消息就直接被丢弃了。
4.4.9.1 底层结构和原理说明
stream结构

一个消息链表,将所有加入的消息都串起来,每个消息都有一个唯一的 ID 和对应的内容
|---|-------------------|-----------------------------------------------------------------------------------------------------------------------------------------------------------------------------------------------------------------------------------|
| 1 | Message Content | 消息内容 |
| 2 | Consumer group | 消费组,通过XGROUP CREATE 命令创建,同一个消费组可以有多个消费者 |
| 3 | Last_delivered_id | 游标,每个消费组会有个游标 last_delivered_id,任意一个消费者读取了消息都会使游标 last_delivered_id 往前移动。 |
| 4 | Consumer | 消费者,消费组中的消费者 |
| 5 | Pending_ids | 消费者会有一个状态变量,用于记录被当前消费已读取但未ack的消息Id,如果客户端没有ack,这个变量里面的消息ID会越来越多,一旦某个消息被ack它就开始减少。这个pending_ids变量在Redis官方被称之为 PEL(Pending Entries List),记录了当前已经被客户端读取的消息,但是还没有 ack (Acknowledge character:确认字符),它用来确保客户端至少消费了消息一次,而不会在网络传输的中途丢失了没处理 |
4.4.9.2 基本命令理论简介
队列相关指令
消费组相关指令
4.4.9.3 基本命令代码实操
队列相关指令
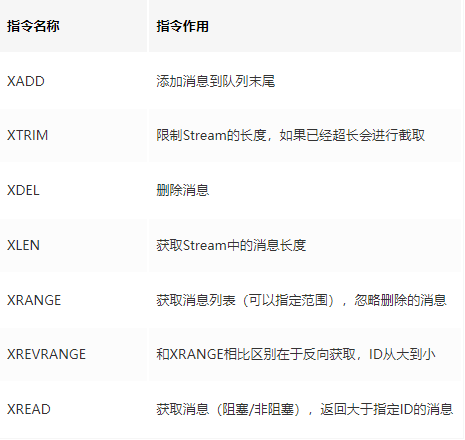
4.4.9.3.1 XADD 添加消息到队列末尾
XADD 用于向Stream 队列中添加消息,如果指定的Stream 队列不存在,则该命令执行时会新建一个Stream 队列
//* 号表示服务器自动生成 MessageID(类似mysql里面主键auto_increment),后面顺序跟着一堆 业务key/value

|-----------------------------------------------------------------------------------------------------------------------------------------------------------------------------------------------------------------------------------------------------------------------|
| 信息条目指的是序列号,在相同的毫秒下序列号从0开始递增,序列号是64位长度,理论上在同一毫秒内生成的数据量无法到达这个级别,因此不用担心序列号会不够用。millisecondsTime指的是Redis节点服务器的本地时间,如果存在当前的毫秒时间戳比以前已经存在的数据的时间戳小的话(本地时间钟后跳),那么系统将会采用以前相同的毫秒创建新的ID,也即redis 在增加信息条目时会检查当前 id 与上一条目的 id, 自动纠正错误的情况,一定要保证后面的 id 比前面大,一个流中信息条目的ID必须是单调增的,这是流的基础。 |
| 客户端显示传入规则: Redis对于ID有强制要求,格式必须是 时间戳-自增Id这样的方式,且后续ID不能小于前一个ID |
| Stream的消息内容,也就是图中的Message Content它的结构类似Hash结构,以key-value的形式存在。 |
消息ID必须要比上个 ID 大

默认用星号表示自动生成规矩
* 用于XADD命令中,让系统自动生成 id
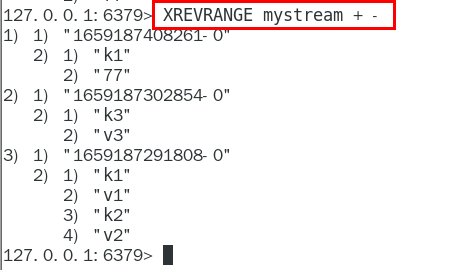
4.4.9.3.2 XRANGE

用于获取消息列表(可以指定范围),忽略删除的消息
start 表示开始值,-代表最小值
end 表示结束值,+代表最大值
count 表示最多获取多少个值
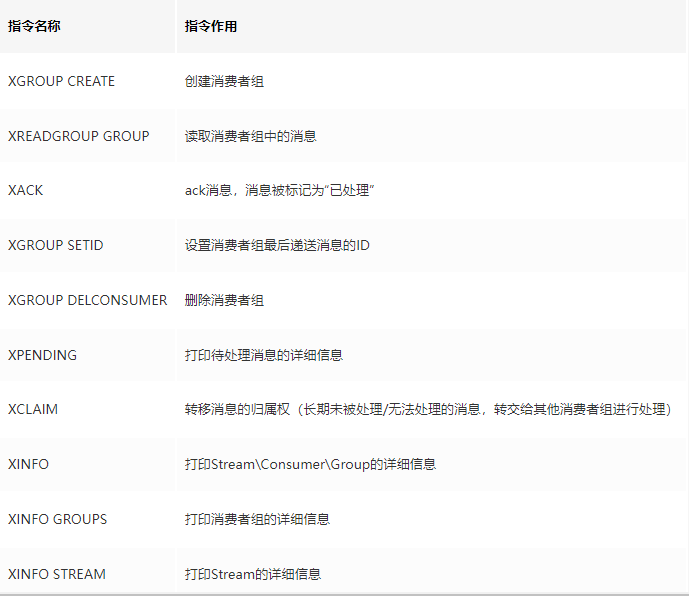
4.4.9.3.3 XREVRANGE
与XRANGE 的区别在于,获取消息列表元素的方向是相反的,end在前,start在后
4.4.9.3.4 XDEL
4.4.9.3.5 XLEN 用于获取Stream 队列的消息的长度

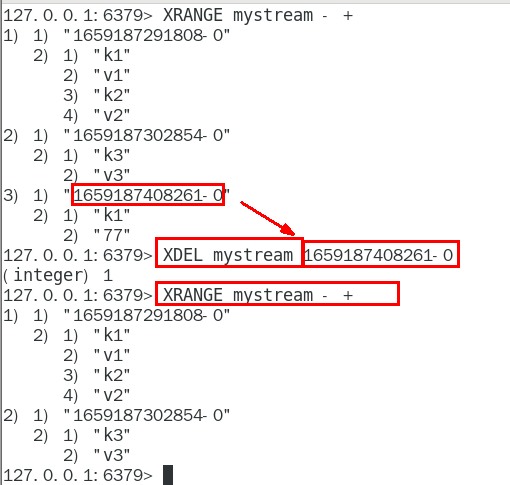
4.4.9.3.6 XTRIM
用于对Stream的长度进行截取,如超长会进行截取
MAXLEN 允许的最大长度,对流进行修剪限制长度
MINID 允许的最小id,从某个id值开始比该id值小的将会被抛弃

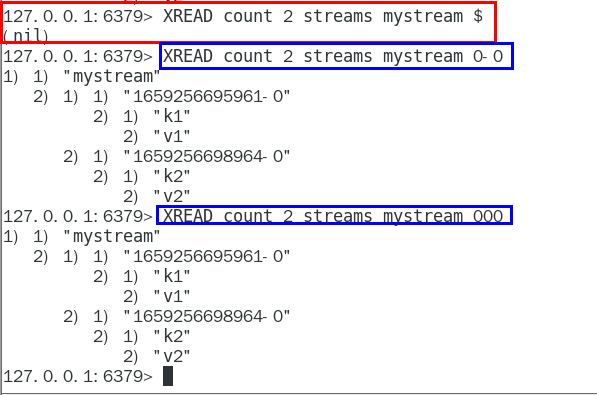
4.4.9.3.7 XREAD
用于获取消息(阻塞/非阻塞),只会返回大于指定ID的消息

非阻塞
|-----------------------------------------------------------------------------------|
| $代表特殊ID,表示以当前Stream已经存储的最大的ID作为最后一个ID,当前Stream中不存在大于当前最大ID的消息,因此此时返回nil |
| 0-0代表从最小的ID开始获取Stream中的消息,当不指定count,将会返回Stream中的所有消息,注意也可以使用0(00/000也都是可以的......) |
| |
阻塞
请redis-cli启动第2个客户端连接上来
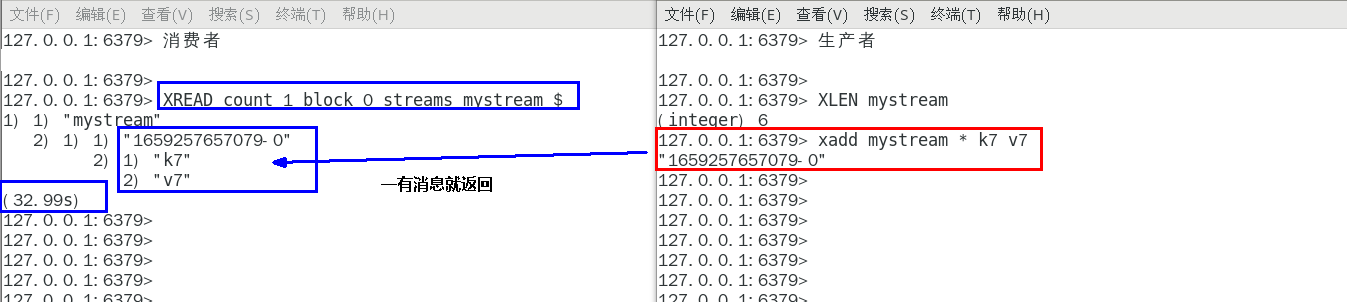
小总结(类似java里面的阻塞队列)
Stream的基础方法,使用xadd存入消息和xread循环阻塞读取消息的方式可以实现简易版的消息队列,交互流程如下

对比List结构

消费组相关指令
4.4.9.3.8 XGROUP CREATE 用于创建消费者组
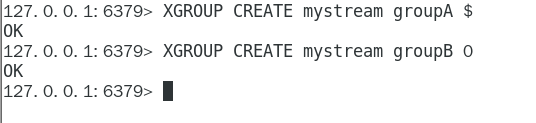
$表示从Stream尾部开始消费
0表示从Stream头部开始消费
创建消费者组的时候必须指定 ID, ID 为 0 表示从头开始消费,为 $ 表示只消费新的消息,队尾新来
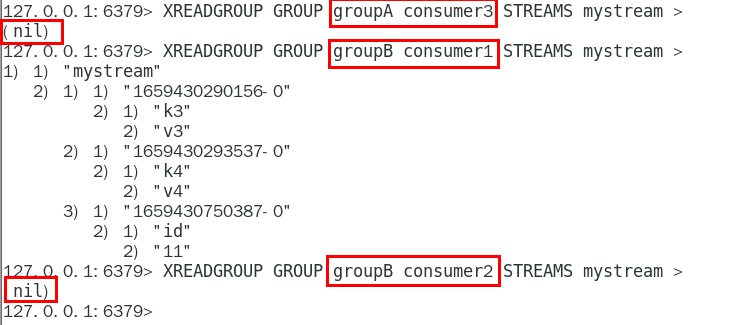
4.4.9.3.9 XREADGROUP GROUP
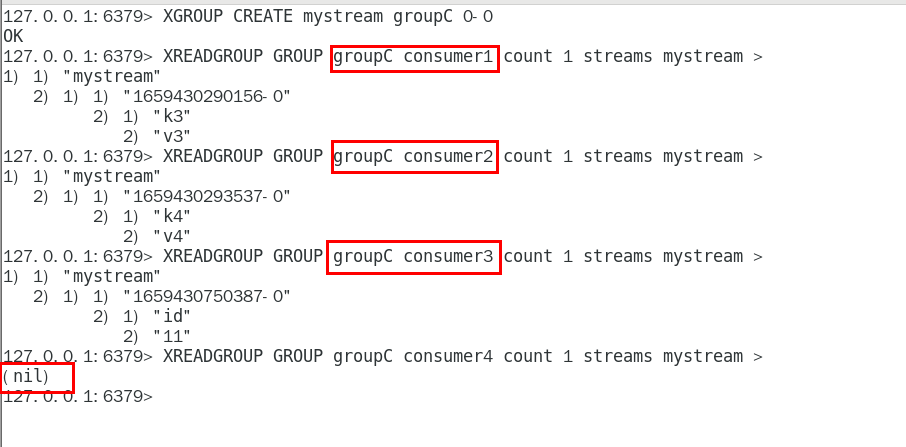
">",表示从第一条尚未被消费的消息开始读取
消费组groupA内的消费者consumer1从mystream消息队列中读取所有消息

但是,不同消费组的消费者可以消费同一条消息
消费组的目的??
让组内的多个消费者共同分担读取消息,所以,我们通常会让每个消费者读取部分消息,从而实现消息读取负载在多个消费者间是均衡分布的
4.4.9.3.10 重点问题
|-----|----------------------------------------------------------------------------------------------|
| 1问题 | 基于 Stream 实现的消息队列,如何保证消费者在发生故障或宕机再次重启后,仍然可以读取未处理完的消息? |
| 2 | Streams 会自动使用内部队列(也称为 PENDING List)留存消费组里每个消费者读取的消息保底措施,直到消费者使用 XACK 命令通知 Streams"消息已经处理完成"。 |
| 3 | 消费确认增加了消息的可靠性,一般在业务处理完成之后,需要执行 XACK 命令确认消息已经被消费完成 |
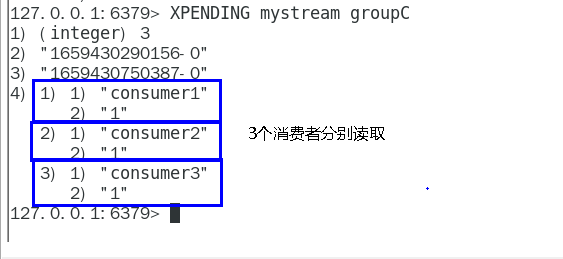
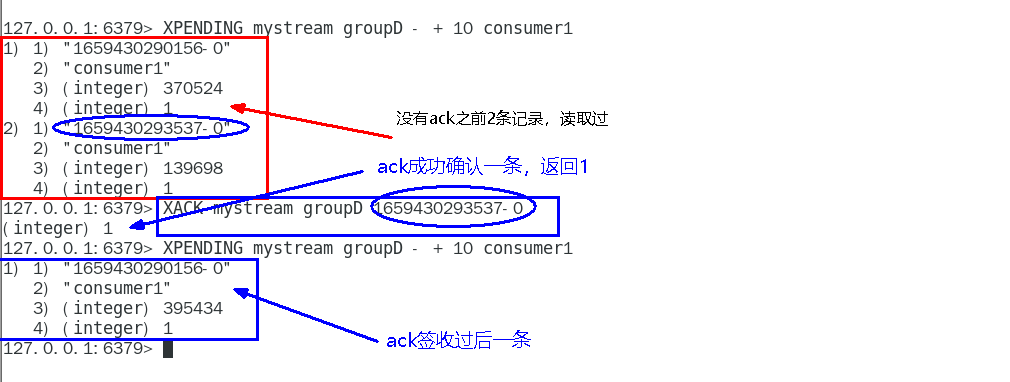
4.4.9.3.11 XPENDING
查询每个消费组内所有消费者「已读取、但尚未确认」的消息
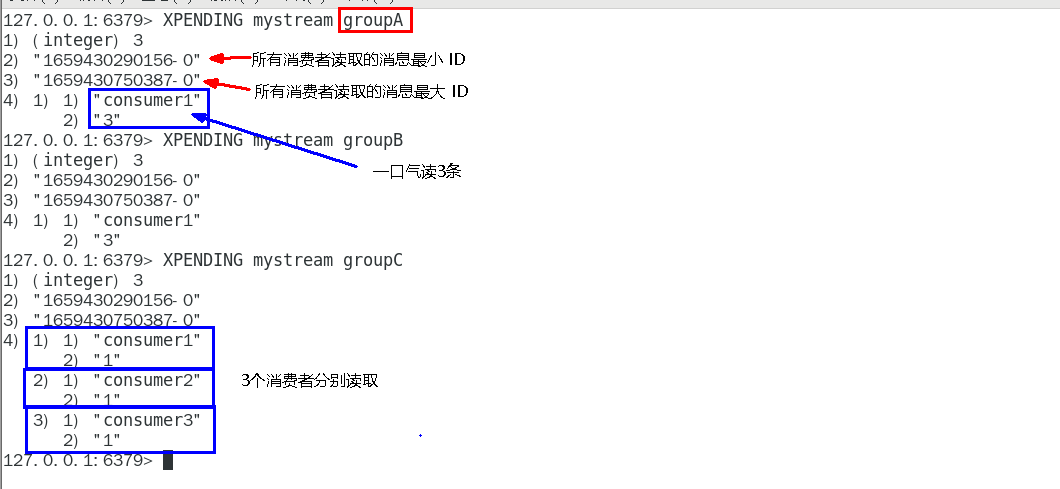
查看某个消费者具体读取了哪些数据
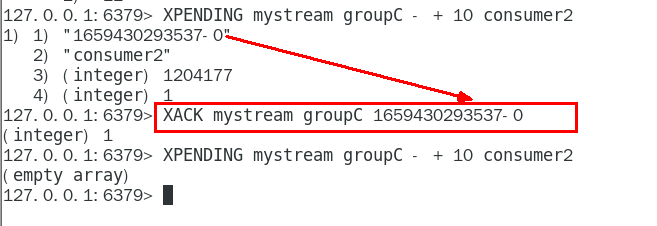
4.4.9.3.12 XACK 向消息队列确认消息处理已完成
XINFO 用于打印Stream\Consumer\Group的详细信息

4.4.9.4 使用建议
Stream还是不能100%等价于Kafka、RabbitMQ来使用的,生产案例少,慎用
仅仅代表本人愚见,不权威
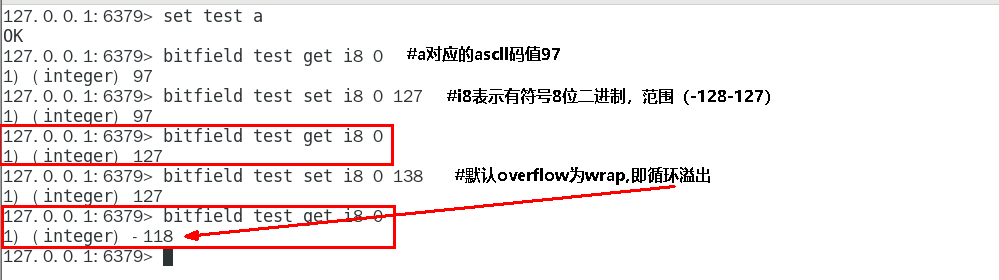
4.4.10 Redis位域(bitfield)
了解即可
是什么
官网 Redis BITFIELD 命令 对字符串执行任意位域整数运算
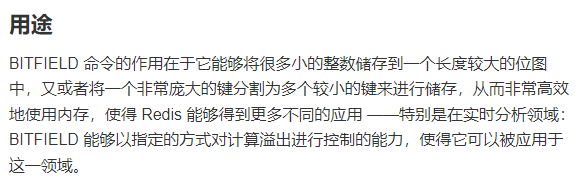
能干嘛
hello 等价于 0110100001100101011011000110110001101111
位域修改
溢出控制
一句话
将一个Redis字符串看作是一个由二进制位组成的数组并能对变长位宽和任意没有字节对齐的指定整型位域进行寻址和修改
命令基本语法
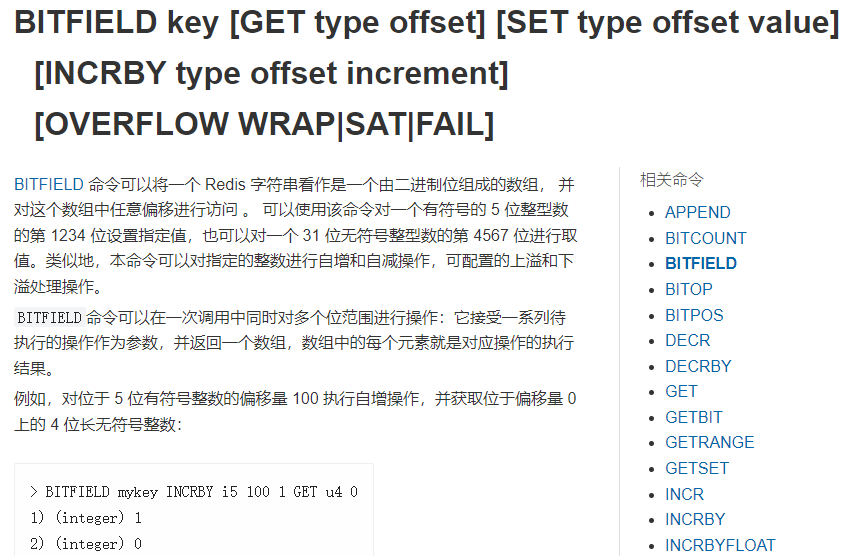
BITFIELD key GET type offset SET type offset value INCRBY type offset increment OVERFLOW WRAP\|SAT\|FAIL
案例
Ascii码表 ascii码 | ascii码对照表
基本命令代码实操:
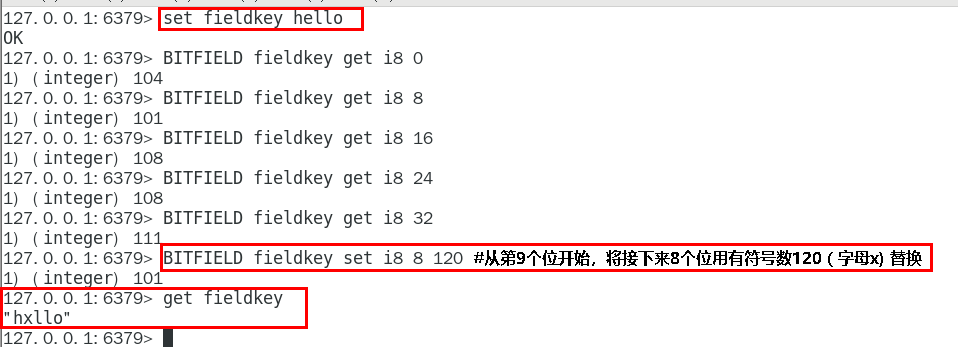
4.4.10.1 BITFIELD key GET type offset

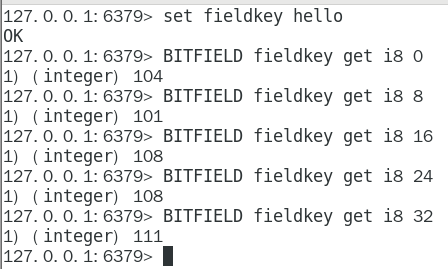

hello 等价于 0110100001100101011011000110110001101111
4.4.10.2 BITFIELD key SET type offset value

4.4.10.3 BITFIELD key INCRBY type offset increment
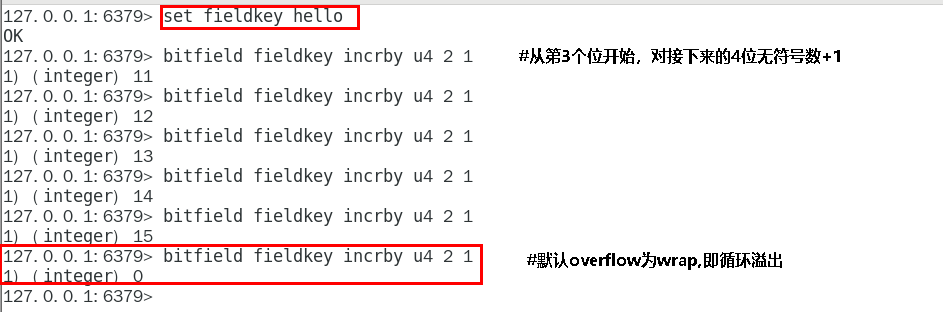
默认情况下, INCRBY 使用 WRAP 参数
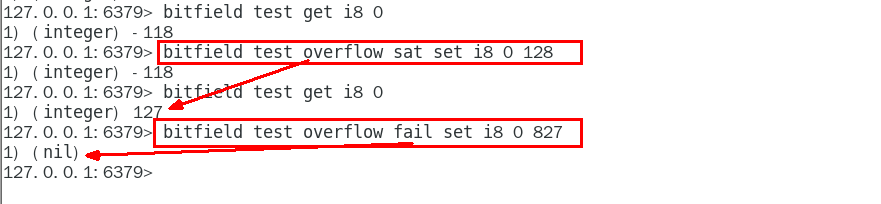
4.4.10.4 溢出控制OVERFLOW WRAP\|SAT\|FAIL
WRAP: 使用回绕(wrap around)方法处理有符号整数和无符号整数的溢出情况
SAT: 使用饱和计算(saturation arithmetic)方法处理溢出,下溢计算的结果为最小的整数值,而上溢计算的结果为最大的整数值

FAIL: 命令将拒绝执行那些会导致上溢或者下溢情况出现的计算,并向用户返回空值表示计算未被执行
5 Redis持久化
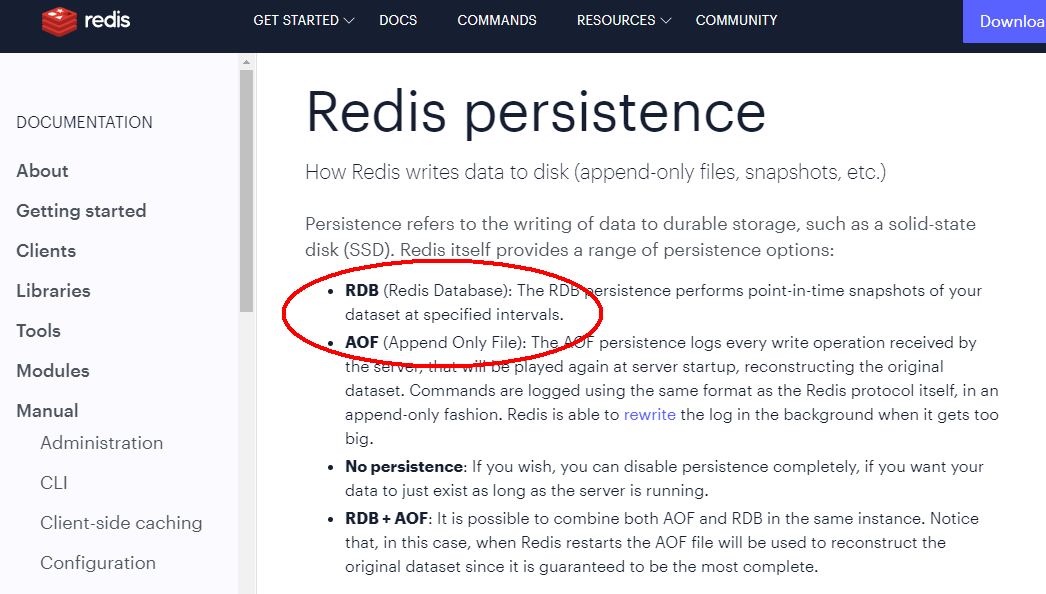
5.1 总体介绍
官网地址
https://redis.io/docs/manual/persistence/
5.2 持化双雄
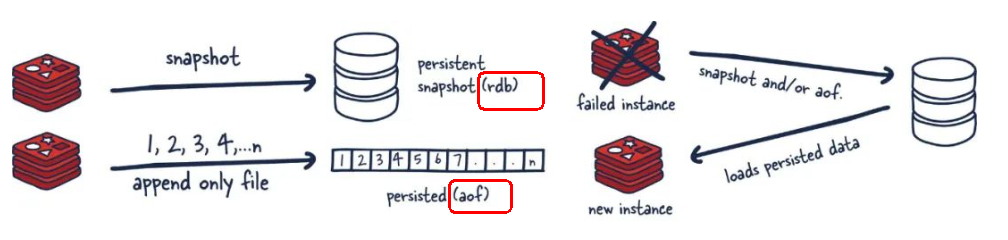
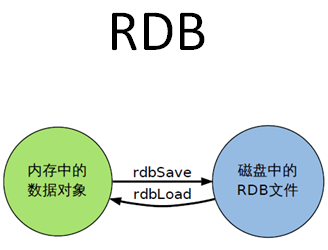
5.2.1 RDB(Redis DataBase)
5.2.1.1 官网介绍
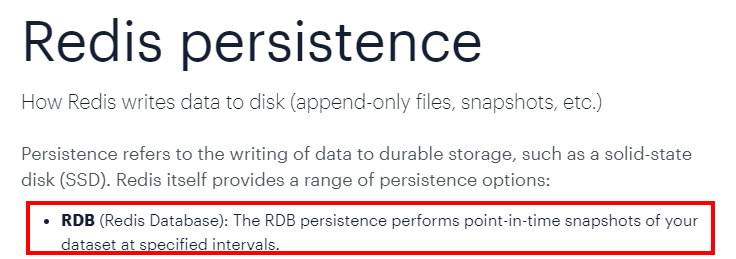
RDB(Redis 数据库):RDB 持久性以指定的时间间隔执行数据集的时间点快照。
5.2.1.2 是什么
在指定的时间间隔,执行数据集的时间点快照
实现类似照片记录效果的方式,就是把某一时刻的数据和状态以文件的形式写到磁盘上,也就是
快照。这样一来即使故障宕机,快照文件也不会丢失,数据的可靠性也就得到了保证。
这个快照文件就称为RDB文件(dump.rdb),其中,RDB就是Redis DataBase的缩写。
5.2.1.3 能干嘛
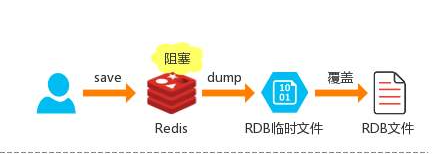
在指定的时间间隔内将内存中的数据集快照写入磁盘,也就是行话讲的Snapshot内存快照,它恢复时再将硬盘快照文件直接读回到内存里
Redis的数据都在内存中,保存备份时它执行的是全量快照,也就是说,把内存中的所有数据都记录到磁盘中,一锅端
Rdb保存的是dump.rdb文件
5.2.1.4 案例演示
需求说明
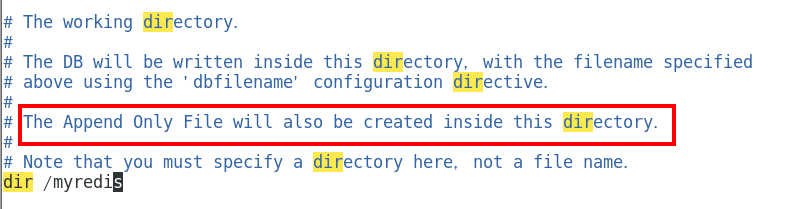
RDB保存到磁盘的文件叫dump.rdb
配置文件(6 VS 7)
Redis6.0.16以下
Redis6.2以及Redis-7.0.0
操作步骤
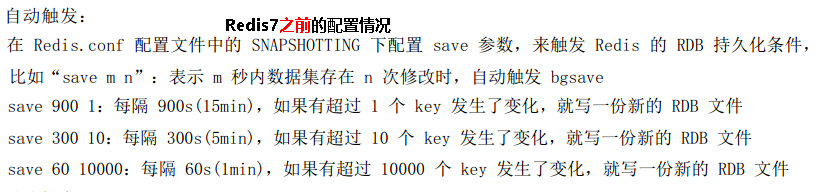
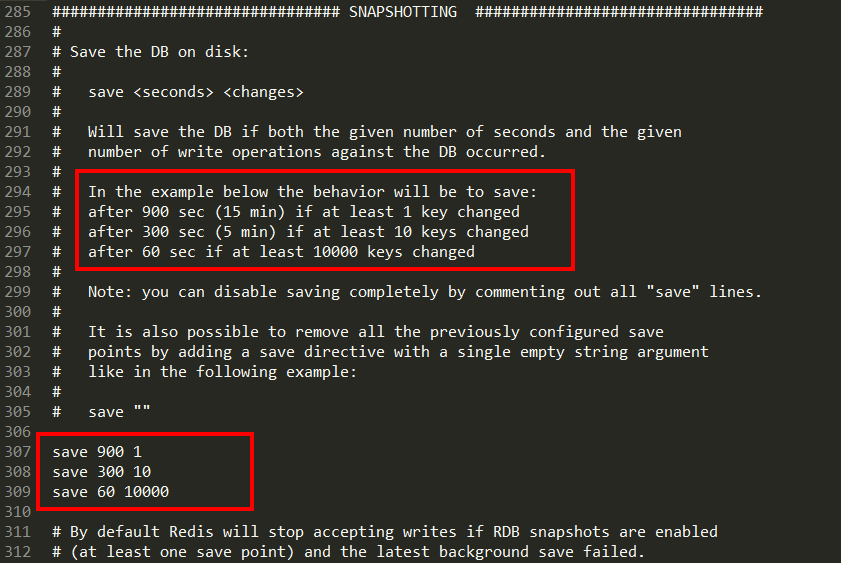
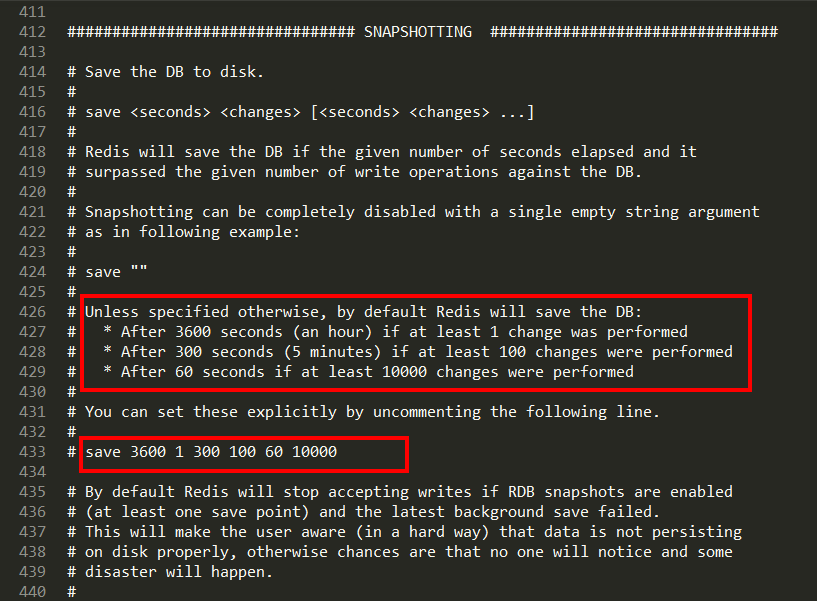
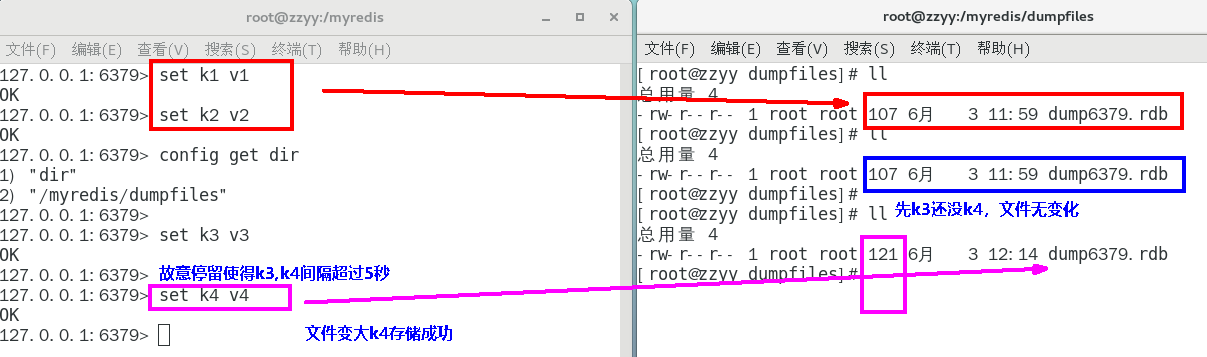
5.2.1.4.1 自动触发
Redis7版本,按照redis.conf里配置的save <seconds> <changes>
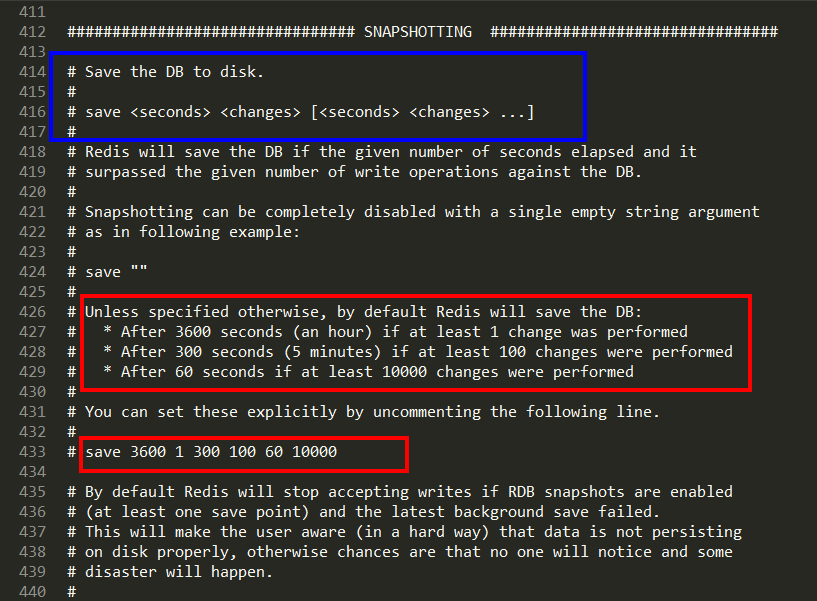
本次案例5秒2次修改
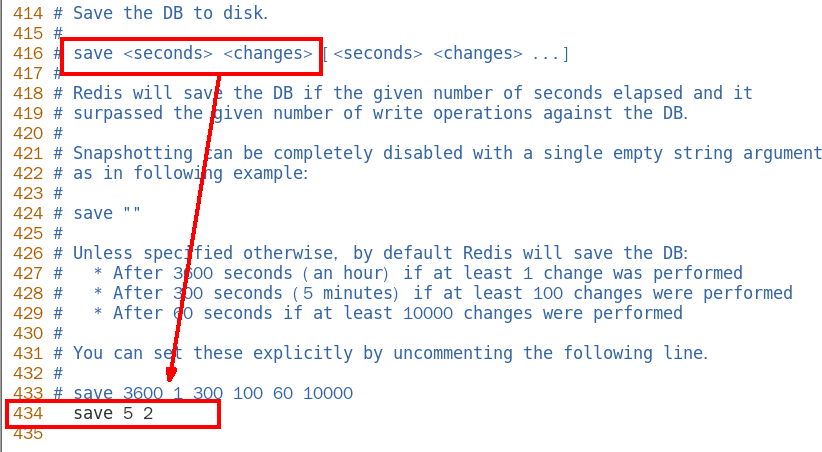
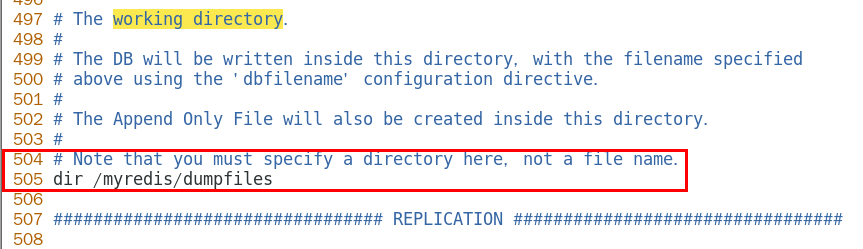
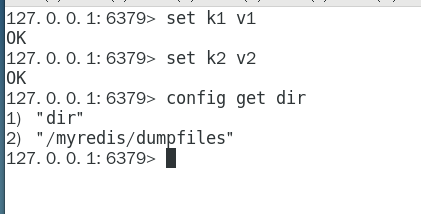
修改dump文件保存路径
默认
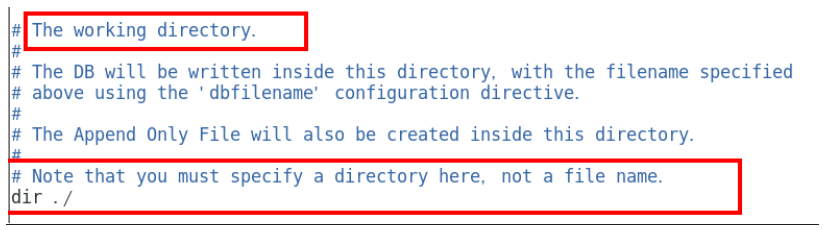
自定义修改的路径且可以进入redis里用CONFIG GET dir获取目录
修改dump文件名称

触发备份
第1种情况

第2种情况
如何恢复
将备份文件 (dump.rdb) 移动到 redis 安装目录并启动服务即可
备份成功后故意用flushdb清空redis,看看是否可以恢复数据
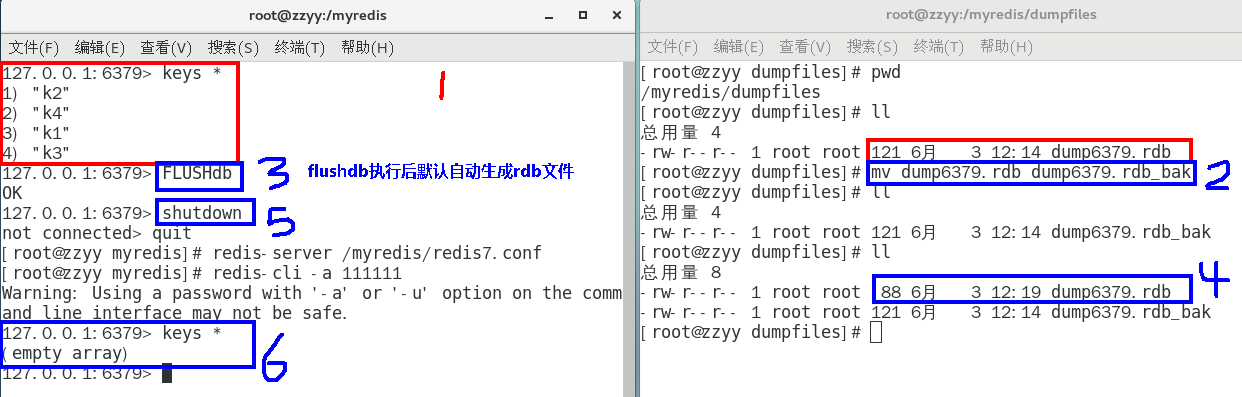
结论:执行flushall/flushdb命令也会产生dump.rdb文件,但里面是空的,无意义
物理恢复,一定服务和备份分机隔离
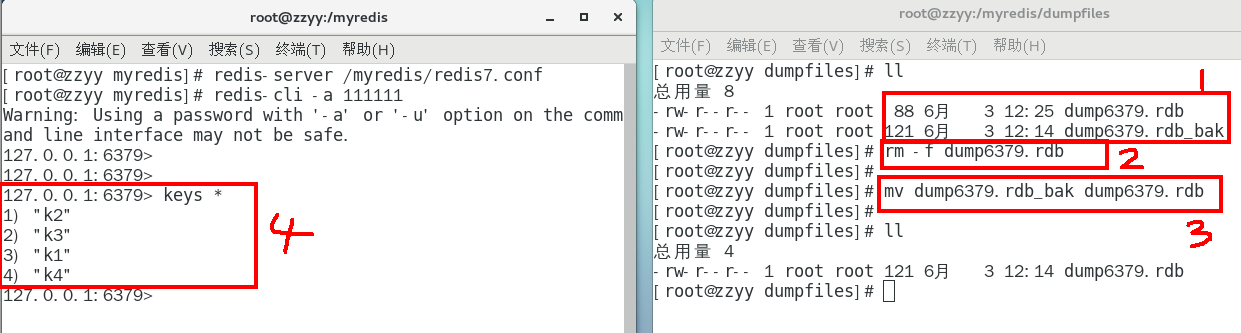
备注:不可以把备份文件dump.rdb和生产redis服务器放在同一台机器,必须分开各自存储,
以防生产机物理损坏后备份文件也挂了。
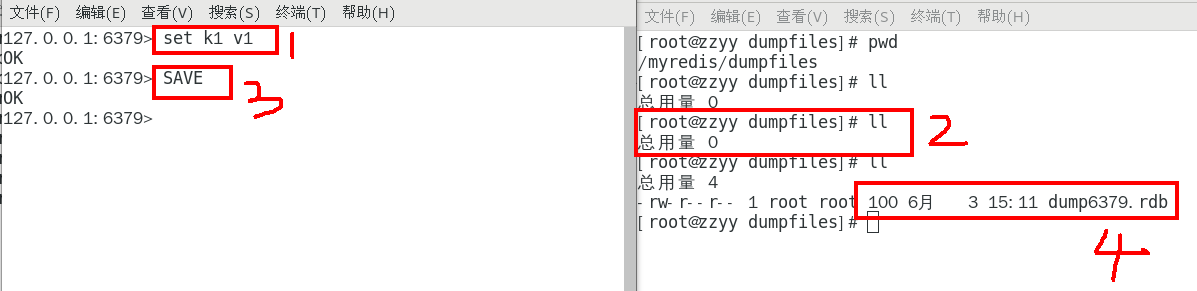
5.2.1.4.2 手动触发
Redis提供了两个命令来⽣成RDB⽂件,分别是save和bgsave

Save
在主程序中执⾏会阻塞当前redis服务器,直到持久化工作完成
执行save命令期间,Redis不能处理其他命令,线上禁止使用
案例
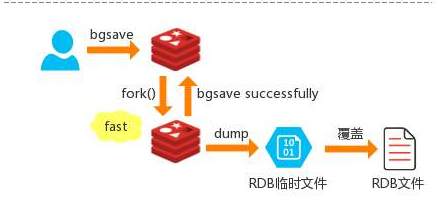
BGSAVE(默认)
Redis会在后台异步进行快照操作,不阻塞
快照同时还可以响应客户端请求,该触发方式会fork一个子进程由子进程复制持久化过程
官网说明
Redis会使用bgsave对当前内存中的所有数据做快照, 这个操作是子进程在后台完成的,这就允许主进程同时可以修改数据。
fork是什么?
各位熟悉的
操作系统角度
在Linux程序中,fork()会产生一个和父进程完全相同的子进程,但子进程在此后多会exec系统调用,出于效率考虑,尽量避免膨胀。
案例
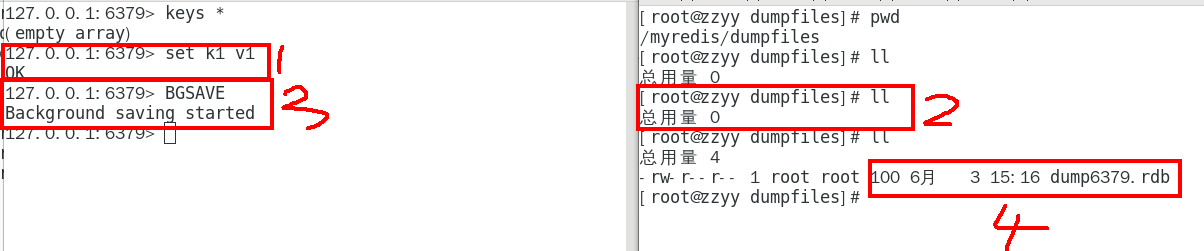
LASTSAVE
可以通过lastsave命令获取最后一次成功执行快照的时间
案例


5.2.1.5 优势
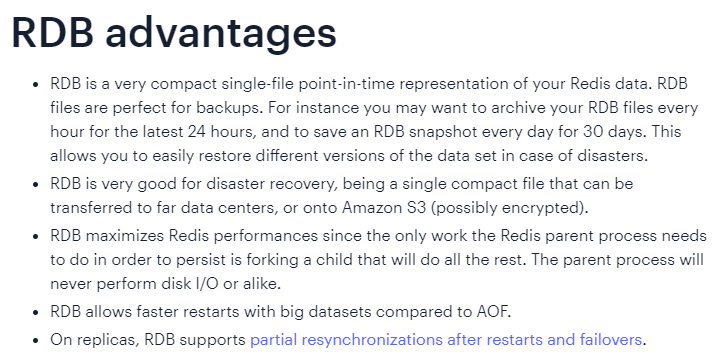
 小总结
小总结
适合大规模的数据恢复
按照业务定时备份
对数据完整性和一致性要求不高
RDB 文件在内存中的加载速度要比 AOF 快得多
5.2.1.6 劣势
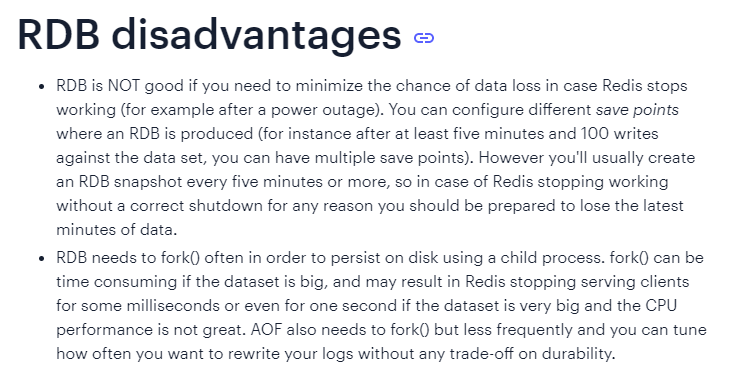
 小总结
小总结
在一定间隔时间做一次备份,所以如果redis意外down掉的话,就会丢失从当前至最近一次快照期间的数据,快照之间的数据会丢失
内存数据的全量同步,如果数据量太大会导致I/0严重影响服务器性能
RDB依赖于主进程的fork,在更大的数据集中,这可能会导致服务请求的瞬间延迟。fork的时候内存中的数据被克隆了一份,大致2倍的膨胀性,需要考虑
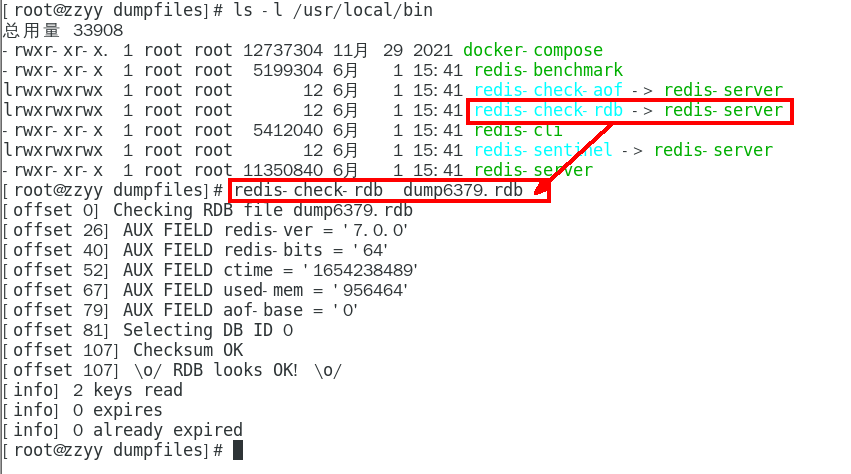
5.2.1.7 如何检查修复dump.rdb文件
5.2.1.8 哪些情况会触发RDB快照
配置文件中默认的快照配置
手动save/bgsave命令
执行flushall/flushdb命令也会产生dump.rdb文件,但里面是空的,无意义
执行shutdown且没有设置开启AOF持久化
主从复制时,主节点自动触发
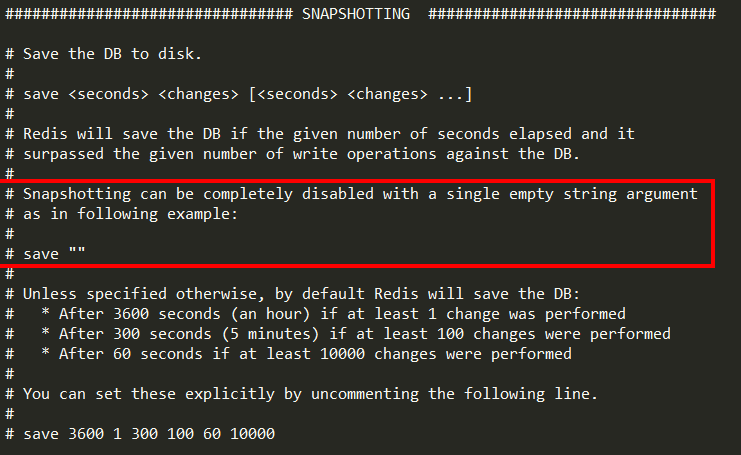
5.2.1.9 如何禁用快照
动态所有停止RDB保存规则的方法:redis-cli config set save ""
快照禁用
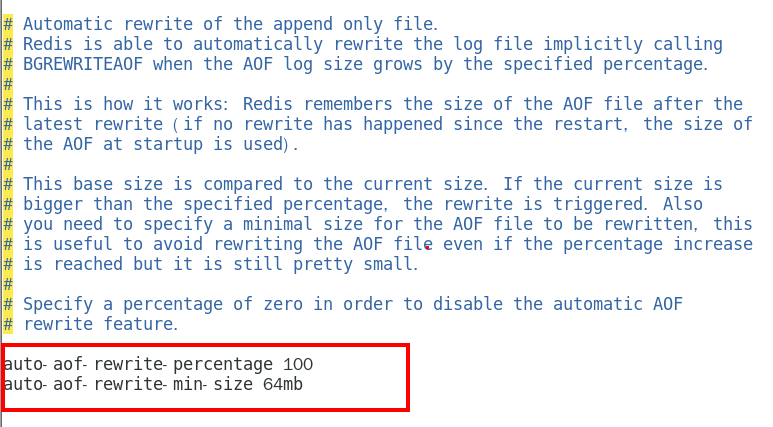
5.2.1.10 RDB优化配置项详解
配置文件SNAPSHOTTING模块
save <seconds> <changes>
dbfilename
dir
stop-writes-on-bgsave-error
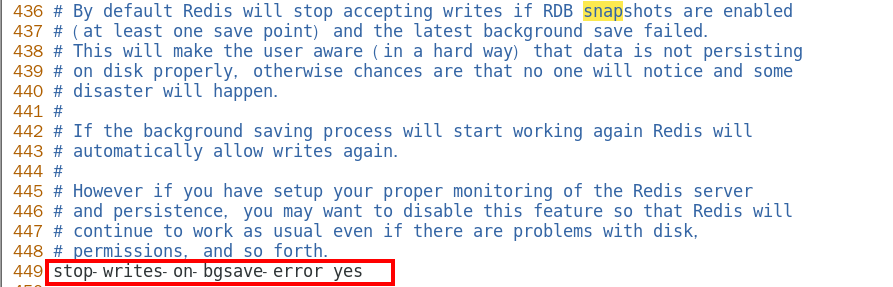
默认yes
如果配置成no,表示你不在乎数据不一致或者有其他的手段发现和控制这种不一致,那么在快照写入失败时,也能确保redis继续接受新的写请求
rdbcompression

|--------------------------------------------------------------------------------|
| 默认yes |
| 对于存储到磁盘中的快照,可以设置是否进行压缩存储。如果是的话,redis会采用LZF算法进行压缩。 如果你不想消耗CPU来进行压缩的话,可以设置为关闭此功能 |
rdbchecksum

|----------------------------------------------------------------------------|
| 默认yes |
| 在存储快照后,还可以让redis使用CRC64算法来进行数据校验,但是这样做会增加大约10%的性能消耗,如果希望获取到最大的性能提升,可以关闭此功能 |
rdb-del-sync-files
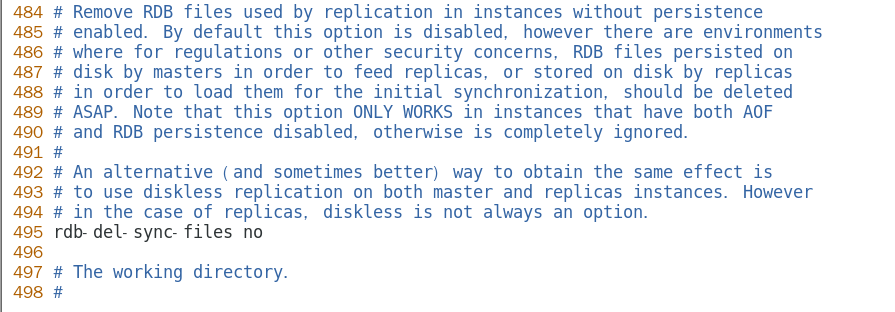
rdb-del-sync-files:在没有持久性的情况下删除复制中使用的RDB文件启用。默认情况下no,此选项是禁用的。
5.2.1.11 小总结

5.2.2 AOF(Append Only File)
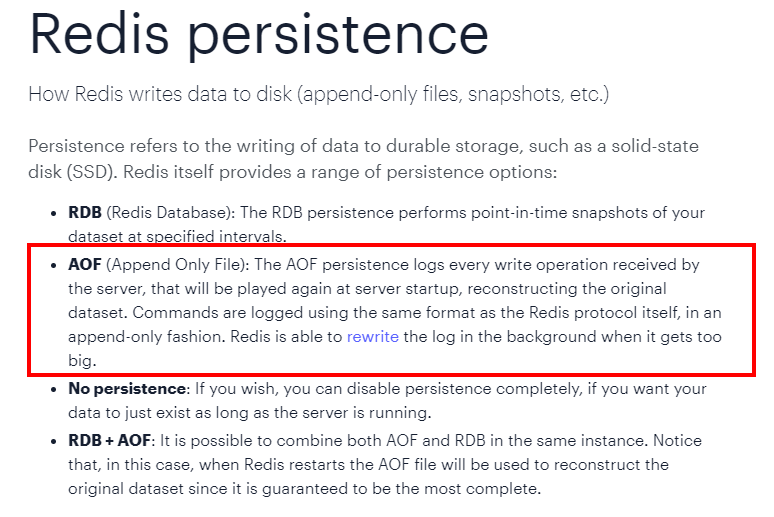
5.2.2.1 是什么
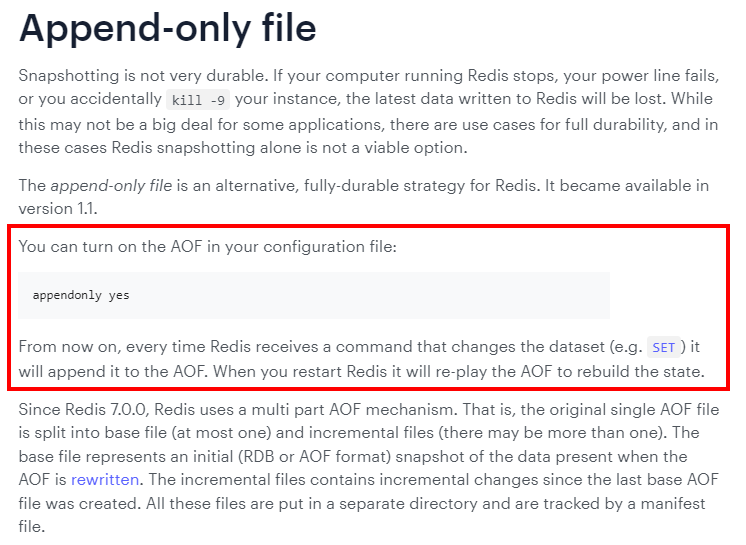
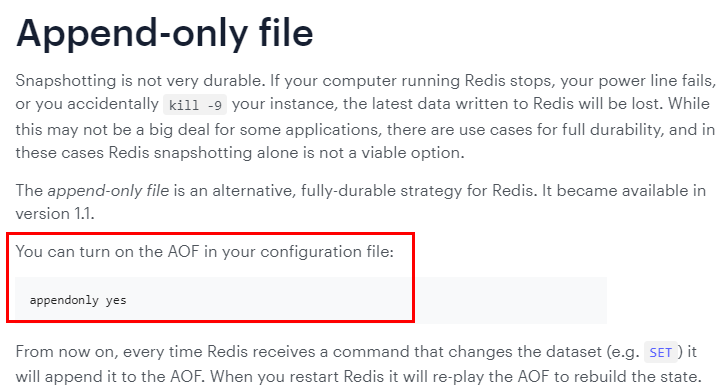
以日志的形式来记录每个写操作,将Redis执行过的所有写指令记录下来(读操作不记录),只许追加文件但不可以改写文件,redis启动之初会读取该文件重新构建数据,换言之,redis重启的话就根据日志文件的内容将写指令从前到后执行一次以完成数据的恢复工作
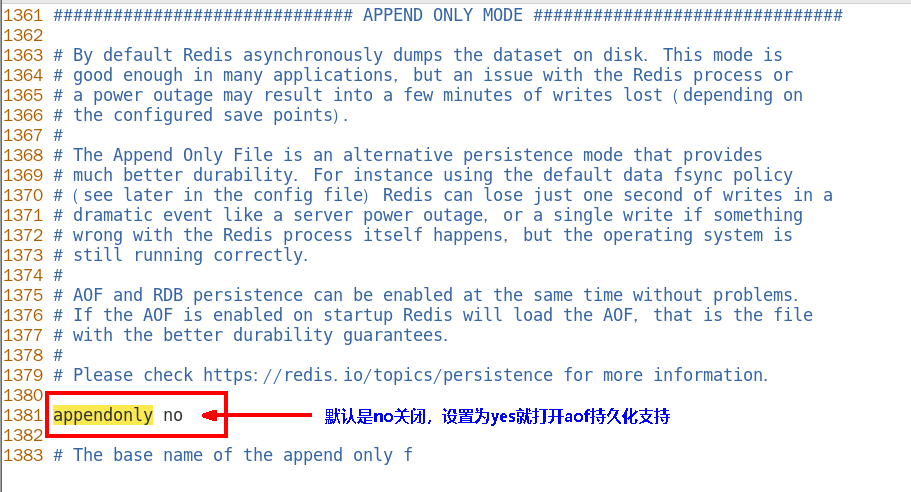
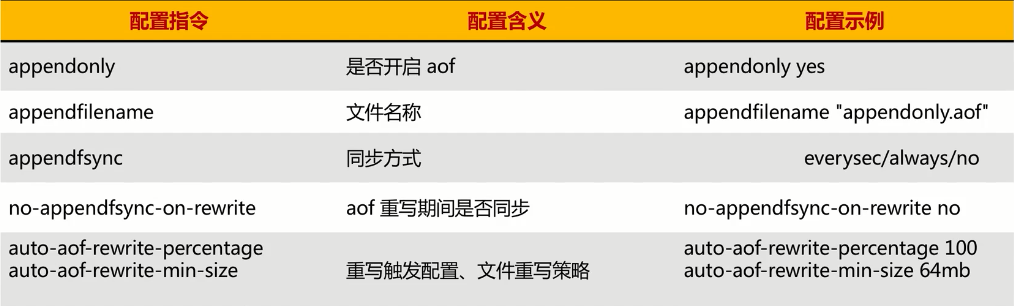
默认情况下,redis是没有开启AOF(append only file)的。开启AOF功能需要设置配置:appendonly yes
5.2.2.2 能干嘛
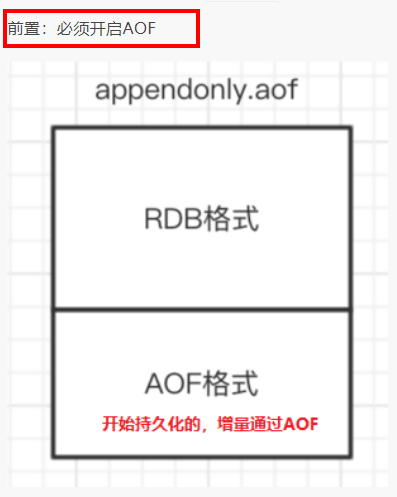
5.2.2.3 Aof保存的是appendonly.aof文件
5.2.2.4 AOF持久化工作流程
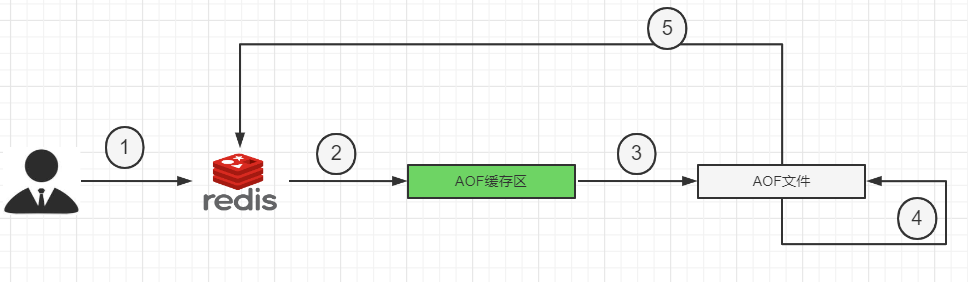
|---|--------------------------------------------------------------------------------------------------------------------|
| 1 | Client作为命令的来源,会有多个源头以及源源不断的请求命令。 |
| 2 | 在这些命令到达Redis Server 以后并不是直接写入AOF文件,会将其这些命令先放入AOF缓存中进行保存。这里的AOF缓冲区实际上是内存中的一片区域,存在的目的是当这些命令达到一定量以后再写入磁盘,避免频繁的磁盘IO操作。 |
| 3 | AOF缓冲会根据AOF缓冲区 同步文件的三种写回策略将命令写入磁盘上的AOF文件。 |
| 4 | 随着写入AOF内容的增加为避免文件膨胀,会根据规则进行命令的合并(又称 AOF重写),从而起到AOF文件压缩的目的。 |
| 5 | 当Redis Server 服务器重启的时候会从AOF文件载入数据。 |
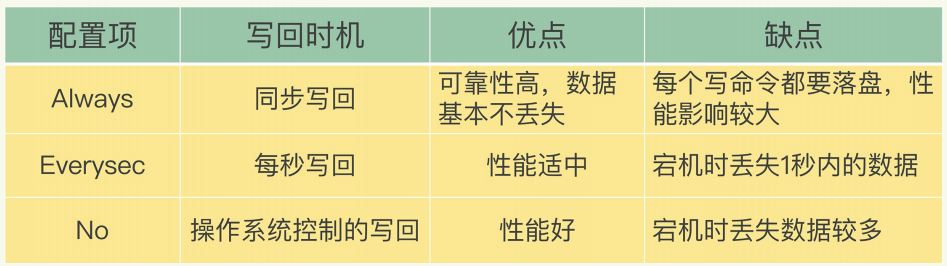
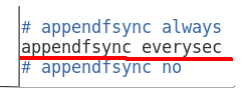
5.2.2.5 AOF缓冲区三种写回策略

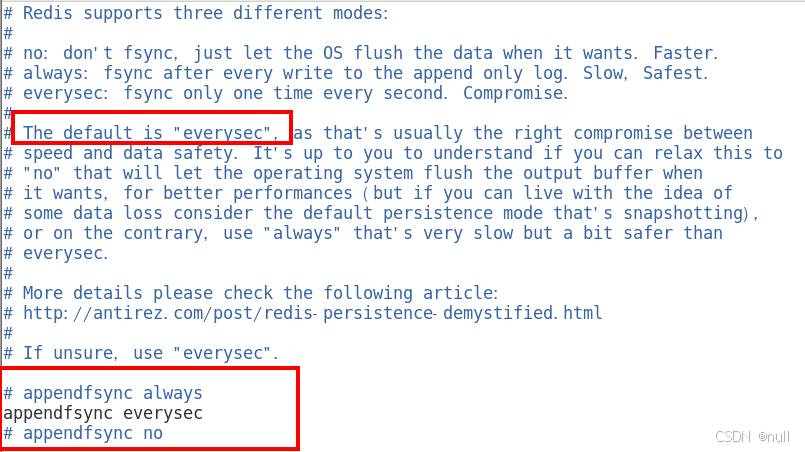
三种写回策略小总结update
5.2.2.6 案例演示和说明 AOF配置/启动/修复/恢复
5.2.2.6.1 配置文件说明(6 VS 7)
如何开启aof
使用默认写回策略,每秒钟
aof文件-保存路径
redis6
AOF保存文件的位置和RDB保存文件的位置一样,都是通过redis.conf配置文件的 dir 配置
redis7之后最新

最终路径
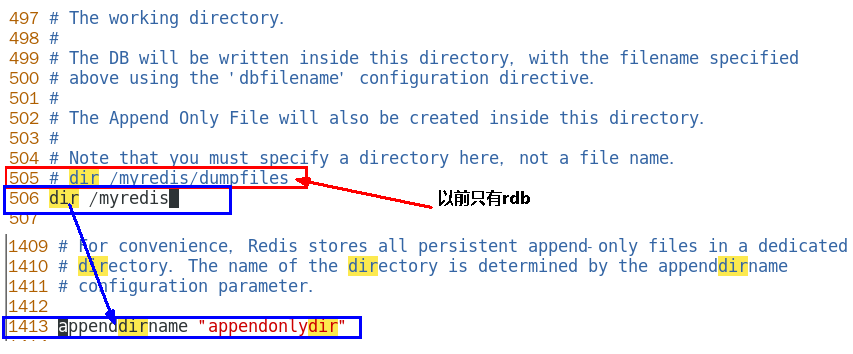
dir + appenddirname
aof文件-保存名称
redis6 有且仅有一个
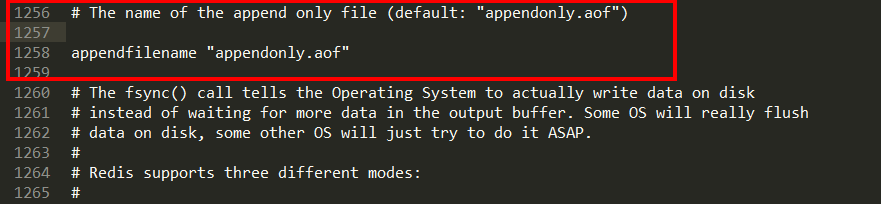
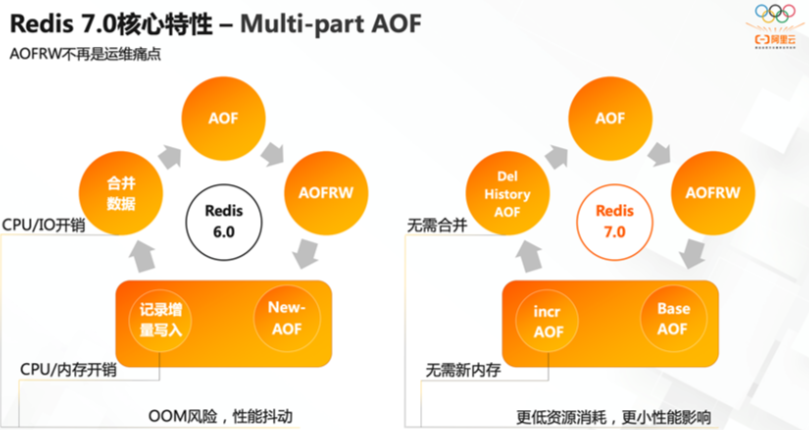
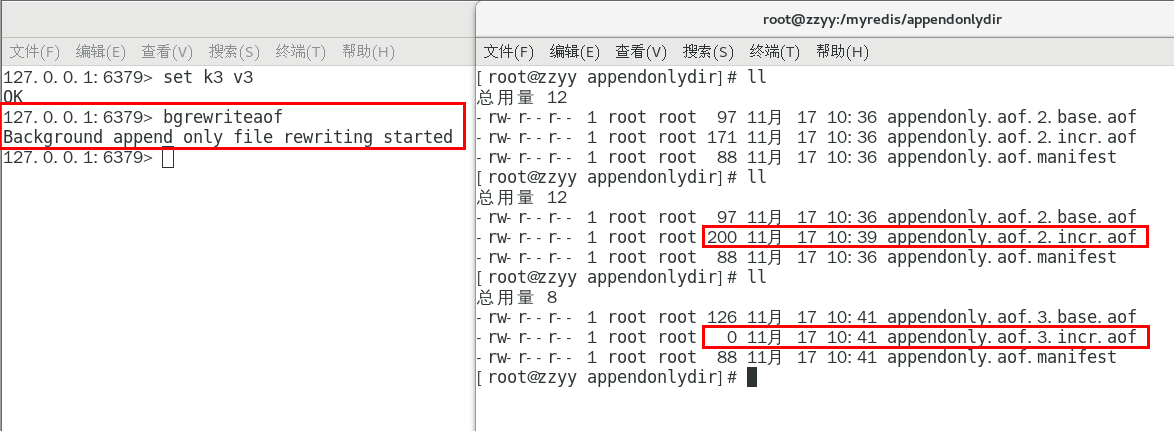
Redis7.0 Multi Part AOF的设计

从1到3
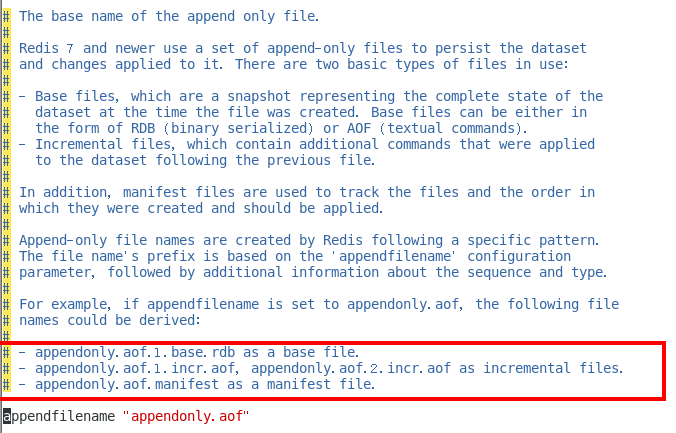
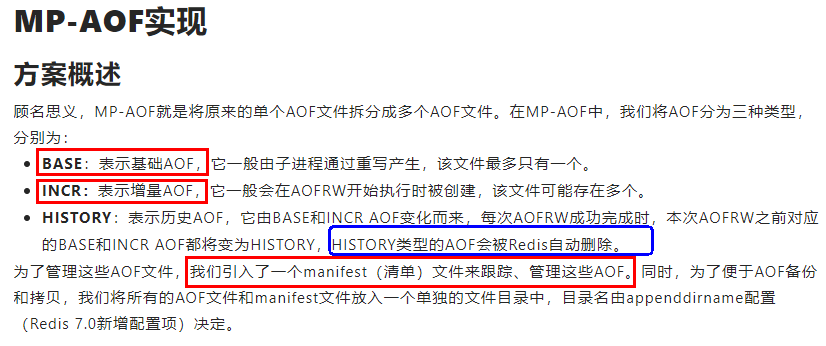
base基本文件 、incr增量文件、manifest清单文件
Redis7.0config 中对应的配置项
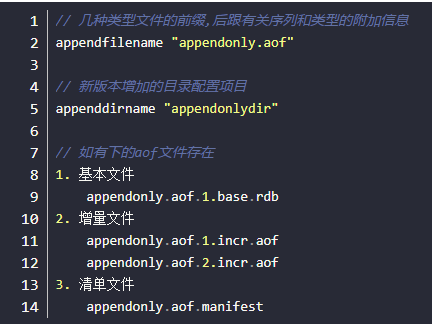
5.2.2.6.2 正常恢复
启动:设置Yes 修改默认的appendonly no,改为yes
写操作继续,生成aof文件到指定的目录
恢复1:重启redis然后重新加载,结果OK
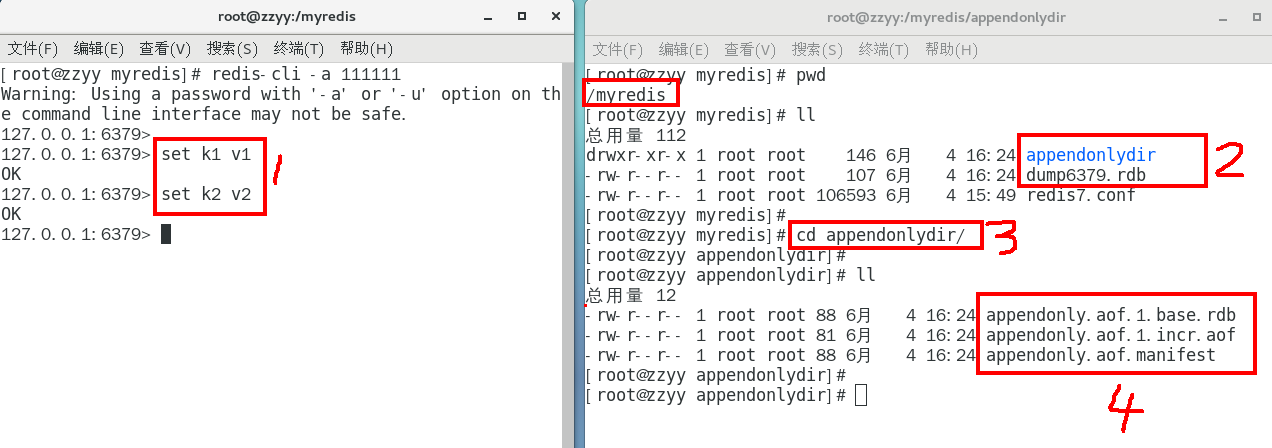
恢复2:
写入数据进redis,然后flushdb+shutdown服务器
新生成了dump和aof
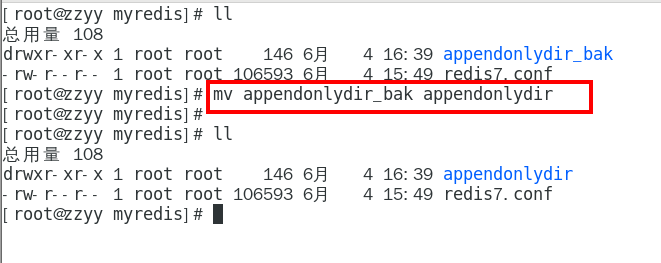
备份新生成的aof.bak,然后删除dump/aof再看恢复
重启redis然后重新加载试试???
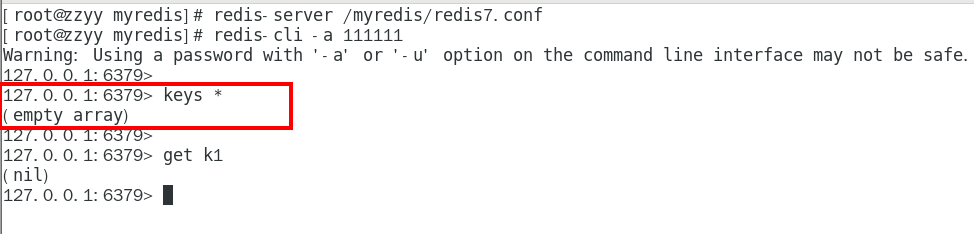
停止服务器,拿出我们的备份修改后再重新启动服务器看看

5.2.2.6.3 异常恢复
故意乱写正常的AOF文件,模拟网络闪断文件写error
vim /myredis/appendonlydir/appendonly.aof.1.incr.aof
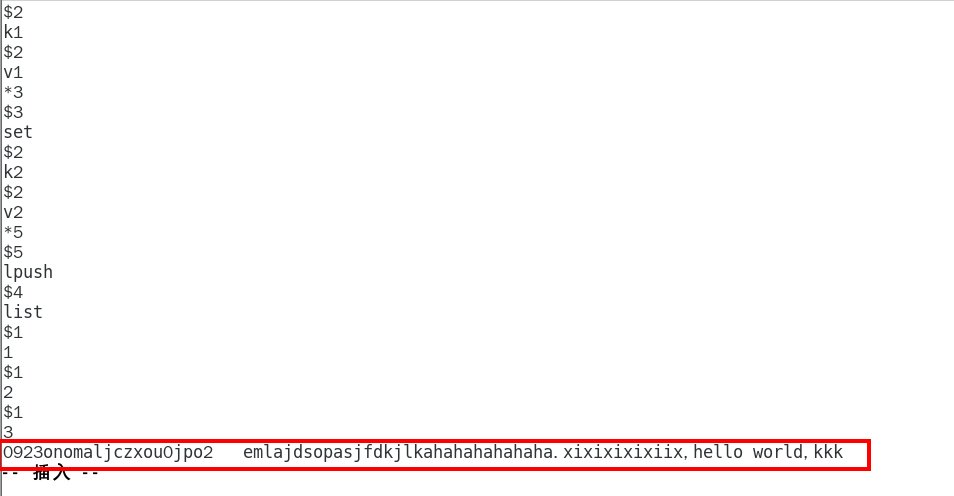
重启 Redis 之后就会进行 AOF 文件的载入,发现启动都不行,o(╥﹏╥)o

异常修复命令:redis-check-aof --fix 进行修复
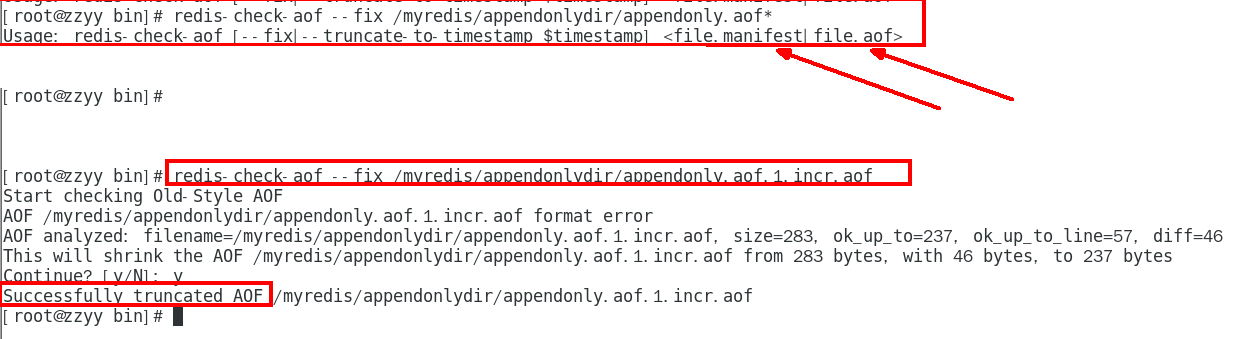
redis-check-aof --fix 进行修复
重新OK
5.2.2.7 优势
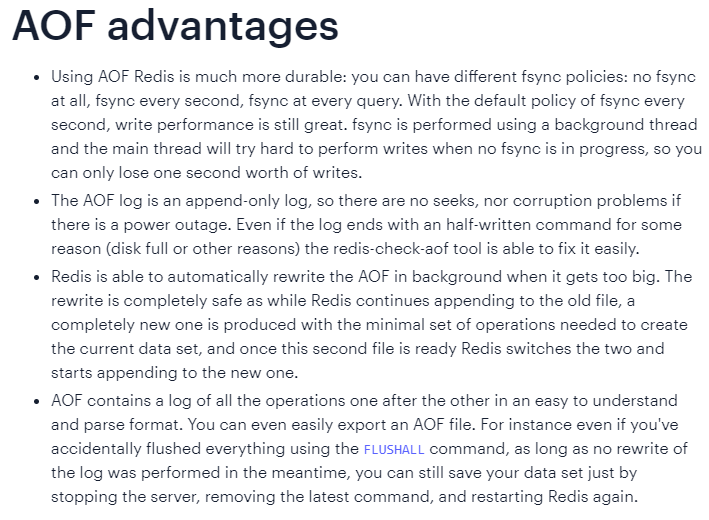
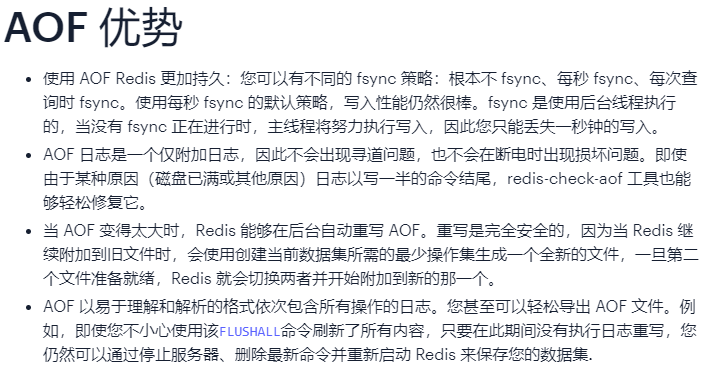 更好的保护数据不丢失 、性能高、可做紧急恢复
相同数据集的数据而言aof文件要远大于rdb文件,恢复速度慢于rdb
5.2.2.8 劣势
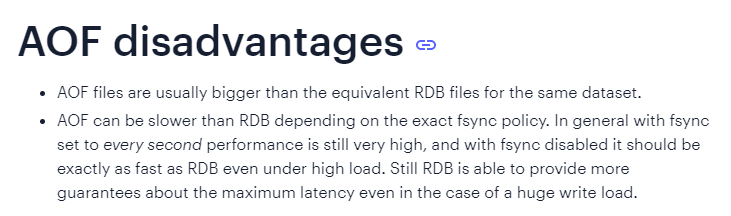
 相同数据集的数据而言aof文件要远大于rdb文件,恢复速度慢于rdb
aof运行效率要慢于rdb,每秒同步策略效率较好,不同步效率和rdb相同
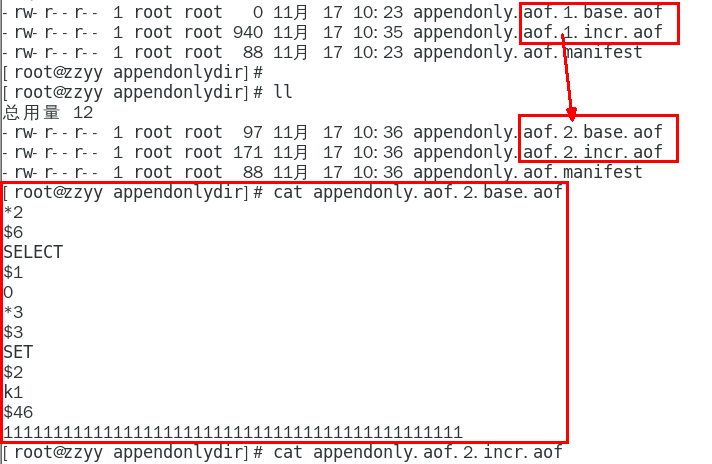
5.2.2.9 AOF重写机制
一句话:启动AOF文件的内容压缩,只保留可以恢复数据的最小指令集。
由于AOF持久化是Redis不断将写命令记录到 AOF 文件中,随着Redis不断的进行,AOF 的文件会越来越大,
文件越大,占用服务器内存越大以及 AOF 恢复要求时间越长。
为了解决这个问题,Redis新增了重写机制,当AOF文件的大小超过所设定的峰值时,Redis就会自动启动AOF文件的内容压缩,
只保留可以恢复数据的最小指令集
或者
可以手动使用命令 bgrewriteaof 来重新。
5.2.2.9.1 触发机制
注意 ,同时满足,且的关系才会触发
1 根据上次重写后的aof大小,判断当前aof大小是不是增长了1倍
2 重写时满足的文件大小
自动触发
满足配置文件中的选项后,Redis会记录上次重写时的AOF大小,默认配置是当AOF文件大小是上次rewrite后大小的一倍且文件大于64M时
手动触发
客户端向服务器发送bgrewriteaof命令
5.2.2.9.2 案例说明
需求说明
启动AOF文件的内容压缩,只保留可以恢复数据的最小指令集。
**举个例子:**比如有个key
一开始你 set k1 v1
然后改成 set k1 v2
最后改成 set k1 v3
如果不重写,那么这3条语句都在aof文件中,内容占空间不说启动的时候都要执行一遍,共计3条命令;
但是,我们实际效果只需要set k1 v3这一条,所以,
开启重写后,只需要保存set k1 v3就可以了只需要保留最后一次修改值,相当于给aof文件瘦身减肥,性能更好。
AOF重写不仅降低了文件的占用空间,同时更小的AOF也可以更快地被Redis加载。
需求验证
启动AOF文件的内容压缩,只保留可以恢复数据的最小指令集。
步骤


自动触发案例01
完成上述正确配置,重启redis服务器,执行set k1 v1查看aof文件是否正常
查看三大配置文件
复习配置项

本次操作
k1不停1111111暴涨
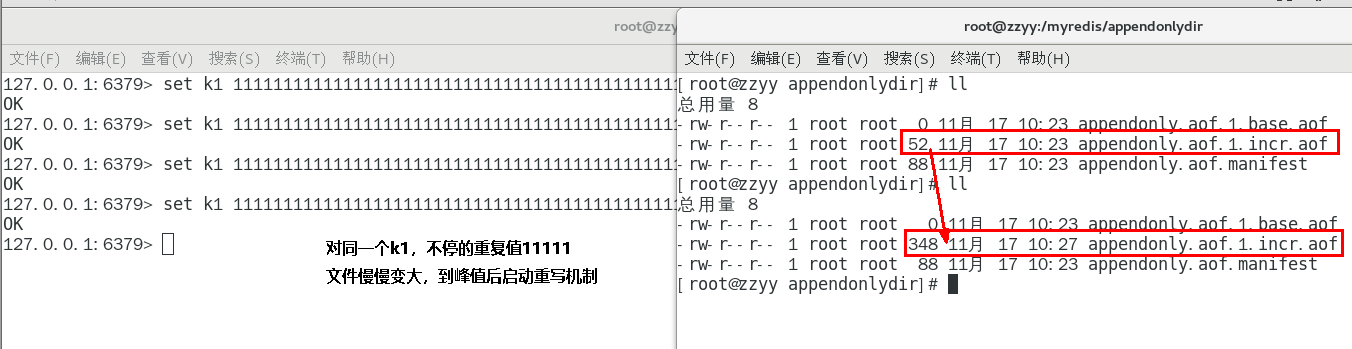
重写触发
手动触发案例02
客户端向服务器发送bgrewriteaof命令
结论

5.2.2.9.3 重写原理
1:在重写开始前,redis会创建一个"重写子进程",这个子进程会读取现有的AOF文件,并将其包含的指令进行分析压缩并写入到一个临时文件中。
2:与此同时,主进程会将新接收到的写指令一边累积到内存缓冲区中,一边继续写入到原有的AOF文件中,这样做是保证原有的AOF文件的可用性,避免在重写过程中出现意外。
3:当"重写子进程"完成重写工作后,它会给父进程发一个信号,父进程收到信号后就会将内存中缓存的写指令追加到新AOF文件中
4:当追加结束后,redis就会用新AOF文件来代替旧AOF文件,之后再有新的写指令,就都会追加到新的AOF文件中
5:重写aof文件的操作,并没有读取旧的aof文件,而是将整个内存中的数据库内容用命令的方式重写了一个新的aof文件,这点和快照有点类似
5.2.2.10 AOF优化配置项详解
配置文件APPEND ONLY MODE模块
5.2.2.11 小总结

5.3 RDB-AOF混合持久化
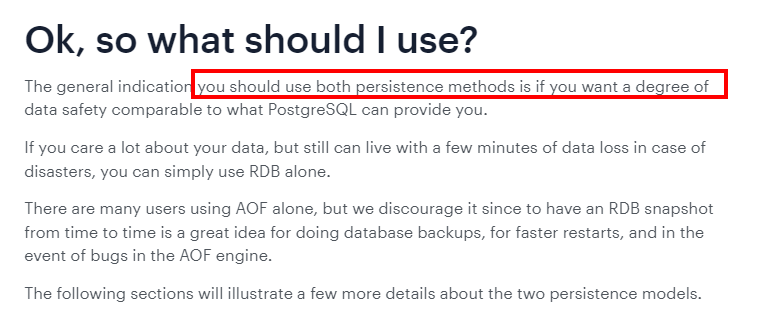
官网建议
5.3.1 rdb vs aof
问题:可否共存?如果共存听谁的?
官网文档
数据恢复顺序和加载流程


5.3.2 你怎么选?用那个?
RDB持久化方式能够在指定的时间间隔能对你的数据进行快照存储
AOF持久化方式记录每次对服务器写的操作,当服务器重启的时候会重新执行这些命令来恢复原始的数据,AOF命令以redis协议追加保存每次写的操作到文件末尾.
5.3.3 同时开启两种持久化方式
在这种情况下,当redis重启的时候会优先载入AOF文件来恢复原始的数据,因为在通常情况下AOF文件保存的数据集要比RDB文件保存的数据集要完整.
RDB的数据不实时,同时使用两者时服务器重启也只会找AOF文件。那要不要只使用AOF呢?作者建议不要,因为RDB更适合用于备份数据库(AOF在不断变化不好备份),留着rdb作为一个万一的手段。
5.3.4 推荐方式
RDB+AOF混合方式
结合了RDB和AOF的优点,既能快速加载又能避免丢失过多的数据。

1 开启混合方式设置
设置aof-use-rdb-preamble的值为 yes yes表示开启,设置为no表示禁用
2 RDB+AOF的混合方式---------> 结论:RDB镜像做全量持久化,AOF做增量持久化
先使用RDB进行快照存储,然后使用AOF持久化记录所有的写操作,当重写策略满足或手动触发重写的时候,将最新的数据存储为新的RDB记录。这样的话,重启服务的时候会从RDB和AOF两部分恢复数据,既保证了数据完整性,又提高了恢复数据的性能。简单来说:混合持久化方式产生的文件一部分是RDB格式,一部分是AOF格式。----》AOF包括了RDB头部+AOF混写
5.4 纯缓存模式
同时关闭RDB+AOF
5.4.1 save ""
禁用rdb
禁用rdb持久化模式下,我们仍然可以使用命令save、bgsave生成rdb文件
5.4.2 appendonly no
禁用aof
禁用aof持久化模式下,我们仍然可以使用命令bgrewriteaof生成aof文件
6 Redis事务
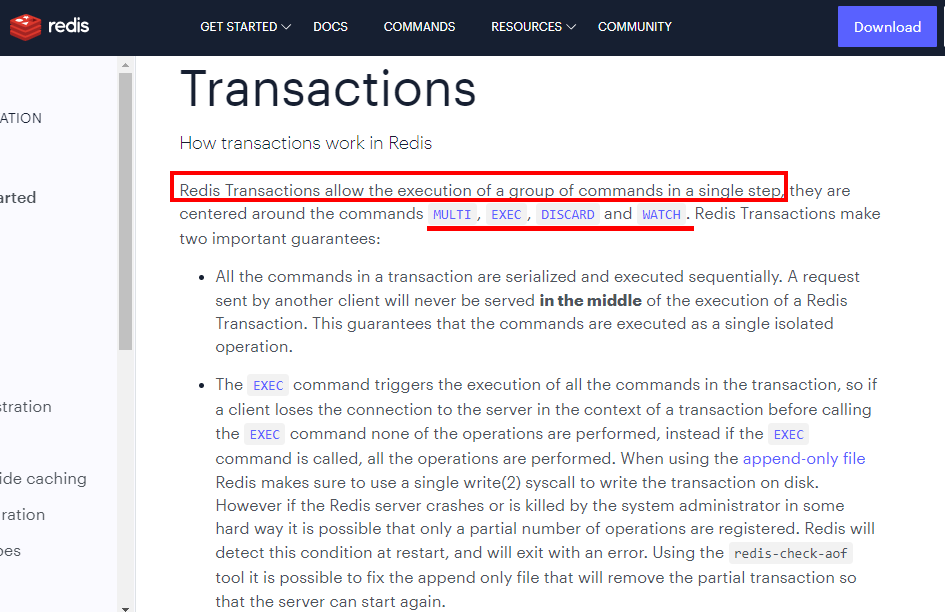
6.1 是什么
官网:Docs
可以一次执行多个命令,本质是一组命令的集合。一个事务中的所有命令都会序列化,按顺序地串行化执行而不会被其它命令插入,不许加塞
6.2 能干嘛
一个队列中,一次性、顺序性、排他性的执行一系列命令
6.3 Redis事务 VS 数据库事务
|-------------|------------------------------------------------------------------------------|
| 1 单独的隔离操作 | Redis的事务仅仅是保证事务里的操作会被连续独占的执行,redis命令执行是单线程架构,在执行完事务内所有指令前是不可能再去同时执行其他客户端的请求的 |
| 2 没有隔离级别的概念 | 因为事务提交前任何指令都不会被实际执行,也就不存在"事务内的查询要看到事务里的更新,在事务外查询不能看到"这种问题了 |
| 3不保证原子性 | Redis的事务 不保证原子性,也就是不保证所有指令同时成功或同时失败,只有决定是否开始执行全部指令的能力,没有执行到一半进行回滚的能力 |
| 4 排它性 | Redis会保证一个事务内的命令依次执行,而不会被其它命令插入 |
6.4 怎么玩
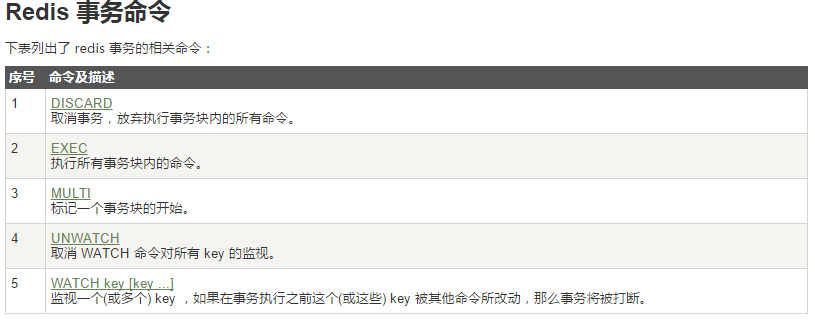
6.4.1 常用命令
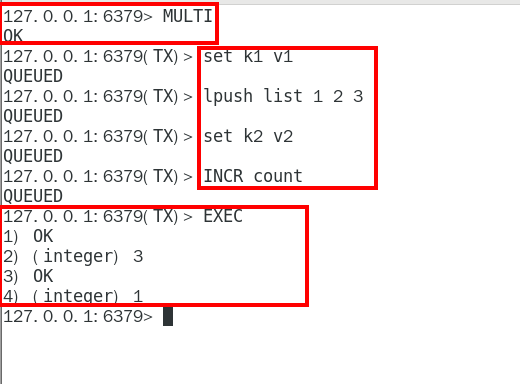
6.4.2 Case1:正常执行
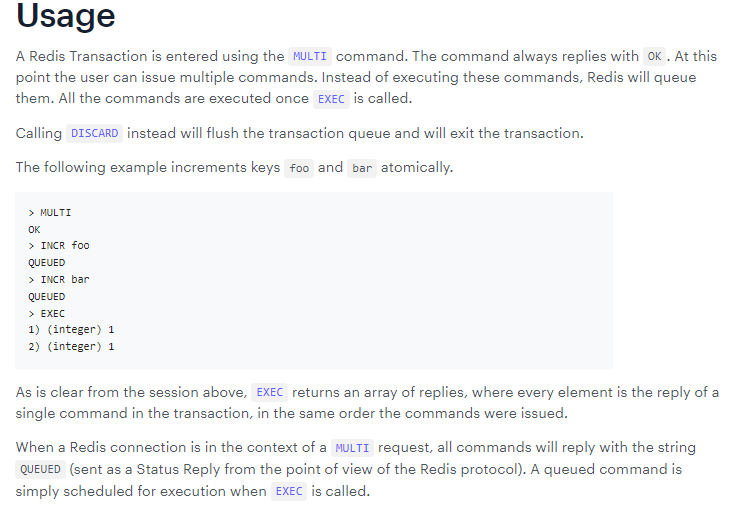
MULTI
EXEC
6.4.3 Case2:放弃事务
MULTI
DISCARD
案例演示:
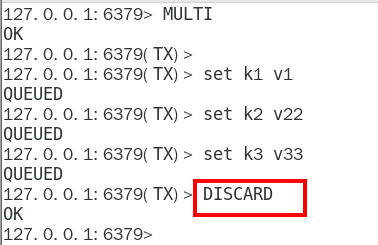
官网说明:

6.4.4 Case3:全体连坐
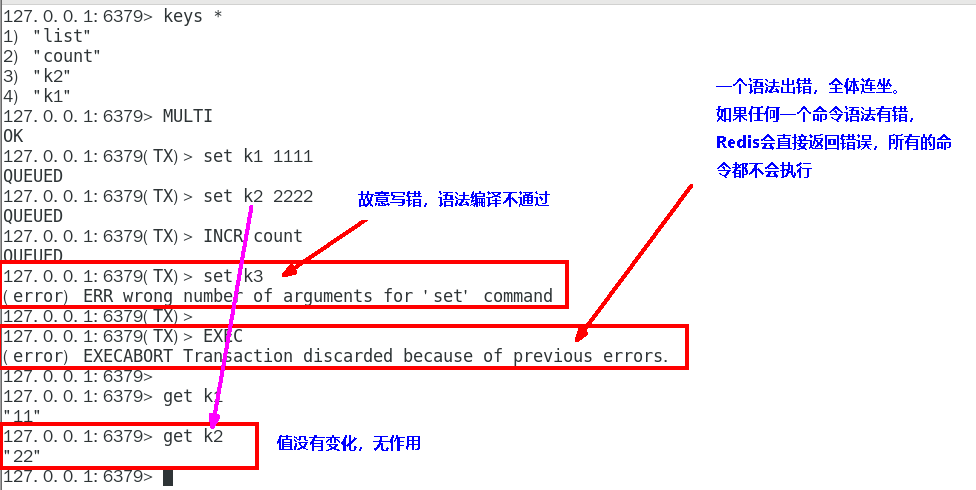
官网说明
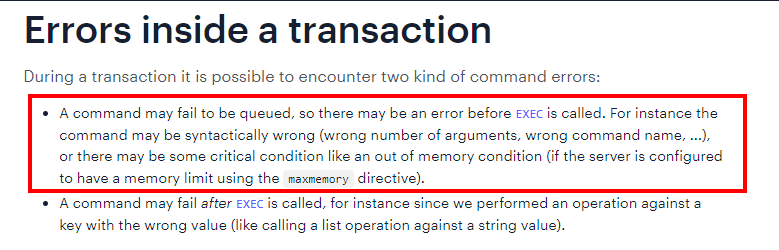
6.4.5 Case4:冤头债主
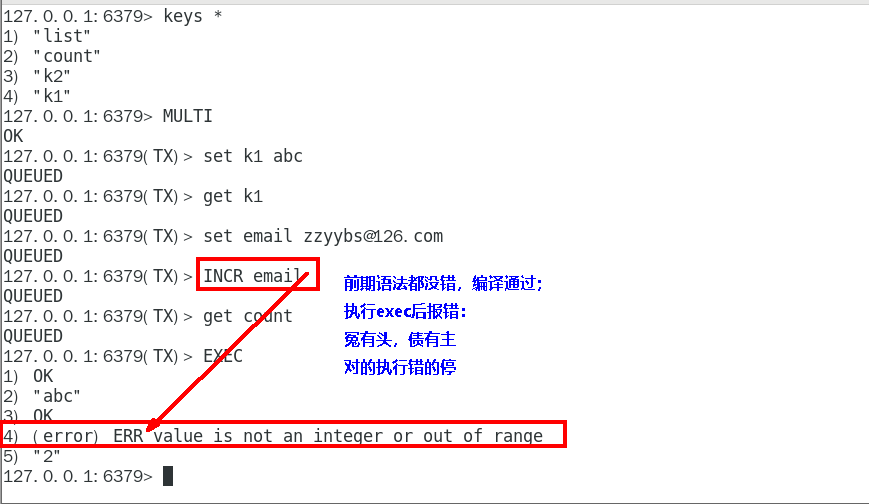
官网说明
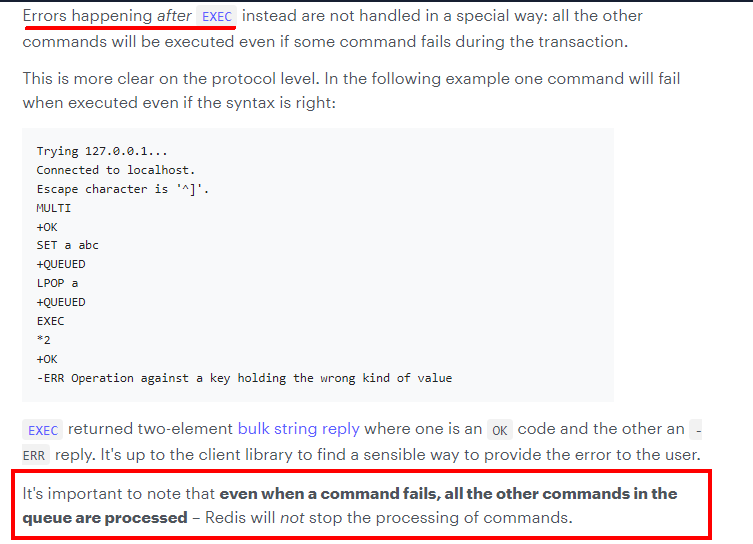
补充
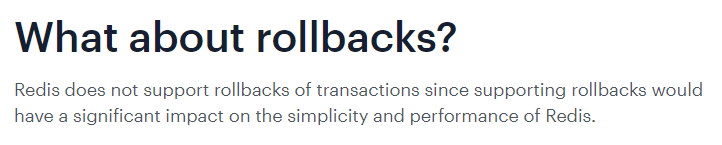
Redis不提供事务回滚的功能,开发者必须在事务执行出错后,自行恢复数据库状态
注意和传统数据库事务区别,不一定要么一起成功要么一起失败
6.4.6 Case5:watch监控
6.4.6.1 Redis使用Watch来提供乐观锁定,类似于CAS(Check-and-Set)
悲观锁
悲观锁(Pessimistic Lock), 顾名思义,就是很悲观,每次去拿数据的时候都认为别人会修改,所以每次在拿数据的时候都会上锁,这样别人想拿这个数据就会block直到它拿到锁。
乐观锁
乐观锁(Optimistic Lock), 顾名思义,就是很乐观,每次去拿数据的时候都认为别人不会修改,所以不会上锁,但是在更新的时候会判断一下在此期间别人有没有去更新这个数据。
乐观锁策略:提交版本必须 大于 记录当前版本才能执行更新
CAS(check-and-set)
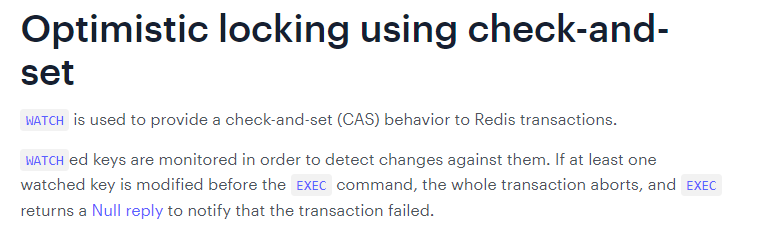
6.4.6.2 watch
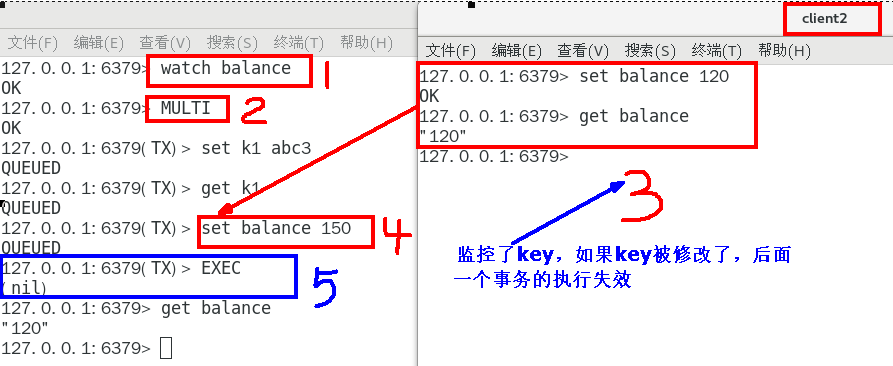
初始化k1和balance两个key,先监控再开启multi,保证两key变动在同一个事务内
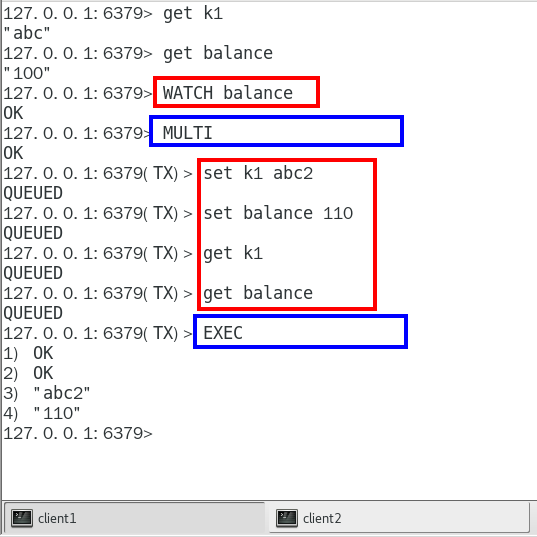
有加塞篡改
watch命令是一种乐观锁的实现,Redis在修改的时候会检测数据是否被更改,如果更改了,则执行失败
第一个窗口蓝色框第5步执行结果返回为空,也就是相当于是失败,笔记见最下面官网说明

6.4.6.3 unwatch
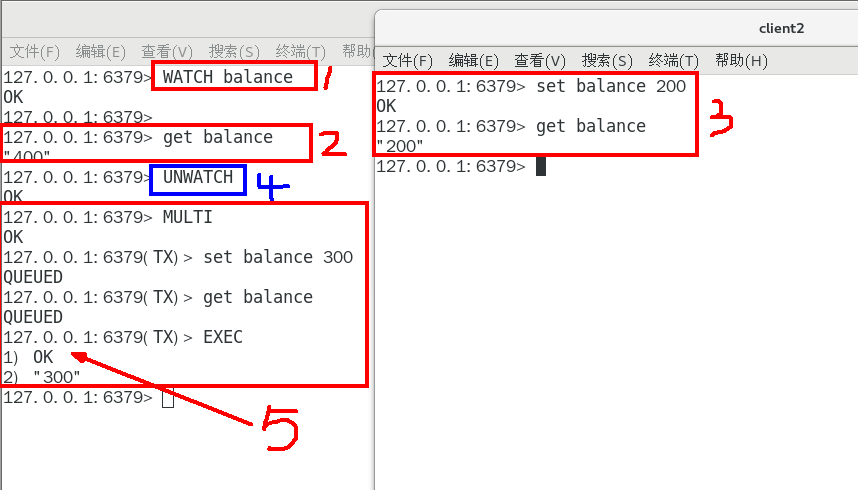
6.4.6.4 小结
一旦执行了exec之前加的监控锁都会被取消掉了
当客户端连接丢失的时候(比如退出链接),所有东西都会被取消监视
6.5 小总结
开启:以MULTI开始一个事务
入队:将多个命令入队到事务中,接到这些命令并不会立即执行,而是放到等待执行的事务队列里面
执行:由EXEC命令触发事务
7 Redis管道
7.1 面试题
如何优化频繁命令往返造成的性能瓶颈?
问题由来:
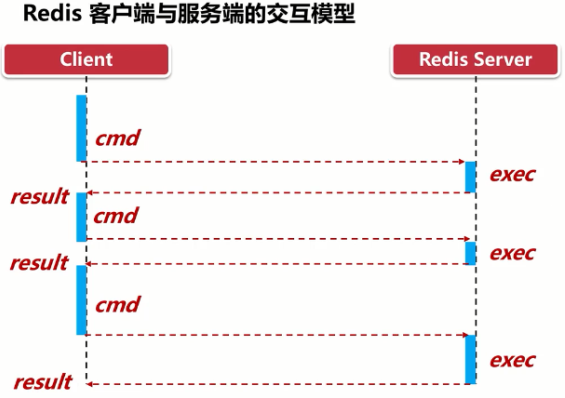
Redis是一种基于客户端-服务端模型以及请求/响应协议的TCP服务。一个请求会遵循以下步骤:
1 客户端向服务端发送命令分四步(发送命令→命令排队→命令执行→返回结果),并监听Socket返回,通常以阻塞模式等待服务端响应。
2 服务端处理命令,并将结果返回给客户端。
上述两步称为:Round Trip Time(简称RTT,数据包往返于两端的时间),问题笔记最下方
如果同时需要执行大量的命令,那么就要等待上一条命令应答后再执行,这中间不仅仅多了RTT(Round Time Trip),而且还频繁调用系统IO,发送网络请求,同时需要redis调用多次read()和write()系统方法,系统方法会将数据从用户态转移到内核态,这样就会对进程上下文有比较大的影响了,性能不太好,o(╥﹏╥)o
7.2 是什么
解决思路
|--------------------------------------------------------------------------------------------------------------------------|
| 管道(pipeline)可以一次性发送多条命令给服务端,服务端依次处理完完毕后, 通过一条响应一次性将结果返回, 通过减少客户端与redis的通信次数来实现降低往返延时时间。pipeline实现的原理是队列,先进先出特性就保证数据的顺序性。 |
 引出管道这个概念
定义:Pipeline是为了解决RTT往返回时,仅仅是将命令打包一次性发送,对整个Redis的执行不造成其它任何影响
一句话:批处理命令变种优化措施,类似Redis的原生批命令(mget和mset)
7.3 案例演示
当堂演示

7.4 小总结
7.4.1 Pipeline与原生批量命令对比
原生批量命令是原子性(例如:mset, mget),pipeline是非原子性
原生批量命令一次只能执行一种命令,pipeline支持批量执行不同命令
原生批命令是服务端实现,而pipeline需要服务端与客户端共同完成
7.4.2 Pipeline与事务对比
事务具有原子性,管道不具有原子性
管道一次性将多条命令发送到服务器,事务是一条一条的发,事务只有在接收到exec命令后才会执行,管道不会
执行事务时会阻塞其他命令的执行,而执行管道中的命令时不会
7.4.3 使用Pipeline注意事项
pipeline缓冲的指令只是会依次执行,不保证原子性,如果执行中指令发生异常,将会继续执行后续的指令
使用pipeline组装的命令个数不能太多,不然数据量过大客户端阻塞的时间可能过久,同时服务端此时也被迫回复一个队列答复,占用很多内存
8 Redis发布订阅
学习定位:了解即可
8.1 是什么
定义:是一种消息通信模式:发送者(PUBLISH)发送消息,订阅者(SUBSCRIBE)接收消息,可以实现进程间的消息传递
一句话:Redis可以实现消息中间件MQ的功能,通过发布订阅实现消息的引导和分流。
仅代表我个人,不推荐使用该功能,专业的事情交给专业的中间件处理,redis就做好分布式缓存功能
8.2 能干嘛
Redis客户端可以订阅任意数量的频道,类似我们微信关注多个公众号
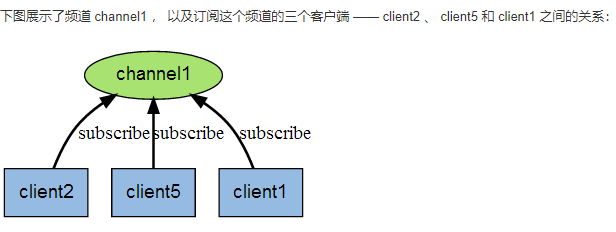
当有新消息通过PUBLISH命令发送给频道channel1时

小总结
发布/订阅其实是一个轻量的队列,只不过数据不会被持久化,一般用来处理实时性较高的异步消息

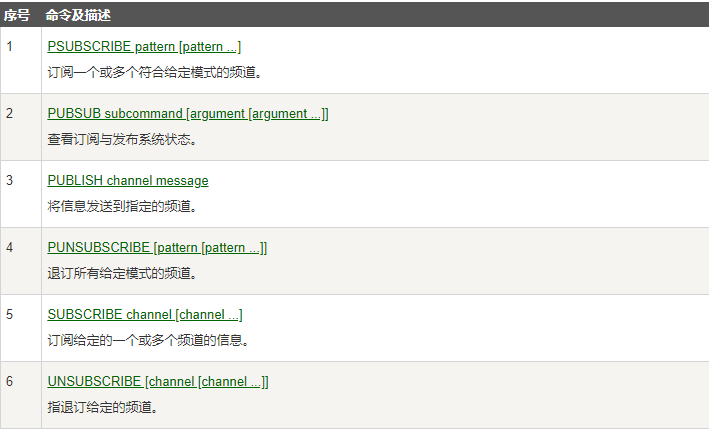
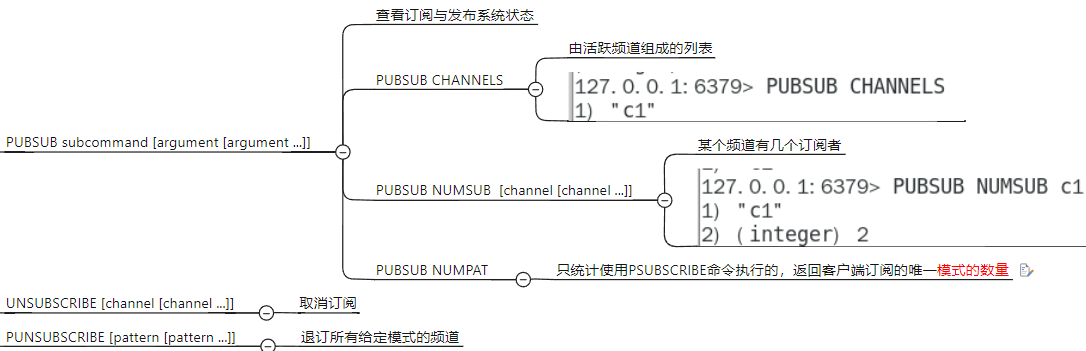
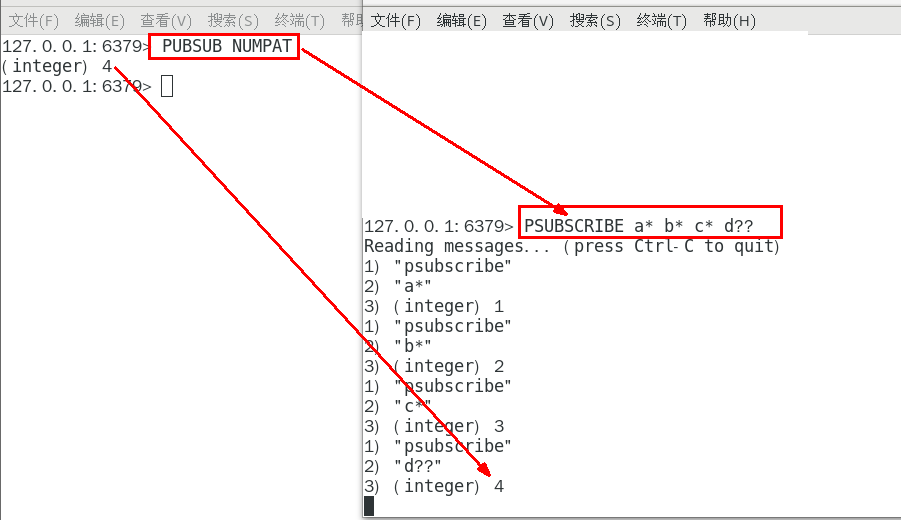
8.3 常用命令

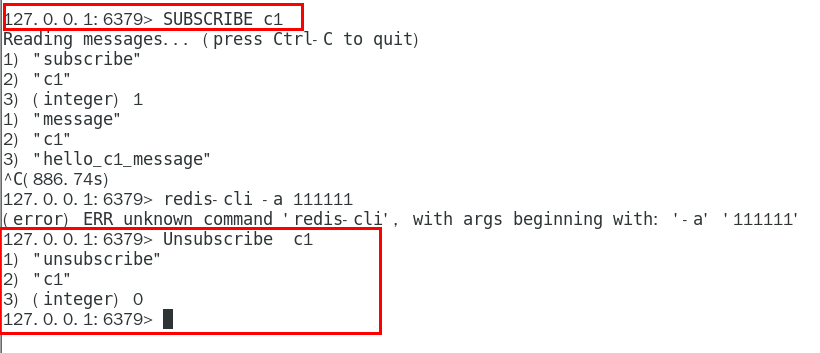
8.4 案例演示
8.4.1 当堂演示
开启3个客户端,演示客户端A、B订阅消息,客户端C发布消息
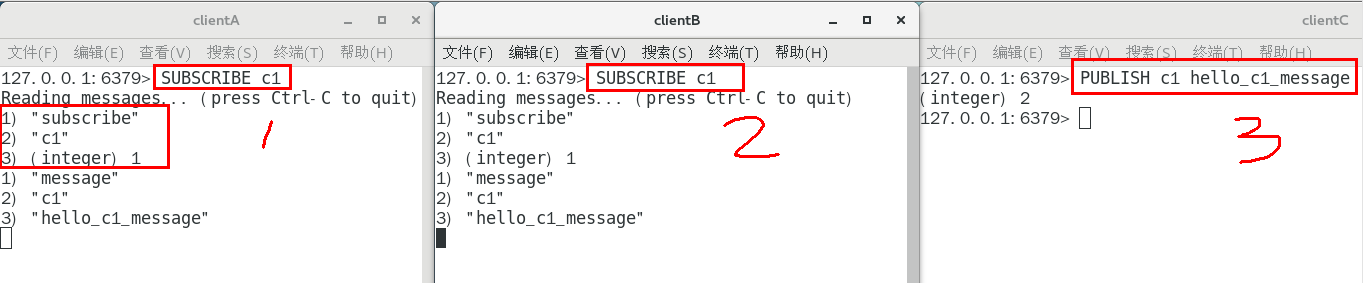
演示批量订阅和发布
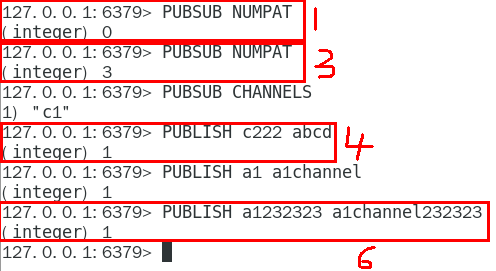
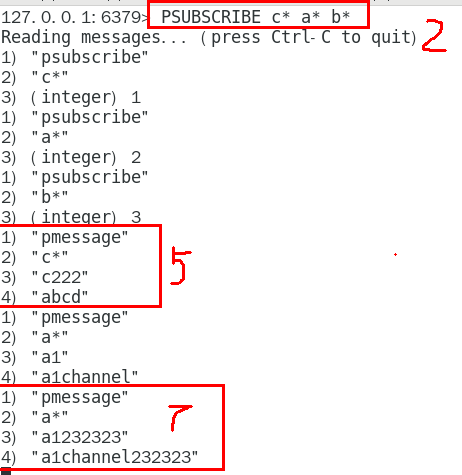
取消订阅
8.4.2 小总结
Redis可以实现消息中间件MQ的功能,通过发布订阅实现消息的引导和分流。仅代表我个人,不推荐使用该功能,专业的事情交给专业的中间件处理,redis就做好分布式缓存功能
Pub/Sub缺点:
发布的消息在Redis系统中不能持久化,因此,必须先执行订阅,再等待消息发布。如果先发布了消息,那么该消息由于没有订阅者,消息将被直接丢弃
消息只管发送对于发布者而言消息是即发即失的,不管接收,也没有ACK机制,无法保证消息的消费成功。
以上的缺点导致Redis的Pub/Sub模式就像个小玩具,在生产环境中几乎无用武之地,为此Redis5.0版本新增了Stream数据结构,不但支持多播,还支持数据持久化,相比Pub/Sub更加的强大
9 Redis复制(replica)★
9.1 是什么
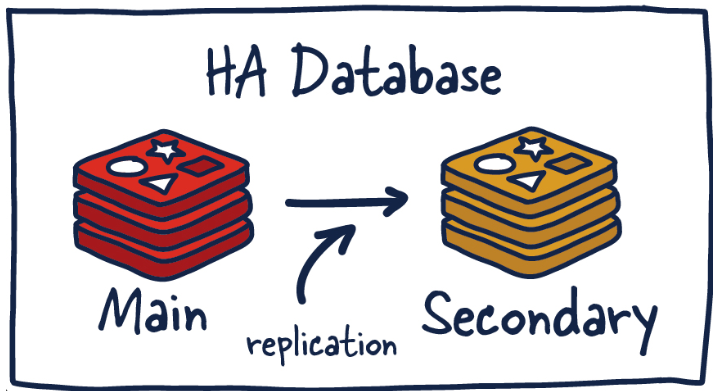
一句话:就是主从复制,master以写为主,Slave以读为主
当master数据变化的时候,自动将新的数据异步同步到其它slave数据库
9.2 能干嘛
读写分离
容灾恢复
数据备份
水平扩容支撑高并发
9.3 怎么玩
9.3.1 配从(库)不配主(库)
9.3.2 权限细节,重要
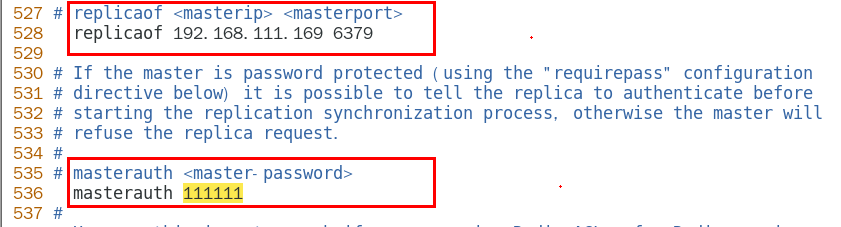
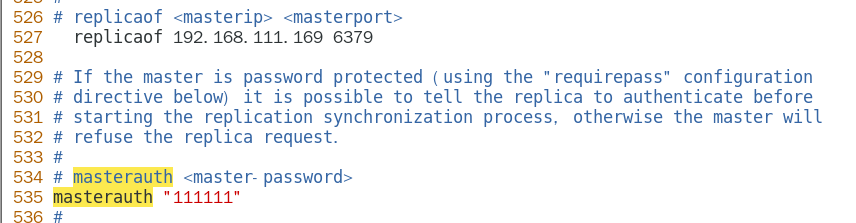
master如果配置了requirepass参数,需要密码登陆
那么slave就要配置masterauth来设置校验密码,否则的话master会拒绝slave的访问请求

9.3.3 基本操作命令
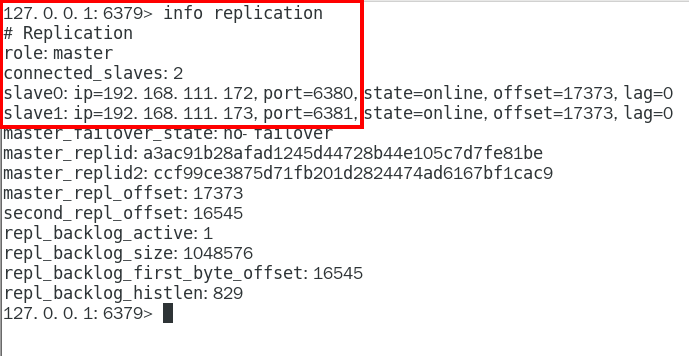
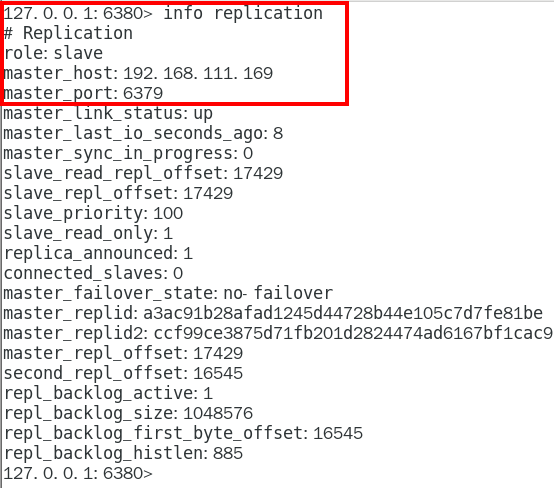
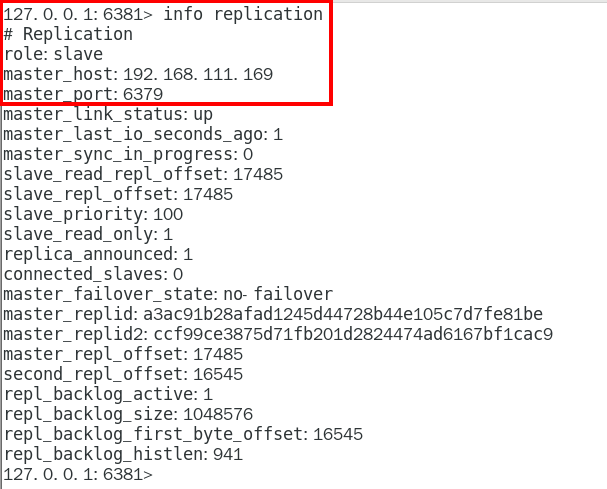
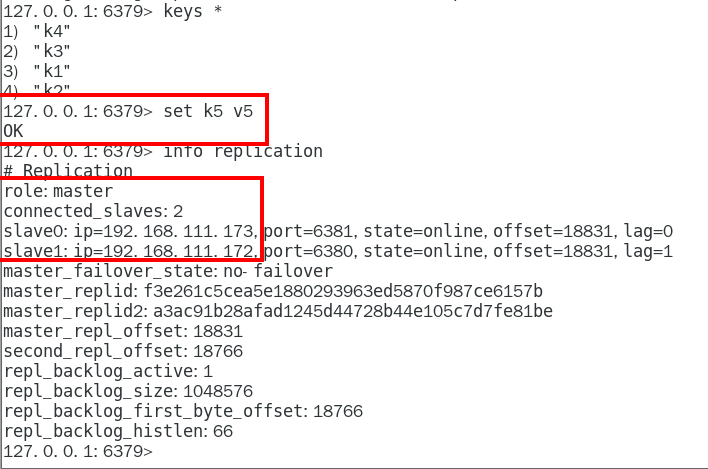
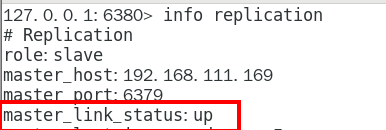
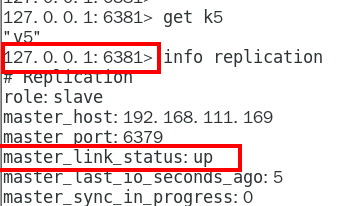
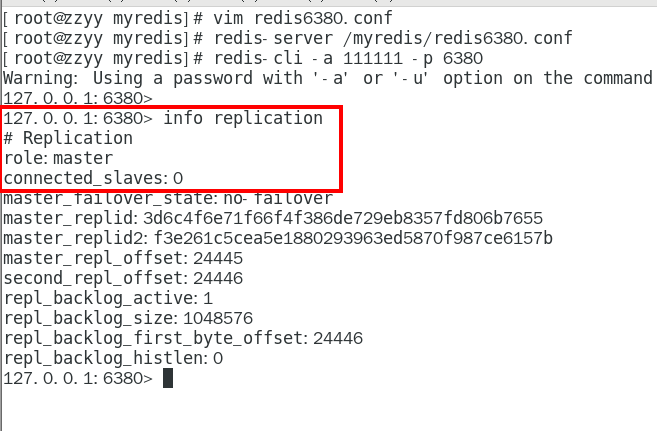
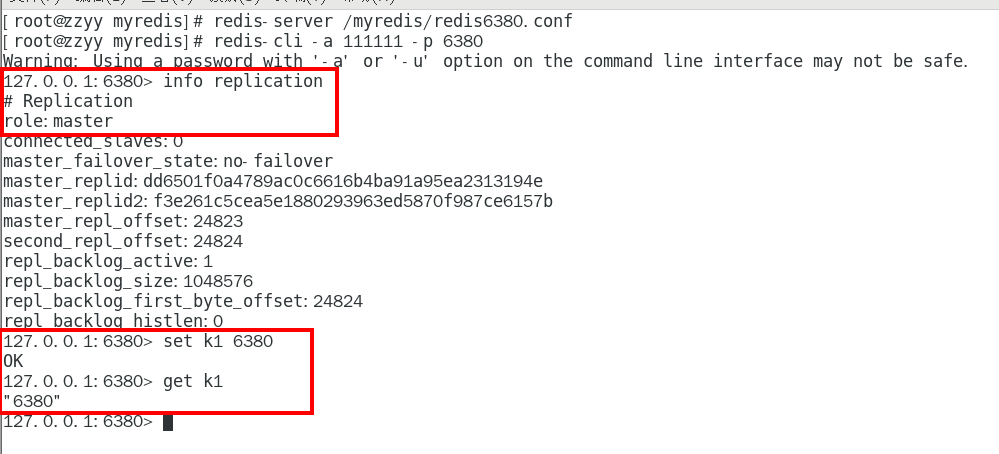
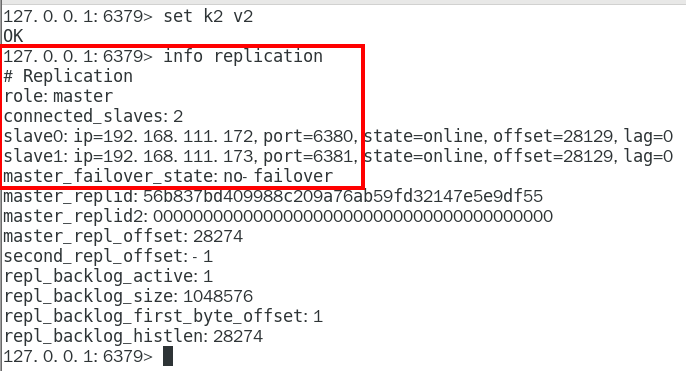
9.3.3.1 info replication
可以查看复制节点的主从关系和配置信息
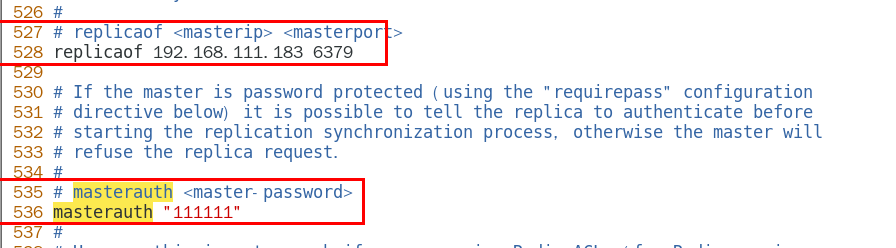
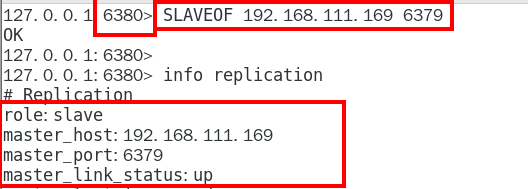
9.3.3.2 replicaof 主库IP 主库端口
一般写入进redis.conf配置文件内
9.3.3.3 slaveof 主库IP 主库端口
每次与master断开之后,都需要重新连接,除非你配置进redis.conf文件
在运行期间修改slave节点的信息,如果该数据库已经是某个主数据库的从数据库,那么会停止和原主数据库的同步关系转而和新的主数据库同步,重新拜码头
9.3.3.4 slaveof no one
使当前数据库停止与其他数据库的同步,转成主数据库,自立为王
9.4 案例演示
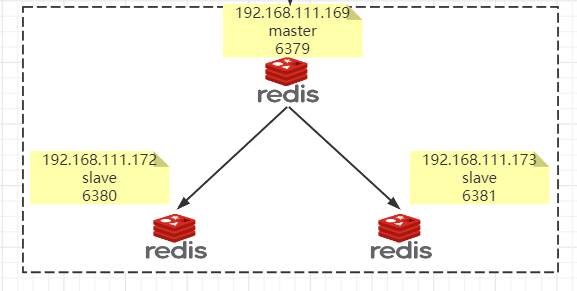
9.4.1 架构说明
一个Master两个Slave:3台虚机,每台都安装redis
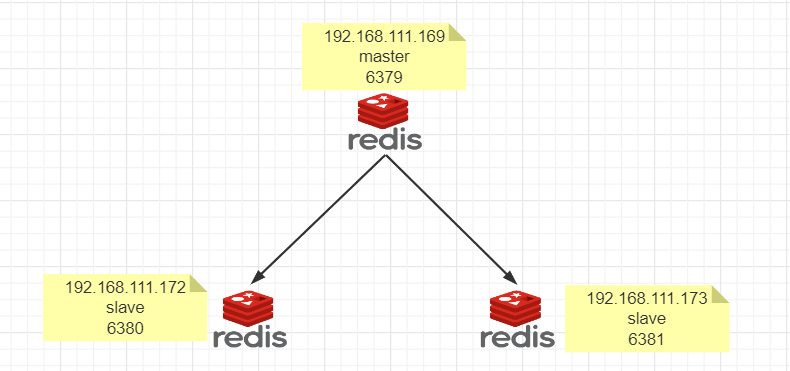
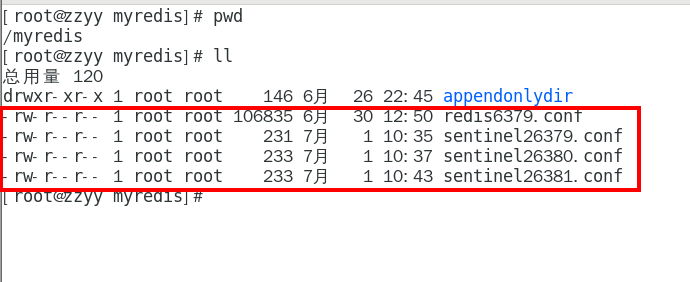
拷贝多个redis.conf文件:redis6379.conf、redis6380.conf、redis6381.conf
9.4.2 小口诀
三边网络相互ping通且注意防火墙配置
三大命令
主从复制:replicaof 主库IP 主库端口 配从(库)不配主(库)
改换门庭:slaveof 新主库IP 新主库端口
自立为王:slaveof no one
9.4.3 修改配置文件细节操作
redis6379.conf为例,步骤:
1 开启daemonize yes

2 注释掉bind 127.0.0.1

3 protected-mode no

4 指定端口

5 指定当前工作目录,dir

6 pid文件名字,pidfile

7 log文件名字,logfile

8 requirepass

9 dump.rdb名字

10 aof文件,appendfilename

11 从机访问主机的通行密码masterauth,必须(从机需要配置,主机不用)
9.4.4 常用3招
9.4.4.1 一主二仆
方案1:配置文件固定写死
配置文件执行 replicaof 主库IP 主库端口
配从(库)不配主(库)
配置从机6380
配置从机6381

先master后两台slave依次启动

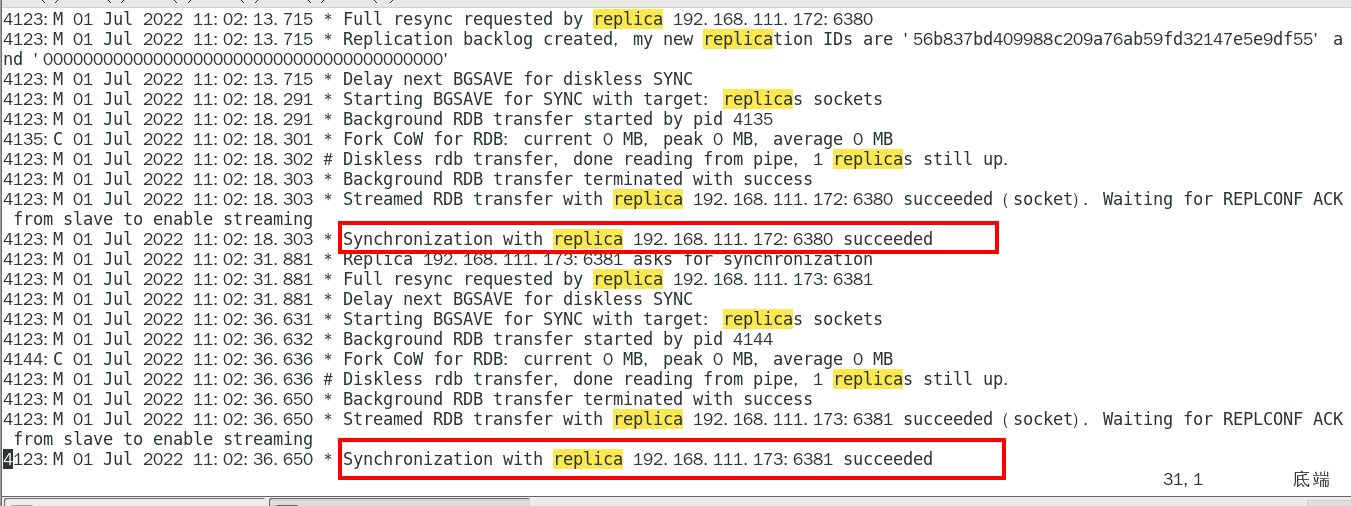
 主从关系查看:
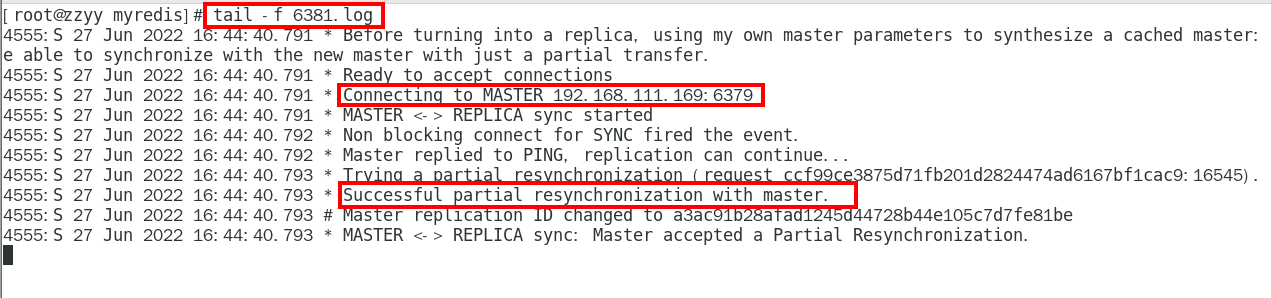
a)日志
主机日志
vim 6379.log
备机日志
 b)命令
b)命令
info replication命令查看
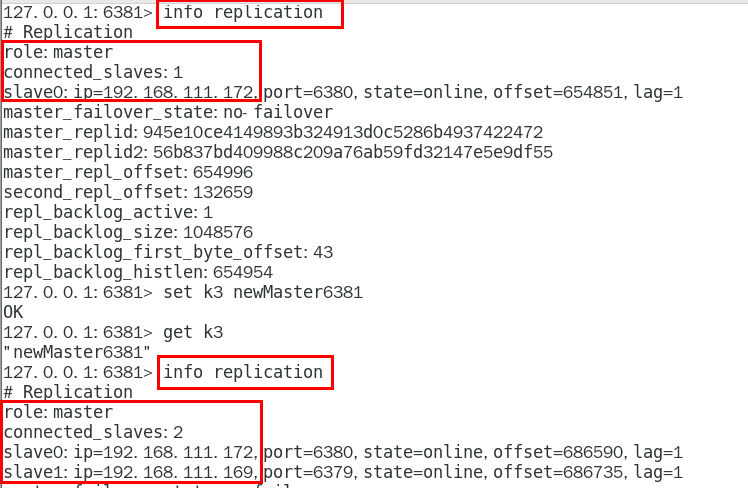
主从问题演示
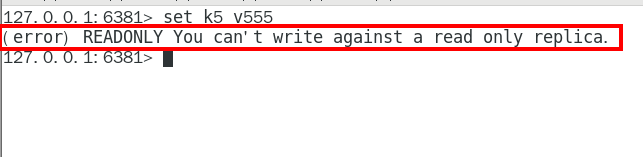
1.从机可以执行写命令吗?
2.从机切入点问题
slave是从头开始复制还是从切入点开始复制?
master启动,写到k3
slave1跟着master同时启动,跟着写到k3
slave2写到k3后才启动,那之前的是否也可以复制?
|-----------------------------|
| Y,首次一锅端,后续跟随,master写,slave跟 |
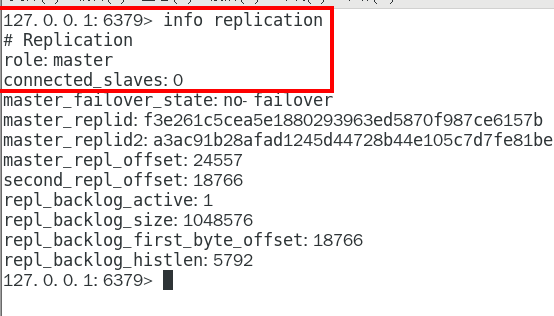
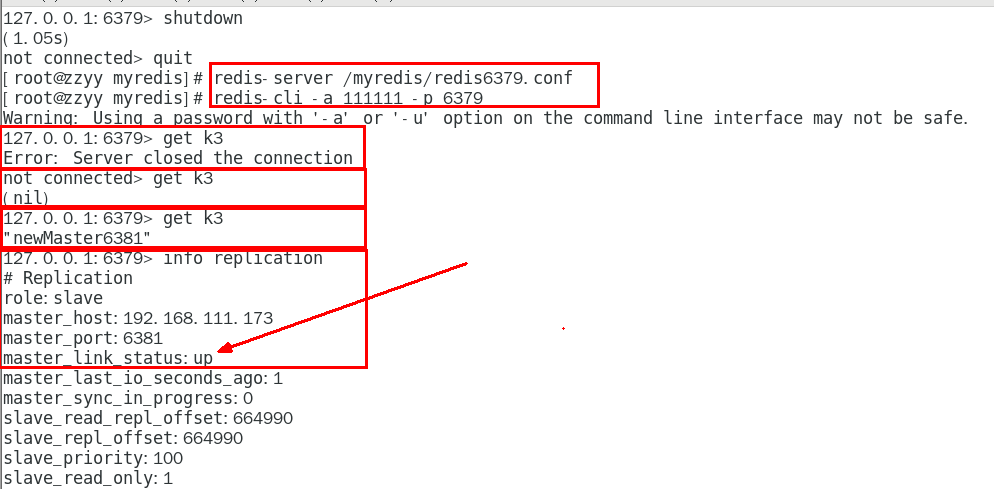
3.主机shutdown后,从机会上位吗?
主机shutdown后情况如何?从机是上位还是原地待命
从机不动,原地待命,从机数据可以正常使用;等待主机重启动归来
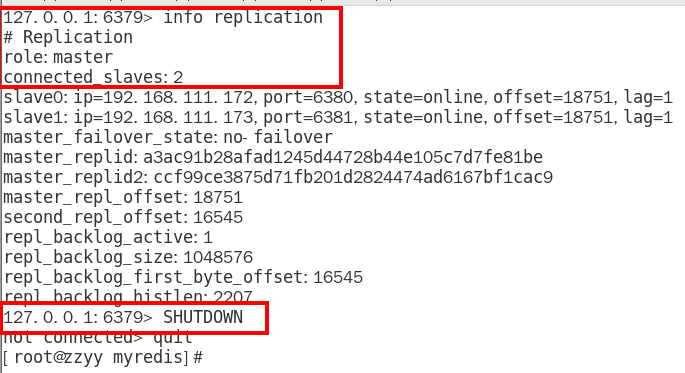
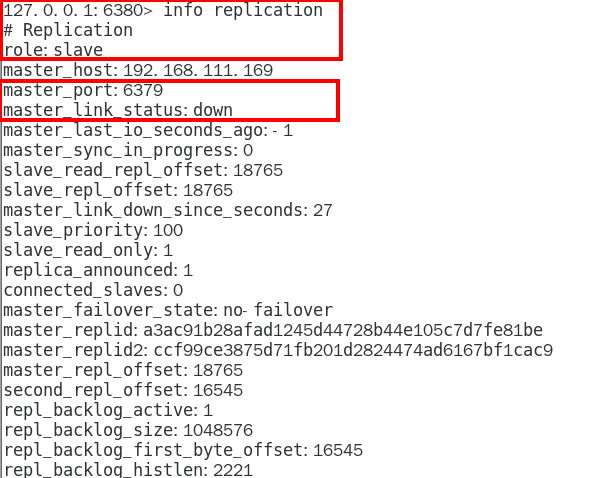
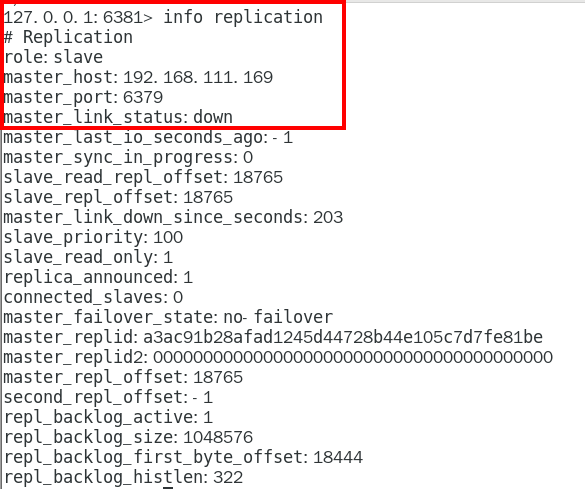
4.主机shutdown后,重启后主从关系还在吗?从机还能否顺利复制?
青山依旧在
5.某台从机down后,master继续,从机重启后它能跟上大部队吗?
重启后一锅端誊抄数据,后续跟随
方案2:命令操作手动指定
从机停机去掉配置文件中的配置项,3台目前都是主机状态,各不从属
3台master


预设的从机上执行命令 slaveof 主库IP 主库端口
效果:

用命令使用的话,2台从机重启后,关系还在吗?
配置 VS 命令的区别,当堂试验讲解
配置,持久稳定;命令,当次生效
9.4.4.2 薪火相传
上一个slave可以是下一个slave的master,slave同样可以接收其他slaves的连接和同步请求,那么该slave作为了链条中下一个的master,可以有效减轻主master的写压力
中途变更转向:会清除之前的数据,重新建立拷贝最新的
slaveof 新主库IP 新主库端口
9.4.4.3 反客为主
SLAVEOF no one
使当前数据库停止与其他数据库的同步,转成主数据库
9.5 复制原理和工作流程
9.5.1 slave启动,同步初请
slave启动成功连接到master后会发送一个sync命令
slave首次全新连接master,一次完全同步(全量复制)将被自动执行,slave自身原有数据会被master数据覆盖清除
9.5.2 首次连接,全量复制
master节点收到sync命令后会开始在后台保存快照(即RDB持久化,主从复制时会触发RDB),同时收集所有接收到的用于修改数据集命令缓存起来,master节点执行RDB持久化完后,master将rdb快照文件和所有缓存的命令发送到所有slave,以完成一次完全同步
而slave服务在接收到数据库文件数据后,将其存盘并加载到内存中,从而完成复制初始化
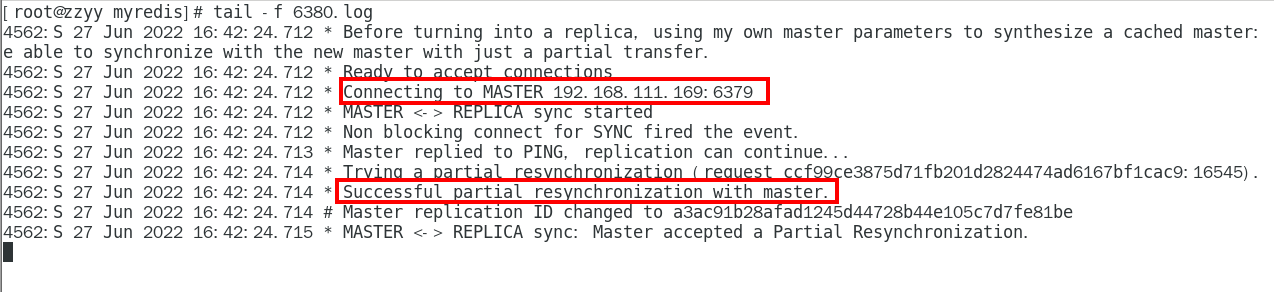
9.5.3 心跳持续,保持通信
repl-ping-replica-period 10
master发出PING包的周期,默认是10秒

9.5.4 进入平稳,增量复制
继续将新的所有收集到的修改命令自动依次传给
9.5.5 从机下线,重连续传
master会检查backlog里面的offset,master和slave都会保存一个复制的offset还有一个masterId,offset是保存在backlog中的。Master只会把已经复制的offset后面的数据复制给Slave,类似断点续传
9.6 复制的缺点
9.6.1 复制延时,信号衰减
由于所有的写操作都是先在Master上操作,然后同步更新到Slave上,所以从Master同步到Slave机器有一定的延迟,当系统很繁忙的时候,延迟问题会更加严重,Slave机器数量的增加也会使这个问题更加严重。

9.6.2 master挂了如何办?
默认情况下,不会在slave节点中自动重选一个master
那每次都要人工干预?
无人值守安装变成刚需
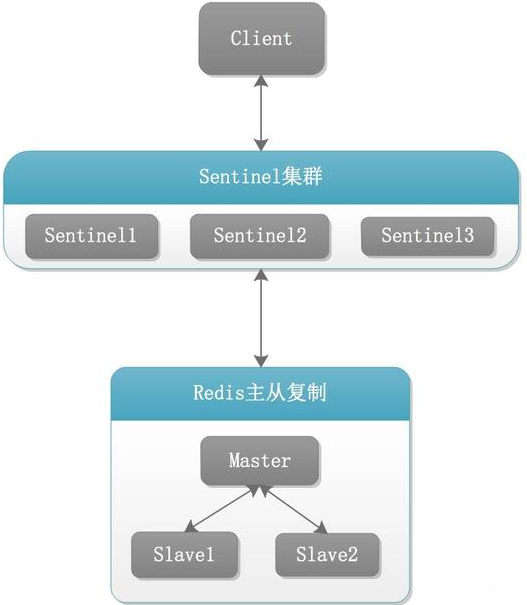
10 Redis哨兵(sentinel)★
10.1 是什么
吹哨人巡查监控后台master主机是否故障,如果故障了根据投票数自动将某一个从库转换为新主库,继续对外服务
官网理论:Docs
**作用:**俗称,无人值守运维
哨兵的作用:
1、监控redis运行状态,包括master和slave
2、当master down机,能自动将slave切换成新master
10.2 能干嘛

主从监控
监控主从redis库运行是否正常
消息通知
哨兵可以将故障转移的结果发送给客户端
故障转移
如果Master异常,则会进行主从切换,将其中一个Slave作为新Master
配置中心
客户端通过连接哨兵来获得当前Redis服务的主节点地址
10.3 怎么玩(案例演示实战步骤)
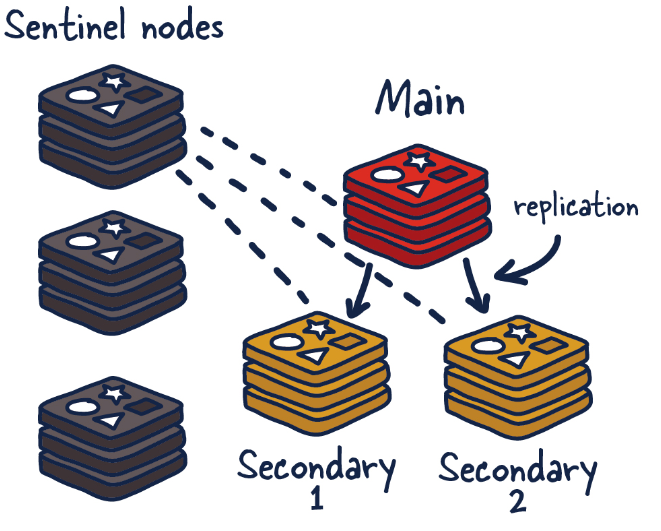
Redis Sentinel架构,前提说明

3个哨兵 自动监控和维护集群,不存放数据,只是吹哨人
1主2从 用于数据读取和存放
**其它备注:**生产都是不同机房不同服务器,很少出现3个哨兵全挂掉的情况;可以同时监控多个master,一行一个
10.3.1 /myredis目录下新建或者拷贝sentinel.conf文件,名字绝不能错
10.3.2 先看看/opt目录下默认的sentinel.conf文件的内容
10.3.3 重点参数项说明
bind 服务监听地址,用于客户端连接,默认本机地址
daemonize 是否以后台daemon方式运行
protected-mode 安全保护模式
port 端口
logfile 日志文件路径
pidfile pid文件路径
dir 工作目录
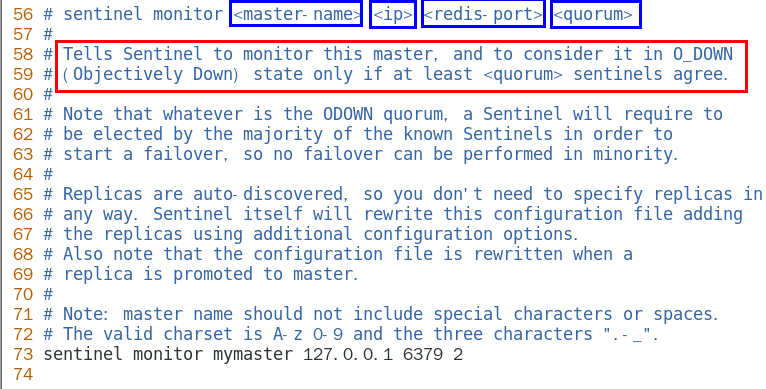
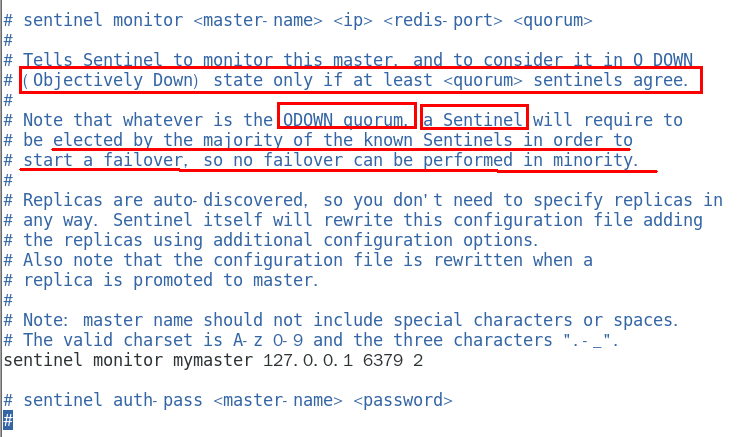
sentinel monitor <master-name> <ip> <redis-port> <quorum>
设置要监控的master服务器
quorum表示最少有几个哨兵认可客观下线,同意故障迁移的法定票数。(Objectively Down,ODown)
行尾最后的quorum代表什么意思呢?quorum:确认客观下线的最少的哨兵数量
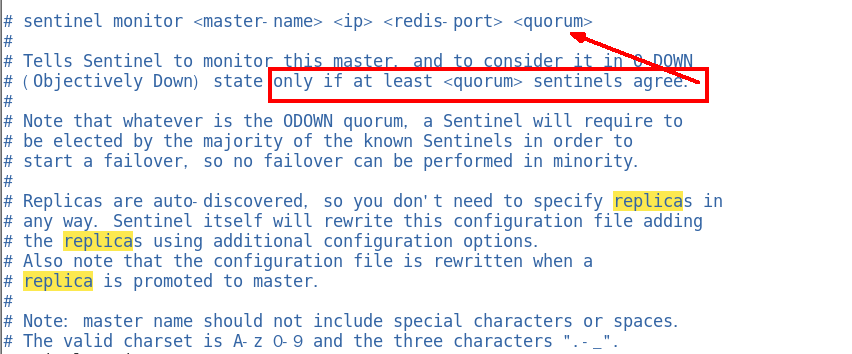
我们知道,网络是不可靠的,有时候一个sentinel会因为网络堵塞而误以为一个master redis已经死掉了,在sentinel集群环境下需要多个sentinel互相沟通来确认某个master是否真的死了,quorum这个参数是进行客观下线的一个依据,意思是至少有quorum个sentinel认为这个master有故障,才会对这个master进行下线以及故障转移。因为有的时候,某个sentinel节点可能因为自身网络原因,导致无法连接master,而此时master并没有出现故障,所以,这就需要多个sentinel都一致认为该master有问题,才可以进行下一步操作,这就保证了公平性和高可用。
sentinel auth-pass <master-name> <password>
master设置了密码,连接master服务的密码
其他
sentinel down-after-milliseconds <master-name> <milliseconds>:
指定多少毫秒之后,主节点没有应答哨兵,此时哨兵主观上认为主节点下线(Subjectively Down,SDown)
sentinel parallel-syncs <master-name> <nums>:
表示允许并行同步的slave个数,当Master挂了后,哨兵会选出新的Master,此时,剩余的slave会向新的master发起同步数据
sentinel failover-timeout <master-name> <milliseconds>:
故障转移的超时时间,进行故障转移时,如果超过设置的毫秒,表示故障转移失败
sentinel notification-script <master-name> <script-path> :
配置当某一事件发生时所需要执行的脚本
sentinel client-reconfig-script <master-name> <script-path>:
客户端重新配置主节点参数脚本
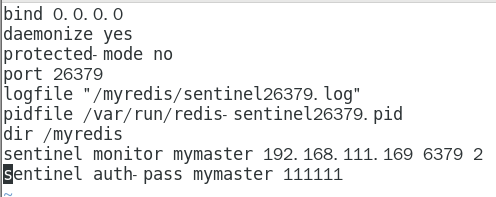
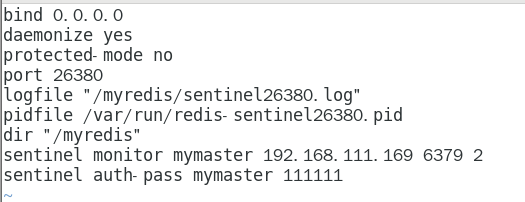
10.3.4 本次案例哨兵sentinel文件通用配置
由于机器硬件关系,我们的3个哨兵都同时配置进192.168.111.169同一台机器
sentinel26379.conf
|----------------------------------------------------------------------------------------------------------------------------------------------------------------------------------------------------------------------------------------|
| bind 0.0.0.0 daemonize yes protected-mode no port 26379 logfile "/myredis/sentinel26379.log" pidfile /var/run/redis-sentinel26379.pid dir /myredis sentinel monitor mymaster 192.168.111.169 6379 2 sentinel auth-pass mymaster 111111 |
sentinel26380.conf
|------------------------------------------------------------------------------------------------------------------------------------------------------------------------------------------------------------------------------------------|
| bind 0.0.0.0 daemonize yes protected-mode no port 26380 logfile "/myredis/sentinel26380.log" pidfile /var/run/redis-sentinel26380.pid dir "/myredis" sentinel monitor mymaster 192.168.111.169 6379 2 sentinel auth-pass mymaster 111111 |
sentinel26381.conf
|------------------------------------------------------------------------------------------------------------------------------------------------------------------------------------------------------------------------------------------|
| bind 0.0.0.0 daemonize yes protected-mode no port 26381 logfile "/myredis/sentinel26381.log" pidfile /var/run/redis-sentinel26381.pid dir "/myredis" sentinel monitor mymaster 192.168.111.169 6379 2 sentinel auth-pass mymaster 111111 |
请看一眼sentinel26379.conf、sentinel26380.conf、sentinel26381.conf我们自己填写的内容

master主机配置文件说明
10.3.5 先启动一主二从3个redis实例,测试正常的主从复制
架构说明
|---|------------------------------------------------------------------------------------------------|
| 1 | 169机器上新建redis6379.conf配置文件,由于要配合本次案例,请设置masterauth项访问密码为111111,不然后续可能报错master_link_status:down |
| 2 | 172机器上新建redis6380.conf配置文件,设置好replicaof <masterip> <masterport> |
| 3 | 173机器上新建redis6381.conf配置文件,设置好replicaof <masterip> <masterport> |
请看一眼redis6379.conf、redis6380.conf、redis6381.conf
我们自己填写主从复制相关内容
主机6379
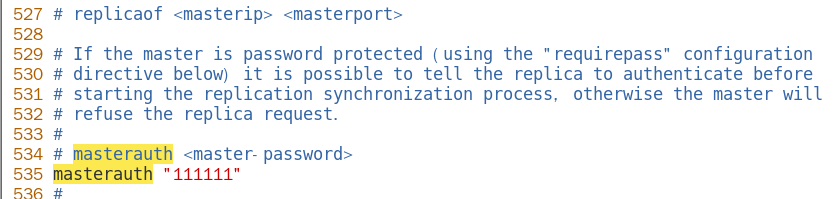
6379后续可能会变成从机,需要设置访问新主机的密码, 请设置masterauth项访问密码为111111,
不然后续可能报错master_link_status:down
6380
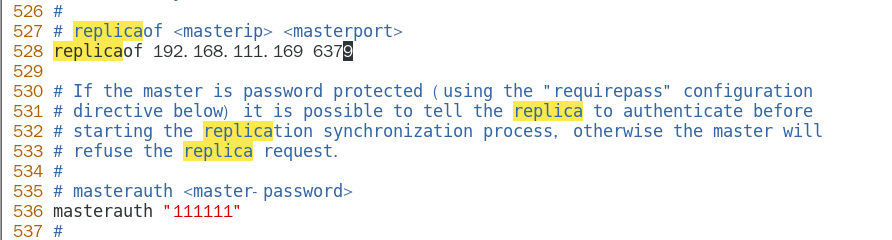
具体IP地址和密码根据你本地真实情况,酌情修改
6381
具体IP地址和密码根据你本地真实情况,酌情修改
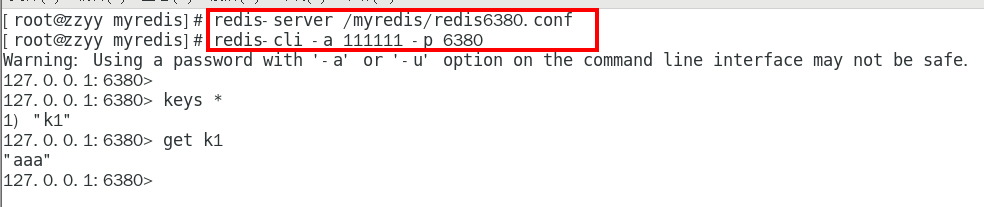
3台不同的虚拟机实例,启动三部真实机器实例并连接,具体查看当堂动手案例配置并观察文件内容
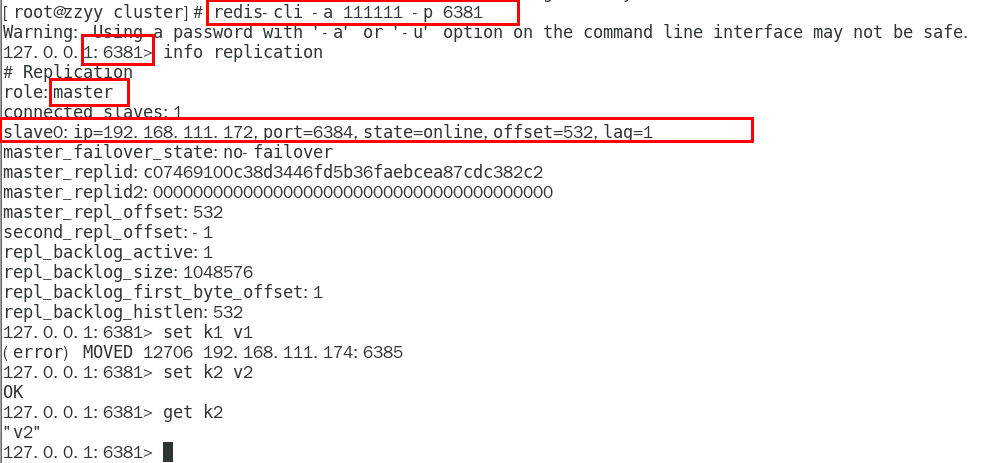
redis-cli -a 111111 -p 6379
redis-cli -a 111111 -p 6380
redis-cli -a 111111 -p 6381
以下是哨兵内容部分
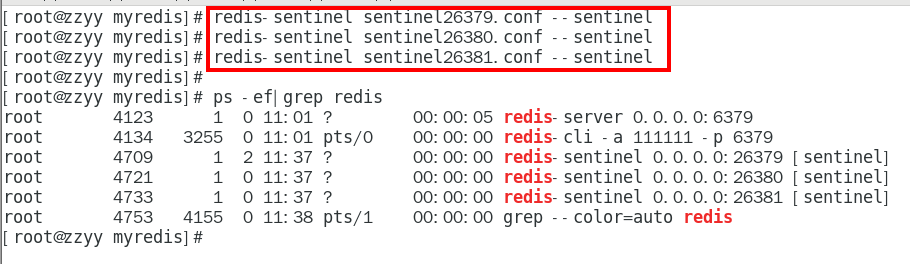
10.3.6 再启动3个哨兵,完成监控
redis-sentinel sentinel26379.conf --sentinel
redis-sentinel sentinel26380.conf --sentinel
redis-sentinel sentinel26381.conf --sentinel
10.3.7 启动3个哨兵监控后再测试一次主从复制
岁月静好一切OK
10.3.8 原有的master挂了
我们自己手动关闭6379服务器,模拟master挂了

问题思考
两台从机数据是否OK?是否会从剩下的2台机器上选出新的master?
之前down机的master机器重启回来,谁将会是新老大?会不会双master冲突?
揭晓答案
数据OK
两个小问题
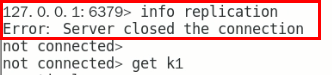

6380
6381
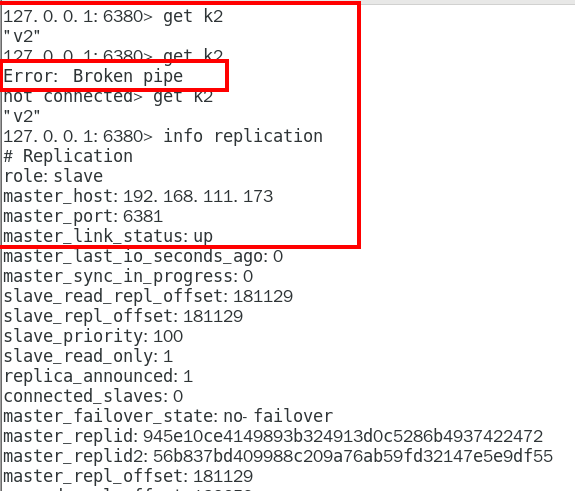
了解 Broken Pipe
|----------------|-----------------------------------------------------------------------------------------------------|
| 认识broken pipe | pipe是管道的意思,管道里面是数据流,通常是从文件或网络套接字读取的数据。当该管道从另一端突然关闭时,会发生数据突然中断,即是broken,对于socket来说,可能是网络被拔出或另一端的进程崩溃 |
| 解决问题 | 其实当该异常产生的时候,对于服务端来说,并没有多少影响。因为可能是某个客户端突然中止了进程导致了该错误 |
| 总结 Broken Pipe | 这个异常是客户端读取超时关闭了连接,这时候服务器端再向客户端已经断开的连接写数据时就发生了broken pipe异常! |
| | |

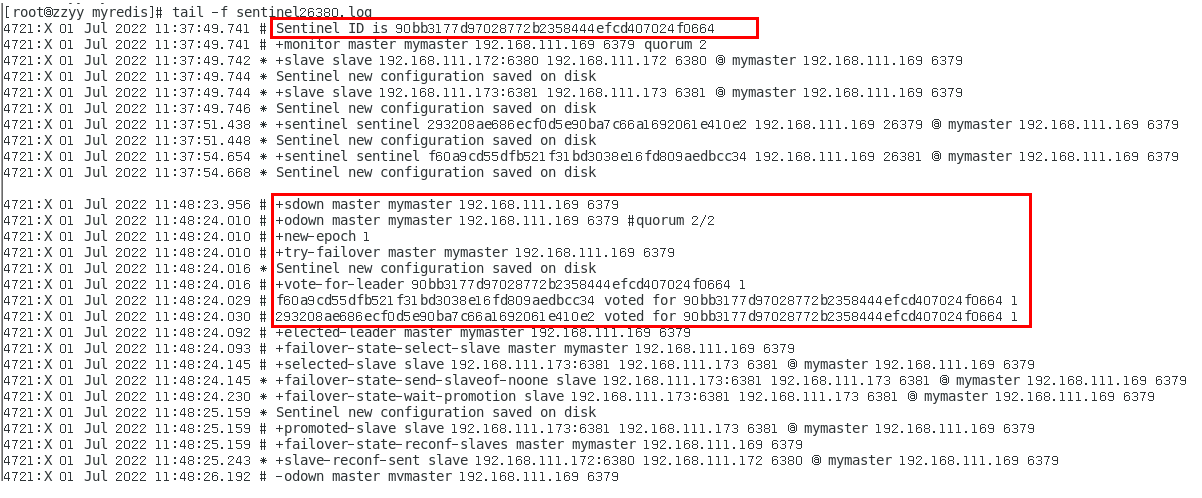
投票新选
sentinel26379.log
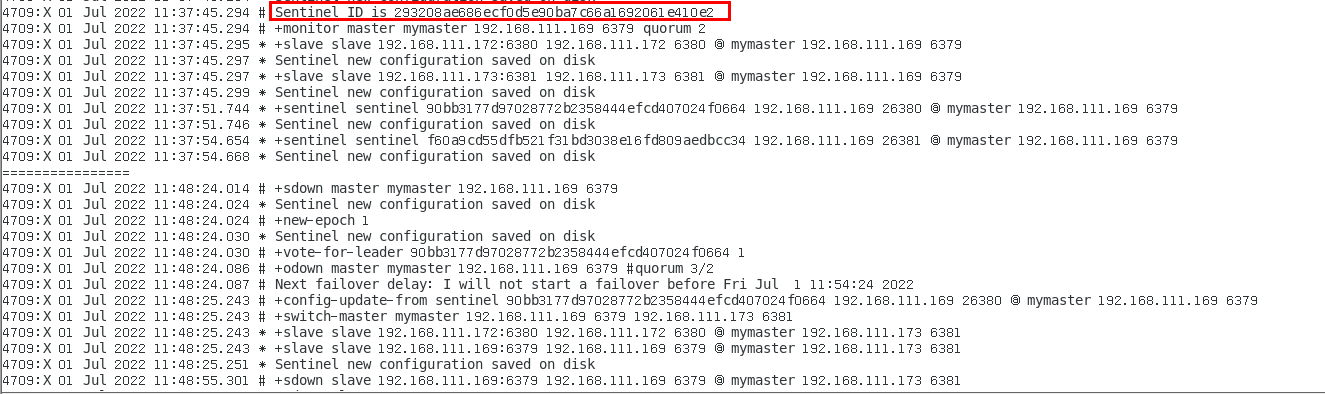
sentinel26380.log

 sentinel26381.log
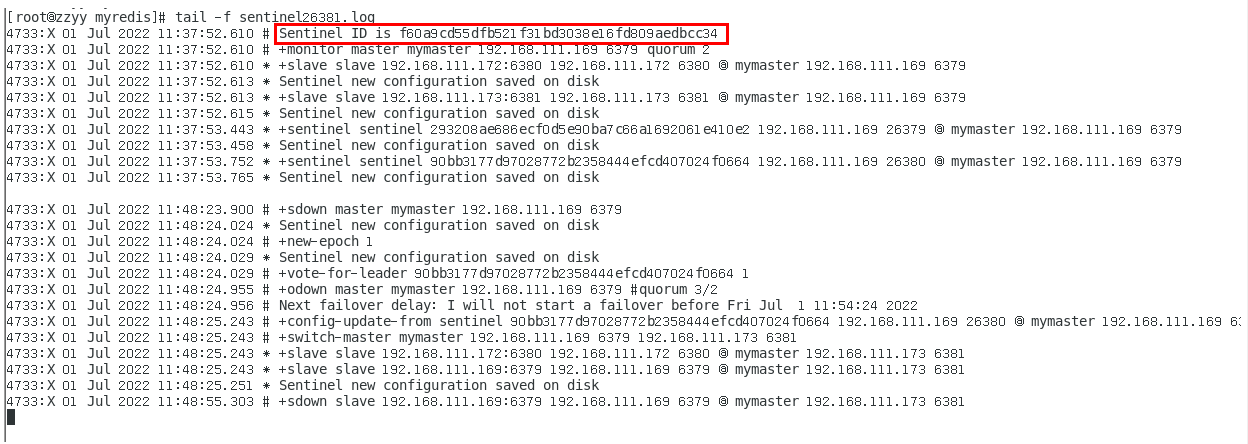
谁是master,限本次案例
6381被选为新master,上位成功
以前的6379从master降级变成了slave
6380还是slave,只不过换了个新老大6381(6379变6381),6380还是slave
10.3.9 对比配置文件
vim sentinel26379.conf
老master,vim redis6379.conf
新master,vim redis6381.conf
结论
文件的内容,在运行期间会被sentinel动态进行更改
Master-Slave切换后,master_redis.conf、slave_redis.conf和sentinel.conf的内容都会发生改变,即master_redis.conf中会多一行slaveof的配置,sentinel.conf的监控目标会随之调换
10.4 哨兵运行流程和选举原理
当一个主从配置中的master失效之后,sentinel可以选举出一个新的master
用于自动接替原master的工作,主从配置中的其他redis服务器自动指向新的master同步数据。
一般建议sentinel采取奇数台,防止某一台sentinel无法连接到master导致误切换
运行流程,故障切换
10.4.1 三个哨兵监控一主二从,正常运行中......
10.4.2 SDown主观下线(Subjectively Down)
SDOWN(主观不可用)是单个sentinel自己主观上检测到的关于master的状态,从sentinel的角度来看,如果发送了PING心跳后,在一定时间内没有收到合法的回复,就达到了SDOWN的条件。
sentinel配置文件中的down-after-milliseconds设置了判断主观下线的时间长度
说明:
所谓主观下线(Subjectively Down, 简称 SDOWN)指的是单个Sentinel实例对服务器做出的下线判断,即单个sentinel认为某个服务下线(有可能是接收不到订阅,之间的网络不通等等原因)。主观下线就是说如果服务器在sentinel down-after-milliseconds给定的毫秒数之内没有回应PING命令或者返回一个错误消息, 那么这个Sentinel会主观的(单方面的)认为这个master不可以用了,o(╥﹏╥)o

sentinel down-after-milliseconds <masterName> <timeout>
表示master被当前sentinel实例认定为失效的间隔时间,这个配置其实就是进行主观下线的一个依据
master在多长时间内一直没有给Sentine返回有效信息,则认定该master主观下线。也就是说如果多久没联系上redis-servevr,认为这个redis-server进入到失效(SDOWN)状态。
10.4.3 ODown客观下线(Objectively Down)
ODOWN需要一定数量的sentinel,多个哨兵达成一致意见才能认为一个master客观上已经宕掉
说明:
四个参数含义:
masterName是对某个master+slave组合的一个区分标识(一套sentinel可以监听多组master+slave这样的组合)
quorum这个参数是进行客观下线的一个依据,法定人数/法定票数
意思是至少有quorum个sentinel认为这个master有故障才会对这个master进行下线以及故障转移。因为有的时候,某个sentinel节点可能因为自身网络原因导致无法连接master,而此时master并没有出现故障,所以这就需要多个sentinel都一致认为该master有问题,才可以进行下一步操作,这就保证了公平性和高可用。
10.4.4 选举出领导者哨兵(哨兵中选出兵王)
当主节点被判断客观下线以后,各个哨兵节点会进行协商, 先选举出一个领导者哨兵节点(兵王)并由该领导者节点,也即被选举出的兵王进行failover(故障迁移)
三哨兵日志文件2次解读分析:
sentinel26379.log

sentinel26380.log
 sentinel26381.log

哨兵领导者,兵王如何选出来的?
Raft算法
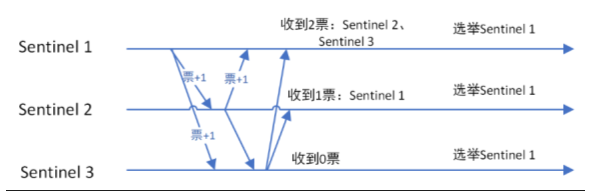
监视该主节点的所有哨兵都有可能被选为领导者,选举使用的算法是Raft算法;Raft算法的基本思路是先到先得:
即在一轮选举中,哨兵A向B发送成为领导者的申请,如果B没有同意过其他哨兵,则会同意A成为领导者
10.4.5 由兵王开始推动故障切换流程并选出一个新master
3步骤:
新主登基
某个Slave被选中成为新Master
选出新master的规则,剩余slave节点健康前提下
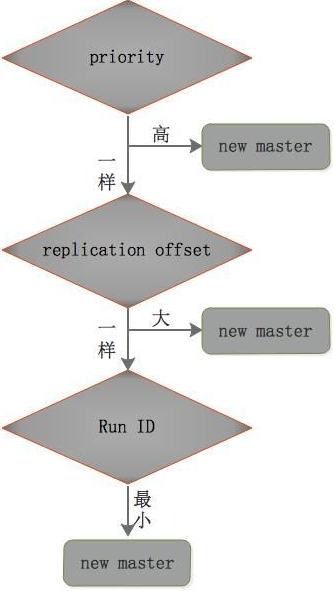
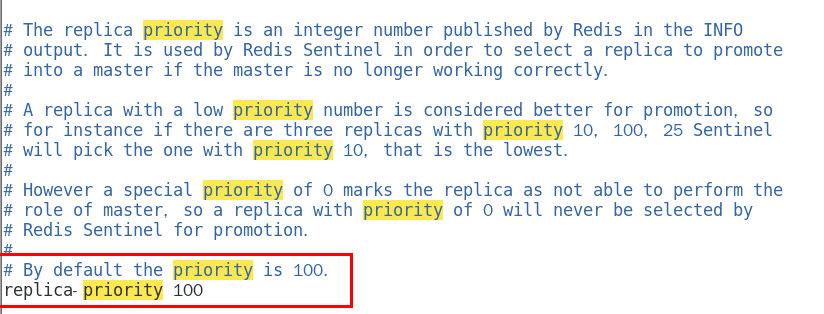
redis.conf文件中,优先级slave-priority或者replica-priority最高的从节点(数字越小优先级越高 )
复制偏移位置offset最大的从节点
最小Run ID的从节点-------->字典顺序,ASCII码
群臣俯首
一朝天子一朝臣,换个码头重新拜
执行slaveof no one命令让选出来的从节点成为新的主节点,并通过slaveof命令让其他节点成为其从节点
Sentinel leader会对选举出的新master执行slaveof no one操作,将其提升为master节点
Sentinel leader向其它slave发送命令,让剩余的slave成为新的master节点的slave
旧主拜服
老master回来也认怂
将之前已下线的老master设置为新选出的新master的从节点,当老master重新上线后,它会成为新master的从节点
Sentinel leader会让原来的master降级为slave并恢复正常工作。
小总结

上述的failover操作均由sentinel自己独自完成,完全无需人工干预。
10.5 哨兵使用建议
哨兵节点的数量应为多个,哨兵本身应该集群,保证高可用
哨兵节点的数量应该是奇数
各个哨兵节点的配置应一致
如果哨兵节点部署在Docker等容器里面,尤其要注意端口的正确映射
哨兵集群+主从复制,并不能保证数据零丢失------>承上启下引出集群
11 Redis集群(cluster)★
11.1 是什么
定义
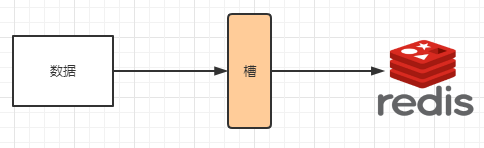
由于数据量过大,单个Master复制集难以承担,因此需要对多个复制集进行集群,形成水平扩展每个复制集只负责存储整个数据集
的一部分,这就是Redis的集群,其作用是提供在多个Redis节点间共享数据的程序集。
官网:Redis cluster specification | Docs
一图

一句话
Redis集群是一个提供在多个Redis节点间共享数据的程序集
Redis集群可以支持多个Master
11.2 能干嘛
a)Redis集群支持多个Master,每个Master又可以挂载多个Slave:读写分离,支持数据的高可用,支持海量数据的读写存储操作
b)由于Cluster自带Sentinel的故障转移机制,内置了高可用的支持,无需再去使用哨兵功能
c)客户端与Redis的节点连接,不再需要连接集群中所有的节点,只需要任意连接集群中的一个可用节点即可
d)槽位slot负责分配到各个物理服务节点,由对应的集群来负责维护节点、插槽和数据之间的关系
11.3 集群算法-分片-槽位slot
11.3.1 官网出处
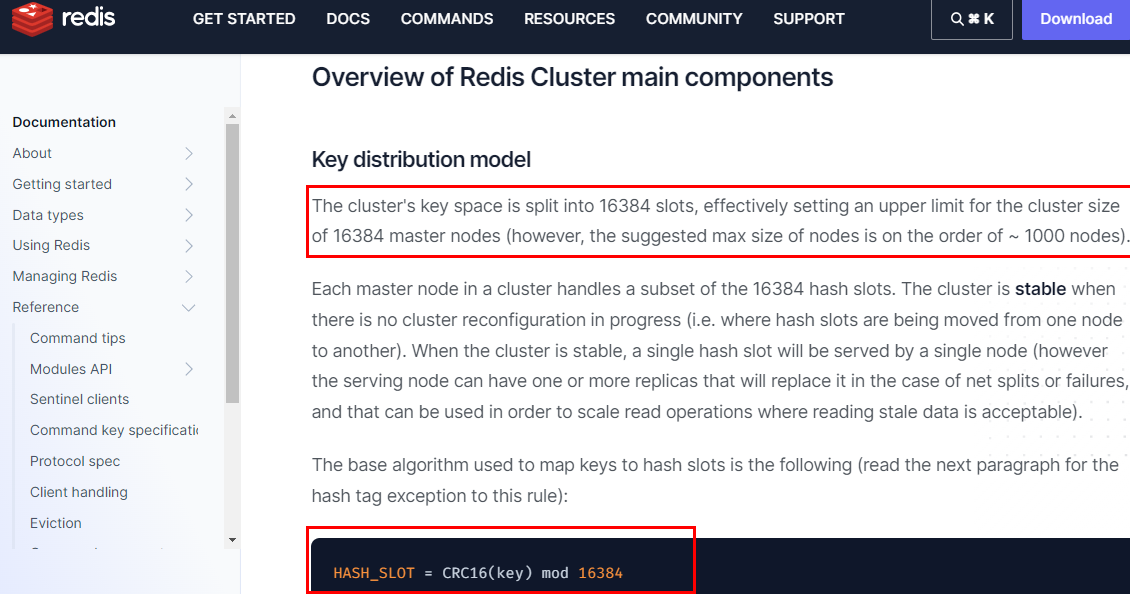
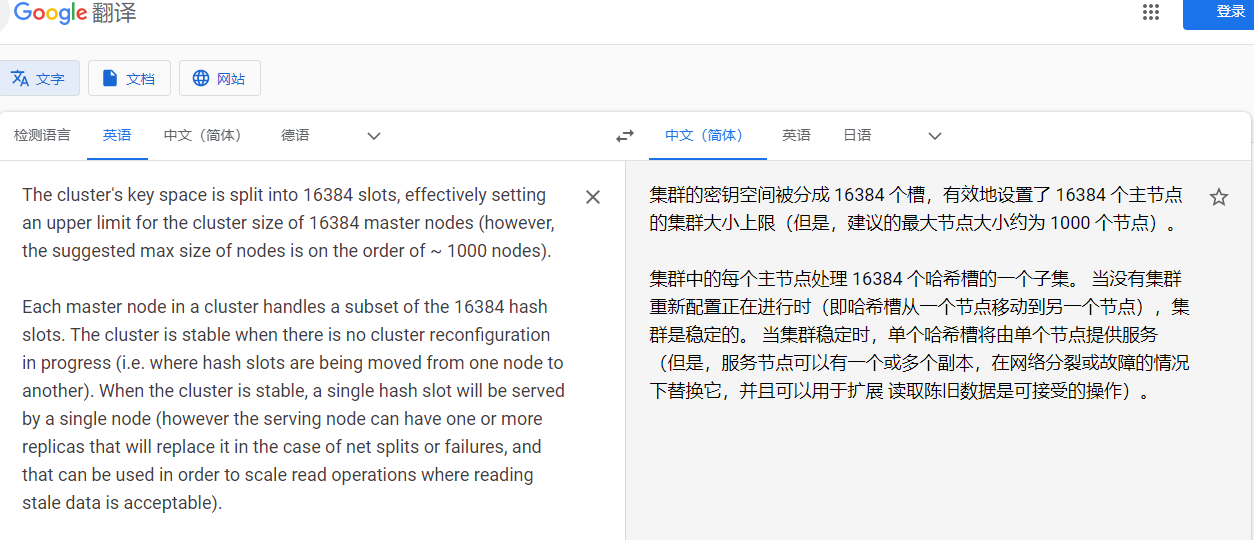
翻译说明
11.3.2 redis集群的槽位slot

11.3.3 redis集群的分片
|--------------|-----------------------------------------------------------------------------------------------------------|
| 分片是什么 | 使用Redis集群时我们会将存储的数据分散到多台redis机器上,这称为分片。简言之,集群中的每个Redis实例都被认为是整个数据的一个分片。 |
| 如何找到给定key的分片 | 为了找到给定key的分片,我们对key进行CRC16(key)算法处理并通过对总分片数量取模。然后, 使用确定性哈希函数,这意味着给定的key 将多次始终映射到同一个分片,我们可以推断将来读取特定key的位置。 |

11.3.4 他两的优势
最大优势,方便扩缩容和数据分派查找


11.3.5 slot槽位映射,一般业界有3种解决方案
11.3.5.1 哈希取余分区

缺点那???
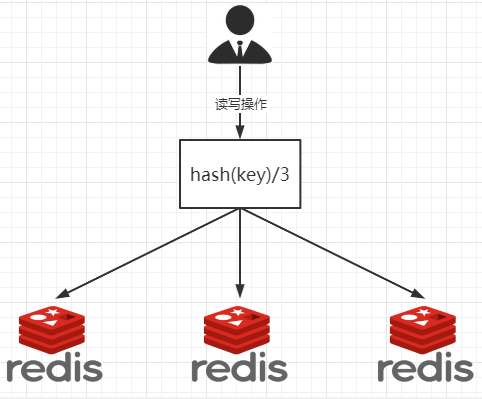
|----------------------------------------------------------------------------------------------------------------------------------------------------------------------------------------------------------------------|
| 缺点: |
| 原来规划好的节点,进行扩容或者缩容就比较麻烦了额,不管扩缩,每次数据变动导致节点有变动,映射关系需要重新进行计算,在服务器个数固定不变时没有问题,如果需要弹性扩容或故障停机的情况下,原来的取模公式就会发生变化:Hash(key)/3会变成Hash(key) /?。此时地址经过取余运算的结果将发生很大变化,根据公式获取的服务器也会变得不可控。 某个redis机器宕机了,由于台数数量变化,会导致hash取余全部数据重新洗牌。 |
11.3.5.2 一致性哈希算法分区
是什么
一致性Hash算法背景:
一致性哈希算法在1997年由麻省理工学院中提出的,设计目标是为了解决
分布式缓存数据变动和映射问题,某个机器宕机了,分母数量改变了,自然取余数不OK了。
能干嘛
提出一致性Hash解决方案。目的是当服务器个数发生变动时,尽量减少影响客户端到服务器的映射关系
3大步骤:
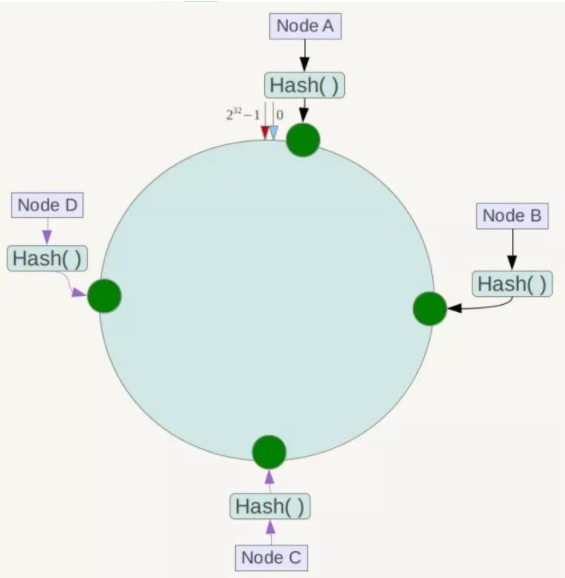
a)算法构建一致性哈希环
一致性哈希环
一致性哈希算法必然有个hash函数并按照算法产生hash值,这个算法的所有可能哈希值会构成一个全量集,这个集合可以成为一个hash空间0,2\^32-1,这个是一个线性空间,但是在算法中,我们通过适当的逻辑控制将它首尾相连(0 = 2^32),这样让它逻辑上形成了一个环形空间。
它也是按照使用取模的方法,前面笔记介绍的节点取模法是对节点(服务器)的数量进行取模。而一致性Hash算法是对2^32取模,简单来说,一致性Hash算法将整个哈希值空间组织成一个虚拟的圆环,如假设某哈希函数H的值空间为0-2^32-1(即哈希值是一个32位无符号整形),整个哈希环如下图:整个空间按顺时针方向组织,圆环的正上方的点代表0,0点右侧的第一个点代表1,以此类推,2、3、4、......直到2^32-1,也就是说0点左侧的第一个点代表2^32-1, 0和2^32-1在零点中方向重合,我们把这个由2^32个点组成的圆环称为Hash环。

b)redis服务器IP节点映射
节点映射
将集群中各个IP节点映射到环上的某一个位置。
将各个服务器使用Hash进行一个哈希,具体可以选择服务器的IP或主机名作为关键字进行哈希,这样每台机器就能确定其在哈希环上的位置。假如4个节点NodeA、B、C、D,经过IP地址的哈希函数计算(hash(ip)),使用IP地址哈希后在环空间的位置如下:
c)key落到服务器的落键规则
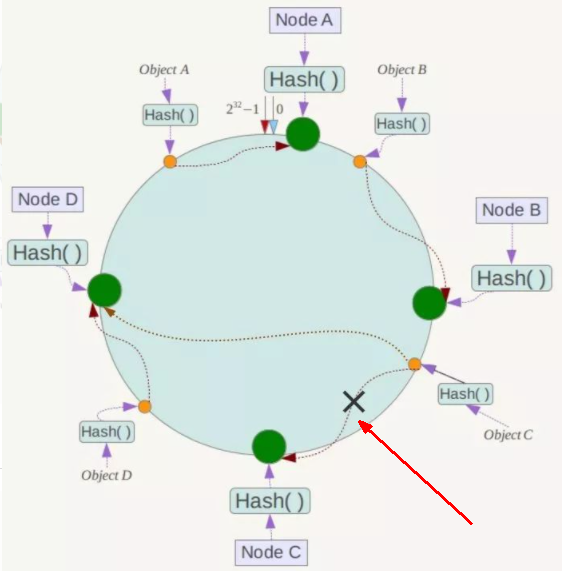
当我们需要存储一个kv键值对时,首先计算key的hash值,hash(key),将这个key使用相同的函数Hash计算出哈希值并确定此数据在环上的位置,从此位置沿环顺时针"行走",第一台遇到的服务器就是其应该定位到的服务器,并将该键值对存储在该节点上。
如我们有Object A、Object B、Object C、Object D四个数据对象,经过哈希计算后,在环空间上的位置如下:根据一致性Hash算法,数据A会被定为到Node A上,B被定为到Node B上,C被定为到Node C上,D被定为到Node D上。

优点:
一致性哈希算法的容错性
容错性
假设Node C宕机,可以看到此时对象A、B、D不会受到影响。一般的,在一致性Hash算法中,如果一台服务器不可用,则受影响的数据仅仅是此服务器到其环空间中前一台服务器(即沿着逆时针方向行走遇到的第一台服务器)之间数据,其它不会受到影响。简单说,就是C挂了,受到影响的只是B、C之间的数据且这些数据会转移到D进行存储。
一致性哈希算法的扩展性
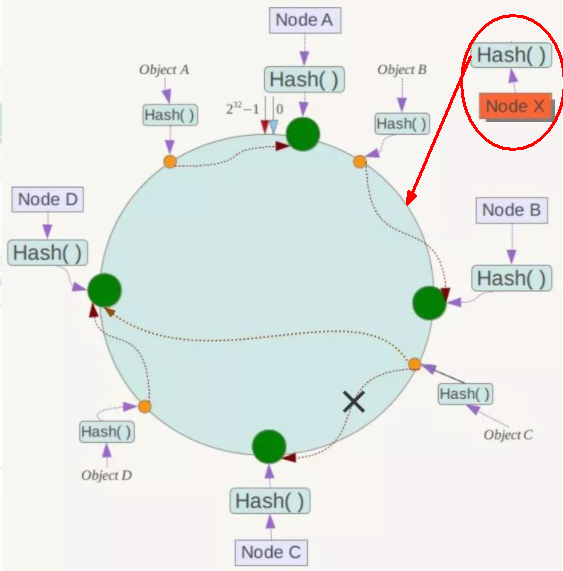
扩展性
数据量增加了,需要增加一台节点NodeX,X的位置在A和B之间,那收到影响的也就是A到X之间的数据,重新把A到X的数据录入到X上即可,
不会导致hash取余全部数据重新洗牌。
缺点:
一致性哈希算法的数据倾斜问题
Hash环的数据倾斜问题
一致性Hash算法在服务节点太少时,容易因为节点分布不均匀而造成数据倾斜(被缓存的对象大部分集中缓存在某一台服务器上)问题,
例如系统中只有两台服务器:

小总结
为了在节点数目发生改变时尽可能少的迁移数据
将所有的存储节点排列在收尾相接的Hash环上,每个key在计算Hash后会顺时针找到临近的存储节点存放。
而当有节点加入或退出时仅影响该节点在Hash环上顺时针相邻的后续节点。
优点
加入和删除节点只影响哈希环中顺时针方向的相邻的节点,对其他节点无影响。
缺点
数据的分布和节点的位置有关,因为这些节点不是均匀的分布在哈希环上的,所以数据在进行存储时达不到均匀分布的效果。
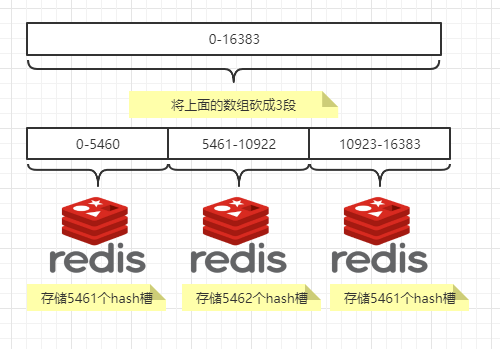
11.3.5.3 哈希槽分区
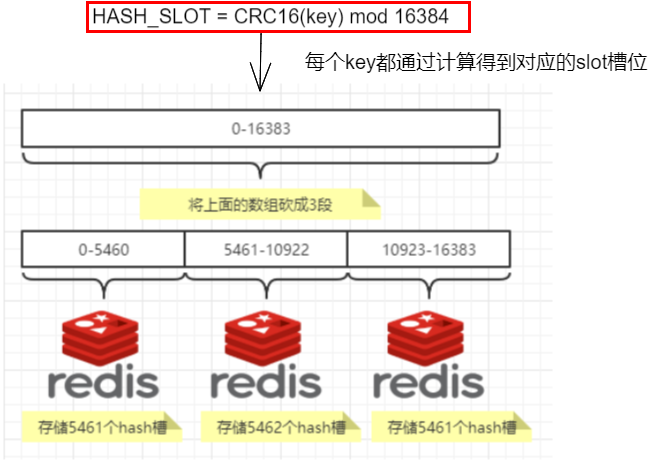
是什么 HASH_SLOT = CRC16(key) mod 16384
1 为什么出现

哈希槽实质就是一个数组,数组0,2\^14 -1形成hash slot空间。
2 能干什么
解决均匀分配的问题,在数据和节点之间又加入了一层,把这层称为哈希槽(slot),用于管理数据和节点之间的关系,现在就相当于节点上放的是槽,槽里放的是数据。
槽解决的是粒度问题,相当于把粒度变大了,这样便于数据移动。哈希解决的是映射问题,使用key的哈希值来计算所在的槽,便于数据分配
3 多少个hash槽
一个集群只能有16384个槽,编号0-16383(0-2^14-1)。这些槽会分配给集群中的所有主节点,分配策略没有要求。
集群会记录节点和槽的对应关系,解决了节点和槽的关系后,接下来就需要对key求哈希值,然后对16384取模,余数是几key就落入对应的槽里。HASH_SLOT = CRC16(key) mod 16384。以槽为单位移动数据,因为槽的数目是固定的,处理起来比较容易,这样数据移动问题就解决了。
哈希槽计算
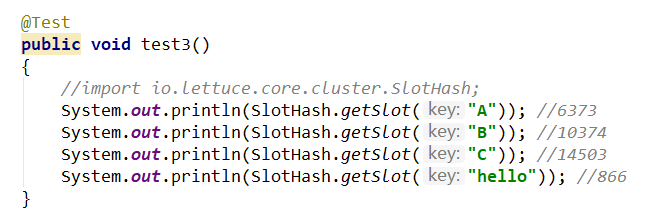
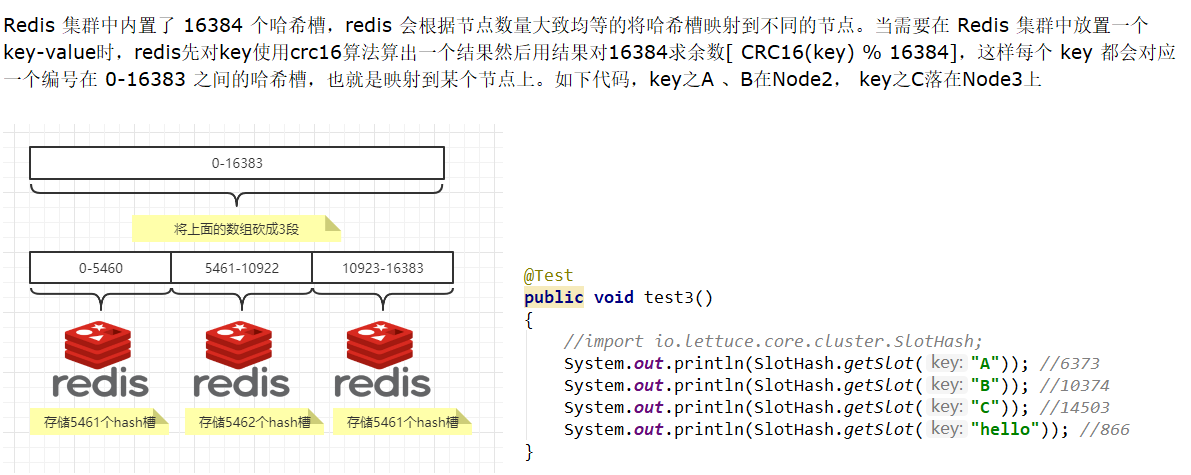
Redis 集群中内置了 16384 个哈希槽,redis 会根据节点数量大致均等的将哈希槽映射到不同的节点。当需要在 Redis 集群中放置一个 key-value时,redis先对key使用crc16算法算出一个结果然后用结果对16384求余数 CRC16(key) % 16384,这样每个 key 都会对应一个编号在 0-16383 之间的哈希槽,也就是映射到某个节点上。如下代码,key之A 、B在Node2, key之C落在Node3上
11.3.6 经典面试题
11.3.6.1 为什么redis集群的最大槽数是16384个?
Redis集群并没有使用一致性hash而是引入了哈希槽的概念。Redis 集群有16384个哈希槽,每个key通过CRC16校验后对16384取模来决定放置哪个槽,集群的每个节点负责一部分hash槽。但为什么哈希槽的数量是16384(2^14)个呢?
|------------------------------------------------------------------------------------------------------------------------------------------------------------------------|
| CRC16算法产生的hash值有16bit,该算法可以产生2^16=65536个值。 换句话说值是分布在0~65535之间,有更大的65536不用为什么只用16384就够? 作者在做mod运算的时候,为什么不mod65536,而选择mod16384? HASH_SLOT = CRC16(key) mod 65536为什么没启用 |
https://github.com/redis/redis/issues/2576
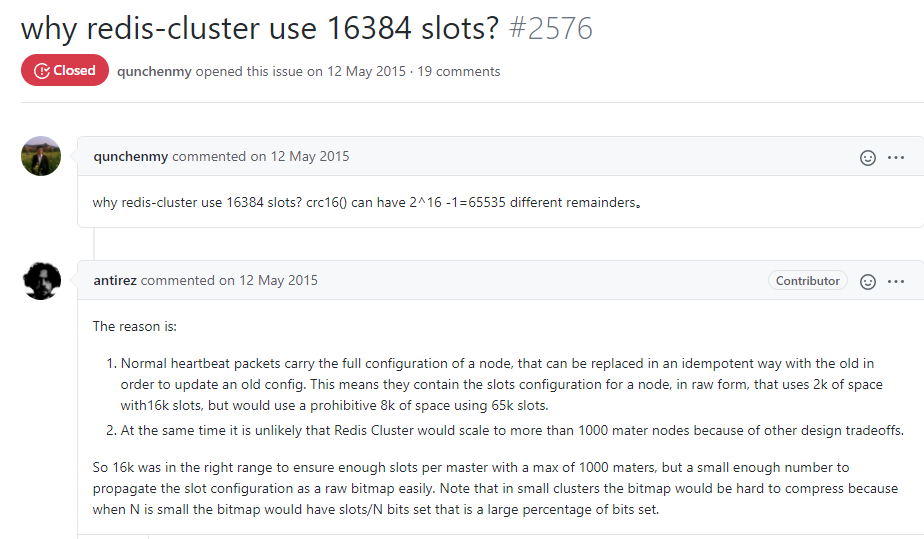
11.3.6.2 说明1
|--------------------------------------------------------------------------------------------------------------------------------------------------------------------------------------------------------------------------------------------------------------------------|
| 正常的心跳数据包带有节点的完整配置,可以用幂等方式用旧的节点替换旧节点,以便更新旧的配置。 这意味着它们包含原始节点的插槽配置,该节点使用2k的空间和16k的插槽,但是会使用8k的空间(使用65k的插槽)。 同时,由于其他设计折衷,Redis集群不太可能扩展到1000个以上的主节点。 因此16k处于正确的范围内,以确保每个主机具有足够的插槽,最多可容纳1000个矩阵,但数量足够少,可以轻松地将插槽配置作为原始位图传播。请注意,在小型群集中,位图将难以压缩,因为当N较小时,位图将设置的slot / N位占设置位的很大百分比。 |

11.3.6.3 说明2

(1)如果槽位为65536,发送心跳信息的消息头达8k,发送的心跳包过于庞大。
在消息头中最占空间的是myslotsCLUSTER_SLOTS/8。 当槽位为65536时,这块的大小是: 65536÷8÷1024=8kb
在消息头中最占空间的是myslotsCLUSTER_SLOTS/8。 当槽位为16384时,这块的大小是: 16384÷8÷1024=2kb
因为每秒钟,redis节点需要发送一定数量的ping消息作为心跳包,如果槽位为65536,这个ping消息的消息头太大了,浪费带宽。
(2)redis的集群主节点数量基本不可能超过1000个。
集群节点越多,心跳包的消息体内携带的数据越多。如果节点过1000个,也会导致网络拥堵。因此redis作者不建议redis cluster节点数量超过1000个。 那么,对于节点数在1000以内的redis cluster集群,16384个槽位够用了。没有必要拓展到65536个。
(3)槽位越小,节点少的情况下,压缩比高,容易传输
Redis主节点的配置信息中它所负责的哈希槽是通过一张bitmap的形式来保存的,在传输过程中会对bitmap进行压缩,但是如果bitmap的填充率slots / N很高的话(N表示节点数),bitmap的压缩率就很低。 如果节点数很少,而哈希槽数量很多的话,bitmap的压缩率就很低。
11.3.6.4 计算结论
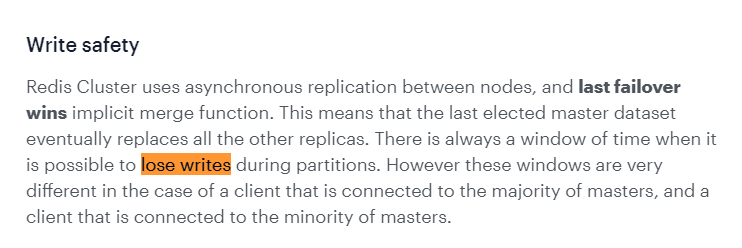
11.3.7 Redis集群不保证强一致性,这意味着在特定的条件下,Redis集群可能会丢掉一些被系统收到的写入请求命令

11.4 集群环境案例步骤
11.4.1 3主3从redis集群配置
11.4.1.1 找3台真实虚拟机,各自新建
mkdir -p /myredis/cluster
11.4.1.2 新建6个独立的redis实例服务
本次案例设计说明(ip会有变化) ProcessOn Flowchart
IP:192.168.111.175+端口6381/端口6382
vim /myredis/cluster/redisCluster6381.conf
|-----------------------------------------------------------------------------------------------------------------------------------------------------------------------------------------------------------------------------------------------------------------------------------------------------------------------------------------------------------------------------------------------------------------------|
| bind 0.0.0.0 daemonize yes protected-mode no port 6381 logfile "/myredis/cluster/cluster6381.log" pidfile /myredis/cluster6381.pid dir /myredis/cluster dbfilename dump6381.rdb appendonly yes appendfilename "appendonly6381.aof" requirepass 111111 masterauth 111111 cluster-enabled yes cluster-config-file nodes-6381.conf cluster-node-timeout 5000 |
vim /myredis/cluster/redisCluster6382.conf
|-----------------------------------------------------------------------------------------------------------------------------------------------------------------------------------------------------------------------------------------------------------------------------------------------------------------------------------------------------------------------------------------------------------------------|
| bind 0.0.0.0 daemonize yes protected-mode no port 6382 logfile "/myredis/cluster/cluster6382.log" pidfile /myredis/cluster6382.pid dir /myredis/cluster dbfilename dump6382.rdb appendonly yes appendfilename "appendonly6382.aof" requirepass 111111 masterauth 111111 cluster-enabled yes cluster-config-file nodes-6382.conf cluster-node-timeout 5000 |
IP:192.168.111.175+端口6383/端口6384
vim /myredis/cluster/redisCluster6383.conf
|-----------------------------------------------------------------------------------------------------------------------------------------------------------------------------------------------------------------------------------------------------------------------------------------------------------------------------------------------------------------------------------------------------------------------|
| bind 0.0.0.0 daemonize yes protected-mode no port 6383 logfile "/myredis/cluster/cluster6383.log" pidfile /myredis/cluster6383.pid dir /myredis/cluster dbfilename dump6383.rdb appendonly yes appendfilename "appendonly6383.aof" requirepass 111111 masterauth 111111 cluster-enabled yes cluster-config-file nodes-6383.conf cluster-node-timeout 5000 |
vim /myredis/cluster/redisCluster6384.conf
|-----------------------------------------------------------------------------------------------------------------------------------------------------------------------------------------------------------------------------------------------------------------------------------------------------------------------------------------------------------------------------------------------------------------------|
| bind 0.0.0.0 daemonize yes protected-mode no port 6384 logfile "/myredis/cluster/cluster6384.log" pidfile /myredis/cluster6384.pid dir /myredis/cluster dbfilename dump6384.rdb appendonly yes appendfilename "appendonly6384.aof" requirepass 111111 masterauth 111111 cluster-enabled yes cluster-config-file nodes-6384.conf cluster-node-timeout 5000 |
IP:192.168.111.175+端口6385/端口6386
vim /myredis/cluster/redisCluster6385.conf
|-----------------------------------------------------------------------------------------------------------------------------------------------------------------------------------------------------------------------------------------------------------------------------------------------------------------------------------------------------------------------------------------------------------------------|
| bind 0.0.0.0 daemonize yes protected-mode no port 6385 logfile "/myredis/cluster/cluster6385.log" pidfile /myredis/cluster6385.pid dir /myredis/cluster dbfilename dump6385.rdb appendonly yes appendfilename "appendonly6385.aof" requirepass 111111 masterauth 111111 cluster-enabled yes cluster-config-file nodes-6385.conf cluster-node-timeout 5000 |
vim /myredis/cluster/redisCluster6386.conf
|-----------------------------------------------------------------------------------------------------------------------------------------------------------------------------------------------------------------------------------------------------------------------------------------------------------------------------------------------------------------------------------------------------------------------|
| bind 0.0.0.0 daemonize yes protected-mode no port 6386 logfile "/myredis/cluster/cluster6386.log" pidfile /myredis/cluster6386.pid dir /myredis/cluster dbfilename dump6386.rdb appendonly yes appendfilename "appendonly6386.aof" requirepass 111111 masterauth 111111 cluster-enabled yes cluster-config-file nodes-6386.conf cluster-node-timeout 5000 |
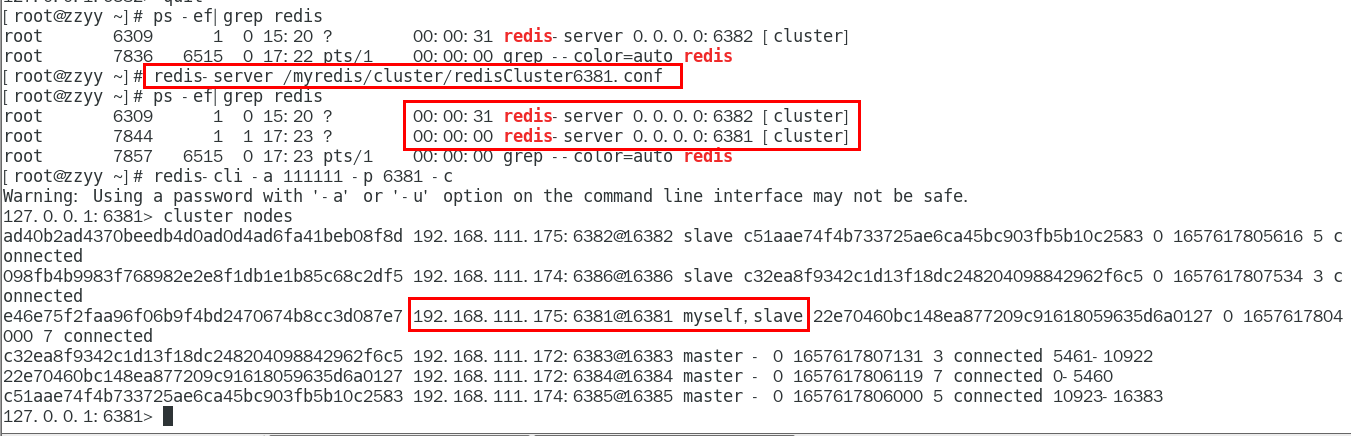
启动6台redis主机实例
redis-server /myredis/cluster/redisCluster6381.conf
。。。。。。
redis-server /myredis/cluster/redisCluster6386.conf
11.4.1.3 通过redis-cli命令为6台机器构建集群关系
构建主从关系命令
//注意,注意,注意自己的真实IP地址 //注意,注意,注意自己的真实IP地址
|---------------------------------------------------------------------------------------------------------------------------------------------------------------------------------------------------------|
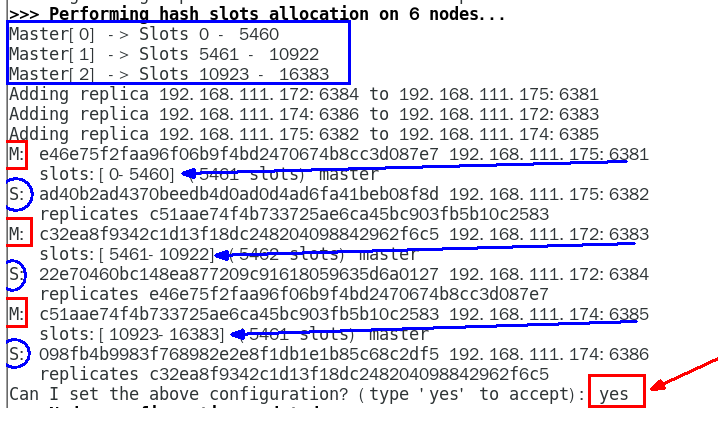
| redis-cli -a 111111 --cluster create --cluster-replicas 1 192.168.111.175:6381 192.168.111.175:6382 192.168.111.172:6383 192.168.111.172:6384 192.168.111.174:6385 192.168.111.174:6386 |
--cluster-replicas 1 表示为每个master创建一个slave节点
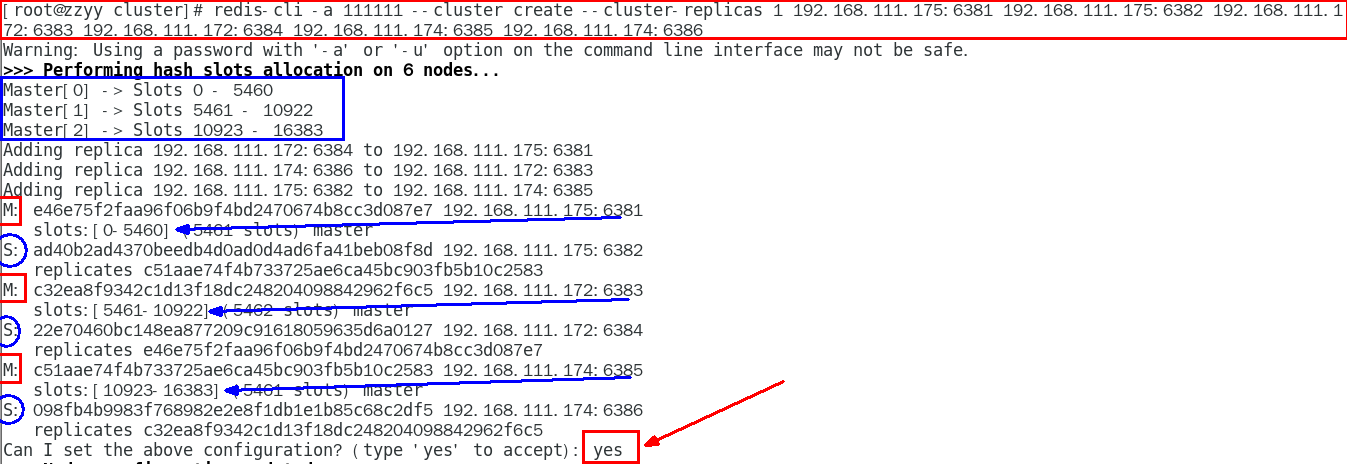

一切OK的话,3主3从搞定
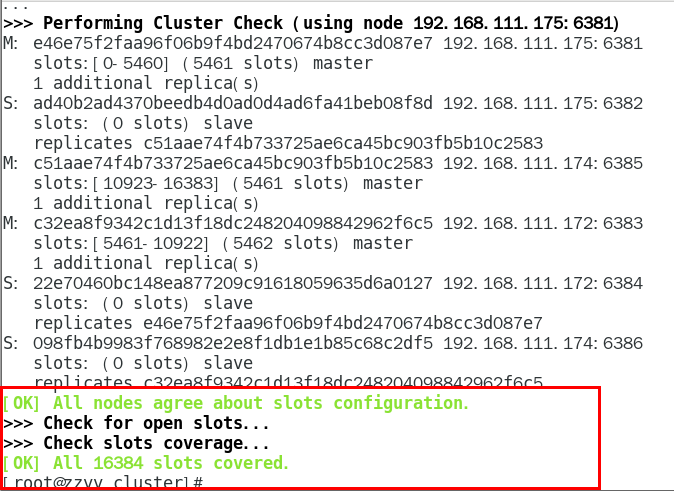
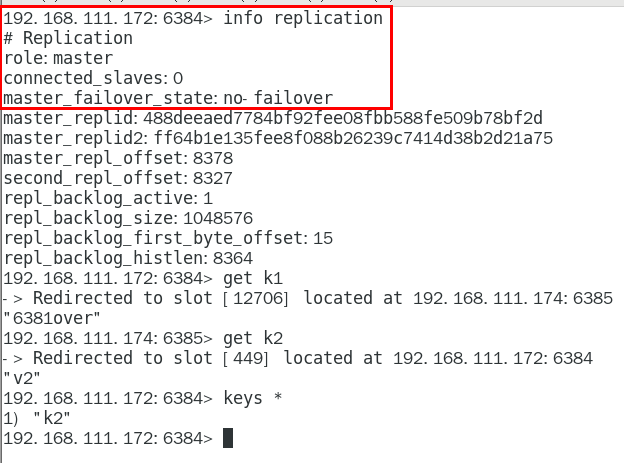
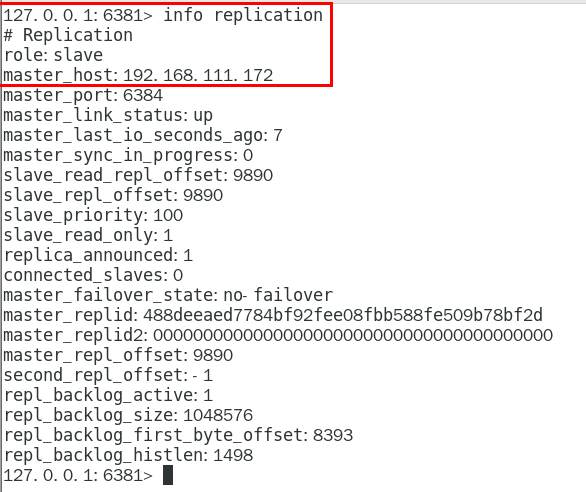
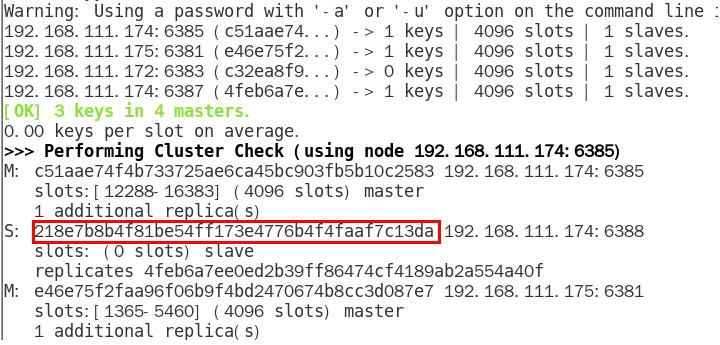
11.4.1.4 链接进入6381作为切入点,查看并检验集群状态
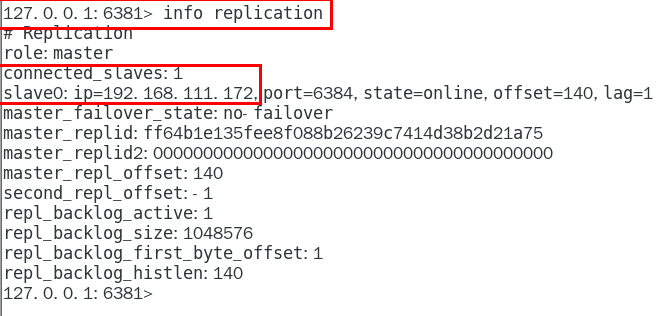
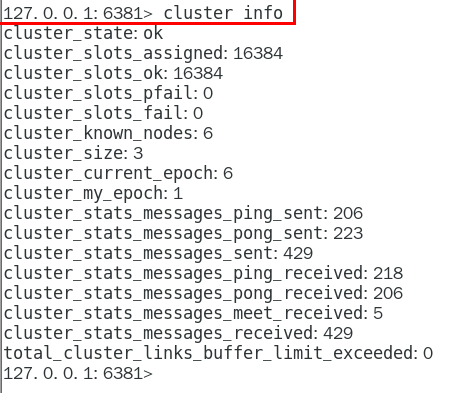
链接进入6381作为切入点,查看节点状态
info replication
cluster info
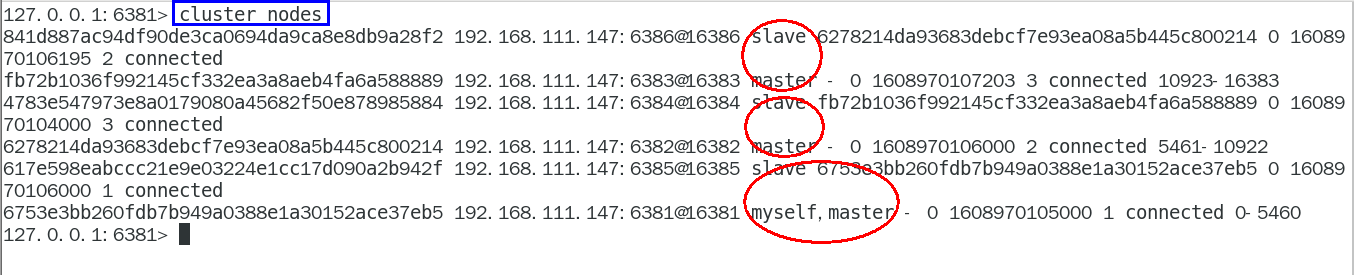
cluster nodes

11.4.2 3主3从redis集群读写
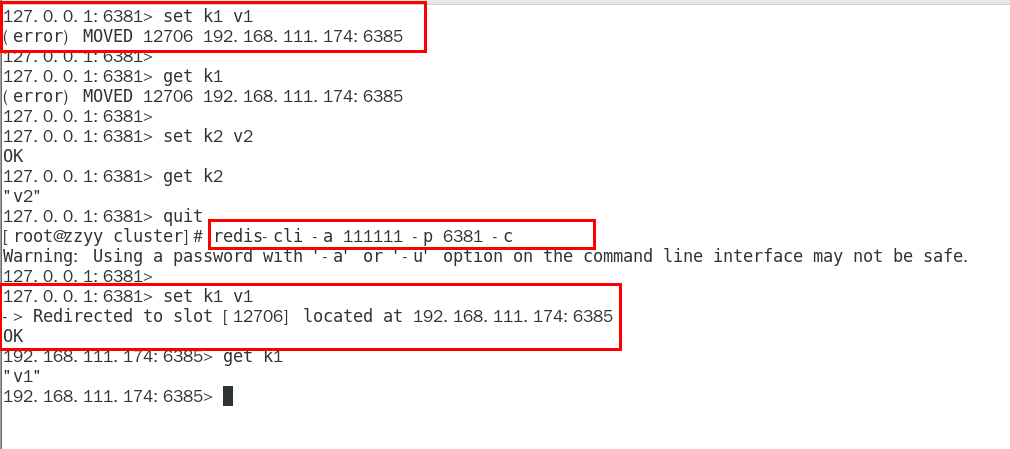
对6381新增两个key,看看效果如何
为什么报错
一定注意槽位的范围区间,需要路由到位,路由到位,路由到位,路由到位
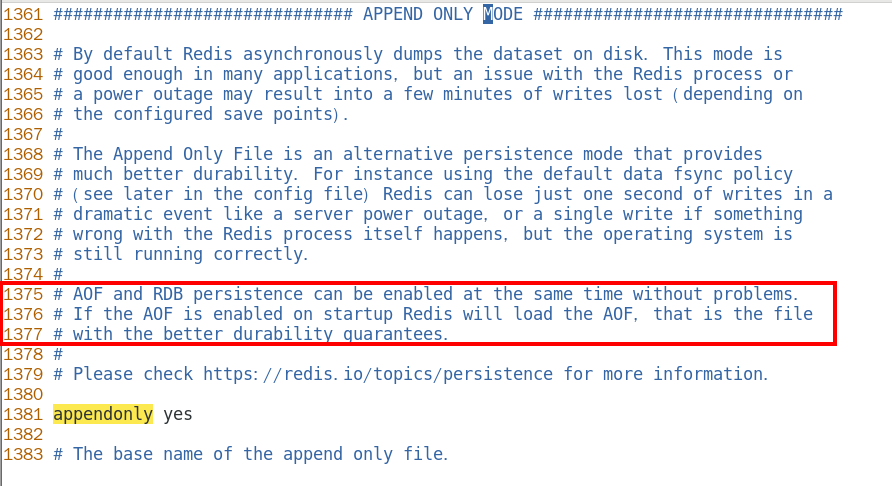
如何解决 防止路由失效加参数-c并新增两个key
加入参数-c,优化路由
查看集群信息

查看某个key该属于对应的槽位值 CLUSTER KEYSLOT 键名称

11.4.3 主从容错切换迁移案例
11.4.3.1 容错切换迁移
主6381和从机切换,先停止主机6381
6381主机停了,对应的真实从机上位
6381作为1号主机分配的从机以实际情况为准,具体是几号机器就是几号
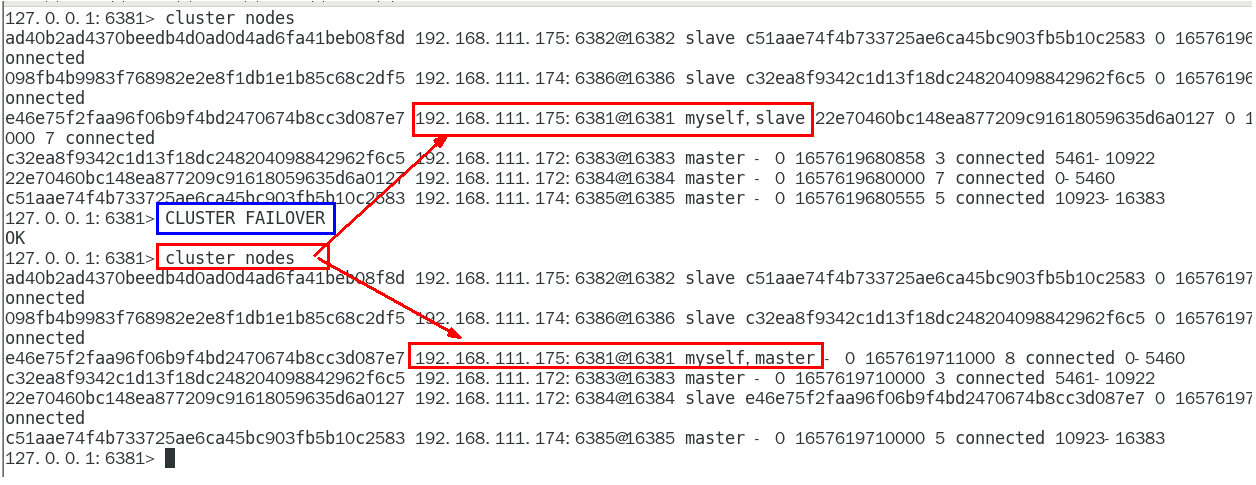
再次查看集群信息,本次6381主6384从

6381master假如宕机了,6384是否会上位成为了新的master?
停止主机6381,再次查看集群信息
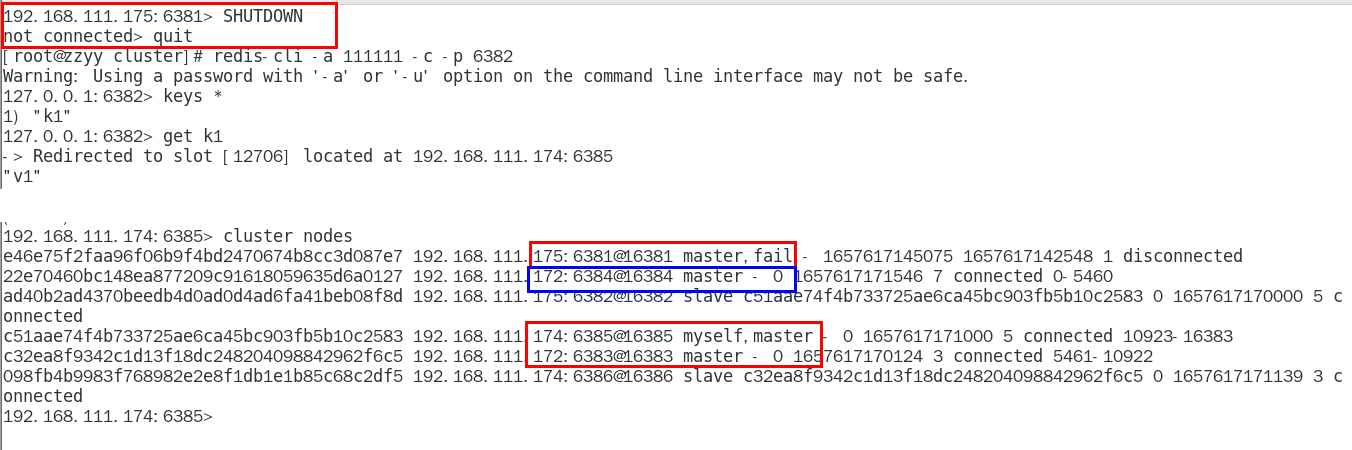
6381宕机了,6384上位成为了新的master。
备注:本次脑图笔记6381为主下面挂从6384。每次案例下面挂的从机以实际情况为准,具体是几号机器就是几号
6384成功上位并正常使用
随后,6381原来的主机回来了,是否会上位?
恢复前

恢复后
6381不会上位并以从节点形式回归
11.4.3.2 集群不保证数据一致性100%OK,一定会有数据丢失情况
Redis集群不保证强一致性,这意味着在特定的条件下,Redis集群可能会丢掉一些被系统收到的写入请求命令
11.4.3.3 手动故障转移 or 节点从属调整该如何处理
上面一换后6381、6384主从对调了,和原始设计图不一样了,该如何
重新登陆6381机器
常用命令
CLUSTER FAILOVER
11.4.4 主从扩容案例
新建6387、6388两个服务实例配置文件+新建后启动
IP:192.168.111.174+端口6387/端口6388
vim /myredis/cluster/redisCluster6387.conf
|-----------------------------------------------------------------------------------------------------------------------------------------------------------------------------------------------------------------------------------------------------------------------------------------------------------------------------------------------------------------------------------------------------------------------|
| bind 0.0.0.0 daemonize yes protected-mode no port 6387 logfile "/myredis/cluster/cluster6387.log" pidfile /myredis/cluster6387.pid dir /myredis/cluster dbfilename dump6387.rdb appendonly yes appendfilename "appendonly6387.aof" requirepass 111111 masterauth 111111 cluster-enabled yes cluster-config-file nodes-6387.conf cluster-node-timeout 5000 |
vim /myredis/cluster/redisCluster6388.conf
|-----------------------------------------------------------------------------------------------------------------------------------------------------------------------------------------------------------------------------------------------------------------------------------------------------------------------------------------------------------------------------------------------------------------------|
| bind 0.0.0.0 daemonize yes protected-mode no port 6388 logfile "/myredis/cluster/cluster6388.log" pidfile /myredis/cluster6388.pid dir /myredis/cluster dbfilename dump6388.rdb appendonly yes appendfilename "appendonly6388.aof" requirepass 111111 masterauth 111111 cluster-enabled yes cluster-config-file nodes-6388.conf cluster-node-timeout 5000 |
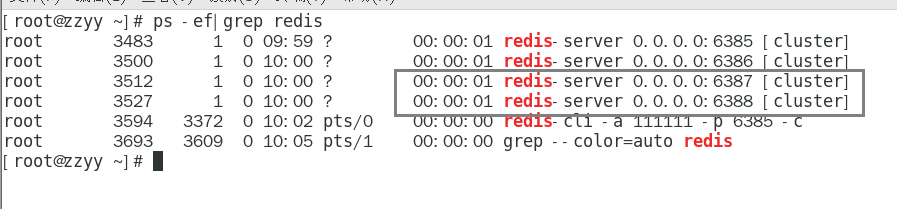
启动87/88两个新的节点实例,此时他们自己都是master
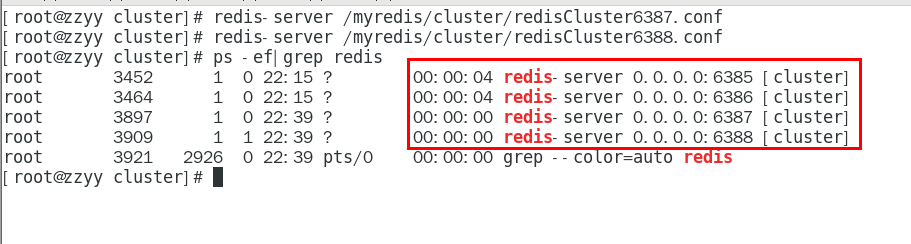
redis-server /myredis/cluster/redisCluster6387.conf
redis-server /myredis/cluster/redisCluster6388.conf
将新增的6387节点(空槽号)作为master节点加入原集群
|-------------------------------------------------------------------------------------------------------------------------------------------------------------------------------------------------------------------------------------------------|
| 将新增的6387作为master节点加入原有集群 redis-cli -a 密码 --cluster add-node 自己实际IP地址: 6387 自己实际IP地址: 6381 6387 就是将要作为master新增节点 6381 就是原来集群节点里面的领路人,相当于6387拜拜6381的码头从而找到组织加入集群 redis-cli -a 111111 --cluster add-node 192.168.111.174:6387 192.168.111.175:6381 |
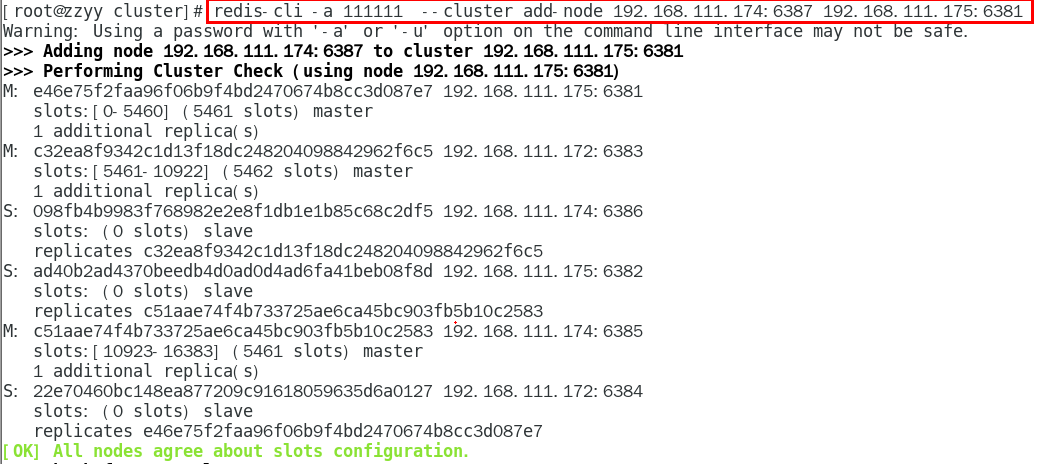

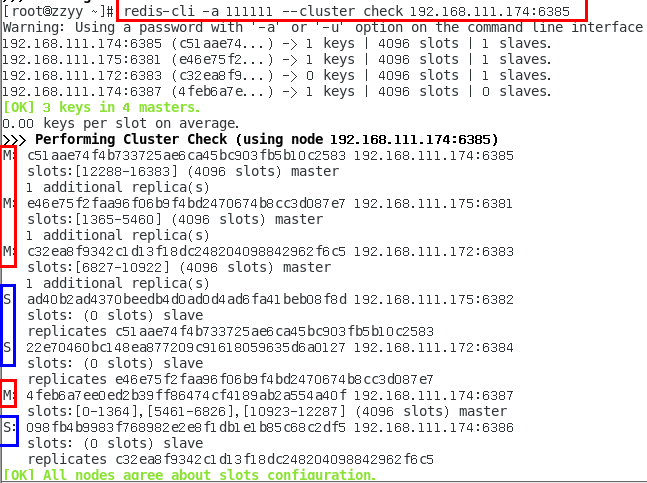
检查集群情况第1次
|---------------------------------------------|
| redis-cli -a 密码 --cluster check 真实ip地址:6381 |
|----------------------------------------------------------|
| redis-cli -a 111111 --cluster check 192.168.111.175:6381 |
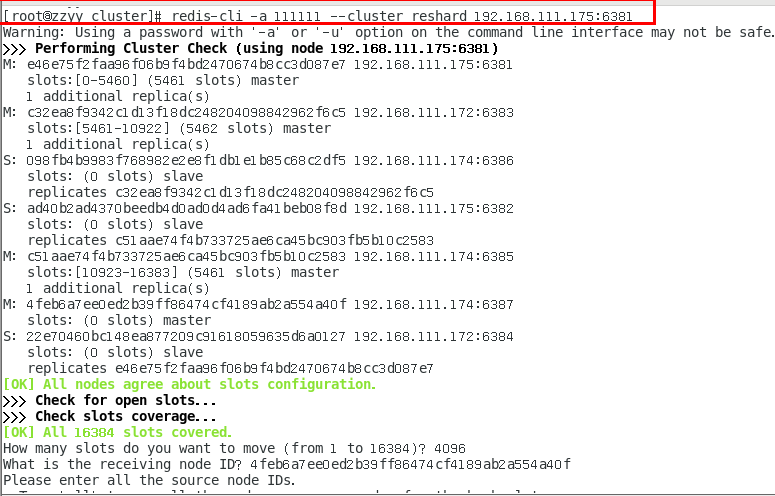
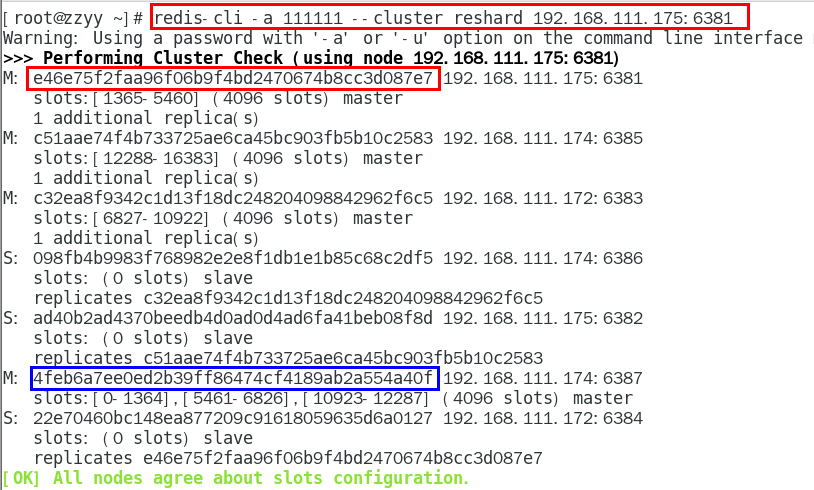
重新分派槽号(reshard)
|----------------------------------------------------------------------------------------------------------------|
| 重新分派槽号 命令:redis-cli -a 密码 --cluster reshardIP地址:端口号 redis-cli -a 密码 --cluster reshard 192.168.111.175:6381 |
检查集群情况第2次
|---------------------------------------|
| redis-cli --cluster check 真实ip地址:6381 |
|----------------------------------------------------------|
| redis-cli -a 111111 --cluster check 192.168.111.175:6381 |
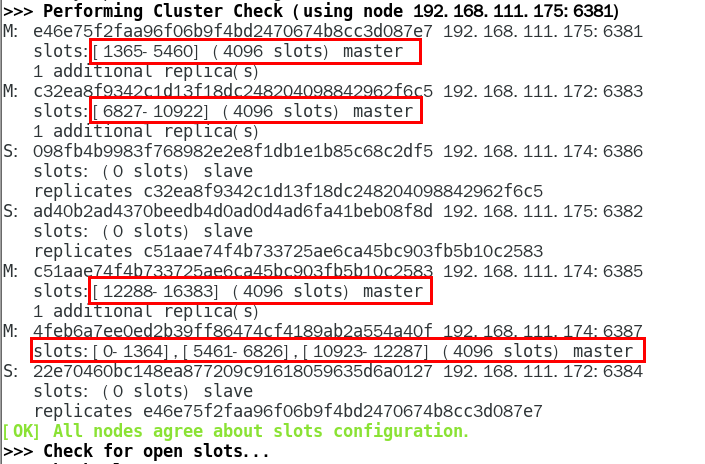
槽号分派说明
|----------------------------------------------------------------------------------------|
| 为什么6387是3个新的区间,以前的还是连续? 重新分配成本太高,所以前3家各自匀出来一部分,从6381/6383/6385三个旧节点分别匀出1364个坑位给新节点6387 |
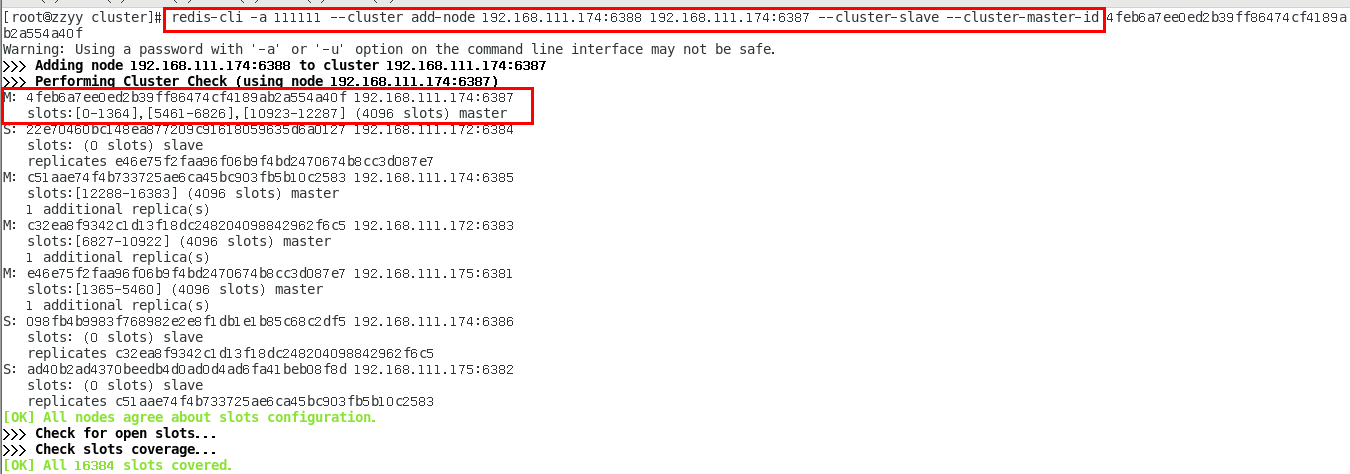
为主节点6387分配从节点6388
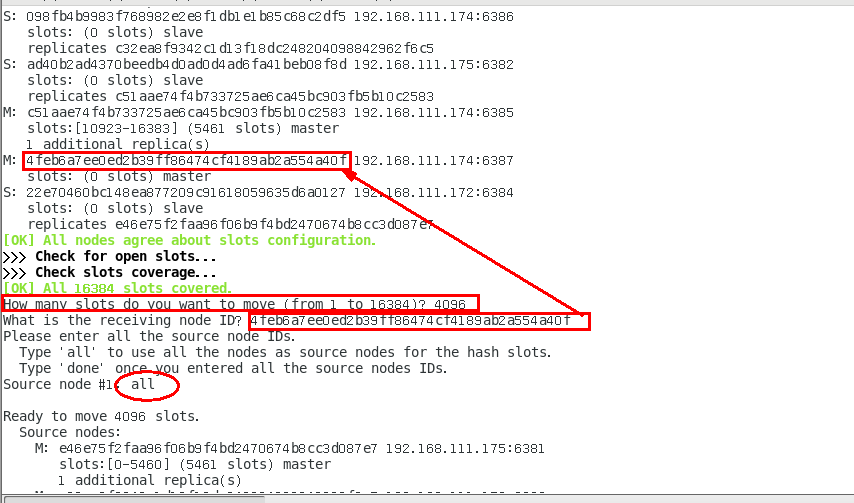
|-----------------------------------------------------------------------------------------------------------------------------------------------------------------------------------------------------------------------------------------------------------------------------------------------------|
| 命令:redis-cli -a 密码 --cluster add-node ip:新slave端口 ip:新master端口 --cluster-slave --cluster-master-id 新主机节点ID redis-cli -a 111111 --cluster add-node 192.168.111.174:6388 192.168.111.174:6387 --cluster-slave --cluster-master-id 4feb6a7ee0ed2b39ff86474cf4189ab2a554a40f------- 这个是6387的编号,按照自己实际情况 |

检查集群情况第3次
|---------------------------------------|
| redis-cli --cluster check 真实ip地址:6381 |
|----------------------------------------------------------|
| redis-cli -a 111111 --cluster check 192.168.111.175:6381 |

11.4.5 主从缩容案例
目的:6387和6388下线
检查集群情况第一次,先获得从节点6388的节点ID
|-------------------------------------------------------|
| redis-cli -a 密码 --cluster check 192.168.111.174: 6388 |
从集群中将4号从节点6388删除
|---------------------------------------------------------------------------------------------------------------------------------------------------------------------------|
| 命令:redis-cli -a 密码 --cluster del-node ip:从机端口 从机6388节点ID redis-cli -a 111111 --cluster del-node 192.168.111.174:6388 218e7b8b4f81be54ff173e4776b4f4faaf7c13da |

|-----------------------------------------------------------|
| redis-cli -a 111111 --cluster check 192.168.111.174: 6385 |
检查一下发现,6388被删除了,只剩下7台机器了。
将6387的槽号清空,重新分配,本例将清出来的槽号都给6381
|----------------------------------------------------------------|
| redis-cli -a 111111 --cluster reshard 192.168.111.175:6381 |

 检查集群情况第二次
|--------------------------------------------------------------------------------------------------------------|
| redis-cli -a 111111 --cluster check 192.168.111.175:6381 4096个槽位都指给6381,它变成了8192个槽位,相当于全部都给6381了,不然要输入3次,一锅端 |

将6387删除
|-----------------------------------------------------------------------------------------------------------------------------------------------------------|
| 命令:redis-cli -a 密码 --cluster del-node ip:端口 6387节点ID redis-cli -a 111111 --cluster del-node 192.168.111.174:6387 4feb6a7ee0ed2b39ff86474cf4189ab2a554a40f |

检查集群情况第三次,6387/6388被彻底祛除
|----------------------------------------------------------|
| redis-cli -a 111111 --cluster check 192.168.111.175:6381 |

11.5 集群常用操作命令和CRC16算法分析
11.5.1 不在同一个slot槽位下的多键操作支持不好,通识占位符登场
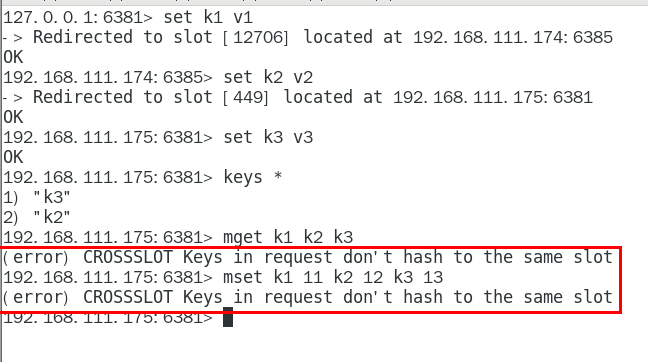
|-----------------------------------------------------------------------|
| 不在同一个slot槽位下的键值无法使用mset、mget等多键操作 |
| 可以通过{}来定义同一个组的概念,使key中{}内相同内容的键值对放到一个slot槽位去,对照下图类似k1k2k3都映射为x,自然槽位一样 |
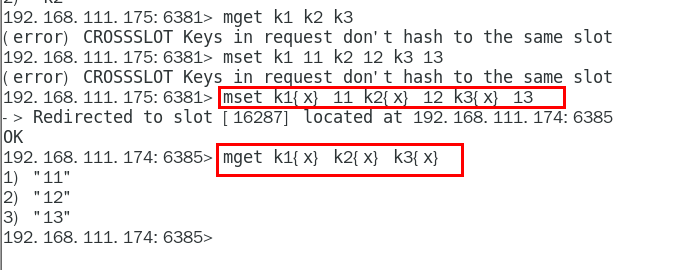
11.5.2 Redis集群有16384个哈希槽,每个key通过CRC16校验后对16384取模来决定放置哪个槽。集群的每个节点负责一部分hash槽
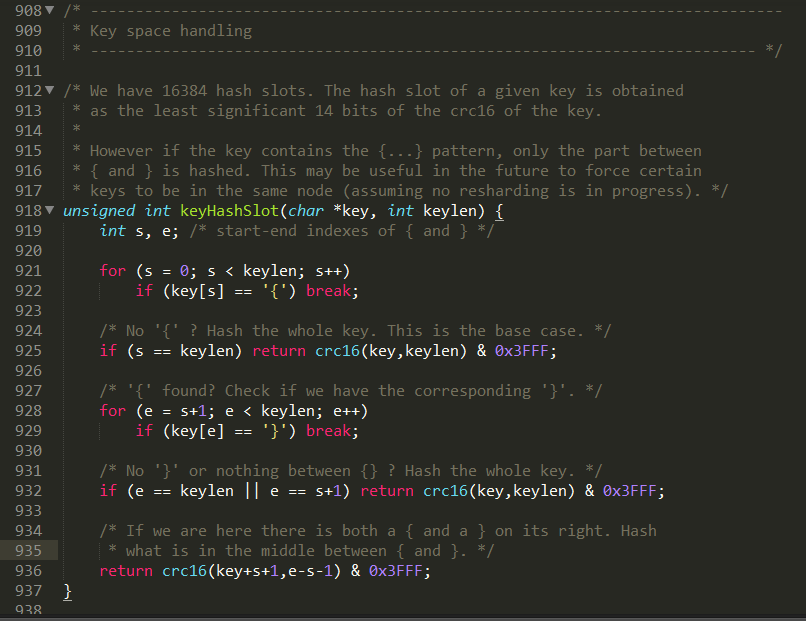
CRC16源码浅谈
cluster.c源码分析一下看看

11.5.3 常用命令
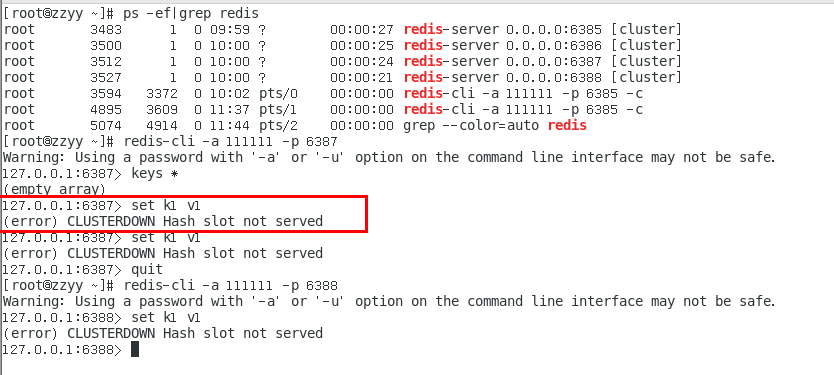
集群是否完整才能对外提供服务 cluster-require-full-coverage
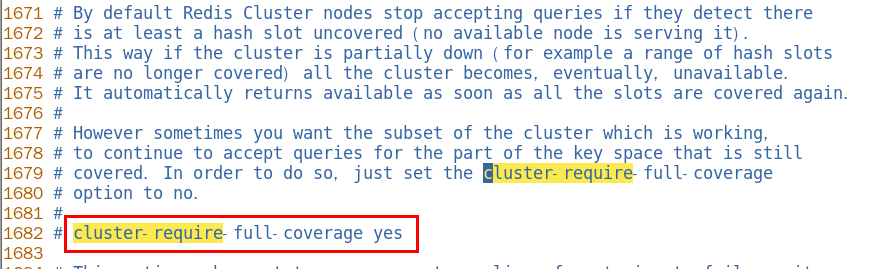
|----------------------------------------------------------------------------------------------------------------------------------------------------------------------------------------------------------------------------------------|
| 默认YES,现在集群架构是3主3从的redis cluster由3个master平分16384个slot,每个master的小集群负责1/3的slot,对应一部分数据。 cluster-require-full-coverage: 默认值 yes , 即需要集群完整性,方可对外提供服务 通常情况,如果这3个小集群中,任何一个(1主1从)挂了,你这个集群对外可提供的数据只有2/3了, 整个集群是不完整的, redis 默认在这种情况下,是不会对外提供服务的。 |
| 如果你的诉求是, 集群不完整的话也需要对外提供服务,需要将该参数设置为no ,这样的话你挂了的那个小集群是不行了,但是其他的小集群仍然可以对外提供服务。 |
CLUSTER COUNTKEYSINSLOT 槽位数字编号
1,该槽位被占用
0,该槽位没占用
CLUSTER KEYSLOT 键名称
该键存在哪个槽位上
总结常用命令
CLUSTER NODES
CLUSTER KEYSLOT k1
CLUSTER COUNTKEYSINSLOT 12707
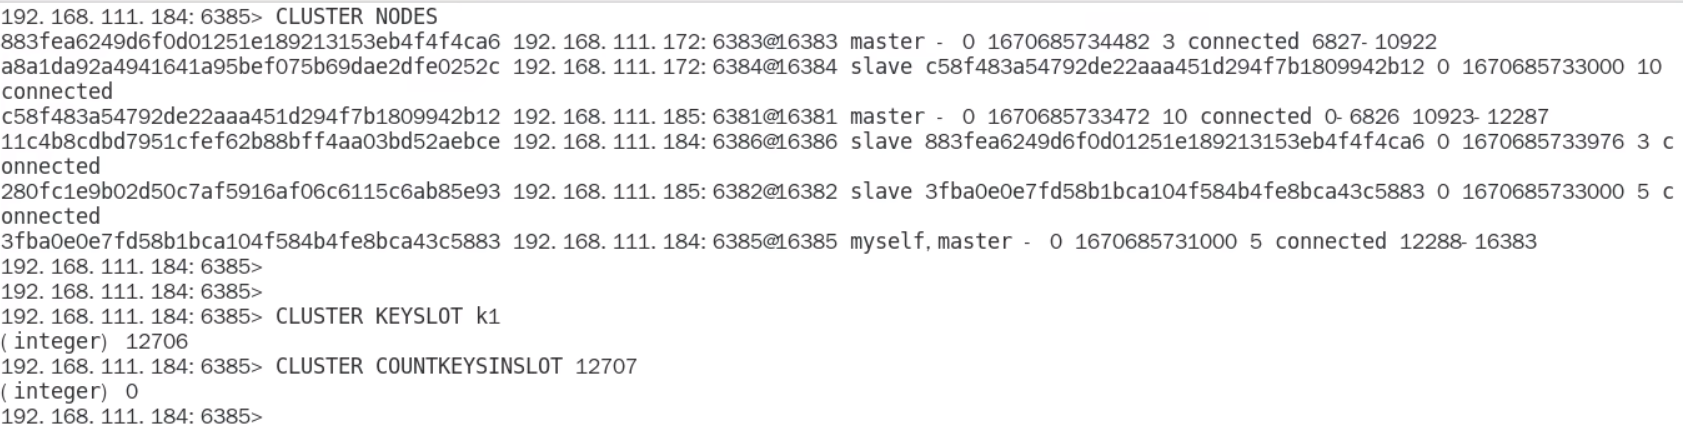
12 SpringBoot集成Redis
12.1 总体概述
jedis-lettuce-RedisTemplate三者的联系
12.2 本地Java连接Redis常见问题,小白注意
bind配置请注释掉
保护模式设置为no
Linux系统的防火墙设置
redis服务器的IP地址和密码是否正确
忘记写访问redis的服务端口号和auth密码
无脑粘贴脑图笔记......o(╥﹏╥)o
12.3 集成Jedis
是什么?
Jedis是一代目,相当于JDBC,非常老牌
Jedis Client是Redis官网推荐的一个面向java客户端,库文件实现了对各类API进行封装调用
步骤:
12.3.1 建Module redis7 study
12.3.2 改POM
XML
<?xml version="1.0" encoding="UTF-8"?>
<project xmlns="http://maven.apache.org/POM/4.0.0"
         xmlns:xsi="http://www.w3.org/2001/XMLSchema-instance"
         xsi:schemaLocation="http://maven.apache.org/POM/4.0.0 http://maven.apache.org/xsd/maven-4.0.0.xsd">
    <modelVersion>4.0.0</modelVersion>

    <groupId>com.atguigu.redis7</groupId>
    <artifactId>redis7_study</artifactId>
    <version>1.0-SNAPSHOT</version>

    <parent>
        <groupId>org.springframework.boot</groupId>
        <artifactId>spring-boot-starter-parent</artifactId>
        <version>2.6.10</version>
        <relativePath/>
    </parent>

    <properties>
        <project.build.sourceEncoding>UTF-8</project.build.sourceEncoding>
        <maven.compiler.source>1.8</maven.compiler.source>
        <maven.compiler.target>1.8</maven.compiler.target>
        <junit.version>4.12</junit.version>
        <log4j.version>1.2.17</log4j.version>
        <lombok.version>1.16.18</lombok.version>
    </properties>

    <dependencies>
        <!--SpringBoot通用依赖模块-->
        <dependency>
            <groupId>org.springframework.boot</groupId>
            <artifactId>spring-boot-starter-web</artifactId>
        </dependency>
        <!--jedis-->
        <dependency>
            <groupId>redis.clients</groupId>
            <artifactId>jedis</artifactId>
            <version>4.3.1</version>
        </dependency>
        <!--通用基础配置-->
        <dependency>
            <groupId>junit</groupId>
            <artifactId>junit</artifactId>
            <version>${junit.version}</version>
        </dependency>
        <dependency>
            <groupId>org.springframework.boot</groupId>
            <artifactId>spring-boot-starter-test</artifactId>
            <scope>test</scope>
        </dependency>
        <dependency>
            <groupId>log4j</groupId>
            <artifactId>log4j</artifactId>
            <version>${log4j.version}</version>
        </dependency>
        <dependency>
            <groupId>org.projectlombok</groupId>
            <artifactId>lombok</artifactId>
            <version>${lombok.version}</version>
            <optional>true</optional>
        </dependency>
    </dependencies>

    <build>
        <plugins>
            <plugin>
                <groupId>org.springframework.boot</groupId>
                <artifactId>spring-boot-maven-plugin</artifactId>
            </plugin>
        </plugins>
    </build>

</project>
12.3.3 写YML
java
server.port=7777

spring.application.name=redis7_study
12.3.4 主启动
java
package com.atguigu.redis7;

import org.springframework.boot.SpringApplication;
import org.springframework.boot.autoconfigure.SpringBootApplication;

/**
 * @auther zzyy
 * @create 2022-11-17 16:36
 */
@SpringBootApplication
public class Redis7Study7777
{
    public static void main(String[] args)
    {
        SpringApplication.run(Redis7Study7777.class,args);
    }
}
12.3.5 业务类
入门案例
java
public class JedisDemo
{
    public static void main(String[] args)
    {
        //1 connection获得,通过指定ip和端口号
        Jedis jedis = new Jedis("192.168.111.185", 6379);
        //2 指定访问服务器的密码
        jedis.auth("111111");
        //3 获得了jedis客户端,可以像jdbc一样,访问我们的redis
        System.out.println(jedis.ping());

        //keys
        Set<String> keys = jedis.keys("*");
        System.out.println(keys);

        //string
        jedis.set("k3","hello-jedis");
        System.out.println(jedis.get("k3"));
        System.out.println(jedis.ttl("k3"));
        jedis.expire("k3",20L);

        //list
        jedis.lpush("list","11","12","13");
        List<String> list = jedis.lrange("list", 0, -1);
        for (String element : list) {
            System.out.println(element);
        }
        //家庭作业

    }
}
家庭作业5+1 一个key 常用五大数据类型
java
package com.atguigu.redis7.test;

import redis.clients.jedis.Jedis;

import java.util.*;

/**
 * @auther zzyy
 * @create 2022-11-17 16:39
 */
public class JedisDemo
{
    public static void main(String[] args)
    {
        //连接本地的 Redis 服务,自己的ip和端口和密码
        Jedis jedis = new Jedis("192.168.111.181",6379);
        // 如果 Redis 服务设置了密码,需要下面这行,没有就不需要
        jedis.auth("111111");

        //key
        Set<String> keys = jedis.keys("*");
        for (Iterator iterator = keys.iterator(); iterator.hasNext();) {
            String key = (String) iterator.next();
            System.out.println(key);
        }
        System.out.println("jedis.exists====>"+jedis.exists("k2"));
        System.out.println(jedis.ttl("k1"));
        //String
        //jedis.append("k1","myreids");
        System.out.println(jedis.get("k1"));
        jedis.set("k4","k4_redis");
        System.out.println("----------------------------------------");
        jedis.mset("str1","v1","str2","v2","str3","v3");
        System.out.println(jedis.mget("str1","str2","str3"));
        //list
        System.out.println("----------------------------------------");
        //jedis.lpush("mylist","v1","v2","v3","v4","v5");
        List<String> list = jedis.lrange("mylist",0,-1);
        for (String element : list) {
            System.out.println(element);
        }
        //set
        jedis.sadd("orders","jd001");
        jedis.sadd("orders","jd002");
        jedis.sadd("orders","jd003");
        Set<String> set1 = jedis.smembers("orders");
        for (Iterator iterator = set1.iterator(); iterator.hasNext();) {
            String string = (String) iterator.next();
            System.out.println(string);
        }
        jedis.srem("orders","jd002");
        System.out.println(jedis.smembers("orders").size());
        //hash
        jedis.hset("hash1","userName","lisi");
        System.out.println(jedis.hget("hash1","userName"));
        Map<String,String> map = new HashMap<String,String>();
        map.put("telphone","138xxxxxxxx");
        map.put("address","atguigu");
        map.put("email","zzyybs@126.com");//课后有问题请给我发邮件
        jedis.hmset("hash2",map);
        List<String> result = jedis.hmget("hash2", "telphone","email");
        for (String element : result) {
            System.out.println(element);
        }

        //zset
        jedis.zadd("zset01",60d,"v1");
        jedis.zadd("zset01",70d,"v2");
        jedis.zadd("zset01",80d,"v3");
        jedis.zadd("zset01",90d,"v4");

        List<String> zset01 = jedis.zrange("zset01", 0, -1);
        zset01.forEach(System.out::println);
    }
}
12.4 集成lettuce
12.4.1 是什么
Lettuce是一个Redis的Java驱动包,Lettuce翻译为生菜,没错,就是吃的那种生菜,所以它的Logo长这样


12.4.2 lettuce VS Jedis

12.4.3 案例
改POM
XML
<?xml version="1.0" encoding="UTF-8"?>
<project xmlns="http://maven.apache.org/POM/4.0.0"
         xmlns:xsi="http://www.w3.org/2001/XMLSchema-instance"
         xsi:schemaLocation="http://maven.apache.org/POM/4.0.0 http://maven.apache.org/xsd/maven-4.0.0.xsd">
    <modelVersion>4.0.0</modelVersion>

    <groupId>com.atguigu.redis7</groupId>
    <artifactId>redis7_study</artifactId>
    <version>1.0-SNAPSHOT</version>

    <parent>
        <groupId>org.springframework.boot</groupId>
        <artifactId>spring-boot-starter-parent</artifactId>
        <version>2.6.10</version>
        <relativePath/>
    </parent>

    <properties>
        <project.build.sourceEncoding>UTF-8</project.build.sourceEncoding>
        <maven.compiler.source>1.8</maven.compiler.source>
        <maven.compiler.target>1.8</maven.compiler.target>
        <junit.version>4.12</junit.version>
        <log4j.version>1.2.17</log4j.version>
        <lombok.version>1.16.18</lombok.version>
    </properties>

    <dependencies>
        <!--SpringBoot通用依赖模块-->
        <dependency>
            <groupId>org.springframework.boot</groupId>
            <artifactId>spring-boot-starter-web</artifactId>
        </dependency>
        <!--jedis-->
        <dependency>
            <groupId>redis.clients</groupId>
            <artifactId>jedis</artifactId>
            <version>4.3.1</version>
        </dependency>
        <!--lettuce-->
        <dependency>
            <groupId>io.lettuce</groupId>
            <artifactId>lettuce-core</artifactId>
            <version>6.2.1.RELEASE</version>
        </dependency>
        <!--通用基础配置-->
        <dependency>
            <groupId>junit</groupId>
            <artifactId>junit</artifactId>
            <version>${junit.version}</version>
        </dependency>
        <dependency>
            <groupId>org.springframework.boot</groupId>
            <artifactId>spring-boot-starter-test</artifactId>
            <scope>test</scope>
        </dependency>
        <dependency>
            <groupId>log4j</groupId>
            <artifactId>log4j</artifactId>
            <version>${log4j.version}</version>
        </dependency>
        <dependency>
            <groupId>org.projectlombok</groupId>
            <artifactId>lombok</artifactId>
            <version>${lombok.version}</version>
            <optional>true</optional>
        </dependency>
    </dependencies>

    <build>
        <plugins>
            <plugin>
                <groupId>org.springframework.boot</groupId>
                <artifactId>spring-boot-maven-plugin</artifactId>
            </plugin>
        </plugins>
    </build>

</project>
业务类
java
package com.atguigu.redis7.test;

import io.lettuce.core.RedisClient;
import io.lettuce.core.RedisFuture;
import io.lettuce.core.RedisURI;
import io.lettuce.core.SortArgs;
import io.lettuce.core.api.StatefulRedisConnection;
import io.lettuce.core.api.async.RedisAsyncCommands;
import io.lettuce.core.api.sync.RedisCommands;
import lombok.extern.slf4j.Slf4j;

import java.util.HashMap;
import java.util.List;
import java.util.Map;
import java.util.Set;
import java.util.concurrent.ExecutionException;

public class LettuceDemo
{
    public static void main(String[] args)
    {
        // 1 使用构建器链式编程来builder我们RedisURI
        RedisURI uri = RedisURI.builder()
                .redis("192.168.111.185")
                .withPort(6379)
                .withAuthentication("default","111111")
                .build();

        //2 创建连接客户端
        RedisClient redisClient = RedisClient.create(uri);
        StatefulRedisConnection conn = redisClient.connect();

        //3 通过conn创建操作的command
        RedisCommands commands = conn.sync();

        //========biz====================
        //keys
        List keys = commands.keys("*");
        System.out.println("***********"+keys);

        //string
        commands.set("k5","hello-lettuce");
        System.out.println("***********"+commands.get("k5"));
        //....

        //========biz====================

        //4 各种关闭释放资源
        conn.close();
        redisClient.shutdown();
    }
}
12.5 集成RedisTemplate-推荐使用
12.5.1 连接单机
boot整合redis基础演示
12.5.1.1 建Module redis7_study
12.5.1.2 改POM
XML
<?xml version="1.0" encoding="UTF-8"?>
<project xmlns="http://maven.apache.org/POM/4.0.0"
         xmlns:xsi="http://www.w3.org/2001/XMLSchema-instance"
         xsi:schemaLocation="http://maven.apache.org/POM/4.0.0 http://maven.apache.org/xsd/maven-4.0.0.xsd">
    <modelVersion>4.0.0</modelVersion>

    <groupId>com.atguigu.redis7</groupId>
    <artifactId>redis7_study</artifactId>
    <version>1.0-SNAPSHOT</version>

    <parent>
        <groupId>org.springframework.boot</groupId>
        <artifactId>spring-boot-starter-parent</artifactId>
        <version>2.6.10</version>
        <relativePath/>
    </parent>

    <properties>
        <project.build.sourceEncoding>UTF-8</project.build.sourceEncoding>
        <maven.compiler.source>1.8</maven.compiler.source>
        <maven.compiler.target>1.8</maven.compiler.target>
        <junit.version>4.12</junit.version>
        <log4j.version>1.2.17</log4j.version>
        <lombok.version>1.16.18</lombok.version>
    </properties>


    <dependencies>
        <!--SpringBoot通用依赖模块-->
        <dependency>
            <groupId>org.springframework.boot</groupId>
            <artifactId>spring-boot-starter-web</artifactId>
        </dependency>
        <!--jedis-->
        <dependency>
            <groupId>redis.clients</groupId>
            <artifactId>jedis</artifactId>
            <version>4.3.1</version>
        </dependency>
        <!--lettuce-->
        <dependency>
            <groupId>io.lettuce</groupId>
            <artifactId>lettuce-core</artifactId>
            <version>6.2.1.RELEASE</version>
        </dependency>
        <!--SpringBoot与Redis整合依赖-->
        <dependency>
            <groupId>org.springframework.boot</groupId>
            <artifactId>spring-boot-starter-data-redis</artifactId>
        </dependency>
        <dependency>
            <groupId>org.apache.commons</groupId>
            <artifactId>commons-pool2</artifactId>
        </dependency>
        <!--swagger2-->
        <dependency>
            <groupId>io.springfox</groupId>
            <artifactId>springfox-swagger2</artifactId>
            <version>2.9.2</version>
        </dependency>
        <dependency>
            <groupId>io.springfox</groupId>
            <artifactId>springfox-swagger-ui</artifactId>
            <version>2.9.2</version>
        </dependency>
        <!--通用基础配置junit/devtools/test/log4j/lombok/hutool-->
        <dependency>
            <groupId>junit</groupId>
            <artifactId>junit</artifactId>
            <version>${junit.version}</version>
        </dependency>
        <dependency>
            <groupId>org.springframework.boot</groupId>
            <artifactId>spring-boot-starter-test</artifactId>
            <scope>test</scope>
        </dependency>
        <dependency>
            <groupId>log4j</groupId>
            <artifactId>log4j</artifactId>
            <version>${log4j.version}</version>
        </dependency>
        <dependency>
            <groupId>org.projectlombok</groupId>
            <artifactId>lombok</artifactId>
            <version>${lombok.version}</version>
            <optional>true</optional>
        </dependency>
    </dependencies>

    <build>
        <plugins>
            <plugin>
                <groupId>org.springframework.boot</groupId>
                <artifactId>spring-boot-maven-plugin</artifactId>
            </plugin>
        </plugins>
    </build>

</project>
12.5.1.3 写YML
XML
server.port=7777

spring.application.name=redis7_study

# ========================logging=====================
logging.level.root=info
logging.level.com.atguigu.redis7=info
logging.pattern.console=%d{yyyy-MM-dd HH:mm:ss.SSS} [%thread] %-5level %logger- %msg%n

logging.file.name=D:/mylogs2023/redis7_study.log
logging.pattern.file=%d{yyyy-MM-dd HH:mm:ss.SSS} [%thread] %-5level %logger- %msg%n

# ========================swagger=====================
spring.swagger2.enabled=true
#在springboot2.6.X结合swagger2.9.X会提示documentationPluginsBootstrapper空指针异常,
#原因是在springboot2.6.X中将SpringMVC默认路径匹配策略从AntPathMatcher更改为PathPatternParser,
# 导致出错,解决办法是matching-strategy切换回之前ant_path_matcher
spring.mvc.pathmatch.matching-strategy=ant_path_matcher

# ========================redis单机=====================
spring.redis.database=0
# 修改为自己真实IP
spring.redis.host=192.168.111.185
spring.redis.port=6379
spring.redis.password=111111
spring.redis.lettuce.pool.max-active=8
spring.redis.lettuce.pool.max-wait=-1ms
spring.redis.lettuce.pool.max-idle=8
spring.redis.lettuce.pool.min-idle=0
12.5.1.4 主启动
java
package com.atguigu.redis7;

import org.springframework.boot.SpringApplication;
import org.springframework.boot.autoconfigure.SpringBootApplication;

/**
 * @auther zzyy
 * @create 2022-11-17 16:36
 */
@SpringBootApplication
public class Redis7Study7777
{
    public static void main(String[] args)
    {
        SpringApplication.run(Redis7Study7777.class,args);
    }
}
12.5.1.5 业务类
配置类
RedisConfig
java
package com.atguigu.redis7.config;

import org.springframework.context.annotation.Bean;
import org.springframework.context.annotation.Configuration;
import org.springframework.data.redis.connection.lettuce.LettuceConnectionFactory;
import org.springframework.data.redis.core.RedisTemplate;
import org.springframework.data.redis.serializer.GenericJackson2JsonRedisSerializer;
import org.springframework.data.redis.serializer.StringRedisSerializer;

/**
 * @auther zzyy
 * @create 2022-11-17 17:34
 */
@Configuration
public class RedisConfig
{
    /**
     * redis序列化的工具配置类,下面这个请一定开启配置
     * 127.0.0.1:6379> keys *
     * 1) "ord:102"  序列化过
     * 2) "\xac\xed\x00\x05t\x00\aord:102"   野生,没有序列化过
     * this.redisTemplate.opsForValue(); //提供了操作string类型的所有方法
     * this.redisTemplate.opsForList(); // 提供了操作list类型的所有方法
     * this.redisTemplate.opsForSet(); //提供了操作set的所有方法
     * this.redisTemplate.opsForHash(); //提供了操作hash表的所有方法
     * this.redisTemplate.opsForZSet(); //提供了操作zset的所有方法
     * @param lettuceConnectionFactory
     * @return
     */
    @Bean
    public RedisTemplate<String, Object> redisTemplate(LettuceConnectionFactory lettuceConnectionFactory)
    {
        RedisTemplate<String,Object> redisTemplate = new RedisTemplate<>();

        redisTemplate.setConnectionFactory(lettuceConnectionFactory);
        //设置key序列化方式string
        redisTemplate.setKeySerializer(new StringRedisSerializer());
        //设置value的序列化方式json,使用GenericJackson2JsonRedisSerializer替换默认序列化
        redisTemplate.setValueSerializer(new GenericJackson2JsonRedisSerializer());

        redisTemplate.setHashKeySerializer(new StringRedisSerializer());
        redisTemplate.setHashValueSerializer(new GenericJackson2JsonRedisSerializer());

        redisTemplate.afterPropertiesSet();

        return redisTemplate;
    }
}
SwaggerConfig
java
package com.atguigu.redis7.config;

import org.springframework.beans.factory.annotation.Value;
import org.springframework.context.annotation.Bean;
import org.springframework.context.annotation.Configuration;
import springfox.documentation.builders.ApiInfoBuilder;
import springfox.documentation.builders.PathSelectors;
import springfox.documentation.builders.RequestHandlerSelectors;
import springfox.documentation.service.ApiInfo;
import springfox.documentation.spi.DocumentationType;
import springfox.documentation.spring.web.plugins.Docket;
import springfox.documentation.swagger2.annotations.EnableSwagger2;

import java.time.LocalDateTime;
import java.time.format.DateTimeFormatter;

/**
 * @auther zzyy
 * @create 2022-11-17 17:44
 */
@Configuration
@EnableSwagger2
public class SwaggerConfig
{
    @Value("${spring.swagger2.enabled}")
    private Boolean enabled;

    @Bean
    public Docket createRestApi() {
        return new Docket(DocumentationType.SWAGGER_2)
                .apiInfo(apiInfo())
                .enable(enabled)
                .select()
                .apis(RequestHandlerSelectors.basePackage("com.atguigu.redis7")) //你自己的package
                .paths(PathSelectors.any())
                .build();
    }
    public ApiInfo apiInfo() {
        return new ApiInfoBuilder()
                .title("springboot利用swagger2构建api接口文档 "+"\t"+ DateTimeFormatter.ofPattern("yyyy-MM-dd").format(LocalDateTime.now()))
                .description("springboot+redis整合,有问题给管理员阳哥邮件:zzyybs@126.com")
                .version("1.0")
                .termsOfServiceUrl("https://www.atguigu.com/")
                .build();
    }
}
service
java
package com.atguigu.redis7.service;

import lombok.extern.slf4j.Slf4j;
import org.springframework.data.redis.core.RedisTemplate;
import org.springframework.stereotype.Service;

import javax.annotation.Resource;
import java.util.UUID;
import java.util.concurrent.ThreadLocalRandom;

@Service
@Slf4j
public class OrderService
{

    public static final String ORDER_KEY = "ord:";

    @Resource private RedisTemplate redisTemplate;
    //@Resource private StringRedisTemplate StringRedisTemplate;

    public void addOrder()
    {
        int keyId = ThreadLocalRandom.current().nextInt(1000)+1;
        String serialNo = UUID.randomUUID().toString();

        String key = ORDER_KEY+keyId;
        String value = "京东订单"+serialNo;

        redisTemplate.opsForValue().set(key,value);


        log.info("***key:{}",key);
        log.info("***value:{}",value);
    }

    public String getOrderById(Integer keyId)
    {
        return (String) redisTemplate.opsForValue().get(ORDER_KEY + keyId);
        //return StringRedisTemplate.opsForValue().get(ORDER_KEY + keyId);
    }

}
controller
java
package com.atguigu.redis7.controller;

import com.atguigu.redis7.service.OrderService;

import io.swagger.annotations.Api;
import io.swagger.annotations.ApiOperation;
import lombok.extern.slf4j.Slf4j;
import org.springframework.web.bind.annotation.PathVariable;
import org.springframework.web.bind.annotation.RequestMapping;
import org.springframework.web.bind.annotation.RequestMethod;
import org.springframework.web.bind.annotation.RestController;

import javax.annotation.Resource;
import java.util.concurrent.ThreadLocalRandom;

@RestController
@Slf4j
@Api(tags = "订单接口")
public class OrderController
{
    @Resource
    private OrderService orderService;

    @ApiOperation("新增订单")
    @RequestMapping(value = "/order/add",method = RequestMethod.POST)
    public void addOrder()
    {
        orderService.addOrder();
    }

    @ApiOperation("按照keyIdc查询订单")
    @RequestMapping(value = "/order/{keyId}",method = RequestMethod.GET)
    public String getOrderById(@PathVariable Integer keyId)
    {
        return orderService.getOrderById(keyId);
    }
}
12.5.1.6 测试
丝袜哥 http://localhost:7777/swagger-ui.html#/
序列化问题
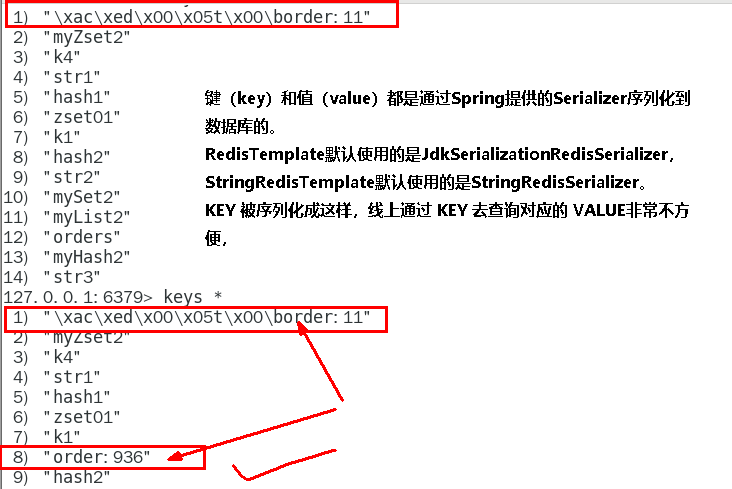
why?
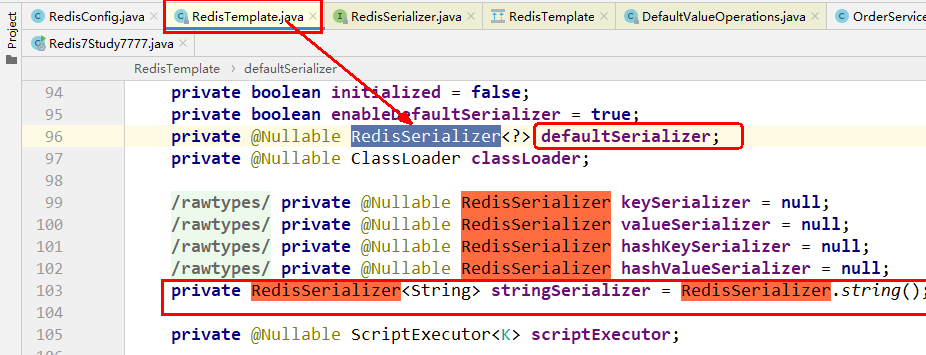
JDK 序列化方式 (默认)惹的祸
JDK 序列化方式 (默认)
org.springframework.data.redis.serializer.JdkSerializationRedisSerializer ,
默认情况下,RedisTemplate 使用该数据列化方式,我们来看下源码 RedisTemplate#afterPropertiesSet()
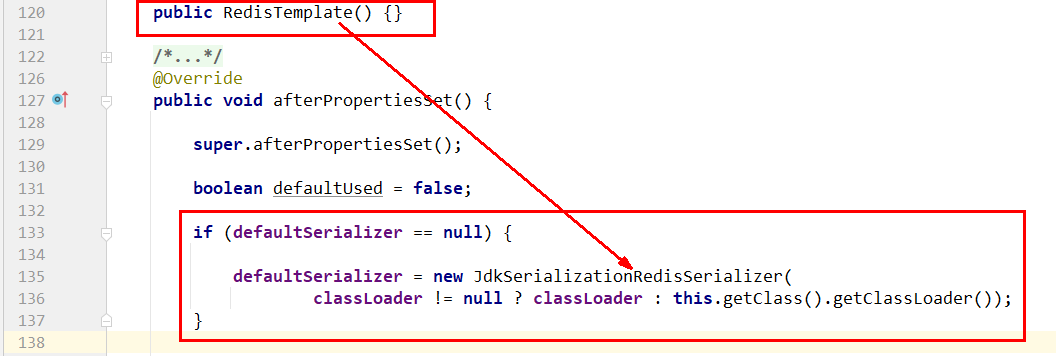
12.5.2 连接集群
启动redis集群6台实例
第一次改写YML
java
server.port=7777

spring.application.name=redis7_study

# ========================logging=====================
logging.level.root=info
logging.level.com.atguigu.redis7=info
logging.pattern.console=%d{yyyy-MM-dd HH:mm:ss.SSS} [%thread] %-5level %logger- %msg%n

logging.file.name=D:/mylogs2023/redis7_study.log
logging.pattern.file=%d{yyyy-MM-dd HH:mm:ss.SSS} [%thread] %-5level %logger- %msg%n

# ========================swagger=====================
spring.swagger2.enabled=true
#在springboot2.6.X结合swagger2.9.X会提示documentationPluginsBootstrapper空指针异常,
#原因是在springboot2.6.X中将SpringMVC默认路径匹配策略从AntPathMatcher更改为PathPatternParser,
# 导致出错,解决办法是matching-strategy切换回之前ant_path_matcher
spring.mvc.pathmatch.matching-strategy=ant_path_matcher


# ========================redis集群=====================
spring.redis.password=111111
# 获取失败 最大重定向次数
spring.redis.cluster.max-redirects=3
spring.redis.lettuce.pool.max-active=8
spring.redis.lettuce.pool.max-wait=-1ms
spring.redis.lettuce.pool.max-idle=8
spring.redis.lettuce.pool.min-idle=0
spring.redis.cluster.nodes=192.168.111.175:6381,192.168.111.175:6382,192.168.111.172:6383,192.168.111.172:6384,192.168.111.174:6385,192.168.111.174:6386
直接通过微服务访问redis集群
一切OK http://localhost:7777/swagger-ui.html#/
问题来了:
人为模拟,master-6381机器意外宕机,手动shutdown
先对redis集群命令方式,手动验证各种读写命令,看看6384是否上位
Redis Cluster集群能自动感知并自动完成主备切换,对应的slave6384会被选举为新的master节点
微服务客户端再次读写访问试试:
故障现象
SpringBoot客户端没有动态感知到RedisCluster的最新集群信息
经典故障:
【故障演练】 Redis Cluster集群部署采用了3主3从拓扑结构,数据读写访问master节点, slave节点负责备份。当master宕机主从切换成功,redis手动OK,but 2个经典故障
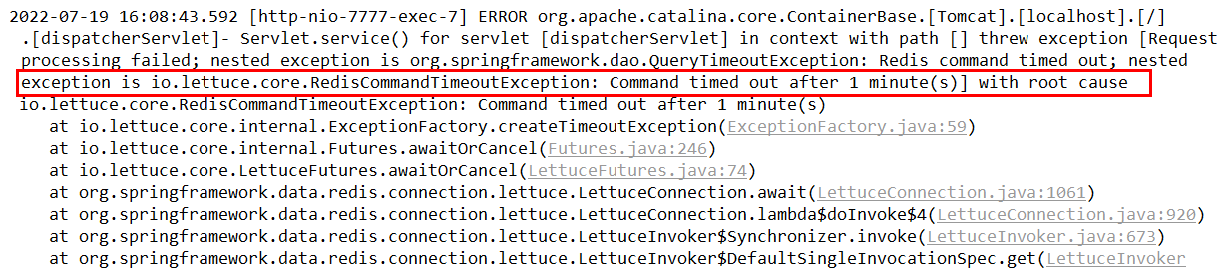

导致原因
SpringBoot 2.X 版本, Redis默认的连接池采用 Lettuce
当Redis 集群节点发生变化后,Letture默认是不会刷新节点拓扑
解决方案
1 排除lettuce采用jedis(不推荐)

2 重写连接工厂实例(极度不推荐)
//仅做参考,不写,不写,不写。
java
@Bean

public DefaultClientResources lettuceClientResources() {

    return DefaultClientResources.create();

}


@Bean

public LettuceConnectionFactory lettuceConnectionFactory(RedisProperties redisProperties, ClientResources clientResources) {


    ClusterTopologyRefreshOptions topologyRefreshOptions = ClusterTopologyRefreshOptions.builder()

            .enablePeriodicRefresh(Duration.ofSeconds(30)) //按照周期刷新拓扑

            .enableAllAdaptiveRefreshTriggers() //根据事件刷新拓扑

            .build();


    ClusterClientOptions clusterClientOptions = ClusterClientOptions.builder()

            //redis命令超时时间,超时后才会使用新的拓扑信息重新建立连接

            .timeoutOptions(TimeoutOptions.enabled(Duration.ofSeconds(10)))

            .topologyRefreshOptions(topologyRefreshOptions)

            .build();


    LettuceClientConfiguration clientConfiguration = LettuceClientConfiguration.builder()

            .clientResources(clientResources)

            .clientOptions(clusterClientOptions)

            .build();


    RedisClusterConfiguration clusterConfig = new RedisClusterConfiguration(redisProperties.getCluster().getNodes());

    clusterConfig.setMaxRedirects(redisProperties.getCluster().getMaxRedirects());

    clusterConfig.setPassword(RedisPassword.of(redisProperties.getPassword()));


    LettuceConnectionFactory lettuceConnectionFactory = new LettuceConnectionFactory(clusterConfig, clientConfiguration);


    return lettuceConnectionFactory;

}
3 刷新节点集群拓扑动态感应
官网:
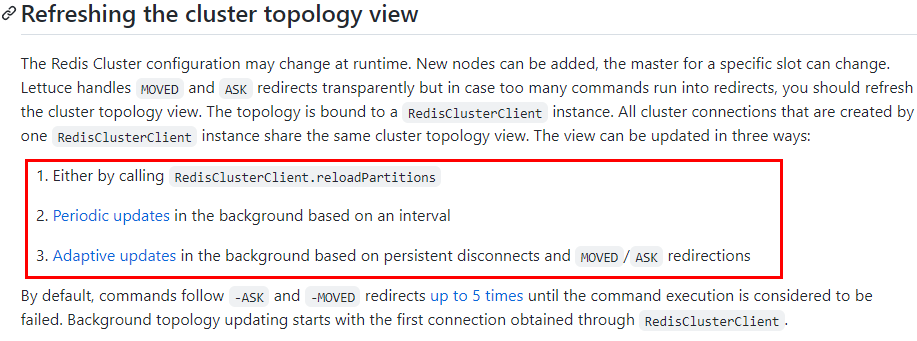

第二次改写YML
java
server.port=7777

spring.application.name=redis7_study

# ========================logging=====================
logging.level.root=info
logging.level.com.atguigu.redis7=info
logging.pattern.console=%d{yyyy-MM-dd HH:mm:ss.SSS} [%thread] %-5level %logger- %msg%n

logging.file.name=D:/mylogs2023/redis7_study.log
logging.pattern.file=%d{yyyy-MM-dd HH:mm:ss.SSS} [%thread] %-5level %logger- %msg%n

# ========================swagger=====================
spring.swagger2.enabled=true
#在springboot2.6.X结合swagger2.9.X会提示documentationPluginsBootstrapper空指针异常,
#原因是在springboot2.6.X中将SpringMVC默认路径匹配策略从AntPathMatcher更改为PathPatternParser,
# 导致出错,解决办法是matching-strategy切换回之前ant_path_matcher
spring.mvc.pathmatch.matching-strategy=ant_path_matcher


# ========================redis集群=====================
spring.redis.password=111111
# 获取失败 最大重定向次数
spring.redis.cluster.max-redirects=3
spring.redis.lettuce.pool.max-active=8
spring.redis.lettuce.pool.max-wait=-1ms
spring.redis.lettuce.pool.max-idle=8
spring.redis.lettuce.pool.min-idle=0

# =====================添加以下两处配置==================================
#支持集群拓扑动态感应刷新,自适应拓扑刷新是否使用所有可用的更新,默认false关闭
spring.redis.lettuce.cluster.refresh.adaptive=true
#定时刷新(每2秒刷新)
spring.redis.lettuce.cluster.refresh.period=2000
# =====================================================================

spring.redis.cluster.nodes=192.168.111.175:6381,192.168.111.175:6382,192.168.111.172:6383,192.168.111.172:6384,192.168.111.174:6385,192.168.111.174:6386