1.下载mysql
下载地址:https://downloads.mysql.com/archives/community/

在这里我们下载zip的包
2.解压mysql包到指定目录

3. 添加my.ini文件
java
# For advice on how to change settings please see
# http://dev.mysql.com/doc/refman/5.6/en/server-configuration-defaults.html
# *** DO NOT EDIT THIS FILE. It's a template which will be copied to the
# *** default location during install, and will be replaced if you
# *** upgrade to a newer version of MySQL.

[mysqld]

# Remove leading # and set to the amount of RAM for the most important data
# cache in MySQL. Start at 70% of total RAM for dedicated server, else 10%.
# innodb_buffer_pool_size = 128M

# Remove leading # to turn on a very important data integrity option: logging
# changes to the binary log between backups.
# log_bin

# These are commonly set, remove the # and set as required.
# 设置mysql的安装目录
basedir = D:/my_application/mysql-5.6.51-winx64
# 设置mysql数据库的数据的存放目录
datadir = D:/my_application/mysql-5.6.51-winx64/data
# 设置3306端口
port = 3306
# server_id = .....

# Remove leading # to set options mainly useful for reporting servers.
# The server defaults are faster for transactions and fast SELECTs.
# Adjust sizes as needed, experiment to find the optimal values.
# join_buffer_size = 128M
# sort_buffer_size = 2M
# read_rnd_buffer_size = 2M

sql_mode = NO_ENGINE_SUBSTITUTION,STRICT_TRANS_TABLES

# 允许最大连接数
max_connections = 200
# 允许连接失败的次数。这是为了防止有人从该主机试图攻击数据库系统
max_connect_errors = 10
# 服务端使用的字符集默认为UTF8
character-set-server = utf8mb4
# 创建新表时将使用的默认存储引擎
default-storage-engine = INNODB
# 默认使用"mysql_native_password"插件认证
default_authentication_plugin = mysql_native_password
[mysql]
# 设置mysql客户端默认字符集
default-character-set = utf8mb4
[client]
# 设置mysql客户端连接服务端时默认使用的端口
port=3306
default-character-set = utf8mb4
说明:
client代表客户端默认设置内容;
mysql代表我们使用mysql命令登录mysql数据库时的默认设置;
mysqld代表数据库自身的默认设置;
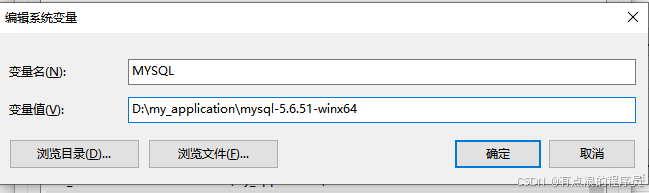
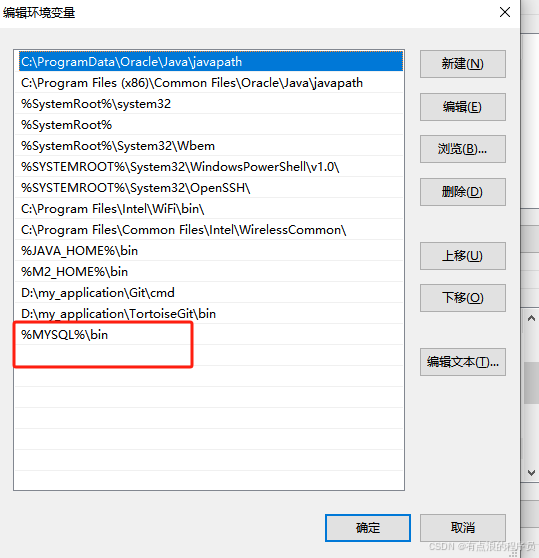
4. 设置mysql的环境变量
鼠标右键电脑-->属性-->高级系统设置-->环境变量
1.添加mysql环境变量
2.path里新增mysql环境变量
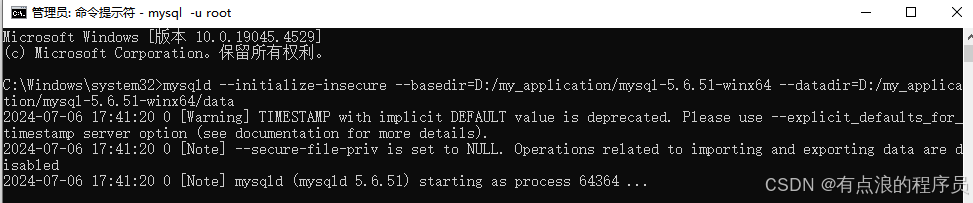
5. 初始化数据目录
打开命令提示符(以管理员身份运行),并运行初始化命令:
java
mysqld --initialize-insecure --basedir=D:/my_application/mysql-5.6.51-winx64 --datadir=D:/my_application/mysql-5.6.51-winx64/data执行成功如下图所示:
6.安装MySQL服务
java
mysqld --install MySQL56 --defaults-file=D:/my_application/mysql-5.6.51-winx64/my.ini说明: MySQL56是服务名称
执行成功如下图所示:

7. 启动MySQL服务
java
net start MySQL56执行成功如下图所示:

8. 连接到MySQL
java
mysql -u root执行成功如下图所示:

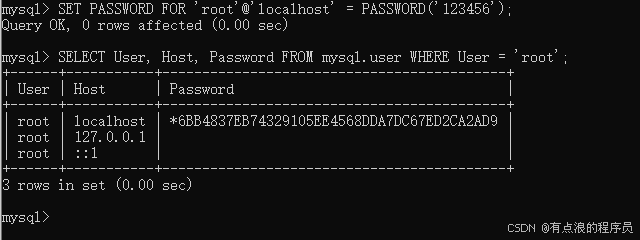
9. 设置root用户密码并查看
java
SET PASSWORD FOR 'root'@'localhost' = PASSWORD('123456');
SELECT User, Host, Password FROM mysql.user WHERE User = 'root';
执行成功如下图所示:
10. 用客户端连接mysql