最近业务需要将 matlab中bwlookup 的转C
这个函数没有现成的m文件参考,内置已经打成库了,所以没有参考源代码
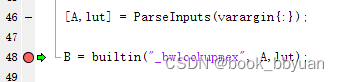
但是它的解释还是很清楚的,可以根据这个来写
Nonlinear filtering using lookup tables - MATLAB bwlookup - MathWorks 中国
A = bwlookup(B,lut) performs a 2-by-2 or 3-by-3 nonlinear neighborhood filtering operation on binary image BW. The neighborhood processing determines an integer index value used to access values in lookup table lut. The fetched lut value becomes the pixel value in output image A at the targeted position.

它说的很清楚,BW是二值图像矩阵,lut是一个512的查找表,对3*3邻居矩阵进行一些滤波(权重和)得到最后结果
用GPT生成一个
#include <stdio.h>
#include <stdlib.h>

#define WIDTH 3
#define HEIGHT 3

// 将 3x3 邻域编码为一个 9 位二进制数
int encodeNeighborhood(int neighborhood[3][3]) {
    int code = 0;
    for (int i = 0; i < 3; ++i) {
        for (int j = 0; j < 3; ++j) {
            code = (code << 1) | neighborhood[i][j];
        }
    }
    return code;
}

// 应用查找表进行形态学操作
void bwlookup(int input[HEIGHT][WIDTH], int output[HEIGHT][WIDTH], int lut[512]) {
    int neighborhood[3][3];

    // 处理内部像素
    for (int y = 1; y < HEIGHT - 1; ++y) {
        for (int x = 1; x < WIDTH - 1; ++x) {
            // 提取 3x3 邻域
            for (int i = -1; i <= 1; ++i) {
                for (int j = -1; j <= 1; ++j) {
                    neighborhood[i + 1][j + 1] = input[y + i][x + j];
                }
            }

            // 使用查找表进行转换
            int code = encodeNeighborhood(neighborhood);
            output[y][x] = lut[code];
        }
    }

    // 处理边缘像素 (拷贝原始值)
    for (int x = 0; x < WIDTH; ++x) {
        output[0][x] = input[0][x];
        output[HEIGHT-1][x] = input[HEIGHT-1][x];
    }
    for (int y = 0; y < HEIGHT; ++y) {
        output[y][0] = input[y][0];
        output[y][WIDTH-1] = input[y][WIDTH-1];
    }
}

int main() {
    // 示例二值图像 (3x3)
    int input[HEIGHT][WIDTH] = {
        {1, 0, 1},
        {0, 1, 0},
        {1, 0, 1}
    };

    // 初始化输出图像
    int output[HEIGHT][WIDTH] = {0};

    // 示例查找表
    int lut[512] = {0};
    lut[2] = 1; // 设定特定模式的输出值

    // 应用 bwlookup
    bwlookup(input, output, lut);

    // 打印结果图像
    for (int y = 0; y < HEIGHT; ++y) {
        for (int x = 0; x < WIDTH; ++x) {
            printf("%d ", output[y][x]);
        }
        printf("\n");
    }

    return 0;
}
显然它给的矩阵滤波器顺序搞错了,它的顺序是
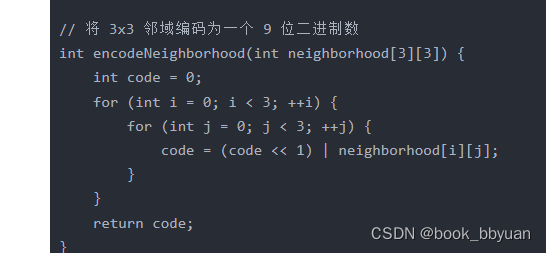
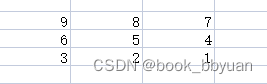 这是行优先,我本来理解为要列优先,其实人matlab代码给出解释了(包括网页)

手动改动下

仔细观察,
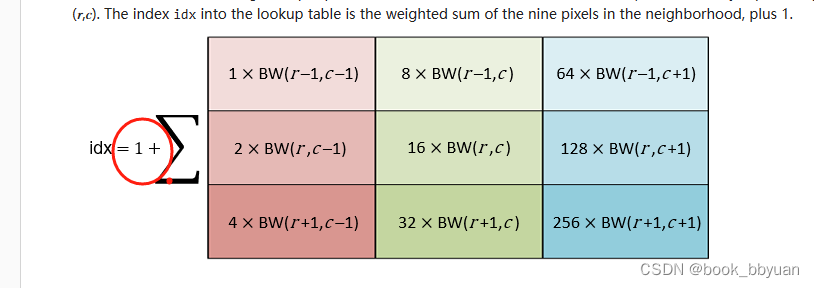
这给地方还有一个加1,c代码中求和一样的code,没有加1,原因是这里做index的时候,c是从0开始,index本身比matlab就要少1

这样计算出来发现还不对,仔细对比,中心数据都对上了,发现还是边缘不对
matlab中的原矩阵需要扩展,扩展的地方都要填0,然后只取中间
把想法交给GPT,让他生成把
#include <stdio.h>

#define HEIGHT 5
#define WIDTH 5

// 将 3x3 邻域编码为一个 9 位二进制数
int encodeNeighborhood(int arr[3][3]) {
    int code = 0;
    for (int i = 0; i < 3; ++i) {
        for (int j = 0; j < 3; ++j) {
            code |= (arr[i][j] << (i * 3 + j));
        }
    }
    return code;
}

// 应用查找表进行形态学操作
void bwlookup(int input[HEIGHT][WIDTH], int output[HEIGHT][WIDTH], int lut[512]) {
    int extendedInput[HEIGHT + 2][WIDTH + 2] = {0}; // 扩展后的输入数组,初始化为零
    int neighborhood[3][3];

    // 将原始输入复制到扩展后的数组中
    for (int y = 0; y < HEIGHT; ++y) {
        for (int x = 0; x < WIDTH; ++x) {
            extendedInput[y + 1][x + 1] = input[y][x];
        }
    }

    // 对扩展后的数组应用形态学操作
    for (int y = 1; y < HEIGHT + 1; ++y) {
        for (int x = 1; x < WIDTH + 1; ++x) {
            // 提取 3x3 邻域
            for (int i = -1; i <= 1; ++i) {
                for (int j = -1; j <= 1; ++j) {
                    neighborhood[i + 1][j + 1] = extendedInput[y + i][x + j];
                }
            }

            // 使用查找表进行转换
            int code = encodeNeighborhood(neighborhood);
            output[y - 1][x - 1] = lut[code];
        }
    }
}

// 测试函数
int main() {
    int input[HEIGHT][WIDTH] = {
        {0, 0, 0, 0, 0},
        {0, 1, 1, 1, 0},
        {0, 1, 1, 1, 0},
        {0, 1, 1, 1, 0},
        {0, 0, 0, 0, 0}
    };

    int output[HEIGHT][WIDTH] = {0}; // 初始化输出数组
    int lut[512]; // 查找表

    // 初始化查找表 (这里假设查找表已定义)
    for (int i = 0; i < 512; ++i) {
        lut[i] = 1; // 这里只是一个示例,你应该根据实际需求初始化查找表
    }

    // 应用形态学操作
    bwlookup(input, output, lut);

    // 打印输出
    printf("输出:\n");
    for (int y = 0; y < HEIGHT; ++y) {
        for (int x = 0; x < WIDTH; ++x) {
            printf("%d ", output[y][x]);
        }
        printf("\n");
    }

    return 0;
}