耗时一个月开发的OJ在线判题系统,文末有项目地址,目前还在更新代码~
今天我们来开发绝大部分前端页面以及相关组件,狠狠的打导员小黑子的脸
文章目录
要开发的页面:
1)用户注册页面
2)创建题目页面(管理员)
3)题目管理页面(管理员)
- 查看
- 删除
- 修改
- 快捷创建
4)题目列表页(用户)
5)题目详情页(在线做题页)
6)题目提交列表页
扩展:提交统计页,用户个人页
1、接入需要的组件
先接入可能用到的组件,再去写页面,避免因为后续依赖冲突,整合组件失败带来的返工。
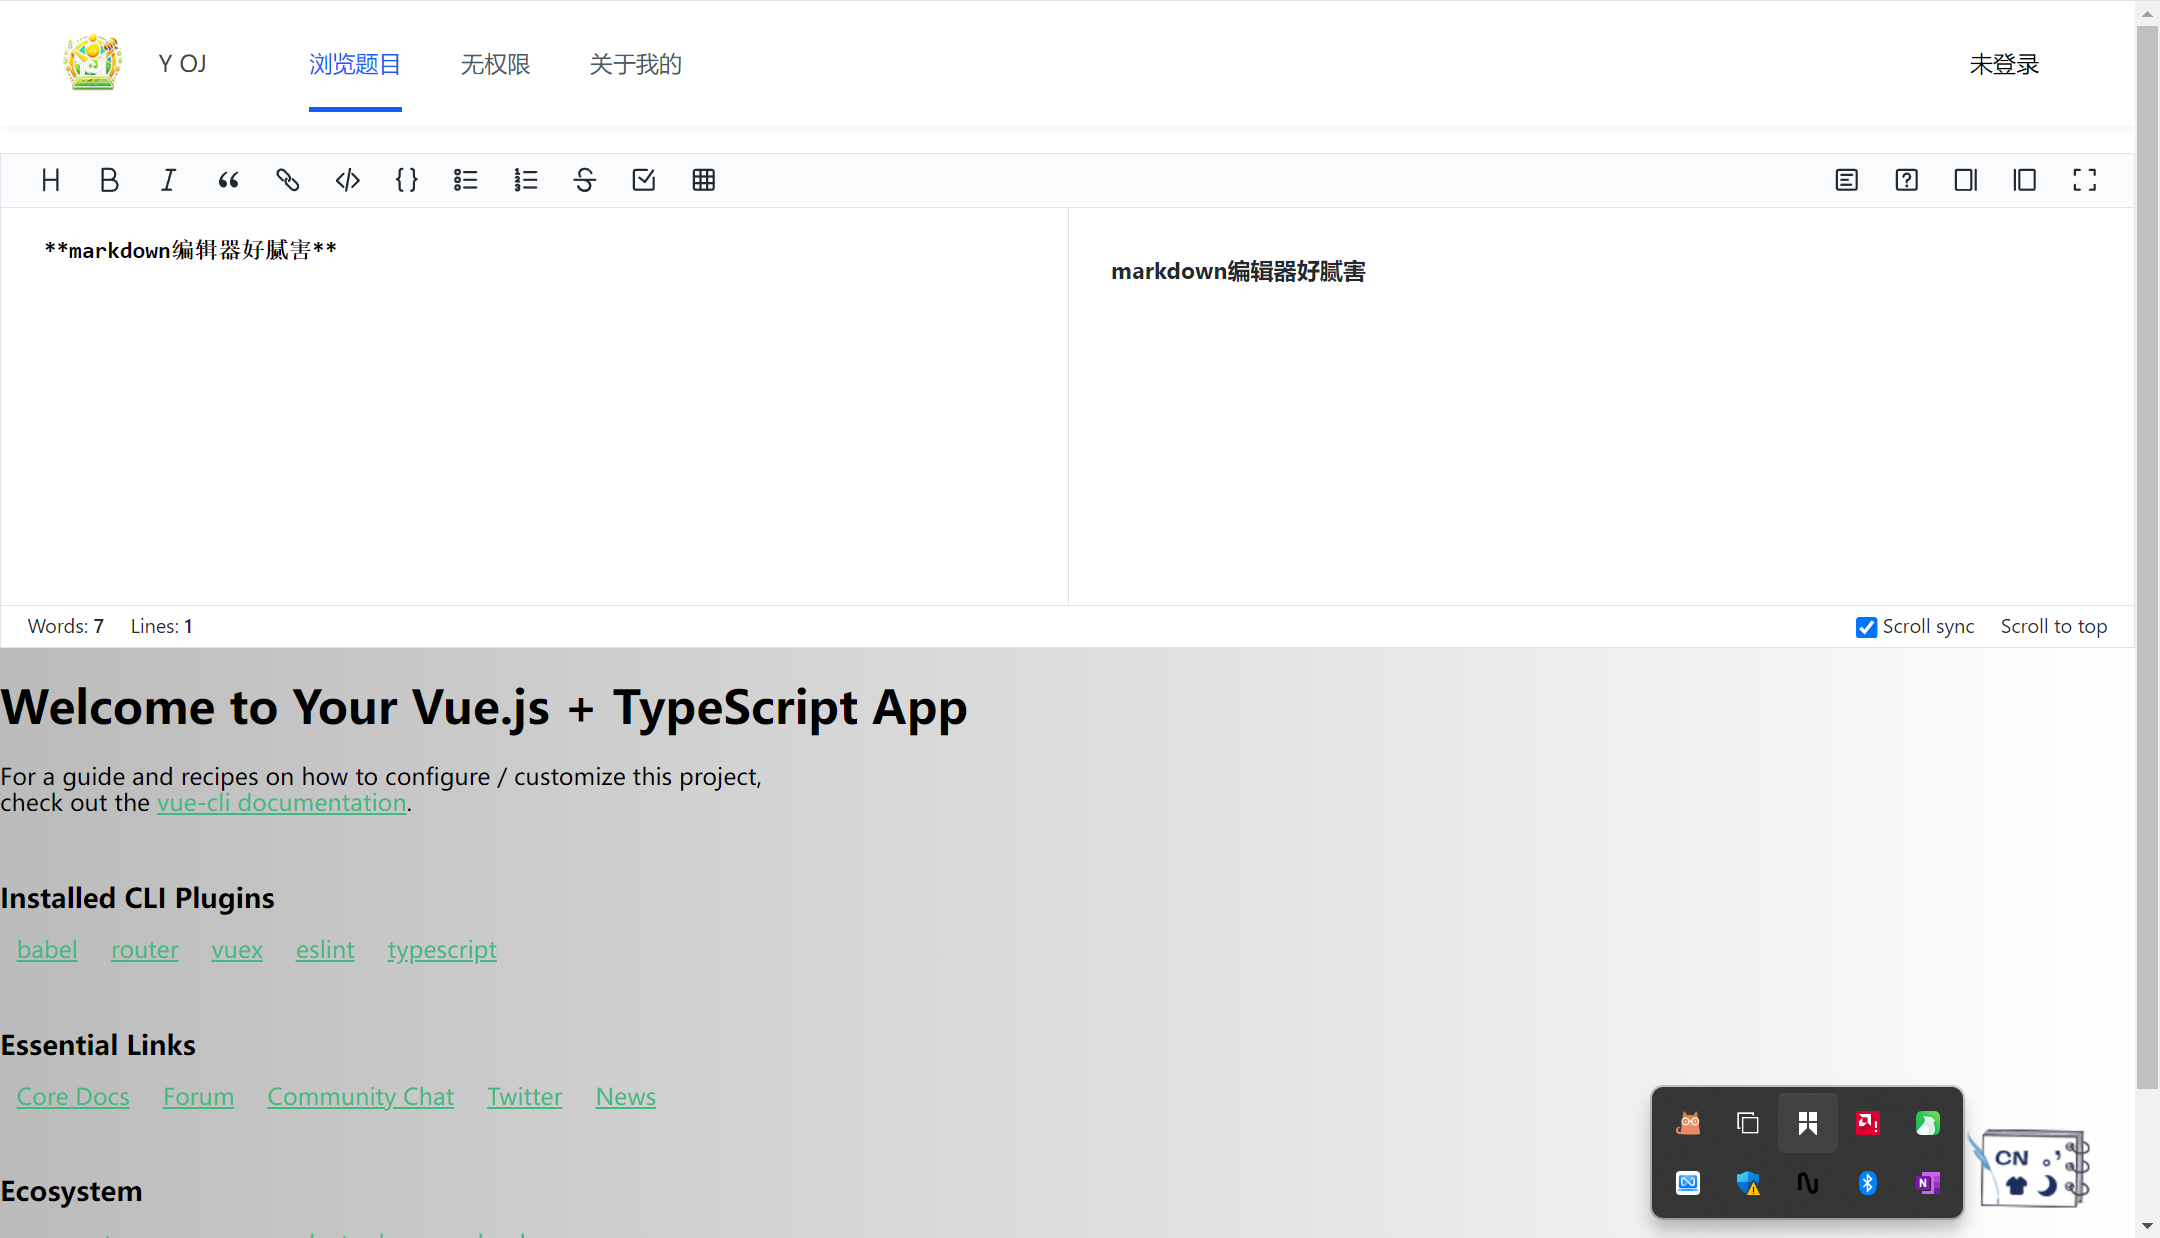
整合Markdown编辑器
为什么用Markdown?
一套通用的文本编辑语法,可以在各大网站上统一标准,渲染出统一的样式,比较简单易学
推荐的Md编辑器组件:https://github.com/bytedance/bytemd
1、下载编辑器及gfm(表格支持)插件,highlight(代码高亮)插件
bash
npm i @bytemd/vue-next
npm i @bytemd/plugin-highlight @bytemd/plugin-gfm
2、main.ts中引入全局样式
vue
import "bytemd/dist/index.css";3、新建MdEditor组件类,编写代码
vue
template>
  <Editor :value="value" :plugins="plugins" @change="handleChange" />
  </template>

    <script setup lang="ts">
  import gfm from "@bytemd/plugin-gfm";
  import highlight from "@bytemd/plugin-highlight";
  import { Editor, Viewer } from "@bytemd/vue-next";
  import { ref } from "vue";

  const plugins = [
    gfm(),
    highlight(),
    // Add more plugins here
  ];

  const value = ref("");

  const handleChange = (v: string) => {
    value.value = v;
  };
</script>

<style scoped></style>
4、隐藏编辑器中不需要的操作图标(比如GitHub图标)
在父组件的style中写
vue
.bytemd-toolbar-icon.bytemd-tippy.bytemd-tippy-right:last-child {
    display: none;
}
5、要把MdEditor当前输入的值暴露给父组件,便于父组件使用,同时也是提高组件的通用性,需要定义属性,把value和handleChange事件交给父组件去管理
这里是父组件传值给子组件吧
MdEditor修改代码:
vue
<template>
  <Editor
    :value="value"
    :mode="mode"
    :plugins="plugins"
    @change="handleChange"
  />
</template>
<script setup lang="ts">
import { Editor, Viewer } from "@bytemd/vue-next";
import gfm from "@bytemd/plugin-gfm";
import highlight from "@bytemd/plugin-highlight";
const plugins = [
  gfm(),
  highlight(),
  // Add more plugins here
];
/**
 * 定义组件属性类型
 */
interface Props {
  value: string;
  mode: string;
  handleChange: (v: string) => void;
}
/**
 * 给组件指定初始值
 */
const props = withDefaults(defineProps<Props>(), {
  value: () => "",
  mode: () => "split",
  handleChange: (v: string) => {
    console.log(v);
  },
});
</script>

<style scoped></style>
引入MdEdit组件的父组件HomeView负责给value和handle-change赋值
vue
<template>
  <div class="home">
    <MdEditor :value="value" :handle-change="onChange" />
    <HelloWorld msg="Welcome to Your Vue.js + TypeScript App" />
  </div>
</template>

<script setup lang="ts">
  import { ref } from "vue";
  import HelloWorld from "@/components/HelloWorld.vue";
  import MdEditor from "@/components/MdEditor.vue";

  const value = ref();

  const onChange = (v: string) => {
    value.value = v;
  };
</script>
<style>
  .bytemd-toolbar-icon.bytemd-tippy.bytemd-tippy-right:last-child {
    display: none;
  }
</style>
6、最终整合效果
整合代码编辑器
微软官方编辑器:https://github.com/microsoft/monaco-editor
官方提供的整合教程(烂):https://github.com/microsoft/monaco-editor/blob/main/docs/integrate-esm.md
1、安装编辑器
2、vue-cli项目(webpack项目)整合monaco-editor
1)先安装monaco-editor-webpack-plugin(https://github.com/microsoft/monaco-editor/blob/main/webpack-plugin/README.md):
vue
npm install monaco-editor-webpack-plugin2)在vue.config.js 中配置webpack插件:
全量加载(我们这里用这个就行):
vue
const { defineConfig } = require("@vue/cli-service");
const MonacoWebpackPlugin = require("monaco-editor-webpack-plugin");

module.exports = defineConfig({
  transpileDependencies: true,
  chainWebpack(config) {
    config.plugin("monaco").use(new MonacoWebpackPlugin());
  },
});
按需加载:
vue
const MonacoWebpackPlugin = require('monaco-editor-webpack-plugin')
module.exports = {
  chainWebpack: config => {
    config.plugin('monaco-editor').use(MonacoWebpackPlugin, [
      {
        // Languages are loaded on demand at runtime
        languages: ['json', 'go', 'css', 'html', 'java', 'javascript', 'less', 'markdown', 'mysql', 'php', 'python', 'scss', 'shell', 'redis', 'sql', 'typescript', 'xml'], // ['abap', 'apex', 'azcli', 'bat', 'cameligo', 'clojure', 'coffee', 'cpp', 'csharp', 'csp', 'css', 'dart', 'dockerfile', 'ecl', 'fsharp', 'go', 'graphql', 'handlebars', 'hcl', 'html', 'ini', 'java', 'javascript', 'json', 'julia', 'kotlin', 'less', 'lexon', 'lua', 'm3', 'markdown', 'mips', 'msdax', 'mysql', 'objective-c', 'pascal', 'pascaligo', 'perl', 'pgsql', 'php', 'postiats', 'powerquery', 'powershell', 'pug', 'python', 'r', 'razor', 'redis', 'redshift', 'restructuredtext', 'ruby', 'rust', 'sb', 'scala', 'scheme', 'scss', 'shell', 'solidity', 'sophia', 'sql', 'st', 'swift', 'systemverilog', 'tcl', 'twig', 'typescript', 'vb', 'xml', 'yaml'],

        features: ['format', 'find', 'contextmenu', 'gotoError', 'gotoLine', 'gotoSymbol', 'hover' , 'documentSymbols'] //['accessibilityHelp', 'anchorSelect', 'bracketMatching', 'caretOperations', 'clipboard', 'codeAction', 'codelens', 'colorPicker', 'comment', 'contextmenu', 'coreCommands', 'cursorUndo', 'dnd', 'documentSymbols', 'find', 'folding', 'fontZoom', 'format', 'gotoError', 'gotoLine', 'gotoSymbol', 'hover', 'iPadShowKeyboard', 'inPlaceReplace', 'indentation', 'inlineHints', 'inspectTokens', 'linesOperations', 'linkedEditing', 'links', 'multicursor', 'parameterHints', 'quickCommand', 'quickHelp', 'quickOutline', 'referenceSearch', 'rename', 'smartSelect', 'snippets', 'suggest', 'toggleHighContrast', 'toggleTabFocusMode', 'transpose', 'unusualLineTerminators', 'viewportSemanticTokens', 'wordHighlighter', 'wordOperations', 'wordPartOperations']
      }
    ])
  }
}
3)如何使用 Monaco Editor?查看示例教程:
https://microsoft.github.io/monaco-editor/playground.html?source=v0.40.0#example-creating-the-editor-hello-world
整合教程参考:http://chart.zhenglinglu.cn/pages/2244bd/#在-vue-中使用
**注意:**monaco editor在读写值的时候,要使用toRaw(编辑器实例) 的语法来执行操作,否则会卡死
示例整合代码:
vue
<template>
  <div id="code-editor" ref="codeEditorRef" style="min-height: 400px" />
</template>

<script setup lang="ts">
import * as monaco from "monaco-editor";
import { onMounted, ref, toRaw } from "vue";

const codeEditorRef = ref();
const codeEditor = ref();
const value = ref("hello world");


onMounted(() => {
  if (!codeEditorRef.value) {
    return;
  }
  // Hover on each property to see its docs!
  codeEditor.value = monaco.editor.create(codeEditorRef.value, {
    value: value.value,
    language: "java",
    automaticLayout: true,
    colorDecorators: true,
    minimap: {
      enabled: true,
    },
    readOnly: false,
    theme: "vs-dark",
    // lineNumbers: "off",
    // roundedSelection: false,
    // scrollBeyondLastLine: false,
  });

  // 编辑 监听内容变化
  codeEditor.value.onDidChangeModelContent(() => {
    console.log("目前内容为:", toRaw(codeEditor.value).getValue());
  });
});
</script>

<style scoped></style>
和Md编辑器一样,也要接收父组件的传值,把显示的输入交给父组件去控制,从而能够让父组件实时得到用户输入的代码:
vue
/**
 * 定义组件属性类型
 */
interface Props {
  value: string;
  handleChange: (v: string) => void;
}

/**
 * 给组件指定初始值
 */
const props = withDefaults(defineProps<Props>(), {
  value: () => "",
  handleChange: (v: string) => {
    console.log(v);
  },
});
在父组件HomeView中引入,并且设置对应的属性值和函数
vue
<template>
  <div class="home">
    <MdEditor :value="Mdvalue" :handle-change="onMdChange" />
    <CodeEditor :value="Codevalue" :handle-change="onCodeChange"/>
    <HelloWorld msg="Welcome to Your Vue.js + TypeScript App" />
  </div>
</template>

<script setup lang="ts">
import { ref } from "vue";
import HelloWorld from "@/components/HelloWorld.vue";
import MdEditor from "@/components/MdEditor.vue";
import CodeEditor from "@/components/CodeEditor.vue";

const Mdvalue = ref();

const onMdChange = (v: string) => {
  Mdvalue.value = v;
};
const Codevalue = ref();

const onCodeChange = (v: string) => {
  Codevalue.value = v;
};
</script>
<style>
.bytemd-toolbar-icon.bytemd-tippy.bytemd-tippy-right:last-child {
  display: none;
}
</style>
3、最终效果

2、页面开发
注意事项
后端接口开发更新完成后,记得要重新根据后端生成前端的请求代码
bash
npx openapi --input http://localhost:8121/api/v2/api-docs --output ./generated --client axios代码重新生成后,记得要再次修改OpenAPI 文件的 CREDENTIALS 参数,应该改为 true。
创建题目页面
使用表单组件,先复制示例代码,再修改:https://arco.design/vue/component/form
此处我们用到了
- 嵌套表单:https://arco.design/vue/component/form#nest
- 动态增减表单:https://arco.design/vue/component/form#dynamic
注意,我们自定义的代码编辑器组件不会被组件库识别,需要手动指定 value 和 handleChange 函数。
需要用户输入的值:
json
{
  "answer": "暴力破解",
  "content": "题目内容",
  "judgeCase": [
    {
      "input": "1 2",
      "output": "3 4"
    }
  ],
  "judgeConfig": {
    "memoryLimit": 1000,
    "stackLimit": 1000,
    "timeLimit": 1000
  },
  "tags": [
      "栈", "简单"
],
  "title": "A + B"
}
创建路由
坐标:src\router\routes.ts
vue
  {
    path: "/add/question",
    name: "创建题目",
    component: AddQuestionView,
    meta: {
      hideInMenu: true,
    },
  },
开发页面
坐标:src\views\question\AddQuestionView.vue
vue
<template>
<div id="addQuestionView">
<h2>创建题目</h2>
<a-form :model="form" label-align="left">
<a-form-item field="title" label="标题">
<a-input v-model="form.title" placeholder="请输入标题" />
</a-form-item>
<a-form-item field="tags" label="标签">
<a-input-tag v-model="form.tags" placeholder="请选择标签" allow-clear />
</a-form-item>
<a-form-item field="content" label="题目内容">
<MdEditor :value="form.content" :handle-change="onContentChange" />
</a-form-item>
<a-form-item field="answer" label="答案">
<MdEditor :value="form.answer" :handle-change="onAnswerChange" />
</a-form-item>
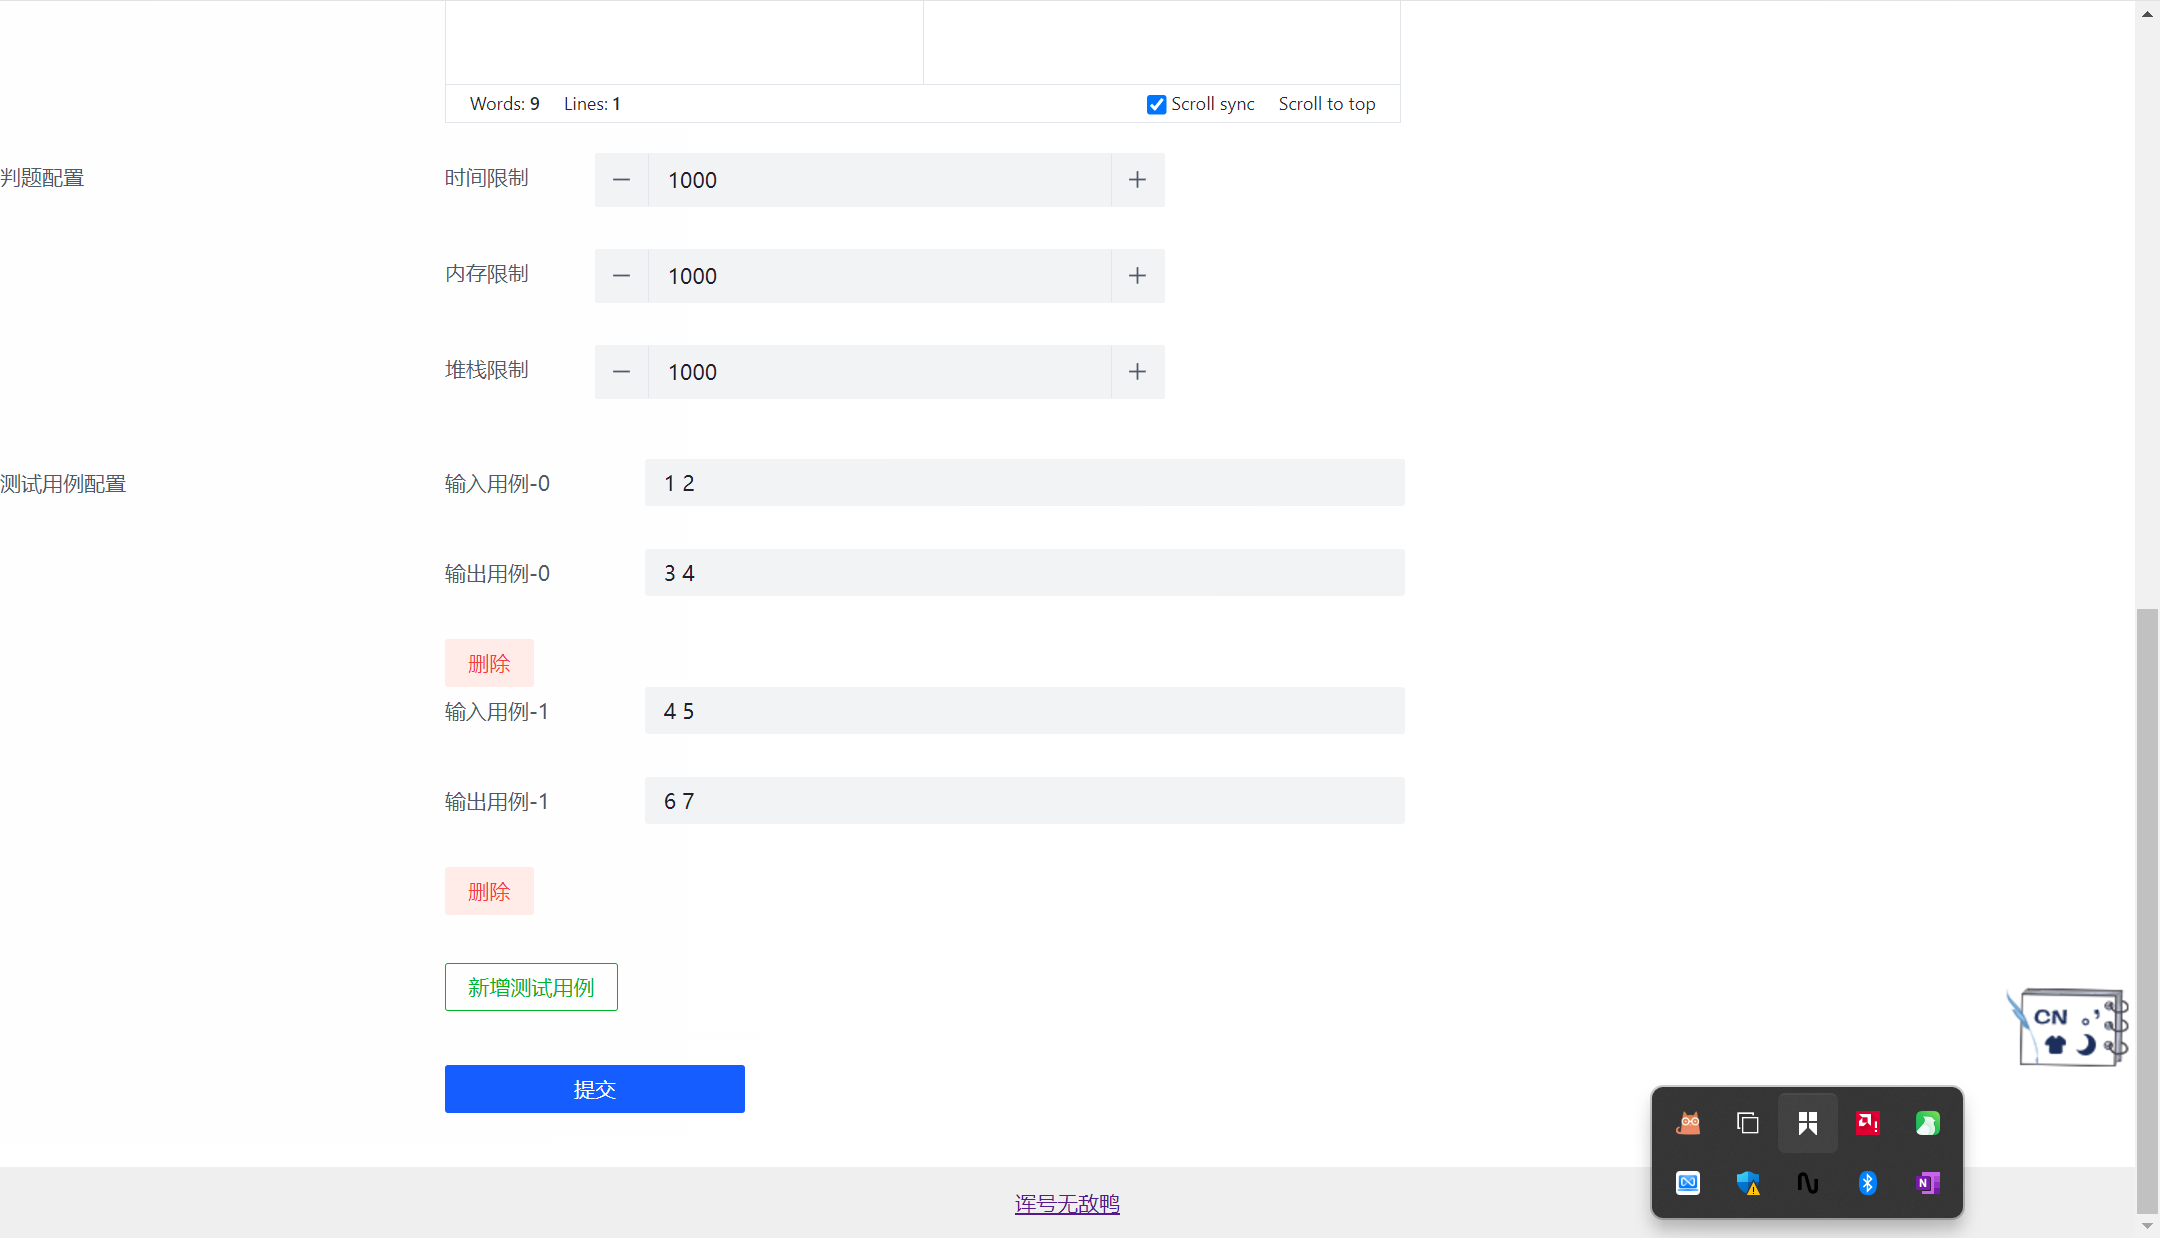
<a-form-item label="判题配置" :content-flex="false" :merge-props="false">
<a-space direction="vertical" style="min-width: 480px">
<a-form-item field="judgeConfig.timeLimit" label="时间限制">
<a-input-number
v-model="form.judgeConfig.timeLimit"
placeholder="请输入时间限制"
mode="button"
min="0"
size="large"
/>
</a-form-item>
<a-form-item field="judgeConfig.memoryLimit" label="内存限制">
<a-input-number
v-model="form.judgeConfig.memoryLimit"
placeholder="请输入内存限制"
mode="button"
min="0"
size="large"
/>
</a-form-item>
<a-form-item field="judgeConfig.stackLimit" label="堆栈限制">
<a-input-number
v-model="form.judgeConfig.stackLimit"
placeholder="请输入堆栈限制"
mode="button"
min="0"
size="large"
/>
</a-form-item>
</a-space>
</a-form-item>
<a-form-item
label="测试用例配置"
:content-flex="false"
:merge-props="false"
>
<a-form-item
v-for="(judgeCaseItem, index) of form.judgeCase"
:key="index"
no-style
>
<a-space direction="vertical" style="min-width: 640px">
<a-form-item
:field="`form.judgeCase[${index}].input`"
:label="`输入用例-${index}`"
:key="index"
>
<a-input
v-model="judgeCaseItem.input"
placeholder="请输入测试输入用例"
/>
</a-form-item>
<a-form-item
:field="`form.judgeCase[${index}].output`"
:label="`输出用例-${index}`"
:key="index"
>
<a-input
v-model="judgeCaseItem.output"
placeholder="请输入测试输出用例"
/>
</a-form-item>
<a-button status="danger" @click="handleDelete(index)">
删除
</a-button>
</a-space>
</a-form-item>
<div style="margin-top: 32px">
<a-button @click="handleAdd" type="outline" status="success"
>新增测试用例
</a-button>
</div>
</a-form-item>
<div style="margin-top: 16px" />
<a-form-item>
<a-button type="primary" style="min-width: 200px" @click="doSubmit"
>提交
</a-button>
</a-form-item>
</a-form>
</div>
</template>
<script setup lang="ts">
import { reactive } from "vue";
import MdEditor from "@/components/MdEditor.vue";
import CodeEditor from "@/components/CodeEditor.vue";
import { QuestionControllerService } from "../../../generated";
import message from "@arco-design/web-vue/es/message";
const form = reactive({
tags: ["栈", "简单"],
title: "A + B",
answer: "请输入题目答案代码",
content: "请输入题目内容",
judgeCase: [
{
input: "1 2",
output: "3 4",
},
],
judgeConfig: {
memoryLimit: 1000,
stackLimit: 1000,
timeLimit: 1000,
},
});
//新增判题用例
const handleAdd = () => {
form.judgeCase.push({
input: "",
output: "",
});
};
//删除判题用例
const handleDelete = (index: number) => {
form.judgeCase.splice(index, 1);
};
const onAnswerChange = (value:string) => {
form.answer = value;
};
const onContentChange = (value:string) => {
form.content = value;
};
const doSubmit = async () => {
const res = await QuestionControllerService.addQuestionUsingPost(form);
if(res.code === 0){
message.success("创建成功");
}else{
message.error("创建失败");
}
}
</script>
<style scoped>
#addQuestionView {
}
</style>页面效果

题目管理页面
1)使用表格组件:https://arco.design/vue/component/table#custom
2)查询后端数据
3)定义表格列
4)加载数据
5)调整格式
比如json格式不好看,有两种方法调整:
- 使用组件库自带的语法,自动格式化(更方便)
- 完全自定义渲染,想展示什么就展示什么(更灵活)
6)添加删除和更新功能
删除后要执行loadData刷新数据
坐标:src\views\question\ManageQuestionView.vue
vue
<template>
  <div id="manageQuestionView">
    <h1>题目管理</h1>

    <a-table
      :ref="tableRef"
      :columns="columns"
      :data="dataList"
      :pagination="{
        pageSize: searchParams.pageSize,
        current: searchParams.pageNum,
        total: total,
        showTotal: true,
      }"
    >
      <template #optional="{ record }">
        <a-space>
          <a-button type="primary" @click="doUpdate(record)">修改</a-button>
          <a-button status="danger" @click="doDelete(record)">刪除</a-button>
        </a-space>
      </template>
    </a-table>
  </div>
</template>

<script setup lang="ts">
import { onMounted, ref } from "vue";
import { Question, QuestionControllerService } from "../../../generated";
import message from "@arco-design/web-vue/es/message";
import { useRouter } from "vue-router";
const dataList = ref([]);
const total = ref(0);
const tableRef = ref();
const searchParams = ref({
  pageSize: 10,
  pageNum: 1,
});
const loadData = async () => {
  const res = await QuestionControllerService.listQuestionByPageUsingPost(
    searchParams.value
  );
  if (res.code === 0) {
    dataList.value = res.data.records;
    total.value = res.data.total;
  } else {
    message.error("加载失败," + res.message);
  }
};
//页面加载时请求数据
onMounted(() => {
  loadData();
});

const doDelete = async (question: Question) => {
  const res = await QuestionControllerService.deleteQuestionUsingPost({
    id: question.id,
  });
  if (res.code === 0) {
    message.success("删除成功");
    //自动更新表格中的数据
    loadData();
  } else {
    message.error("删除失败");
  }
};
//更新数据
const router = useRouter();
const doUpdate = (question: Question) => {
  router.push({
    path: "/update/question",
    query: {
      id: question.id,
    },
  });
};
const columns = [
  {
    title: "id",
    dataIndex: "id",
  },
  {
    title: "标题",
    dataIndex: "title",
  },
  {
    title: "内容",
    dataIndex: "content",
  },
  {
    title: "标签",
    dataIndex: "tags",
  },
  {
    title: "答案",
    dataIndex: "answer",
  },
  {
    title: "提交数",
    dataIndex: "submitNum",
  },
  {
    title: "通过数",
    dataIndex: "acceptedNum",
  },
  {
    title: "判题配置",
    dataIndex: "judgeConfig",
  },
  {
    title: "判题用例",
    dataIndex: "judgeCase",
  },
  {
    title: "用户id",
    dataIndex: "userId",
  },
  {
    title: "创建时间",
    dataIndex: "createTime",
  },
  {
    title: "操作",
    slotName: "optional",
  },
];
</script>

<style scoped>
#manageQuestionView {
}
</style>
更新题目页面
策略:由于更新和创建都是相同的表单,所以完全没必要开发 / 复制 2 遍,可以直接复用创建页面。
关键实现:如何区分两个页面?
- 路由(/add/question 和 /update/question)
- 请求参数(id = 1)
更新页面相比于创建页面,多了 2 个改动:
1)在加载页面时,更新页面需要加载出之前的数据
2)在提交时,请求的接口不同
坐标:src\views\question\AddQuestionView.vue
vue
<template>
  <div id="addQuestionView">
    <a-form :model="form" label-align="left">
      <a-form-item field="title" label="标题">
        <a-input v-model="form.title" placeholder="请输入标题" />
      </a-form-item>
      <a-form-item field="tags" label="标签">
        <a-input-tag v-model="form.tags" placeholder="请选择标签" allow-clear />
      </a-form-item>
      <a-form-item field="content" label="题目内容">
        <MdEditor :value="form.content" :handle-change="onContentChange" />
      </a-form-item>
      <a-form-item field="answer" label="答案">
        <MdEditor :value="form.answer" :handle-change="onAnswerChange" />
      </a-form-item>
      <a-form-item label="判题配置" :content-flex="false" :merge-props="false">
        <a-space direction="vertical" style="min-width: 480px">
          <a-form-item field="judgeConfig.timeLimit" label="时间限制">
            <a-input-number
              v-model="form.judgeConfig.timeLimit"
              placeholder="请输入时间限制"
              mode="button"
              min="0"
              size="large"
            />
          </a-form-item>
          <a-form-item field="judgeConfig.memoryLimit" label="内存限制">
            <a-input-number
              v-model="form.judgeConfig.memoryLimit"
              placeholder="请输入内存限制"
              mode="button"
              min="0"
              size="large"
            />
          </a-form-item>
          <a-form-item field="judgeConfig.stackLimit" label="堆栈限制">
            <a-input-number
              v-model="form.judgeConfig.stackLimit"
              placeholder="请输入堆栈限制"
              mode="button"
              min="0"
              size="large"
            />
          </a-form-item>
        </a-space>
      </a-form-item>
      <a-form-item
        label="测试用例配置"
        :content-flex="false"
        :merge-props="false"
      >
        <a-form-item
          v-for="(judgeCaseItem, index) of form.judgeCase"
          :key="index"
          no-style
        >
          <a-space direction="vertical" style="min-width: 640px">
            <a-form-item
              :field="`form.judgeCase[${index}].input`"
              :label="`输入用例-${index}`"
              :key="index"
            >
              <a-input
                v-model="judgeCaseItem.input"
                placeholder="请输入测试输入用例"
              />
            </a-form-item>
            <a-form-item
              :field="`form.judgeCase[${index}].output`"
              :label="`输出用例-${index}`"
              :key="index"
            >
              <a-input
                v-model="judgeCaseItem.output"
                placeholder="请输入测试输出用例"
              />
            </a-form-item>
            <a-button status="danger" @click="handleDelete(index)">
              删除
            </a-button>
          </a-space>
        </a-form-item>
        <div style="margin-top: 32px">
          <a-button @click="handleAdd" type="outline" status="success"
            >新增测试用例
          </a-button>
        </div>
      </a-form-item>
      <div style="margin-top: 16px" />
      <a-form-item>
        <a-button type="primary" style="min-width: 200px" @click="doSubmit"
          >提交
        </a-button>
      </a-form-item>
    </a-form>
  </div>
</template>

<script setup lang="ts">
import { onMounted, reactive, ref } from "vue";
import MdEditor from "@/components/MdEditor.vue";
import CodeEditor from "@/components/CodeEditor.vue";
import {
  QuestionAddRequest,
  QuestionControllerService,
} from "../../../generated";
import message from "@arco-design/web-vue/es/message";
import { useRoute } from "vue-router";
const route = useRoute();
//如果页面路由地址包含update,视为更新页面
const updatePage = route.path.includes("update");
//根据题目id获取老的数据
const loadData = async () => {
  const id = route.query.id;
  if (!id) {
    return;
  }
  const res = await QuestionControllerService.getQuestionByIdUsingGet(
    id as any
  );
  if (res.code === 0) {
    form.value = res.data as any;
    if (!form.value.judgeCase) {
      form.value.judgeCase = [
        {
          input: "",
          output: "",
        },
      ];
    } else {
      form.value.judgeCase = JSON.parse(form.value.judgeCase as any);
    }
    if (!form.value.judgeConfig) {
      form.value.judgeConfig = {
        memoryLimit: 1000,
        stackLimit: 1000,
        timeLimit: 1000,
      };
    } else {
      form.value.judgeConfig = JSON.parse(form.value.judgeConfig as any);
    }
    if (!form.value.tags) {
      form.value.tags = [];
    } else {
      //json转js对象
      form.value.tags = JSON.parse(form.value.tags as any);
    }
  } else {
    message.error("更新失败");
  }
};
onMounted(() => {
  loadData();
});
let form = ref({
  tags: [],
  title: "",
  answer: "",
  content: "",
  judgeCase: [
    {
      input: "",
      output: "",
    },
  ],
  judgeConfig: {
    memoryLimit: 1000,
    stackLimit: 1000,
    timeLimit: 1000,
  },
});
//新增判题用例
const handleAdd = () => {
  form.value.judgeCase.push({
    input: "",
    output: "",
  });
};
//删除判题用例
const handleDelete = (index: number) => {
  form.value.judgeCase.splice(index, 1);
};

const onAnswerChange = (value: string) => {
  form.value.answer = value;
};

const onContentChange = (value: string) => {
  form.value.content = value;
};

const doSubmit = async () => {
  if (updatePage) {
    const res = await QuestionControllerService.updateQuestionUsingPost(
      form.value
    );
    if (res.code === 0) {
      message.success("创建成功");
    } else {
      message.error("创建失败");
    }
  }
};
</script>

<style scoped>
#addQuestionView {
}
</style>
代码优化
1)先处理菜单项的权限控制和显示隐藏
通过 meta.hideInMenu 和 meta.access 属性控制
2)管理页面分页问题的修复
todo 可以参考聚合搜索项目的搜索条件改变和 url 状态同步
核心原理:在分页页号改变时,触发 @page-change 事件,通过改变 searchParams 的值,并且通过 watchEffect 监听 searchParams 的改变(然后执行 loadData 重新加载速度),实现了页号变化时触发数据的重新加载。
vue
const OnPageChange = (page:number) => {
searchParams.value = {
  ...searchParams.value,
  current: page,
}
};
  //记得在使用loadData前要先初始化loadData
watchEffect(() => {
  loadData();
})
3)修复刷新页面未登录问题
修改 access\index.ts 中的获取登录用户信息,把登录后的信息更新到 loginUser 变量上
vue
if (!loginUser || !loginUser.userRole) {
  // 加 await 是为了等用户登录成功之后,再执行后续的代码
  await store.dispatch("user/getLoginUser");
  loginUser = store.state.user.loginUser;
}
题目列表搜索页面
核心实现:表格组件
步骤 :
1)复制管理题目页的表格
2)只保留需要的columns字段
3)自定义表格列的渲染
标签:使用tag组件
通过率:自行计算
创建时间:使用moment库进行格式化:https://momentjs.com/docs/#/displaying/format/
安装:
bash
npm install moment使用:
vue
//记得先引入
moment(record.createTime).format("YYYY-MM-DD")
操作按钮:补充跳转到做题页的按钮
4)编写搜索表单,使用form的layout=inline布局,让用户的输入和searchParams同步,并且给提交按钮绑定修改searchParams,从而被watchEffect监听到,触发查询
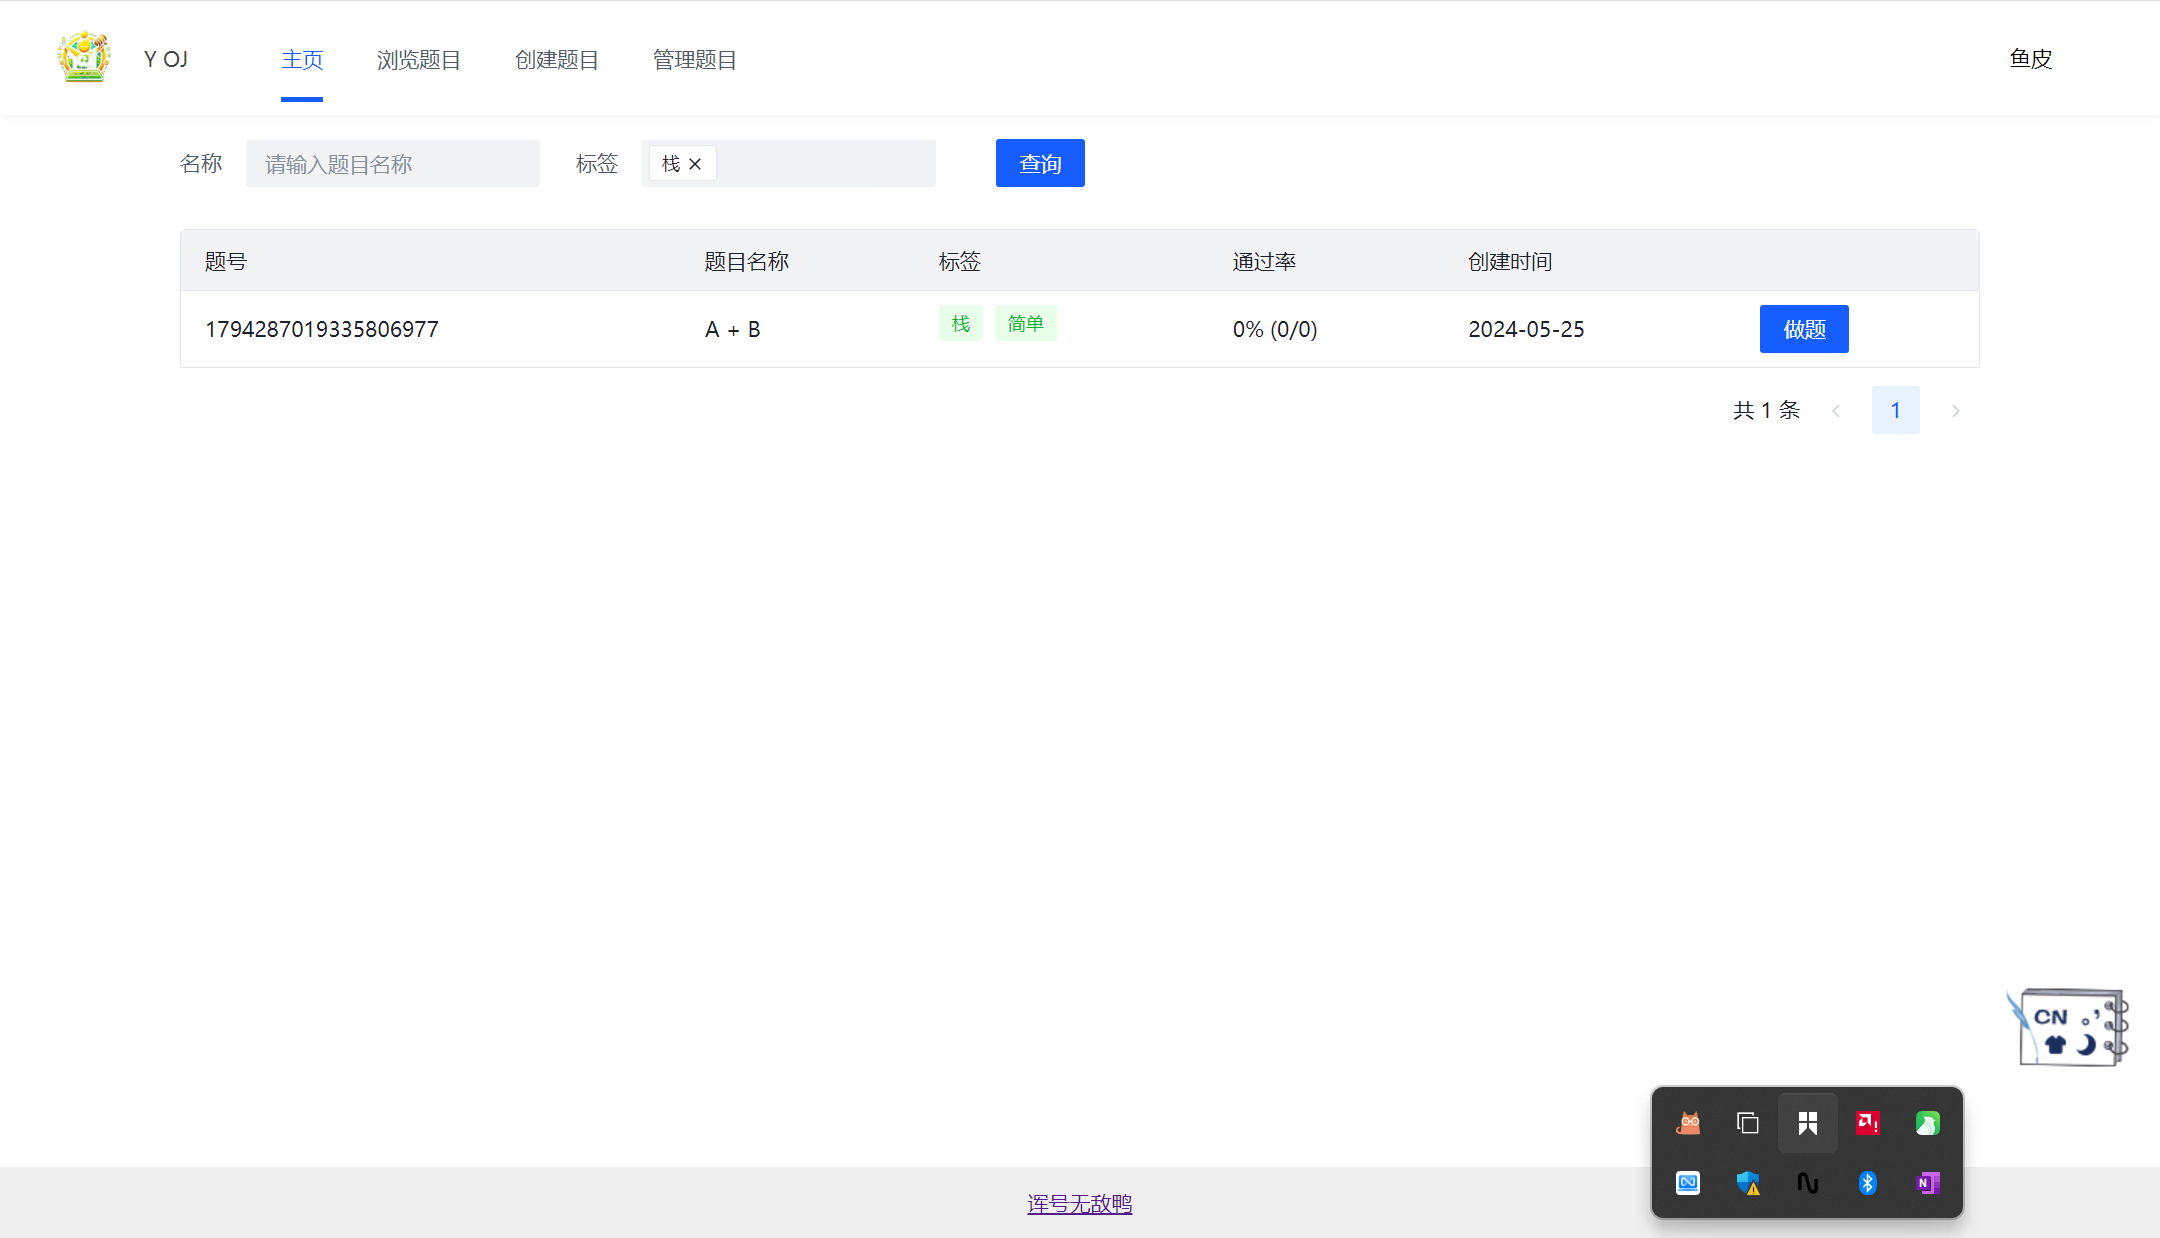
坐标:src\views\question\QuestionsView.vue
vue
<template>
  <div id="QuestionsView">
    <a-form :model="searchParams" layout="inline">
      <a-form-item field="title" label="名称" style="min-width: 240px">
        <a-input v-model="searchParams.title" placeholder="请输入题目名称" />
      </a-form-item>
      <a-form-item field="tags" label="标签" style="min-width: 240px">
        <a-input-tag v-model="searchParams.tags" placeholder="请输入题目标签" />
      </a-form-item>
      <a-form-item>
        <a-button type="primary" @click="doSubmit">查询</a-button>
      </a-form-item>
    </a-form>
    <a-divider size="0" />
    <a-table
      :ref="tableRef"
      :columns="columns"
      :data="dataList"
      :pagination="{
        pageSize: searchParams.pageSize,
        current: searchParams.current,
        total: total,
        showTotal: true,
      }"
      @page-change="OnPageChange"
    >
      <template #tags="{ record }">
        <a-space wrap>
          <a-tag
            v-for="(tag, index) of record.tags"
            :key="index"
            color="green"
            >{{ tag }}</a-tag
          >
        </a-space>
      </template>
      <template #acceptedRate="{ record }">
        {{
          `${
            record.submitNum ? record.acceptedNum / record.submitNum : "0"
          }% (${record.acceptedNum}/${record.submitNum})`
        }}
      </template>
      <template #createTime="{ record }">
        {{ moment(record.createTime).format("YYYY-MM-DD") }}
      </template>
      <template #optional="{ record }">
        <a-space>
          <a-button type="primary" @click="toQuestionPage(record)"
            >做题</a-button
          >
        </a-space>
      </template>
    </a-table>
  </div>
</template>

<script setup lang="ts">
import { onMounted, ref, watchEffect } from "vue";
import {
  Question,
  QuestionControllerService,
  QuestionQueryRequest,
} from "../../../generated";
import message from "@arco-design/web-vue/es/message";
import { useRouter } from "vue-router";
import moment from "moment";
const dataList = ref([]);
const total = ref(0);
const tableRef = ref();
const searchParams = ref<QuestionQueryRequest>({
  title: "",
  tags: [],
  pageSize: 10,
  current: 1,
});
const loadData = async () => {
  const res = await QuestionControllerService.listQuestionVoByPageUsingPost(
    searchParams.value
  );
  if (res.code === 0) {
    dataList.value = res.data.records;
    total.value = res.data.total;
  } else {
    message.error("加载失败," + res.message);
  }
};

watchEffect(() => {
  loadData();
});
//页面加载时请求数据
onMounted(() => {
  loadData();
});
const columns = [
  {
    title: "题号",
    dataIndex: "id",
  },
  {
    title: "题目名称",
    dataIndex: "title",
  },
  {
    title: "标签",
    slotName: "tags",
  },
  {
    title: "通过率",
    slotName: "acceptedRate",
  },
  {
    title: "创建时间",
    slotName: "createTime",
  },
  {
    slotName: "optional",
  },
];
const OnPageChange = (page: number) => {
  searchParams.value = {
    ...searchParams.value,
    current: page,
  };
  loadData();
};

//更新数据
const router = useRouter();
//跳转到做题页
const toQuestionPage = (question: Question) => {
  router.push({
    path: `/view/question/${question.id}`,
  });
};
//执行查询
const doSubmit = () => {
  //重置搜索页面
  searchParams.value = {
    ...searchParams.value,
    current: 1,
  };
};
</script>

<style scoped>
#QuestionsView {
  max-width: 1200px;
  margin: 0 auto;
}
</style>
最终效果:
题目浏览页面
1)先定义动态路由参数,开启props为true,可以在页面的 props 中直接获取到动态参数(题目id)
vue
  {
    path: "/view/question/:id",
    name: "在线做题",
    component: ViewQuestionView,
    props: true,
    meta: {
      access: ACCESS_ENUM.USER,
      hideInMenu: true,
    },
  },
2)定义布局:左侧是题目信息,右侧是代码编辑器
3)左侧题目信息:
- tabs 切换展示的内容
- 定义 MdViewer 组件展示题目内容
- 使用descriptions 组件展示判题配置 https://arco.design/vue/component/descriptions
4)使用select组件让用户选择编程语言
在代码编辑器中监听属性的变化,注意监听props要使用箭头函数
https://blog.csdn.net/wuyxinu/article/details/124477647
todo 代码编辑器没有更改语言
坐标:src\views\question\ViewQuestionView.vue
vue
<template>
  <div id="viewQuestionsView" :gutter="[24, 24]">
    <a-row>
      <a-col :md="12" :xs="24">
        <a-tabs default-active-key="question">
          <a-tab-pane key="question" title="題目">
            <a-card v-if="question" :title="question.title">
              <a-space direction="vertical" size="large" fill>
                <a-descriptions
                  title="判题条件"
                  :column="{ xs: 1, md: 2, lg: 3 }"
                >
                  <a-descriptions-item label="时间限制">
                    {{ question.judgeConfig?.timeLimit ?? 0 }}
                  </a-descriptions-item>
                  <a-descriptions-item label="内存限制">
                    {{ question.judgeConfig?.memoryLimit ?? 0 }}
                  </a-descriptions-item>
                  <a-descriptions-item label="堆栈限制">
                    {{ question.judgeConfig?.stackLimit ?? 0 }}
                  </a-descriptions-item>
                </a-descriptions>
              </a-space>
              <MdViewer :value="question.content || ''" />
              <template #extra>
                <a-space wrap>
                  <a-tag
                    v-for="(tag, index) of question.tags"
                    :key="index"
                    color="green"
                    >{{ tag }}</a-tag
                  >
                </a-space>
              </template>
            </a-card>
          </a-tab-pane>
          <a-tab-pane key="comment" title="评论"> 评论区 </a-tab-pane>
          <a-tab-pane key="answer" title="题解"> 暂时无题解 </a-tab-pane>
        </a-tabs>
      </a-col>
      <a-col :md="12" :xs="24">
        <a-form :model="form" layout="inline">
          <a-form-item
            field="language"
            label="编程语言"
            style="min-width: 240px"
          >
            <a-select
              v-model="form.language"
              :style="{ width: '320px' }"
              placeholder="选择编程语言"
            >
              <a-option>java</a-option>
              <a-option>cpp</a-option>
              <a-option>go</a-option>
            </a-select>
          </a-form-item>
        </a-form>

        <CodeEditor
          :value="form.code as string"
          :language="form.language"
          :handle-change="changeCode"
        />
        <a-divider size="0" />
        <a-button type="primary" style="min-width: 200px" @click="doSubmit"
          >提交</a-button
        >
      </a-col>
    </a-row>
  </div>
</template>

<script setup lang="ts">
import { onMounted, ref } from "vue";
import {
  QuestionControllerService,
  QuestionSubmitControllerService,
  QuestionVO,
  QuestionSubmitAddRequest,
} from "../../../generated";
import message from "@arco-design/web-vue/es/message";
import CodeEditor from "@/components/CodeEditor.vue";
import MdViewer from "@/components/MdViewer.vue";
import { languages } from "monaco-editor/esm/metadata";
interface Props {
  id: string;
}
const props = withDefaults(defineProps<Props>(), {
  id: () => "",
});
const question = ref<QuestionVO>();
const loadData = async () => {
  const res = await QuestionControllerService.getQuestionVoByIdUsingGet(
    props.id as any
  );
  if (res.code === 0) {
    question.value = res.data;
  } else {
    message.error("加载失败," + res.message);
  }
};

const form = ref<QuestionSubmitAddRequest>({
  language: "java",
  code: "",
});
//提交代码
const doSubmit = async () => {
  if (!question.value?.id) {
    return;
  }
  const res = await QuestionSubmitControllerService.doQuestionSubmitUsingPost({
    ...form.value,
    questionId: question.value.id,
  });
  if (res.code === 0) {
    message.success("提交成功");
  } else {
    message.error("提交失败" + res.message);
  }
};
//页面加载时请求数据
onMounted(() => {
  loadData();
});
const changeCode = (value: string) => {
  form.value.code = value;
};
</script>

<style>
#viewQuestionsView {
  max-width: 1400px;
  margin: 0 auto;
}

#viewQuestionsView .arco-space-horizontal .arco-space-item {
  margin-bottom: 0 !important;
}
</style>
坐标:src\components\CodeEditor.vue
vue
<template>
  <div
    id="code-editor"
    ref="codeEditorRef"
    style="min-height: 600px"
    height="70vh"
  />
</template>
<script setup lang="ts">
import * as monaco from "monaco-editor";
import { onMounted, ref, toRaw, watch } from "vue";

const codeEditorRef = ref(); //创建了一个 Monaco Editor 实例。
const codeEditor = ref(); //用于存储 Monaco Editor 实例。
const value = ref("hello world");

/**
 * 定义组件属性类型
 */
interface Props {
  value: string;
  language?: string;
  handleChange: (v: string) => void;
}
/**
 * 给组件指定初始值
 */
const props = withDefaults(defineProps<Props>(), {
  value: () => "",
  language: () => "java",
  handleChange: (v: string) => {
    console.log(v);
  },
});
// watch(
//   () => props.language,
//   () => {
//     codeEditor.value = monaco.editor.create(codeEditorRef.value, {
//       value: value.value,
//       language: props.language,
//       automaticLayout: true,
//       colorDecorators: true,
//       minimap: {
//         enabled: true,
//       },
//       readOnly: false,
//       theme: "vs-dark",
//       // lineNumbers: "off",
//       // roundedSelection: false,
//       // scrollBeyondLastLine: false,
//     });
//   }
// );

onMounted(() => {
  if (!codeEditorRef.value) {
    return;
  }
  codeEditor.value = monaco.editor.create(codeEditorRef.value, {
    value: value.value,
    language: props.language,
    automaticLayout: true,
    colorDecorators: true,
    minimap: {
      enabled: true,
    },
    readOnly: false,
    theme: "vs-dark",
    // lineNumbers: "off",
    // roundedSelection: false,
    // scrollBeyondLastLine: false,
  });
  // 编辑 监听内容变化
  codeEditor.value.onDidChangeModelContent(() => {
    props.handleChange(toRaw(codeEditor.value).getValue());
  });
});
</script>

<style scoped></style>
代码编辑器语言切换失败问题
解决方案:监听language属性,动态更改编辑器的语言
坐标:src\components\CodeEditor.vue
tsx
watch(
  () => props.language,
  () => {
    if (codeEditor.value) {
      monaco.editor.setModelLanguage(
        toRaw(codeEditor.value).getModel(),
        props.language
      );
    }
  }
);
项目地址
(求求大佬们赏个star~)
前端:https://github.com/IMZHEYA/yoj-frontend