- egg-amqplib: 基于 rabbitmq 消息队列封装的库
安装:
npm i egg-amqplib --save引入
// {app_root}/config/plugin.js
exports.amqplib = {
  enable: true,
  package: 'egg-amqplib',
};
设置
// {app_root}/config/config.default.js
exports.amqplib = {
  client: {
    // url: 'amqp://localhost',
    connectOptions: {
      protocol: 'amqp',
      hostname: 'localhost',
      port: 5672,
      username: 'guest',
      password: 'guest',
      locale: 'en_US',
      frameMax: 0,
      heartbeat: 0,
      vhost: '/',
    },
    // socketOptions: {
    //   cert: certificateAsBuffer, // client cert
    //   key: privateKeyAsBuffer, // client key
    //   passphrase: 'MySecretPassword', // passphrase for key
    //   ca: [caCertAsBuffer], // array of trusted CA certs
    // },
  },
};
查看github: https://github.com/zubinzhang/egg-amqplib
控制层:
javascript
'use strict';

const Controller = require('egg').Controller;
const queueName = 'test';

class HomeController extends Controller {
  async publish() {
    const { msg } = this.ctx.query;

    const ch = await this.app.amqplib.createChannel();
    await ch.assertQueue(queueName, { durable: false });
    const ok = await ch.sendToQueue(queueName, Buffer.from(msg));
    await ch.close();

    this.ctx.body = ok;
    this.ctx.status = 200;
  }

  async consume() {
    const ch = await this.app.amqplib.createChannel();
    await ch.assertQueue(queueName, { durable: false });
    const msg = await new Promise(resolve => ch.consume(queueName, msg => resolve(msg)));

    if (msg !== null) {
      ch.ack(msg);
      await ch.close();

      this.ctx.status = 200;
      this.ctx.body = { msg: msg.content.toString() };
    } else {
      this.ctx.status = 500;
    }
  }
}

module.exports = HomeController;
路由:
javascript
'use strict';

module.exports = app => {
  const { router, controller } = app;

  router.get('/publish', controller.home.publish);
  router.get('/consume', controller.home.consume);
};- 安装rabbitmq, 可使用docker安装rabbitmq
javascript
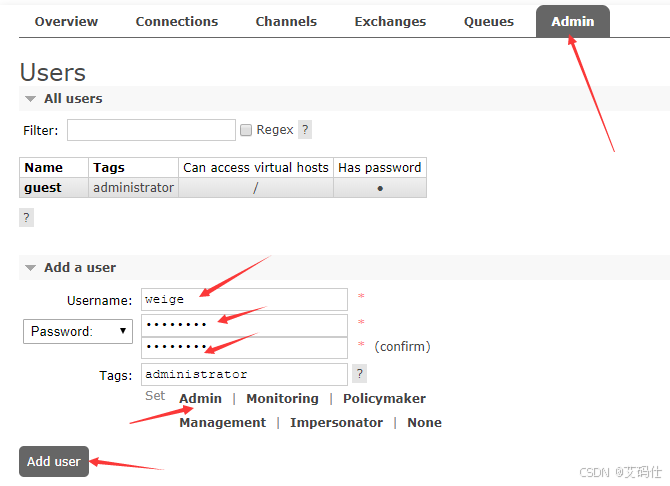
docker run --name rabbitmq -p 5672:567. -p 15672:15672 rabbitmq:3-management访问地址: http://localhost:15672
默认的账号密码是: guest : guest
创建管理员:
- 队列: 一对一
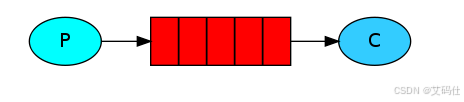
P 是我们的生产者 > 中间的框是一个队列,代表消费者保留的消息缓冲区 > C 是我们的消费者
javascript
'use strict';
const Controller = require('egg').Controller;
/**
 * 一对一队列演示
 */

// 频道名称
const queueName = 'hasone'

class UserController extends Controller {

  // 生成者
  async send() {
    // 1. 获取要发送的消息
    const { msg } = this.ctx.query
    // 2. 创建频道
    const ch = await this.app.amqplib.createChannel();
    // 3. 创建队列 durable 关闭持久化存储
    await ch.assertQueue(queueName, { durable: false }  );
    // 4. 发送消息
    const ok = await ch.sendToQueue(queueName, Buffer.from(msg));
    // 5. 关闭连接
    await ch.close();

    this.ctx.body = ok;
    this.ctx.status = 200;
  }

  // 消费者
  async work() {
    // 1. 创建频道
    const ch = await this.app.amqplib.createChannel();
    // 2. 选择队列
    await ch.assertQueue(queueName, { durable: false });
    //3. 接收队列的消息
    const resultMsg = await new Promise(resolve => ch.consume(queueName, msg => resolve(msg), { noAck: true }));

    // 4. 显示消息内容
    if (resultMsg !== null) {
      ch.ack(resultMsg);
      await ch.close();

      const { content } = resultMsg;
      this.status = 200;
      this.ctx.body = { msg: content.toString() }

    } else {
      this.ctx.body = '队列消费失败'
      this.ctx.status = 500;
    }
  }
}
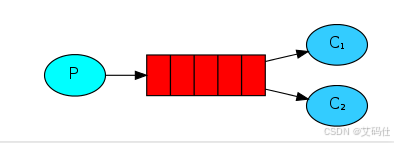
module.exports = UserController;- 队列: 一对多
javascript
'use strict';
const Controller = require('egg').Controller;
/**
 * 队列一对多演示
 * 生产者 ---->  队列 ----> 消费者
*                    ----> 消费者
                     ----> 消费者
 */

// 频道名称
const queueName = 'hasMany'

class UserController extends Controller {

  // 生成者
  async send() {
    const { msg } = this.ctx.query;
    //1. 创建频道
    const ch = await this.app.amqplib.createChannel();
    // 2. 创建队列 开启持久化存储
    await ch.assertQueue(queueName, { durable: true });
    // 3. 发送消息
    let ok = null;
    for(let i=0; i<50; i++) {
      // 此时我们确信即使RabbitMQ重新启动,task_queue队列也不会丢失。现在我们需要将消息标记为持久性 - 通过使用持久性选项Channel.sendToQueue。
      ok = await ch.sendToQueue(queueName, Buffer.from(msg+i), { persistent: true });
    }
    //4. 关闭连接
    await ch.close();

    this.ctx.body = ok;
    this.ctx.status = 200;
  }

  // 消费者
  async work1() {
   // 1. 创建频道
   const ch = await this.app.amqplib.createChannel();
   //2. 选择队列
   await ch.assertQueue(queueName, { durable: true });
   // 3. 接收消息 noAck 关闭消息自动确认模式,需要手动 ack
   const resultMsg = await new Promise(resolve => ch.consume(queueName, msg => {

    setTimeout(() => {
      resolve(msg)
     }, 500)

   }, { noAck: false }) );

   if (resultMsg !== null) {
    const { content } = resultMsg;
     //消费者发回ack(nowledgement)告诉RabbitMQ已收到,处理了特定消息,RabbitMQ可以自由删除它
    ch.ack(resultMsg);
    await ch.close();

    this.ctx.body = { work1: content.toString() };
    this.ctx.status = 200;
   } else {
     this.ctx.body = '消费者1号失败'
     this.ctx.status = 500
   }

  }

  async work2() {
     // 1. 创建频道
   const ch = await this.app.amqplib.createChannel();
   //2. 选择队列 RabbitMQ永远不会丢失我们的队列。为此,我们需要声明它是持久的
   await ch.assertQueue(queueName, { durable: true });
   // 3. 接收消息 noAck 开启自动确认模式
   const resultMsg = await new Promise(resolve => ch.consume(queueName, msg => {
    setTimeout(() => {
      resolve(msg)
     }, 1000)

   }, { noAck: false }) );

   if (resultMsg !== null) {
    const { content } = resultMsg;
    ch.ack(resultMsg);
    await ch.close();

    this.ctx.body = { work2: content.toString() };
    this.ctx.status = 200;
   } else {
     this.ctx.body = '消费者2号失败'
     this.ctx.status = 500
   }
  }

  async work3() {
     // 1. 创建频道
   const ch = await this.app.amqplib.createChannel();
   //2. 选择队列
   await ch.assertQueue(queueName, { durable: true });
   // 3. 接收消息 noAck 开启自动确认模式
   const resultMsg = await new Promise(resolve => ch.consume(queueName, msg => {

    setTimeout(() => {
      resolve(msg)
     }, 1500)


   }, { noAck: false }) );


   if (resultMsg !== null) {
    const { content } = resultMsg;
    //消费者发回ack(nowledgement)告诉RabbitMQ已收到,处理了特定消息,RabbitMQ可以自由删除它
    ch.ack(resultMsg);
    await ch.close();

    this.ctx.body = { work3: content.toString() };
    this.ctx.status = 200;
   } else {
     this.ctx.body = '消费者3号失败'
     this.ctx.status = 500
   }

  }
}

module.exports = UserController;