笔者使用的是STM32MP157的板子
1 怎么写 LED 驱动程序?
详细步骤如下:
① 看原理图确定引脚,确定引脚输出什么电平才能点亮/熄灭 LED
② 看主芯片手册,确定寄存器操作方法:哪些寄存器?哪些位?地址是?
③ 编写驱动:先写框架,再写硬件操作的代码
注意:在芯片手册中确定的寄存器地址被称为物理地址,在 Linux 内核中无法直接使用。
需要使用内核提供的 ioremap 把物理地址映射为虚拟地址,使用虚拟地址。
ioremap 函数的使用:
cpp
#include <asm/io.h>
void __iomem *ioremap(resource_size_t res_cookie, size_t size);
把物理地址 phys_addr 开始的一段空间(大小为 size),映射为虚拟地址;返回值是该段虚拟地址的首地址。
实际上,它是按页(4096 字节)进行映射的,是整页整页地映射的。
假设 phys_addr = 0x10002, size=4, ioremap 的内部实现是:
a) phys_addr 按页取整,得到地址 0x10000
b) size 按页取整,得到 4096
c) 把起始地址 0x10000,大小为 4096 的这一块物理地址空间,映射到虚拟地址空间,
假设得到的虚拟空间起始地址为 0xf0010000
d) 那么 phys_addr = 0x10002 对应的 virt_addr = 0xf0010002
③ 不再使用该段虚拟地址时,要 iounmap(virt_addr):
cpp
void iounmap(volatile void __iomem *cookie);为什么有ioremap,这里解释的很清楚了。
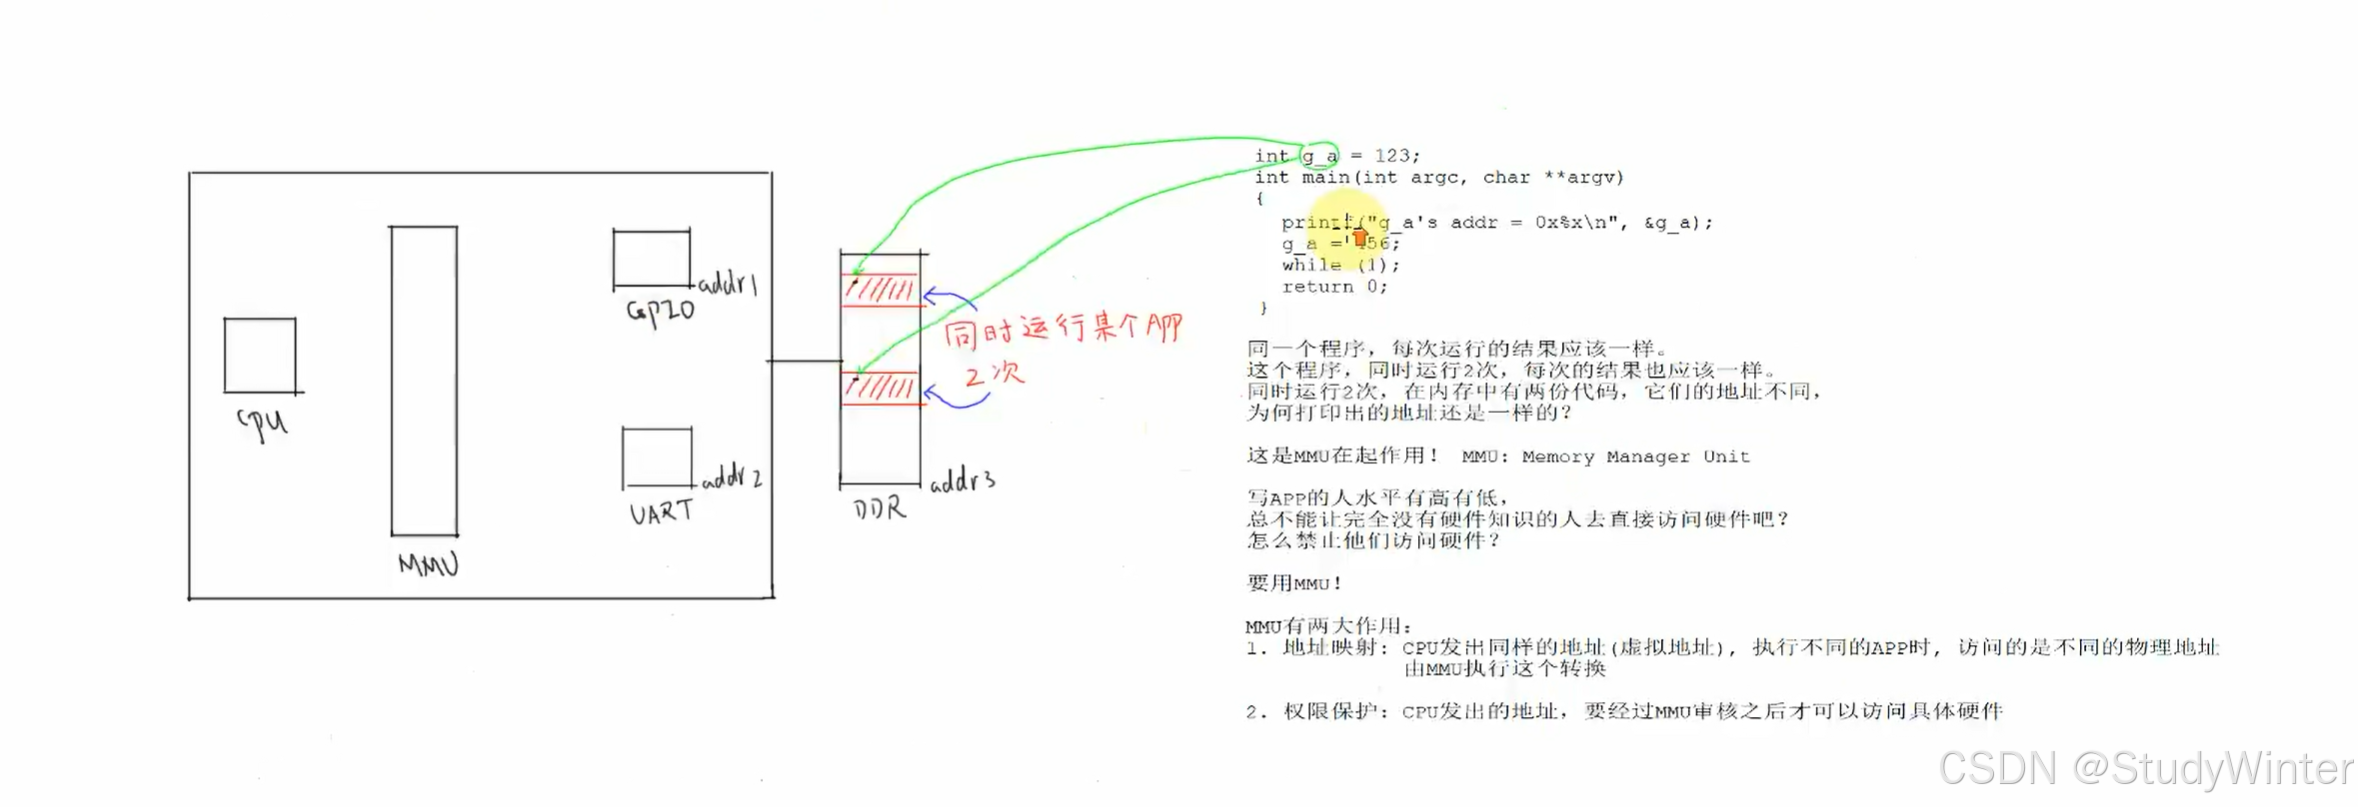
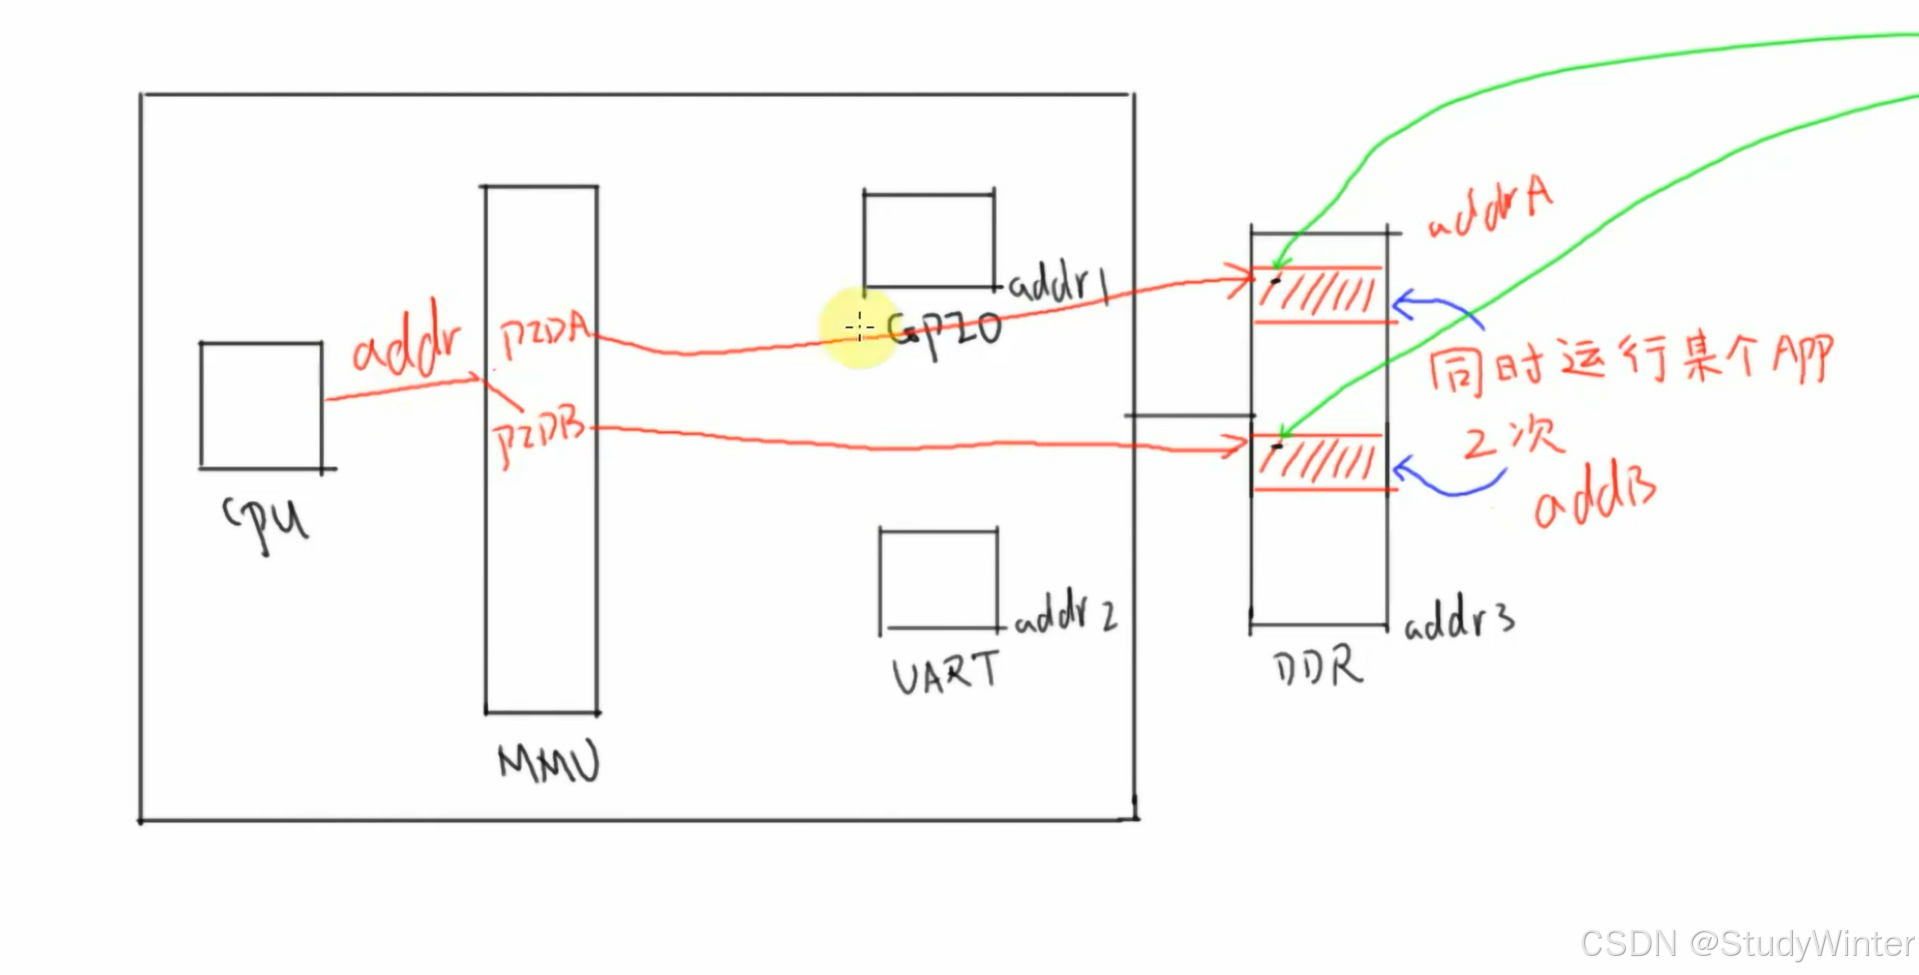
同一个程序,同时运行2次,在内存中有两份代码,他们地址是不同的,但是打印出来的结果是一样的(虚拟地址),主要是MMU(内存管理单元)在起作用,完成物理地址到虚拟地址的转换。
感怪怪的,图中代码是全局变量


根据进程号转换成不同的物理地址。MMU将物理地址映射成虚拟地址,内核通过虚拟地址访问uart等硬件。
2 修改
修改之期的led_operations结构体,由它控制点灯的个数
led_operations.h
cpp
#ifndef LED_OPERATIONS_H
#define LED_OPERATIONS_H

struct led_operations {
	int num;								// 灯的数量
    int (*init) (int which);                // 初始化LED,which是哪一个LED
    int (*ctl) (int which, char status);     // 控制LED,which-哪一个LED,status-1亮,0灭
};

// 返回结构体指针
struct led_operations* get_board_led_operations(void);


#endif
stmp32mp157.c
(主要框架还是board_demo.c的,结合了之前的 韦东山嵌入式linux系列-LED驱动程序-CSDN博客)
cpp
#include <linux/kernel.h>
#include <linux/module.h>
#include <linux/slab.h>
#include <linux/init.h>
#include <linux/fs.h>
#include <linux/delay.h>
#include <linux/poll.h>
#include <linux/mutex.h>
#include <linux/wait.h>
#include <linux/uaccess.h>
#include <asm/io.h>
#include <linux/device.h>

#include "led_operations.h"

// 不能使用物理地址,需要映射
// 1寄存器
// RCC_PLL4CR地址:0x50000000 + 0x894,提供时钟的
static volatile unsigned int* RCC_PLL4CR;

// 2使能GPIOA本身
// RCC_MP_AHB4ENSETR地址:0x50000000 + 0xA28
static volatile unsigned int* RCC_MP_AHB4ENSETR;

// 3设置引脚为输出模式
// GPIOA_MODER地址:0x50002000 + 0x00,设置bit[21:20]=0b01,用于输出模式
static volatile unsigned int* GPIOA_MODER;

// 4设置输出电平
// 方法2:直接写寄存器,一次操作即可,高效
// GPIOA_BSRR地址: 0x50002000 + 0x18
static volatile unsigned int* GPIOA_BSRR;


// init函数-配置引脚,把引脚配置成GPIO输出功能
static int board_demo_led_init(int which)
{
	printk("%s %s line %d, led %d\n", __FILE__, __FUNCTION__, __LINE__, which);
	// 之前没有映射,就映射
	if (!RCC_PLL4CR)
	{
		// 驱动程序访问硬件,必须先ioremap,在这里映射,映射的是一页4k的地址,参考
		// ioremap(base_phy, size);
		// 1寄存器
		// RCC_PLL4CR地址:0x50000000 + 0x894,提供时钟的
		// static volatile unsigned int* RCC_PLL4CR;
		RCC_PLL4CR = ioremap(0x50000000 + 0x894, 4);

		// 2使能GPIOA本身
		// RCC_MP_AHB4ENSETR地址:0x50000000 + 0xA28
		// static volatile unsigned int* RCC_MP_AHB4ENSETR;
		RCC_MP_AHB4ENSETR = ioremap(0x50000000 + 0xA28, 4);

		// 3设置引脚为输出模式
		// GPIOA_MODER地址:0x50002000 + 0x00,设置bit[21:20]=0b01,用于输出模式
		// static volatile unsigned int* GPIOA_MODER;
		GPIOA_MODER = ioremap(0x50002000 + 0x00, 4);


		// 4设置输出电平
		// 方法2:直接写寄存器,一次操作即可,高效
		// GPIOA_BSRR地址: 0x50002000 + 0x18
		// static volatile unsigned int* GPIOA_BSRR;
		GPIOA_BSRR = ioremap(0x50002000 + 0x18, 4);
	}

	// 初始化引脚
	if (which == 0)
	{
		// 使能PLL4,是所有GPIO的时钟
		*RCC_PLL4CR |= (1 << 0);					// 设置bit0为1
		while ((*RCC_PLL4CR & (1 << 1)) == 0);		// 如果bit1一直为0的话,就等待

		// 使能GPIOA
		*RCC_MP_AHB4ENSETR |= (1 << 0); 			// 1左移0位

		// 将GPIOA的第十个引脚配置成GPIO
		// 配置GPIO是输出模式,只有用户程序open的时候,才表示要使用这个引脚,这个时候再配置引脚
		*GPIOA_MODER &= ~(3 << 20); 				// 清零 11左移20位,取反,
		*GPIOA_MODER |= (1 << 20);					// 20位设置成1,配置成01,输出模式
	}

	return 0;
}

// ctl函数-通过参数把引脚设置成高/低电平
static int board_demo_led_ctl(int which, char status)
{
	printk("%s %s line %d, led %d, %s\n",
		__FILE__, __FUNCTION__, __LINE__, which, status ? "on" : "off");
	// 设置高/低电平
	if (which == 0)
	{
		// 设置GPIOA10寄存器1/0
		if (status)
		{
			// 设置led on,让引脚输出低电平
			*GPIOA_BSRR =  (1 << 26);				// 1左移26

		}
		else
		{
			// 设置led off,让引脚输出高电平
			*GPIOA_BSRR =  (1 << 10);				// 1左移10
		}

	}

	return 0;
}

// 加一个num属性
static struct led_operations board_demo_led_operations = {
	.num = 1,
	.init = board_demo_led_init,
	.ctl = board_demo_led_ctl,
};

// 返回结构体
struct led_operations* get_board_led_operations(void)
{
	return &board_demo_led_operations;
}
led_drv.c
cpp
/*************************************************************************
 > File Name: led.drv.c
 > Author: Winter
 > Created Time: Sun 07 Jul 2024 12:35:19 AM EDT
 ************************************************************************/

#include <linux/module.h>

#include <linux/fs.h>
#include <linux/errno.h>
#include <linux/miscdevice.h>
#include <linux/kernel.h>
#include <linux/major.h>
#include <linux/mutex.h>
#include <linux/proc_fs.h>
#include <linux/seq_file.h>
#include <linux/stat.h>
#include <linux/init.h>
#include <linux/device.h>
#include <linux/tty.h>
#include <linux/kmod.h>
#include <linux/gfp.h>
#include "led_operations.h"

// #define LED_NUM 2


// 1确定主设备号,也可以让内核分配
static int major = 0;				// 让内核分配
static struct class *led_class;
struct led_operations* p_led_operations;


#define MIN(a, b) (a < b ? a : b)

// 3 实现对应的 drv_open/drv_read/drv_write 等函数,填入 file_operations 结构体
static ssize_t led_drv_read (struct file *file, char __user *buf, size_t size, loff_t *offset)
{
	printk("%s %s line %d\n", __FILE__, __FUNCTION__, __LINE__);
	return 0;
}

// write(fd, &val, 1);
static ssize_t led_drv_write (struct file *file, const char __user *buf, size_t size, loff_t *offset)
{
	int err;
	char status;
	struct inode* node;
	int minor;
	printk("%s %s line %d\n", __FILE__, __FUNCTION__, __LINE__);
	// 把用户区的数据buf拷贝到内核区status,即向写到内核status中写数据
	err = copy_from_user(&status, buf, 1);
	// 根据次设备号和status控制LED
	node = file_inode(file);
	minor = iminor(node);
	p_led_operations->ctl(minor, status);

	return 1;
}

static int led_drv_open (struct inode *node, struct file *file)
{
	int minor;
	printk("%s %s line %d\n", __FILE__, __FUNCTION__, __LINE__);
	// 得到次设备号
	minor = iminor(node);

	// 根据次设备号初始化LED
	p_led_operations->init(minor);
	return 0;
}

static int led_drv_close (struct inode *node, struct file *file)
{
	printk("%s %s line %d\n", __FILE__, __FUNCTION__, __LINE__);
	return 0;
}


// 2定义自己的 file_operations 结构体
static struct file_operations led_drv = {
	.owner = THIS_MODULE,
	.open = led_drv_open,
	.read = led_drv_read,
	.write = led_drv_write,
	.release = led_drv_close,
};


// 4把 file_operations 结构体告诉内核: register_chrdev
// 5谁来注册驱动程序啊?得有一个入口函数:安装驱动程序时,就会去调用这个入口函数
static int __init led_init(void)
{
	int err, i;
	printk("%s %s line %d\n", __FILE__, __FUNCTION__, __LINE__);
	// 注册led_drv,返回主设备号
	major = register_chrdev(0, "winter_led", &led_drv);  /* /dev/led */
	// 创建class
	led_class = class_create(THIS_MODULE, "led_class");
	err = PTR_ERR(led_class);
	if (IS_ERR(led_class)) {
		printk("%s %s line %d\n", __FILE__, __FUNCTION__, __LINE__);
		unregister_chrdev(major, "led_class");
		return -1;
	}
	// 入口函数获得结构体指针
	p_led_operations = get_board_led_operations();

	// 创建device
	// 根据次设备号访问多个LED
//	device_create(led_class, NULL, MKDEV(major, 0), NULL, "winter_led0"); /* /dev/winter_led0 */
//	device_create(led_class, NULL, MKDEV(major, 1), NULL, "winter_led1"); /* /dev/winter_led1 */
	for (i = 0; i < p_led_operations->num; i++)
	{
		device_create(led_class, NULL, MKDEV(major, i), NULL, "winter_led%d", i);
	}

	return 0;
}


// 6有入口函数就应该有出口函数:卸载驱动程序时,出口函数调用unregister_chrdev
static void __exit led_exit(void)
{
	int i;
	printk("%s %s line %d\n", __FILE__, __FUNCTION__, __LINE__);
	for (i = 0; i < p_led_operations->num; i++)
	{
		device_destroy(led_class, MKDEV(major, i));
	}
	class_destroy(led_class);
	// 卸载
	unregister_chrdev(major, "winter_led");
}


// 7其他完善:提供设备信息,自动创建设备节点: class_create,device_create
module_init(led_init);
module_exit(led_exit);

MODULE_LICENSE("GPL");
led_drv_test.c
cpp
/*************************************************************************
 > File Name: hello_test.c
 > Author: Winter
 > Created Time: Sun 07 Jul 2024 01:39:39 AM EDT
 ************************************************************************/

#include <sys/types.h>
#include <sys/stat.h>
#include <fcntl.h>
#include <unistd.h>
#include <stdio.h>
#include <string.h>

/*
 * ./led_drv  /dev/winter_led0 on
 * ./led_drv  /dev/winter_led0 off
 */
int main(int argc, char **argv)
{
	int fd;
	char status;


	/* 1. 判断参数 */
	if (argc < 2)
	{
		printf("Usage: %s <dev> <on | off>\n", argv[0]);
		return -1;
	}

	/* 2. 打开文件 */
	fd = open(argv[1], O_RDWR);
	if (fd == -1)
	{
		printf("can not open file %s\n", argv[1]);
		return -1;
	}

	/* 3. 写文件 */
	if (0 == strcmp(argv[2], "on"))
	{
		status = 1;
	}
	else
	{
		status = 0;
	}
	write(fd, &status, 1);

	close(fd);

	return 0;
}
Makefile
bash
# 1. 使用不同的开发板内核时, 一定要修改KERN_DIR
# 2. KERN_DIR中的内核要事先配置、编译, 为了能编译内核, 要先设置下列环境变量:
# 2.1 ARCH,          比如: export ARCH=arm64
# 2.2 CROSS_COMPILE, 比如: export CROSS_COMPILE=aarch64-linux-gnu-
# 2.3 PATH,          比如: export PATH=$PATH:/home/book/100ask_roc-rk3399-pc/ToolChain-6.3.1/gcc-linaro-6.3.1-2017.05-x86_64_aarch64-linux-gnu/bin
# 注意: 不同的开发板不同的编译器上述3个环境变量不一定相同,
#       请参考各开发板的高级用户使用手册

KERN_DIR = /home/book/100ask_stm32mp157_pro-sdk/Linux-5.4

all:
	make -C $(KERN_DIR) M=`pwd` modules
	$(CROSS_COMPILE)gcc -o led_drv_test led_drv_test.c

clean:
	make -C $(KERN_DIR) M=`pwd` modules clean
	rm -rf modules.order
	rm -f led_drv_test

# 参考内核源码drivers/char/ipmi/Makefile
# 要想把a.c, b.c编译成ab.ko, 可以这样指定:
# ab-y := a.o b.o
# obj-m += ab.o

# leddrv.c board_demo.c 编译成 100ask.ko
winter_led-y := led_drv.o stm32mp157.o
obj-m	+= winter_led.o
编译
bash
make
3 测试
在开发板挂载 Ubuntu 的NFS目录
bash
mount -t nfs -o nolock,vers=3 192.168.5.11:/home/book/nfs_rootfs/ /mnt将ko文件和测试代码拷贝到挂载目录,安装驱动
bash
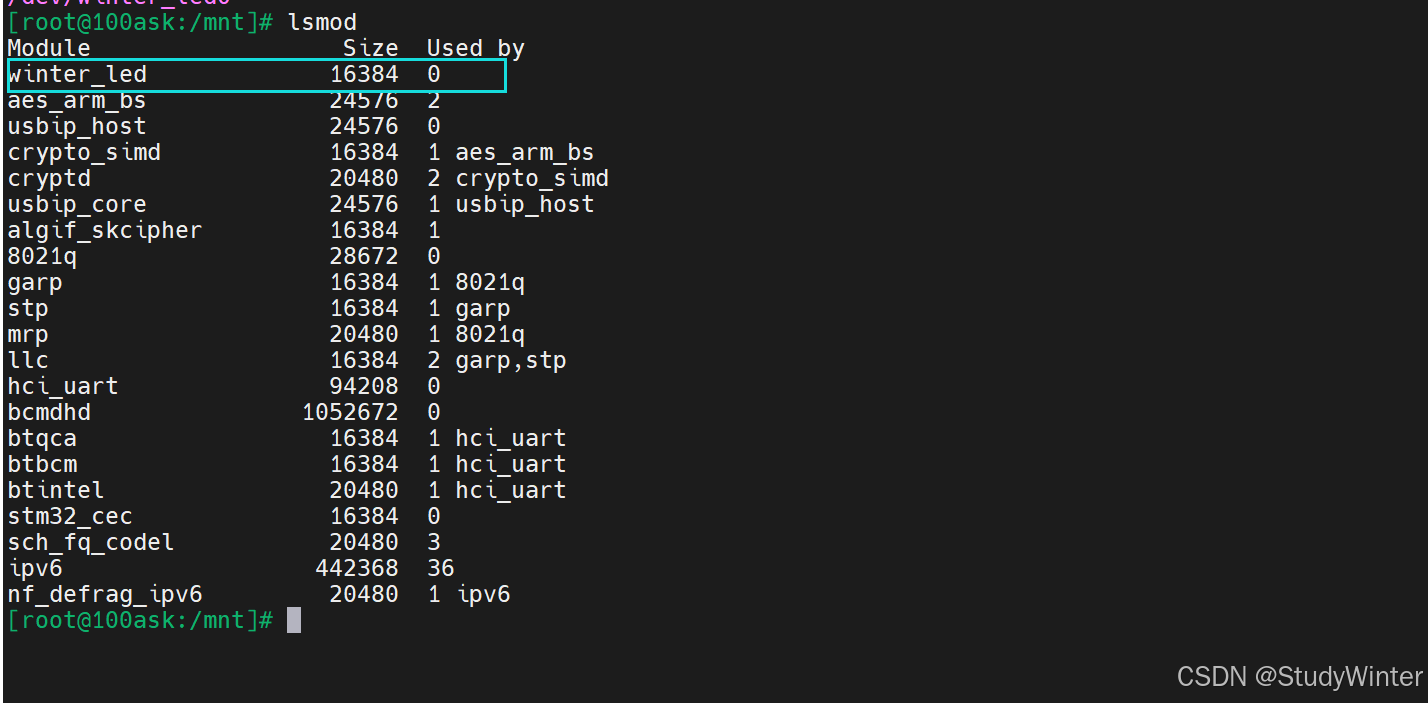
insmod winter_led.ko

执行测试程序
bash
./led_drv_test /dev/winter_led0 on
./led_drv_test /dev/winter_led0 off
板子上只有log,关掉【心跳灯】
bash
ls /sys/class/leds/
echo none > /sys/class/leds/heartbeat/trigger
再执行on/off就可以看到灯的亮灭了

4 思考
a.在驱动里有 ioremap,什么时候执行 iounmap?请完善程序
答:需要在led_operations.h和stmp32mp157.c中加一个close函数,在close函数中执行iounmap操作,在led_drv.c的close函数中调用。
似乎不太行
b.视频里我们只实现了点一个 LED,修改代码支持两个 LED。
答:需要看原理图和手册,在stmp32mp157.c的init函数中配置引脚和输出高低电平。