React二组件进阶
React 组件通讯
组件是独立且封闭的单元,默认情况下,只能使用组件自己的数据。在组件化过程中,我们将一个完整的功能
拆分成多个组件,以更好的完成整个应用的功能。而在这个过程中,多个组件之间不可避免的要共享某些数据
。为了实现这些功能,就需要打破组件的独立封闭性,让其与外界沟通。这个过程就是组件通讯。
组件的 props
组件是封闭的,要接收外部数据应该通过 props 来实现:
-
props的作用是接收传递给组件的数据
-
传递数据通过给组件标签添加属性
-
接收数据,函数组件通过参数props接收数据,类组件通过 this.props 接收数据
// 接收参数
function FuncProps(props) {
return (
)
}
// 传递参数
ReactDOM.createRoot(document.getElementById('funcProps')).render()
class ClassProps extends React.Component {
constructor(props) {
super()
console.log(props);
}
render() {
return (
)
}
}
ReactDOM.createRoot(document.getElementById('classProps')).render()
props 的特点:
-
可以给组件传递任意类型的数据
-
props 是只读的对象,只能读取属性的值,无法修改对象
-
使用类组件时,如果写了构造函数,应该将 props 作为构造函数的参数,并推荐将 props 传递给 super(),否则无法在构造函数中获取到 props
class PropsParticular extends React.Component {
constructor(props) {
// 推荐将props传递给父类构造函数
super(props)
console.log(props);
}
changeProps = () => {
  this.props.str = 'string'
}
render() {
  return (
    <div>
      <h4>props 的特点</h4>
      <p>字符串:{this.props.str},数值:{this.props.num},对象:{JSON.stringify(this.props.obj)}</p>
      {this.props.label}
      <button onClick={this.props.func}>函数</button>
      <button onClick={this.changeProps}>修改 props</button>
    </div>
  )
}
}
ReactDOM.createRoot(document.getElementById('propsParticular')).render(<PropsParticular
str='我是字符串'
num={19}
obj={{ a: 'a', b: 'b'}}
label={
我是标签
}
func={() => alert('我是函数')}
)
组件通讯的三种方式
1、父组件传递数据给子组件:
2、子组件传递数据给父组件,思路是利用回调函数,父组件提供回调,子组件调用,将要传递的数据作为回调函数的参数:
-
父组件提供一个回调函数(用于接收数据),将该函数作为属性的值,传递给子组件
-
子组件通过 props 调用回调函数,将子组件的数据作为参数传递给回调函数
class ParentOne extends React.Component {
state = { sonMsg: '' }
message = msg => {
this.setState({ sonMsg: msg })
console.log('state: ', this.state);
}
render() {
return (
子组件传递数据给父组件
父组件:{this.state.sonMsg.length > 0 ? '我儿子在' + this.state.sonMsg : ''}
)
}
}
class SonOne extends React.Component {
render() {
return (
子组件:发消息
<button onClick={() => this.props.sendMsg('打球')}>打球
<button onClick={() => this.props.sendMsg('打游戏')}>打游戏
<button onClick={() => this.props.sendMsg('写作业')}>写作业
)
}
}
ReactDOM.createRoot(document.getElementById('sonToParent')).render()
3、兄弟组件传递数据:
将共享状态提升到最近的公共父组件中,由公共父组件管理这个状态
-
思想:状态提升
-
公共父组件职责:1. 提供共享状态 2. 提供操作共享状态的方法
-
要通讯的子组件只需通过 props 接收状态或操作状态的方法
class ParentTwo extends React.Component {
state = {
count: 0
}
changeCount = (value) => {
this.setState({ count: value + this.state.count })
}
render() {
return (
兄弟组件传递数据
)
}
}
class SonTwo extends React.Component {
render() { return 结果:{this.props.count}
}
}
class SonThree extends React.Component {
render() { return <button onClick={() => { this.props.changeCount(1) }}>+1 }
}
ReactDOM.createRoot(document.getElementById('brotherToBrother')).render()
Context
Context 的作用是跨组件传递数据,如果出现层级比较多的情况下(例如:爷爷传递数据给孙子),会使用Context来进行传递,使用步骤如下:
-
调用 React.createContext() 创建 Provider(提供数据) 和 Consumer(消费数据) 两个组件
-
使用Provider 组件作为父节点
-
设置value属性,表示要传递的数据
-
哪一层想要接收数据,就用Consumer进行包裹,在里面回调函数中的参数就是传递过来的值
const { Provider, Consumer } = React.createContext()
class ContextParent extends React.Component {
render() {
return (
<Provider value={{ name: '张三', age: 18 }}>
<div style={{padding: 10, width: 200, height: 100, backgroundColor: 'red', boxSizing: 'border-box'}}>
)
}
}
const ContextNode = () => {
return (
<div style={{ padding: 10, width: 180, height: 80, backgroundColor: 'green', boxSizing: 'border-box'}}>
)
}
const ContextSubNode = () => {
return (
<div style={{ padding: 10, width: 160, height: 60, backgroundColor: 'blue', boxSizing: 'border-box'}}>
)
}
const ContextChild = () => {
return (
{ (data) => (<div style={{ width: 140, height: 40, backgroundColor: 'cyan'}}>{'我是' + data.name + ',' + data.age + '岁'}) }
)
}
ReactDOM.createRoot(document.getElementById('contextParent')).render(
)
props 进阶
children 属性
children 属性表示组件标签的子节点。当组件标签有子节点时,props 就会有该属性。children 属性与普通的props一样,值可以是任意值(文本、React元素、组件,甚至是函数)。
const ChildrenCom = (props) => (<>{props.children}</>)
const jsx = (<><p>JSX</p></>)
const TestCom = () => (<>组件</>)
const FuncChildren = (props) => (<div><button onClick={props.children}>函数</button></div>)
class ChildrenProp extends React.Component {
  render() {
    return (
      <>
        <h4>children 属性</h4>
        <ChildrenCom>文本节点</ChildrenCom>
        <ChildrenCom><p>p 标签</p></ChildrenCom>
        <ChildrenCom>{jsx}</ChildrenCom>
        <ChildrenCom><TestCom></TestCom></ChildrenCom>
        <FuncChildren>{() => alert('函数 children')}</FuncChildren>
      </>
    )
  }
}
ReactDOM.createRoot(document.getElementById('childrenProp')).render(<ChildrenProp></ChildrenProp>)
props 校验
对于组件来说,props 是外来的,无法保证组件使用者传入什么格式的数据。如果传入的数据格式不对,可能会导致组件内部报错
关键问题:组件的使用者不知道明确的错误原因
props 校验允许在创建组件的时候,就指定 props 的类型、格式等。捕获使用组件时因为 props 导致的错误,给出明确的错误提示,增加组件的健壮性。使用步骤如下:
-
安装包 prop-types (yarn add prop-types / npm i props-types)
-
导入 prop-types 包 import PropTypes from 'prop-types'
-
使用 组件名.propTypes = {} 来给组件的props添加校验规则
-
校验规则通过 PropTypes 对象来指定
import PropTypes from 'prop-types'
const PropsCheck = (props) => {
return (
<>
props 校验
{/* {props.colors.map((item, i) => (- {item}
))}
/}
{/ */}
{'intValue: ' + props.intValue}
......
</>
)
}
// 添加校验
PropsCheck.propTypes = {
intValue: PropTypes.number,
stringValue: PropTypes.string.isRequired,
elementValue: PropTypes.element,
arrayValue: PropTypes.array,
objectValue: PropTypes.shape({
name: PropTypes.string.isRequired,
age: PropTypes.number
}).isRequired,
funcValue: PropTypes.func
}
const checkCom = <PropsCheck
intValue='a'
funcValue='a'
ReactDOM.createRoot(document.getElementById('propsCheck')).render(checkCom)
常见的约束规则:
- 常见的类型:
array、bool、func、number、object、string
- React元素类型:
element
- 必填项:
isRequired
- 特定结构的对象:
shape({})
- 更多的约束规则
props 的默认值
可以给 props 设置默认值,在未传入 props 时生效,函数组件和类组件有所不同。
1、函数组件
-
方法一:通过在参数后面写 = 和默认值来进行解构
-
方法二:使用 组件名.propTypes = {},此方法以后将在函数组件中移除不推荐使用。
// 函数组件 props 默认值
// 方法一
const FuncPropsDefault = ({age=18, ...props}) => {
console.log('props: ', props);
return (
<>
{props: ${JSON.stringify(props)}, age: ${age}}</>
)
}
// 方法二 此方法将移除,不推荐使用
FuncPropsDefault.defaultProps = {
name: '张三'
}
2、类组件
-
方法一:在类组件的定义中使用 static defaultProps = {},定义静态属性。
-
方法二:与函数组件一样使用 组件名.propTypes = {}。
// 类组件 props 默认值
class ClassPropsDefaultOne extends React.Component {
// 方法一
static defaultProps = {
name: '李四',
age: 19
}
render = () => <>
{JSON.stringify(this.props)}</>
}
// 方法二
class ClassPropsDefaultTwo extends React.Component {
render = () => <>{JSON.stringify(this.props)}</>
}
ClassPropsDefaultTwo.defaultProps = {
name: '王五',
age: 20
}
组件的生命周期
组件的生命周期有助于理解组件的运行方式、完成更复杂的组件功能、分析组件错误原因等。组件的生命周期包含组件从被创建到挂载到页面中运行,再到组件不用时卸载的过程。
生命周期的每个阶段总是伴随着一些方法调用,这些方法就是生命周期的钩子函数。钩子函数的作用是为开发人员在不同阶段操作组件提供了时机。
只有 类组件 才有生命周期。
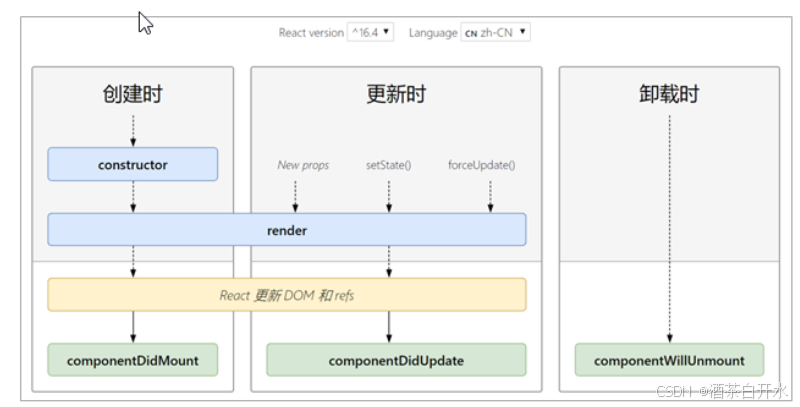
1、创建时(挂载阶段),执行时机是组件创建时(页面加载时),执行顺序 constructor() -> render() -> componentDidMount()。
| 钩子函数 |
触发时机 |
作用 |
| constructor |
创建组件时,最先执行 |
初始化state、为事件处理程序绑定this...... |
| render |
每次组件渲染都会触发 |
渲染UI(注意:不能调用setState()) |
| componentDidMount |
组件挂载(完成DOM渲染)后 |
发送网络请求、DOM操作 |
2、更新时(更新阶段),执行时机:
- setState()
- forceUpdate()
- 组件接收到新的props
以上三者任意一种变化,组件就会重新渲染,执行顺序:render() -> componentDidUpdate()
| 钩子函数 |
触发时机 |
作用 |
| render |
每次组件渲染都会触发 |
渲染UI(与 挂在阶段 是同一个render) |
| componentDidUpdate |
组件更新(完成DOM渲染)后 |
发送网络请求、DOM操作......,注意:如果要setState() 必须放在一个if条件中 |
3、卸载时(卸载阶段), 执行时机是组件从页面中消失。
| 钩子函数 |
触发时机 |
作用 |
| componentWillUnmount |
组件卸载(从页面中消失) |
执行清理工作(比如:清理定时器等) |
class LifeCircle extends React.Component {
  // 生命周期
  constructor() {
    super()

    // 初始化state
    this.state = { count: 0 }
    // 处理 this 指向问题......

    console.warn('生命周期钩子函数: constructor');
  }
  componentDidMount() {
    // 可以在这里 请求网络、操作 DOM
    console.warn('生命周期钩子函数: componentDidMount');
  }
  shouldComponentUpdate() {
    console.warn('生命周期钩子函数: shouldComponentUpdate')
    return true
  }
  render() {
    // 不能 更新状态
    console.warn('生命周期钩子函数: render');
    return (
      <>
        {this.state.count > 3 ? <p>豆豆被打死了</p> : <Counter count={this.state.count}></Counter>}
        <button onClick={() => this.forceUpdate()}>强制刷新</button>
        <button onClick={this.clickHandle}>打豆豆</button>
      </>
    )
  }
  componentDidUpdate(prevProps) {
    // 可以在这里 请求网络、操作 DOM,但是需要注意,若果 setState() 必须放在一个条件语句中,否则容易导致死循环
    // 一般来说判断状态是否变化
    if (prevProps.count !== this.props.count) {
      // this.setState({ count: this.state.count})
      // 网络请求......
    }
    console.warn('生命周期钩子函数: componentDidUpdate');
  }
  componentWillUnmount() {
    // 执行清理工作(比如:清理定时器等)
    console.warn('生命周期钩子函数: componentWillUnmount')
  }
  getSnapshotBeforeUpdate() {
    console.warn('生命周期钩子函数: getSnapshotBeforeUpdate')
    return null
  }

  clickHandle = () => {
    this.setState({ count: this.state.count + 1 })
  }
}
class Counter extends React.Component {
  constructor() {
    super()
    console.warn('--子组件--生命周期钩子函数: constructor')
  }
  componentDidMount() {
    console.warn('--子组件--生命周期钩子函数: componentDidMount')
    this.timerOne = setInterval(() => {
      console.log('timer one');
    }, 1000);
    this.timerTwo = setInterval(() => {
      console.log('timer two');
    }, 3000);
  }
  shouldComponentUpdate() {
    console.warn('--子组件--生命周期钩子函数: shouldComponentUpdate')
    return true
  }
  render() {
    console.warn('--子组件--生命周期钩子函数: render')
    return (<p>统计豆豆被打的次数:{this.props.count}</p>)
  }
  componentDidUpdate() {
    console.warn('--子组件--生命周期钩子函数: componentDidUpdate')
  }
  componentWillUnmount() {
    // 执行清理工作(比如:清理定时器等)
    clearInterval(this.timerOne)
    console.warn('--子组件--生命周期钩子函数: componentWillUnmount')
  }
  getSnapshotBeforeUpdate() {
    console.warn('--子组件--生命周期钩子函数: getSnapshotBeforeUpdate')
    return null
  }
}
ReactDOM.createRoot(document.getElementById('lifeCircle')).render(<LifeCircle></LifeCircle>)
完整生命周期钩子函数
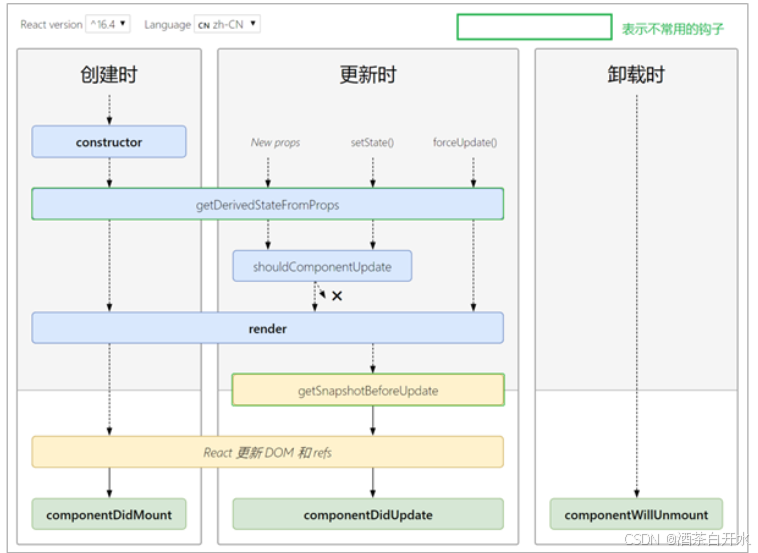
getDerivedStateFromProps()
getDerivedStateFromProps 会在调用 render 方法之前调用,并且在初始挂载及后续更新时都会被调用。它应返回一个对象来更新 state,如果返回 null 则不更新任何内容- 不管原因是什么,都会在每次渲染前触发此方法
- 已经弃用
shouldComponentUpdate()
- 根据
shouldComponentUpdate() 的返回值,判断 React 组件的输出是否受当前 state 或 props 更改的影响。默认行为是 state 每次发生变化组件都会重新渲染
- 当 props 或 state 发生变化时,
shouldComponentUpdate() 会在渲染执行之前被调用。返回值默认为 true
getSnapshotBeforeUpdate()
getSnapshotBeforeUpdate() 在最近一次渲染输出(提交到 DOM 节点)之前调用。它使得组件能在发生更改之前从 DOM 中捕获一些信息(例如,滚动位置)。此生命周期的任何返回值将作为参数传递给 componentDidUpdate()- 此用法并不常见,但它可能出现在 UI 处理中,如需要以特殊方式处理滚动位置的聊天线程等
render-props和高阶组件
思考:如果两个组件中的部分功能相似或相同,该如何处理?
复用相似的功能(联想函数封装),复用什么? 复用的就是 state 和 操作state的方法 (组件状态逻辑 )。两种方式:
这两种方式不是新的API,而是利用React自身特点的编码技巧,演化而成的固定模式(写法)。
render props 模式
将要复用的state和操作state的方法封装到一个组件中,那么就涉及两个问题:
-
如何拿到该组件中复用的state?在使用组件时,添加一个值为函数的prop,通过 函数参数 来获取(需要组件内部实现)
-
如何渲染任意的UI?使用该函数的返回值作为要渲染的UI内容(需要组件内部实现)
<Mouse render={(point) => { return
鼠标位置:{point.x}, {point.y}
}}>
使用步骤:
-
创建Mouse组件,在组件中提供复用的状态逻辑代码(1. 状态 2. 操作状态的方法)
-
将要复用的状态作为 props.render(state) 方法的参数,暴露到组件外部
-
使用 props.render() 的返回值作为要渲染的内容
class Mouse extends React.Component {
state = { x: 0, y: 0 }
render() { return this.props.render(this.state) }
// 监听鼠标
componentDidMount() {
window.addEventListener('mousemove', this.mouseMoveHandle)
}
// 鼠标移动处理
mouseMoveHandle = (e) => { this.setState({ x: e.clientX, y: e.clientY }) }
}
// 使用 Mouse
<Mouse render={(point) => { return <img src={imgCat} style={{ position: 'fixed', left: point.x + 1, top: point.y + 1}}> }}>
说明:
- Mouse组件负责:封装复用的状态逻辑代码(1. 状态 2. 操作状态的方法)
- 传入的render prop负责:使用复用的状态来渲染UI结构
children代替render属性
注意:并不是该模式叫 render props 就必须使用名为render的prop,实际上可以使用任意名称的prop。把prop是一个函数并且告诉组件要渲染什么内容的技术叫做 render props模式,推荐使用 children 代替 render 属性。
class Mouse extends React.Component {
  state = { x: 0, y: 0 }
  render() { return this.props.children(this.state) }
  // 监听鼠标
  componentDidMount() {
    window.addEventListener('mousemove', this.mouseMoveHandle)
  }

  // 鼠标移动处理
  mouseMoveHandle = (e) => { this.setState({ x: e.clientX, y: e.clientY }) }
}
代码优化:
-
给 render props 模式添加 props校验
-
应该在组件卸载时解除 mousemove 事件绑定
// 导入图片
import imgCat from './cat.png'
class Mouse extends React.Component {
state = { x: 0, y: 0 }
render() { return this.props.children(this.state) }
// 监听鼠标
componentDidMount() {
window.addEventListener('mousemove', this.mouseMoveHandle)
}
// 清理工作,移除事件绑定
componentWillUnmount() {
window.removeEventListener('mousemove', this.mouseMoveHandle)
}
// 鼠标移动处理
mouseMoveHandle = (e) => { this.setState({ x: e.clientX, y: e.clientY }) }
}
// 为 children 添加 校验
Mouse.propTypes = {
children: PropTypes.func.isRequired
}
// 使用示例
class RenderProps extends React.Component {
state = { show: false }
render() {
return (
<>
{
// 条件渲染
this.state.show && (
<>
{(point) => { return 鼠标位置:{point.x}, {point.y}
}}
{(point) => { return <img src={imgCat} style={{ position: 'fixed', left: point.x + 1, top: point.y + 1}}> }}
</>
)
}
<button onClick={() => this.setState({ show: !this.state.show })}>{this.state.show ? '隐藏' : '显示'}
</>
)
}
}
ReactDOM.createRoot(document.getElementById('renderProps')).render()
高阶组件
高阶组件就相当于手机壳,通过包装组件,增强组件功能。
高阶组件(HOC,Higher-Order Component)是一个函数,接收要包装的组件,返回增强后的组件。
高阶组件内部创建一个类组件,在这个类组件中提供复用的状态逻辑代码,通过prop将复用的状态传递给被包装组件 WrappedComponent。使用步骤:
-
创建一个函数,名称约定以 with 开头
-
指定函数参数,参数应该以大写字母开头(作为要渲染的组件)
-
在函数内部创建一个类组件,提供复用的状态逻辑代码,并返回
-
在该组件中,渲染参数组件,同时将状态通过prop传递给参数组件
-
调用该高阶组件,传入要增强的组件,通过返回值拿到增强后的组件,并将其渲染到页面中
// 高阶组件
function withMouse(WrapedComponent) {
class MouseHOC extends React.Component {
state = { x: 0, y: 0 }
componentDidMount() {
window.addEventListener('mousemove', this.mouseMoveHandle)
}
componentWillUnmount() {
window.removeEventListener('mousemove', this.mouseMoveHandle)
}
render() {
return <WrapedComponent {...this.state}>
}
mouseMoveHandle = (e) => {
this.setState({ x: e.clientX, y: e.clientY })
}
}
return MouseHOC
}
function Position(props) {
return (
<>
鼠标位置:{props.x}, {props.y}
</>
)
}
const HeightOrderCom = withMouse(Position)
ReactDOM.createRoot(document.getElementById('heigherOrderCom')).render()
设置displayName
使用高阶组件存在的一个问题是得到组件的名称相同?
默认情况下,React使用组件名称作为displayName,解决方式是为高阶组件设置displayName,便于调试时区分不同的组件。displayName的作用是用于设置调试信息(React Developer Tools信息),设置方式:
  // 设置 displayName
  MouseHOC.displayName = `WithMouse${getDisplayName(WrapedComponent)}`

function getDisplayName(WrapedComponent) {
  return WrapedComponent.displayName || WrapedComponent.name || 'Component'
}
传递props
props丢失,原因是高阶组件没有往下传递props。解决方式是在渲染 WrappedComponent 时,将 state 和 this.props 一起传递给组件。
    render() {
      return <WrapedComponent {...this.state} {...this.props}></WrapedComponent>
    }
整体使用效果:
// 高阶组件
function withMouse(WrapedComponent) {
  class MouseHOC extends React.Component {
    state = { x: 0, y: 0 }
    componentDidMount() {
      window.addEventListener('mousemove', this.mouseMoveHandle)
    }
    componentWillUnmount() {
      window.removeEventListener('mousemove', this.mouseMoveHandle)
    }
    render() {
      return <WrapedComponent {...this.state} {...this.props}></WrapedComponent>
    }
    mouseMoveHandle = (e) => {
      this.setState({ x: e.clientX, y: e.clientY })
    }
  }
  // 设置 displayName
  MouseHOC.displayName = `WithMouse${getDisplayName(WrapedComponent)}`

  return MouseHOC
}
function getDisplayName(WrapedComponent) {
  return WrapedComponent.displayName || WrapedComponent.name || 'Component'
}
function Position(props) {
  return (
    <>
      <p>鼠标位置:{props.x}, {props.y}</p>
    </>
  )
}
function Cat(props) {
  return (
    <>
      <img src={props.img} style={{ position: 'fixed', left: props.x + 1, top: props.y + 1 }}></img>
    </>
  )
}
const MousePosition = withMouse(Position)
const MouseCat = withMouse(Cat)
class HeightOrderCom extends React.Component {
  state = { show: false }
  render() {
    return (
      <>
        {this.state.show && (
          <>
            <MousePosition></MousePosition>
            <MouseCat img={imgCat}></MouseCat>
            <br></br>
          </>
        )}
        <button onClick={() => { this.setState({ show: !this.state.show }) }}>{this.state.show ? '隐藏' : '显示'}</button>
      </>
    )
  }
}
ReactDOM.createRoot(document.getElementById('heigherOrderCom')).render(<HeightOrderCom></HeightOrderCom>)