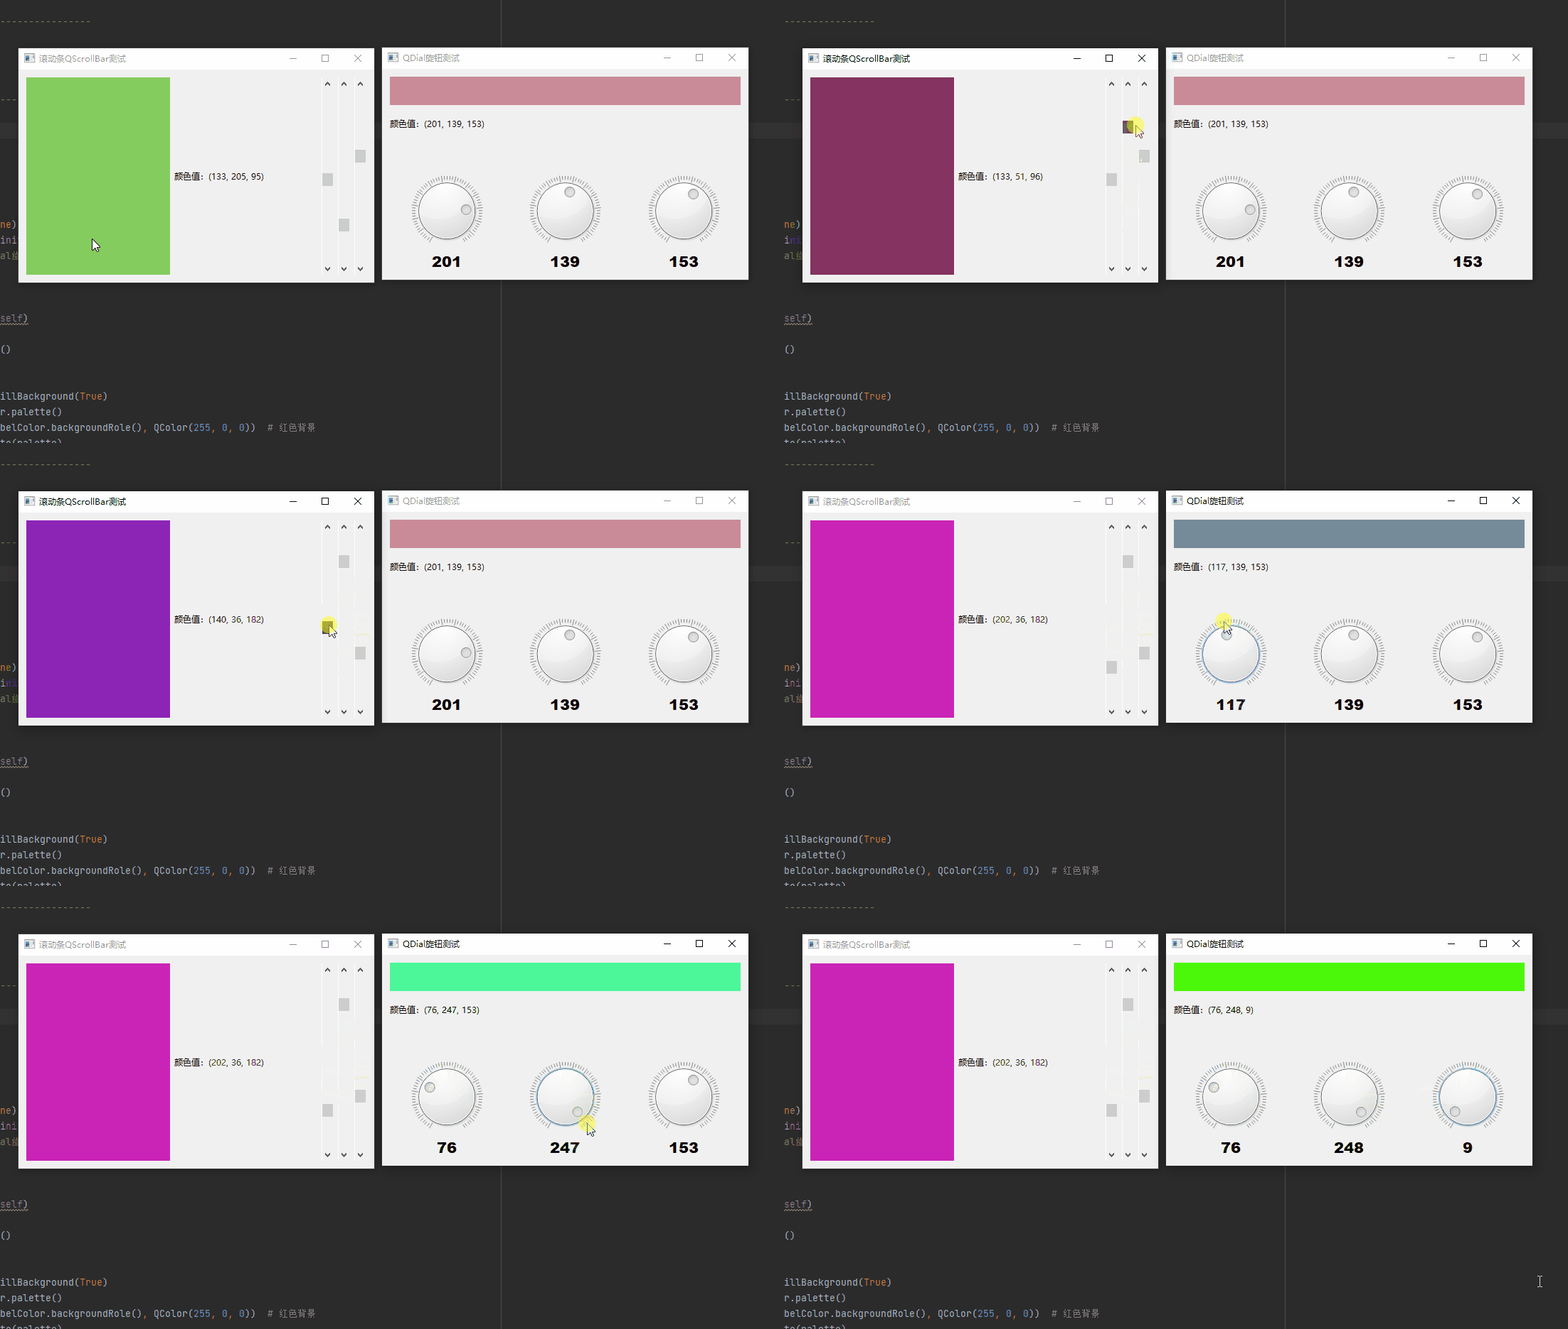
**本文给大家带来一个利用pyqt制作的颜色调节器,通过拨动滚动条或者旋钮就可以调整rgb三色进行颜色的微调,**效果如下:

本文实现的是不同的UI设计,实现的相同的功能,我们先分析以下思路:
- 首先进行UI页面设计
- 分析颜色如何进行调整的逻辑
- 将改动的数据反馈到UI页面
先看左侧的滚动条的功能:
1 UI页面设计
首先,创建QLabel来显示颜色变换的舞台,并指定默认为红色背景,以及创建lb2来显示数据的变化。
python
		self.lb = QLabel()
        # 设置标签的背景色
        self.lb.setAutoFillBackground(True)
        palette = self.lb.palette()
        palette.setColor(self.lb.backgroundRole(), QColor(255, 0, 0))  # 红色背景
        self.lb.setPalette(palette)

        self.lb2=QLabel()
        self.lb2.setText("颜色值:(255, 0, 0)")
接下来,创建滑块,这里的滑块需要三个,分别代表红绿蓝的数据,并通过改变滑块来实现红绿蓝三色的数字变化。
python
		self.s1 = QScrollBar()
        self.s1.setMaximum(255)
        self.s1.sliderMoved.connect(self.sliderval)

        self.s2=QScrollBar()
        self.s2.setMaximum(255)
        self.s2.sliderMoved.connect(self.sliderval)

        self.s3 = QScrollBar()
        self.s3.setMaximum(255)
        self.s3.sliderMoved.connect(self.sliderval)
2 数据改变函数
咱们通过配置槽函数sliderval来修改颜色值,并以palette调色板的方式返回到self.lb上,就可以实现了颜色随数字的变化而变化了。
python
    def sliderval(self):
        print(self.s1.value(),self.s2.value(),self.s3.value())
        palette = self.lb.palette()
        palette.setColor(self.lb.backgroundRole(), QColor(self.s1.value(), self.s2.value(), self.s3.value()))  # 红色背景
        self.lb.setPalette(palette)
        self.lb2.setText("颜色值:(%s, %s, %s)" % (self.s1.value(),self.s2.value(),self.s3.value()))
3 完整代码
为了方便大家的实现和学习,完整代码贴上。(爱看不看,不看拉到!)
python
# -*- coding:utf-8 -*-
"""
------------------------------------------------
File Name: 滚动条.py
Description:
Author: lzq
date:2024-07-27 19:16
------------------------------------------------
"""
import sys

from PyQt6.QtGui import QColor
from PyQt6.QtWidgets import QDialog, QPushButton, QVBoxLayout, QApplication, QWidget, QHBoxLayout, QScrollBar, QLabel


class MyWidget(QWidget):
    def __init__(self, parent=None):
        super(MyWidget, self).__init__(parent)
        self.setWindowTitle("滚动条QScrollBar测试")
        self.resize(500,150)

        self.lb = QLabel()
        # 设置标签的背景色
        self.lb.setAutoFillBackground(True)
        palette = self.lb.palette()
        palette.setColor(self.lb.backgroundRole(), QColor(255, 0, 0))  # 红色背景
        self.lb.setPalette(palette)

        self.lb2=QLabel()
        self.lb2.setText("颜色值:(255, 0, 0)")


        hbox=QHBoxLayout()
        self.s1 = QScrollBar()
        self.s1.setMaximum(255)
        self.s1.sliderMoved.connect(self.sliderval)

        self.s2=QScrollBar()
        self.s2.setMaximum(255)
        self.s2.sliderMoved.connect(self.sliderval)

        self.s3 = QScrollBar()
        self.s3.setMaximum(255)
        self.s3.sliderMoved.connect(self.sliderval)
        hbox.addWidget(self.lb)
        hbox.addWidget(self.lb2)
        hbox.addWidget(self.s1)
        hbox.addWidget(self.s2)
        hbox.addWidget(self.s3)
        self.setGeometry(500,200,500,300)
        self.setLayout(hbox)

    def sliderval(self):
        print(self.s1.value(),self.s2.value(),self.s3.value())
        palette = self.lb.palette()
        palette.setColor(self.lb.backgroundRole(), QColor(self.s1.value(), self.s2.value(), self.s3.value()))  # 红色背景
        self.lb.setPalette(palette)
        self.lb2.setText("颜色值:(%s, %s, %s)" % (self.s1.value(),self.s2.value(),self.s3.value()))

if __name__=='__main__':
    app = QApplication(sys.argv)
    w = MyWidget()
    w.show()
    sys.exit(app.exec())
接下来我们来学习下右侧的旋钮实现的颜色调节器的功能:
4 同样先进性UI设计
先创建一个文本颜色标签,用来展示随着rgb变化而变化的颜色,这是舞台。
python
 		self.labelColor = QLabel()
        # 设置标签的背景色
        self.labelColor.setAutoFillBackground(True)
        palette = self.labelColor.palette()
        palette.setColor(self.labelColor.backgroundRole(), QColor(255, 0, 0))  # 红色背景
        self.labelColor.setPalette(palette)
        self.ltk = QLabel()
        self.ltext = QLabel()
        self.ltext.setText("颜色值:(255, 0, 0)")
接着创建旋钮,旋钮是QDial类的实例。我们在旋钮下方配置旋钮变化的数字标签。
python
		#左侧旋钮,代表红色
		self.dial = QDial()
        self.dial.setRange(0,255)
        self.dial.setNotchesVisible(True)
        self.dial.valueChanged.connect(self.onDialValueChanged)
		#左侧旋钮下标签文字,默认为0
        self.lb = QLabel('0', self)
        self.lb.setAlignment(Qt.AlignmentFlag.AlignCenter)
        self.lb.setFont(QFont('Arial Black', 16))
		#中间旋钮,代表绿色
        self.dial2 = QDial()
        self.dial2.setRange(0, 255)
        self.dial2.setNotchesVisible(True)
        self.dial2.valueChanged.connect(self.onDialValueChanged)
		#中间旋钮下标签文字,默认为0
        self.lb2 = QLabel('0', self)
        self.lb2.setAlignment(Qt.AlignmentFlag.AlignCenter)
        self.lb2.setFont(QFont('Arial Black', 16))
		#右侧旋钮,代表蓝色
        self.dial3 = QDial()
        self.dial3.setRange(0, 255)
        self.dial3.setNotchesVisible(True)
        self.dial3.valueChanged.connect(self.onDialValueChanged)
		#右侧旋钮下标签文字,默认为0
        self.lb3=QLabel('0',self)
        self.lb3.setAlignment(Qt.AlignmentFlag.AlignCenter)
        self.lb3.setFont(QFont('Arial Black',16))
此时,所有的按钮和页面都搞好了,但是有个问题,不知道你注意没有:
1 旋钮在上,文字在下。怎么实现?
2 旋钮和文字又和显示颜色的那部分控件位置不一样,怎么实现?
很简单,先回答问题1:我们通过添加垂直布局,就可以实现旋钮在上,文字在下了。不是很easy吗?
但是问题2呢?此时你就得考虑嵌套布局了。
看代码,这个是实现问题1的旋钮在上,文字在下布局。
python
		#创建水平布局,把所哟的旋钮在上文字在线的垂直布局当成儿子放进去
		hlayout = QHBoxLayout(self)

        vlayout = QVBoxLayout(self)
        vlayout.addWidget(self.dial)
        vlayout.addWidget(self.lb)

        vlayout2 = QVBoxLayout(self)
        vlayout2.addWidget(self.dial2)
        vlayout2.addWidget(self.lb2)

        vlayout3 = QVBoxLayout(self)
        vlayout3.addWidget(self.dial3)
        vlayout3.addWidget(self.lb3)

        hlayout.addLayout(vlayout)
        hlayout.addLayout(vlayout2)
hlayout.addLayout(vlayout3)这里是颜色显示处的布局:
python
 		textVlayout = QVBoxLayout()
        textVlayout.addWidget(self.labelColor)
        textVlayout.addWidget(self.ltext)
        textVlayout.addWidget(self.ltk)
此时,我们得到的布局有两个:按钮组对应的水平布局,和颜色显示组对应的垂直布局。如果我们现在再来一个大的布局,把这些孙子都装进去,那不就搞定了吗?
python
		#创建爷爷级布局,把前面的孙子儿子布局都装进去,就搞定了
		ww_layout = QVBoxLayout(self)
		ww_layout.addLayout(textVlayout)
        ww_layout.addLayout(hlayout)
        self.setLayout(ww_layout)
注意: 布局这一块,很容易让人迷糊,因此要多思考,最好找张草稿纸画一下。
逻辑槽函数和第一个案例的滑块相似,不卖关子了,直接贴出来:
python
    def onDialValueChanged(self):
        self.lb.setText(str(self.dial.value()))
        self.lb2.setText(str(self.dial2.value()))
        self.lb3.setText(str(self.dial3.value()))
        palette = self.labelColor.palette()
        palette.setColor(self.labelColor.backgroundRole(), QColor(self.dial.value(), self.dial2.value(), self.dial3.value()))  # 红色背景
        self.labelColor.setPalette(palette)
        self.ltext.setText("颜色值:(%s, %s, %s)" % (self.dial.value(), self.dial2.value(), self.dial3.value()))
5 完整代码2
这时候就完成了所有的功能,完整代码列出来:
python
# -*- coding:utf-8 -*-
"""
------------------------------------------------
File Name: 旋钮.py
Description:
Author: lzq
date:2024-07-27 19:50
------------------------------------------------
"""
import sys

from PyQt6.QtCore import Qt
from PyQt6.QtGui import QFont, QColor
from PyQt6.QtWidgets import QDialog, QPushButton, QVBoxLayout, QApplication, QWidget, QDial, QLabel, QHBoxLayout


class MyWidget(QWidget):
    def __init__(self, parent=None):
        super(MyWidget, self).__init__(parent)
        self.setWindowTitle("QDial旋钮测试")
        self.resize(330,100)


        ww_layout = QVBoxLayout(self)

        self.labelColor = QLabel()

        # 设置标签的背景色
        self.labelColor.setAutoFillBackground(True)
        palette = self.labelColor.palette()
        palette.setColor(self.labelColor.backgroundRole(), QColor(255, 0, 0))  # 红色背景
        self.labelColor.setPalette(palette)
        self.ltk = QLabel()
        self.ltext = QLabel()
        self.ltext.setText("颜色值:(255, 0, 0)")

        textVlayout = QVBoxLayout()
        textVlayout.addWidget(self.labelColor)
        textVlayout.addWidget(self.ltext)
        textVlayout.addWidget(self.ltk)


        self.dial = QDial()
        self.dial.setRange(0,255)
        self.dial.setNotchesVisible(True)
        self.dial.valueChanged.connect(self.onDialValueChanged)

        self.lb = QLabel('0', self)
        self.lb.setAlignment(Qt.AlignmentFlag.AlignCenter)
        self.lb.setFont(QFont('Arial Black', 16))

        self.dial2 = QDial()
        self.dial2.setRange(0, 255)
        self.dial2.setNotchesVisible(True)
        self.dial2.valueChanged.connect(self.onDialValueChanged)

        self.lb2 = QLabel('0', self)
        self.lb2.setAlignment(Qt.AlignmentFlag.AlignCenter)
        self.lb2.setFont(QFont('Arial Black', 16))

        self.dial3 = QDial()
        self.dial3.setRange(0, 255)
        self.dial3.setNotchesVisible(True)
        self.dial3.valueChanged.connect(self.onDialValueChanged)

        self.lb3=QLabel('0',self)
        self.lb3.setAlignment(Qt.AlignmentFlag.AlignCenter)
        self.lb3.setFont(QFont('Arial Black',16))

        hlayout = QHBoxLayout(self)

        vlayout = QVBoxLayout(self)
        vlayout.addWidget(self.dial)
        vlayout.addWidget(self.lb)

        vlayout2 = QVBoxLayout(self)
        vlayout2.addWidget(self.dial2)
        vlayout2.addWidget(self.lb2)

        vlayout3 = QVBoxLayout(self)
        vlayout3.addWidget(self.dial3)
        vlayout3.addWidget(self.lb3)

        hlayout.addLayout(vlayout)
        hlayout.addLayout(vlayout2)
        hlayout.addLayout(vlayout3)
        # self.setLayout(hlayout)

        ww_layout.addLayout(textVlayout)
        ww_layout.addLayout(hlayout)
        self.setLayout(ww_layout)

    def onDialValueChanged(self):
        self.lb.setText(str(self.dial.value()))
        self.lb2.setText(str(self.dial2.value()))
        self.lb3.setText(str(self.dial3.value()))
        palette = self.labelColor.palette()
        palette.setColor(self.labelColor.backgroundRole(), QColor(self.dial.value(), self.dial2.value(), self.dial3.value()))  # 红色背景
        self.labelColor.setPalette(palette)
        self.ltext.setText("颜色值:(%s, %s, %s)" % (self.dial.value(), self.dial2.value(), self.dial3.value()))


if __name__=='__main__':
    app = QApplication(sys.argv)
    w = MyWidget()
    w.show()
    sys.exit(app.exec())