分布式存储的作用
加入分布式存储的目的:主要是为了对数据进行保护避免因一台服务器磁盘的损坏,导致数据丢失不能正常使用。
参考文档:https://gowinder.work/post/proxmox-ve-部署双节点集群及glusterfs分布式文件系统/
需要保存两个pve节点的版本一样
两个proxmox ve节点,实现高可用vm,lxc自动迁移
1.修改hosts文件
在两台pve的/etc/hosts中,增加如下host
root@pve1:~# cat /etc/hosts
192.168.1.50 pve1.local pve1
192.168.1.60 pve2.local pve2
192.168.1.50 gluster1
192.168.1.60 gluster2
2.修改服务器名
在两台pve的/etc/hostname中,增加如下
root@pve1:~# cat /etc/hostname
pve1

root@pve2:~# cat /etc/hostname
pve2
3.安装glusterfs
以下操作都在两台机器上做, 这里分别为pve1, pve2
wget -O - https://download.gluster.org/pub/gluster/glusterfs/9/rsa.pub | apt-key add -
DEBID=$(grep 'VERSION_ID=' /etc/os-release | cut -d '=' -f 2 | tr -d '"')
DEBVER=$(grep 'VERSION=' /etc/os-release | grep -Eo '[a-z]+')
DEBARCH=$(dpkg --print-architecture)
echo deb https://download.gluster.org/pub/gluster/glusterfs/LATEST/Debian/${DEBID}/${DEBARCH}/apt ${DEBVER} main > /etc/apt/sources.list.d/gluster.list
apt update  [备注这一步可以不做,当源已经确定使用具体源时]
apt install -y glusterfs-server
3.1.需要保存gluster的版本一样
gluster --version
3.2在pve1上编辑: nano /etc/glusterfs/glusterd.vol, 在 option transport.socket.listen-port 24007 增加:
option transport.rdma.bind-address gluster1
option transport.socket.bind-address gluster1
option transport.tcp.bind-address gluster1
3.3在pve2上编辑: nano /etc/glusterfs/glusterd.vol, 在 option transport.socket.listen-port 24007 增加:
option transport.rdma.bind-address gluster2
option transport.socket.bind-address gluster2
option transport.tcp.bind-address gluster2
3.4开启服务
systemctl enable glusterd.service
systemctl start glusterd.service
3.5重要,在pve2上需要执行命令以加入集群
gluster peer probe gluster1
显示: peer probe: success 就OK
3.6增加volume
先决条件:需要自己每台服务器上存在数据盘并且已经挂载到/data目录下。
gluster volume create VMS replica 2 gluster1:/data/s gluster2:/data/s
gluster vol start VMS
命令分析
* gluster volume create: 这是 GlusterFS 的命令,用于创建一个新的卷。
* VMS: 这是你给新卷指定的名称。在这个例子中,卷的名称是 VMS。
* replica 2: 这指定了卷的类型和复制因子。replica 表示这是一个复制卷,2 表示数据将在两个节点上进行复制。这意味着你有两个副本的数据,一个在主节点上,另一个在复制节点上。
* gluster1:/data/s: 这是第一个存储路径。gluster1 是 GlusterFS 集群中的一个节点的名称或 IP 地址,/data/s 是该节点上用于存储 GlusterFS 卷数据的目录。
* gluster2:/data/s: 这是第二个存储路径。与第一个路径类似,但指定了第二个节点和存储目录。在这个例子中,数据将被复制到 gluster1 和 gluster2 这两个节点上的 /data/s 目录。
当执行这个命令时,GlusterFS 会在 gluster1 和 gluster2 这两个节点上创建一个名为 VMS 的复制卷,并将数据在两个节点的 /data/s 目录中进行复制。这样做可以提高数据的可靠性和可用性,因为如果其中一个节点出现故障,另一个节点上的数据副本仍然可用。
然而,正如你遇到的错误消息所提到的,创建复制卷(特别是只有两个副本时)有脑裂(split-brain)的风险。脑裂是指当两个或多个节点都认为自己是主节点并且都在接受写操作时,数据可能会变得不一致。为了避免这种情况,可以使用仲裁节点(arbiter)或将复制因子增加到 3 或更多。但在许多情况下,简单的双节点复制卷对于大多数应用来说已经足够了。
-------------------------------
gluster vol start VMS命令分析
1. 启动卷服务:该命令会启动 GlusterFS 集群中名为 VMS 的卷的服务,使得客户端可以开始访问该卷上的数据。
2. 确保数据可用性:当卷启动后,GlusterFS 会确保数据在集群中的节点之间是可用的,并会根据卷的类型(如分布式复制卷)来管理和复制数据。
3. 检查节点状态:在启动卷之前,GlusterFS 会检查集群中所有参与该卷的节点的状态,确保它们都是可用的并且处于正确的配置中。
4. 处理客户端请求:一旦卷启动成功,客户端就可以通过挂载该卷来访问存储在上面的数据。GlusterFS 会处理来自客户端的读写请求,并确保数据在集群中的一致性。
5. 负载均衡:对于分布式卷和分布式复制卷,GlusterFS 会在启动时自动进行负载均衡,确保数据在各个节点之间均匀分布,从而提高整体性能和可靠性。
6. 监控和日志记录:在卷启动后,GlusterFS 会持续监控该卷的状态和性能,并记录相关的日志信息。这些信息对于后续的故障排查和性能调优非常有用。
综上所述,gluster volume start VMS 命令的作用是启动 GlusterFS 集群中名为 VMS 的卷,确保数据的可用性、一致性和性能,并处理来自客户端的读写请求。在执行该命令之前,需要确保 GlusterFS 集群中的所有节点都已正确配置并可以相互通信。
3.7.检查状态
gluster vol info VMS
gluster vol status VMS
3.8增加挂载
在两台pve上都要做
mkdir /vms
修改pve1的/etc/fstab,增加
gluster1:VMS /vms glusterfs defaults,_netdev,x-systemd.automount,backupvolfile-server=gluster2 0 0
修改pve2的/etc/fstab,增加
gluster2:VMS /vms glusterfs defaults,_netdev,x-systemd.automount,backupvolfile-server=gluster1 0 0
重启两台pve,让/mnt挂载
两台pve不重启挂载
mount /vms
3.9解决split-brain问题
两个节点的gluster会出现split-brain问题,就是两节点票数一样,谁也不听谁的,解决办法如下:
gluster vol set VMS cluster.heal-timeout 5
gluster volume heal VMS enable
gluster vol set VMS cluster.quorum-reads false
gluster vol set VMS cluster.quorum-count 1
gluster vol set VMS network.ping-timeout 2
gluster volume set VMS cluster.favorite-child-policy mtime
gluster volume heal VMS granular-entry-heal enable
gluster volume set VMS cluster.data-self-heal-algorithm full
4.0pve双节点集群设置
第一个创建,第二个加入,没什么好说的【参考PVE组建集群】
5.0创建共享目录
在DataCenter中的Storage中,点Add,Directory填/vms, 钩选 share
6.0HA设置
修改 /etc/pve/corosync.conf
在quorum中增加,变成这样:
quorum {
    provider: corosync_votequorum
    expected_votes: 1
    two_node: 1
}
其中, expected_votes表示希望的节点数量, two_node: 1表示,只有两个节点,还有一个wait_for_all: 0, NOTES: enabling two_node: 1 automatically enables wait_for_all. It is still possible to override wait_for_all by explicitly setting it to 0. If more than 2 nodes join the cluster, the two_node option is automatically disabled.
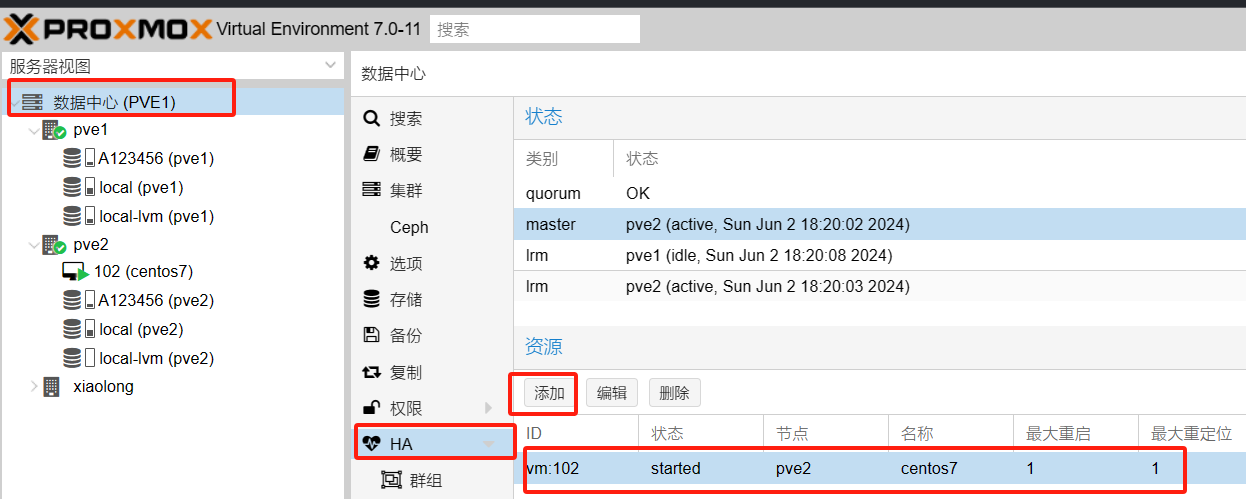
6.1配置自动故障转移进入HA

当PVe2节点发生挂断的情况出现,虚拟机会自动漂移至另一台PVE1下