canvas绘制表格
最近在为公司产品做技术预研,经理让用canvas做一个表格,于是就有了这篇博客。
我们的数据是后端通过MQTT推送过来的
我在代码中也直接使用了
具体MQTT的实现代码,可见博客
在vue使用MQTT
在这里为了方便实用我直接封装成组件了,当MQTT数据来了就出发绘制方法
js
<template>
<div>
<!-- 画布元素,用于绘图 -->
<canvas ref="canvasRef" height="180" width="600"></canvas>
</div>
</template>
<script setup>
import {defineExpose, onMounted, ref} from 'vue';
import UseMqtt from "../hooks/useMqtt.js"; // 引入MQTT通信的自定义hook
// 画布引用
const canvasRef = ref(null);
// 画布上下文
const ctx = ref(null);
// 存储接收到的数据
const data = ref([]);
// 行高
const rowHeight = 30;
// 当前偏移量,用于控制画布滚动
const currentOffset = ref(30);
// 数据格式示例
/*[{
"hx": 56,
"szy": 77,
"xl": 74,
"ssy": 122,
"xybhd": 0.36
}]*/
/**
* 绘制函数,用于在画布上绘制表格
*/
const drawTable = () => {
const canvas = canvasRef.value;
ctx.value = canvas.getContext('2d');
ctx.value.clearRect(0, 0, canvas.width, canvas.height); // 清除画布
ctx.value.fillStyle = 'black'; // 设置填充颜色
ctx.value.font = '16px Arial'; // 设置字体
// 绘制列标题
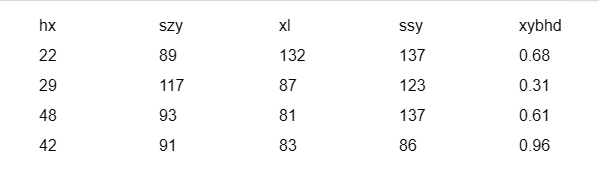
const headers = ["hx", "szy", "xl", "ssy", "xybhd"];
headers.forEach((header, index) => {
ctx.value.fillText(header, index * 120, rowHeight);
});
// 绘制数据行
data.value.forEach((item, rowIndex) => {
const y = (rowIndex + 1) * rowHeight + currentOffset.value;
if (y < canvas.height) {
Object.values(item).forEach((value, colIndex) => {
ctx.value.fillText(value, colIndex * 120, y);
});
}
});
};
onMounted(() => {
drawTable(); // 组件挂载后绘制表格
});
const options = {
subscription: {topic: "/testtopic/yq", qos: 0} // MQTT订阅配置
}
const {
createAndDo,
destroyConnection
} = UseMqtt(options, getMessage); // 使用MQTT hook,并传入消息处理函数
/**
* 接收消息
* @param v 接收到的消息
*/
function getMessage(v) {
try {
data.value.push(JSON.parse(v)) // 解析并存储消息
if (data.value.length >= 5) {
data.value.shift() // 如果数据超过5条,移除最旧的一条
}
drawTable(); // 重新绘制表格
} catch (e) {
console.error(e) // 错误处理
}
}
onMounted(() => {
createAndDo() // 组件挂载后建立MQTT连接并开始接收消息
})
defineExpose({
destroyConnection, // 暴露销毁MQTT连接的方法
createAndDo // 暴露建立并开始MQTT连接的方法
})
</script>效果图