一、HTML表单
表单的作用是用于采集用户再页面上填入的数据,并发送给后端服务器,经常用于用户注册、登录、xx信息添加、xx信息修改
1.1表单
1、input表示文本框
type属性:负责配置不同的输入框类型
text:普通文本框
password:密码框
date:日期选择框
radio:单选框,checked属性定义默认选中
checkbox:复选框,checked属性定义默认选中
file:文件上传,multiple属性定义可多选
submit:提交按钮
reset:重置按钮
button:普通按钮,通常与js结合使用
hidden:隐藏域
name属性:input框的名称,指向后台传入参数的名称
value属性:用户输入的内容,或者按钮展示的文字
placeholder属性:input中提示的文本
**2、form标签:**嵌套多个input标签,收集用户填写的数据,上传到服务器,配合submit和reset完成提交和重置功能
action属性:配置数据提交的服务器地址
method属性:(提交方式)
get:将参数以字符串的形式拼接到地址后方,缺点:参数大小有限制
post:参数大小无限制,将数据存入请求体中
**3、下拉框:**使用select和option共同完成
select:声明下拉框
name属性:提交到服务器的参数名
option:下拉框中的每个选项
value属性:选项传递到服务器的真实数据
selected属性:默认选中
**4、文本域:**textarea,生成一个多行多列的文本输入域
rows:定义行数
cols:定义列数
5、页签:
使用方式一:
使用<label></label>标签,将文字和其他html标签包裹在一起
使用方式二:
1.使用<label></label>标签包裹文字
2.在需要拼接的其他标签上设置一个唯一的id
3.在label通过for和其他标签关联到一起
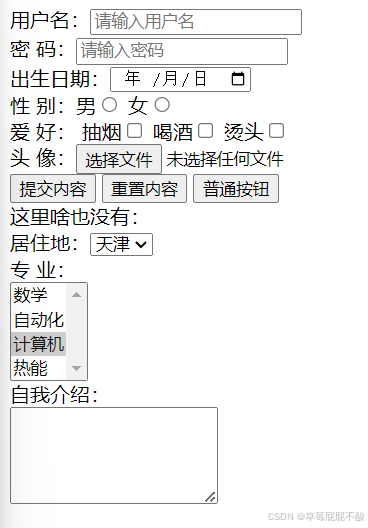
html
<!DOCTYPE html>
<html lang="en">
<head>
    <meta charset="UTF-8">
    <meta name="viewport" content="width=device-width, initial-scale=1.0">
    <title>表单</title>
</head>
<body>
    <form action="#/" method="post">
        用户名:<input type="text" name="username" placeholder="请输入用户名"><br>
        密 码:<input type="password" name="password" placeholder="请输入密码"><br>
        出生日期:<input type="date" name="birthday"><br>
        性 别:<label>男<input type="radio" name="sex"></label>
        <label for="nv">女</label><input id="nv" type="radio" name="sex"><br>
        爱 好: 抽烟<input type="checkbox" name="hobby">
               喝酒<input type="checkbox" name="hobby">
               烫头<input type="checkbox" name="hobby"> <br>
        头 像:<input type="file" name="files" multiple><br>
        <input type="submit" value="提交内容">
        <input type="reset" value="重置内容">
        <input type="button" value="普通按钮"><br>
        这里啥也没有:<input type="hidden" value="100"><br>
        居住地:<select name="city">
            <option value="bj">北京</option>
            <option value="sh">上海</option>
            <option value="sz">深圳</option>
            <option value="tj" selected>天津</option>
            <option value="hz">杭州</option>
            <option value="nc">南昌</option>
        </select><br>
        专 业:<br>
        <select name="zhuanye" multiple>
            <option value="0">数学</option>
            <option value="1">自动化</option>
            <option value="2">计算机</option>
            <option value="3">热能</option>
        </select><br>
        自我介绍:<br>
        <textarea name="dec" rows="5"></textarea>
    </form>
</html>
二、CSS入门
CSS(层叠样式表)用于HTML页面的美化。
HTML引入CSS的三种方式:
-
**行内样式:**定义在标签的属性中, 作用于当前标签
-
**内部样式:**定义在页面的head部分, 作用于当前页面中的所有(部分)标签
优先级: 行内样式 > (内部样式 外部样式 后面覆盖前面)
html
<!DOCTYPE html>
<html lang="en">
<head>
<meta charset="UTF-8">
<meta name="viewport" content="width=device-width, initial-scale=1.0">
<title>HTML引入CSS</title>
<!-- 声明一个内部样式 -->
<!-- 当前页面上所有h1标签,颜色紫色 -->
<style>
h1 {
color: blueviolet;
}
</style>
</head>
<body>
<!-- 行内样式 -->
<h1 style="color: aqua;">行内样式</h1>
<h1>内部样式</h1>
</body>
</html>
**3. 外部样式:**定义在页面外部(同级目录下创建一个my.css文件,在文件中写样式),通过link标签引入到页面中,作用于所有引入此样式文件的页面标签
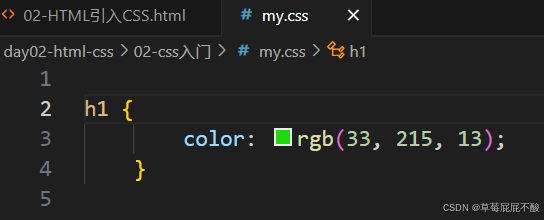
html
<!DOCTYPE html>
<html lang="en">
<head>
<meta charset="UTF-8">
<meta name="viewport" content="width=device-width, initial-scale=1.0">
<title>HTML引入CSS</title>
<!-- 声明一个外部样式 -->
<link rel="stylesheet" href="./my.css">
</head>
<body>
<!-- 行内样式 -->
<h1 style="color: aqua;">行内样式</h1>
<h1>外部样式</h1>
</body>
</html>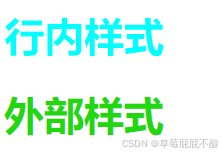
三、CSS选择器
选择器的作用是用来找出页面中一组特定的标签,选择器大方向上分为基础选择器和复合选择器以及伪选择器。
3.1 基础选择器
3.1.1 标签选择器
作用:使用标签名选中一类标签,然后设置样式
语法:标签名 { css样式 }
注意:标签选择器无法差异化同名标签的显示效果
html
<!DOCTYPE html>
<html lang="en">
<head>
<meta charset="UTF-8">
<meta name="viewport" content="width=device-width, initial-scale=1.0">
<title>标签选择器</title>
<style>
/*1. 将所有的span文字大小设置为16px, 颜色是红色 */
span {
font-size: 16px;
color: red;
}
/*2. 将所有图片大小设置为50 * 50*/
img {
width: 50px;
height: 50px;
}
/* 3. 将表格中的所有文字设置居中效果*/
td {
text-align: center;
}
</style>
</head>
<body>
<span>古力娜扎</span>
<span>迪丽热巴</span>
<span>黑寡妇</span>
<span>钢铁侠</span>
<span>超人</span>
<span>灭霸</span>
<table border="1px" width="800px" cellpadding="0" cellspacing="0">
<tr>
<th>编号</th>
<th>图像</th>
<th>姓名</th>
<th>地址</th>
<th>操作</th>
</tr>
<tr>
<td>1</td>
<td>
<img src="../img/autor.jpg">
</td>
<td>张三</td>
<td>西安</td>
<td>
<a href="###">修改</a>
<a href="###">删除</a>
</td>
</tr>
</table>
</body>
</html>3.1.2 类选择器
作用:使用标签的class属性选中一类标签
语法:.class属性值{ css样式 }
步骤:1. 在目标标签上添加class=""属性
- 使用类选择器选中标签,然后设置样式
注意:一个类选择器可以供多个标签使用,一个标签也可以使用多个类选择器,需要使用空格隔开
html
<!DOCTYPE html>
<html lang="en">
<head>
<meta charset="UTF-8">
<meta name="viewport" content="width=device-width, initial-scale=1.0">
<title>类选择器</title>
<style>
/* 1. 所有女性,文字变红*/
.woman {
color: red;
}
/*2. 所有英雄,字体加粗*/
.hero{
font-weight: bolder;
}
/*3. 标题背景色设置 #DEE3E6 普通行背景色设置 #F5F5F5*/
.bt{
background-color: #dee3e6;
}
.pt{
background-color: #f5f5f5;
}
</style>
</head>
<body>
<span class="woman">古力娜扎</span>
<span class="woman">迪丽热巴</span>
<span class="woman hero">黑寡妇</span>
<span class="hero">钢铁侠</span>
<span class="hero">超人</span>
<span>灭霸</span>
<table border="1px" width="600px" cellpadding="0" cellspacing="0">
<tr class="bt">
<th>编号</th>
<th>姓名</th>
<th>地址</th>
<th>操作</th>
</tr>
<tr class="pt">
<td>1</td>
<td>张三</td>
<td>西安</td>
<td>
<a href="###">修改</a>
<a href="###">删除</a>
</td>
</tr>
<tr class="pt">
<td>2</td>
<td>李四</td>
<td>武汉</td>
<td>
<a href="###">修改</a>
<a href="###">删除</a>
</td>
</tr>
<tr class="pt">
<td>3</td>
<td>王五</td>
<td>北京</td>
<td>
<a href="###">修改</a>
<a href="###">删除</a>
</td>
</tr>
</table>
</body>
</html>运行结果:

3.1.3 id选择器和通配符选择器
id选择器
作用:使用id属性选中一个标签
语法:#id{css样式}
步骤:1. 在目标标签上添加id=""属性
- 使用id选择器选中标签,然后设置样式
注意:一个id选择器在一个页面上只能用一次(html不建议页面上的元素有相同的id名称)
通配符选择器
作用:查找页面所有标签,设置相同样式
语法:*{ css样式 }
注意:不需要调用,浏览器自动查找页面所有标签,设置相同的样式;优先级最低
html
<!DOCTYPE html>
<html lang="en">
<head>
<meta charset="UTF-8">
<meta name="viewport" content="width=device-width, initial-scale=1.0">
<title>id选择器和通配符选择器</title>
<style>
/* id选择器: 1. 将灭霸变成紫色 20px */
#boss{
color:purple;
font-size: 20px;
}
/* 通配符选择器: 2. 将页面上所有文字变成50px */
* {
font-size: 50px;
}
</style>
</head>
<body>
<span>古力娜扎</span>
<span>迪丽热巴</span>
<span>黑寡妇</span>
<span>钢铁侠</span>
<span>超人</span>
<span id="boss">灭霸</span>
</body>
</html>
3.2 复合选择器
由多个基础选择器,通过不同的方式组合形成的选择器,它可以更准确、更高效的选择目标元素(标签)
3.2.1 后代选择器
作用:选中某元素的后代元素
语法:父选择器 子选择器 { css样式 }
html
<!DOCTYPE html>
<html lang="en">
<head>
<meta charset="UTF-8">
<meta name="viewport" content="width=device-width, initial-scale=1.0">
<title>后代选择器</title>
<!-- 将所有div下所有span中的文字设置为红色 -->
<style>
div span{
color: red;
}
</style>
</head>
<body>
<span>span</span>
<div>
<span>
div-span
</span>
<p>
<span>div-span-span</span>
</p>
</div>
</body>
</html>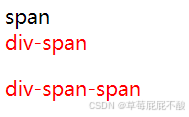
3.2.2 子代选择器
作用:选中某元素的字代元素(最近的子级)
语法:父选择器 > 子选择器 { css样式 }
html
<!DOCTYPE html>
<html lang="en">
<head>
<meta charset="UTF-8">
<meta name="viewport" content="width=device-width, initial-scale=1.0">
<title>子代选择器</title>
<!-- 将所有div中一级span中的文字颜色变成红色 -->
<style>
div > span{
color: red;
}
</style>
</head>
<body>
<span>span</span>
<div>
<span>
div-span
</span>
<p>
<span>div-span-span</span>
</p>
</div>
</body>
</html>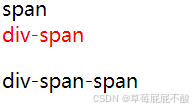
3.2.3 并集选择器
作用:选中多组标签设置相同的样式
语法:选择器1, 选择器2, ..., 选择器N { css样式 }
html
<!DOCTYPE html>
<html lang="en">
<head>
<meta charset="UTF-8">
<meta name="viewport" content="width=device-width, initial-scale=1.0">
<title>并集选择器</title>
<!-- 将div和span中的文字设置为红色 -->
<style>
div,p,span{
color: red;
}
</style>
</head>
<body>
<div> div 标签</div>
<p>p 标签</p>
<span>span 标签</span>
</body>
</html>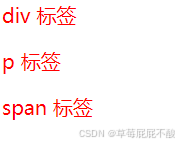
3.3 伪选择器
3.3.1 一般伪选择器
作用:伪类表示元素状态,选中元素的某个状态设置样式
语法:选择器:状态{ css样式 } 状态有四种:link-访问前 visited-访问后 hover-鼠标悬停 active-点击时
注意:如果要给超链接设置以上四个状态,需要按 LVHA 的顺序书写
html
<!DOCTYPE html>
<html lang="en">
<head>
<meta charset="UTF-8">
<meta name="viewport" content="width=device-width, initial-scale=1.0">
<title>一般伪类选择器</title>
<style>
/*修改a标签,让超链接在访问前后,鼠标悬停和点击样式一样*/
a:link{
color: royalblue;
text-decoration: none;/*无下划线*/
}
a:visited{
color: royalblue;
text-decoration: none;/*无下划线*/
}
a:hover{
color: royalblue;
text-decoration: none;/*无下划线*/
}
a:active{
color: royalblue;
text-decoration: none;/*无下划线*/
}
.box:hover{
color: lightcoral;
}
</style>
</head>
<body>
<a href="#">a 标签</a>
<div class="box">div 标签</div>
</body>
</html>3.3.2 结构伪选择器
作用:根据元素的结构关系查找元素
语法:选择器 { css样式 }

html
<!DOCTYPE html>
<html lang="en">
<head>
<meta charset="UTF-8">
<meta name="viewport" content="width=device-width, initial-scale=1.0">
<title>结构伪类选择器</title>
<style>
/*奇数行设置为蓝色*/
ul li:nth-child(2N+1){
color: rgb(27, 42, 216);
}
/*偶数行设置为绿色*/
ul li:nth-child(2N){
color: rgb(26, 220, 68);
}
/*给第一个li设置背景色为红色*/
ul li:first-child{
color: red;
}
/*给最后一个li设置背景色为红色*/
ul li:last-child{
color: red;
}
</style>
</head>
<body>
<ul>
<li>1</li>
<li>2</li>
<li>3</li>
<li>4</li>
<li>5</li>
<li>6</li>
<li>7</li>
<li>8</li>
<li>9</li>
<li>10</li>
</ul>
</body>
</html>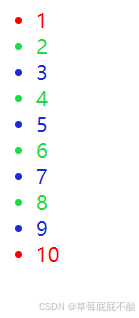
3.3.3 伪元素选择器(一般处理li标签)
作用:创建虚拟元素(伪元素),用来摆放装饰性的内容
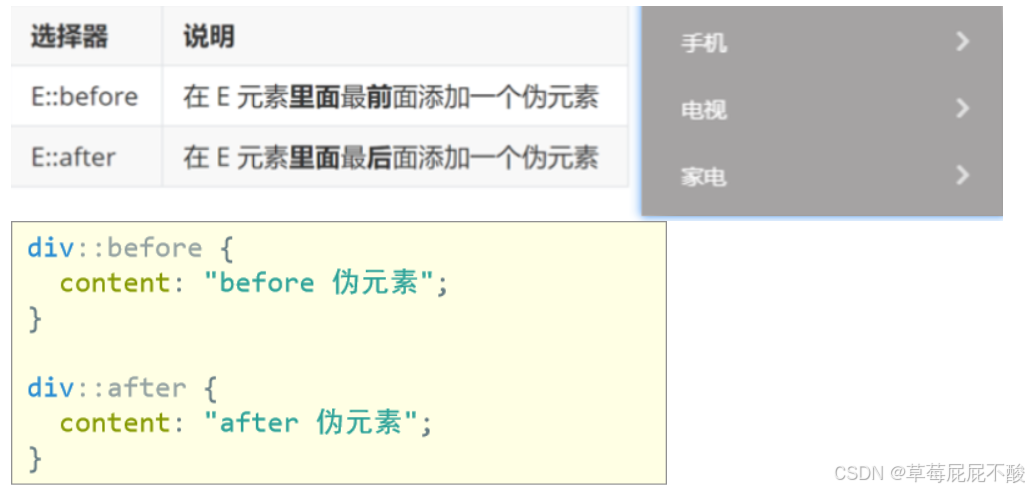
注意:必须设置 content: ""属性,用来设置伪元素的内容,如果没有内容,则引号留空即可,伪元素默认是行内显示模式
html
<!DOCTYPE html>
<html lang="en">
<head>
<meta charset="UTF-8">
<meta name="viewport" content="width=device-width, initial-scale=1.0">
<title>伪元素选择器</title>
<style>
div::before{
content: "嘻嘻";
}
div::after{
content: "嘿嘿";
}
</style>
</head>
<body>
<div>哈哈</div>
<div>哈哈</div>
<div>哈哈</div>
</body>
</html>
四、CSS样式
4.1 文字样式
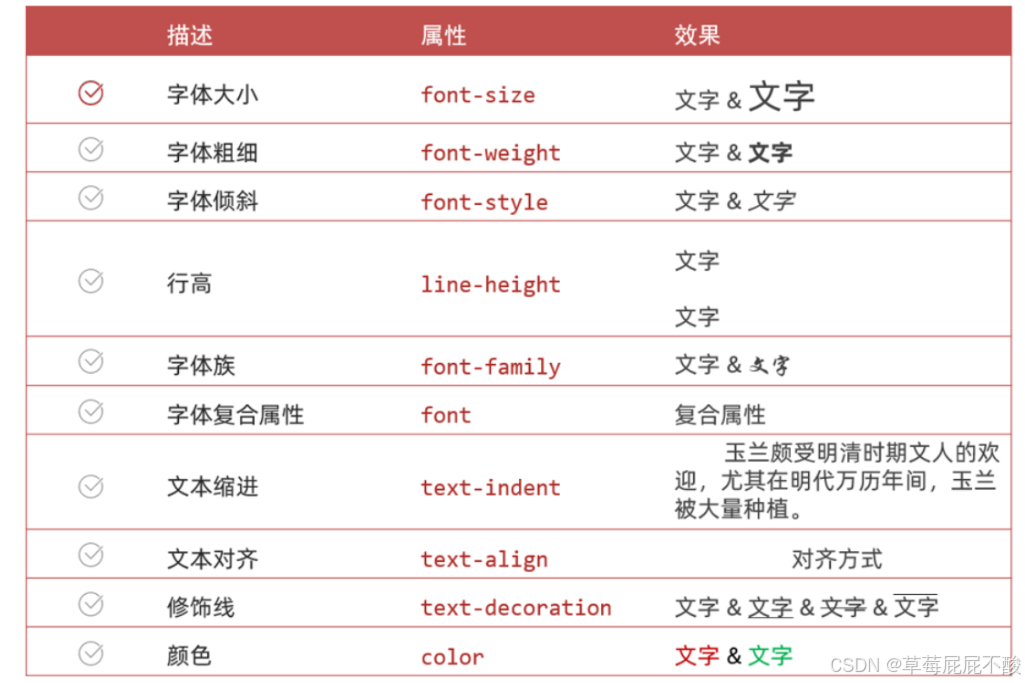
font-size: 20px; /* 设置字号 /
font-family: '楷体'; / 设置字体 /
font-weight: bold; / 设置文字加粗( normal:正常[默认], bold:粗体, 数值 ) /
font-style: italic; / 设置文字倾斜( normal:正常[默认], italic:倾斜 ) /
color:red; / 设置字体颜色 /
line-height: 40px; / 设置行高 /
text-indent: 40px; / 设置段落的首行缩进 /
text-align: center / 设置元素水平位置 /
text-decoration: none; / 设置修饰线(none:无, underline:下划线, overline:上划线, line-through:横穿线 ) */
4.2 背景样式
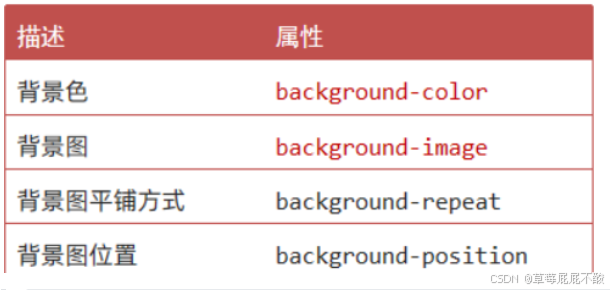
width: 600px;背景宽度
height: 600px;背景高度
background-color: rgb(168, 244, 218);
background-image: url(../img/cat.jpg);/平铺效果/
background-repeat: no-repeat;/不平铺/
background-repeat: repeat-x;/上面平铺/
background-repeat: repeat-y;/下面平铺/
background-position: 200px 30px;/左边距200px,上边界30px/
4.3 显示模式
块级元素: 独占一行, 可设宽高 div p 标题 列表
行内元素: 一行可以显示多个, 无法设置宽高 span a b u i
行内块元素: 一行可以显示多个,可设宽高 img input
如何转换: 使用css提供的display属性
block 块
inline-block 行内块
inline 行内
html
<!DOCTYPE html>
<html lang="en">
<head>
    <meta charset="UTF-8">
    <meta name="viewport" content="width=device-width, initial-scale=1.0">
    <title>显示模式</title>
    <style>
        div{
            width: 50px;
            height: 50px;
            background-color: bisque;
            display: inline-block;
        }
        span{
            width: 200px;
            height: 300px;
            background-color: aquamarine;
            display: block;
        }
        img{
            width: 100px;
        }
    </style>
</head>
<body>
    <!--定义块级元素-->
    <div>123</div>
    <div>123</div>
    <!--定义行内元素-->
    <span>你好</span>
    <span>世界</span><br>
    <!--定义行内块元素-->
    <img src="../img/cat.jpg">
    <img src="../img/cat.jpg">
</body>
</html>