强烈推荐在生产环境中使用反向代理服务器转发请求到Kestrel Http服务器,本文将会实践将Nginx --->ASP.NET Core 部署架构容器化的过程。
Nginx->ASP.NET Coe部署架构容器化
在Docker中部署Nginx--->ASP.NETCore 有两种选择, 第一种是在单容器内部署Nginx+ASP.NET Core, 这是本文着重要讲述的,另外一种是以独立容器分别部署Nginx和ASP.NET Core,容器之间通过Docker内建的network bridge完成通信(请关注后续博文)。
本次实践将会使用.NET Core CLI 创建默认的web应用
mkdir app

cd app

dotnet new web

dotnet restore

dotnet build
之后将项目发布到指定目录(dotnet publish), 发布产生的文件将会用于镜像打包。
1. 编写Dockerfile
本次将以 ASP.NETCore Runtime Image【mcr.microsoft.com/dotnet/core/aspnet:2.2】 作为基础镜像, 该镜像包含.NET Core Runtime、ASP.NET Core框架组件、依赖项, 该镜像为生产部署做了一些优化。
坑1:本次部署的是web app,不要使用【mcr.microsoft.com/dotnet/core/runtime:2.2】作为基础镜像,启动容器会报错:
It was not possible to find any compatible framework version
The specified framework 'Microsoft.AspNetCore.App', version '2.2.0' was not found.
- Check application dependencies and target a framework version installed at:
/usr/share/dotnet/
- Installing .NET Core prerequisites might help resolve this problem:
https://go.microsoft.com/fwlink/?LinkID=798306\&clcid=0x409
- The .NET Core framework and SDK can be installed from:
https://aka.ms/dotnet-download
因为该基础镜像是.NetCore 运行时镜像,但不包含ASP.NET Core框架。
本次Dokefile的定义将会包含nginx,在容器内启用Nginx标准配置代理请求到Kestrel:
FROM mcr.microsoft.com/dotnet/core/aspnet:2.2

RUN apt-get update
RUN apt-get install -y nginx

WORKDIR /app
COPY bin/Debug/netcoreapp2.2/publish .

COPY ./startup.sh .
RUN chmod 755 /app/startup.sh

RUN rm /etc/nginx/nginx.conf
COPY nginx.conf /etc/nginx

ENV ASPNETCORE_URLS http://+:5000
EXPOSE 5000 80

CMD ["sh", "/app/startup.sh"]-
Line 1 指定基础镜像
-
Line 3-4 从Debian package management store安装Nginx
-
Line 6-7 设置工作目录,放置ASP.NET Core WebApp部署包
-
Line 9-10 设置启动脚本
-
Line 12-13 设置nginx配置文件
-
Line 15-16 设置ASP.NETCore Kestrel在5000端口上监听, 暴露5000,80 端口给容器外部
-
Line 18 稍后给出启动脚本
tip: 需要理解容器内是一个独立的linux环境,Dockfile中EXPOSE用于指示容器打算暴露的端口。
这里可只暴露80端口给外部,但是必须给ASPNETCORE_URLS定义一个非80端口,作为容器内kestrel监听端口。
最终(tree -L 1)输出的app目录结构如下:
.
├── app.csproj
├── appsettings.Development.json
├── appsettings.json
├── bin
├── Dockerfile
├── nginx.conf
├── obj
├── Program.cs
├── Properties
├── Startup.cs
└── startup.sh
2. 构建镜像
docker build -t example/hello-nginx .该镜像名称为 example/hello-nginx 观察输出,会看到Dockerfile 中定义的每一步输出。
该镜像构建Dockerfile与vs docker tool生成的dockerfile进行对比,该文件生成的镜像更小,充分利用了镜像分层的理念。
Nginx配置
创建以上Dockerfile中需要的nginx配置文件,在同一目录,vim nginx.conf 创建文件:
worker_processes 4;

events { worker_connections 1024; }

http {
    sendfile on;

    upstream app_servers {
        server 127.0.0.1:5000;
    }

    server {
        listen 80;

        location / {
            proxy_pass         http://app_servers;
            proxy_redirect     off;
            proxy_set_header   Host $host;
            proxy_set_header   X-Real-IP $remote_addr;
            proxy_set_header   X-Forwarded-For $proxy_add_x_forwarded_for;
            proxy_set_header   X-Forwarded-Host $server_name;
        }
    }
}- Line 8-10 定义一组服务器(这里只有webapp), 资源名称(app_servers)可用在本文件任意位置。
- Line 13 通知Nginx在80端口监听
- Line 15-22 指示所有的请求都需要被代理到app_servers
总之,这个文件定义了Nginx在80端口监听外部请求,并将请求转发给同一容器的5000端口。
启动脚本
对于Docker容器,只能使用一个CMD(或ENTRYPOINT定义),但是这种反向代理配置需要启动Nginx和Kestrel, 所以我们定义一个脚本去完成这两个任务:
#!/bin/bash
service nginx start
dotnet /app/app.dll
3. 运行镜像
docker run --name test -it -d -p 8080:80 example/test该容器名称为test, 现在可从 http://localhost:8080 端口访问webapp, 通过curl -s -D - localhost:8080 -o /dev/null 验证
通过shell终端进入容器内部, 可进一步分别探究Nginx和Kestrel服务:
docker exec -it test bash

# curl -s -D - localhost:80 -o /dev/null
HTTP/1.1 200 OK
Server: nginx/1.6.2
Date: Fri, 24 Feb 2017 14:45:03 GMT
Content-Type: text/html; charset=utf-8
Transfer-Encoding: chunked

# curl -s -D - localhost:5000 -o /dev/null
HTTP/1.1 200 OK
Date: Fri, 24 Feb 2017 14:45:53 GMT
Transfer-Encoding: chunked
Content-Type: text/html; charset=utf-8
Server: Kestrel
tip:对于正在运行的容器,可使用docker exec -it [container_id] [command] 进入容器内部探究容器。
对于启动失败的容器,可使用docker logs [container_id] 查看容器输出日志。
了解一下docker的网络基础知识:
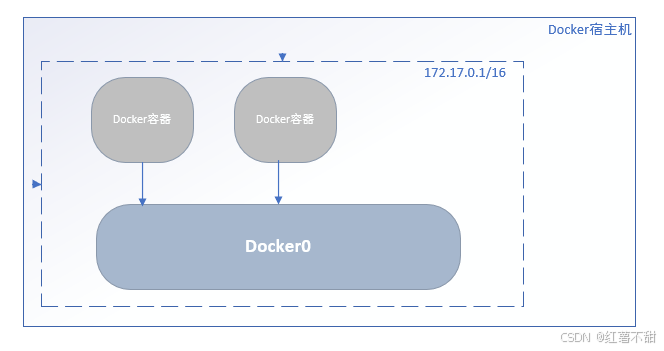
当Docker守护进程以其默认的配置参数在宿主机启动时,会创建一个名为docker0的Linux网桥设备, 该网桥会自动分配RFC1918定义的私有IP段的随机IP地址和子网, 该子网决定了所有新创建容器将被分配的容器IP地址所属网段。

docker network ls 列出所有网络:
docker inspect [network_id] 查看默认网络的详细信息,其中【Container】包含刚刚建立的容器 xenodochial_mahavira
[root@gs-server-5809 ~]$ docker  inspect a74331df40dc
[
    {
        "Name": "bridge",
        "Id": "a74331df40dc8c94483115256538304f1cbefe9f65034f20780a27271e6db606",
        "Created": "2018-12-28T17:05:33.100125947+08:00",
        "Scope": "local",
        "Driver": "bridge",
        "EnableIPv6": false,
        "IPAM": {
            "Driver": "default",
            "Options": null,
            "Config": [
                {
                    "Subnet": "172.17.0.0/16",
                    "Gateway": "172.17.0.1"
                }
            ]
        },
        "Internal": false,
        "Attachable": false,
        "Ingress": false,
        "ConfigFrom": {
            "Network": ""
        },
        "ConfigOnly": false,
        "Containers": {
            "3482bffb690c8a83c675ebd1d9bdcd149fc790ac8719bf447afae77e4cecbd7d": {
                "Name": "xenodochial_mahavira",
                "EndpointID": "1fe8569c3806b4b2bc032f54162a809ea3e18fd8e4ea41d68ed1a9e4f233eb17",
                "MacAddress": "02:42:ac:11:00:03",
                "IPv4Address": "172.17.0.3/16",
                "IPv6Address": ""
            },
            "510f41b1e39e983fbc7a75d235078d642c385f08a42e34bcfd5df14a07e3700c": {
                "Name": "gitlab-runner",
                "EndpointID": "ff9d8ac9ab9fbbf37be93f03bdc0fb3e7db803c1e0a5d0e0c533caf8de1cc0da",
                "MacAddress": "02:42:ac:11:00:02",
                "IPv4Address": "172.17.0.2/16",
                "IPv6Address": ""
            }
        },
        "Options": {
            "com.docker.network.bridge.default_bridge": "true",
            "com.docker.network.bridge.enable_icc": "true",
            "com.docker.network.bridge.enable_ip_masquerade": "true",
            "com.docker.network.bridge.host_binding_ipv4": "0.0.0.0",
            "com.docker.network.bridge.name": "docker0",
            "com.docker.network.driver.mtu": "1500"
        },
        "Labels": {}
    }
]
上面显示默认的容器都会加入名为"bridge"的网络,该网络以bridge形式,利用的是docker0网桥设备,
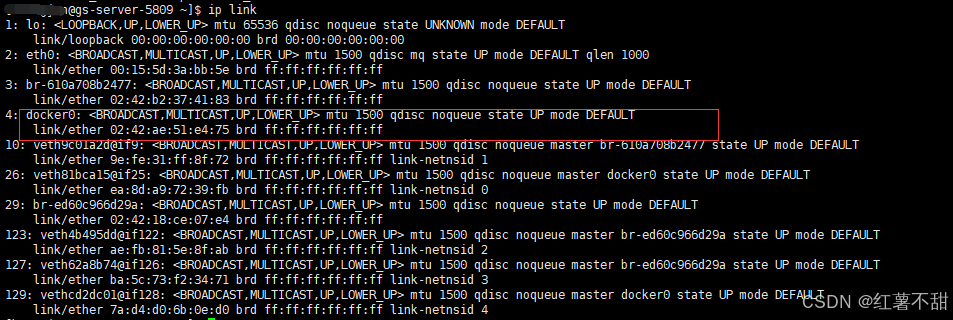
可使用 ip addr 确认系统已经存在 docker0网桥设备, 使用 brctl show 查看网桥连接哪些接口。

正如上面所说,ASP.NET Core有两种容器化反向代理部署架构,后续将会实践以独立容器分别部署Nginx、ASP.NET Core。