一、搭建高可用OpenStack(Queen版)集群之部署计算节点
一、部署nova
1、安装nova-compute
在全部计算节点安装nova-compute服务
yum install python-openstackclient openstack-utils openstack-selinux -y
yum install openstack-nova-compute -y
若yum安装时报错如下,解决办法:找到对应包进行单独安装
Failed:
  python-backports-ssl_match_hostname.noarch 0:3.5.0.1-1.el7                                                                                       python2-urllib3.noarch 0:1.21.1-1.el7
解决
python2-urllib3.noarch 0:1.21.1-1.el7下载地址:python-urllib3-1.21.1-1.el7 | Build Info | CentOS Community Build Service 具体包的地址:http://cbs.centos.org/kojifiles/packages/python-urllib3/1.21.1/1.el7/noarch/python2-urllib3-1.21.1-1.el7.noarch.rpm
python-backports-ssl_match_hostname
2、配置nova.conf
在全部计算节点操作
** 注意:**
- "my_ip"参数,根据节点修改
- nova.conf文件的权限:root:nova
cp -rp /etc/nova/nova.conf{,.bak}
egrep -v "^$|^#" /etc/nova/nova.conf [DEFAULT]
my_ip=10.20.9.46
use_neutron=true
firewall_driver=nova.virt.firewall.NoopFirewallDriver
enabled_apis=osapi_compute,metadata
# 前端采用haproxy时,服务连接rabbitmq会出现连接超时重连的情况,可通过各服务与rabbitmq的日志查看;
# transport_url=rabbit://openstack:openstack@controller:5673
# rabbitmq本身具备集群机制,官方文档建议直接连接rabbitmq集群;但采用此方式时服务启动有时会报错,原因不明;如果没有此现象,强烈建议连接rabbitmq直接对接集群而非通过前端haproxy
transport_url=rabbit://openstack:openstack@controller01:5672,openstack:openstack@controller02:5672,openstack:openstack@controller03:5672
[api]
auth_strategy=keystone
[api_database]
[barbican]
[cache]
[cells]
[cinder]
[compute]
[conductor]
[console]
[consoleauth]
[cors]
[crypto]
[database]
[devices]
[ephemeral_storage_encryption]
[filter_scheduler]
[glance]
api_servers=http://controller:9292
[guestfs]
[healthcheck]
[hyperv]
[ironic]
[key_manager]
[keystone]
[keystone_authtoken]
auth_uri = http://controller:5000
auth_url = http://controller:35357
memcached_servers = controller01:11211,controller02:11211,controller03:11211
auth_type = password
project_domain_name = default
user_domain_name = default
project_name = service
username = nova
password = nova_pass
[libvirt]
# 通过“egrep -c '(vmx|svm)' /proc/cpuinfo”命令查看主机是否支持硬件加速,返回1或者更大的值表示支持,返回0表示不支持;
# 支持硬件加速使用”kvm”类型,不支持则使用”qemu”类型;
# 一般虚拟机不支持硬件加速
virt_type=qemu
[matchmaker_redis]
[metrics]
[mks]
[neutron]
[notifications]
[osapi_v21]
[oslo_concurrency]
lock_path=/var/lib/nova/tmp
[oslo_messaging_amqp]
[oslo_messaging_kafka]
[oslo_messaging_notifications]
[oslo_messaging_rabbit]
[oslo_messaging_zmq]
[oslo_middleware]
[oslo_policy]
[pci]
[placement]
os_region_name=RegionTest
auth_type=password
auth_url=http://controller:35357/v3
project_name=service
project_domain_name=Default
username=placement
user_domain_name=Default
password=placement_pass
[quota]
[rdp]
[remote_debug]
[scheduler]
[serial_console]
[service_user]
[spice]
[upgrade_levels]
[vault]
[vendordata_dynamic_auth]
[vmware]
[vnc]
enabled=true
vncserver_listen=0.0.0.0
vncserver_proxyclient_address=$my_ip
# 因某些未做主机绑定的客户端不能访问”controller”名字,改为使用具体的ip地址
novncproxy_base_url=http://10.20.9.47:6080/vnc_auto.html
[workarounds]
[wsgi]
[xenserver]
[xvp]3、启动服务,并设置为开机自启,然后验证服务是否正常
在全部计算节点操作
systemctl enable libvirtd.service openstack-nova-compute.service
systemctl restart libvirtd.service
systemctl restart openstack-nova-compute.service

systemctl status libvirtd.service openstack-nova-compute.service
4、向cell数据库添加计算节点
在任意控制节点操作
确认数据库中含有主机
[root@controller01 ml2]# openstack compute service list --service nova-compute
+-----+--------------+-----------+------+---------+-------+----------------------------+
|  ID | Binary       | Host      | Zone | Status  | State | Updated At                 |
+-----+--------------+-----------+------+---------+-------+----------------------------+
| 123 | nova-compute | compute01 | nova | enabled | up    | 2018-09-15T13:06:40.000000 |
| 126 | nova-compute | compute02 | nova | enabled | up    | 2018-09-15T13:06:46.000000 |
+-----+--------------+-----------+------+---------+-------+----------------------------+
1、手动发现计算节点
手工发现计算节点主机,即添加到cell数据库
su -s /bin/sh -c "nova-manage cell_v2 discover_hosts --verbose" nova2、自动发现计算节点
在全部控制节点操作
- 为避免新加入计算节点时,手动执行注册操作"nova-manage cell_v2 discover_hosts",可设置控制节点定时自动发现主机;
- 涉及控制节点nova.conf文件的[scheduler]字段;
- 如下设置自动发现时间为5min,可根据实际环境调节
设置自动发现时间为5min
# vim /etc/nova/nova.conf
[scheduler]
discover_hosts_in_cells_interval=300
重启nova服务,配置生效
systemctl restart openstack-nova-api.service
systemctl status openstack-nova-api.service
5、验证
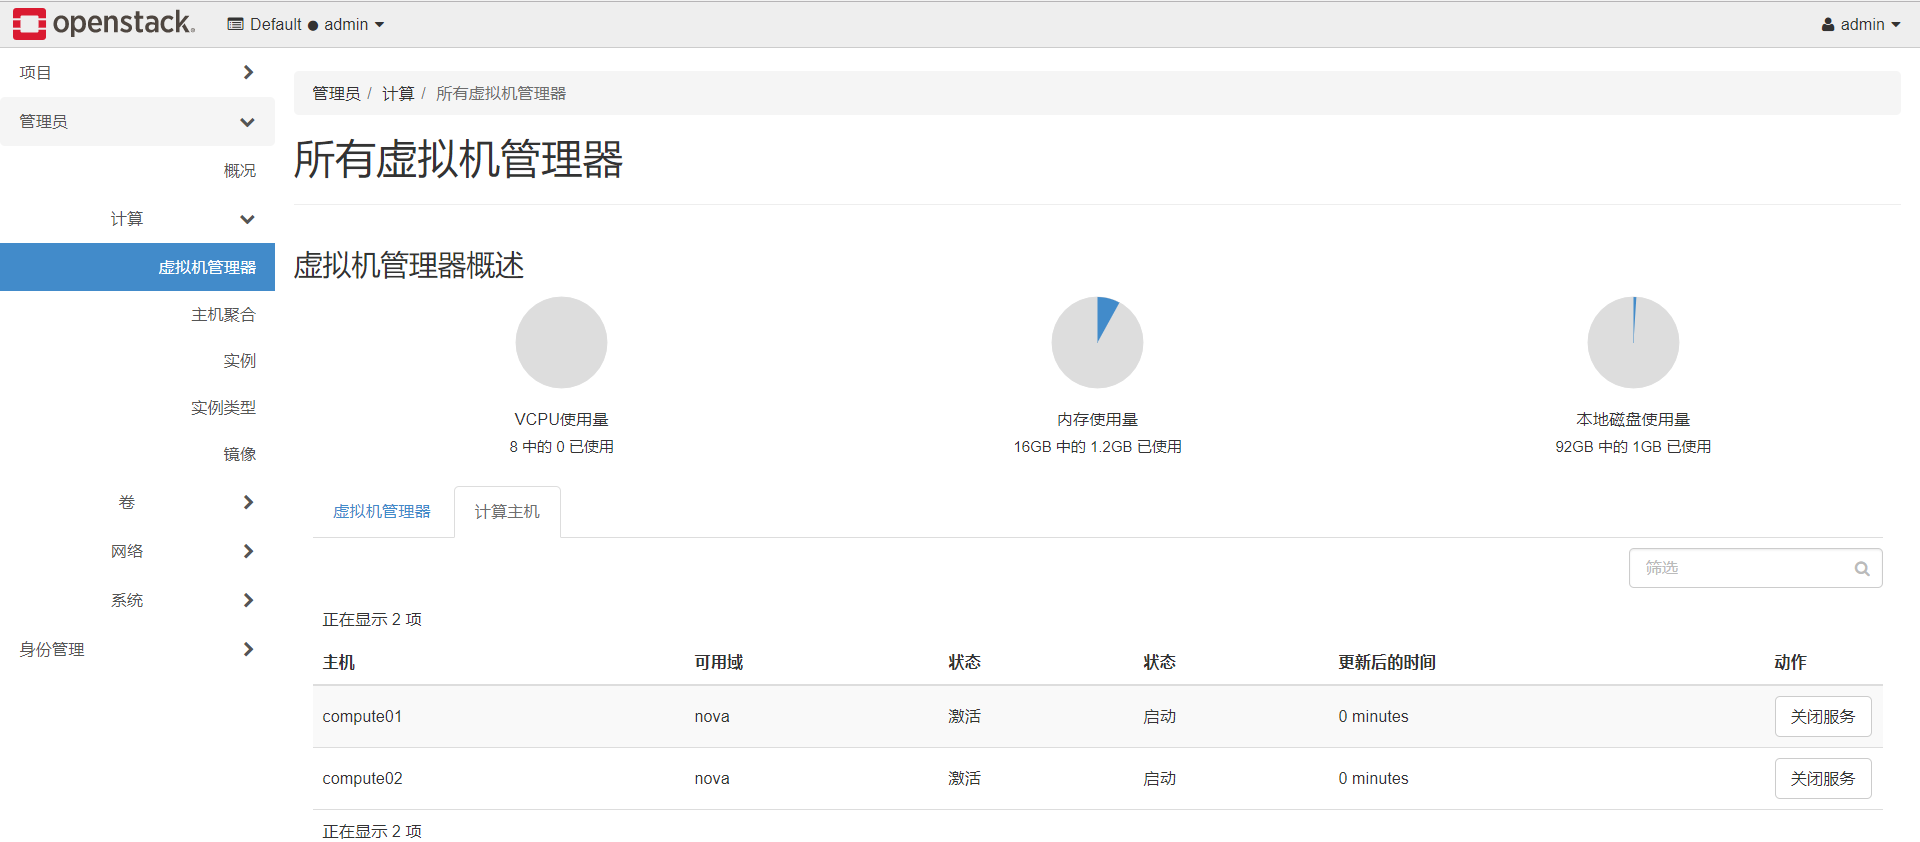
登陆dashboard,管理员-->计算-->虚拟机管理器
如果已注册成功,在"虚拟机管理器"标签下可发现计算节点,并能展示出各计算节点的资源;如果未注册或注册失败,则"虚拟机管理器"标签下无主机。
账号:admin 密码:admin_pass
1、查看计算节点情况

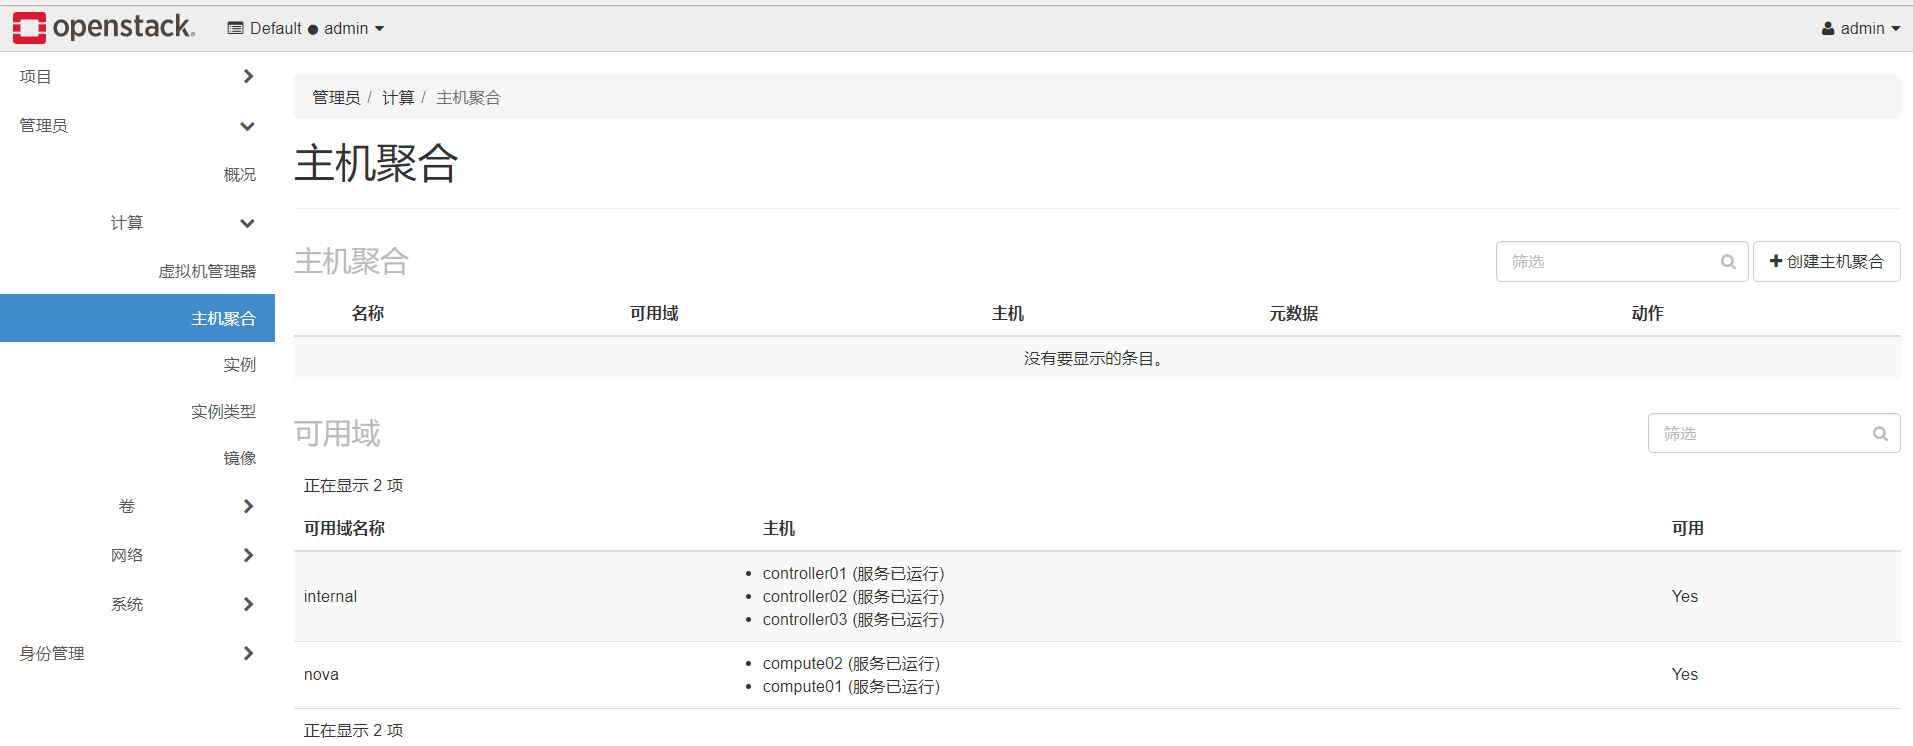
2、查看openstack集群中所有节点情况

二、部署Neutron
1、安装neutron-linuxbridge
在全部计算节点安装neutro-linuxbridge服务
yum install openstack-neutron-linuxbridge ebtables ipset -y2、配置neutron.conf
在全部计算节点操作
** 注意:**
- "bind_host"参数,根据节点修改
- neutron.conf文件的权限:root:neutron
cp -rp /etc/neutron/neutron.conf{,.bak}
egrep -v "^$|^#" /etc/neutron/neutron.conf[DEFAULT]
state_path = /var/lib/neutron
bind_host = 10.20.9.46
auth_strategy = keystone
# 前端采用haproxy时,服务连接rabbitmq会出现连接超时重连的情况,可通过各服务与rabbitmq的日志查看;
# transport_url = rabbit://openstack:openstack@controller:5673
# rabbitmq本身具备集群机制,官方文档建议直接连接rabbitmq集群;
但采用此方式时服务启动有时会报错,原因不明;如果没有此现象,强烈建议连接rabbitmq直接对接集群而非通过前端haproxy
transport_url=rabbit://openstack:openstack@controller01:5672,openstack:openstack@controller02:5672,openstack:openstack@controller03:5672
[agent]
[cors]
[database]
[keystone_authtoken]
www_authenticate_uri = http://controller:5000
auth_url = http://controller:35357
memcached_servers = controller01:11211,controller02:11211,controller03:11211
auth_type = password
project_domain_name = default
user_domain_name = default
project_name = service
username = neutron
password = neutron_pass
[matchmaker_redis]
[nova]
[oslo_concurrency]
lock_path = $state_path/lock
[oslo_messaging_amqp]
[oslo_messaging_kafka]
[oslo_messaging_notifications]
[oslo_messaging_rabbit]
[oslo_messaging_zmq]
[oslo_middleware]
[oslo_policy]
[quotas]
[ssl]3、配置linuxbridge_agent.ini
1、配置linuxbridge_agent.ini
在全部计算节点操作
** 注意:linuxbridge_agent.ini文件的权限:root:neutron**
**** 单网卡需要设置:physical_interface_mappings = provider:ens192****
cp /etc/neutron/plugins/ml2/linuxbridge_agent.ini{,.bak}
egrep -v "^$|^#" /etc/neutron/plugins/ml2/linuxbridge_agent.ini[DEFAULT]
[agent]
[linux_bridge]
# 网络类型名称与物理网卡对应,这里vlan租户网络对应规划的eth3;
# 需要明确的是物理网卡是本地有效,需要根据主机实际使用的网卡名确定;
# 另有”bridge_mappings”参数对应网桥
physical_interface_mappings = vlan:eth3
[network_log]
[securitygroup]
firewall_driver = neutron.agent.linux.iptables_firewall.IptablesFirewallDriver
enable_security_group = true
[vxlan]
enable_vxlan = true
# tunnel租户网络(vxlan)vtep端点,这里对应规划的eth2(的地址),根据节点做相应修改
local_ip = 10.0.0.41
l2_population = true 2、配置内核参数
- bridge:是否允许桥接;
- 如果"sysctl -p"加载不成功,报" No such file or directory"错误,需要加载内核模块"br_netfilter";
- 命令"modinfo br_netfilter"查看内核模块信息;
- 命令"modprobe br_netfilter"加载内核模块,解决错误
echo "# bridge" >> /etc/sysctl.conf
echo "net.bridge.bridge-nf-call-iptables = 1" >> /etc/sysctl.conf
echo "net.bridge.bridge-nf-call-ip6tables = 1" >> /etc/sysctl.conf
sysctl -p
4、配置nova.conf
在全部计算节点操作
配置只涉及nova.conf的"[neutron]"字段
# vim /etc/nova/nova.conf
[neutron]
url=http://controller:9696
auth_type=password
auth_url=http://controller:35357
project_name=service
project_domain_name=default
username=neutron
user_domain_name=default
password=neutron_pass
region_name=RegionTest
5、启动服务
在全部计算节点操作
nova.conf文件已变更,首先需要重启全部计算节点的nova服务
systemctl restart openstack-nova-compute.service
systemctl status openstack-nova-compute.service
启动网络服务
systemctl enable neutron-linuxbridge-agent.service
systemctl restart neutron-linuxbridge-agent.service
systemctl status neutron-linuxbridge-agent.service
6、验证
** 任意控制节点操作**
加载环境变量
. admin-openrc查看neutron相关的agent
[root@controller01 neutron]# openstack network agent list
+--------------------------------------+--------------------+--------------+-------------------+-------+-------+---------------------------+
| ID                                   | Agent Type         | Host         | Availability Zone | Alive | State | Binary                    |
+--------------------------------------+--------------------+--------------+-------------------+-------+-------+---------------------------+
| 03637bae-7416-4a23-b478-2fcafe29e11e | Linux bridge agent | controller02 | None              | :-)   | UP    | neutron-linuxbridge-agent |
| 1272cce8-459d-4880-b2ec-ce4f808d4271 | Metadata agent     | controller01 | None              | :-)   | UP    | neutron-metadata-agent    |
| 395b2cbb-87c0-4323-9273-21b9a9e7edaf | DHCP agent         | controller03 | nova              | :-)   | UP    | neutron-dhcp-agent        |
| 70dcfbb4-e60f-44a7-86ed-c07a719591fc | L3 agent           | controller02 | nova              | :-)   | UP    | neutron-l3-agent          |
| 711ef8dc-594d-4e81-8b45-b70944f031b0 | DHCP agent         | controller01 | nova              | :-)   | UP    | neutron-dhcp-agent        |
| 7626f6ec-620e-4eb4-b69b-78081f07cae5 | Linux bridge agent | compute02    | None              | :-)   | UP    | neutron-linuxbridge-agent |
| a1d93fac-d0bf-43d9-b613-3b6c6778e3ea | Linux bridge agent | compute01    | None              | :-)   | UP    | neutron-linuxbridge-agent |
| a5a67133-3218-41df-946e-d6162098b199 | Linux bridge agent | controller01 | None              | :-)   | UP    | neutron-linuxbridge-agent |
| af72caaf-48c3-423d-8526-31f529a1575b | L3 agent           | controller01 | nova              | :-)   | UP    | neutron-l3-agent          |
| b54c108f-a543-43f5-b81f-396b832da9c3 | Linux bridge agent | controller03 | None              | :-)   | UP    | neutron-linuxbridge-agent |
| cde2adf4-6796-4d50-9471-fda0cc060f09 | Metadata agent     | controller03 | None              | :-)   | UP    | neutron-metadata-agent    |
| d1707f54-e626-47fe-ba20-2f5e15abb662 | DHCP agent         | controller02 | nova              | :-)   | UP    | neutron-dhcp-agent        |
| e47a48b8-e7cb-48d1-b10f-895b7a536b70 | L3 agent           | controller03 | nova              | :-)   | UP    | neutron-l3-agent          |
| ec20a89d-2527-4342-9dab-f47ac5d71726 | Metadata agent     | controller02 | None              | :-)   | UP    | neutron-metadata-agent    |
+--------------------------------------+--------------------+--------------+-------------------+-------+-------+---------------------------+
[root@controller01 neutron]# openstack network agent list --agent-type linux-bridge
+--------------------------------------+--------------------+--------------+-------------------+-------+-------+---------------------------+
| ID                                   | Agent Type         | Host         | Availability Zone | Alive | State | Binary                    |
+--------------------------------------+--------------------+--------------+-------------------+-------+-------+---------------------------+
| 03637bae-7416-4a23-b478-2fcafe29e11e | Linux bridge agent | controller02 | None              | :-)   | UP    | neutron-linuxbridge-agent |
| 7626f6ec-620e-4eb4-b69b-78081f07cae5 | Linux bridge agent | compute02    | None              | :-)   | UP    | neutron-linuxbridge-agent |
| a1d93fac-d0bf-43d9-b613-3b6c6778e3ea | Linux bridge agent | compute01    | None              | :-)   | UP    | neutron-linuxbridge-agent |
| a5a67133-3218-41df-946e-d6162098b199 | Linux bridge agent | controller01 | None              | :-)   | UP    | neutron-linuxbridge-agent |
| b54c108f-a543-43f5-b81f-396b832da9c3 | Linux bridge agent | controller03 | None              | :-)   | UP    | neutron-linuxbridge-agent |
+--------------------------------------+--------------------+--------------+-------------------+-------+-------+---------------------------+
三、部署cinder
https://www.cnblogs.com/netonline/p/9337900.html
在采用ceph或其他商业/非商业后端存储时,建议将cinder-volume服务部署在控制节点,通过pacemaker将服务运行在active/passive模式。
1、安装cinder
在全部计算点安装cinder服务
yum install -y openstack-cinder targetcli python-keystone2、配置cinder.conf
在全部计算点操作
** 注意:**
- "my_ip"参数,根据节点修改
- cinder.conf文件的权限:root:cinder
cp -rp /etc/cinder/cinder.conf{,.bak}
egrep -v "^$|^#" /etc/cinder/cinder.conf[DEFAULT]
state_path = /var/lib/cinder
my_ip = 10.20.9.46
glance_api_servers = http://controller:9292
auth_strategy = keystone
# 简单的将cinder理解为存储的机头,后端可以采用nfs,ceph等共享存储
enabled_backends = ceph
# 前端采用haproxy时,服务连接rabbitmq会出现连接超时重连的情况,可通过各服务与rabbitmq的日志查看;
# transport_url = rabbit://openstack:openstack@controller:5673
# rabbitmq本身具备集群机制,官方文档建议直接连接rabbitmq集群;但采用此方式时服务启动有时会报错,原因不明;
# 如果没有此现象,强烈建议连接rabbitmq直接对接集群而非通过前端haproxy
transport_url=rabbit://openstack:openstack@controller01:5672,openstack:openstack@controller02:5672,openstack:openstack@controller03:5672
[backend]
[backend_defaults]
[barbican]
[brcd_fabric_example]
[cisco_fabric_example]
[coordination]
[cors]
[database]
connection = mysql+pymysql://cinder:123456@controller/cinder
[fc-zone-manager]
[healthcheck]
[key_manager]
[keystone_authtoken]
www_authenticate_uri = http://controller:5000
auth_url = http://controller:35357
memcached_servers = controller01:11211,controller02:11211,controller03:11211
auth_type = password
project_domain_id = default
user_domain_id = default
project_name = service
username = cinder
password = cinder_pass
[matchmaker_redis]
[nova]
[oslo_concurrency]
lock_path = $state_path/tmp
[oslo_messaging_amqp]
[oslo_messaging_kafka]
[oslo_messaging_notifications]
[oslo_messaging_rabbit]
[oslo_messaging_zmq]
[oslo_middleware]
[oslo_policy]
[oslo_reports]
[oslo_versionedobjects]
[profiler]
[service_user]
[ssl]
[vault]3、启动服务
在全部计算点操作
systemctl enable openstack-cinder-volume.service target.service
systemctl restart openstack-cinder-volume.service
systemctl restart target.service
systemctl status openstack-cinder-volume.service target.service
4、验证
在任意控制节点操作
加载环境变量
. admin-openrc 查看agent服务或:cinder service-list
此时后端存储服务为ceph,但ceph相关服务尚未启用并集成到cinder-volume,导致cinder-volume服务的状态也是"down"
[root@controller01 ~]# openstack volume service list
+------------------+--------------+------+---------+-------+----------------------------+
| Binary           | Host         | Zone | Status  | State | Updated At                 |
+------------------+--------------+------+---------+-------+----------------------------+
| cinder-scheduler | controller01 | nova | enabled | up    | 2018-09-10T13:09:24.000000 |
| cinder-scheduler | controller03 | nova | enabled | up    | 2018-09-10T13:09:25.000000 |
| cinder-scheduler | controller02 | nova | enabled | up    | 2018-09-10T13:09:23.000000 |
+------------------+--------------+------+---------+-------+----------------------------+