「OC」暑假第三周------天气预报的仿写
文章目录
写在前面
天气预报作为暑假最后的一个项目,算得上我觉得有点用的内容,毕竟用上了网络请求,就是迈出了新的一步,不过就是在网络请求之中其实卡了挺久,第一次使用或多或少出现了问题。写完了任务也是归心似箭,到了家才开始天气预报的总结。
预览

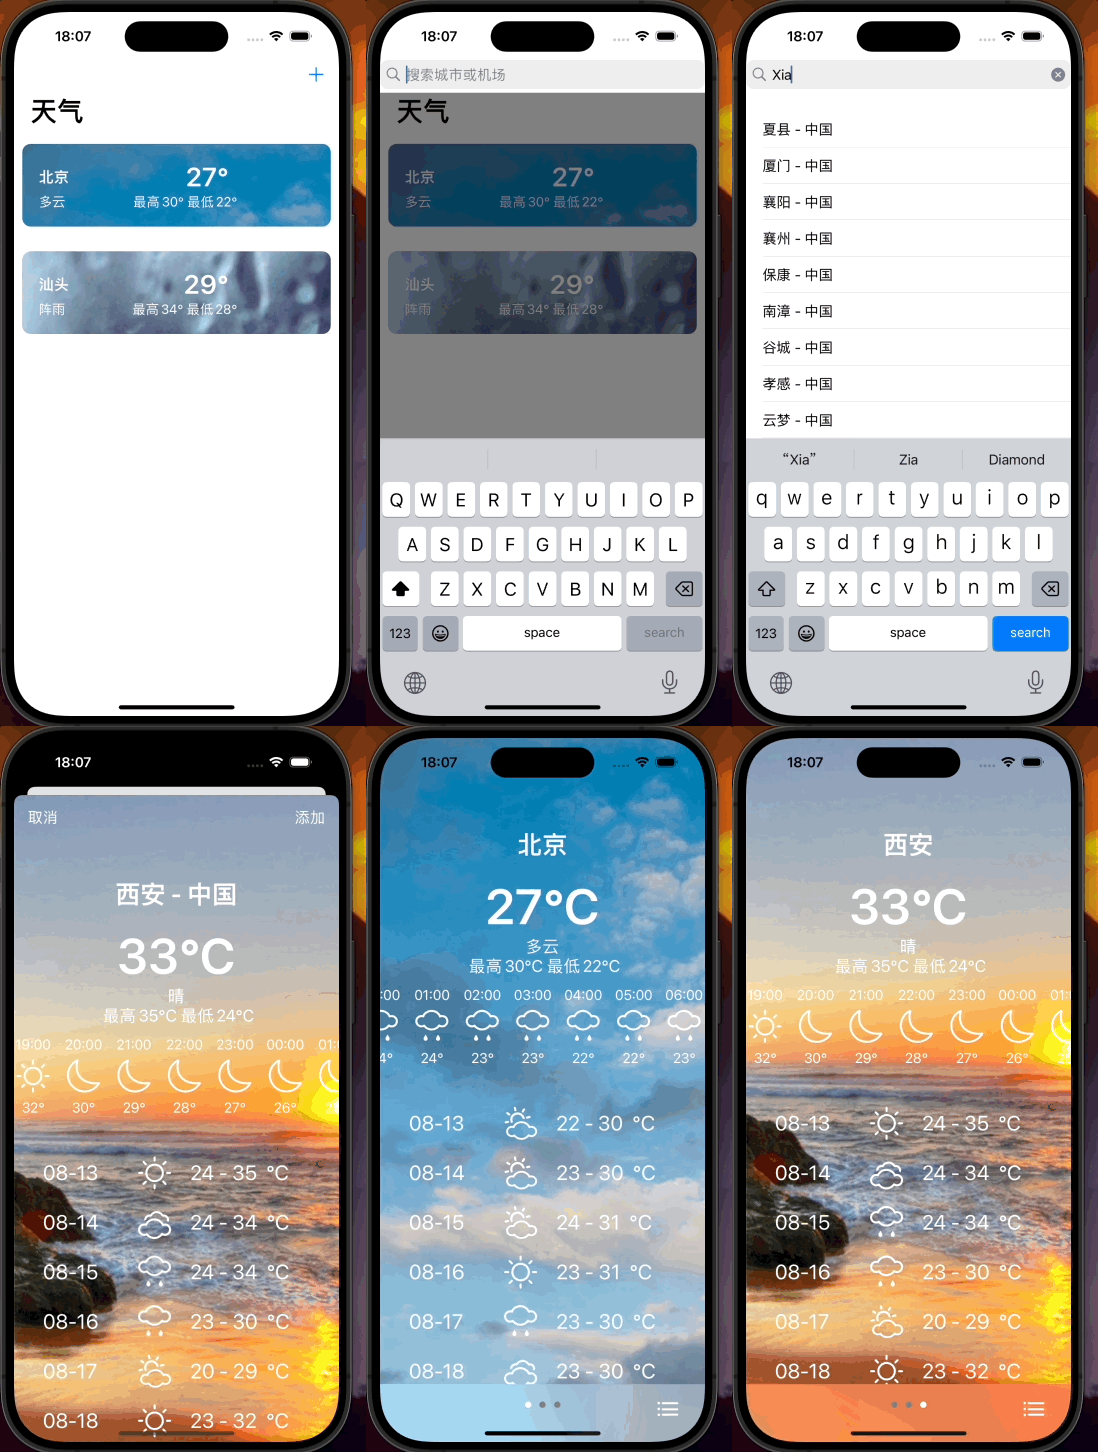
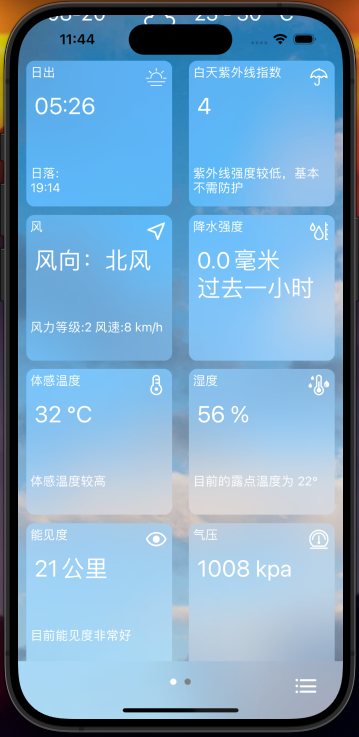
此次天气预报一共实现了三个界面,一个是初始的主页面,供展示我们添加的城市天气以及展示模糊搜索的内容,第二个页面是从模糊搜索之中点入的天气详情页,有将该城市天气添加到主页的功能,第三个页面就是从主页的cell点入的所有天气详情页,可以查看所有已经添加的天气。
UItableView嵌套UICollectionView

为了实现这个圆角控件,我一开始是想要直接使用一个单独的collectionView来进行布局,但是由于前面是tableView,要使得这个圆角控件的风格统一就必须把内容全部写在tableView之中,于是我就开始研究如何进行tableViewCell和CollectionView的嵌套。
要实现嵌套,我们就要将实现collectionView所需要的协议放在tableViewCell之中,实现<UICollectionViewDataSource,UICollectionViewDelegate, UICollectionViewDelegateFlowLayout>,然后就在tableViewCell之中开始创建流式布局,创建collectionView,布局大小,就是将之前在控制器之中做的在tableViewCell之中实现,代码如下
#import "SquareTableViewCell.h"
#import "SquareCollectionViewCell.h"
@implementation SquareTableViewCell

- (instancetype)initWithStyle:(UITableViewCellStyle)style reuseIdentifier:(NSString *)reuseIdentifier {
    self = [super initWithStyle:style reuseIdentifier:reuseIdentifier];
    if (self) {

        self.backgroundColor = [UIColor clearColor];
        [self setupCollectionView];
    }
    return self;
}

- (void)setupCollectionView {
    UICollectionViewFlowLayout *layout = [[UICollectionViewFlowLayout alloc] init];
    layout.minimumInteritemSpacing = 10;
    layout.minimumLineSpacing = 10;
    layout.sectionInset = UIEdgeInsetsMake(10, 10, 10, 10);

    self.collectionView = [[UICollectionView alloc] initWithFrame:CGRectZero collectionViewLayout:layout];
    self.collectionView.backgroundColor = [UIColor clearColor];
    self.collectionView.delegate = self;
    self.collectionView.dataSource = self;
    [self.collectionView registerClass:[SquareCollectionViewCell class] forCellWithReuseIdentifier:@"SquareCollectionViewCell"];
    [self.contentView addSubview:self.collectionView];

    self.collectionView.translatesAutoresizingMaskIntoConstraints = NO;
    [NSLayoutConstraint activateConstraints:@[
        [self.collectionView.topAnchor constraintEqualToAnchor:self.contentView.topAnchor],
        [self.collectionView.bottomAnchor constraintEqualToAnchor:self.contentView.bottomAnchor],
        [self.collectionView.leadingAnchor constraintEqualToAnchor:self.contentView.leadingAnchor],
        [self.collectionView.trailingAnchor constraintEqualToAnchor:self.contentView.trailingAnchor]
    ]];
}


- (void)setData:(NSArray *)data {
    _data = data;
    [self.collectionView reloadData];
}

- (NSInteger)collectionView:(UICollectionView *)collectionView numberOfItemsInSection:(NSInteger)section {
    return self.data.count;
}

- (UICollectionViewCell *)collectionView:(UICollectionView *)collectionView cellForItemAtIndexPath:(NSIndexPath *)indexPath {
    SquareCollectionViewCell *cell = [collectionView dequeueReusableCellWithReuseIdentifier:@"SquareCollectionViewCell" forIndexPath:indexPath];

    NSDictionary *item = self.data[indexPath.item];
    [cell configureWithIcon:item[@"icon"] title:item[@"title"] detail:item[@"detail"] subdetail:item[@"subdetail"]];

    return cell;
}

- (CGSize)collectionView:(UICollectionView *)collectionView layout:(UICollectionViewLayout *)collectionViewLayout sizeForItemAtIndexPath:(NSIndexPath *)indexPath {
    CGFloat itemWidth = (self.contentView.bounds.size.width - 40) / 2;
    return CGSizeMake(itemWidth, itemWidth);
}

@end
毛玻璃效果
UIVisualEffectView是从iOS 8开始提供的控件,功能是创建毛玻璃(Blur)效果,也就是实现模糊效果。
我在实现上面的圆角控件时,背景就是使用的是UIVisualEffectView,用于美化外观
UIVisualEffectView的基础使用非常简单,
 UIBlurEffect *blurEffect = [UIBlurEffect effectWithStyle:UIBlurEffectStyleRegular];
    UIVisualEffectView *blurView = [[UIVisualEffectView alloc] initWithEffect:blurEffect];
    blurView.frame = self.contentView.bounds;
    [self.contentView addSubview:blurView];
根据以上代码,我们有几个知识点需要了解一下
-
UIBlurEffect:
-
UIBlurEffect是UIVisualEffect类的子类,用于创建模糊效果。 -
通过UIBlurEffectStyle
枚举可以指定不同的模糊效果风格,包括:
UIBlurEffectStyleExtraLight:额外亮度模糊效果。UIBlurEffectStyleLight:亮度模糊效果。UIBlurEffectStyleDark:暗色模糊效果。UIBlurEffectStyleRegular:一般模糊效果。UIBlurEffectStyleProminent:显著模糊效果。
-
-
UIVisualEffectView:
UIVisualEffectView是一个视图类,用于显示视觉效果,比如模糊效果。- 它可以包含
UIBlurEffect或UIVibrancyEffect对象,以创建模糊效果或振动效果。 - 通过将
UIVisualEffectView添加到视图层次结构中,可以在其上方显示模糊或振动效果,使应用程序的界面看起来更加吸引人。
其实了解了以上的两个知识点,我们就可以正常使用UIVisualEffectView的相关功能了。
在此之外我再介绍一下UIVisualEffectView之中的 UIVibrancyEffect 对象,用在实现在毛玻璃上的特殊书写效果,内容就像是写在这个毛玻璃效果之上的。如果我们需要,可以根据一下流程进行实现
objc
- (void)viewDidLoad {
    [super viewDidLoad];
    self.view.backgroundColor = [UIColor colorWithPatternImage:[UIImage imageNamed:@"back3.jpeg"]];
    // 创建一个模糊效果
    UIBlurEffect *blurEffect = [UIBlurEffect effectWithStyle:UIBlurEffectStyleLight];
    UIVisualEffectView *blurEffectView = [[UIVisualEffectView alloc] initWithEffect:blurEffect];
    blurEffectView.frame = self.view.bounds;
    [self.view addSubview:blurEffectView];

    // 创建一个振动效果
    UIVibrancyEffect *vibrancyEffect = [UIVibrancyEffect effectForBlurEffect:blurEffect];
    UIVisualEffectView *vibrancyEffectView = [[UIVisualEffectView alloc] initWithEffect:vibrancyEffect];
    vibrancyEffectView.frame = self.view.bounds;

    // 在振动效果视图中添加子视图(比如标签)
    UILabel *label = [[UILabel alloc] initWithFrame:CGRectMake(0, 0, 400, 30)];
    label.text = @"Hello, Vibrancy Effect!";

    label.font = [UIFont boldSystemFontOfSize:30];
    label.textAlignment = NSTextAlignmentCenter;
    label.center = vibrancyEffectView.center;
    [vibrancyEffectView.contentView addSubview:label];

    // 将振动效果视图添加到模糊效果视图中
    [blurEffectView.contentView addSubview:vibrancyEffectView];
}
此外,需要注意的是如果我们要将控件添加到
UIVisualEffectView之中,我们需要将子控件添加到其contentView属性中。
SVGKit库的使用
在关于天气相关的icon,我使用了和风天气API之中自带的icon,根据时刻的天气之中JSON数据,读取到相应的icon编号,利用和风天气自身给出的图片素材库实现了,当前天气icon的展示。
因为xcode似乎不支持SVG格式的图片,所以我们需要引入第三方SVGKit库来进行使用,首先是安装完成集成第三方库的Cocoapods,然后创建podfile文件,在podfile文件之中加入以下代码,并进行保存,最后在终端之中开始install就可以安装好了。
platform:ios,'17.5'

target 'weather' do

 pod 'SVGKit', :git => 'https://github.com/SVGKit/SVGKit.git', :branch => '2.x'
 pod 'CocoaLumberjack'


end
关于SVGKit库的用法:
objc
 NSString *imagename = data[@"icon"];

 SVGKImage* image = [SVGKImage imageNamed:imagename];
 image.size = CGSizeMake(40, 40);
 UIImage* iconImage = image.UIImage;
 UIImageView* iView = [[UIImageView alloc] initWithImage:iconImage];
就可以直接使用SVG类型的图片格式了
简单的动画实现
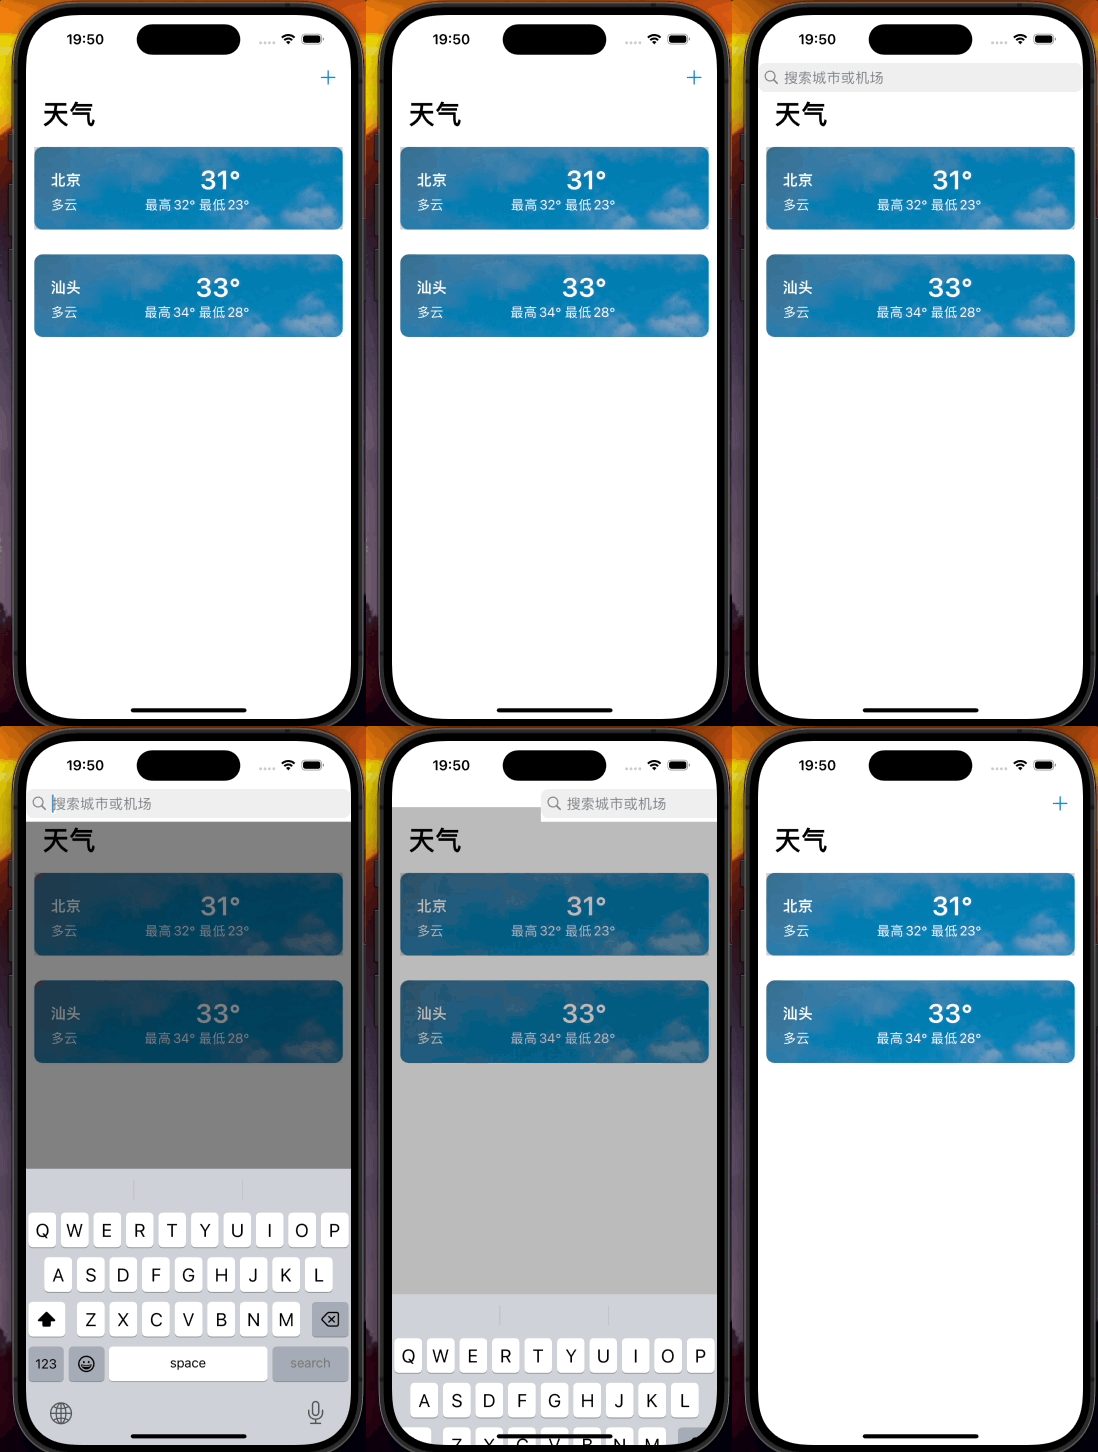
在天气预报编写的过程之中,我还加入了一些动画,比如搜索栏从右往左动至导航栏上;在点击搜索框键盘弹出的过程,慢慢添加一个半透明背景。

objc
- (void)keyboardWillShow:(NSNotification *)notification {
    [self.view addSubview:self.dimmedBackgroundView];

    [self.view addGestureRecognizer:self.tapGesture];
    [UIView animateWithDuration:0.3 animations:^{
        self.dimmedBackgroundView.alpha = 1;
        [self.view bringSubviewToFront:self.tableView1];
    }];
}
- (void)keyboardWillHide:(NSNotification *)notification {
    [self.view removeGestureRecognizer:self.tapGesture];
    [UIView animateWithDuration:0.3 animations:^{
        self.dimmedBackgroundView.alpha = 0;
        if (self.tableView1.hidden) {
            self.searchContainerView.frame = CGRectMake(self.view.frame.size.width, 0, self.view.frame.size.width, 44);
        }


    } completion:^(BOOL finished) {
        [self.dimmedBackgroundView removeFromSuperview];

    }];
}

-(void)setupSearchBar {
    self.searchBar = [[UISearchBar alloc] init];
    self.searchBar.placeholder = @"搜索城市或机场";
    self.searchBar.delegate = self;
    // 初始化容器视图
    self.searchContainerView = [[UIView alloc] initWithFrame:CGRectMake(self.view.frame.size.width, 0, self.view.frame.size.width, 44)];
    self.searchContainerView.backgroundColor = [UIColor whiteColor]; // 可以根据需要设置背景颜色
    [self.searchContainerView addSubview:self.searchBar];

    // 添加容器视图到导航栏的顶部
    [self.navigationController.navigationBar addSubview:self.searchContainerView];

    // 设置 searchBar 的 frame
    self.searchBar.frame = self.searchContainerView.bounds;
}

- (void)addButtonTapped {
    [UIView animateWithDuration:0.3 animations:^{
           self.searchContainerView.frame = CGRectMake(0, 0, self.view.frame.size.width, 44);
       }];

}
我通过判断键盘是否需要回收来,对黑色半透明背景和搜索栏进行动画操作,在搜索栏初始化的时候,我将其设置在了控制器屏幕外的右边,当点击加号按钮时,利用动画将搜索栏移至屏幕正上方,黑色半透明背景也是如此,当键盘弹出时将黑色背景加入并将透明度从0拉到1,当键盘回收时,再将视图透明度从1拉回0,然后再移出当前控制器。
主页之中详情页的编写
在点入主页之中的cell,我使用的是一个滚动视图,然后将详情页变为当前滚动视图所在的控制器的子控制器,然后将详情页控制器的view属性全部添加至滚动视图之中,具体代码如下:
objc
-(void)setupScrollview {

    self.scrollView = [[UIScrollView alloc] initWithFrame:self.view.bounds];
    self.scrollView.showsHorizontalScrollIndicator = NO;
    self.scrollView.contentSize = CGSizeMake( W * self.weatherDataArray.count, 0);
    self.scrollView.pagingEnabled = YES;
    self.scrollView.scrollEnabled = YES;
    self.scrollView.delegate = self;
    self.scrollView.bounces = NO;
    [self.scrollView setContentOffset:CGPointMake( self.index * W, 0)];
    for (int i = 0; i < self.weatherDataArray.count; i++) {
        detailViewController *city = [[detailViewController alloc] init];
        city.cityName = self.weatherDataArray[i][@"cityName"];
        city.name = self.weatherDataArray[i][@"cityID"];
        city.view.frame = CGRectMake(i * W, 0, W, H);
        [self addChildViewController:city];//将详情页控制器作为当前控制器的子控制器
        [self.scrollView addSubview:city.view];
    }
    [self.view addSubview:self.scrollView];
}
总结
暑假的项目学习过程,随着天气预报的完成也是趋近尾声,接下来的日子可以好好回家休息了!!!