本文列举了部分用于优化动画时延的正反案例,帮助开发者在遇到相似场景时进行优化,解决构建页面动画时遇到动画时延较长的问题。
减少动画丢帧
在播放动画或者生成动画时,画面产生停滞而导致帧率过低的现象,称为动画丢帧。
播放动画时,系统需要在一个刷新周期内完成动画变化曲线的计算,完成组件布局绘制等操作。建议使用系统提供的动画接口,只需设置曲线类型、终点位置、时长等信息,就能够满足常用的动画功能,减少UI主线程的负载。
反例:应用使用了自定义动画,动画曲线计算过程很容易引起UI线程高负载,易导致丢帧。
@Entry
@Component
struct AttrAnimationExample0 {
  @State widthSize: number = 200
  @State heightSize: number = 100
  @State flag: boolean = true

  computeSize() {
    let duration = 2000
    let period = 16
    let widthSizeEnd = 0
    let heightSizeEnd = 0
    if (this.flag) {
      widthSizeEnd = 100
      heightSizeEnd = 50
    } else {
      widthSizeEnd = 200
      heightSizeEnd = 100
    }
    let doTimes = duration / period
    let deltaHeight = (heightSizeEnd - this.heightSize) / doTimes
    let deltaWeight = (widthSizeEnd - this.widthSize) / doTimes
    for (let i = 1; i <= doTimes; i++) {
      let t = period * (i);
      setTimeout(() => {
        this.heightSize = this.heightSize + deltaHeight
        this.widthSize = this.widthSize + deltaWeight
      }, t)
    }
    this.flag = !this.flag
  }

  build() {
    Column() {
      Button('click me')
        .onClick(() => {
          let delay = 500
          setTimeout(() => { this.computeSize() }, delay)
        })
        .width(this.widthSize).height(this.heightSize).backgroundColor(0x317aff)
    }.width('100%').margin({ top: 5 })
  }
}
使用系统提供的属性动效API
建议:通过系统提供的属性动效API实现上述动效功能。
@Entry
@Component
struct AttrAnimationExample1 {
  @State widthSize: number = 200
  @State heightSize: number = 100
  @State flag: boolean = true

  build() {
    Column() {
      Button('click me')
        .onClick((event?: ClickEvent | undefined) => {
          if (this.flag) {
            this.widthSize = 100
            this.heightSize = 50
          } else {
            this.widthSize = 200
            this.heightSize = 100
          }
          this.flag = !this.flag
        })
        .width(this.widthSize).height(this.heightSize).backgroundColor(0x317aff)
        .animation({
          duration: 2000, // 动画时长
          curve: Curve.Linear, // 动画曲线
          delay: 500, // 动画延迟
          iterations: 1, // 播放次数
          playMode: PlayMode.Normal // 动画模式
        }) // 对Button组件的宽高属性进行动画配置
    }.width('100%').margin({ top: 5 })
  }
}
更详细的API文档请参考:属性动画。
使用系统提供的显式动效API
建议:通过系统提供的显式动效API实现上述动效功能。
@Entry
@Component
struct AnimateToExample2 {
  @State widthSize: number = 200;
  @State heightSize: number = 100;
  @State flag: boolean = true;

  build() {
    Column() {
      Button('click me')
        .onClick((event?: ClickEvent | undefined) => {
          if (this.flag) {
            animateTo({
              duration: 2000, // 动画时长
              curve: Curve.Linear, // 动画曲线
              delay: 500, // 动画延迟
              iterations: 1, // 播放次数
              playMode: PlayMode.Normal // 动画模式
            }, () => {
              this.widthSize = 100;
              this.heightSize = 50;
            })
          } else {
            animateTo({
              duration: 2000, // 动画时长
              curve: Curve.Linear, // 动画曲线
              delay: 500, // 动画延迟
              iterations: 1, // 播放次数
              playMode: PlayMode.Normal // 动画模式
            }, () => {
              this.widthSize = 200;
              this.heightSize = 100;
            })
          }
          this.flag = !this.flag;
        })
        .width(this.widthSize).height(this.heightSize).backgroundColor(0x317aff)
    }.width('100%').margin({ top: 5 })
  }
}
更详细的API文档请参考:显式动画。
优化效果
相比于自定义动画,使用系统提供的动效API可提高动画帧数,提高应用性能。
| 动画实现方式 | 帧数(fps) |
|---|---|
| 自定义动画 | 60 |
| 属性动效API | 120 |
| 显式动效API | 120 |
合理设置隐式动画
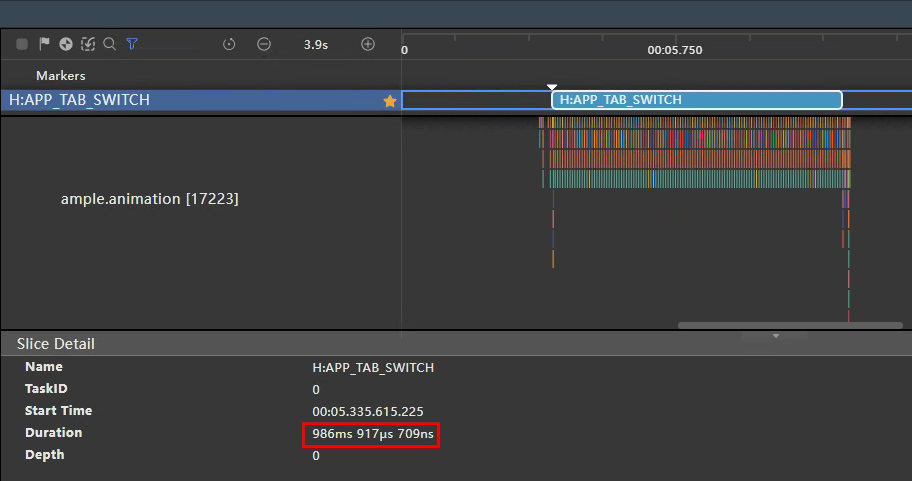
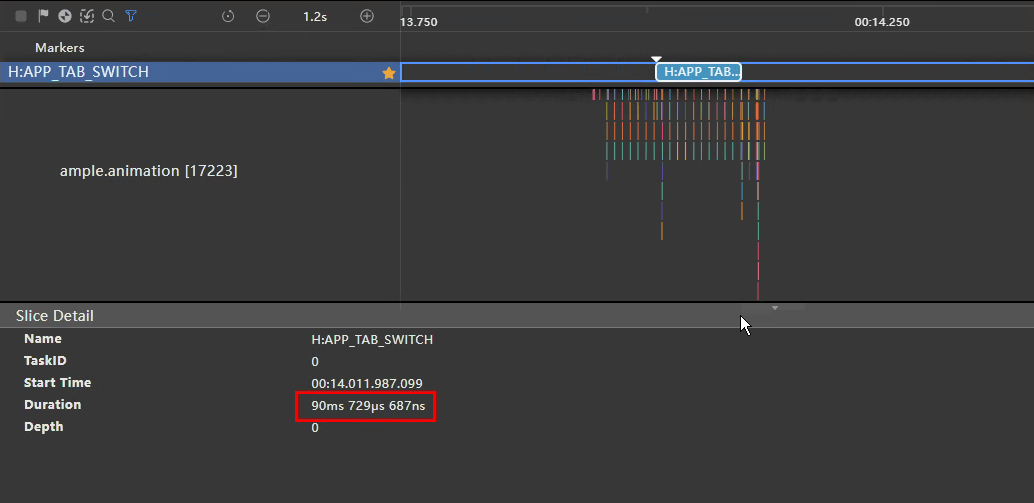
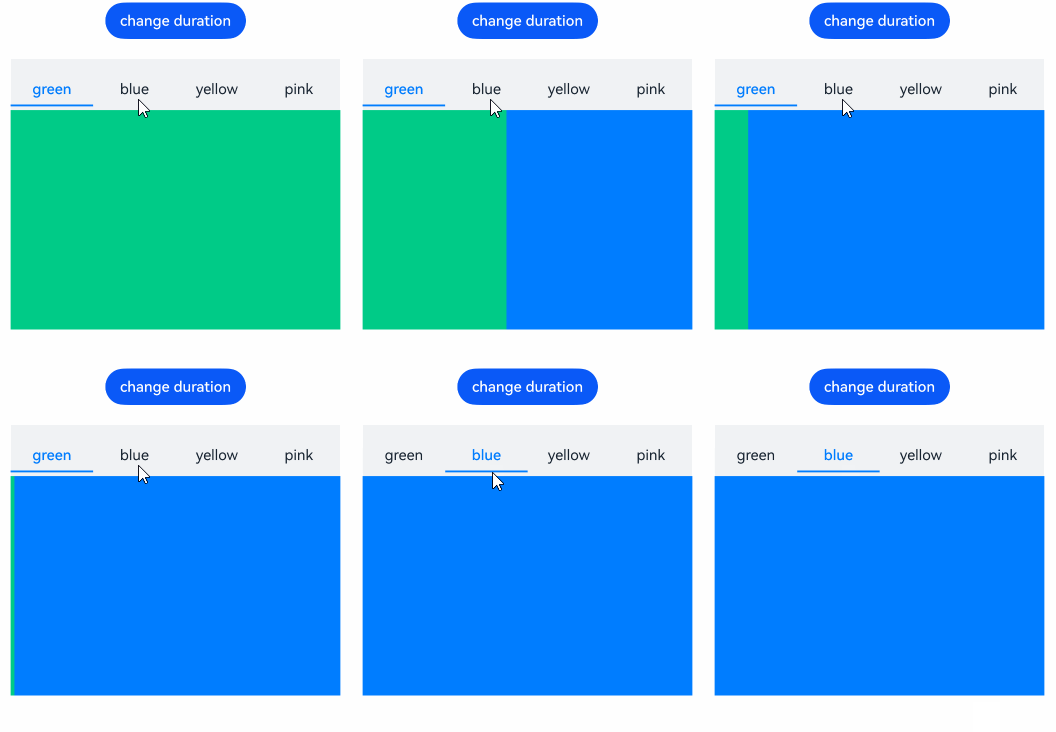
Tabs组件在不为BottomTabBarStyle样式时,切换页面时默认加载300ms的隐式动画,如果开发场景不需要该动画效果,会因默认加载导致页面跳转完成时延变长,此时可手动设置animationDuration减少动画完成时延。下述正反示例分别为100ms和1000ms的动画时延:
反例:
@Entry
@Component
struct TabsExample {
  ...
  private controller: TabsController = new TabsController();

  build() {
    Column() {
      Tabs({ barPosition: BarPosition.Start, index: this.currentIndex, controller: this.controller }) {
        TabContent()
        TabContent()
        // ...
      }
      // ...
      // 设置Tabs页面跳转的动画时长为1000ms
      .animationDuration(1000)
    }
    .width('100%')
  }
}
正例:
@Entry
@Component
struct TabsExample {
  ...
  private controller: TabsController = new TabsController();

  build() {
    Column() {
      Tabs({ barPosition: BarPosition.Start, index: this.currentIndex, controller: this.controller }) {
        TabContent()
        TabContent()
        // ...
      }
      // ...
      // 设置Tabs页面跳转的动画时长为100ms
      .animationDuration(100)
    }
    .width('100%')
  }
}
优化效果
| 优化前 1000ms | 优化后 100ms |
|---|---|
 |
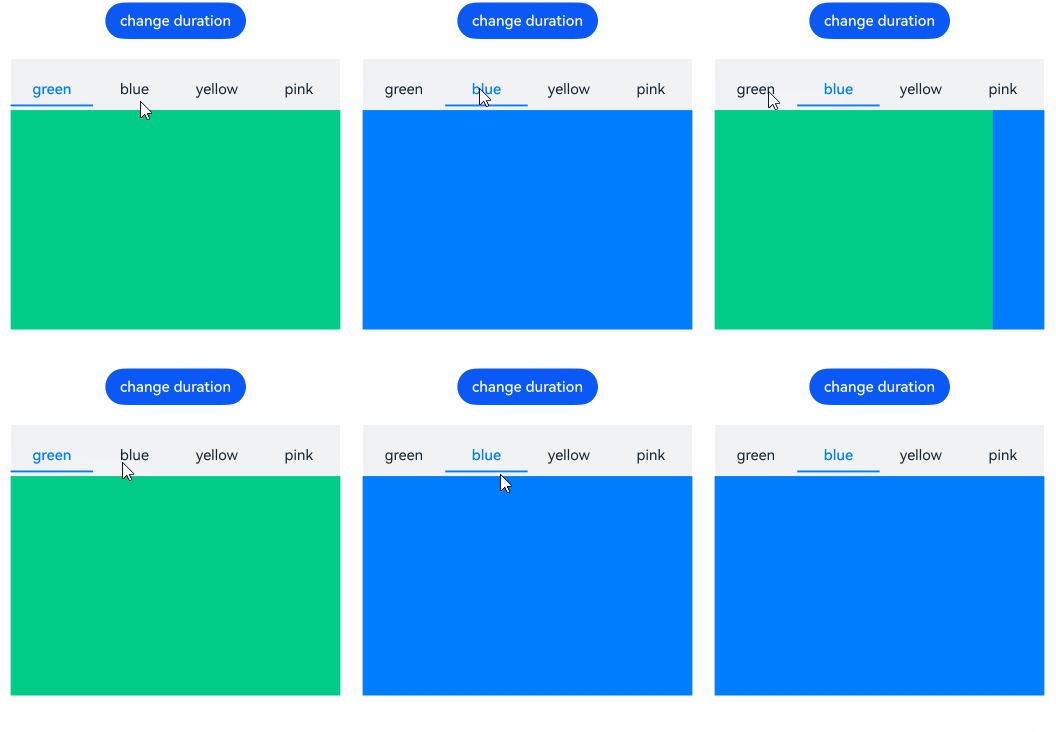 |
上述示例通过减少animationDuration数值,减少Tabs切换完成时延。当数值设置为0且TabBar不为BottomTabBarStyle样式时,隐式动效延时为默认的300ms。开发者可根据实际场景适当减少隐式动效时延,如果应用没有特殊的动效要求时,建议设置数值为1,减少阻塞主线程,提高应用性能。
更详细的API文档请参考:Tabs-animationduration。
合理设置动效时长
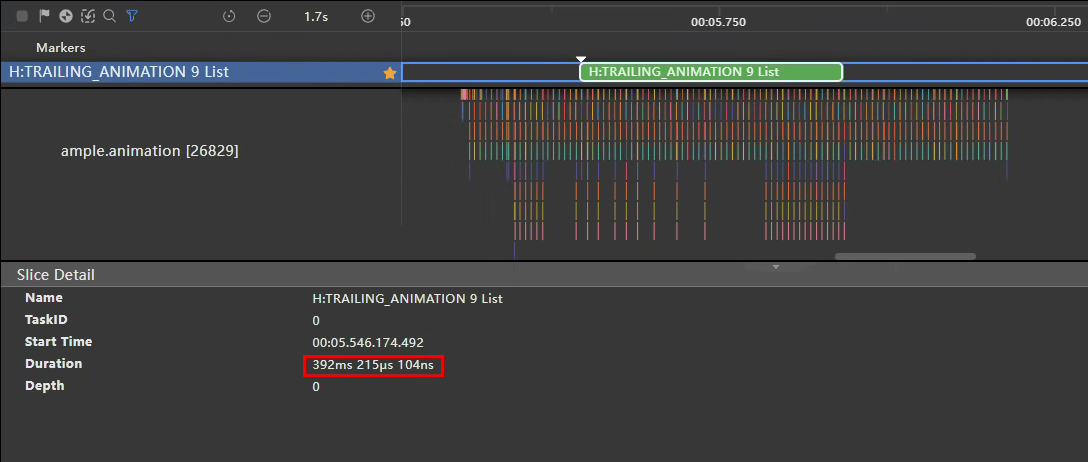
滚动类组件可使用fling方法按传入的初始速度进行惯性滚动,不合理的滚动速度设置可能导致动效时长过长,此时应通过加快滚动速度减少动效时长。下述正反示例通过改变List组件惯性滚动速度减少动效时长:
反例:
@Entry
@Component
struct ListExample {
  scrollerForList: Scroller = new Scroller();

  build() {
    Column() {
      Button('Fling100')
        .onClick(() => {
          // 设置当前滚动初始速度为100vp/s
          this.scrollerForList.fling(100);
        })
      List({ space: 20, initialIndex: 0, scroller: this.scrollerForList }) {
        // ...
      }
    }
  }
}
正例:
@Entry
@Component
struct ListExample {
  scrollerForList: Scroller = new Scroller();

  build() {
    Column() {
      Button('Fling100')
        .onClick(() => {
          // 设置当前滚动初始速度为10000vp/s
          this.scrollerForList.fling(10000);
        })
      List({ space: 20, initialIndex: 0, scroller: this.scrollerForList }) {
        // ...
      }
    }
  }
}
优化效果
100vp/s:
10000vp/s:
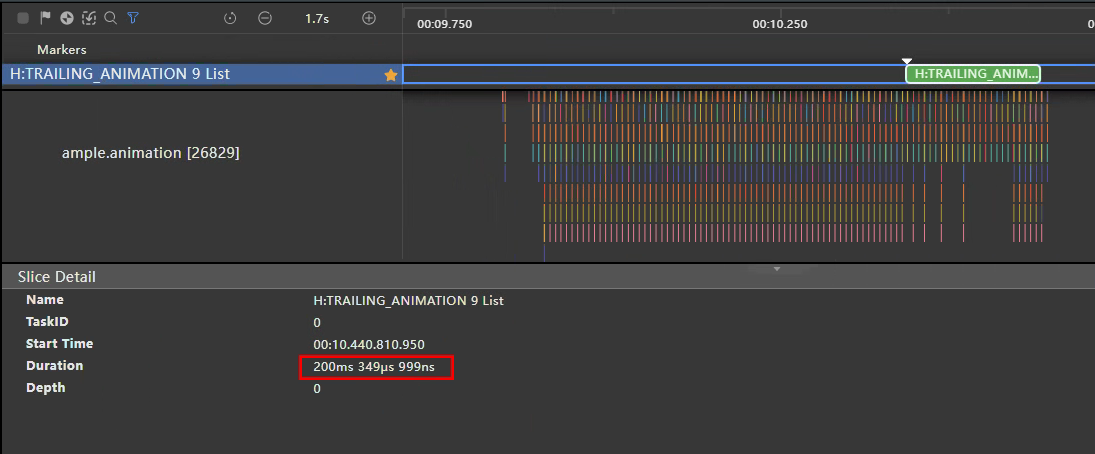
| 示例 | 动效耗时(ms) |
|---|---|
| 优化前 | 392 |
| 优化后 | 200 |
上述示例在提高滚动速度到10000vp/s后,相比100vp/s减少了200ms的动画时延。开发者可根据实际场景适当增加滚动速度,在不影响页面效果的情况下减少页面完成时延,提高应用性能。
最后
小编在之前的鸿蒙系统扫盲中,有很多朋友给我留言,不同的角度的问了一些问题,我明显感觉到一点,那就是许多人参与鸿蒙开发,但是又不知道从哪里下手,因为资料太多,太杂,教授的人也多,无从选择。有很多小伙伴不知道学习哪些鸿蒙开发技术?不知道需要重点掌握哪些鸿蒙应用开发知识点?而且学习时频繁踩坑,最终浪费大量时间。所以有一份实用的鸿蒙(HarmonyOS NEXT)文档用来跟着学习是非常有必要的。
为了确保高效学习,建议规划清晰的学习路线,涵盖以下关键阶段:
GitCode - 全球开发者的开源社区,开源代码托管平台希望这一份鸿蒙学习文档能够给大家带来帮助~
鸿蒙(HarmonyOS NEXT)最新学习路线

该路线图包含基础技能、就业必备技能、多媒体技术、六大电商APP、进阶高级技能、实战就业级设备开发,不仅补充了华为官网未涉及的解决方案
路线图适合人群:
IT开发人员: 想要拓展职业边界
零基础小白: 鸿蒙爱好者,希望从0到1学习,增加一项技能。
**技术提升/进阶跳槽:**发展瓶颈期,提升职场竞争力,快速掌握鸿蒙技术
2.视频学习教程+学习PDF文档
HarmonyOS Next 最新全套视频教程
纯血版鸿蒙全套学习文档(面试、文档、全套视频等)
总结
参与鸿蒙开发,你要先认清适合你的方向,如果是想从事鸿蒙应用开发方向的话,可以参考本文的学习路径,简单来说就是:为了确保高效学习,建议规划清晰的学习路线
