目录
[1. 对话框](#1. 对话框)
[1.1 消息对话框(QMessageBox)](#1.1 消息对话框(QMessageBox))
[1.2 消息对话框实例](#1.2 消息对话框实例)
[1.3 颜色对话框(QColorDialog)、字体对话框(QFontDialog)、文件对话框(QFileDialog)](#1.3 颜色对话框(QColorDialog)、字体对话框(QFontDialog)、文件对话框(QFileDialog))
[1.4 输入对话框(QInputDialog)](#1.4 输入对话框(QInputDialog))
[2. 事件处理机制](#2. 事件处理机制)
[2.1 事件处理函数简介](#2.1 事件处理函数简介)
[2.2 事件处理函数由来](#2.2 事件处理函数由来)
[2.3 鼠标和键盘事件](#2.3 鼠标和键盘事件)
[2.4 定时器事件](#2.4 定时器事件)
学习内容:
1. 对话框
Qt提供了多种用图形化界面的对话框,以便于提高程序的可操作性:同于信息交互的消息对话框、用于获取系统中颜色和字体的颜色对话框和字体对话框、关于文件操作的文件对话框、用于数据输入的输入对话框
1.1 消息对话框(QMessageBox)
消息对话框类提供了两套用于实现消息对话框的API,分别是基于属性版本和基于静态成员函数版本
1> 基于属性版本
1、使用类实例化对象(构造函数)
2、给对象设置相关属性:窗口名称、消息内容、提供的按钮
3、调用成员函数将对话框展示出来
QMessageBox::QMessageBox( //构造函数函数名
QMessageBox::Icon icon, //图标
const QString &title, //窗口标题
const QString &text, //窗口文本内容
QMessageBox::StandardButtons buttons = NoButton, //提供的按钮
QWidget *parent = nullptr) //父组件
对参数1的解析:是一个该类提供的内部枚举类型
Constant
Value
Description
QMessageBox::NoIcon
0
不提供图标.
QMessageBox::Question
4
提供一个问号的图标
QMessageBox::Information
1
提供一个 i 符号的图标
QMessageBox::Warning
2
提供一个感叹号的图标表示警告
QMessageBox::Critical
3
提供一个叉号图标表示错误.
对参数4的解析:是给对话框上提供的用于用户操作的按钮,也是一个枚举类型,如果需要提供多个按钮,中间使用位或隔开
Constant
Value
Description
QMessageBox::Ok
0x00000400
An "OK" button defined with the AcceptRole.
QMessageBox::Open
0x00002000
An "Open" button defined with the AcceptRole.
QMessageBox::Save
0x00000800
A "Save" button defined with the AcceptRole.
QMessageBox::Cancel
0x00400000
A "Cancel" button defined with the RejectRole.
QMessageBox::Close
0x00200000
A "Close" button defined with the RejectRole.
。。。
举个例子
QMessageBox msgBox;
msgBox.setText("The document has been modified.");
msgBox.setInformativeText("Do you want to save your changes?");
msgBox.setStandardButtons(QMessageBox::Save | QMessageBox::Discard | QMessageBox::Cancel);
msgBox.setDefaultButton(QMessageBox::Save);
int ret = msgBox.exec();
2> 基于静态成员函数版本
无需实例化对象,直接使用类名调用函数即可
系统提供4个静态成员函数:information、question、warning、critical
static\] QMessageBox::StandardButton //函数返回值类型,是一个静态成员函数,返回的是一个按钮 QMessageBox::information( //函数名 QWidget \*parent, //父组件 const QString \&title, //对话框标题 const QString \&text, //对话框文本内容 QMessageBox::StandardButtons buttons = Ok, //提供的按钮 QMessageBox::StandardButton defaultButton = NoButton) //默认按钮 举个例子: int ret = QMessageBox::warning(this, tr("My Application"), tr("The document has been modified.\\n" "Do you want to save your changes?"), QMessageBox::Save \| QMessageBox::Discard \| QMessageBox::Cancel, QMessageBox::Save);
1.2 消息对话框实例
1> 头文件
#ifndef WIDGET_H
#define WIDGET_H


#include <QWidget>


QT_BEGIN_NAMESPACE
namespace Ui { class Widget; }
QT_END_NAMESPACE


class Widget : public QWidget
{
    Q_OBJECT


public:
    Widget(QWidget *parent = nullptr);
    ~Widget();


private slots:
    void on_warnIconBtn_clicked();


    void on_infoIconBtn_clicked();


private:
    Ui::Widget *ui;
};
#endif // WIDGET_H
2> 源文件
#include "widget.h"
#include "ui_widget.h"
#include<QMessageBox>      //消息对话框类
#include<QDebug>


Widget::Widget(QWidget *parent)
    : QWidget(parent)
    , ui(new Ui::Widget)
{
    ui->setupUi(this);
}


Widget::~Widget()
{
    delete ui;
}


//警告按钮对应的槽函数
void Widget::on_warnIconBtn_clicked()
{
    //1、实例化对象
    QMessageBox box(QMessageBox::Warning,              //图标
                    "警告对话框",                       //对话框标题
                    "放学别走,等着哈",                  //对话框文本内容
                    QMessageBox::Ok|QMessageBox::No,    //提供的按钮
                    this);                              //父组件


    //2、可以对对话框进行属性设置
    box.setButtonText(QMessageBox::Ok, "没问题");
    box.setButtonText(QMessageBox::No, "怂了");


    //3、调用成员显示对话框
    int res = box.exec();


    //4、对用户按钮进行判断
    if(res == QMessageBox::Ok)
    {
        qDebug()<<"谁走谁小狗";
    }else if(res == QMessageBox::No)
    {
        qDebug()<<"你永远是我大哥,已老实,求放过";
    }
}
//信息按钮的槽函数
void Widget::on_infoIconBtn_clicked()
{
    //调用静态成员函数版本
    int res = QMessageBox::information(this,               //父组件
                             "信息",                         //对话框标题
                             "今晚老地方见",                   //对话框文本内容
                             QMessageBox::Yes|QMessageBox::No,   //提供的按钮
                             QMessageBox::Yes);               //默认选中的按钮


    //对用户点击的按钮进行判断
    if(res == QMessageBox::Yes)
    {
        qDebug()<<"不见不散,不醉不归";
    }else if(res == QMessageBox::No)
    {
        qDebug() << "不好意思,有约了,下次一定";
    }
}
1.3 颜色对话框(QColorDialog)、字体对话框(QFontDialog)、文件对话框(QFileDialog)
1> 这三个对话框,一般都是使用静态成员函数版本实现
2> 颜色对话框
static\] QColor //函数返回值类型,是一个颜色类对象 QColorDialog::getColor( //函数名 const QColor \&initial = Qt::white, //打开对话框后的初始颜色 QWidget \*parent = nullptr, //父组件 const QString \&title = QString()) //对话框标题 所需要的类: QColor:颜色类 QColorDialog:颜色对话框类
2> 字体对话框
static\] QFont //返回值类型,是一个字体类的对象 QFontDialog::getFont( //函数名 bool \*ok, //用于地址传递,判断用户是否选中了某个字体 const QFont \&initial, //初始字体,对话框中的第一个字体,如果用户点击了取消,则将该字体作为函数返回值 QWidget \*parent = nullptr, //父组件 const QString \&title = QString()) //对话框标题 该函数所需要的类: QFontDialog //字体对话框类 QFont //字体类 举个例子: bool ok; QFont font = QFontDialog::getFont(\&ok, QFont("Times", 12), this); if (ok) { // font is set to the font the user selected } else { // the user canceled the dialog; font is set to the initial // value, in this case Times, 12. }
保存文件文件路径
static\] QString //返回值类型:是用户选中的文件路径,该字符串可以不存在 QFileDialog::getSaveFileName( //函数名 QWidget \*parent = nullptr, //父组件 const QString \&caption = QString(), //对话框标题 const QString \&dir = QString(), //遍历文件系统时的起始路径 const QString \&filter = QString()) //过滤器 所需类:QFileDialog -------------------------------------------------------- 打开文件文件路径 \[static\] QString QFileDialog::getOpenFileName( QWidget \*parent = nullptr, const QString \&caption = QString(), const QString \&dir = QString(), const QString \&filter = QString())
1、依赖的类是QFile
2、使用QFile类实例化对象,用该对象对文件进行读写操作
3、可以使用构造函数打开文件,也可以调用无参构造,使用open函数打开文件
4、文件读写函数,read、readLine、readAll 、write
5、关闭文件close
举个例子:
//QT中文件操作
QFile file(fileName); //使用得到的文件路径创建一个文件对象
//以写的形式打开文件
if(!file.open(QFile::WriteOnly|QFile::Text|QFile::Truncate))
{
return ;
}
//说明文件已经打开
//获取ui界面上文本编辑器上的内容
QString msg = ui->textEdit->toPlainText();
file.write(msg.toLocal8Bit()); //将信息写入文件
//关闭文件
file.close();
头文件
#ifndef WIDGET_H
#define WIDGET_H


#include <QWidget>


QT_BEGIN_NAMESPACE
namespace Ui { class Widget; }
QT_END_NAMESPACE


class Widget : public QWidget
{
    Q_OBJECT


public:
    Widget(QWidget *parent = nullptr);
    ~Widget();


private slots:
    void on_colorBtn_clicked();


    void on_fontBtn_clicked();


    void on_saveBtn_clicked();


private:
    Ui::Widget *ui;
};
#endif // WIDGET_H
源文件
#include "widget.h"
#include "ui_widget.h"
#include<QColor>           //颜色类
#include<QColorDialog>      //颜色对话框类
#include<QMessageBox>          //消息对话框类
#include<QFontDialog>          //字体对话框
#include<QFont>                //字体类
#include<QFileDialog>            //文件对话框类
#include<QFile>                //文件类
#include<QDebug>             //信息调试类


Widget::Widget(QWidget *parent)
    : QWidget(parent)
    , ui(new Ui::Widget)
{
    ui->setupUi(this);
}


Widget::~Widget()
{
    delete ui;
}


//颜色按钮对应的槽函数
void Widget::on_colorBtn_clicked()
{
    QColor c = QColorDialog::getColor(QColor(255,0,0),            //静态成员函数,参数1为初始颜色
                           this,                        //父组件
                           "请选择颜色");                //对话框标题


    //对用户选中的颜色进行判断
    if(c.isValid())
    {
        //表示用户选中了颜色
        //将当前选中的颜色,放到文本编辑器上
        //ui->textEdit->setTextColor(c);        //设置字体 前景色
        ui->textEdit->setTextBackgroundColor(c);      //设置字体背景色
    }else
    {
        //表示用户没有选择颜色
        QMessageBox::information(this,"提示","您没有选择颜色");
    }
}
//字体按钮对应的槽函数
void Widget::on_fontBtn_clicked()
{
    bool ok = false;           //定义用于返回用户是否选中字体
    QFont f = QFontDialog::getFont(&ok,                    //接受是否选中结果
                                   QFont("隶书",10, 10),   //初始字体
                                   this,                   //父组件
                                   "选择字体");             //对话框标题
    //使用字体
    if(ok)
    {
        //表示用户选择了某个字体
        //ui->textEdit->setFont(f);              //对所有文本设置字体
        ui->textEdit->setCurrentFont(f);          //对选中的字体进行设置
        ui->textEdit->setFontItalic(true);      //设置字体倾斜
    }else
    {
        //用户选择了取消按钮
        QMessageBox::information(this,"提示","您取消了选择字体");
    }
}


//保存按钮对应的槽函数
void Widget::on_saveBtn_clicked()
{
    QString fileName = QFileDialog::getSaveFileName(this,           //父组件
                                                    "保存",          //对话框标题
                                                    "./",           //起始目录
                                                    "所有文件(*.*);;图片(*.png *.jpg *.gif);;文本(*.txt);;原文件(*.cpp)");//过滤器
    //输出选中的文件
    qDebug() << fileName;


    //QT中文件操作
    QFile file(fileName);             //使用得到的文件路径创建一个文件对象


    //以写的形式打开文件
    if(!file.open(QFile::WriteOnly|QFile::Text|QFile::Truncate))
    {
        return ;
    }


    //说明文件已经打开
    //获取ui界面上文本编辑器上的内容
    QString msg = ui->textEdit->toPlainText();
    file.write(msg.toLocal8Bit());            //将信息写入文件

    //关闭文件
    file.close();


}
1.4 输入对话框(QInputDialog)
1> 输入对话框可以提供一个字符串、整数、小数等的输入框
2> 一般也是使用静态成员函数来完成
3> getText为例
static\] QString // 返回值类型,用户在输入框中输入的内容 QInputDialog::getText( //函数名 QWidget \*parent, //父组件 const QString \&title, //对话框标题 const QString \&label, //输入框的标签 QLineEdit::EchoMode mode = QLineEdit::Normal, //输入框模式 const QString \&text = QString(), //输入框中的默认文本内容 bool \*ok = nullptr) //用于接收判断是否点击确认 举个例子: bool ok = false; QString text = QInputDialog::getText(this, //父组件 "您想说啥", //对话框标题 "姓名", //输入框的介绍 QLineEdit::Normal, //输入框的模式 "张三", //输入框中的默认文本 \&ok); //接收用户是否确认输入 if(ok \&\& !text.isEmpty()) { qDebug()\<\<"姓名为"\<\
2. 事件处理机制
2.1 事件处理函数简介
- 什么是事件? (重点)
事件是由窗口系统或者自身产生的,用以响应所发生的
各类事情,比如用户按下并释放了键盘或者鼠标、窗口因
暴露而需要重绘、定时器到时而应有所动作,等等
从某种意义上讲,事件比信号更原始,甚至可以认为大多
数信号其实都是由事件产生的。比如一个下压式按钮首先
感受到的是鼠标事件,
在进行必要的处理以产生按钮下沉
继而弹起的视觉效果之后,才会发射 clicked()信号
- 如何处理事件? (重点)
myWnd(自定义类) -继承-> QWidget -继承-> QObject
1> 当事件发生时,首先被调用的是QObject类中的虚函数event(),
其 QEvent型参数标识了具体的事件类型
bool QObject:: event (QEvent* e)
{
if (e == mouseEvent)
{
void QWidget::mousePressEvent (QMouseEvent* e)
void QWidget:: mouseReleaseEvent (QMouseEvent* e)
}
if(e == keyEvent){
void QWidget::keyPressEvent (QMouseEvent* e)
void QWidget:: keyReleaseEvent (QMouseEvent* e)
}
}
2> 作为QObject类的子类, QWidget类覆盖了其基类中的
event()虚函数,并根据具体事件调用具体事件处理函数
void QWidget::mousePressEvent (QMouseEvent* e)
void QWidget::mouseReleaseEvent (QMouseEvent* e)
void QWidget::keyPressEvent (QMouseEvent* e)
void QWidget:: keyReleaseEvent (QMouseEvent* e)
void QWidget::paintEvent (QPaintEvent* e):
3> 而这些事件处理函数同样也是虚函数,也可以被 QWidget类
的子类覆盖,以提供针对不同窗口部件类型的事件处理
4> 组件的使用者所关心的往往是定义什么样的槽处理什么样的信号,
而组件的实现者更关心覆盖哪些事件处理函数
5> 以上事件处理函数的虚函数,是所有QWidget类的所有子类都拥有的成员虚函数,只需要进行重写这些函数即可
2.2 事件处理函数由来
QObject类 提供了那些可以重写的虚函数
virtual\] bool QObject::event(QEvent \*e) // 参数:事件的类型 QWidgets类, 提供了那些可以重写的虚函数 \[override virtual protected\] bool QWidget::event(QEvent \*event) \[virtual protected\] void QWidget::keyPressEvent(QKeyEvent \*event) \[virtual protected\] void QWidget::keyReleaseEvent(QKeyEvent \*event) \[virtual protected\] void QWidget::mouseMoveEvent(QMouseEvent \*event) \[virtual protected\] void QWidget::mousePressEvent(QMouseEvent \*event) \[virtual protected\] void QWidget::mouseReleaseEvent(QMouseEvent \*event) \[virtual protected\] void QWidget::mouseDoubleClickEvent(QMouseEvent \*event) \[virtual protected\] void QObject::timerEvent(QTimerEvent \*event) QPainter类 ---\> 画家类 void SimpleExampleWidget::paintEvent(QPaintEvent \*) { QPainter painter(this); painter.setPen(Qt::blue); painter.setFont(QFont("Arial", 30)); painter.drawText(rect(), Qt::AlignCenter, "Qt"); }
2.3 鼠标和键盘事件
1> 对于键盘事件而言,如果长按键盘,则系统默认会认为一段时间后自动抬起并重新按下
2> 对于鼠标事件而言,如果没有抬起,就没有抬起
virtual protected\] void QWidget::keyPressEvent(QKeyEvent \*event) //键盘按下事件处理函数 \[virtual protected\] void QWidget::keyReleaseEvent(QKeyEvent \*event) //键盘抬起事件处理寒素 \[virtual protected\] void QWidget::mouseMoveEvent(QMouseEvent \*event) //鼠标移动事件处理函数 \[virtual protected\] void QWidget::mousePressEvent(QMouseEvent \*event) //鼠标按下事件处理函数版 \[virtual protected\] void QWidget::mouseReleaseEvent(QMouseEvent \*event) //鼠标抬起事件处理函数 \[virtual protected\] void QWidget::mouseDoubleClickEvent(QMouseEvent \*event) //鼠标双击事件处理寒素
3> 有关QKeyEvent类的相关函数
count():返回本次触发键盘事件的按下键的个数
text():返回本事件中操作的键的文本内容
key():返回本事件中的操作的键的值
4> 有关QMouseEvent类的相关函数

程序实现
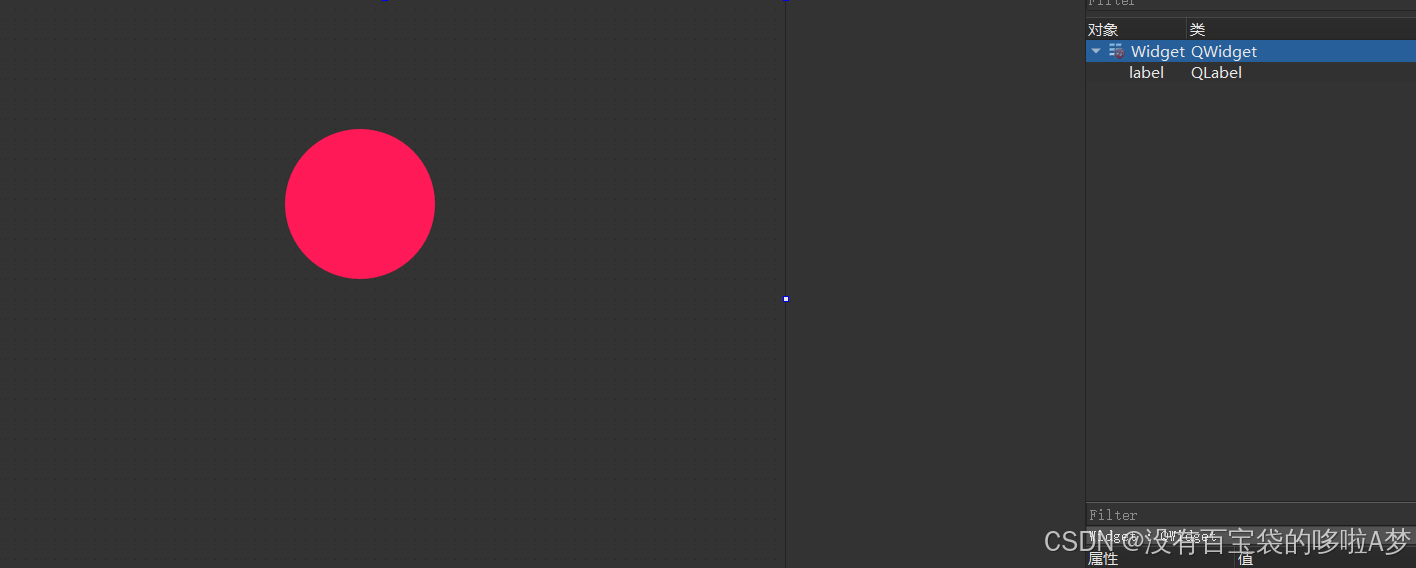
ui界面

头文件
#ifndef WIDGET_H
#define WIDGET_H


#include <QWidget>
#include<QKeyEvent>          //键盘事件类
#include<QMouseEvent>        //鼠标事件类


QT_BEGIN_NAMESPACE
namespace Ui { class Widget; }
QT_END_NAMESPACE


class Widget : public QWidget
{
    Q_OBJECT


public:
    Widget(QWidget *parent = nullptr);
    ~Widget();


    //声明键盘事相关处理函数
    void keyPressEvent(QKeyEvent *event) override;           //键盘按下事件处理函数
    void keyReleaseEvent(QKeyEvent *event) override;         //键盘抬起事件处理函数


    //声明鼠标事件相关处理函数
    void mouseMoveEvent(QMouseEvent *event) override;          //鼠标移动事件处理函数
    void mousePressEvent(QMouseEvent *event) override;         //鼠标按下事件处理函数
    void mouseReleaseEvent(QMouseEvent *event) override;       //鼠标抬起事件处理函数
    void mouseDoubleClickEvent(QMouseEvent *event) override;   //鼠标双击事件处理函数


private:
    Ui::Widget *ui;
};
#endif // WIDGET_H
源文件
#include "widget.h"
#include "ui_widget.h"
#include<QDebug>             //信息调试类


Widget::Widget(QWidget *parent)
    : QWidget(parent)
    , ui(new Ui::Widget)
{
    ui->setupUi(this);


    //开启鼠标追踪功能
    this->setMouseTracking(true);


}


Widget::~Widget()
{
    delete ui;
}


//键盘按下事件处理函数
void Widget::keyPressEvent(QKeyEvent *event)
{
    qDebug()<<event->key()<<": "<<event->text();    //分别求该事件中的键的值和键的文本内容


    //对键的值进行判断
    switch (event->key())
    {
        case 'W':
        {
            //判断组件是否移除界面
            if(ui->label->y() <= -ui->label->height())
            {
                //将组件移动到界面的最下面
                ui->label->move(ui->label->x(), this->height());
            }


            //正常上移动一格
            ui->label->move(ui->label->x(), ui->label->y()-1);
        }
        break;


    }


}


//键盘抬起事件处理函数
void Widget::keyReleaseEvent(QKeyEvent *event)
{
    qDebug()<<"world";
}


//鼠标移动事件函数定义
void Widget::mouseMoveEvent(QMouseEvent *event)
{
    //判断是哪个鼠标键被按下
    if(event->buttons() == Qt::LeftButton)
    {
        ui->label->setText("鼠标左键被移动");
        qDebug() <<"局部坐标为"<<event->pos()<<"  全局坐标为:"<<event->globalPos();
    }else if(event->buttons() == Qt::RightButton)
    {
        ui->label->setText("鼠标右键被移动");
        qDebug() <<"局部坐标为"<<event->pos()<<"  全局坐标为:"<<event->globalPos();
    }else if(event->buttons() == Qt::MiddleButton)
    {
        ui->label->setText("鼠标中间键被移动");
        qDebug() <<"局部坐标为"<<event->pos()<<"  全局坐标为:"<<event->globalPos();
    }


    ui->label->move(event->pos().x()-ui->label->width()/2, event->pos().y()-ui->label->height()/2);


}
//鼠标按下事件函数定义
void Widget::mousePressEvent(QMouseEvent *event)
{
    //判断是哪个鼠标键被按下
    if(event->button() == Qt::LeftButton)
    {
        ui->label->setText("鼠标左键被按下");
        qDebug() <<"局部坐标为"<<event->pos()<<"  全局坐标为:"<<event->globalPos();
    }else if(event->button() == Qt::RightButton)
    {
        ui->label->setText("鼠标右键被按下");
        qDebug() <<"局部坐标为"<<event->pos()<<"  全局坐标为:"<<event->globalPos();
    }else if(event->button() == Qt::MiddleButton)
    {
        ui->label->setText("鼠标中间键被按下");
        qDebug() <<"局部坐标为"<<event->pos()<<"  全局坐标为:"<<event->globalPos();
    }
}
//鼠标抬起事件函数定义
void Widget::mouseReleaseEvent(QMouseEvent *event)
{
    //判断是哪个鼠标键被按下
    if(event->button() == Qt::LeftButton)
    {
        ui->label->setText("鼠标左键被抬起");
        qDebug() <<"局部坐标为"<<event->pos()<<"  全局坐标为:"<<event->globalPos();
    }else if(event->button() == Qt::RightButton)
    {
        ui->label->setText("鼠标右键被抬起");
        qDebug() <<"局部坐标为"<<event->pos()<<"  全局坐标为:"<<event->globalPos();
    }else if(event->button() == Qt::MiddleButton)
    {
        ui->label->setText("鼠标中间键被抬起");
        qDebug() <<"局部坐标为"<<event->pos()<<"  全局坐标为:"<<event->globalPos();
    }
}
//鼠标双击事件函数定义
void Widget::mouseDoubleClickEvent(QMouseEvent *event)
{
    //判断是哪个鼠标键被按下
    if(event->button() == Qt::LeftButton)
    {
        ui->label->setText("鼠标左键被双击");
        qDebug() <<"局部坐标为"<<event->pos()<<"  全局坐标为:"<<event->globalPos();
    }else if(event->button() == Qt::RightButton)
    {
        ui->label->setText("鼠标右键被双击");
        qDebug() <<"局部坐标为"<<event->pos()<<"  全局坐标为:"<<event->globalPos();
    }else if(event->button() == Qt::MiddleButton)
    {
        ui->label->setText("鼠标中间键被双击");
        qDebug() <<"局部坐标为"<<event->pos()<<"  全局坐标为:"<<event->globalPos();
    }
}
2.4 定时器事件
1> 程序员有时需要做某些事,按照指定时间来完成,此时就可以使用定时器完成
原理:当启动一个定时器后,系统会每隔给定的超时时间后,自动调用某些函数来做相关的功能
2> 定时的实现QT中提供两种
基于属性版本(QTimer类)
基于事件处理函数版本(无需其他类,使用自身的定时器事件处理函数)
3> 基于属性版本的定时器(本质上是信号与槽机制)
1、使用类QTimer实例化对象
2、通过对象调用成员函数 start(sec);启动一个定时器,每隔src毫秒后会自动发射一个timeout的信号
3、将timeout的信号连接到自定义的槽函数中
4、这样就营造出每隔sec毫秒后,系统自动调用自定义的槽函数了
5、停止一个定时器:stop函数完成
4> 实现案例
1、ui界面
2、头文件
#ifndef WIDGET_H
#define WIDGET_H


#include <QWidget>
#include<QTimer>            //定时器类
#include<QTime>            //时间类
#include<QTimerEvent>       //定时器事件类
#include<QDateTime>         //日期时间类


QT_BEGIN_NAMESPACE
namespace Ui { class Widget; }
QT_END_NAMESPACE


class Widget : public QWidget
{
    Q_OBJECT


public:
    Widget(QWidget *parent = nullptr);
    ~Widget();


private slots:
    void on_objStartBtn_clicked();


    void timeout_slot();            //自定义处理超时信号的槽函数


    void on_eventStartBtn_clicked();


private:
    Ui::Widget *ui;


    //定义一个定时器变量
    QTimer t1;


    /**************************下面是有关事件处理函数版本的相关成员************/
    int tid = 0;        //定时器id号
    void timerEvent(QTimerEvent *event) override;     //定时器事件处理函数的声明


};
#endif // WIDGET_H
3> 源文件
#include "widget.h"
#include "ui_widget.h"
#include<QDebug>


Widget::Widget(QWidget *parent)
    : QWidget(parent)
    , ui(new Ui::Widget)
{
    ui->setupUi(this);


    //由于定时器事件的信号与槽的绑定只需要一次,所以直接写在构造函数中即可
    connect(&t1, &QTimer::timeout, this, &Widget::timeout_slot);


}


Widget::~Widget()
{
    delete ui;
}


//对象版启动按钮对应的槽函数
void Widget::on_objStartBtn_clicked()
{
    if(ui->objStartBtn->text() == "启动")
    {
        //启动一个定时器
        t1.start(1000);        //每隔指定的时间,发送一个timeout的信号


        //将按钮的文本内容更新成"关闭"
        ui->objStartBtn->setText("关闭");
    }else
    {
        //关闭一个定时器
        t1.stop();             //关闭t1这个定时器


        //将按钮的文本内容设置成启动
        ui->objStartBtn->setText("启动");
    }
}
//自定义超时函数的定义
void Widget::timeout_slot()
{
    //static int num = 0;
    //qDebug()<<"num = "<<num++;
    //ui->objLab->setNum(num++);
    //获取系统的时间
    QTime sysTime = QTime::currentTime();
    //将QTime类对象转变成字符串
    QString tm = sysTime.toString("hh:mm:ss");
    //将时间展示到ui界面上
    ui->objLab->setText(tm);


    //设置标签居中显示
    ui->objLab->setAlignment(Qt::AlignCenter);
//    if(sysTime.second()%2==0)
//    {
//        tm[2] = ':';
//    }else
//    {
//        tm[2] = ' ';
//    }


//    ui->lcdNumber->display(tm);


}


/****************************上面是基于属性版本,下面是基于事件处理函数版本****************/
void Widget::on_eventStartBtn_clicked()
{


    if(ui->eventStartBtn->text() == "启动")
    {
        //启动一个定时器
        tid = this->startTimer(1000);         //启动一个定时器,每个1000毫秒会自动调用定时器事件处理函数
                                        //并返回当前定时器的id号


        //将按钮的文本内容更新成"关闭"
        ui->eventStartBtn->setText("关闭");
    }else
    {
        //关闭一个定时器
        this->killTimer(tid);            //关闭一个定时器


        //将按钮的文本内容设置成启动
        ui->eventStartBtn->setText("启动");
    }
}


//定时器事件处理函数的定义
void Widget::timerEvent(QTimerEvent *event)
{
    //判断是否为自己的定时器到位
    if(event->timerId() == tid)
    {
        //在 ui界面上显示日期时间
        ui->eventLab->setText(QDateTime::currentDateTime().toString("yyyy-MM-dd hh:mm:ss"));
        ui->eventLab->setAlignment(Qt::AlignCenter);
    }


}
课内练习:
练习:使用鼠标事件完成组件的移动

头文件
#ifndef WIDGET_H
#define WIDGET_H


#include <QWidget>
#include<QMouseEvent>


QT_BEGIN_NAMESPACE
namespace Ui { class Widget; }
QT_END_NAMESPACE


class Widget : public QWidget
{
    Q_OBJECT


public:
    Widget(QWidget *parent = nullptr);
    ~Widget();


    void mouseMoveEvent(QMouseEvent *event) override;    //鼠标移动事件
    void mousePressEvent(QMouseEvent *event) override;      //鼠标点击事件


private:
    Ui::Widget *ui;


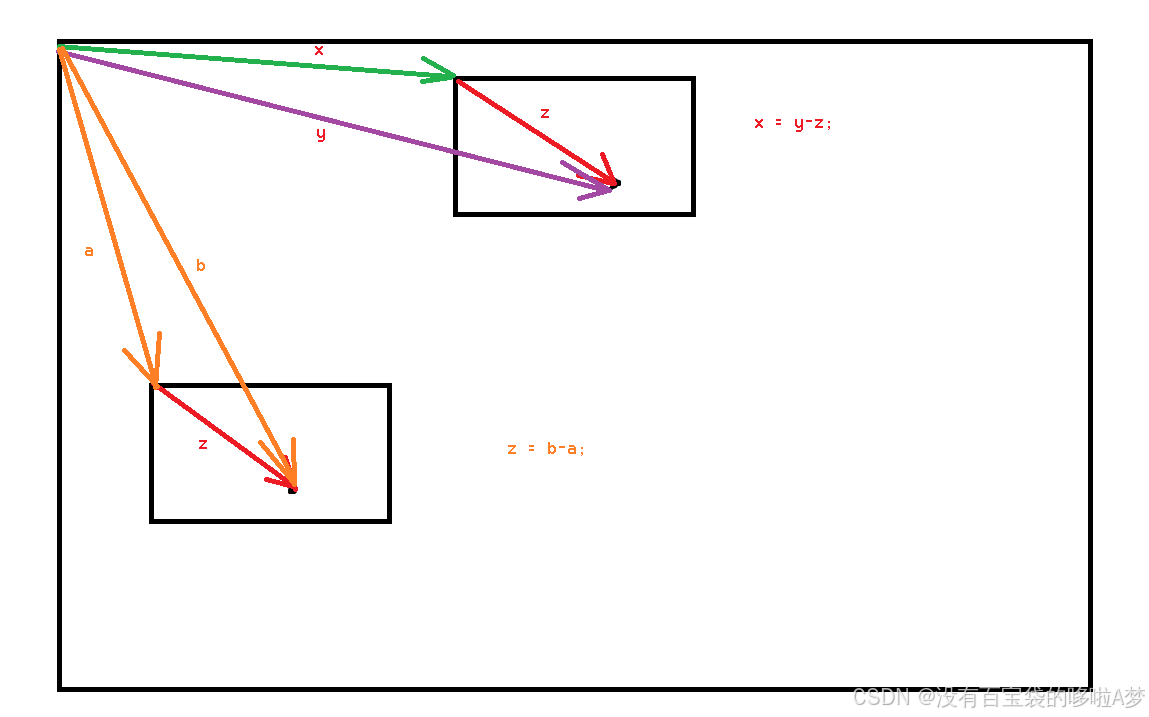
    QPoint temp;        //中间辅助向量
};
#endif // WIDGET_H
源文件
#include "widget.h"
#include "ui_widget.h"
#include<QDebug>


Widget::Widget(QWidget *parent)
    : QWidget(parent)
    , ui(new Ui::Widget)
{
    ui->setupUi(this);


    //设置 去除控件的头部
    this->setWindowFlag(Qt::FramelessWindowHint);


    this->move(300,200);
}


Widget::~Widget()
{
    delete ui;
}


//鼠标移动事件
void Widget::mouseMoveEvent(QMouseEvent *event)
{
    this->move(event->globalPos() - temp);
}


//鼠标点击事件
void Widget::mousePressEvent(QMouseEvent *event)
{
    //qDebug()<<this->pos();
    temp = event->globalPos() - this->pos();    //求出中间辅助向量
    if(event->button() == Qt::RightButton)
    {
        this->close();
    }
}
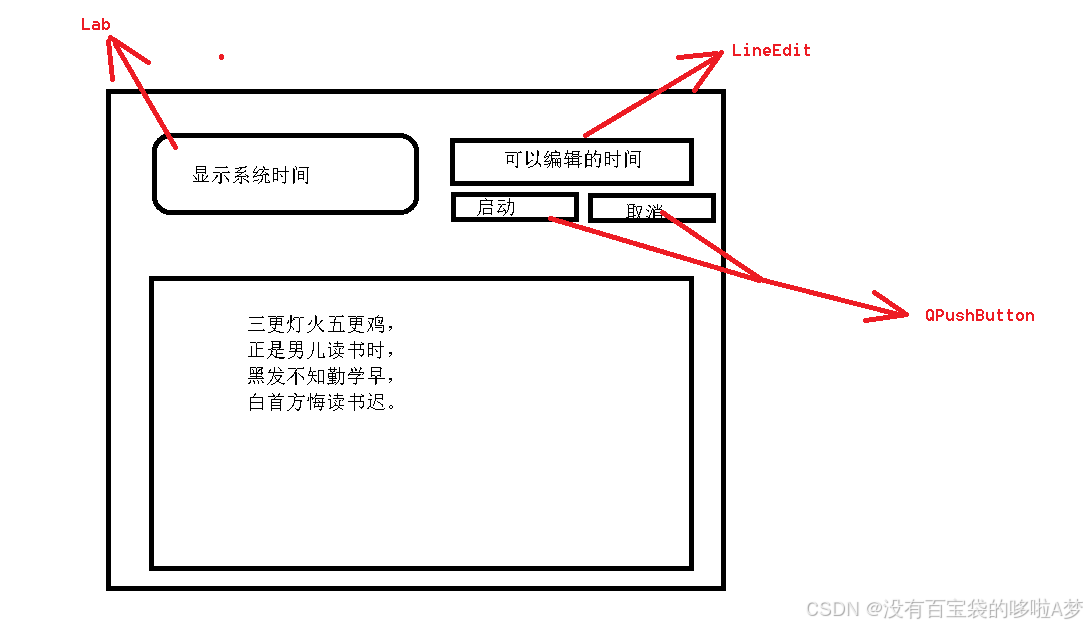
课外作业:

头文件
#ifndef WIDGET_H
#define WIDGET_H

#include <QWidget>
#include<QPushButton>
#include<QTextToSpeech>       //文本转语音类
#include <QTimer>
#include <QTime>
#include <QTextEdit>
#include <QLabel>
#include <QLineEdit>
QT_BEGIN_NAMESPACE
namespace Ui { class Widget; }
QT_END_NAMESPACE

class Widget : public QWidget
{
    Q_OBJECT

public:
    Widget(QWidget *parent = nullptr);
    ~Widget();

    QPushButton *blt1;
    QPushButton *blt2;
    QTimer t1;
    QTimer *t2;
    QTextEdit *textedi;
    QLabel *lab1;
    QLineEdit *linedi;
    QTextToSpeech *speecher1;
private:
    Ui::Widget *ui;
private slots:
    void timeout_slot();
    void updatetime();
};
#endif // WIDGET_H
源文件
#include "widget.h"
#include "ui_widget.h"

Widget::Widget(QWidget *parent)
    : QWidget(parent)
    , ui(new Ui::Widget)
{
    ui->setupUi(this);
    speecher1 = new QTextToSpeech(this);
    lab1 = new QLabel(this);
    lab1->move(20,20);
    lab1->resize(300,150);
    lab1->setStyleSheet("background: skyblue");
    lab1->setText("系统时间");

    t2 = new QTimer(this);
    connect(t2,&QTimer::timeout,this,&Widget::updatetime);
    t2->start(100);

    blt1 = new QPushButton("启动",this);
    blt1->move(370,100);
    blt1->resize(140,70);

    blt2 = new QPushButton("取消",this);
    blt2->move(550,100);
    blt2->resize(140,70);
    blt2->setEnabled(false);

    linedi = new QLineEdit(this);
    linedi->move(350,20);
    linedi->resize(370,70);

    textedi = new QTextEdit(this);
    textedi->move(20,200);
    textedi->resize(800,400);
    connect(&t1,&QTimer::timeout,this,&Widget::timeout_slot);
    connect(blt1,&QPushButton::clicked,[&](){
        t1.start(100);
        this->blt2->setEnabled(true);
        connect(blt2,&QPushButton::clicked,[&](){
            t1.stop();
        });
    });


}

Widget::~Widget()
{
    delete ui;
}


void Widget::timeout_slot()
{

    if(this->linedi->text() == this->lab1->text())
    {
        QString mes = "三更灯火五更鸡,正是男儿读书时,黑发不知勤学早,白首方悔读书迟。";
        textedi->setText(mes);
        speecher1->say(mes);
    }

}

void Widget::updatetime()
{
    QString currentTime = QDateTime::currentDateTime().toString("HH:mm:ss");
    this->lab1->setText(currentTime);
    this->lab1->setAlignment(Qt::AlignCenter);
}
主函数
#include "widget.h"

#include <QApplication>

int main(int argc, char *argv[])
{
    QApplication a(argc, argv);
    Widget w;
    w.show();
    return a.exec();
}