背景
在项目中,避免不了需要调用系统资源和系统能力,比如:日历读写、摄像头等。因此,需要了解对系统资源访问权限的申请方式方法。
授权方式
包括两种授权方式,分别是system_grant(系统授权) 和 user_grant(用户授权)。
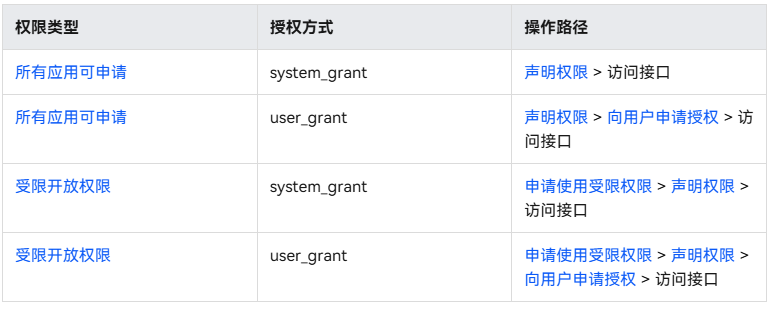
system_grant(系统授权)
仅需要在module.json5文件中,标注需要的权限,应用打开时,系统会自动赋予需要的权限。
user_grant(用户授权)
需要在项目中向系统发送申请,然后由用户决定是否给应用提供需要的权限。
应用的授权等级(APL)
一共有三个等级:normal、system_basic、system_core。权限等级依次提高。
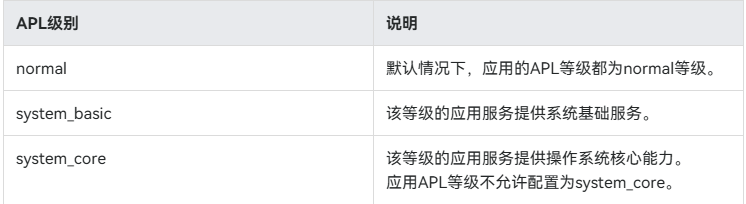
- normal 等级是全部应用都可以使用
- system_basic 等级是需要申请签名证书后,才能使用
- system_core 等级是对系统应用开放,对第三方应用不开放
应用权限
封装代码
PermissionUtils类
封装了三个常用的方法:
- 检查权限是否授权(CheckPermissions)
- 申请授权(RequestPermissions)
- 打开系统设置的权限管理页面(OpenPermissionSettingsPage)
javascript
import { abilityAccessCtrl, bundleManager, common, Permissions } from '@kit.AbilityKit';

/**
 *权限封装类
 */
export class PermissionUtils {
  /**
   * 检查权限是否授权(完全授权)
   * @param permissionsArr 权限集合
   * @returns true:已经全部授权;false:没有全部授权
   */
  public static CheckPermissions(permissionsArr: Permissions[]): boolean {
    const atManager = abilityAccessCtrl.createAtManager();
    //获取bundle信息
    const bundleInfo =
      bundleManager.getBundleInfoForSelfSync(bundleManager.BundleFlag.GET_BUNDLE_INFO_WITH_APPLICATION);
    // 拿到当前应用的tokenID 标识
    const tokenID = bundleInfo.appInfo.accessTokenId
    //校验应用是否被授予权限
    let result: boolean = true;
    permissionsArr.forEach((x: Permissions, index: number) => {
      if (!(atManager.checkAccessTokenSync(tokenID, x) === abilityAccessCtrl.GrantStatus.PERMISSION_GRANTED)) {
        result = false;
        return;
      }
    })
    return result;
  }

  /**
   * 申请授权(首次弹窗申请)
   * @param permissionList 权限集合
   * @returns true:权限完全加载;false:有权限没有加载
   */
  public static async RequestPermissions(permissionList: Permissions[]): Promise<boolean> {
    // 程序访问控制管理
    const atManager = abilityAccessCtrl.createAtManager();
    // 拉起弹框请求用户授权
    const grantStatus = await atManager.requestPermissionsFromUser(getContext(), permissionList)
    // 获取请求权限的结果
    const isAuth = grantStatus.authResults.every(v => v === abilityAccessCtrl.GrantStatus.PERMISSION_GRANTED)
    // 返回 Promise 授权结果
    return isAuth ? Promise.resolve(true) : Promise.reject(false)
  }

  /**
   * 打开系统设置的权限管理页面
   */
  public static OpenPermissionSettingsPage() {
    // 获取上下文
    const context = getContext() as common.UIAbilityContext
    // 获取包信息
    const bundleInfo = bundleManager.getBundleInfoForSelfSync(bundleManager.BundleFlag.GET_BUNDLE_INFO_WITH_APPLICATION)
    // 打开系统设置页
    context.startAbility({
      bundleName: 'com.huawei.hmos.settings',
      abilityName: 'com.huawei.hmos.settings.MainAbility',
      uri: 'application_info_entry',
      parameters: {
        // 按照包名打开对应设置页
        pushParams: bundleInfo.name
      }
    })
  }
}
index界面
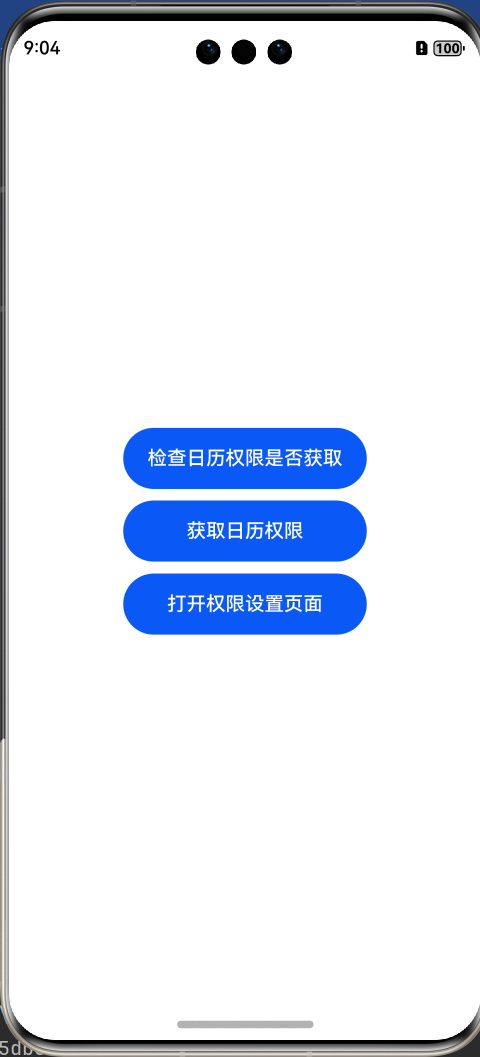
添加三个按钮分别测试对应的方法
javascript
import { PermissionUtils } from '../Utils/PermissionsUtils';
import { promptAction } from '@kit.ArkUI';
import { Permissions } from '@kit.AbilityKit';

@Entry
@Component
struct Index {
  permissionList: Permissions[] = ['ohos.permission.READ_CALENDAR', 'ohos.permission.WRITE_CALENDAR'];

  build() {
    Column() {
      Button("检查日历权限是否获取")
        .width(200)
        .height(50)
        .margin({ bottom: 10 })
        .onClick((event: ClickEvent) => {
          const checkResult =
            PermissionUtils.CheckPermissions(this.permissionList);
          if (checkResult) {
            promptAction.showToast({
              message: "已经获取日历相关操作权限",
              duration: 2000
            });
          } else {
            promptAction.showToast({
              message: "没有日历相关操作权限",
              duration: 2000
            });
          }
        })
      Button("获取日历权限")
        .width(200)
        .height(50)
        .margin({ bottom: 10 })
        .onClick(async (event: ClickEvent) => {
          let result = await PermissionUtils.RequestPermissions(this.permissionList);
          if (result) {
            promptAction.showToast({
              message: "成功获取日历相关操作权限",
              duration: 2000
            });
          } else {
            promptAction.showToast({
              message: "日历相关操作权限获取失败",
              duration: 2000
            });
          }
        })
      Button("打开权限设置页面")
        .width(200)
        .height(50)
        .margin({ bottom: 10 })
        .onClick((event: ClickEvent) => {
          PermissionUtils.OpenPermissionSettingsPage();
        })

    }
    .height('100%')
    .width('100%')
    .alignItems(HorizontalAlign.Center)
    .justifyContent(FlexAlign.Center)
  }
}
需要注意的是,所有的权限都需要先去module.json5中配置权限:
javascript
"requestPermissions": [
      {
        "name": 'ohos.permission.READ_CALENDAR',
        "reason": "$string:CalendarRead",
        "usedScene": {

        }
      },
      {
        "name": 'ohos.permission.WRITE_CALENDAR',
        "reason": "$string:CalenderWrite",
        "usedScene": {
        }
      }
    ]
模拟器中询问受限制的权限
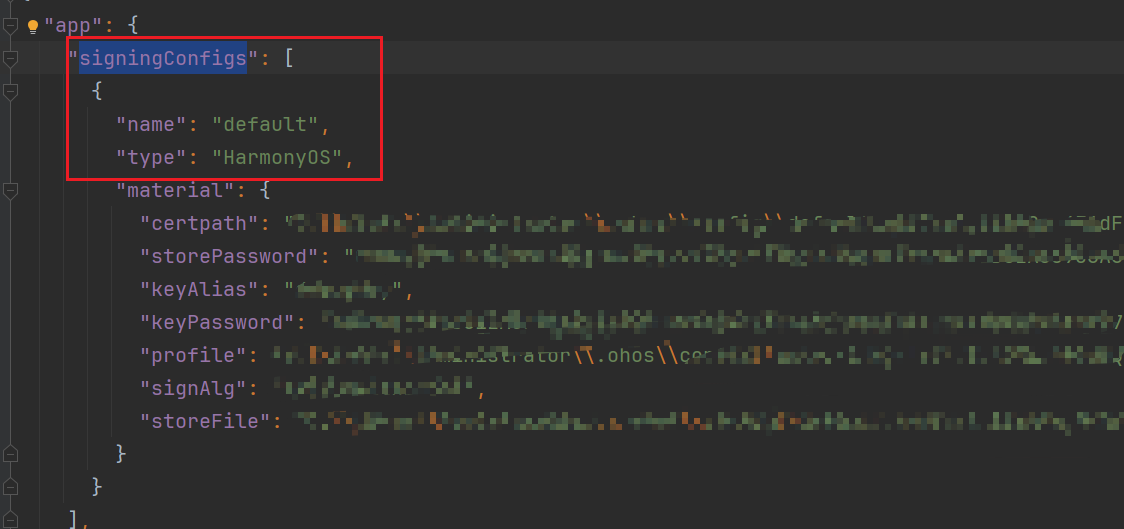
下图的权限,可以在模拟器的调试阶段,使用自动签名的方式使用:
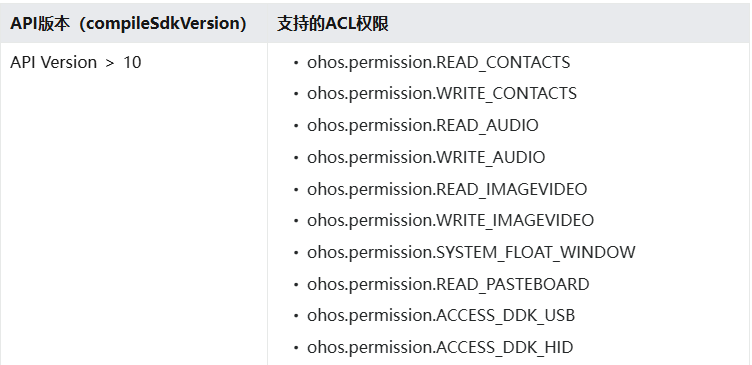
如果没有自动签名时,添加这些权限在module.json5文件中,编辑会报错。
需要注意的点:
- 确保已经连接真机或模拟器
- 打开项目结构,然后勾选自动生成签名文件
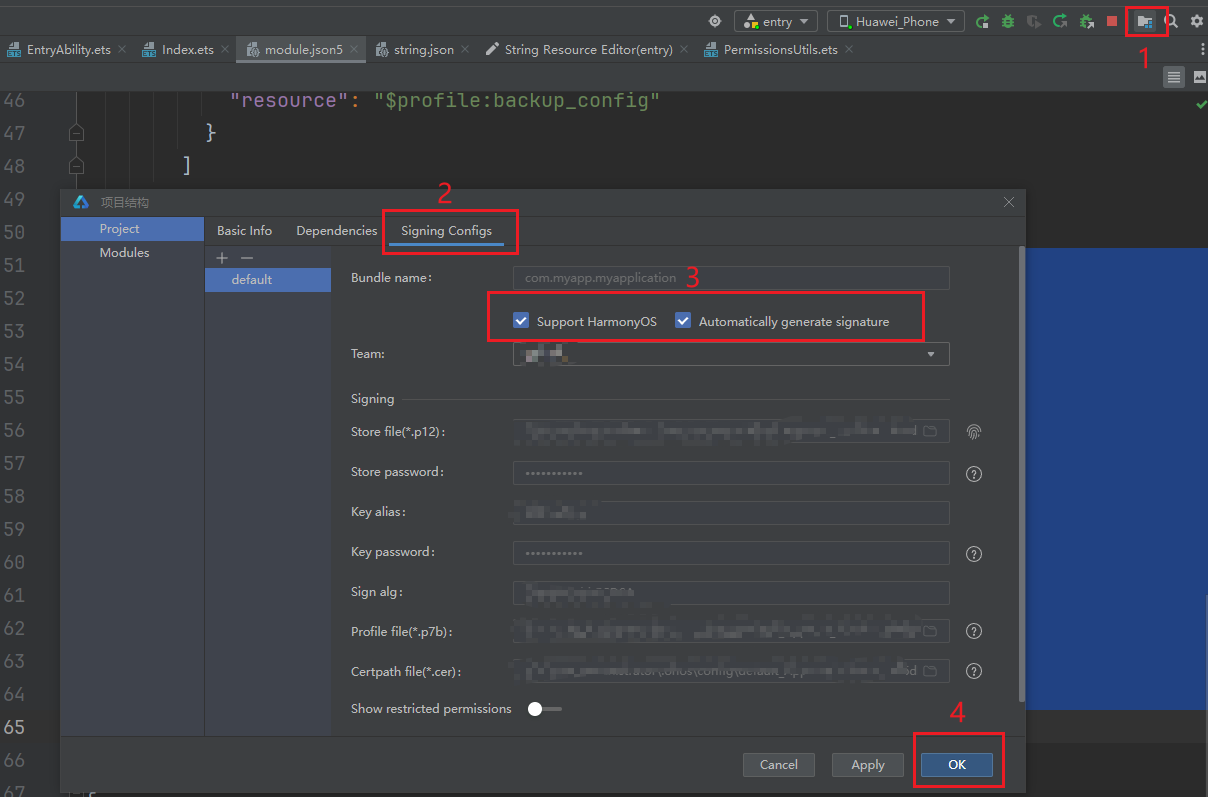
- 在项目的build-profile.json5文件下,查看signingConfigs下是否签名成功