Certbot自动申请并续期https证书
一、
-
安装 Certbot:使用命令安装 Certbot:
bashdnf install certbot python3-certbot-nginx -
获取 SSL 证书:运行 Certbot 命令来获取并安装 SSL 证书。
示例命令,替换其中的域名和路径信息:
bash如果使用源码安装,并且没有加入环境变量需要做软连接 ln -s /usr/local/nginx/sbin/nginx /usr/bin/nginx ln -s /usr/local/nginx/conf/ /etc/nginx #只生成证书 certbot certonly --nginx -w /data/web -d zhongta.ponytest.com --register-unsafely-without-email #生成证书把那个改配置 certbot --nginx -w /data/web -d zhongta.ponytest.com --register-unsafely-without-email #或者也可以直接指定nginx的目录,根据python版本不一样安装 yum install certbot python-certbot-nginx 或者 dnf install certbot python3-certbot-nginx certbot --nginx --nginx-server-root /usr/local/nginx1.24/conf --nginx-ctl /usr/local/nginx1.24/sbin/nginx --domain cloud.ponytest.com --register-unsafely-without-email这将使用 Certbot 的 webroot 插件来进行验证,并为你的域名生成 SSL 证书。确保将
-w /path/to/your/website替换为你网站的根目录路径,your-domain.com替换为你的实际域名。 -
设置自动续期:Certbot 支持设置自动续期任务,以确保你的 SSL 证书在到期前得到更新。你可以使用系统的计划任务工具(如 cron)来定期运行 Certbot 命令。
示例:
cron 任务配置,每天凌晨 2 点自动运行 Certbot:0 2 * * * certbot renew --quiet请使用合适的编辑器打开计划任务配置文件(通常是
/etc/crontab),将上述命令添加到文件末尾,并保存文件。Certbot 每天凌晨 2 点自动检查证书是否需要续期,并在需要时更新证书。
二、使用 Certbot 自动申请并续订阿里云 DNS 免费泛域名证书
Certbot 支持自动申请 LetsEncrypt 的泛域名证书,但是官方插件不支持阿里云,在 GitHub 搜索发现已经有人写好了阿里云 DNS 插件,下面只需要进行简单的配置即可免费申请一个泛域名证书并自动续订。
一)、安装cerbot
yum install epel-release -y
yum install certbot -y
二)、申请证书
域名分为主域名 test.com 和泛域名 *.test.com。
理论上泛域名证书可以同时用在主域名和泛域名上面,不知道为什么我的主域名用了泛域名的证书,chrome 提示我的证书无效。 于是我分开申请了两个证书,有知道解法的同学告知一下。
执行以下命令:
css
# 泛域名:
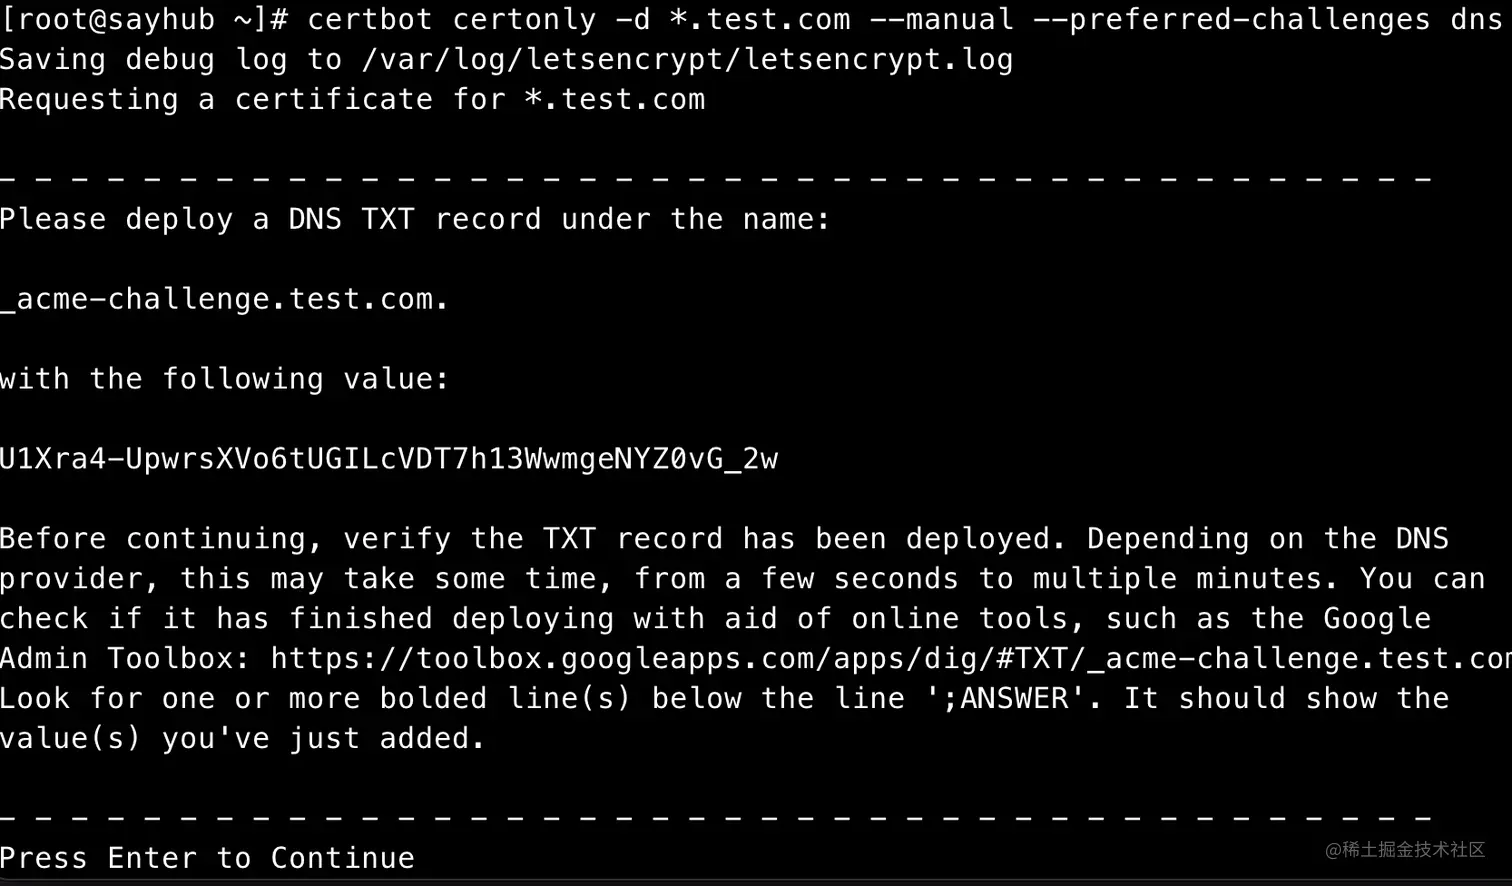
certbot certonly -d *.test.com --manual --preferred-challenges dns

# 主域名:
certbot certonly -d test.com --manual --preferred-challenges dns
这时会出现下图的界面

你需要按照提示,在你的域名服务商处,添加对应的 DNS TXT 解析记录。
配置好之后,按回车继续。
如果成功的话,它会生成两个文件:
/etc/letsencrypt/live/test.com/fullchain.pem/etc/letsencrypt/live/test.com/privkey.pem
三)、nginx 配置
接下来配置 nginx 配置,我主要使用 nginx 代理我的前端项目,nginx 请自行安装。
我的 nginx 默认配置文件在 /etc/nginx/nginx.conf。当子域名很多的时候,这个文件就会很庞大,所以我把所有域名的配置都拆分到一个/etc/nginx/conf.d 文件夹。
以www.test.com 为例,在/etc/nginx/conf.d 文件夹下新建一个 www.test.com.conf 文件,内容如下:
yml
server {
    listen 443 ssl;
    # 子域名
    server_name  www.test.com;
    # 这里是你证书的位置
    ssl_certificate /etc/letsencrypt/live/test.com/fullchain.pem;
    ssl_certificate_key /etc/letsencrypt/live/test.com/privkey.pem;
    ssl_protocols TLSv1 TLSv1.1 TLSv1.2;
    ssl_ciphers ECDHE-RSA-AES128-GCM-SHA256:HIGH:!aNULL:!MD5:!RC4:!DHE;
    ssl_prefer_server_ciphers on;
    root /usr/share/nginx/html;

    location / {
      # 指向前端资源的路径
      root   /home/webapps/test-app/dist;
      index  index.html;
    }

    error_page 404 /404.html;
        location = /40x.html {
    }

    error_page 500 502 503 504 /50x.html;
        location = /50x.html {
    }
}
nginx.conf 配置如下:
yml
http {
    log_format  main  '$remote_addr - $remote_user [$time_local] "$request" '
                      '$status $body_bytes_sent "$http_referer" '
                      '"$http_user_agent" "$http_x_forwarded_for"';

    access_log  /var/log/nginx/access.log  main;

    sendfile            on;
    tcp_nopush          on;
    tcp_nodelay         on;
    keepalive_timeout   65;
    types_hash_max_size 2048;

    include             /etc/nginx/mime.types;
    default_type        application/octet-stream;

    # 这里是防止别人恶意解析
    server {
       listen 80 default_server;
       server_name _;
       access_log off;
       return 404;
    }

    server {
        listen 443  default_server;
        server_name _;
        ssl_certificate /etc/letsencrypt/live/test.com/fullchain.pem;
        ssl_certificate_key /etc/letsencrypt/live/test.com/privkey.pem;
        access_log off;
        return 404;
    }

    # 这里配置强制把 http 转换成 https
    server {
        listen       80;
        server_name  test.com;
        root         /usr/share/nginx/html;
        return 301 https://$host$request_uri;
    }
    server {
        listen       80;
        server_name  *.test.com;
        root         /usr/share/nginx/html;
        return 301 https://$host$request_uri;
    }
    # 这里需要把之前拆分出去的配置引入进来
    include /etc/nginx/conf.d/*.conf;
}执行nginx -s reload,没问题的话,在浏览器输入域名,已经可以看到 HTTPS 的小锁了。
四)、续期
手动续期:
你只需要在到期前,再手动执行生成证书的命令
certbot certonly -d *.test.com --manual --preferred-challenges dns
再重复一下配置 DNS 解析的操作就 OK 啦。
自动续期:
certbot 提供了一个 hook,让我们可以编写一个 Shell 脚本。在续期的时候让脚本调用 DNS 服务商的 API 接口动态添加 TXT 记录,验证完成后再删除此记录。
安装和使用指南可看 README。
-
安装 aliyun cli 工具
bashwget https://aliyuncli.alicdn.com/aliyun-cli-linux-latest-amd64.tgz tar xzvf aliyun-cli-linux-latest-amd64.tgz sudo cp aliyun /usr/local/bin rm aliyun安装完成后需要配置凭证信息
-
安装 certbot-dns-aliyun 插件
bashwget https://cdn.jsdelivr.net/gh/justjavac/certbot-dns-aliyun@main/alidns.sh sudo cp alidns.sh /usr/local/bin sudo chmod +x /usr/local/bin/alidns.sh sudo ln -s /usr/local/bin/alidns.sh /usr/local/bin/alidns rm alidns.sh申请证书
测试是否能正确申请:
bashcertbot certonly -d *.example.com --manual --preferred-challenges dns --manual-auth-hook "alidns" --manual-cleanup-hook "alidns clean" --dry-run正式申请时去掉
--dry-run参数:bashcertbot certonly -d *.example.com --manual --preferred-challenges dns --manual-auth-hook "alidns" --manual-cleanup-hook "alidns clean"证书续期
bashcertbot renew --manual --preferred-challenges dns --manual-auth-hook "alidns" --manual-cleanup-hook "alidns clean" --dry-run如果以上命令没有错误,把
--dry-run参数去掉。 -
自动续期
添加定时任务 crontab。
bashcrontab -e输入
bash1 1 */1 * * root certbot renew --manual --preferred-challenges dns --manual-auth-hook "alidns" --manual-cleanup-hook "alidns clean" --deploy-hook "nginx -s reload"上面脚本中的
--deploy-hook "nginx -s reload"表示在续期成功后自动重启 nginx。
生成也可以用:
bash
# 泛域名
certbot certonly -d *.test.com --manual --preferred-challenges dns --manual-auth-hook "alidns" --manual-cleanup-hook "alidns clean"
续费命令:
bash
# 续费命令
certbot renew --manual --preferred-challenges dns --manual-auth-hook "alidns" --manual-cleanup-hook "alidns clean"
然后再利用 crontab 定时任务,每天执行一下自动续期。
bash
1 1 */1 * * root certbot renew --manual --preferred-challenges dns --manual-auth-hook "alidns" --manual-cleanup-hook "alidns clean" --deploy-hook "nginx -s reload"h-hook "alidns" --manual-cleanup-hook "alidns clean"
然后再利用 crontab 定时任务,每天执行一下自动续期。

```bash
1 1 */1 * * root certbot renew --manual --preferred-challenges dns --manual-auth-hook "alidns" --manual-cleanup-hook "alidns clean" --deploy-hook "nginx -s reload"