目录
[1 环境准备](#1 环境准备)
[1.1 安装rust](#1.1 安装rust)
[1.2 安装Android Studio](#1.2 安装Android Studio)
[1.3 设置环境变量](#1.3 设置环境变量)
[2 转换模型](#2 转换模型)
[2.1 安装mlc-llm](#2.1 安装mlc-llm)
[2.2 (可选)转换参数](#2.2 (可选)转换参数)
[2.3 (可选)生成配置](#2.3 (可选)生成配置)
[2.4 (可选)上传到huggingface](#2.4 (可选)上传到huggingface)
[2.5 (可选) 测试转换的模型](#2.5 (可选) 测试转换的模型)
[3 打包运行](#3 打包运行)
[3.1 修改配置文件](#3.1 修改配置文件)
[3.2 运行打包命令](#3.2 运行打包命令)
[3.3 创建签名](#3.3 创建签名)
[3.4 修改gradle配置](#3.4 修改gradle配置)
[3.5 命令行编译](#3.5 命令行编译)
[3.6 运行体验](#3.6 运行体验)
本文是对书生大模型L3-彩蛋岛-InternLM 1.8B 模型 Android 端侧部署实践部分的学习和实现,学习地址如下:
学习地址:学员闯关手册 - 飞书云文档 (feishu.cn)
1 环境准备
1.1 安装rust
参考: Other Installation Methods - Rust Forge。
使用了国内的镜像,出现选项直接Enter:
export RUSTUP_DIST_SERVER=https://mirrors.ustc.edu.cn/rust-static
export RUSTUP_UPDATE_ROOT=https://mirrors.ustc.edu.cn/rust-static/rustup
curl --proto '=https' --tlsv1.2 -sSf https://mirrors.ustc.edu.cn/misc/rustup-install.sh  | sh
1.2 安装Android Studio
参考 :https://developer.android.com/studio。
mkdir -p /root/android && cd /root/android
wget https://redirector.gvt1.com/edgedl/android/studio/ide-zips/2024.1.1.12/android-studio-2024.1.1.12-linux.tar.gz
tar -xvzf android-studio-2024.1.1.12-linux.tar.gz
cd android-studio
wget https://dl.google.com/android/repository/commandlinetools-linux-11076708_latest.zip?hl=zh-cn
unzip commandlinetools-linux-11076708_latest.zip\?hl\=zh-cn
export JAVA_HOME=/root/android/android-studio/jbr
cmdline-tools/bin/sdkmanager "ndk;27.0.12077973" "cmake;3.22.1"  "platforms;android-34" "build-tools;33.0.1" --sdk_root='sdk'
1.3 设置环境变量
. "$HOME/.cargo/env"
export ANDROID_NDK=/root/android/android-studio/sdk/ndk/27.0.12077973
export TVM_NDK_CC=$ANDROID_NDK/toolchains/llvm/prebuilt/linux-x86_64/bin/aarch64-linux-android24-clang
export JAVA_HOME=/root/android/android-studio/jbr
export ANDROID_HOME=/root/android/android-studio/sdk
export PATH=/usr/local/cuda-12/bin:$PATH
export PATH=/root/android/android-studio/sdk/cmake/3.22.1/bin:$PATH
2 转换模型
2.1 安装mlc-llm
参考:https://llm.mlc.ai/docs/install/mlc_llm.html,安装mlc-llm可能需要代理。
安装pytorch部分也可以使用其他包含torch的conda环境。
conda create --name mlc-prebuilt  python=3.11
conda activate mlc-prebuilt
conda install -c conda-forge git-lfs
conda install pytorch torchvision torchaudio pytorch-cuda=12.1 -c pytorch -c nvidia
python -m pip install --pre -U -f https://mlc.ai/wheels mlc-llm-nightly-cu122 mlc-ai-nightly-cu122
测试如下输出说明安装正确:
python -c "import mlc_llm; print(mlc_llm)"
克隆项目:
git clone https://github.com/mlc-ai/mlc-llm.git
cd mlc-llm
git submodule update --init --recursive
2.2 (可选)转换参数
(如果不想上传到huggingface可以跳过这一步,有公开上传的)
使用 mlc_llm 的 convert_weight 对模型参数进行转换和量化,转换后的参数可以跨平台使用。
mkdir -p /root/models/
ln -s /share/new_models/Shanghai_AI_Laboratory/internlm2_5-1_8b-chat /root/models/internlm2_5-1_8b-chat
cd android/MLCChat
export TVM_SOURCE_DIR=/root/android/mlc-llm/3rdparty/tvm
export MLC_LLM_SOURCE_DIR=/root/android/mlc-llm
mlc_llm convert_weight /root/models/internlm2_5-1_8b-chat/ \
    --quantization q4f16_1 \
    -o dist/internlm2_5-1_8b-chat-q4f16_1-MLC
2.3 (可选)生成配置
(如果不想上传到huggingface可以跳过这一步,有公开上传的)
使用 mlc_llm 的 gen_config 生成 mlc-chat-config.json 并处理 tokenizer。
出现提示时输入y。
mlc_llm gen_config /root/models/internlm2_5-1_8b-chat/  \
    --quantization q4f16_1 --conv-template chatml  \
    -o dist/internlm2_5-1_8b-chat-q4f16_1-MLC
Do you wish to run the custom code? [y/N] y
2.4 (可选)上传到huggingface
上传这一步需要能访问huggingface,可能需要部署代理并耗费一定流量。
具体方法可以参考网上的大量教程,如果不想上传到huggingface可以跳过这一步,直接在接下来的配置中使用如下链接的模型(和文档中的转换方法一样) https://huggingface.co/timws/internlm2_5-1_8b-chat-q4f16_1-MLC。
2.5 (可选) 测试转换的模型
在打包之前可以测试模型效果,需要编译成二进制文件。
在个人电脑上运行测试代码正常,InternStudio 上暂未成功。
mlc_llm compile ./dist/internlm2_5-1_8b-chat-q4f16_1-MLC/mlc-chat-config.json \
    --device cuda -o dist/libs/internlm2_5-1_8b-chat-q4f16_1-MLC-cuda.so
测试编译的模型是否符合预期,手机端运行的效果和测试效果接近:
from mlc_llm import MLCEngine

# Create engine
engine = MLCEngine(model="./dist/internlm2_5-1_8b-chat-q4f16_1-MLC", model_lib="./dist/libs/internlm2_5-1_8b-chat-q4f16_1-MLC-cuda.so")

# Run chat completion in OpenAI API.
print(engine)
for response in engine.chat.completions.create(
    messages=[{"role": "user", "content": "你是谁?"}],
    stream=True
):
    for choice in response.choices:
        print(choice.delta.content, end="", flush=True)
print("\n")
engine.terminate()
3 打包运行
3.1 修改配置文件
修改mlc-package-config.json 参考如下:
{
    "device": "android",
    "model_list": [
        {
            "model": "HF://timws/internlm2_5-1_8b-chat-q4f16_1-MLC",
            "estimated_vram_bytes": 3980990464,
            "model_id": "internlm2_5-1_8b-chat-q4f16_1-MLC"

        },
        {
            "model": "HF://mlc-ai/gemma-2b-it-q4f16_1-MLC",
            "model_id": "gemma-2b-q4f16_1-MLC",
            "estimated_vram_bytes": 3980990464
        }
    ]
}
3.2 运行打包命令
这一步需要能访问huggingface,可能需要部署代理:
mlc_llm package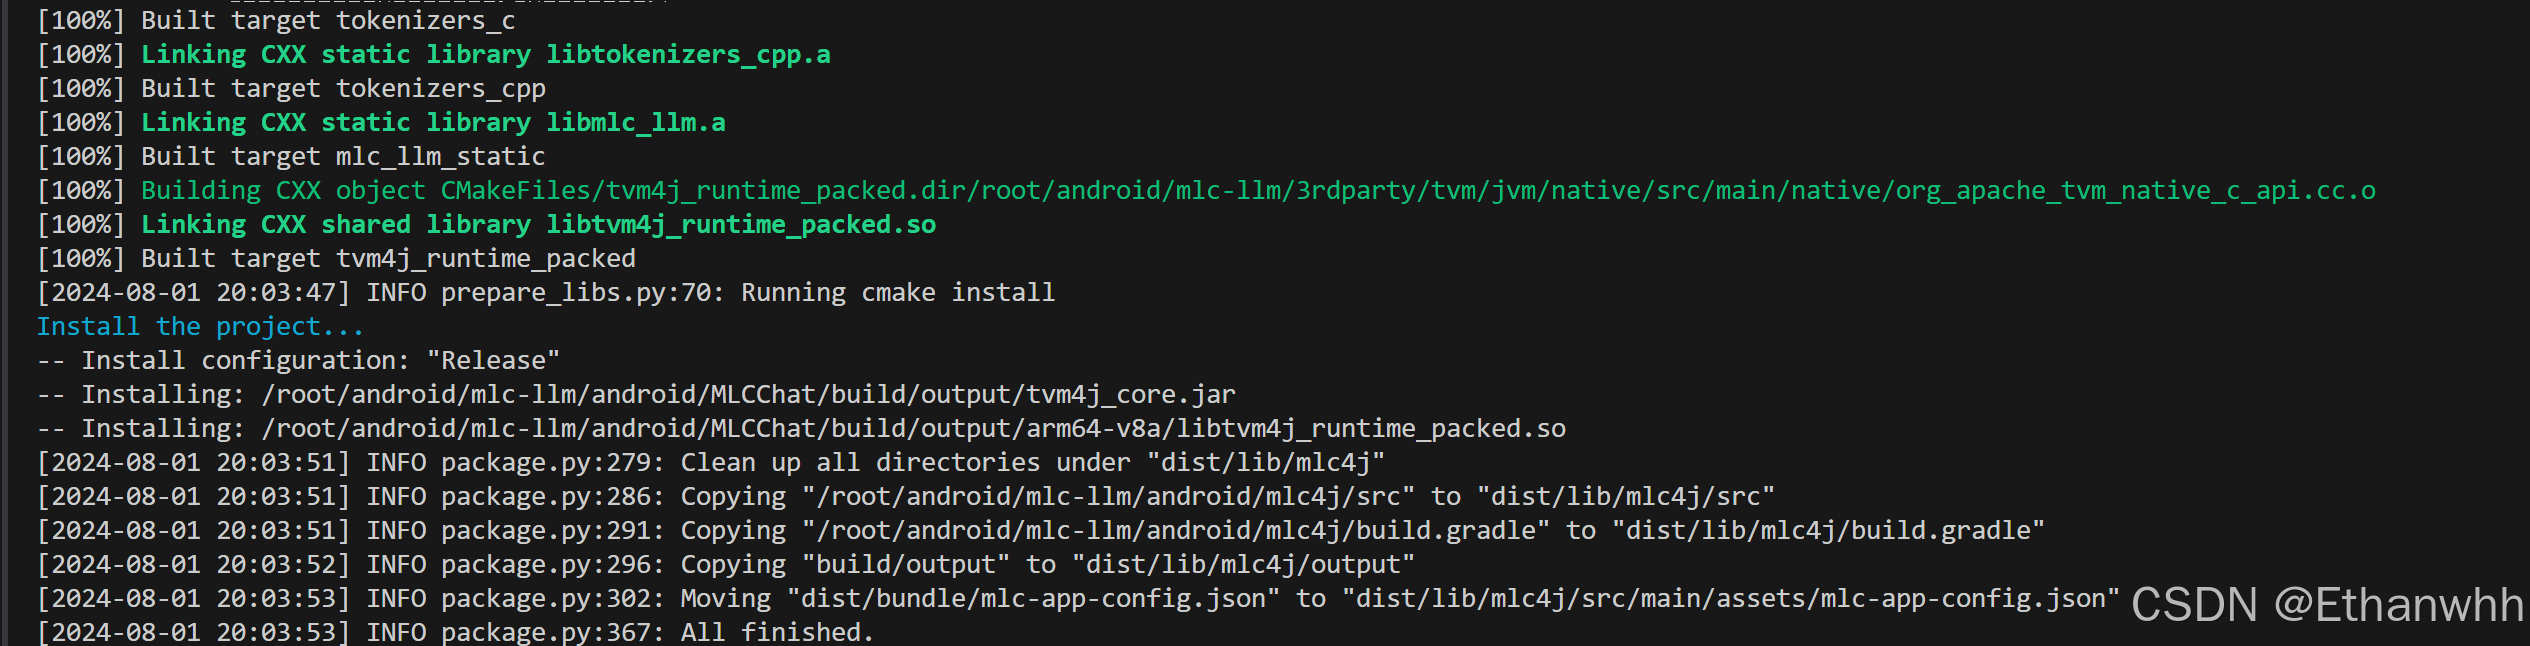
3.3 创建签名
cd /root/android/mlc-llm/android/MLCChat
/root/android/android-studio/jbr/bin/keytool -genkey -v -keystore my-release-key.jks -keyalg RSA -keysize 2048 -validity 10000
Enter keystore password:
Re-enter new password:
What is your first and last name?
  [Unknown]:  Any
What is the name of your organizational unit?
  [Unknown]:  Any
What is the name of your organization?
  [Unknown]:  Any
What is the name of your City or Locality?
  [Unknown]:  Any
What is the name of your State or Province?
  [Unknown]:  Any
What is the two-letter country code for this unit?
  [Unknown]:  CN
Is CN=Any, OU=Any, O=Any, L=Any, ST=Any, C=CN correct?
  [no]:  yes

Generating 2,048 bit RSA key pair and self-signed certificate (SHA256withRSA) with a validity of 10,000 days
        for: CN=Any, OU=Any, O=Any, L=Any, ST=Any, C=CN
[Storing my-release-key.jks]
3.4 修改gradle配置
如果是本地可以WIFI或USB调试不用签名,在服务器构建需要签名 修改app/build.gradle为如下内容,主要是增加了签名部分,注意确认签名文件的位置:
plugins {
    id 'com.android.application'
    id 'org.jetbrains.kotlin.android'
}

android {
    namespace 'ai.mlc.mlcchat'
    compileSdk 34

    defaultConfig {
        applicationId "ai.mlc.mlcchat"
        minSdk 26
        targetSdk 33
        versionCode 1
        versionName "1.0"

        testInstrumentationRunner "androidx.test.runner.AndroidJUnitRunner"
        vectorDrawables {
            useSupportLibrary true
        }
    }


    compileOptions {
        sourceCompatibility JavaVersion.VERSION_1_8
        targetCompatibility JavaVersion.VERSION_1_8
    }
    kotlinOptions {
        jvmTarget = '1.8'
    }
    buildFeatures {
        compose true
    }
    composeOptions {
        kotlinCompilerExtensionVersion '1.4.3'
    }
    packagingOptions {
        resources {
            excludes += '/META-INF/{AL2.0,LGPL2.1}'
        }
    }

    signingConfigs {
        release {
            storeFile file("/root/android/mlc-llm/android/MLCChat/my-release-key.jks")
            storePassword "123456"
            keyAlias "mykey"
            keyPassword "123456"
        }
    }

    buildTypes {
        release {
            minifyEnabled false
            proguardFiles getDefaultProguardFile('proguard-android-optimize.txt'), 'proguard-rules.pro'
            signingConfig signingConfigs.release
        }
    }
}

dependencies {
    implementation project(":mlc4j")
    implementation 'androidx.core:core-ktx:1.10.1'
    implementation 'androidx.lifecycle:lifecycle-runtime-ktx:2.6.1'
    implementation 'androidx.activity:activity-compose:1.7.1'
    implementation platform('androidx.compose:compose-bom:2022.10.00')
    implementation 'androidx.lifecycle:lifecycle-viewmodel-compose:2.6.1'
    implementation 'androidx.compose.ui:ui'
    implementation 'androidx.compose.ui:ui-graphics'
    implementation 'androidx.compose.ui:ui-tooling-preview'
    implementation 'androidx.compose.material3:material3:1.1.0'
    implementation 'androidx.compose.material:material-icons-extended'
    implementation 'androidx.appcompat:appcompat:1.6.1'
    implementation 'androidx.navigation:navigation-compose:2.5.3'
    implementation 'com.google.code.gson:gson:2.10.1'
    implementation fileTree(dir: 'src/main/libs', include: ['*.aar', '*.jar'], exclude: [])
    testImplementation 'junit:junit:4.13.2'
    androidTestImplementation 'androidx.test.ext:junit:1.1.5'
    androidTestImplementation 'androidx.test.espresso:espresso-core:3.5.1'
    androidTestImplementation platform('androidx.compose:compose-bom:2022.10.00')
    androidTestImplementation 'androidx.compose.ui:ui-test-junit4'
    debugImplementation 'androidx.compose.ui:ui-tooling'
    debugImplementation 'androidx.compose.ui:ui-test-manifest'

}
3.5 命令行编译
运行编译命令,完成后在app/build/outputs/apk/release生成app-release.apk安装包,下载到手机上运行 运行App需要能访问huggingface下载模型(参考文档中的bundle方法需要ADB刷入模型数据):
./gradlew assembleRelease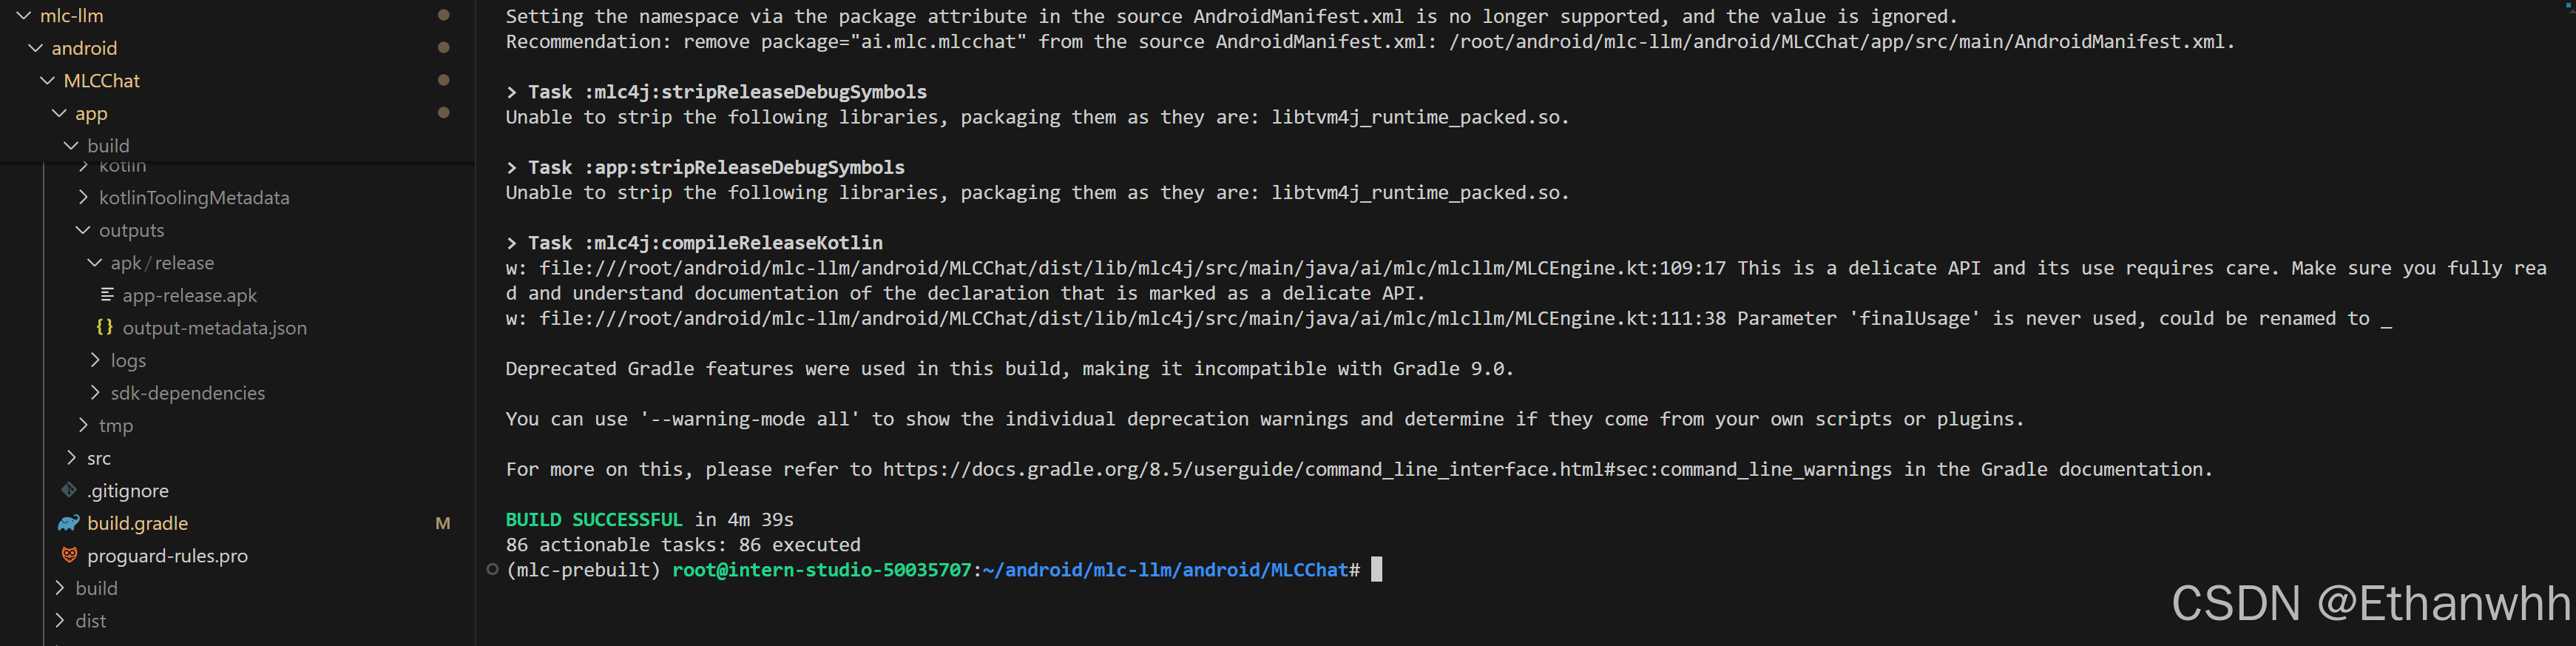
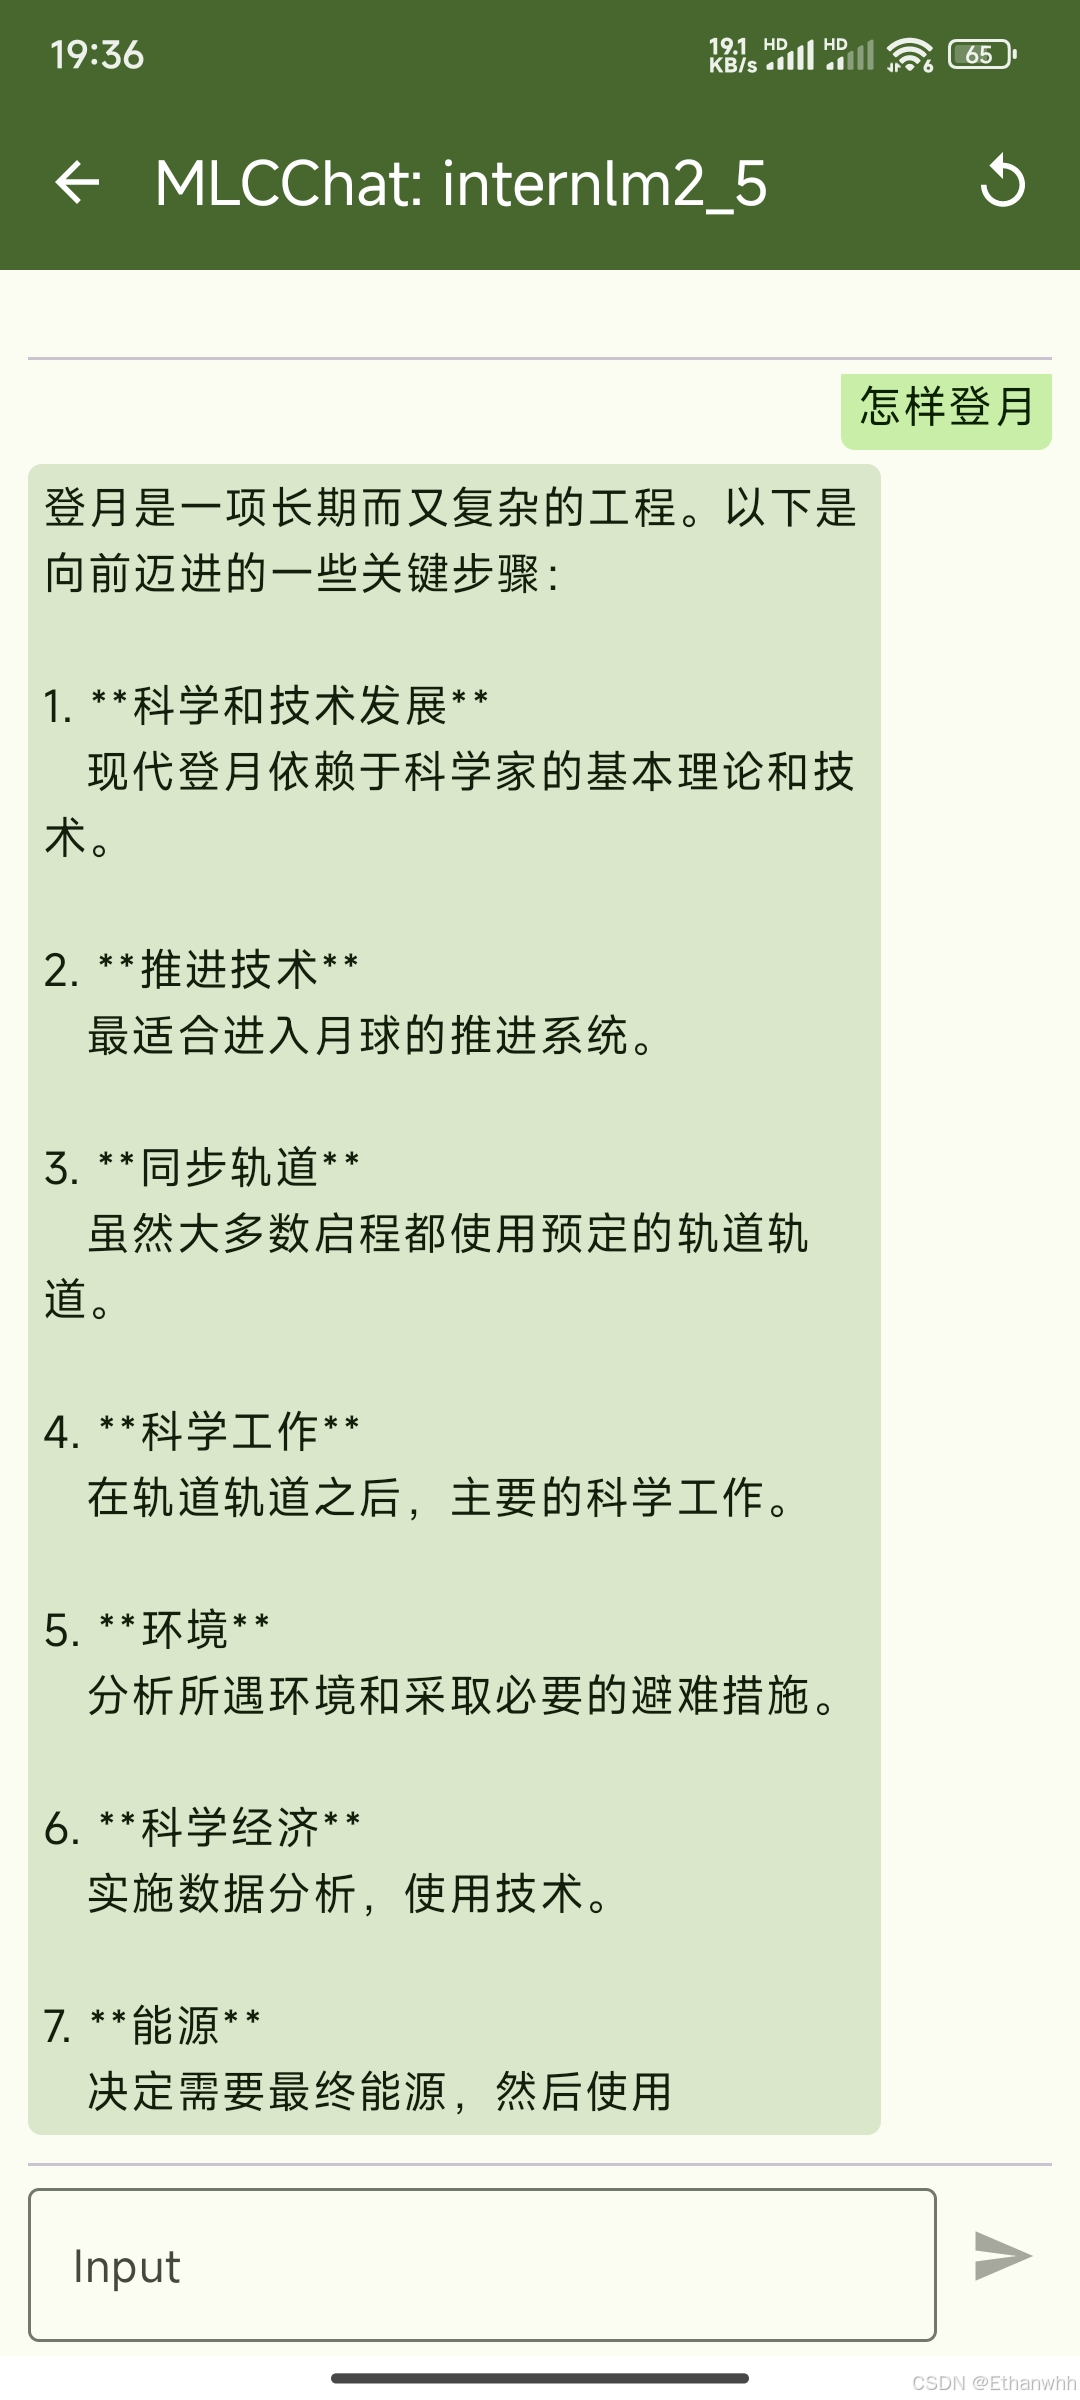
3.6 运行体验
- 运行App需要能访问huggingface下载模型
- 需要大概4G运行内存
- 如果运行闪退,和可能是下载不完整可以删除重新下载