让你的移动端任务启动起来吧。
重要的更新公告
!!!GDPU的小伙伴,感谢大家的支持,希望到此一游的帅哥美女能有所帮助。本学期的前端框架及移动应用,采用专栏订阅量达到50才开始周更了哦( •̀ .̫ •́ )✧
Andriod生命周期
创建3个Activity: MainActivity, NormalActivity和DialogActivity。
其中MainActivity是app启动的第一个Activity(在Intent filter中设置)
NormalActivity是普通的Activity
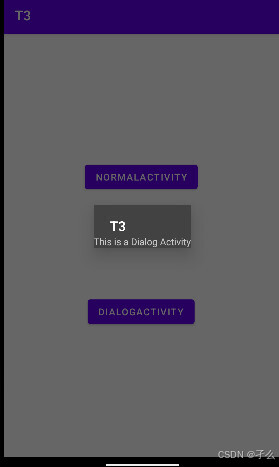
DialogActivity的主题为theme="@android:style/Theme.Dialog
在MainActivity中通过点击按钮启动NormalActivity和DialogActivity。
重写这三个Activity的生命周期7个回调方法。在回调方法中打印Activity所在的类名称和回调方法名称。
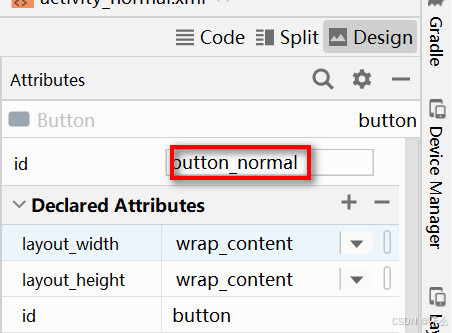
先新建这几个活动,其中配有几个布局的xml,怎么新建,不会的可以看上次活动创建的实验。然后加组件时别忘了改组件的id,便于在你的java文件去获取。
MainActivity
java
import android.content.Intent;
import android.os.Bundle;
import android.util.Log;
import android.view.View;
import android.widget.Button;
import androidx.appcompat.app.AppCompatActivity;

public class MainActivity extends AppCompatActivity {
    private static final String TAG = "MainActivity";

    @Override
    protected void onCreate(Bundle savedInstanceState) {
        super.onCreate(savedInstanceState);
        setContentView(R.layout.activity_main);

        Button normalButton = findViewById(R.id.button_normal);
        Button dialogButton = findViewById(R.id.button_dialog);

        normalButton.setOnClickListener(new View.OnClickListener() {
            @Override
            public void onClick(View v) {
                Intent intent = new Intent(MainActivity.this, NormalActivity.class);
                startActivity(intent);
            }
        });

        dialogButton.setOnClickListener(new View.OnClickListener() {
            @Override
            public void onClick(View v) {
                Intent intent = new Intent(MainActivity.this, DialogActivity.class);
                startActivity(intent);
            }
        });
        Log.d(TAG, getClass().getSimpleName() + ": onCreate");
    }

    @Override
    protected void onStart() {
        super.onStart();
        Log.d(TAG, getClass().getSimpleName() + ": onStart");
    }

    @Override
    protected void onResume() {
        super.onResume();
        Log.d(TAG, getClass().getSimpleName() + ": onResume");
    }

    @Override
    protected void onPause() {
        super.onPause();
        Log.d(TAG, getClass().getSimpleName() + ": onPause");
    }

    @Override
    protected void onStop() {
        super.onStop();
        Log.d(TAG, getClass().getSimpleName() + ": onStop");
    }

    @Override
    protected void onDestroy() {
        super.onDestroy();
        Log.d(TAG, getClass().getSimpleName() + ": onDestroy");
    }

    @Override
    protected void onRestart() {
        super.onRestart();
        Log.d(TAG, getClass().getSimpleName() + ": onRestart");
    }
}
XML
<?xml version="1.0" encoding="utf-8"?>
<androidx.constraintlayout.widget.ConstraintLayout xmlns:android="http://schemas.android.com/apk/res/android"
    xmlns:app="http://schemas.android.com/apk/res-auto"
    android:layout_width="match_parent"
    android:layout_height="match_parent">

    <Button
        android:id="@+id/button_normal"
        android:layout_width="wrap_content"
        android:layout_height="wrap_content"
        android:layout_marginStart="120dp"
        android:layout_marginTop="188dp"
        android:text="NormalActivity"
        app:layout_constraintStart_toStartOf="parent"
        app:layout_constraintTop_toTopOf="parent" />

    <Button
        android:id="@+id/button_dialog"
        android:layout_width="wrap_content"
        android:layout_height="wrap_content"
        android:layout_marginStart="124dp"
        android:layout_marginTop="152dp"
        android:text="DialogActivity"
        app:layout_constraintStart_toStartOf="parent"
        app:layout_constraintTop_toBottomOf="@id/button_normal" />
</androidx.constraintlayout.widget.ConstraintLayout>
NormalActivity
java
import android.os.Bundle;
import android.util.Log;
import androidx.appcompat.app.AppCompatActivity;

public class NormalActivity extends AppCompatActivity {
    private static final String TAG = "NormalActivity";

    @Override
    protected void onCreate(Bundle savedInstanceState) {
        super.onCreate(savedInstanceState);
        setContentView(R.layout.activity_normal);
        Log.d(TAG, getClass().getSimpleName() + ": onCreate");
    }

    @Override
    protected void onStart() {
        super.onStart();
        Log.d(TAG, getClass().getSimpleName() + ": onStart");
    }

    @Override
    protected void onResume() {
        super.onResume();
        Log.d(TAG, getClass().getSimpleName() + ": onResume");
    }

    @Override
    protected void onPause() {
        super.onPause();
        Log.d(TAG, getClass().getSimpleName() + ": onPause");
    }

    @Override
    protected void onStop() {
        super.onStop();
        Log.d(TAG, getClass().getSimpleName() + ": onStop");
    }

    @Override
    protected void onDestroy() {
        super.onDestroy();
        Log.d(TAG, getClass().getSimpleName() + ": onDestroy");
    }

    @Override
    protected void onRestart() {
        super.onRestart();
        Log.d(TAG, getClass().getSimpleName() + ": onRestart");
    }
}
XML
<?xml version="1.0" encoding="utf-8"?>
<LinearLayout xmlns:android="http://schemas.android.com/apk/res/android"
android:layout_width="match_parent"
android:layout_height="match_parent"
android:orientation="vertical"
android:gravity="center">
<TextView
android:layout_width="wrap_content"
android:layout_height="wrap_content"
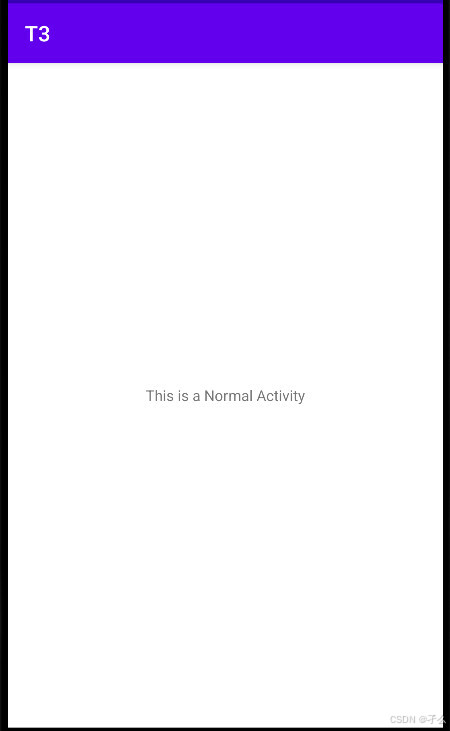
android:text="This is a Normal Activity" />
</LinearLayout>DialogActivity
java
import android.os.Bundle;
import android.util.Log;
import android.view.View;
import android.widget.Button;

import androidx.appcompat.app.AppCompatActivity;

public class DialogActivity extends AppCompatActivity {
    private static final String TAG = "DialogActivity";

    @Override
    protected void onCreate(Bundle savedInstanceState) {
        super.onCreate(savedInstanceState);
        setContentView(R.layout.activity_dialog);
        Log.d(TAG, getClass().getSimpleName() + ": onCreate");
    }

    @Override
    protected void onStart() {
        super.onStart();
        Log.d(TAG, getClass().getSimpleName() + ": onStart");
    }

    @Override
    protected void onResume() {
        super.onResume();
        Log.d(TAG, getClass().getSimpleName() + ": onResume");
    }

    @Override
    protected void onPause() {
        super.onPause();
        Log.d(TAG, getClass().getSimpleName() + ": onPause");
    }

    @Override
    protected void onStop() {
        super.onStop();
        Log.d(TAG, getClass().getSimpleName() + ": onStop");
    }

    @Override
    protected void onDestroy() {
        super.onDestroy();
        Log.d(TAG, getClass().getSimpleName() + ": onDestroy");
    }

    @Override
    protected void onRestart() {
        super.onRestart();
        Log.d(TAG, getClass().getSimpleName() + ": onRestart");
    }
}
XML
<?xml version="1.0" encoding="utf-8"?>
<LinearLayout xmlns:android="http://schemas.android.com/apk/res/android"
    android:layout_width="match_parent"
    android:layout_height="match_parent"
    android:orientation="vertical"
    android:gravity="center">

    <TextView
        android:layout_width="wrap_content"
        android:layout_height="wrap_content"
        android:text="This is a Dialog Activity" />
</LinearLayout>
AndroidManifest.xml
XML
<?xml version="1.0" encoding="utf-8"?>
<manifest xmlns:android="http://schemas.android.com/apk/res/android"
    package="com.example.t3">

    <application
        android:allowBackup="true"
        android:icon="@mipmap/ic_launcher"
        android:label="@string/app_name"
        android:roundIcon="@mipmap/ic_launcher_round"
        android:supportsRtl="true"
        android:theme="@style/Theme.T3">
        <activity android:name=".MainActivity"
            android:exported="true">
            <intent-filter>
                <action android:name="android.intent.action.MAIN" />
                <category android:name="android.intent.category.LAUNCHER" />
            </intent-filter>
        </activity>

        <activity android:name=".NormalActivity" />

        <activity
            android:name=".DialogActivity"
            android:theme="@style/Theme.AppCompat.Dialog" />
    </application>

</manifest>
NormalActivity与DialogActivity的代码几乎是相似的,不同点在于DialogActivity加了对话的主题。

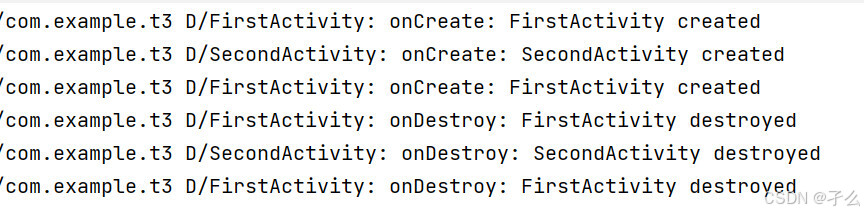
运行程序,查看logcat的输出。
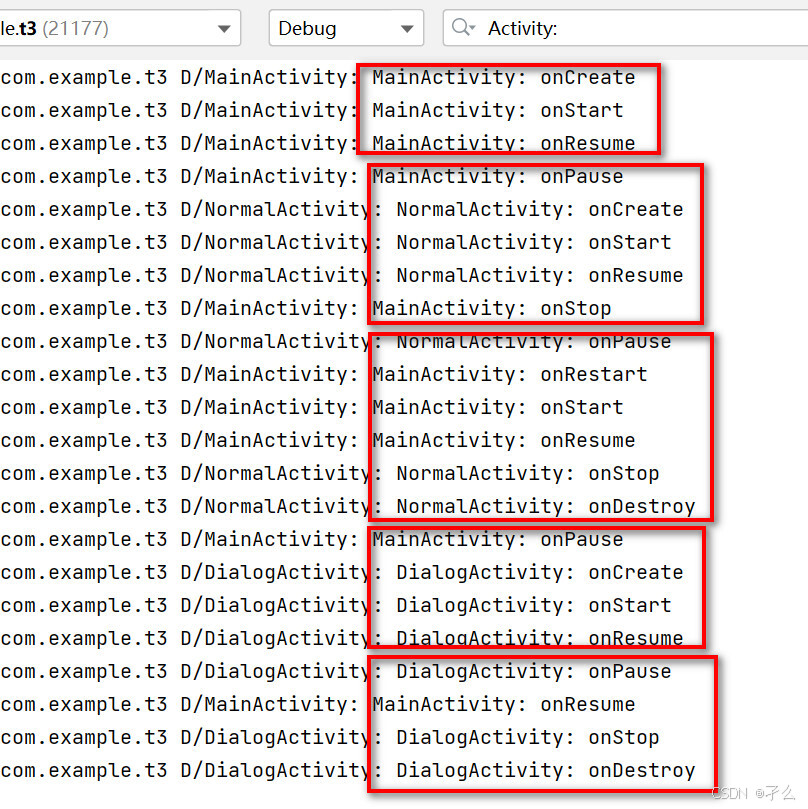
可以看到, 点击DialogActivity没有跳出MainActivity,在点击NormalActivity时MainActivity执行了onStop,而onStop在活动不再可见时调用,然后返回MainActivity是要进行onRestart的。注意找一下实验中的区别,方便更好理解生命周期函数在什么时候调用。
提醒一下,虚拟手机就把它当作你的手机用,长按它往边划一下即可返回。
然后到了简答题部分,要多背了。
1.onCreate()方法中适合编写什么功能的代码?为什么?
(1).初始化应用的界面(如调用 setContentView())。
初始化数据(如设置视图控件的初始状态)。
启动任何需要的服务或线程。
加载布局、绑定事件等。
(2).onCreate() 是 Activity 生命周期中的第一个回调方法,它在 Activity 第一次被创建时调用,因此适合进行初始化工作。
2.通常应该在onPause()回调方法里面做什么操作?为什么?
(1)将一些消耗cpu的资源释放
保存一些关键数据。
暂停动画或视频播放。
(2)onPause() 在系统准备去启动或者恢复另一个活动的时候调用。此时需要保存关键数据和状态,以确保用户重新回到该 Activity 时能够恢复之前的状态。
3.通常应该onStop()回调方法里面做什么操作?为什么?
(1)释放不再需要的资源(如停止后台任务)。
保存持久数据。
解除注册的广播接收器。
(2)onStop() 在活动不可见的时候调用。这是释放资源和保存数据的好时机,以避免不必要的内存占用和资源浪费。
4.一个Activity启动到可以跟用户交互顺序调用哪些回调方法?在什么时候可见?
(1)onCreate()
onStart()
onResume()
(2)在 onStart() 时,Activity 对用户是可见的,但尚未与用户交互。在 onResume() 时,Activity 已经完全可见并且可以与用户交互。
5.什么情况下Activity会部分可见?请举个例子。
部分可见的情况:当一个 Activity 被另一个 Activity 启动,并且新启动的 Activity 是透明的或浮动的(如对话框 Dialog 或 Activity 的 Theme 属性设置为透明)。例如,一个全屏的 Activity 在另一个 Activity 上方显示时,底下的 Activity 仍然可见,但不与用户交互。
6.一个Activity从Stop状态到可以跟用户交互顺序调用了哪些回调方法?
顺序调用的回调方法:
onRestart()(如果 Activity 是从 onStop() 再次启动的)
onStart()
onResume()
活动的启动模式
编写一个FirstActivity,并在FirstActivity中通过点击按钮启动SecondActivity,然后在SecondActivity中通过点击按钮再次启动FirstActivity。重新这两个Activity的onCreate和onDestory方法,打印简单的调试信息,方便你查看他们的启动和销毁。
设置FirstActivity的启动模式为standard。查看运行和退出效果
设置FirstActivity的启动模式为singleTask。查看运行和退出效果
设置FirstActivity的启动模式为singleInstance。查看运行和退出效果
从题我们可以看出又得新建一个主活动当主页,我们知道一个应用只能有一个主活动,可是上题已经占用了,莫非又得新建一个工程,NO~~,新建一个模块吧。
这样你就在同一个工程创建多了一个模块,即多了一个应用了,注意要是代码没报错却运行不了很可能是sdk的问题,要记得去应用的build.gradle进行设置哦。
FirstActivity
java
import android.content.Intent;
import android.os.Bundle;
import android.view.View;
import android.widget.Button;
import android.util.Log;
import androidx.appcompat.app.AppCompatActivity;
public class FirstActivity extends AppCompatActivity {
private static final String TAG = "FirstActivity";
@Override
protected void onCreate(Bundle savedInstanceState) {
super.onCreate(savedInstanceState);
setContentView(R.layout.activity_first);
Button button = findViewById(R.id.button_to_second);
button.setOnClickListener(new View.OnClickListener() {
@Override
public void onClick(View v) {
startActivity(new Intent(FirstActivity.this, SecondActivity.class));
}
});
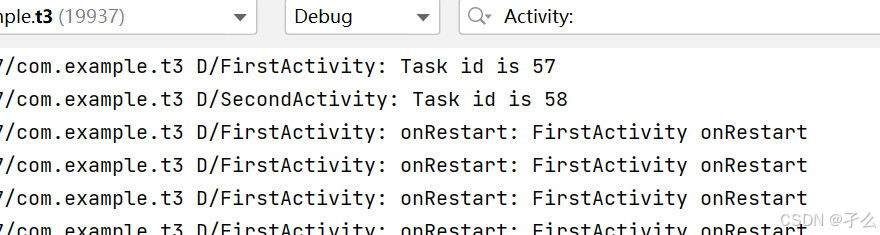
// Log.d(TAG,"Task id is "+ getTaskId());
Log.d(TAG, "onCreate: FirstActivity created");
}
@Override
protected void onRestart() {
super.onRestart();
Log.d(TAG, "onRestart: FirstActivity onRestart");
}
@Override
protected void onDestroy() {
super.onDestroy();
Log.d(TAG, "onDestroy: FirstActivity destroyed");
}
}
XML
<?xml version="1.0" encoding="utf-8"?>
<RelativeLayout xmlns:android="http://schemas.android.com/apk/res/android"
    android:layout_width="match_parent"
    android:layout_height="match_parent">

    <Button
        android:id="@+id/button_to_second"
        android:layout_width="wrap_content"
        android:layout_height="wrap_content"
        android:text="Go to Second Activity"
        android:layout_centerInParent="true"/>
</RelativeLayout>
SecondActivity
java
import android.content.Intent;
import android.os.Bundle;
import android.view.View;
import android.widget.Button;
import android.util.Log;
import androidx.appcompat.app.AppCompatActivity;

public class SecondActivity extends AppCompatActivity {
    private static final String TAG = "SecondActivity";

    @Override
    protected void onCreate(Bundle savedInstanceState) {
        super.onCreate(savedInstanceState);
        setContentView(R.layout.activity_second);

        Button button = findViewById(R.id.button_to_first);
        button.setOnClickListener(new View.OnClickListener() {
            @Override
            public void onClick(View v) {
                startActivity(new Intent(SecondActivity.this, FirstActivity.class));
            }
        });

//        Log.d(TAG,"Task id is "+ getTaskId());
        Log.d(TAG, "onCreate: SecondActivity created");
    }

    @Override
    protected void onDestroy() {
        super.onDestroy();
        Log.d(TAG, "onDestroy: SecondActivity destroyed");
    }
}
XML
<?xml version="1.0" encoding="utf-8"?>
<RelativeLayout xmlns:android="http://schemas.android.com/apk/res/android"
    android:layout_width="match_parent"
    android:layout_height="match_parent">

    <Button
        android:id="@+id/button_to_first"
        android:layout_width="wrap_content"
        android:layout_height="wrap_content"
        android:text="Go to First Activity"
        android:layout_centerInParent="true"/>
</RelativeLayout>
AndroidManifest.xml
XML
<?xml version="1.0" encoding="utf-8"?>
<manifest xmlns:android="http://schemas.android.com/apk/res/android"
package="com.example.t3">
<application
android:allowBackup="true"
android:icon="@mipmap/ic_launcher"
android:label="task"
android:roundIcon="@mipmap/ic_launcher_round"
android:supportsRtl="true"
android:theme="@style/Theme.T3">
<activity
android:name=".FirstActivity"
android:exported="true"
android:launchMode="singleTask"> <!-- singleTop , singleInstance -->
<intent-filter>
<action android:name="android.intent.action.MAIN" />
<category android:name="android.intent.category.LAUNCHER" />
</intent-filter>
</activity>
<activity
android:name=".SecondActivity" />
</application>
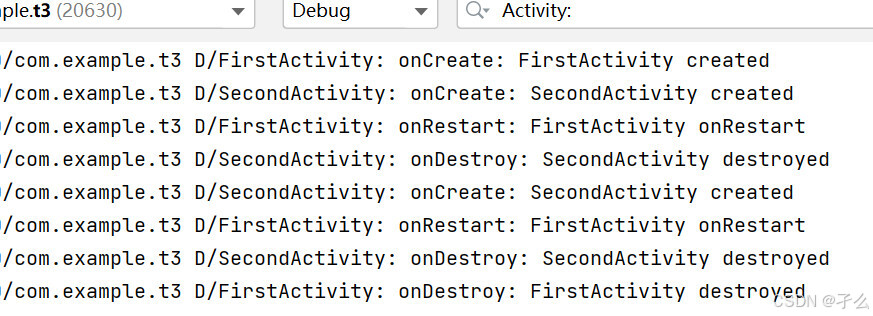
</manifest>注意一下,这里的代码是几种不同的启动模式,不同点已在里面注释,主要是在android:launchMode="singleTask"里修改一下即可,然后打开logcat查看输出理解一下。
singleTop
singleTask
singleInstance
1.解析singleTask和singleTop启动模式的区别
(1)
singleTask:在任务中只会有一个该 Activity 的实例。如果再次启动该 Activity,系统会重用现有实例,并调用其 onNewIntent() 方法。
singleTop:如果该 Activity 已经位于任务栈的顶部,系统会重用那个实例;如果不在顶部,则会创建一个新的实例。
(2)
singleTask:当该 Activity 被重新启动时,会将它移到栈顶并清除其上面的所有活动。
singleTop:不会影响栈中的其他活动,仅在栈顶时重用实例。
2.解析singleTask和singleInstance启动模式的区别。
(1)
singleTask:该 Activity 会在自己的任务栈中运行,可以被其他活动启动,并且可以有其他活动与之共享同一任务。
singleInstance:该 Activity 会在一个单独的任务栈中运行,其他任何活动不能在其任务栈中启动。
(2)
singleTask:允许在同一任务中和其他活动一起存在。
singleInstance:只能自己存在于一个单独的任务中,且不会与其他活动共享。
可以想一下,你在准备一个礼盒给闺蜜送花,然后往小盒子收集,往里面放再取出来。把这个盒子当作返回栈,你要盖住的盒口当栈顶, 后面放进去的会是先取出的。
实验心得
活动可重启,只是当时已惘然。