布局原则
1、不显式设置元素大小。
2、不使用绝对定位。
元素应该根据容器的内容来进行排列。绝对定位在开发前期会带来一些便捷,但扩展性比较差。一旦显示器尺寸或分辨率发生改变,界面的显示效果可能会达不到预期的效果。
3、布局容器可以嵌套使用
常用布局容器
WPF中的布局控件继承自System.Windows.Controls.Panel抽象类。
常用的布局容器如下:
|------------|----------------------------------------------------|
| Grid | 网格容器。可以创建不可见的行和列,然后通过设置行、列来进行元素排列。这是最灵活也是最常用的容器之一。 |
| StackPanel | 堆栈式面板。 在水平或垂直的堆栈中放置元素。当移除一个元素后,后面的元素会自动向前移动以填充空缺 |
| WrapPanel | 自动换行面板 |
| DockPanel | 停靠式面板。这个面板可以设置控件停靠的方式,类似Winform中的Dock属性 |
| Canvas | 画布。Canvas使用绝对定位来控制元素的位置。动画时会经常用到这个容器 |
| | |
Grid
Grid容器是WPF中最常用的布局容器。创建一个WPF工程后,系统会自动添加Grid标签作为顶级容器。
Grid容器通过定义行和列来设置控件的位置
 1   <!--ShowGridLines属性可以开启行列显示-->
 2     <Grid ShowGridLines="True">
 3         <!--添加行列-->
 4         <Grid.RowDefinitions>
 5             <RowDefinition/>
 6             <RowDefinition/>
 7         </Grid.RowDefinitions>
 8
 9         <Grid.ColumnDefinitions>
10             <ColumnDefinition/>
11             <ColumnDefinition/>
12         </Grid.ColumnDefinitions>
13
14         <Label Content="Row=0,Column=0"/>
15         <Label Content="Row=1,Column=1"/>
16     </Grid>
说明:
如果没有指定行和列,元素会默认放置在Grid的0行0列。
在Grid容器中,行和列的尺寸支持三种模式:
1、指定尺寸
 1 <!--指定尺寸-->
 2         <Grid Grid.Column="1" ShowGridLines="True">
 3             <Grid.ColumnDefinitions>
 4                 <ColumnDefinition Width="120"/>
 5                 <ColumnDefinition/>
 6             </Grid.ColumnDefinitions>
 7
 8             <Label Content="宽度120"/>
 9             <Label Content="宽度为Grid容器大小 - 120" Grid.Column="1"/>
10         </Grid>
这种模式可以指定行和列的高度或宽度。
说明:
1、WPF中默认宽高单位是像素(Pixel),完整的写法应该是Width="120px",但是这个px可以省略。
2、WPF还支持英寸(in)、厘米(cm)、点(pt)等单位,这里不做详细介绍。可参阅推荐阅读。
3、这种模式不建议使用,因为这种方式是使用设备无关单位准确的设置尺寸。
2、指定比例
 1 <Grid Grid.Column="2" ShowGridLines="True">
 3             <Grid.RowDefinitions>
 4                 <RowDefinition Height="*"/>
 5                 <RowDefinition Height="3*"/>
 6             </Grid.RowDefinitions>
 7
 8             <!--不指定比例,会等比拆分行列-->
 9             <Grid.ColumnDefinitions>
10                 <ColumnDefinition/>
11                 <ColumnDefinition/>
12             </Grid.ColumnDefinitions>
13 </Grid>可通过(* )来指定行列所占比例。未使用(*)指定比例的,按等比划分。
上面的示例代码中,定义了两行,两列。
第一行占Grid容器高度的1/4,第二行占Grid容器高度的3/4。
在定义列的时候,未指定比例,所以两列各占Grid容器宽度的1/2
3、自动设置
自动设置就是在指定宽高时使用Auto,使用了Auto的行列宽高是根据内部所放置元素来决定。
1     <Grid ShowGridLines="True">
2             <Grid.RowDefinitions>
3                 <RowDefinition/>
4                 <RowDefinition/>
5                 <RowDefinition Height="Auto"/>
6             </Grid.RowDefinitions>
7
8             <Label Content="高度 50" Grid.Row="2"/>
9         </Grid>
上面的示例代码中,在Grid中定义了三行。
第三行的高度使用了Auto。
如果不在第三行放置任何元素,第一行和第二行会各占Grid元素的1/2,即 Grid.Height /2
当在第三行放置一个高度为50的元素后,第三行有了50的高度。
这个时候,前面两行的高度就会发生变化,变成 (Grid.Height - 50 ) / 2
说明:
1、指定为Auto时,可以通过MinHeight来指定最小高度,MinHeight来指定最小宽度。
2、在布局时,通常会混合使用以上各种模式。
3、可以使用 Grid.UseLayoutRounding="True"来启用抗锯齿功能。启用后,会将容器内所有内容对齐到最近的像素边界。
跨越行和列
在定义行和列以后,有时候会需要跨越行来列来进行布局。这个时候可以使用Grid.RowSpan和Grid.ColumnSpan这两个附加属性来进行设置。
 1 <Grid>
 2                 <Grid.RowDefinitions>
 3                     <RowDefinition/>
 4                     <RowDefinition/>
 5                 </Grid.RowDefinitions>
 6
 7                 <Grid.ColumnDefinitions>
 8                     <ColumnDefinition/>
 9                     <ColumnDefinition/>
10                 </Grid.ColumnDefinitions>
11
12                 <Label Name="label1" Content="不跨越列" Grid.Row="0" Grid.Column="0" HorizontalAlignment="Center"/>
13                 <Label Name="label2" Content="跨越两列" Grid.Row="0" Grid.Column="0" Grid.ColumnSpan="2" HorizontalAlignment="Center"/>
14
15                 <Label Name="label3" Content="不跨越行" Grid.Row="0" Grid.Column="0" VerticalAlignment="Center"/>
16                 <Label Name="label4" Content="跨越两行" Grid.Row="0" Grid.Column="0" Grid.RowSpan="2" VerticalAlignment="Center"/>
17             </Grid>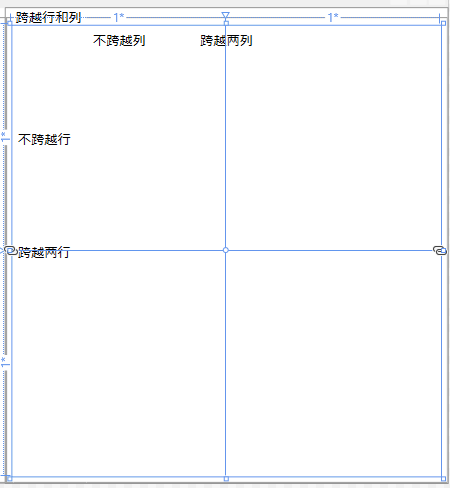
说明:
Grid布局技巧:
1、根据需要动态变化的内容,设置行列宽高来进行布局。
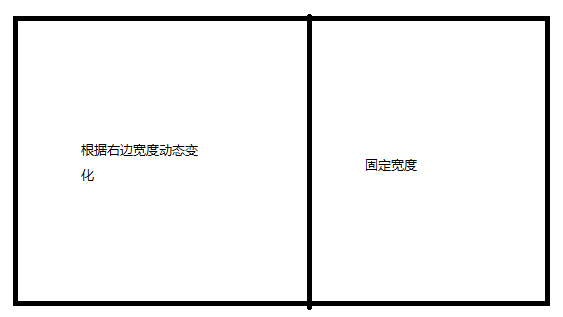
2、针对长度或宽度不固定的区域,可以设置宽度为Auto
3、WPF提供了一个GridSplitter类,可以动态的调整Grid的行高和列宽
 1  <Grid>
 2                 <Grid.RowDefinitions>
 3                     <RowDefinition/>
 4                     <RowDefinition Height="auto"/>
 5                     <RowDefinition/>
 6                 </Grid.RowDefinitions>
 7
 8                 <Grid.ColumnDefinitions>
 9                     <ColumnDefinition/>
10                     <ColumnDefinition Width="auto"/>
11                     <ColumnDefinition/>
12                 </Grid.ColumnDefinitions>
13
14                 <Grid Grid.Row="0" Grid.Column="0" Background="Green"></Grid>
15                 <Grid Grid.Row="0" Grid.Column="2" Background="Silver"></Grid>
16                 <Grid Grid.Row="2" Grid.Column="0" Background="Pink"></Grid>
17                 <Grid Grid.Row="2" Grid.Column="2" Background="LightSkyBlue"></Grid>
18
19                 <GridSplitter HorizontalAlignment="Stretch" VerticalAlignment="Center" Grid.Row="1" Grid.Column="0" Grid.ColumnSpan="3" Height="2"></GridSplitter>
20                 <GridSplitter VerticalAlignment="Stretch" HorizontalAlignment="Center" Grid.Column="1" Grid.Row="0" Grid.RowSpan="3" Width="2"></GridSplitter>
21             </Grid>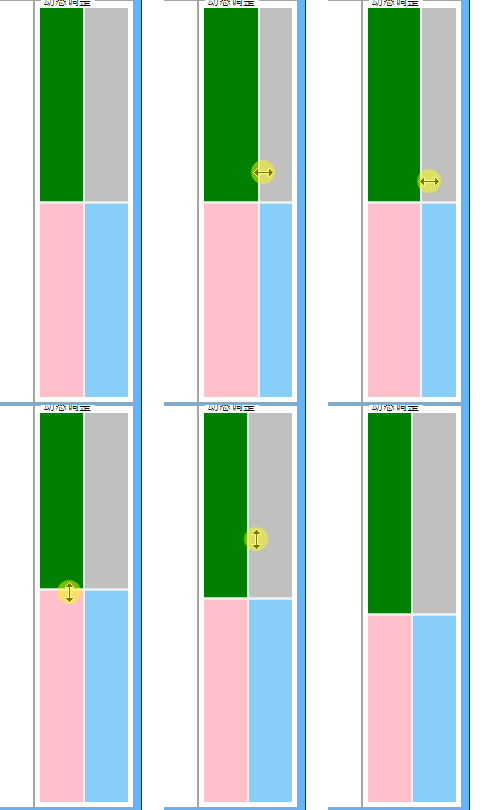
StackPanel
StackPanel容器的使用比较简单,它可以在单行或单列中以堆栈形式放置元素。
使用方法如下:
1 <!--垂直堆放元素(默认)-->
2         <StackPanel Grid.Column="0">
3             <Button Content="Button1" Margin="10"/>
4             <Button Content="Button2" HorizontalAlignment="Left"/>
5             <Button Content="Button3" HorizontalAlignment="Right"/>
6         </StackPanel>
1        <!--水平堆放元素 -->
2         <!--需要指定属性  Orientation="Horizontal"-->
3         <StackPanel Grid.Column="1" Orientation="Horizontal">
4             <Button Content="Button1" Margin="10"/>
5             <Button Content="Button2" VerticalAlignment="Top"/>
6             <Button Content="Button3" VerticalAlignment="Bottom"/>
7         </StackPanel>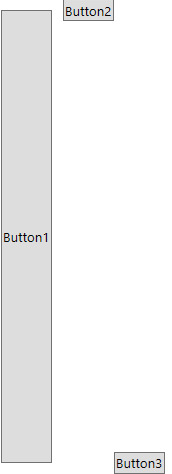
通过FlowDirection属性可以指定元素的浮动方向
 1             <!--FlowDirection可以指定元素的浮动方向-->
 2             <!--LeftToRight是默认值,表示元素从左向右浮动-->
 3             <StackPanel FlowDirection="LeftToRight">
 4                 <Button Content="Button1" Width="120" Height="28" HorizontalAlignment="Left"/>
 5             </StackPanel>
 6
 7             <!--RightToLeft表示元素从右向左浮动-->
 8             <StackPanel FlowDirection="RightToLeft" Grid.Row="1">
 9                 <Button Content="Button1" Width="120" Height="28" HorizontalAlignment="Left"/>
10             </StackPanel>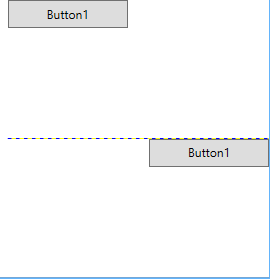
WrapPanel
WrapPanel和StackPanel差不多,它采用了流式 布局,控件也是一次一行或一列的方式布置。但它与StackPanel又有区别,WrapPanel的 控件从左向右或从上往下进行排列,排列满了以后再在下一行或下一列排列。
WrapPanel可用于工具栏类似的场景,因为控件可以依次排列下去。
 1 <!--默认水平排列-->
 2         <WrapPanel Grid.Row="0" Grid.Column="0">
 3             <Button Content="abc"/>
 4             <Button Content="abc"/>
 5             <Button Content="abc"/>
 6             <Button Content="abc"/>
 7             <Button Content="abc"/>
 8             <Button Content="abc"/>
 9             <!--当水平方向排列不下时,自动排列到下一行-->
10             <Button Content="abc"/>
11         </WrapPanel>
1  <!--设置为垂直排列-->
2         <WrapPanel Grid.Row="0" Grid.Column="1" Orientation="Vertical">
3             <Button Content="abc"/>
4             <Button Content="abc"/>
5             <Button Content="abc"/>
6             <!--当垂直方向排列不下时,自动排列到下一列-->
7             <Button Content="abc"/>
8         </WrapPanel>
DockPanel
DockPanel是一种停靠式布局容器。通过附加属性DockPanel.Dock设置元素的停靠方向。
当元素被指定为停靠在顶部时,元素会占据布局容器的整个宽度,高度会根据内容和MinHeight属性而定。当元素被停靠在左边时,元素会占据整个布局容器的高度,而宽度会根据内容和MinWidth属性而定。
1 <DockPanel Grid.Row="0"  Margin="10">
2             <Button Content="左停靠" DockPanel.Dock="Left" MinWidth="80"/>
3             <Button Content="右停靠" DockPanel.Dock="Right"/>
4             <Button Content="上停靠" DockPanel.Dock="Top"/>
5             <Button Content="下停靠" DockPanel.Dock="Bottom"/>
6 </DockPanel>
默认情况下DockPanel.LastChildFill 属性值为true ,该属性会设置最后一个元素否占满整个布局容器。如果设置LastChildFill 为false,可以看到

使用DockPanel容器进行布局时,元素的先后顺序影响会很大。在上面的示例中,最先放置向左停靠的元素,所以【上停靠】这个按钮会占据整个面板的高度,其它的元素会放置在它的右边。
如果最先放置向上停靠的元素,那这个向上停靠的元素会占据整个面板的宽度,其它的元素会放置在它的下面
1 <!--可以看到元素的先后顺序对布局会产生很大的影响-->
2         <DockPanel Grid.Row="2" Margin="10">
3             <Button Content="左停靠" DockPanel.Dock="Top" MinWidth="80"/>
4             <Button Content="右停靠" DockPanel.Dock="Right"/>
5             <Button Content="上停靠" DockPanel.Dock="Left"/>
6             <Button Content="下停靠" DockPanel.Dock="Bottom"/>
7         </DockPanel>
重复上面的过程,可以更清楚的看到元素的先后对布局的影响以及DockPanel元素排列的规则
 1  <DockPanel Grid.Row="3" Margin="10">
 2             <Button Content="左停靠" DockPanel.Dock="Left" MinWidth="80"/>
 3             <Button Content="右停靠" DockPanel.Dock="Right"/>
 4             <Button Content="上停靠" DockPanel.Dock="Top"/>
 5             <Button Content="下停靠" DockPanel.Dock="Bottom"/>
 6             <Button Content="上停靠" DockPanel.Dock="Top" MinWidth="80"/>
 7             <Button Content="右停靠" DockPanel.Dock="Right"/>
 8             <Button Content="左停靠" DockPanel.Dock="Left"/>
 9             <Button Content="下停靠" DockPanel.Dock="Bottom"/>
10 </DockPanel>
Canvas
Canvas面板,画布面板,它可以通过使用精确的坐标来放置元素。大多数情况下,我们不需要绝对定位来放置元素,因为显示器的大小和分辨率有可能会改变。但是如果需要设计绘图相关的界面,或需要对元素进行动画时,就要用到Canvas面板。
Canvas面板是最轻量级的布局容器,因为它不包含任何复杂的布局逻辑。
通过Canvas.Left附加属性,设置元素左边和Canvas面板左边的单位数。不指定单位时,默认是px。通过Canvas.Top附加属性,设置元素上边和Canvas面板上边的单位数。
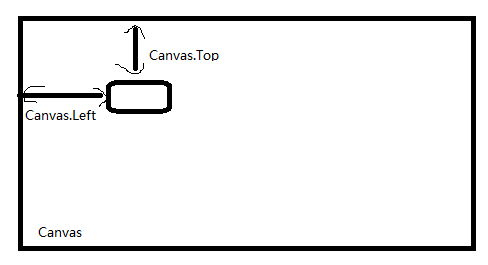
也可以设置Canvas.Bottom和Canvas.Right附加属性来指定距离面板底部和右边的单位数(设置无关单位,当将系统DPI指定为96dpi时,设置无关单位恰好等于通常使用的像素)。
说明:
1、不能同时指定Canvas.Left和Canvas.Right,只能选择一种指定。
2、不能同时指定Canvas.Top和Canvas.Bottom,只能选择一种指定。
在Canvas面板中,需要指定元素的大小,即指定Width和Height属性的值 。如果未指定元素宽高,元素的大小就是刚好能展示其全部内容的大小
 1    <Canvas>
 2         <!--基本使用-->
 3         <!--未指定宽高-->
 4         <Button Content="Canvas" Canvas.Left="100" Canvas.Top="200"/>
 5         <Button Content="Canvas" Canvas.Left="200px" Canvas.Top="200px"/>
 6         <Button Content="Canvas" Canvas.Left="2in" Canvas.Top="2.5in"/>
 7         <Button Content="Canvas" Canvas.Right="100" Canvas.Bottom="200"/>
 8
 9         <!--指定宽高 -->
10         <Button Content="Canvas" Canvas.Left="50" Canvas.Top="100" Width="150" Height="28"/>
11     </Canvas>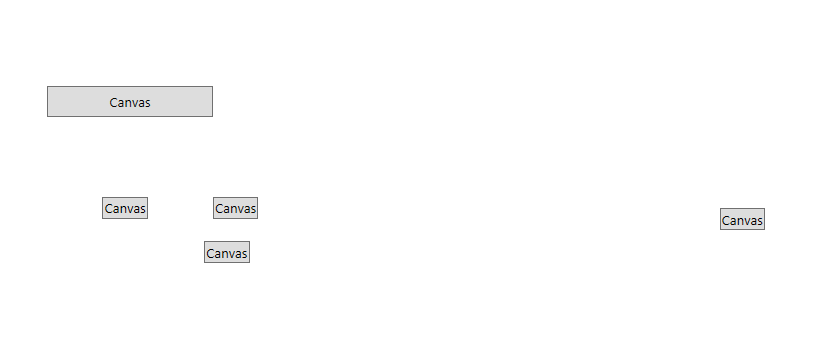
说明:
当Canvas面板的大小改变时,面板内放置的元素大小不会改变。
元素叠放的顺序Z-Order
如果Canvas面板中有重叠的元素,可以通过设置Canvas.ZIndex附加属性来控制层叠方式。
默认每个元素会有默认的ZIndex值0,具有更高ZIndex值的元素会始终显示在较低ZIndex值元素的上面。ZIndex值可以为负数
1   <!--指定叠放顺序-->
2         <Button Content="ZIndex=0" Canvas.Left="300" Canvas.Top="190"/>
3         <Button Content="ZIndex=1" Canvas.Left="310" Canvas.Top="200"/>
4         <Button Content="ZIndex=2" Canvas.Left="290" Canvas.Top="200"/>
5
6         <!--ZIndex值都为0的情况下,后放置的元素会显示在上面-->
7         <Button Content="ZIndex=0-1" Canvas.Left="380" Canvas.Top="190"/>
8         <Button Content="ZIndex=0-2" Canvas.Left="380" Canvas.Top="190"/>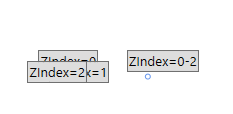
推荐阅读
宽高支持的单位
FrameworkElement.Width Property (System.Windows) | Microsoft Learn
WPF控件库示例
https://github.com/Microsoft/WPF-Samples/tree/master/Getting%20Started/ControlsAndLayout
本文示例代码:
https://github.com/zhaotianff/DotNetCoreWPF/tree/master/五、WPF中的布局容器