第0章 QT工具介绍
0.1 编译工具
uic,rcc,moc,qmake 都是 qt 的工具
uic 主要是 编译 .ui文件 -> ui_xxx.h //.ui文件 .h
rcc 主要是 编译 资源文件.qrc文件 -> xxx.rcc //.qrc资源文件 .rcc
moc 主要是 编译 带有Q_OBJECT宏的.h文件 -> moc_xxx.cpp // 元功能 .cpp
qmake就类似于cmake,用来处理Makefile那一套逻辑了。
uic:
生成我们的 ui_xxx.h,ui_xxx.cpp文件
bash
uic.exe xxx.ui -o ui_xxx.h
uic.exe xxxL.ui -o ui_xxx.cpp
moc:
生成我们的 moc_xxx.cpp文件
bash
moc.exe xxx.h -o moc_xxx.cpprcc:
生成我们的WidgetDLL.rcc文件
bash
rcc xxx.qrc -o xxx.rcccmake可能缺插件导致新增文件时CMakeLists.txt不自动添加资源,现象就是添加的文件不在工程目录种,还是建议用qmake。
0.2 .ui和代码设计的区别
.ui文件拖动组件构建界面,不会更改源码,只会更改.ui文件的 xml内容。
其实,xxx.ui文件是一个XML文件,在Qt creator双击打开就是显示窗口界面,以文本方式打开。
按理来说,我把一个控件拉进界面里面,重新编译出来的源码会添加相应的代码,
其实生成的是头文件"ui_mainwindow.h",这个文件不在Qt creator的项目界面上,也不在demo目录下,而是在build-xxx-Debug里面。
QT通过uic工具将 .ui编译成.h文件

0.3 通过代码来访问并操作组件
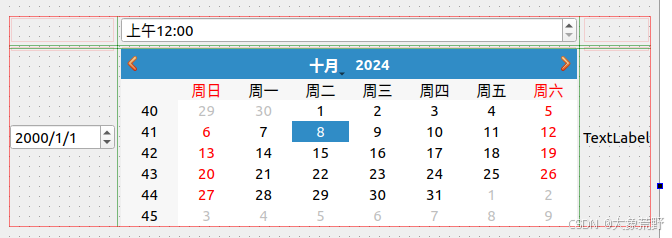
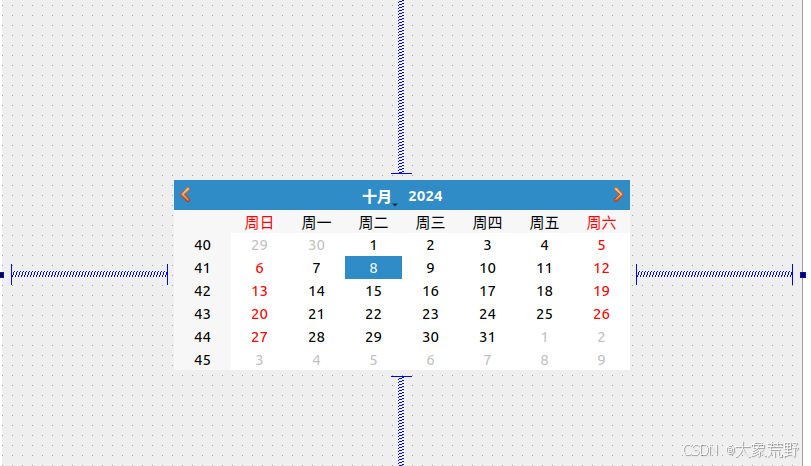
要代码访问.ui的组件,首先要知道组建的变量名是什么。
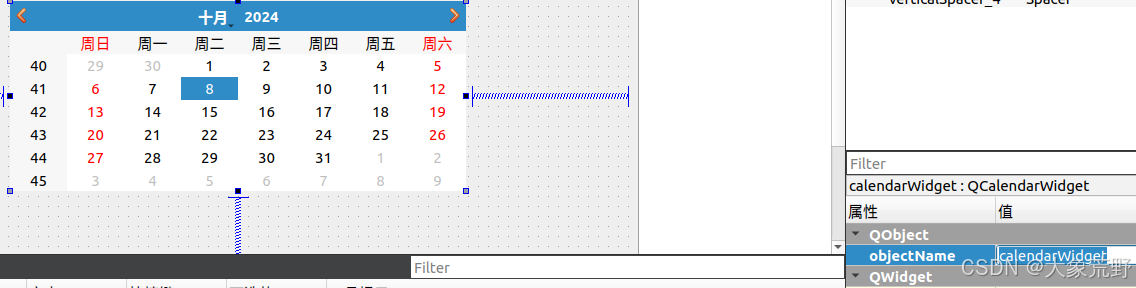 比如这里万年历组件的变量名 QCalendarWidget
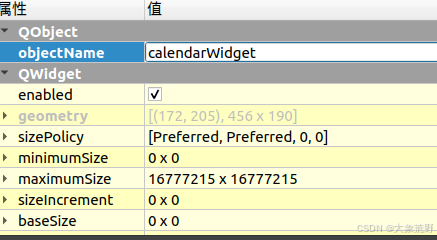 变量名 QCalendarWidget 的组件的 属性
然后可以在main.cpp访问该组件:
cpp
int main(int argc, char *argv[])
{
QApplication app(argc, argv);
QWidget window;
// 创建一个Ui::Widget实例,并初始化UI元素
Ui::Widget *ui = new Ui::Widget;
//将widget.ui文件中设计的UI元素应用到window指向的QWidget实例上
ui->setupUi(&window);
/* 设置属性 */
ui->calendarWidget->setLayoutDirection(Qt::LayoutDirection::RightToLeft); //->layoutDirection();
window.show(); //展示窗口
return app.exec();
}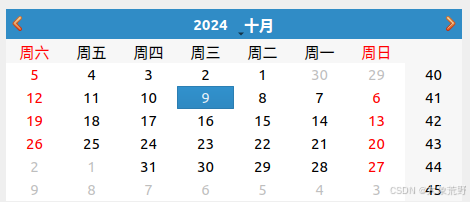 发现布局方向如期更改
0.3.1 关于 Ui.setupUi的解释
我们在 xxx.ui上绘制了界面,在 xxx.cpp里面定义了 xxx类继承自 Widget类,希望 xxx.show()的时候显示的界面是 xxx.ui上绘制的。
这是很常见的做法,
在类声明的头文件中,把声明了一个Ui :: xxx类型,
同时xxx类成员中,声明一个私有的 Ui::xxx类型的变量,变量名 ui。
请注意!!!!
Ui :: xxx类型,和 xxx类型,所属的命名空间不同,xxx类型全名 ::xxx,冒号左边是空的。
cpp
/*在头文件中,把 class xxx声明进namespace Ui*/
QT_BEGIN_NAMESPACE              //被展开成 namespace QT {
namespace Ui { class MainWindow; }
QT_END_NAMESPACE                //被展开成 }

class MainWindow : public QMainWindow
{
    Q_OBJECT

public:
    MainWindow(QWidget *parent = nullptr);
    ~MainWindow();

/*创建一个私有的ui变量*/
private:
    Ui::MainWindow *ui;
};
在类定义的源文件中,xxx构造函数中使用初始化列表来新建该变量 ui,
并使用 ui->setupUi(this)来将 UI界面应用到 Ui::xxx组件上。
cpp
/*在类定义的源文件中,*/
MainWindow::MainWindow(QWidget *parent)
    : QMainWindow(parent)
    , ui(new Ui::MainWindow) //使用初始化列表新建 Ui::xxx变量
{
    ui->setupUi(this);
}

MainWindow::~MainWindow()
{
    delete ui;
}
我们显式声明了 namespace Ui { class MainWindow;},因此 Ui::MainWindow这种用法还可以理解,这个 setupUi函数是怎么来的???
ctrl+左键查看 setUp的定义,发现定义于 ui_xxx.h这个文件,
主要是 定义了一个 Ui_xxx类,类中主要就是 setupUi()方法,setupUi方法是根据 UI界面的改动而自动生成的,作用是设置 xxx类窗口。
并给了一个命名空间中的前向声明,表明 xxx类是 Ui_xxx类的子类,由此实现了继承。
cpp
/*******************************************************
 * 由 Qt User Interface Compiler (版本 5.14.2) 生成
 * 警告:重新编译 UI 文件时,对此文件的所有更改都将丢失
 *******************************************************/

#ifndef UI_MAINWINDOW_H
#define UI_MAINWINDOW_H

// 包含必要的 Qt 头文件
#include <QtCore/QVariant>
#include <QtWidgets/QApplication>
#include <QtWidgets/QMainWindow>
#include <QtWidgets/QMenuBar>
#include <QtWidgets/QStatusBar>
#include <QtWidgets/QWidget>

QT_BEGIN_NAMESPACE

// Ui_MainWindow 类定义,用于设置主窗口的 UI
class Ui_MainWindow
{
public:
    QWidget *centralwidget;    // 中央窗口小部件
    QMenuBar *menubar;         // 菜单栏
    QStatusBar *statusbar;     // 状态栏

    // 设置 UI 的方法,初始化UI的成员
    void setupUi(QMainWindow *MainWindow)
    {
        // 设置主窗口的对象名称和大小
        MainWindow->setObjectName("MainWindow");
        MainWindow->resize(800, 600);

        // 创建并设置中央窗口小部件
        centralwidget = new QWidget(MainWindow);
        MainWindow->setCentralWidget(centralwidget);

        // 创建并设置菜单栏
        menubar = new QMenuBar(MainWindow);
        MainWindow->setMenuBar(menubar);

        // 创建并设置状态栏
        statusbar = new QStatusBar(MainWindow);
        MainWindow->setStatusBar(statusbar);

        // 重新翻译 UI(设置窗口标题等)
        retranslateUi(MainWindow);

        // 通过名称连接信号和槽
        QMetaObject::connectSlotsByName(MainWindow);
    }

    // 重新翻译 UI 的方法(例如,设置窗口标题)(国际化)
    void retranslateUi(QMainWindow *MainWindow)
    {
        MainWindow->setWindowTitle("MainWindow");
    }
};

// 在 Ui 命名空间中定义
namespace Ui {
    class MainWindow : public Ui_MainWindow {};
}

QT_END_NAMESPACE

#endif // UI_MAINWINDOW_H
0.4 .ui设计和代码设计的区别
代码繁琐细节到位,UI设计支持国际化,但某些组件配置不支持。
代码+UI,法力无边。
第1章 Qt中的基础数据类型
1.1 基础类型
Qt在<QtGlobal>中定义了一些基本数据类型,如 qint8、qint16等,这些类型主要对应不同大小的有符号和无符号整数,以及浮点数qreal等。
尽管Qt有自定义类型,但编程中通常仍使用C/C++的标准类型,如 int、float、double等。C/C++类型兼容性更强。
1.2 log输出
1.2.1 在调试窗口中输入日志
在 Qt中,日志输出通常使用 QDebug类及其相关函数。
通过 qDebug()、qWarning()、qInfo()和 qCritical()等函数,可以方便地输出各种类型和自定义的日志信息到IDE的调试窗口。
cpp
// 包含了QDebug头文件, 直接通过全局函数 qDebug() 就可以进行日志输出了
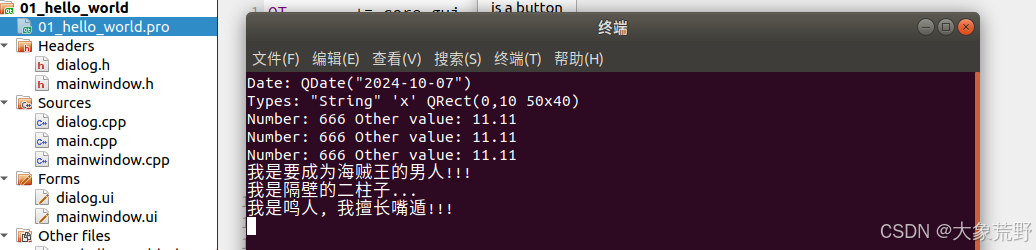
qDebug() << "Date:" << QDate::currentDate();
qDebug() << "Types:" << QString("String") << QChar('x') << QRect(0, 10, 50, 40);
qDebug() << "Custom coordinate type:" << coordinate;
// 和全局函数 qDebug() 类似的日志函数还有: qWarning(), qInfo(), qCritical()
int number = 666;
float i = 11.11;
qWarning() << "Number:" << number << "Other value:" << i;
qInfo() << "Number:" << number << "Other value:" << i;
qCritical() << "Number:" << number << "Other value:" << i;
qDebug() << "我是要成为海贼王的男人!!!";
qDebug() << "我是隔壁的二柱子...";
qDebug() << "我是鸣人, 我擅长嘴遁!!!";以上代码可在控制台看到打印的输出。
 qDebug控制台打印
1.2.2 在终端窗口中输出日志
在非 IDE调试环境下,默认无日志窗口输出。
为在终端显示日志,需在项目文件(*.pro)的 CONFIG项中添加 console属性,并重新编译项目。
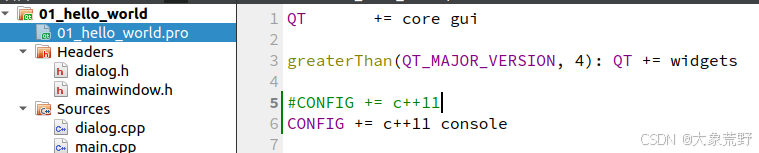
这样,日志信息即可打印到终端窗口。
1.3 字符串类型
在Qt中,除支持C的char *和C++的std::string外,
还定义了专属字符串类型,如QByteArray和QString。
掌握这些类型的使用及它们之间的转换是必需的。
| 语言类型 | 字符串类型 |
|---|---|
| C | char * |
| C++ | std::string, char * |
| Qt | QByteArray,QString等 |
1.3.1 QByteArray
QByteArray是Qt中处理字节数组的类,可视为C语言中 char*的升级版。
构造与初始化:
可构造空对象或基于C字符串、字节和字符进行初始化。
cpp
QByteArray ba;  // 空对象
QByteArray ba("Hello");  // 基于C字符串初始化
QByteArray ba(5, 'A'); // 创建一个包含5个'A'的字节数组数据操作:
支持在尾部、头部追加或插入数据,以及删除指定位置的数据。
cpp
ba.append(" World");  // 尾部追加
ba.prepend("Hi ");  // 头部添加
ba.insert(5, "Qt");  // 在第5个字节位置插入"Qt"
ba.remove(0, 2); // 从第0个字节开始删除2个字节字符串替换与查找:
提供子字符串替换功能,并判断是否包含特定子字符串或字符,以及字符串的开始和结束。
cpp
ba.replace("World", "Qt");  // 替换子字符串
bool containsHello = ba.contains("Hello");  // 判断是否包含"Hello"
bool startsWithHi = ba.startsWith("Hi"); // 判断是否以"Hi"开始遍历:
可使用迭代器或数组索引方式遍历字节数组。
cpp
 /* 迭代器遍历 */
for(auto it = ba.begin(); it != ba.end(); ++it)
{

}

 // 使用数组索引访问
char ch = ba[0]; 查看字节数:
提供多种方法获取字节数组的长度或特定字符/子字符串的出现次数。
cpp
int len = ba.length();  // 获取长度
int countHello = ba.count("Hello"); // 统计"Hello"出现的次数类型转换:
支持与C字符串、基本数据类型及std::string之间的转换。
cpp
const char* cstr = ba.data();  // 转换为C字符串
int num = ba.toInt();  // 转换为int
std::string stdStr = ba.toStdString(); // 转换为std::string大小写转换:
提供将整个字节数组转换为大写或小写的方法。
cpp
QByteArray upperBa = ba.toUpper();  // 转换为大写
QByteArray lowerBa = ba.toLower();  // 转换为小写
1.3.2 QString
QString是 Qt框架中封装字符串的类,内部使用 UTF-8编码,支持多语言字符。
构造函数
cpp
QString();                       // 空字符串
QString(const char *str);        // 从char*构造
QString(const QByteArray &ba);   // 从QByteArray构造
数据操作
cpp
QString &append(const QString &str);     // 尾部追加
QString &prepend(const QString &str);    // 头部添加
QString &insert(int position, const QString &str); // 插入
QString &remove(int position, int n);    // 删除
void chop(int n);                        // 从尾部删除n个字符
void truncate(int position);             // 截断
void clear();                            // 清空
字符串替换
cpp
QString &replace(const QString &before, const QString &after); // 替换子字符串查找和判断
cpp
bool contains(const QString &str) const;      // 是否包含
bool startsWith(const QString &s) const;      // 是否以s开始
bool endsWith(const QString &s) const;        // 是否以s结尾
遍历
cpp
iterator begin();     // 迭代器开始
iterator end();       // 迭代器结束
const QChar at(int position) const; // 位置访问
const QChar operator[](int position) const; // 数组方式访问
查看字节数
cpp
int length() const;    // 字符个数
int count(const QStringRef &str) const; // 子字符串出现次数
类型转换
cpp
QString &setNum(int n, int base = 10); // 数字转QString
int toInt(bool *ok = nullptr, int base = 10) const; // QString转数字

static QString fromStdString(const std::string &str); // std::string转QString
std::string toStdString() const; // QString转std::string

QByteArray toLocal8Bit() const; // 转本地编码
QByteArray toLatin1() const;    // 转Latin-1编码
QByteArray toUtf8() const;      // 转UTF-8编码

QString toUpper() const; // 转大写
QString toLower() const; // 转小写
字符串格式
cpp
QString arg(const QString &a, int fieldWidth = 0, QChar fillChar = ' ') const; // 格式化
QString arg(int a, int fieldWidth = 0, int base = 10, QChar fillChar = ' ') const;
cpp
//QString格式化示例
int i, total;
QString fileName;
QString status = QString("Processing file %1 of %2: %3").arg(i).arg(total).arg(fileName);
1.4 QVariant
QVariant是一个通用的容器类,能存储多种Qt数据类型及C++基本类型,如QBrush、QColor、int、float等,便于不同类型数据的传递。
1.4.1 标准类型
将标准类型转换为QVariant类型、判断QVariant中封装的实际数据类型以及将QVariant对象转换为实际数据类型。
将标准类型转换为QVariant类型:
使用QVariant的构造函数。
cpp
QVariant var1(123);           // int转换为QVariant
QVariant var2(3.14);          // double转换为QVariant
QVariant var3("Hello"); // QString转换为QVariant判断QVariant中封装的实际数据类型:
使用type()函数,返回QVariant::Type枚举值。
cpp
QVariant::Type type = var1.type(); // 获取var1的实际数据类型将QVariant对象转换为实际的数据类型:
使用toxxx()方法。
cpp
bool boolValue = var1.toBool();         // 转换为bool
QByteArray byteArray = var2.toByteArray();// 转换为QByteArray(此例可能不适用,仅为展示)
double doubleValue = var2.toDouble();   // 转换为double
int intValue = var1.toInt();            // 转换为int
QString stringValue = var3.toString();  // 转换为QString
1.4.2 自定义类型
自定义类型的声明与注册:
使用QVariant封装自定义类型要先对自定义类型进行注册。
首先,在头文件中声明自定义类型,并使用Q_DECLARE_METATYPE宏进行注册。
cpp
#include<QString>
#include<QMetaType>

// MyTest.h
struct MyTest {
    int id;
    QString name;
};

// 自定义类型注册
Q_DECLARE_METATYPE(MyTest)在源文件中使用QVariant封装与读取自定义类型:
接下来,在源文件中创建自定义类型的实例,使用QVariant::fromValue进行封装,并使用canConvert和value进行读取。
cpp
// main.cpp 或其他源文件
#include "MyTest.h"
#include <QVariant>
#include <QDebug>

int main() {
    MyTest t;
    t.id = 666;
    t.name = "张三丰";

    // 值的封装
    QVariant vt = QVariant::fromValue(t);

    // 值的读取
    if (vt.canConvert<MyTest>()) {
        MyTest tRead = vt.value<MyTest>();
        qDebug() << "name:" << tRead.name << ", id:" << tRead.id;
    }

    return 0;
}用到的QVariant类的API:
bool QVariant::canConvert<T>() const:检查当前QVariant对象是否可以转换为模板类型T。
T QVariant::value<T>() const:将当前QVariant对象转换为实际的模板类型T。
1.5 位置和尺寸
在 QT中我们常见的 点,线,尺寸,矩形 都被进行了封装, 下边依次为大家介绍相关的类。
1.5.1 QPoint
QPoint 类用于表示二维坐标点 (x, y),提供以下常用 API:
构造函数:
默认构造,坐标原点 (0, 0):
cpp
QPoint point;指定坐标 (xpos, ypos):
cpp
QPoint point(x, y);设置坐标:
设置 x 轴坐标:
cpp
point.setX(x);设置 y 轴坐标:
cpp
point.setY(y);获取坐标:
获取 x 轴坐标:
cpp
int x = point.x();
int &refX = point.rx(); // 引用
获取 y 轴坐标:
cpp
int y = point.y();
int &refY = point.ry(); // 引用算术运算:
乘法(支持 float, double, int 类型因子):
cpp
point *= factor;加法(与另一个 QPoint 对象相加):
cpp
point += anotherPoint;减法(与另一个 QPoint 对象相减):
cpp
point -= anotherPoint;除法(除以一个实数因子):
cpp
point /= divisor;1.5.2 QLine
QLine是一个直线类, 封装了两个坐标点 (两点确定一条直线)。
构造函数:
默认构造,创建空对象:
cpp
QLine line;通过两个 QPoint 构造直线:
cpp
QLine line(point1, point2);通过四个整数坐标构造直线:
cpp
QLine line(x1, y1, x2, y2);设置端点:
设置两个端点:
cpp
line.setPoints(point1, point2);
line.setLine(x1, y1, x2, y2);
分别设置起点和终点:
cpp
line.setP1(point1);
line.setP2(point2);获取端点:
获取起点和终点:
cpp
QPoint p1 = line.p1();
QPoint p2 = line.p2();
获取中心点和各坐标值:
cpp
QPoint center = line.center();
int x1 = line.x1();
int y1 = line.y1();
int x2 = line.x2();
int y2 = line.y2();平移直线:
就地平移:
cpp
line.translate(offset);
line.translate(dx, dy);

//获取平移后的直线
QLine newLine = line.translated(offset);
QLine newLine = line.translated(dx, dy);比较直线:
比较两条直线是否相等或不等:
cpp
bool isNotEqual = line1 != line2;
bool isEqual = line1 == line2;
1.5.3 QSize
在 QT中 QSize类用来形容长度和宽度, 常用的API如下:
构造函数:
创建一个无效尺寸的默认构造函数:
cpp
QSize size;使用指定的宽度和高度创建一个有效尺寸:
cpp
QSize size(width, height);设置尺寸:
单独设置宽度或高度:
cpp
size.setWidth(width);
size.setHeight(height);获取尺寸:
获取宽度或高度,以及它们的引用:
cpp
int w = size.width();
int &rw = size.rwidth(); // 可用于直接修改宽度
int h = size.height();
int &rh = size.rheight(); // 可用于直接修改高度交换尺寸:
就地交换宽度和高度:
cpp
size.transpose();返回交换后的新尺寸对象,原对象不变:
cpp
QSize transposedSize = size.transposed();算术运算:
对尺寸进行缩放、加减等运算:
cpp
size *= factor; // 缩放
size += otherSize; // 增加另一个尺寸
size -= otherSize; // 减少另一个尺寸
size /= divisor; // 除以一个因子
1.5.4 QRect
在Qt中使用 QRect类来描述一个矩形, 常用的API如下:
构造函数:
默认构造空矩形:
cpp
QRect rect;通过左上角和右下角坐标构造:
cpp
QRect rect(topLeft, bottomRight);通过左上角坐标和尺寸构造:
cpp
QRect rect(topLeft, size);
QRect rect(x, y, width, height);设置属性:
修改尺寸,保持左上角不变:
cpp
rect.setSize(size);设置左上角坐标和尺寸:
cpp
rect.setRect(x, y, width, height);单独设置宽度或高度:
cpp
rect.setWidth(width);
rect.setHeight(height);获取坐标和尺寸:
获取各角点坐标:
cpp
QPoint topLeft = rect.topLeft();
QPoint topRight = rect.topRight();
QPoint bottomLeft = rect.bottomLeft();
QPoint bottomRight = rect.bottomRight();
QPoint center = rect.center();
获取边缘坐标:
cpp
int top = rect.top(); // 同 rect.y()
int bottom = rect.bottom();
int left = rect.left(); // 同 rect.x()
int right = rect.right();
获取宽度和高度:
cpp
int width = rect.width(); // 注意:width 是宽度
int height = rect.height(); // height 是高度
QSize size = rect.size(); // 同时获取宽度和高度
1.6 日期和时间
1.6.1 QDate
QDate 类是处理日期的工具,提供日期创建、修改、获取和比较等功能。
构造函数:
cpp
QDate();  // 默认构造,无效日期
QDate(int y, int m, int d); // 用年、月、日构造成员函数:
cpp
bool setDate(int year, int month, int day);  // 设置日期
QDate addDays(qint64 ndays) const;  // 增加天数,返回新日期
QDate addMonths(int nmonths) const;  // 增加月数,返回新日期
QDate addYears(int nyears) const;  // 增加年数,返回新日期

int year() const;  // 获取年
int month() const;  // 获取月
int day() const;  // 获取日
void getDate(int *year, int *month, int *day) const;  // 获取年、月、日并存储到指针

QString toString(const QString &format) const;  // 按格式返回日期字符串

// 操作符重载,用于日期比较
bool operator!=(const QDate &d) const;
bool operator<(const QDate &d) const;
bool operator<=(const QDate &d) const;
bool operator==(const QDate &d) const;
bool operator>(const QDate &d) const;
bool operator>=(const QDate &d) const;静态函数:
cpp
static QDate currentDate(); // 获取当前本地日期
cpp
QDate date(2023, 10, 5);  // 创建日期
date.setDate(2024, 1, 1);  // 设置新日期
QDate newDate = date.addDays(10);  // 增加10天
int year = date.year();  // 获取年
QString formattedDate = date.toString("yyyy-MM-dd");  // 格式化为字符串
QDate today = QDate::currentDate();  // 获取当前日期
bool isEqual = date == newDate;  // 比较日期
1.6.2 QTime
QTime 类用于处理时间,提供时间创建、修改、获取、格式化和比较等功能
构造函数:
cpp
QTime();  // 默认构造,无效时间
QTime(int h, int m, int s = 0, int ms = 0); // 用时、分、秒、毫秒构造成员函数:
cpp
bool setHMS(int h, int m, int s, int ms = 0);  // 设置时间
QTime addSecs(int s) const;  // 增加秒数,返回新时间
QTime addMSecs(int ms) const;  // 增加毫秒数,返回新时间

int hour() const;  // 获取小时
int minute() const;  // 获取分钟
int second() const;  // 获取秒
int msec() const;  // 获取毫秒

QString toString(const QString &format) const;  // 按格式返回时间字符串

// 过时的阶段性计时API
void start();  // 开始计时
int elapsed() const;  // 获取经过的时间(毫秒)
int restart();  // 重新启动计时器并返回经过的时间

// 操作符重载,用于时间比较
bool operator!=(const QTime &t) const;
bool operator<(const QTime &t) const;
bool operator<=(const QTime &t) const;
bool operator==(const QTime &t) const;
bool operator>(const QTime &t) const;
bool operator>=(const QTime &t) const;静态函数:
cpp
static QTime currentTime(); // 获取当前本地时间推荐使用的阶段性计时API(QElapsedTimer 类):
cpp
QElapsedTimer timer;
timer.start();  // 开始计时
qint64 elapsed = timer.elapsed();  // 获取经过的时间
qint64 restartedElapsed = timer.restart();  // 重启计时并获取经过的时间
cpp
QTime t(14, 0, 0);  // 创建时间 14:00:00
QTime newTime = t.addSecs(70);  // 增加70秒,新时间为 14:01:10
int hour = t.hour();  // 获取小时
QString formattedTime = t.toString("hh:mm:ss");  // 格式化为字符串 "14:00:00"
QTime now = QTime::currentTime();  // 获取当前时间
bool isEqual = t == newTime;  // 比较时间

// 阶段性计时示例
QElapsedTimer timer;
timer.start();  // 开始计时
// 执行一些操作...
qint64 elapsedTime = timer.elapsed();  // 获取经过的时间
1.6.3 QDateTime
QDateTime 类结合了 QDate 和 QTime,用于封装并操作日期和时间信息。
构造函数:
cpp
// 默认构造,初始为无效日期时间
QDateTime();
// 使用指定日期和时间构造
QDateTime(const QDate &date, const QTime &time, Qt::TimeSpec spec = Qt::LocalTime); 成员函数:
cpp
void setDate(const QDate &date);  // 设置日期
void setTime(const QTime &time);  // 设置时间

QDateTime addYears(int nyears) const;  // 增加或减少年份
QDateTime addMonths(int nmonths) const;  // 增加或减少月份
QDateTime addDays(qint64 ndays) const;  // 增加或减少天数
QDateTime addSecs(qint64 s) const;  // 增加或减少秒数
QDateTime addMSecs(qint64 msecs) const;  // 增加或减少毫秒数

QDate date() const;  // 获取日期部分
QTime time() const;  // 获取时间部分

QString toString(const QString &format) const; // 按指定格式返回日期时间字符串操作符重载(用于日期时间比较):
cpp
bool operator!=(const QDateTime &other) const;
bool operator<(const QDateTime &other) const;
bool operator<=(const QDateTime &other) const;
bool operator==(const QDateTime &other) const;
bool operator>(const QDateTime &other) const;
bool operator>=(const QDateTime &other) const;静态函数:
cpp
static QDateTime currentDateTime(); // 获取当前本地日期和时间
cpp
QDateTime dt(QDate(2023, 10, 1), QTime(14, 30, 0));  // 创建指定日期时间
QDateTime newDt = dt.addDays(5);  // 增加5天

QDate date = dt.date();  // 获取日期部分
QTime time = dt.time();  // 获取时间部分

QString formattedDt = dt.toString("yyyy-MM-dd hh:mm:ss");  // 格式化为字符串

QDateTime now = QDateTime::currentDateTime();  // 获取当前本地日期和时间

bool isEqual = dt == newDt;  // 比较两个日期时间对象
第二章 QT中的信号与槽
2.1 信号和槽概述
信号槽是Qt中的观察者模式。事件触发时,对象发出信号;感兴趣的对象通过connect将信号绑定到槽函数,信号发出时槽函数自动执行。示例:
cpp
// 将按钮的点击信号连接到MyClass的onButtonClicked槽函数
connect(
    button,            // 信号发出者,即按钮对象
    &Button::clicked,  // 发出的信号,即按钮的点击信号
    this,              // 信号接收者,即当前对象
    &MyClass::onButtonClicked  // 接收信号后要调用的槽函数,即MyClass类的onButtonClicked函数
);
2.1.1 信号的本质
信号在Qt中代表事件,如按钮单击等。当事件发生时,Qt框架通过调用对应的信号函数通知使用者。信号以函数形式呈现,发出者为实例化的类对象。对象内部检测事件并发出信号。
cpp
// 假设有一个按钮对象 button,它是QPushButton的实例
QPushButton *button = new QPushButton("Click Me");

// 连接按钮的点击信号到槽函数
connect(button,                     //按钮
    &QPushButton::clicked,          //事件
    this,                           //当前对象
    &MyClass::onButtonClicked);     //当前对象的槽函数

// 当按钮被点击时,Qt框架调用button的clicked信号函数,进而触发MyClass的onButtonClicked槽函数
2.2 槽的本质
在Qt中,槽函数既可作普通成员函数,又负责处理信号。
| 实例对象 | 角色 | 描述 |
|---|---|---|
| 小朋友 | 信号发出者 | 发出信号:我饿了 |
| 我 | 信号接收者 | 槽函数:带他去吃饭 |
cpp
// 假设有一个小朋友类和小朋友对象
class Child {
public:
    void emitHungrySignal() {
        // 发出"我饿了"的信号(实际Qt中通过特定机制实现)
        emit hungry();
    }
signals:
    void hungry();  // 信号定义
};

Child *child = new Child();

// 假设有一个我类和我对象
class Me {
public slots:
    void handleHungrySignal() {
        // 处理"我饿了"的信号,即带小朋友去吃饭
        // 实现代码...
    }
};

Me *me = new Me();

// 连接信号和槽(假设Qt的connect函数已适当重载)
connect(child, &Child::hungry, me, &Me::handleHungrySignal);

// 当小朋友发出"我饿了"的信号时,我会处理这个信号
child->emitHungrySignal();
在这个例子中,Child类发出hungry信号,Me类通过槽函数handleHungrySignal处理该信号。
通过connect函数将信号和槽连接起来,当child发出信号时,me的槽函数会被调用。
2.3 信号和槽的关系
在Qt中,信号和槽函数通过connect()函数关联,类似于牛郎和织女通过喜鹊相会。
connect()函数将信号发出者(sender)和信号接收者(receiver)连接起来,当sender发出信号时,receiver的槽函数(method)被调用。
cpp
QMetaObject::Connection QObject::connect(
    const QObject *sender,              //发出信号的对象
    PointerToMemberFunction signal,     //sender对象的信号函数指针
    const QObject *receiver,            //接收信号的对象
    PointerToMemberFunction method,     //receiver对象的槽函数指针
    Qt::ConnectionType type = Qt::AutoConnection
);
cpp
// 假设有一个Sender类和一个Receiver类
class Sender : public QObject {
    Q_OBJECT
public:
    void emitSignal() {
        emit mySignal();
    }
signals:
    void mySignal();
};

class Receiver : public QObject {
    Q_OBJECT
public slots:
    void handleSignal() {
        // 处理信号的逻辑
    }
};

// 实例化Sender和Receiver对象
Sender *sender = new Sender();
Receiver *receiver = new Receiver();

// 连接信号和槽
connect(sender, &Sender::mySignal, receiver, &Receiver::handleSignal);

// 当sender发出mySignal信号时,receiver的handleSignal槽函数会被调用
sender->emitSignal();
2.4 标准信号槽使用
2.4.1 标准信号/槽
在Qt中,许多标准类能检测用户触发的特定事件,并产生对应的标准信号。这些信号是Qt类内部自带的。
同样,Qt类也提供了许多功能函数,这些函数可以作为信号触发后的处理动作,称为标准槽函数。
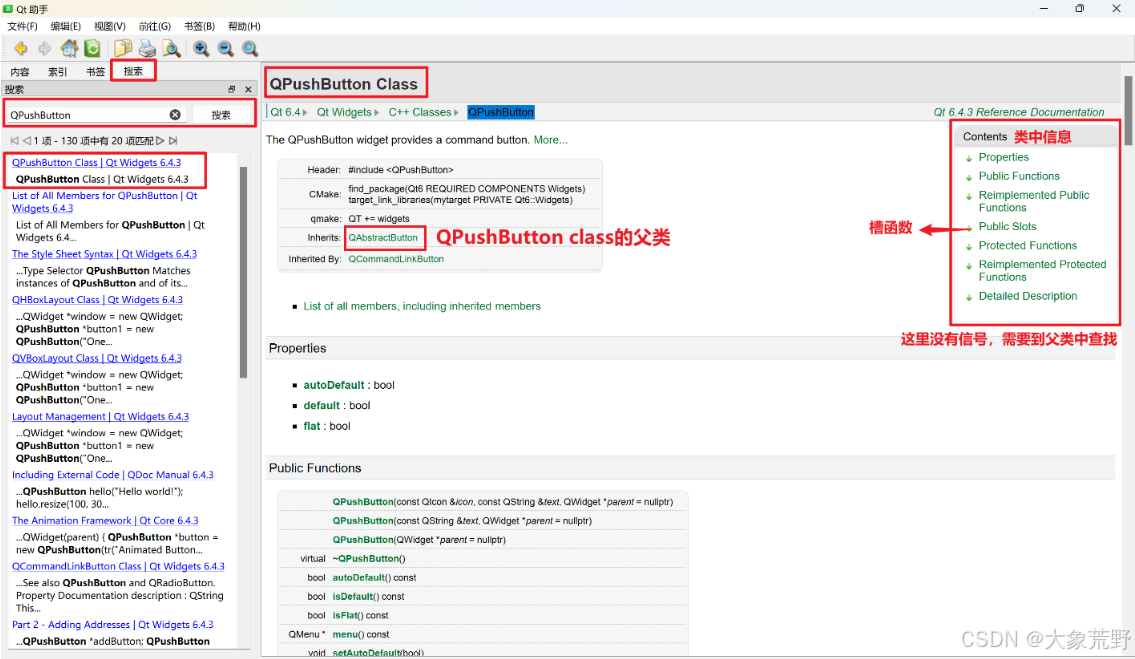
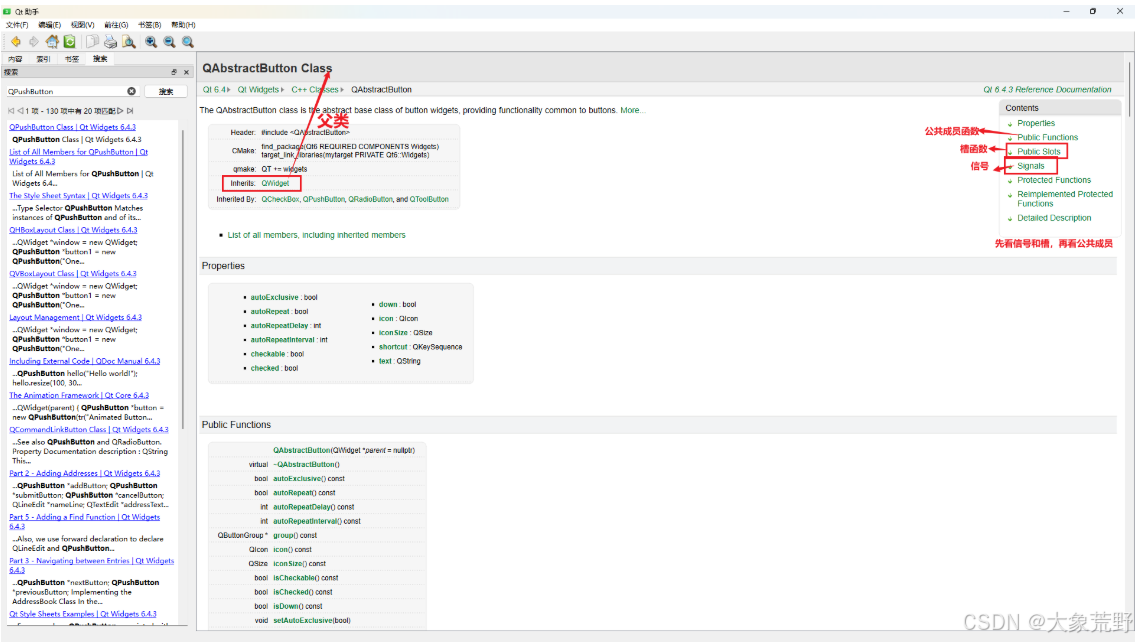
要查找系统自带的信号和槽,通常需要使用帮助文档。以QPushButton为例,查找其点击信号的过程如下:
在帮助文档中输入QPushButton。
在QPushButton类的文档中,首先查看Contents以寻找signals关键字,但可能未直接找到。
此时,应查看QPushButton从父类继承了哪些信号,因为按钮的点击信号(如clicked)通常是从其父类QAbstractButton继承而来的。
2.4.2 使用
在Qt中,掌握标准信号、槽的查找方式以及connect()函数的作用后,可以轻松地实现事件处理。以下是一个简单的例子,展示如何使用这些功能来实现点击按钮关闭窗口的功能。
功能实现:点击窗口上的按钮,关闭窗口
功能分析:
按钮:信号发出者,类型为QPushButton。
窗口:信号的接收者和处理者,类型为QWidget(在实际应用中可能是QMainWindow或其子类)。
需要使用的标准信号和槽函数:
信号:signal void QAbstractButton::clicked(bool checked = false),单击按钮时发出。
槽函数:slot bool QWidget::close(),关闭窗口。
实现代码:
只需一句代码即可实现单击按钮关闭窗口的功能:
cpp
connect(ui->closewindow, &QPushButton::clicked, this, &MainWindow::close);这行代码通常写在窗口的构造函数中,用于在Qt框架中注册信号处理。当按钮被点击时,框架会调用接收者对象的槽函数。
2.5 自定义信号槽使用
在Qt框架中,若其提供的信号和槽无法满足项目需求,我们可以自定义所需的信号和槽,并通过connect()函数进行连接。
信号和槽都是特殊的成员函数,要实现自定义信号槽,需要遵循以下步骤:
创建新类:编写一个新的类,并让它继承Qt的某个标准类(如QWidget、QMainWindow等)。
继承QObject:确保这个新类是从QObject类或其子类派生而来的。
添加Q_OBJECT宏:在新类的头文件中,加入Q_OBJECT宏。这个宏是必需的,因为它为类提供了元对象功能,包括信号和槽的机制。
关于 Q_OBJECT宏。在 Qt 中,元对象系统通过 QMetaObject 类来实现,它包含了关于类的所有元信息,如类的名称、属性、方法、信号、槽等。
元对象功能是 Qt 框架核心机制,提供在运行时对对象进行反射和元数据操作的能力。
cpp
// 头文件 MyMainWindow.h
#ifndef MYMAINWINDOW_H
#define MYMAINWINDOW_H

#include <QWidget>

class MyMainWindow : public QWidget {
    Q_OBJECT  // 加入Q_OBJECT宏,提供元对象功能

public:
    MyMainWindow(QWidget *parent = nullptr);

signals:
    // 自定义信号
    void myCustomSignal();

public slots:
    // 自定义槽函数
    void myCustomSlot();
};

#endif // MYMAINWINDOW_H
cpp
// MyMainWindow.cpp
#include "MyMainWindow.h"  // 包含头文件
#include <QPushButton>     // 引入QPushButton类
#include <QVBoxLayout>     // 引入QVBoxLayout类

// MyMainWindow类的构造函数
MyMainWindow::MyMainWindow(QWidget *parent) : QWidget(parent) {
    QVBoxLayout *layout = new QVBoxLayout(this);  // 创建垂直布局
    QPushButton *button = new QPushButton("Trigger Signal", this);  // 创建按钮
    layout->addWidget(button);  // 将按钮添加到布局中

    // 连接按钮点击信号到自定义信号
    connect(button, &QPushButton::clicked, this, &MyMainWindow::myCustomSignal);
    // 连接自定义信号到自定义槽
    connect(this, &MyMainWindow::myCustomSignal, this, &MyMainWindow::myCustomSlot);
}

// 自定义槽函数的实现
void MyMainWindow::myCustomSlot() {
    // 槽函数的功能,例如关闭窗口
    close();
}

// main.cpp(主函数)
#include <QApplication>     // 引入QApplication类
#include "MyMainWindow.h"   // 包含MyMainWindow头文件

// 主函数入口
int main(int argc, char *argv[]) {
    QApplication app(argc, argv);  // 创建QApplication对象
    MyMainWindow window;           // 创建MyMainWindow对象
    window.show();                 // 显示窗口
    return app.exec();             // 进入Qt事件循环
}
2.5.1 自定义信号
在 Qt框架中,信号是一种特殊的成员函数,用于在对象之间通信。当标准信号无法满足需求时,我们可以自定义信号。
自定义信号要点:
成员函数:信号是类的成员函数。
返回类型:信号无返回值(void)。
命名:信号名可自定义。
参数:信号可带任意类型参数,支持重载。
声明:使用signals关键字声明信号。
实现:信号只需声明,无需定义(无函数体)。
发射信号:通过调用信号函数发射信号,emit关键字可选。
cpp
// Test.h
#ifndef TEST_H
#define TEST_H

#include <QObject>

class Test : public QObject {
    Q_OBJECT

signals:
    void testSignal();  // 自定义无参数信号
    void testSignal(int a);  // 自定义带参数信号
};

#endif // TEST_H
cpp
// 使用示例(通常在类的成员函数或槽函数中发射信号)
void someFunction(Test *testObj) {
    emit testObj->testSignal();  // 发射无参数信号
    emit testObj->testSignal(42);  // 发射带参数信号
}

// 注意:在实际使用中,需要连接信号到槽函数,并在适当位置发射信号。
// 上面的 someFunction 只是一个示例函数,展示如何发射信号。
2.5.2 自定义槽
在Qt框架中,槽函数用于处理信号,并可作为普通成员函数使用。
当标准槽函数不满足需求时,可自定义槽函数。
自定义槽函数要点:
返回类型:槽函数无返回值(void)。
重载:槽函数支持重载。
参数:槽函数的参数与连接信号的参数个数和类型应匹配。
信号参数多于槽函数参数时,多余参数被忽略。
类型多样:槽函数可以是成员函数、全局函数、静态函数或Lambda表达式。
声明:使用**slots关键字(Qt5中可省略)**声明槽函数,可使用public、private、protected限定访问权限。
cpp
// Test.h
#ifndef TEST_H
#define TEST_H

#include <QObject>

class Test : public QObject {
    Q_OBJECT

public:
    void testSlot();  // 普通成员函数,可作为槽函数
    static void testFunc();  // 静态函数,可作为槽函数

public slots:
    void testSlot(int id);  // 带参数的槽函数
};

#endif // TEST_H
cpp
// 使用示例(通常在类的构造函数或某个成员函数中连接信号和槽)
void setupConnections(Test *testObj, QObject *sender) {
    connect(sender, SIGNAL(someSignal()), testObj, SLOT(testSlot()));  // 连接无参数信号和槽
    connect(sender, SIGNAL(someSignal(int)), testObj, SLOT(testSlot(int)));  // 连接带参数信号和槽
    // 注意:在Qt5中,推荐使用新的信号和槽连接方式,它提供了更好的类型检查和编译时的错误检查。
     connect(sender, &SenderClass::someSignal, testObj, &Test::testSlot);
}

// 注意:testSlot() 和 testSlot(int) 的实现应在 Test.cpp 中给出,这里仅展示声明。
第三章 布局管理器
Qt的布局系统能自动排列窗口中的子控件,适用于所有QWidget子类。
通过QWidget::setLayout()设置布局后,系统将负责子控件的排列、窗口默认及最小大小的感知、调整大小处理、内容变化时的自动更新、字体及文本等内容的调整、子控件的显示/隐藏以及移除。
3.1 Qt的布局类
Qt的布局类是通过手写C++代码设计的,便于使用。
Qt Designer工具能辅助开发用户界面,避免编译、链接、运行的循环。
| 类 | 描述 |
|---|---|
| QBoxLayout | 水平或垂直排列控件 |
| QButtonGroup | 组织按钮的容器 |
| QFormLayout | 管理输入控件和其相关的标签 |
| QGraphicsAnchor | 表示在QGraphicsAnchorLayout中两个项目之间的锚 |
| QGraphicsAnchorLayout | 在图形视图中可以将锚连接到一起 |
| QGridLayout | 网格布局(多行多列) |
| QGroupBox | 带标题的分组框 |
| QHBoxLayout | 水平排列控件 |
| QLayout | 几何管理器的基类 |
| QLayoutItem | 抽象的操作布局Item |
| QSizePolicy | 描述水平和垂直大小调整的策略 |
| QSpacerItem | 布局中的空间隔 |
| QStackedLayout | 切换控件,同一时间只有一个控件可见 |
| QStackedWidget | 切换控件,同一时间只有一个控件可见 |
| QVBoxLayout | 垂直排列控件 |
| QWidgetItem | 表示一个控件的布局项 |
3.2 布局的样式
Qt窗口布局利用内置的布局管理器来组织子窗口。
主要的布局管理器包括:
QHBoxLayout(水平布局)
QVBoxLayout(垂直布局)
QGridLayout(网格布局)
QFormLayout(表单布局)
QStackedLayout(堆栈布局)
这些布局管理器都继承自QLayout,它本身继承自QObject。
布局会自动按顺序排列子窗口。复杂布局可通过嵌套实现。
cpp
#include <QApplication>  // 包含Qt应用程序类
#include <QWidget>       // 包含基础窗口部件类
#include <QVBoxLayout>   // 包含垂直布局管理器类
#include <QHBoxLayout>   // 包含水平布局管理器类
#include <QPushButton>   // 包含按钮类

int main(int argc, char *argv[]) {
    QApplication app(argc, argv);  // 初始化Qt应用程序
    QWidget window;                // 创建基础窗口部件,用作UI容器

    QVBoxLayout *vLayout = new QVBoxLayout;  // 创建垂直布局管理器
    QHBoxLayout *hLayout = new QHBoxLayout;  // 创建水平布局管理器

    QPushButton *button1 = new QPushButton("Button 1");  // 创建按钮1
    QPushButton *button2 = new QPushButton("Button 2");  // 创建按钮2
    QPushButton *button3 = new QPushButton("Button 3");  // 创建按钮3

    // 将按钮1和按钮2添加到水平布局中
    hLayout->addWidget(button1);
    hLayout->addWidget(button2);

    // 将水平布局和按钮3添加到垂直布局中(嵌套效果)
    vLayout->addLayout(hLayout);
    vLayout->addWidget(button3);

    // 将垂直布局设置到窗口上
    window.setLayout(vLayout);
    // 显示窗口
    window.show();

    // 进入Qt应用程序的事件循环
    return app.exec();
}
水平布局和垂直布局效果图
3.3 在UI窗口中设置布局
在UI窗口中设置布局有两种方式:
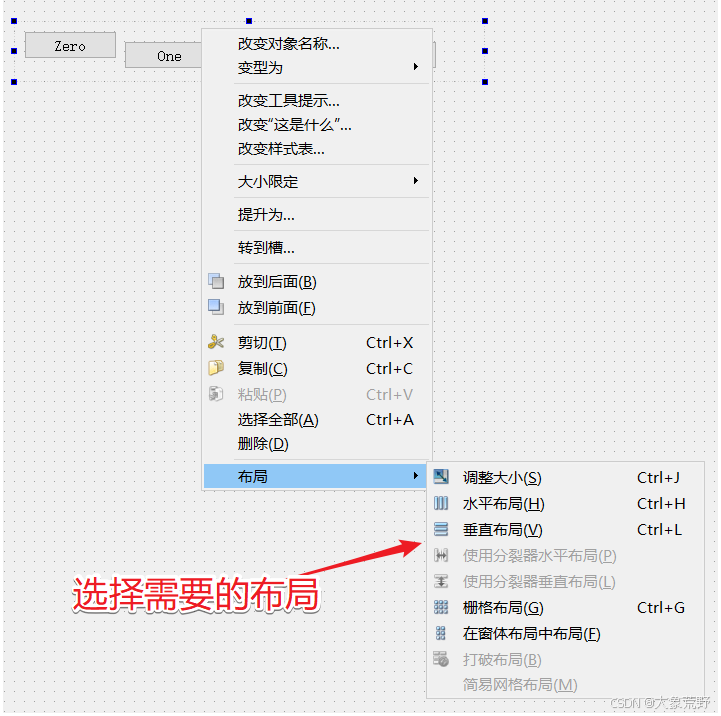
1、使用Qt布局:从工具箱拖拽布局到UI窗口,将控件放入布局的红色框内,控件自动排列。可右键修改当前布局。
 网格布局,可水平可垂直
 表单布局,UI界面双击可添加表单行
2、直接在父窗口布局子部件:若窗口结构复杂,需先拖拽QWidget到UI界面,将子控件放入QWidget中,然后右键选择布局方式,或使用工具栏的布局按钮进行布局。
3.3.1 弹簧的使用
在窗口布局时,为美化界面,需调整控件位置及间距,这可通过使用弹簧实现。
弹簧有水平和垂直两种,分别在水平和垂直方向起作用。
弹簧的sizeType属性常用选项为Fixed和Expanding,前者得到固定大小弹簧,后者得到可伸缩弹簧并默认撑到最大。
弹簧一个经典用处就是不管窗口放大还是缩小都保持控件在固定位置。
如图,项目中增加 "widget.ui"文件,并增加 "widget.h"和 "widget.cpp"。
cpp
/*main.cpp*/
#include "widget.h"

#include <QApplication>
#include <QWidget>
#include <QVBoxLayout>
#include <QHBoxLayout>
#include <QPushButton>
#include "ui_widget.h" // 引入由Qt Creator自动生成的头文件

int main(int argc, char *argv[])
{

    QApplication app(argc, argv);

    QWidget window;//QWidget对象,用作UI容器

    QVBoxLayout *vLayout = new QVBoxLayout;
    QHBoxLayout *hLayout = new QHBoxLayout;

    QPushButton *button1 = new QPushButton("Button 1");
    QPushButton *button2 = new QPushButton("Button 2");
    QPushButton *button3 = new QPushButton("Button 3");

    hLayout->addWidget(button1);
    hLayout->addWidget(button2);

    vLayout->addLayout(hLayout);
    vLayout->addWidget(button3);


    // 创建一个Ui::Widget实例,并初始化UI元素
    Ui::Widget *ui = new Ui::Widget;
    //将widget.ui文件中设计的UI元素应用到window指向的QWidget实例上
    ui->setupUi(&window);

    window.setLayout(vLayout);//设置窗口的水平布局
    window.show();  //展示窗口
    return app.exec();
}

如图,窗口缩放后,组件位置发生了变化。
而弹簧可以起到固定组件位置的作用。
 弹簧都是expanding,整体栅格布局


3.3.2 布局属性设置
当我们给窗口设置了布局之后, 选中当前窗口, 就可以看到在其对应的属性窗口中除了有窗口属性, 还有一个布局属性:
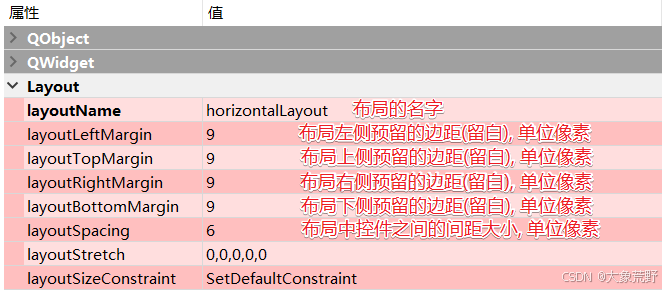
我们通过设置布局上下左右的边距, 或者是控件之间的距离也可以使界面看起来更加美观。
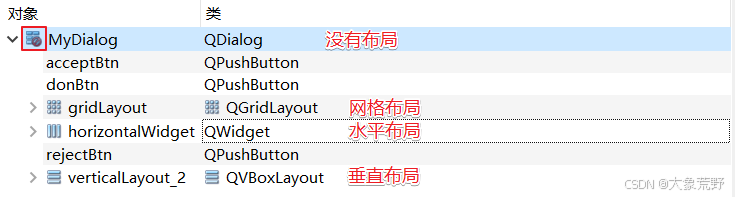
3.3.3 布局的注意事项
通过UI编辑窗口的树状列表检查布局,未设置布局的窗口需进行设置,否则子部件可能无法显示,初学者需特别注意。
3.4 通过API设置布局
在QT中, 布局也有对应的类, 布局类之间的关系如下:
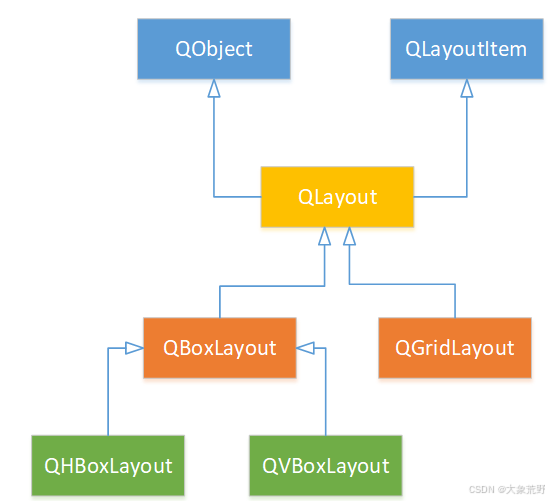 布局类关系图
常用的布局类有三个,
| 布局样式 | 类名 |
|---|---|
| 水平布局 | QHBoxLayout |
| 垂直布局 | QVBoxLayout |
| 网格布局 | QGridLayout |
3.4.1 QLayout
在布局末尾添加窗口:
cpp
void QLayout::addWidget(QWidget *w);从布局中移除窗口(需自行管理窗口析构):
cpp
void QLayout::removeWidget(QWidget *widget); 设置布局四边边距:
cpp
void QLayout::setContentsMargins(int left, int top, int right, int bottom); 设置布局中窗口间隙:
cpp
void QLayout::setSpacing(int spacing); 3.4.2 QHBoxLayout
QHBoxLayout是Qt框架中用于创建水平布局的类,其常用API源自基类。
cpp
// 创建窗口和按钮
QWidget *window = new QWidget;
QPushButton *button1 = new QPushButton("One");
QPushButton *button2 = new QPushButton("Two");
QPushButton *button3 = new QPushButton("Three");
QPushButton *button4 = new QPushButton("Four");
QPushButton *button5 = new QPushButton("Five");

// 创建水平布局并添加按钮
QHBoxLayout *layout = new QHBoxLayout;
layout->addWidget(button1);
layout->addWidget(button2);
layout->addWidget(button3);
layout->addWidget(button4);
layout->addWidget(button5);

// 设置布局并显示窗口
window->setLayout(layout);
window->show();
QHBoxLayout创建水平布局
3.4.3 QVBoxLayout
QVBoxLayout是Qt中用于创建垂直布局的类,它继承了基类的常用API。
cpp
// 创建窗口和按钮
QWidget *window = new QWidget;
QPushButton *button1 = new QPushButton("One");
QPushButton *button2 = new QPushButton("Two");
QPushButton *button3 = new QPushButton("Three");
QPushButton *button4 = new QPushButton("Four");
QPushButton *button5 = new QPushButton("Five");
// 创建垂直布局并添加按钮
QVBoxLayout *layout = new QVBoxLayout;
layout->addWidget(button1);
layout->addWidget(button2);
layout->addWidget(button3);
layout->addWidget(button4);
layout->addWidget(button5);
// 设置布局并显示窗口
window->setLayout(layout);
window->show();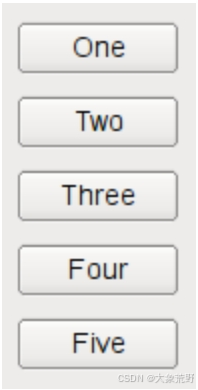 QVBoxLayout创建垂直布局
3.4.4 QGridLayout
QGridLayout是Qt框架中用于创建网格布局的类。
cpp
// 创建窗口和按钮等部件
QWidget *window = new QWidget;
QPushButton *button1 = new QPushButton("One");
QPushButton *button2 = new QPushButton("Two");
QPushButton *button3 = new QPushButton("Three");
QPushButton *button4 = new QPushButton("Four");
QPushButton *button5 = new QPushButton("Five");
QPushButton *button6 = new QPushButton("Six");
QTextEdit *txedit = new QTextEdit;
txedit->setText("我占用了两行两列的空间哦。");
// 创建网格布局
QGridLayout *layout = new QGridLayout;
// 在布局中添加部件,并指定它们的位置和占据的行列数
layout->addWidget(button1, 0, 0); // 第1行第1列
layout->addWidget(button2, 0, 1); // 第1行第2列
layout->addWidget(button3, 0, 2); // 第1行第3列
layout->addWidget(txedit, 1, 0, 2, 2); // 第2行第1列,占据2行2列
layout->addWidget(button4, 1, 2); // 第2行第3列
layout->addWidget(button5, 2, 2); // 第3行第3列
layout->addWidget(button6, 3, 0, 1, 3); // 第4行第1列,占据1行3列
// 设置布局并显示窗口
window->setLayout(layout);
window->show();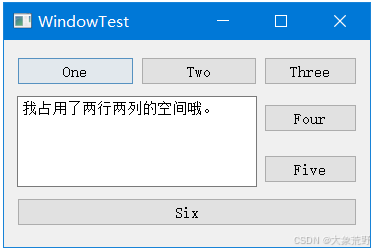 网格布局
网格布局
第四章 QWidget类
4.0 QWidget和 QMainWindow的区别
QWidget是所有窗口和控件类的基类,其继承自QObject。
为窗口类对象指定父对象后,可实现内存资源的自动管理。
QWidget:
它是Qt中所有用户界面对象的基类。这意味着其他窗口和控件类都直接或间接继承自QWidget
QWidget提供了基本的窗口功能和控件的基础类。
作为一个基本的窗口组件,QWidget可以包含其他窗口组件(如按钮、文本框等),但它本身并不提供如标题栏、菜单栏等高级功能。
QMainWindow:
它继承自QWidget,并扩展了其功能。
专为创建主窗口而设计,是Qt中用于创建应用程序主窗口的特殊类。提供了一些特殊的功能,如菜单栏、工具栏、状态栏和中心窗口区域。
QWidget类继承关系树状图
4.1 QWidget 父对象管理
构造函数
创建一个 QWidget 实例,可选指定父对象和窗口标志。
cpp
// QWidget 构造函数
QWidget(
    QWidget *parent = nullptr,  // 父对象指针,默认为 nullptr
    Qt::WindowFlags f = Qt::WindowFlags()  // 窗口标志,默认为无特殊标志
);
成员函数
设置父对象。
cpp
//用于设置当前窗口的父对象,可附带窗口标志。
void setParent(QWidget *parent);
void setParent(QWidget *parent, Qt::WindowFlags f);
获取父对象
cpp
QWidget *parentWidget() const;//返回当前窗口的父对象,无父对象时返回 nullptr。4.2 窗口位置
获取几何信息
cpp
QRect frameGeometry() const;   //返回窗口相对于父窗口的几何信息(含边框)。
const QRect &geometry() const; //返回窗口相对于父窗口的几何信息(不含边框)。
设置几何信息
cpp
//设置窗口的位置和尺寸(不含边框)
void setGeometry(int x, int y, int w, int h);
void setGeometry(const QRect &);
移动窗口
cpp
//重新设置窗口的位置
void move(int x, int y);  //坐标移动
void move(const QPoint &);//点对象移动
4.3 窗口尺寸
获取尺寸
cpp
QSize size() const;                   //获取当前尺寸
QSize maximumSize() const;             //获取最大尺寸
QSize minimumSize() const;             //获取最小尺寸

//设置最大尺寸
void setMaximumSize(const QSize &);
void setMaximumSize(int maxw, int maxh);

//设置最小尺寸
void setMinimumSize(const QSize &);
void setMinimumSize(int minw, int minh);
获取高度
cpp
int height() const;         //当前高度
int minimumHeight() const;  //最小高度
int maximumHeight() const;  //最大高度
获取宽度
cpp
int width() const;        //当前宽度
int minimumWidth() const; //最小宽度
int maximumWidth() const; //最大宽度
设置尺寸
cpp
/*调整窗口尺寸*/
void resize(int w, int h);
void resize(const QSize &);

/*设置固定尺寸*/
void setFixedSize(const QSize &s);
void setFixedSize(int w, int h);
设置高度
cpp
void setFixedHeight(int h);      //设置窗口固定高度
void setMaximumHeight(int maxh); //设置最大高度
void setMinimumHeight(int minh); //设置最小高度
设置宽度
cpp
void setFixedWidth(int w);      //设置固定宽度
void setMaximumWidth(int maxw); //设置最大宽度
void setMinimumWidth(int minw); //设置最小宽度
4.4 窗口标题和图标
窗口标题
cpp
QString windowTitle() const;            //获取窗口标题
void setWindowTitle(const QString &);   //设置窗口标题
设置 title
cpp
int main(int argc, char *argv[])
{

    QApplication app(argc, argv);
    QWidget window;

    /* 设置title */
    window.setWindowTitle("mytitle");
    window.show();     //展示窗口
    return app.exec();
}
窗口图标
cpp
QIcon windowIcon() const;             //获取当前窗口的图标
void setWindowIcon(const QIcon &icon);//设置当前窗口的图标
QIcon::QIcon(const QString &fileName);//通过图片路径构造当前窗口图标
cpp
// 假设有一个图片文件路径 "icon.png"
QIcon icon("icon.png");
setWindowIcon(icon);
4.5 QWidget的信号
cpp
// QWidget::setContextMenuPolicy(Qt::ContextMenuPolicy policy);
// 窗口的右键菜单策略 contextMenuPolicy() 参数设置为 Qt::CustomContextMenu, 按下鼠标右键发射该信号
[signal] void QWidget::customContextMenuRequested(const QPoint &pos);
// 窗口图标发生变化, 发射此信号
[signal] void QWidget::windowIconChanged(const QIcon &icon);
// 窗口标题发生变化, 发射此信号
[signal] void QWidget::windowTitleChanged(const QString &title);
4.6 槽函数
cpp
//------------- 窗口显示 -------------
// 关闭当前窗口
[slot] bool QWidget::close();
// 隐藏当前窗口
[slot] void QWidget::hide();
// 显示当前创建以及其子窗口
[slot] void QWidget::show();
// 全屏显示当前窗口, 只对windows有效
[slot] void QWidget::showFullScreen();
// 窗口最大化显示, 只对windows有效
[slot] void QWidget::showMaximized();
// 窗口最小化显示, 只对windows有效
[slot] void QWidget::showMinimized();
// 将窗口回复为最大化/最小化之前的状态, 只对windows有效
[slot] void QWidget::showNormal();

//------------- 窗口状态 -------------
// 判断窗口是否可用
bool QWidget::isEnabled() const; // 非槽函数
// 设置窗口是否可用, 不可用窗口无法接收和处理窗口事件
// 参数true->可用, false->不可用
[slot] void QWidget::setEnabled(bool);
// 设置窗口是否可用, 不可用窗口无法接收和处理窗口事件
// 参数true->不可用, false->可用
[slot] void QWidget::setDisabled(bool disable);
// 设置窗口是否可见, 参数为true->可见, false->不可见
[slot] virtual void QWidget::setVisible(bool visible);
4.7 自定义QWidget类实现鼠标右键菜单栏
右键菜单策略
cpp
//设置菜单策略
QWidget::setContextMenuPolicy(Qt::ContextMenuPolicy policy);//菜单策略
自定义菜单信号
cpp
//当用户右键击窗口时,发射此信号,并传递点击位置。
[signal] void QWidget::customContextMenuRequested(const QPoint &pos);
cpp
// 设置右键菜单策略为自定义
setContextMenuPolicy(Qt::CustomContextMenu);

// 连接自定义菜单信号到槽函数
connect(this, &QWidget::customContextMenuRequested, this, &MyWidget::showCustomContextMenu);

// 槽函数实现
void MyWidget::showCustomContextMenu(const QPoint &pos) {
    // 在指定位置显示自定义菜单
    // ...
}
窗口图标与标题变化信号
cpp
//窗口图标变化信号,当窗口图标发生变化时,发射此信号,并传递新的图标。
[signal] void QWidget::windowIconChanged(const QIcon &icon);
cpp
//窗口标题变化信号。当窗口标题发生变化时,发射此信号,并传递新的标题。
[signal] void QWidget::windowTitleChanged(const QString &title);
cpp
// 连接窗口图标变化信号到槽函数
connect(this, &QWidget::windowIconChanged, this, &MyWidget::handleWindowIconChanged);

// 连接窗口标题变化信号到槽函数
connect(this, &QWidget::windowTitleChanged, this, &MyWidget::handleWindowTitleChanged);

// 槽函数实现
void MyWidget::handleWindowIconChanged(const QIcon &icon) {
    // 处理图标变化
}

void MyWidget::handleWindowTitleChanged(const QString &title) {
    // 处理标题变化
}
源码与效果
cpp
/*自定义类,在类中设置槽函数成员和并重写mousePressEvent来捕捉右键事件,发射信号*/
#ifndef MYWIDGET_H
#define MYWIDGET_H

#include <QWidget>
#include <QMouseEvent>

class MyWidget : public QWidget {
    Q_OBJECT

public:
    explicit MyWidget(QWidget *parent = nullptr);
public slots:
    // 槽函数,用于显示自定义上下文菜单
    void showContextMenu(const QPoint &pos);

    // 菜单项的槽函数
    void action1Triggered();
    void action2Triggered();
protected:
    // 重写 mousePressEvent 来捕捉右键点击事件,并发射 customContextMenuRequested 信号
    void mousePressEvent(QMouseEvent *event) override;
};

#endif // MYWIDGET_H
cpp
/*自定义类的实现*/
#include "MyWidget.h"
#include <QMenu>
#include <QDebug>

MyWidget::MyWidget(QWidget *parent) : QWidget(parent) {
    // 开启鼠标追踪,以便接收鼠标右键事件
 //(这一步不是必需的,因为 customContextMenuRequested 也可以由其他方式触发)
    setMouseTracking(true);
    // 连接 customContextMenuRequested 信号到 showContextMenu 槽函数
    QObject::connect(this,
       &MyWidget::customContextMenuRequested,
       this,
       &MyWidget::showContextMenu);
}

void MyWidget::mousePressEvent(QMouseEvent *event) {
    if (event->button() == Qt::RightButton) {
        emit customContextMenuRequested(event->pos());
    }
    QWidget::mousePressEvent(event); // 调用基类的 mousePressEvent,确保其他鼠标事件正常处理
}

//该函数作为鼠标右键事件的槽函数,向菜单栏中添加了两个菜单项,也就是动作项,动作项被点击时动作项的槽函数会被触发
void MyWidget::showContextMenu(const QPoint &pos) {
    QMenu contextMenu(this);
    contextMenu.addAction("Action 1", this, SLOT(action1Triggered()));//向菜单中添加一个动作(或称为菜单项)
    contextMenu.addAction("Action 2", this, SLOT(action2Triggered()));//向菜单中添加一个动作(或称为菜单项)

    // 在鼠标点击位置显示菜单
    contextMenu.exec(mapToGlobal(pos));
}

void MyWidget::action1Triggered() {
    qDebug() << "Action 1 triggered";
}

void MyWidget::action2Triggered() {
    qDebug() << "Action 2 triggered";
}
cpp
/*main.c*/
#include "mainwindow.h"

#include <QApplication>
#include <QPoint>

#include "MyWidget.h"
int main(int argc, char *argv[])
{
    QApplication a(argc, argv);
    MainWindow w;

    MyWidget widget;
    widget.resize(400, 300);

    widget.show(); //自定义类继承自QWidget,具备窗体容器功能

    return a.exec();
}
QWidget信号效果
第五章 QDialog类
5.1 常用API
cpp
// 构造函数
QDialog::QDialog(QWidget *parent = nullptr,//父类指针
    Qt::WindowFlags f = Qt::WindowFlags());//指定窗口的标志,这些标志控制窗口的外观和行为

// 模态方法对话框,返回DialogCode(包括Accepted或者Rejected两个值)
[virtual slot] int QDialog::exec();//该方法对话框在窗口关闭前会阻塞整个程序所有窗口的响应。

// 接受对话框,设置返回值为 QDialog::Accepted,执行完会关闭对话框调用finished
[virtual slot] void QDialog::accept();

// 拒绝对话框,设置返回值为 QDialog::Rejected,执行完会关闭对话框调用finished
[virtual slot] void QDialog::reject();

// 关闭对话框,并发出finished(r)信号。执行完会关闭对话框调用finished
[virtual slot] void QDialog::done(int r);

//对话框关闭时发出,包括结果代码
[signal] void QDialog::finished(int result);
5.2 常见使用方法
主窗口上三个按钮,一个接收,一个拒绝,一个完成。
点接收弹出子窗口,点拒绝退出,点完成输出666
cpp
// MyDialog.h
#ifndef MYDIALOG_H
#define MYDIALOG_H

#include <QDialog>

namespace Ui {
    class MyDialog;
}

class MyDialog : public QDialog
{
    Q_OBJECT

public:
    explicit MyDialog(QWidget *parent = nullptr);
    ~MyDialog(); // 添加析构函数声明

private slots:
    /*三个按键的槽函数*/
    /*注意这里,按照规则声明槽函数可以省去connect连接过程*/
    /*.ui按键的变量名要和on_xxx_clicked的xxx相符*/
    void on_acceptBtn_clicked();
    void on_rejectBtn_clicked();
    void on_doneBtn_clicked();

private:
    Ui::MyDialog *ui; // 添加UI成员变量声明
};

#endif // MYDIALOG_H
cpp
// MyDialog.cpp
#include "MyDialog.h"
#include "ui_MyDialog.h" // 包含由.ui文件生成的UI类头文件
#include <QDebug>

MyDialog::MyDialog(QWidget *parent) :
    QDialog(parent),
    ui(new Ui::MyDialog) // 初始化UI对象,
{
    ui->setupUi(this); // 设置UI元素

    // 连接finished信号到相应的槽函数
    connect(this, &MyDialog::finished, []() {
        qDebug("finish report");
        });
}

MyDialog::~MyDialog()
{
    delete ui; // 释放UI对象
}

/*注意这里,按照规则声明槽函数可以省去connect连接过程*/
void MyDialog::on_acceptBtn_clicked()
{
    this->accept(); // 设置exec()返回QDialog::Accepted
}

void MyDialog::on_rejectBtn_clicked()
{
    this->reject(); // 设置exec()返回QDialog::Rejected
}

void MyDialog::on_doneBtn_clicked()
{
    this->done(666); // 设置exec()返回666
}
cpp
#include "mainwindow.h"
#include <QApplication>
#include <QPoint>
#include "MyWidget.h"
#include "MyDialog.h"
#include <qdebug.h>
#include <iostream>
int main(int argc, char *argv[])
{
QApplication a(argc, argv);
MainWindow w;
MyDialog mydialog;
int ret = mydialog.exec(); // 显示对话框并阻塞式获取返回值
if(ret == QDialog::Accepted){
qDebug("accepted report");
w.show();
}
else if(ret == QDialog::Rejected){
qDebug("Rejected report");
}
else qDebug()<<"done report is"<<ret;
return a.exec();
}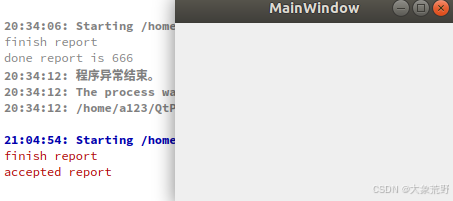 槽函数按规范命名了可省略connect函数
第六章 QDialog的子类
6.1 QMessageBox
QMessageBox是QDialog子类,用于显示提示框,如警告、错误等,只需掌握其静态方法。
6.1.1 API - 静态函数
QMessageBox类提供静态方法显示模态对话框:
about(QWidget*, QString, QString):显示关于对话框。
cpp
QMessageBox::about(parent, title, text);information、critical、question、warning方法:
cpp
QMessageBox::StandardButton result;
result = QMessageBox::information(parent, title, text, buttons, defaultButton);
// 类似地调用 critical, question, warning 方法
cpp
//QMessageBox示例
int main(int argc, char *argv[]) {
    QApplication app(argc, argv);

    // 创建一个父窗口(虽然在这个例子中不是必需的,但通常会有一个)
    QWidget parent;

    // 设置对话框的标题、文本和按钮
    QString title = "信息对话框";
    QString text = "这是一个信息对话框的示例。";
    QMessageBox::StandardButtons buttons = QMessageBox::Ok;
    QMessageBox::StandardButton defaultButton = QMessageBox::NoButton;

    // 显示信息对话框,并获取用户点击的按钮(在这个例子中只会是Ok)
    QMessageBox::StandardButton result = QMessageBox::information(&parent, title, text, buttons, defaultButton);

    // 根据用户点击的按钮执行相应的操作(在这个例子中,只会是Ok,所以不需要判断)
    if (result == QMessageBox::Ok) {
        // 用户点击了Ok按钮
        // 这里可以执行一些操作,比如关闭程序、打开新窗口等
    }

    // 进入Qt应用程序的事件循环
    return app.exec();
}
6.2 QFileDialog
QFileDialog 提供静态方法以简化文件和目录的选择过程:
using namespace QFileDialog;
QString dir = getExistingDirectory(); // 选择目录,返回其绝对路径
QString file = getOpenFileName(); // 选择单个文件,返回其绝对路径
QStringList files = getOpenFileNames(); // 选择多个文件,返回其绝对路径列表
QString saveFile = getSaveFileName(); // 选择保存文件的目录,返回文件绝对路径
cpp
// 选择目录,返回其绝对路径
QString dir = QFileDialog::getExistingDirectory(
    QWidget *parent = nullptr,       // 父窗口指针,可以为空
    const QString &caption = QString(), // 对话框标题,默认为空字符串
    const QString &dir = QString(),    // 默认打开的目录,默认为空字符串(即系统默认目录)
    QFileDialog::Options options = QFileDialog::ShowDirsOnly // 对话框选项,这里指定只显示目录
);

// 选择单个文件,返回其绝对路径
QString file = QFileDialog::getOpenFileName(
    QWidget *parent = nullptr,       // 父窗口指针,可以为空
    const QString &caption = QString(), // 对话框标题,默认为空字符串
    const QString &dir = QString(),    // 默认打开的目录,默认为空字符串
    const QString &filter = QString(), // 文件过滤器,默认为空字符串(即显示所有文件)
    QString *selectedFilter = nullptr, // 默认使用的过滤器指针,可以为空(即使用第一个过滤器)
    QFileDialog::Options options = QFileDialog::Options() // 对话框选项,一般使用默认值(即无特殊选项)
);

// 选择多个文件,返回其绝对路径列表
QStringList files = QFileDialog::getOpenFileNames(
    QWidget *parent = nullptr,       // 父窗口指针,可以为空
    const QString &caption = QString(), // 对话框标题,默认为空字符串
    const QString &dir = QString(),    // 默认打开的目录,默认为空字符串
    const QString &filter = QString(), // 文件过滤器,默认为空字符串
    QString *selectedFilter = nullptr, // 默认使用的过滤器指针,可以为空
    QFileDialog::Options options = QFileDialog::Options() // 对话框选项,使用默认值
);

// 选择保存文件的目录,返回文件的绝对路径
QString saveFile = QFileDialog::getSaveFileName(
    QWidget *parent = nullptr,       // 父窗口指针,可以为空
    const QString &caption = QString(), // 对话框标题,默认为空字符串
    const QString &dir = QString(),    // 默认打开的目录,默认为空字符串
    const QString &filter = QString(), // 文件过滤器,默认为空字符串
    QString *selectedFilter = nullptr, // 默认使用的过滤器指针,可以为空
    QFileDialog::Options options = QFileDialog::Options() // 对话框选项,使用默认值
);
cpp
/* MyWindow.h */
#ifndef MYWINDOW_H
#define MYWINDOW_H

#include <QWidget>      // 引入QWidget类,作为窗口的基类
#include <QLabel>       // 引入QLabel类,用于显示文本

// 前向声明,避免包含不必要的头文件
class QVBoxLayout;  // 布局管理器,用于排列窗口中的控件
class QPushButton;  // 按钮控件,用于触发用户操作

class MyWindow : public QWidget {
    Q_OBJECT  // 使用Qt的宏,支持信号与槽机制

public:
    // 构造函数,初始化窗口
    explicit MyWindow(QWidget *parent = nullptr);  //expicit防止构造函数被隐式调用

private slots:
    // 声明私有槽函数,这些函数将作为信号的响应函数
    void openFile();       // 打开单个文件
    void openFiles();      // 打开多个文件
    void openDirectory();  // 打开目录
    void saveFile();       // 保存文件

private:
    QLabel *pathLabel;  // 标签控件,用于显示文件/目录路径
};

#endif // MYWINDOW_H
cpp
/*.cpp文件*/

// 构造函数,初始化窗口和布局
MyWindow::MyWindow(QWidget *parent) : QWidget(parent) {
    QVBoxLayout *layout = new QVBoxLayout(this);  // 创建垂直布局

    // 创建并连接"打开文件"按钮
    QPushButton *openFileButton = new QPushButton("Open File", this);
    connect(openFileButton, &QPushButton::clicked, this, &MyWindow::openFile);
    layout->addWidget(openFileButton);

    // 创建并连接"打开多个文件"按钮
    QPushButton *openFilesButton = new QPushButton("Open Files", this);
    connect(openFilesButton, &QPushButton::clicked, this, &MyWindow::openFiles);
    layout->addWidget(openFilesButton);

    // 创建并连接"打开目录"按钮
    QPushButton *openDirButton = new QPushButton("Open Directory", this);
    connect(openDirButton, &QPushButton::clicked, this, &MyWindow::openDirectory);
    layout->addWidget(openDirButton);

    // 创建并连接"保存文件"按钮
    QPushButton *saveFileButton = new QPushButton("Save File", this);
    connect(saveFileButton, &QPushButton::clicked, this, &MyWindow::saveFile);
    layout->addWidget(saveFileButton);

    // 创建用于显示路径的标签
    pathLabel = new QLabel("No path selected", this); //QLabel是绑定到这个窗口的
    layout->addWidget(pathLabel);

    setLayout(layout);  // 设置窗口布局
}

// 打开单个文件,更新路径标签
void MyWindow::openFile() {
    QString filePath = QFileDialog::getOpenFileName(this, "Open File", "", "All Files (*.*)");
    if (!filePath.isEmpty()) {
        pathLabel->setText(filePath);
    }
}

// 打开多个文件,更新路径标签(显示所有路径)
void MyWindow::openFiles() {
    QStringList filePaths = QFileDialog::getOpenFileNames(this, "Open Files", "", "All Files (*.*)");
    if (!filePaths.isEmpty()) {
        pathLabel->setText(filePaths.join(", "));
    }
}

// 打开目录,更新路径标签
void MyWindow::openDirectory() {
    QString dirPath = QFileDialog::getExistingDirectory(this, "Open Directory", "");
    if (!dirPath.isEmpty()) {
        pathLabel->setText(dirPath);
    }
}

// 保存文件,更新路径标签(可添加保存逻辑)
void MyWindow::saveFile() {
    QString filePath = QFileDialog::getSaveFileName(this, "Save File", "", "All Files (*.*)");
    if (!filePath.isEmpty()) {
        pathLabel->setText(filePath);
        // 添加保存文件的逻辑
    }
}
cpp
int main(int argc, char *argv[])
{
    QApplication a(argc, argv);

    MyWindow mw;
    mw.show();

    return a.exec();
}
6.3 QFontDialog
QFontDialog是QDialog的子类,用于提供字体属性设置的对话框窗口。
通过调用其静态成员函数,可轻松获取此对话框以进行字体设置。
6.3.1 QFont 字体类
QFont 对象用于定义字体属性,可通过 QWidget 和 QApplication 类的相关方法设置给窗口或应用程序。
QFont 类
构造函数
cpp
QFont::QFont(); // 默认构造函数
QFont::QFont(const QString &family, //字体名
                int pointSize = -1, //字号
                   int weight = -1, //粗细
              bool italic = false); //是否倾斜
设置属性
cpp
void setFamily(const QString &family); // 设置字体名
void setPointSize(int pointSize); // 设置字号(点)
void setPixelSize(int pixelSize); // 设置字号(像素)
void setWeight(int weight); // 设置粗细,范围 0~99
void setBold(bool enable); // 设置是否加粗
void setItalic(bool enable); // 设置是否倾斜
获取属性
cpp
QString family() const; // 获取字体名
int pointSize() const;  // 获取字号(点)
int pixelSize() const;  // 获取字号(像素)
int weight() const;     // 获取粗细
bool bold() const;      // 是否加粗
bool italic() const;    // 是否倾斜
QWidget 类
获取和设置字体
cpp
const QFont& font() const; // 获取当前窗口字体
void setFont(const QFont &font); // 设置当前窗口字体
QApplication 类
获取和设置应用程序字体
cpp
static QFont font(); // 获取当前应用程序字体
static void setFont(const QFont &font, const char *className = nullptr);
// 设置当前应用程序字体,可选指定类名,默认作用于所有窗口
6.3.2 QFontDialog类的静态API
cpp
/*
静态函数,用于显示字体对话框并获取用户选择的字体
*/
[static] QFont QFontDialog::getFont(
    bool *ok,             // 传出参数,判断是否有效字体信息
    const QFont &initial, // 默认选中的字体信息
    QWidget *parent = nullptr,      // 父对象
    const QString &title = QString(), // 对话框标题
    QFontDialog::FontDialogOptions options = FontDialogOptions() // 对话框选项,默认即可
);

/*
静态函数,简化版,只获取有效字体信息和父对象
*/
[static] QFont QFontDialog::getFont(
    bool *ok,            // 传出参数,判断是否有效字体信息
    QWidget *parent = nullptr // 父对象
);
cpp
int main(int argc, char *argv[])
{
QApplication a(argc, argv);
QWidget w;
bool ok;
QFont font = QFontDialog::getFont(&ok); // 显示字体对话框,获取用户选择的字体
if (ok) {
// 用户点击了"确定"按钮,使用了有效字体
qDebug() << "Selected font:" << font.toString();
} else {
// 用户点击了"取消"按钮,或关闭了对话框
qDebug() << "No font selected.";
}
/*弹出字体选择框,设置组件字体*/
w.setFont(font);
QLabel label;
label.setText("ceshi");
QVBoxLayout *layout = new QVBoxLayout(&w);
layout->addWidget(&label);
w.setLayout(layout);//给窗口组件设置布局
w.resize(200,200); //设置窗口尺寸
w.show();
return a.exec();
}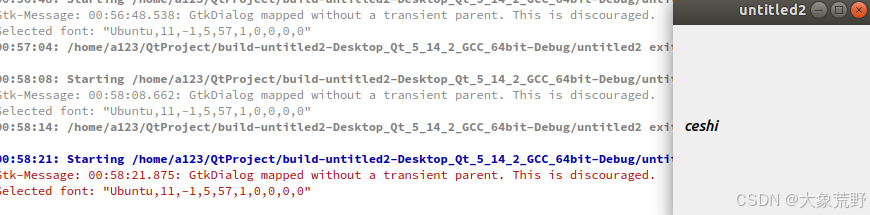 手动选择字体后
6.4 QColorDialog
QColorDialog是QDialog的子类,用于提供颜色选择对话框。通过调用其静态成员函数,可轻松获取此对话框以选择颜色。
6.4.1 颜色类 QColor
在QT框架中,颜色属性被封装于QColor类。该类基于红、绿、蓝(RGB)三原色调配颜色,并支持透明度设置(默认不透明)。
QColor类提供了多种构造函数来创建颜色对象,包括使用预定义的全局颜色、指定RGB值及透明度,或默认构造。该类还提供了设置和获取颜色分量(红、绿、蓝、透明度)的方法。
构造函数:
cpp
QColor redColor(Qt::red); // 使用全局颜色创建红色对象
QColor customColor(255, 0, 0, 127); // 创建半透明红色对象,RGB值为(255, 0, 0),透明度为127
QColor defaultColor; // 创建默认颜色对象,通常为黑色且不透明设置和获取颜色分量:
cpp
QColor color;
color.setRed(255); // 设置红色分量
color.setGreen(128); // 设置绿色分量
color.setBlue(0); // 设置蓝色分量
color.setAlpha(64); // 设置透明度,64表示半透明

int red = color.red(); // 获取红色分量
int green = color.green(); // 获取绿色分量
int blue = color.blue(); // 获取蓝色分量
int alpha = color.alpha(); // 获取透明度分量

int r, g, b, a;
color.getRgb(&r, &g, &b, &a); // 一次性获取所有颜色分量
6.4.2 静态API函数
QColorDialog类提供了一个静态方法getColor,用于弹出颜色选择对话框并返回选中的颜色。
cpp
static QColor QColorDialog::getColor(
    const QColor &initial = Qt::white,  // 初始颜色,默认为白色
    QWidget *parent = nullptr,          // 父窗口指针,默认为空
    const QString &title = QString(),   // 对话框标题,默认为空字符串
    // 对话框选项,使用默认设置
    QColorDialog::ColorDialogOptions options = QColorDialog::ColorDialogOptions()
);
// 备注:弹出颜色选择对话框,返回用户选择的颜色。
cpp
int main(int argc, char *argv[]) {
    QApplication app(argc, argv);

    // 弹出颜色选择对话框,并获取用户选择的颜色
    QColor selectedColor = QColorDialog::getColor(Qt::blue); // 初始颜色设置为蓝色

    // 检查用户是否选择了有效颜色
    if (selectedColor.isValid()) {
        qDebug() << "Selected color:" << selectedColor.name();
        // 这里可以进一步处理用户选择的颜色
    } else {
        qDebug() << "No color selected.";
    }

    return 0;
}
6.5 QInputDialog
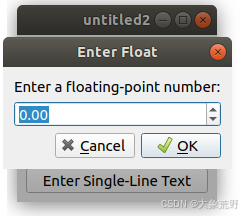
QInputDialog是QDialog的子类,用于创建输入对话框。该对话框支持输入整数、浮点数、字符串,并可显示下拉菜单供选择。通过调用其静态成员函数,可轻松创建并使用此类对话框。
6.5.1 API - 静态函数
cpp
// 浮点数输入对话框
double QInputDialog::getDouble(
    QWidget *parent,          // 父窗口
    const QString &title,     // 标题
    const QString &label,     // 标签
    double value = 0,         // 默认值
    double min = -2e9,        // 最小值
    double max = 2e9,         // 最大值
    int decimals = 1,         // 小数位数
    bool *ok = nullptr,       // 是否确定
    Qt::WindowFlags flags = Qt::WindowFlags());
// 示例
double result = QInputDialog::getDouble(nullptr, "Title", "Enter a float:", 0.0, 0.0, 100.0, 2);

// 整数输入对话框
int QInputDialog::getInt(
    QWidget *parent,          // 父窗口
    const QString &title,     // 标题
    const QString &label,     // 标签
    int value = 0,            // 默认值
    int min = -2e9,           // 最小值
    int max = 2e9,            // 最大值
    int step = 1,             // 步长
    bool *ok = nullptr,       // 是否确定
    Qt::WindowFlags flags = Qt::WindowFlags());
// 示例
int result = QInputDialog::getInt(nullptr, "Title", "Enter an integer:", 0, 0, 100, 1);

// 下拉菜单选择对话框
QString QInputDialog::getItem(
    QWidget *parent,          // 父窗口
    const QString &title,     // 标题
    const QString &label,     // 标签
    const QStringList &items, // 选项列表
    int current = 0,          // 当前选项
    bool editable = true,     // 是否可编辑
    bool *ok = nullptr,       // 是否确定
    Qt::WindowFlags flags = Qt::WindowFlags(),
    Qt::InputMethodHints inputMethodHints = Qt::ImhNone);
// 示例
QStringList items = {"Option 1", "Option 2", "Option 3"};
QString result = QInputDialog::getItem(nullptr, "Title", "Choose an option:", items);

// 多行文本输入对话框
QString QInputDialog::getMultiLineText(
    QWidget *parent,          // 父窗口
    const QString &title,     // 标题
    const QString &label,     // 标签
    const QString &text = QString(), // 默认文本
    bool *ok = nullptr,       // 是否确定
    Qt::WindowFlags flags = Qt::WindowFlags(),
    Qt::InputMethodHints inputMethodHints = Qt::ImhNone);
// 示例
QString result = QInputDialog::getMultiLineText(nullptr, "Title", "Enter multi-line text:");

// 单行文本输入对话框
QString QInputDialog::getText(
    QWidget *parent,          // 父窗口
    const QString &title,     // 标题
    const QString &label,     // 标签
    QLineEdit::EchoMode mode = QLineEdit::Normal, // 输入模式
    const QString &text = QString(), // 默认文本
    bool *ok = nullptr,       // 是否确定
    Qt::WindowFlags flags = Qt::WindowFlags(),
    Qt::InputMethodHints inputMethodHints = Qt::ImhNone);
// 示例
QString result = QInputDialog::getText(nullptr, "Title", "Enter single-line text:");
cpp
#ifndef MAINWINDOW_H           // 如果未定义 MAINWINDOW_H
#define MAINWINDOW_H           // 定义 MAINWINDOW_H,防止头文件重复包含

#include <QMainWindow>         // 引入 QMainWindow 类
#include <QPushButton>         // 引入 QPushButton 类
#include <QVBoxLayout>         // 引入 QVBoxLayout 类
#include <QWidget>             // 引入 QWidget 类

class MainWindow : public QMainWindow {  // 定义一个继承自 QMainWindow 的 MainWindow 类
    Q_OBJECT  // 使用 Qt 的宏,支持 Qt 的元对象系统

public:
    explicit MainWindow(QWidget *parent = nullptr);  // 构造函数,可以接受一个父窗口指针

private slots:  // 定义私有槽函数,用于信号和槽机制
    void showFloatDialog();    // 显示浮点数对话框的函数
    void showIntDialog();      // 显示整数对话框的函数
    void showItemDialog();     // 显示项目对话框的函数
    void showMultiLineDialog(); // 显示多行文本对话框的函数
    void showSingleLineDialog();// 显示单行文本对话框的函数

private:  // 私有成员变量
    QWidget *centralWidget;    // 中心部件
    QVBoxLayout *layout;       // 垂直布局管理器
    QPushButton *floatButton;  // 浮点数按钮
    QPushButton *intButton;    // 整数按钮
    QPushButton *itemButton;   // 项目按钮
    QPushButton *multiLineButton; // 多行文本按钮
    QPushButton *singleLineButton;// 单行文本按钮
};

#endif // MAINWINDOW_H  // 结束头文件保护
cpp
#include "mainwindow.h"  // 引入 MainWindow 头文件
#include <QInputDialog>  // 引入 QInputDialog 类,用于输入对话框
#include <QStringList>   // 引入 QStringList 类,用于存储字符串列表
#include <QMessageBox>   // 引入 QMessageBox 类,用于显示消息框

// MainWindow 构造函数,初始化各个成员变量并设置界面
MainWindow::MainWindow(QWidget *parent) : QMainWindow(parent),
                                          centralWidget(new QWidget(this)),
                                          layout(new QVBoxLayout(centralWidget)),
                                          floatButton(new QPushButton("Enter Float", this)),
                                          intButton(new QPushButton("Enter Int", this)),
                                          itemButton(new QPushButton("Choose Item", this)),
                                          multiLineButton(new QPushButton("Enter Multi-Line Text", this)),
                                          singleLineButton(new QPushButton("Enter Single-Line Text", this)) {

    // 将按钮添加到布局中
    layout->addWidget(floatButton);
    layout->addWidget(intButton);
    layout->addWidget(itemButton);
    layout->addWidget(multiLineButton);
    layout->addWidget(singleLineButton);

    // 连接按钮的点击信号到相应的槽函数
    connect(floatButton, &QPushButton::clicked, this, &MainWindow::showFloatDialog);
    connect(intButton, &QPushButton::clicked, this, &MainWindow::showIntDialog);
    connect(itemButton, &QPushButton::clicked, this, &MainWindow::showItemDialog);
    connect(multiLineButton, &QPushButton::clicked, this, &MainWindow::showMultiLineDialog);
    connect(singleLineButton, &QPushButton::clicked, this, &MainWindow::showSingleLineDialog);

    // 设置中心部件
    setCentralWidget(centralWidget);
}

// 显示浮点数输入对话框,并显示结果
void MainWindow::showFloatDialog() {
    double value = QInputDialog::getDouble(...);  // 省略了具体参数,详见原代码
    QMessageBox::information(this, "Result", QString::number(value));
}

// 显示整数输入对话框,并显示结果
void MainWindow::showIntDialog() {
    int value = QInputDialog::getInt(...);  // 省略了具体参数,详见原代码
    QMessageBox::information(this, "Result", QString::number(value));
}

// 显示项目选择对话框,并显示结果
void MainWindow::showItemDialog() {
    QStringList items = {...};  // 省略了具体项目列表,详见原代码
    QString item = QInputDialog::getItem(...);  // 省略了具体参数,详见原代码
    QMessageBox::information(this, "Result", item);
}

// 显示多行文本输入对话框,并显示结果
void MainWindow::showMultiLineDialog() {
    QString text = QInputDialog::getMultiLineText(...);  // 省略了具体参数,详见原代码
    QMessageBox::information(this, "Result", text);
}

// 显示单行文本输入对话框,并显示结果
void MainWindow::showSingleLineDialog() {
    QString text = QInputDialog::getText(...);  // 省略了具体参数,详见原代码
    QMessageBox::information(this, "Result", text);
}
cpp
int main(int argc, char *argv[]) {
    QApplication app(argc, argv);

    MainWindow mainWindow;
    mainWindow.show();

    return app.exec();
}
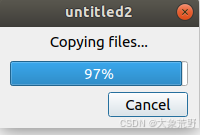
6.6 QProgressDialog
QProgressDialog是Qt框架中用于显示带进度条的对话框类。它继承自QDialog,并提供了多种构造函数和成员函数来配置和控制进度条。
6.6.1 常用API
构造函数
基本构造函数:创建默认的进度对话框。
cpp
QProgressDialog(
    QWidget *parent = nullptr,  // 父窗口,默认无
    Qt::WindowFlags f = Qt::WindowFlags()  // 窗口标志,默认无特殊设置
);扩展构造函数:允许设置标签文本、取消按钮文本、进度条最小值和最大值。
cpp
QProgressDialog(
    const QString &labelText,         // 显示的标签文本
    const QString &cancelButtonText,  // 取消按钮的文本
    int minimum,                      // 进度条的最小值
    int maximum,                      // 进度条的最大值
    QWidget *parent = nullptr,        // 父窗口,默认无
    Qt::WindowFlags f = Qt::WindowFlags()  // 窗口标志,默认无特殊设置
);
主要成员函数
设置/获取标签文本:用于设置和获取进度对话框中显示的提示信息。
cpp
void setLabelText(const QString &text);
QString labelText() const;
设置/获取取消按钮文本:用于设置和获取取消按钮上显示的文本。
cpp
void setCancelButtonText(const QString &cancelButtonText);设置/获取进度条范围:用于设置和获取进度条的最小值和最大值。
cpp
void setMinimum(int minimum);  // 设置进度条的最小值
int minimum() const;           // 获取进度条的最小值

void setMaximum(int maximum);  // 设置进度条的最大值
int maximum() const;           // 获取进度条的最大值

void setRange(int minimum, int maximum);  // 同时设置进度条的最小值和最大值
设置/获取进度条当前值:用于设置和获取进度条当前的进度值。
cpp
void setValue(int progress);
int value() const;
自动重置和关闭:控制进度条达到最大值时是否自动重置或关闭对话框。
cpp
void setAutoReset(bool reset);
bool autoReset() const;
void setAutoClose(bool close);
bool autoClose() const;
取消和重置:用于处理用户取消操作或重置进度条。
cpp
bool wasCanceled() const; // 检查是否取消
void cancel(); // 取消并关闭对话框(如果autoClose为真)
void reset(); // 重置进度条
信号:当用户点击取消按钮时发出。
cpp
[signal] void canceled();设置窗口模态:控制对话框的显示模态(模态、非模态等)。
cpp
void setWindowModality(Qt::WindowModality windowModality);
cpp
#include <QApplication>
#include <QProgressDialog>
#include <QThread>
#include <QTimer>

int main(int argc, char *argv[]) {
    QApplication app(argc, argv);

    QProgressDialog progressDialog("Copying files...", "Cancel", 0, 100);
    progressDialog.setWindowModality(Qt::WindowModal); // 设置为模态对话框
    progressDialog.setAutoClose(true); // 进度条满时自动关闭

    QThread workerThread;
    QTimer timer;
    int progress = 0;

    // 使用QTimer模拟进度更新
    QObject::connect(&timer, &QTimer::timeout, [&]() {
        progress++;
        progressDialog.setValue(progress);
        if (progress == 100) {
            timer.stop();
        }
    });

    // 启动定时器和线程(在实际应用中,这里可能是真正的工作线程)
    timer.start(100); // 每100毫秒更新一次进度
    workerThread.start();

    progressDialog.exec(); // 显示进度对话框

    return app.exec();
}
第七章 Qt 之模式、非模式和半模式对话框
对话框有"模式"与"非模式"之分,两者之间还存在一种较少提及的状态,即"半模式"。
7.1 模式对话框
模式对话框阻塞主界面操作,用户需先完成交互。
调用exec()展示模态对话框,返回前无法操作主界面。
cpp
int main(int argc, char *argv[]) {
QApplication app(argc, argv);
QMainWindow *w = new QMainWindow();
w->setWindowTitle("main window");
w->show();
QDialog *pDialog = new QDialog(w);
pDialog->setWindowTitle("second window");
pDialog->exec();
return app.exec();
}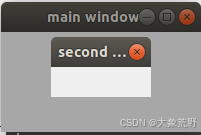 默认就是模式对话框
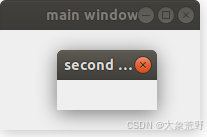
7.2 非模式对话框
非模式对话框允许用户同时与主窗口和对话框交互。
使用show()方法显示非模式对话框后,程序控制会立即返回给调用者。
cpp
int main(int argc, char *argv[]) {
    QApplication app(argc, argv);

    QMainWindow *w = new QMainWindow();
    w->setWindowTitle("main window");
    w->show();
    QDialog *pDialog = new QDialog(w);
    pDialog->setWindowTitle("second window");
    pDialog->show();
    return app.exec();
}
为了保持用户移动后的对话框位置,可在子类重写closeEvent(),处理对话框的位置信息,并在下次显示前将其移动到该位置。
cpp
QPoint m_lastPosition;//点

//对话框关闭时自动调用Qdialog的closeEvent函数
void closeEvent(QCloseEvent *event) override {
    // 在对话框关闭时保存其位置
    // 假设使用成员变量m_lastPosition来保存位置
    m_lastPosition = pos();
    QDialog::closeEvent(event);
}

// 显示对话框时,如有必要,将其移动到保存的位置
void showDialog() {
    if (!m_lastPosition.isNull()) {
        move(m_lastPosition);
    }
    show();
}
7.3 半模式对话框
通过调用setModal(true)或setWindowModality()方法,可以将对话框设置为模态,
但使用show()方法显示时,它不会阻塞程序的主事件循环。
与exec()不同,show()会立即将控制返回给调用者。这对于需要用户交互的进度对话框特别有用,如取消长时间运行的操作。
在这种情况下,应定期调用QApplication::processEvents()以允许用户与对话框交互。
QApplication::processEvents() 用于在事件循环阻塞时强制处理未处理的事件。
在Qt应用中,事件循环通常由QApplication::exec()启动,并持续运行至应用退出。
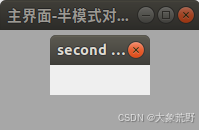 半模式对话不阻塞
QApplication::processEvents()
假设你正在开发一个文件处理应用程序,其中有一个功能需要读取一个大文件并将其内容保存到另一个文件中。这个操作可能非常耗时,如果不采取任何措施,应用程序的界面将会在这段时间内变得无响应。
在每次读取和写入操作后,通过调用 QApplication::processEvents() 来处理待处理的事件。这允许用户在文件复制过程中与应用程序的其他部分交互,例如点击按钮或移动窗口。
cpp
while (!in.atEnd()) {
        QString line = in.readLine();
        out << line << "\n";

        // 在每次读取和写入操作后调用 processEvents(),来允许其他事件的处理
        QApplication::processEvents();
    }
7.4 QDialog,QWidget实现模态和非模态
对于 QDialog 的模态及非模态是直接可以实现。
7.5.1 模态QDialog
cpp
/*QDialog实现模式对话框*/
QDialog dlg(this);
dlg.exec();

/*QDialog实现模式对话框,如果调用QApplication ::processEvents()就是半模式 */
QDialog *pDlg = new QDialog(this);
pDlg->setModal(true);
pDlg->show();
7.5.2 非模态QDialog
cpp
QDialog *pDlg = new QDialog(this);
pDlg->show();
7.5.3 QWidget实现模态和非模态
QWidget作为QDialog的基类,而且QWidget作为"窗口"使用也是在平常不过了。
QWidget :: setWindowModality()就是用来设置QWidget运行时的程序阻塞方式的。
Qt::NonModal 不阻塞
Qt::WindowModal 阻塞父窗口,所有祖先窗口及其子窗口
Qt::ApplicationModal 阻塞整个应用程序
cpp
setWindowModality(Qt::ApplicationModal); // 设置阻塞类型这里需要注意,当希望使用`setWindowModality()`将 QWidget设置为模态时应该保证QWidget父部件为NULL。
此外,直接设置部件(或窗口)属性也可以:setAttribute(Qt::WA_ShowModal, true);
cpp
setAttribute(Qt::WA_ShowModal, true); // 属性设置
cpp
/*QWidget通过setWindowModality方法实现模态、非模态*/
// QWidget *pWid = new QWidget(this);  ----- 注意这样设置不能实现非模态,改成如下
QWidget *pWid = new QWidget (NULL);
pWid->setWindowModality(Qt::ApplicationModal);

/*QWidget通过设置属性attribute实现模态、非模态*/
pWid->setAttribute(Qt::WA_ShowModal, true);
pWid->show();