在这篇博文中,我们将引导您完成将 Hangfire 集成到 ASP.NET Core NET Core 项目中以安排 API 每天运行的步骤。Hangfire 是一个功能强大的库,可简化 .NET 应用程序中的后台作业处理,使其成为调度任务的绝佳选择。继续阅读以了解如何设置 Hangfire 并将其配置为每天运行您的 API。
为什么在 ASP.NET Core 中使用 Hangfire 执行后台作业?
在深入实现之前,让我们先了解一下为什么 Hangfire 是后台作业的首选:
·易于使用: Hangfire 设置和使用简单,让您专注于应用程序的核心功能。
·可扩展性:它可以处理大量作业,并且可扩展以满足您的应用程序的需求。
·可靠性: Hangfire 确保即使在服务器重启后仍能执行作业,为关键任务提供可靠性。
**·仪表板:**它带有一个用于监控作业的内置仪表板,可以轻松跟踪和管理后台进程。
Hangfire 提供的调度类型
Hangfire 支持各种类型的后台作业,使其能够灵活地应用于不同的场景。以下是它提供的主要调度类型:
·即发即弃作业: 这些作业仅执行一次,且几乎在创建后立即执行。它们适用于需要快速完成且无需重复的任务。
BackgroundJob.Enqueue(() => Console.WriteLine("Fire-and-forget job executed!"));
·延迟作业: 这些作业仅执行一次,但不会立即执行。它们被安排在指定的延迟后运行。
BackgroundJob.Schedule(() => Console.WriteLine("Delayed job executed!"), TimeSpan.FromDays(1));
·重复作业: 这些作业会按照指定的 CRON 计划执行多次。它们对于需要定期运行的任务非常有用。
RecurringJob.AddOrUpdate(() => Console.WriteLine("Recurring job executed!"), Cron.Daily);
·延续: 这些作业在其父作业完成后执行。它们对于作业依赖于另一作业的成功完成的工作流很有用。
var jobId = BackgroundJob.Enqueue(() => Console.WriteLine("Parent job executed!"));
BackgroundJob.ContinueWith(jobId, () => Console.WriteLine("Continuation job executed!"));
先决条件
开始之前,请确保您已准备好以下物品:
· Visual Studio 2019 或更高版本
· .NET Core SDK 安装
· ASP.NET Core 基础知识 NET Core
集成 Hangfire 的分步指南
**步骤 1:**创建一个新的 ASP.NET Core Web API 项目
首先,创建一个新的 ASP.NET Core 项目或打开一个现有项目。如果您没有任何项目,请按照此处提到的步骤创建一个。我还添加了创建测试 API 的步骤。
**第 2 步:**安装 Hangfire NuGet 包
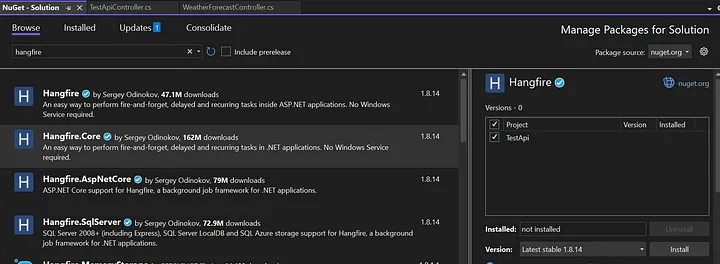
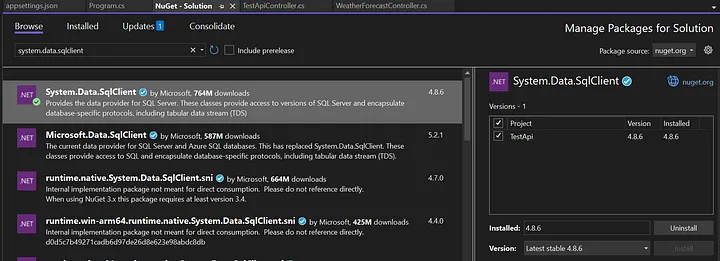
· 转到工具>NuGet 包管理器>管理解决方案的 NuGet 包...
· 搜索 Hangfire 并安装最新版本。
· 搜索System.Data.SqlClient并安装最新的。
步骤 3: 创建用于 Hangfire 的数据库
打开 SSMS 并创建一个新数据库。您也可以使用现有的数据库。

步骤 4: 将连接字符串添加到 appsettings.json
在 appsettings.json 文件中,添加 SQL Server 的连接字符串:
{
"Logging": {
"LogLevel": {
"Default": "Information",
"Microsoft.AspNetCore": "Warning"
}
},
"AllowedHosts": "*",
"ConnectionStrings": {
"TestDatabase": "Server=SHEKHAR\\SQLEXPRESS;Database=HangfireDemo;TrustServerCertificate=True;User Id=adminuser;Password=adminuser;"
}
}
步骤 5: 在 Program.cs 中配置 Hangfire
修改 Program.cs 文件来配置 Hangfire:
using Hangfire;
using Hangfire.SqlServer;
var builder = WebApplication.CreateBuilder(args);
// Add services to the container.
builder.Services.AddControllers();
// Learn more about configuring Swagger/OpenAPI at https://aka.ms/aspnetcore/swashbuckle
builder.Services.AddEndpointsApiExplorer();
builder.Services.AddSwaggerGen();
// Step 1 -> Hangfire configuration with SQL Server storage
var connectionString = builder.Configuration.GetConnectionString("TestDatabase");
builder.Services.AddHangfire(config =>
{
config.UseSqlServerStorage(connectionString, new SqlServerStorageOptions
{
CommandBatchMaxTimeout = TimeSpan.FromMinutes(5),
SlidingInvisibilityTimeout = TimeSpan.FromMinutes(5),
QueuePollInterval = TimeSpan.Zero,
UseRecommendedIsolationLevel = true,
DisableGlobalLocks = true
});
});
// Step 2 -> Add Hangfire's server.
builder.Services.AddHangfireServer();
var app = builder.Build();
// Configure the HTTP request pipeline.
if (app.Environment.IsDevelopment())
{
app.UseSwagger();
app.UseSwaggerUI();
}
app.UseHttpsRedirection();
app.UseAuthorization();
app.MapControllers();
//Step 3 -> Added the dashboard url
app.UseHangfireDashboard("/hangfire");
app.Run();
步骤 6: 创建后台作业来调用 API
创建一个调用 API 的后台作业。在此示例中,我使用我的 API 端点 https ://localhost:7282/api/TestApi。我们需要创建一个服务来调用此端点,然后使用 Hangfire 对其进行调度。
创建一个新的服务类 ApiCallService.cs 并添加以下代码:
namespace TestApi
{
public class ApiCallService
{
private readonly HttpClient _httpClient;
public ApiCallService(HttpClient httpClient)
{
_httpClient = httpClient;
}
public async Task CallApiEndpointAsync()
{
var response = await _httpClient.GetAsync("https://localhost:7282/api/TestApi");
response.EnsureSuccessStatusCode();
// Log success or handle the response as needed
}
}
}
在 Program.cs 中注册 HttpClient 和 ApiCallService:
builder.Services.AddHttpClient<ApiCallService>();
在 Program.cs 中安排作业:
// Schedule the job to call the API endpoint
RecurringJob.AddOrUpdate<ApiCallService>("call-api-endpoint", service => service.CallApiEndpointAsync(), Cron.Daily); // Adjust the schedule as needed
最终的 Program.cs 代码:
using Hangfire;
using Hangfire.SqlServer;
using TestApi;
var builder = WebApplication.CreateBuilder(args);
// Add services to the container.
builder.Services.AddControllers();
// Learn more about configuring Swagger/OpenAPI at https://aka.ms/aspnetcore/swashbuckle
builder.Services.AddEndpointsApiExplorer();
builder.Services.AddSwaggerGen();
// Step 1 -> Hangfire configuration with SQL Server storage
var connectionString = builder.Configuration.GetConnectionString("TestDatabase");
builder.Services.AddHangfire(config =>
{
config.UseSqlServerStorage(connectionString, new SqlServerStorageOptions
{
CommandBatchMaxTimeout = TimeSpan.FromMinutes(5),
SlidingInvisibilityTimeout = TimeSpan.FromMinutes(5),
QueuePollInterval = TimeSpan.Zero,
UseRecommendedIsolationLevel = true,
DisableGlobalLocks = true
});
});
// Step 2 -> Add Hangfire's server.
builder.Services.AddHangfireServer();
// Register httpclient
builder.Services.AddHttpClient<ApiCallService>();
var app = builder.Build();
// Configure the HTTP request pipeline.
if (app.Environment.IsDevelopment())
{
app.UseSwagger();
app.UseSwaggerUI();
}
app.UseHttpsRedirection();
app.UseAuthorization();
app.MapControllers();
//Step 3 -> Added the dashboard url
app.UseHangfireDashboard("/hangfire");
// Schedule the job to call the API endpoint
RecurringJob.AddOrUpdate<ApiCallService>("call-api-endpoint", service => service.CallApiEndpointAsync(), Cron.Daily); // Adjust the schedule as needed
app.Run();
步骤 7: 运行并监控您的应用程序
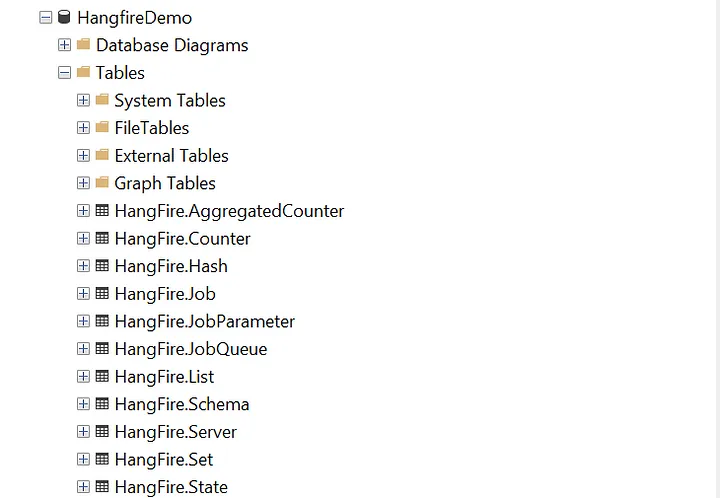
运行项目后,您将看到数据库中创建了一些新表。Hangfire 创建这些表是为了跟踪作业并执行其他操作:
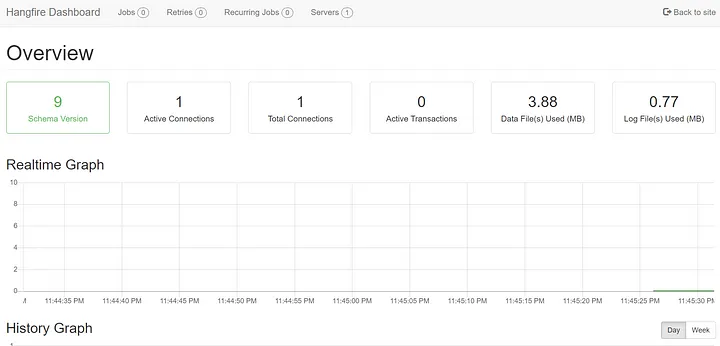
访问https://localhost:7282/hangfire/上的 Hangfire 仪表板来监控您的后台作业。
单击"重复作业"选项卡可查看所有重复作业。目前仅显示我们已安排的作业。

单击"作业">"成功"以查看作业的状态。
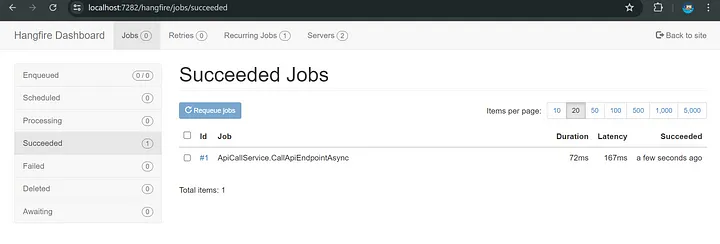
要获取更多详细信息,请单击该职位:
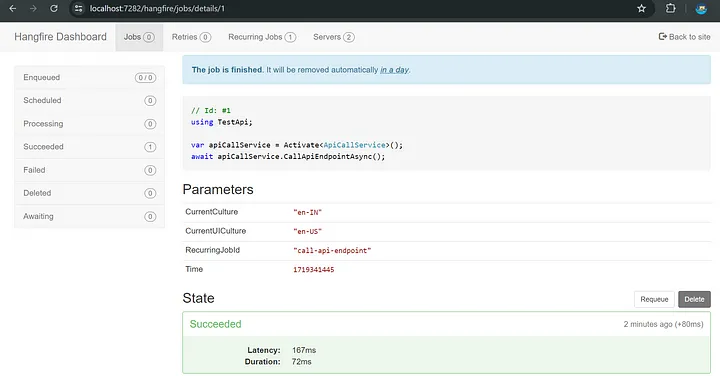
最终代码:
这是已添加所有的代码:https://download.csdn.net/download/hefeng_aspnet/89918351。
结论
通过遵循本指南,您已将 Hangfire 集成到您的 . NET 8 项目中,并使用 SQL Server 作为存储提供程序,安排了使用 Hangfire 的 API 调用。此设置可确保您的 API 按照指定的时间表定期调用。有关更多高级 Hangfire 配置和存储选项,请参阅官方 Hangfire 文档。