文章目录
😀BIO
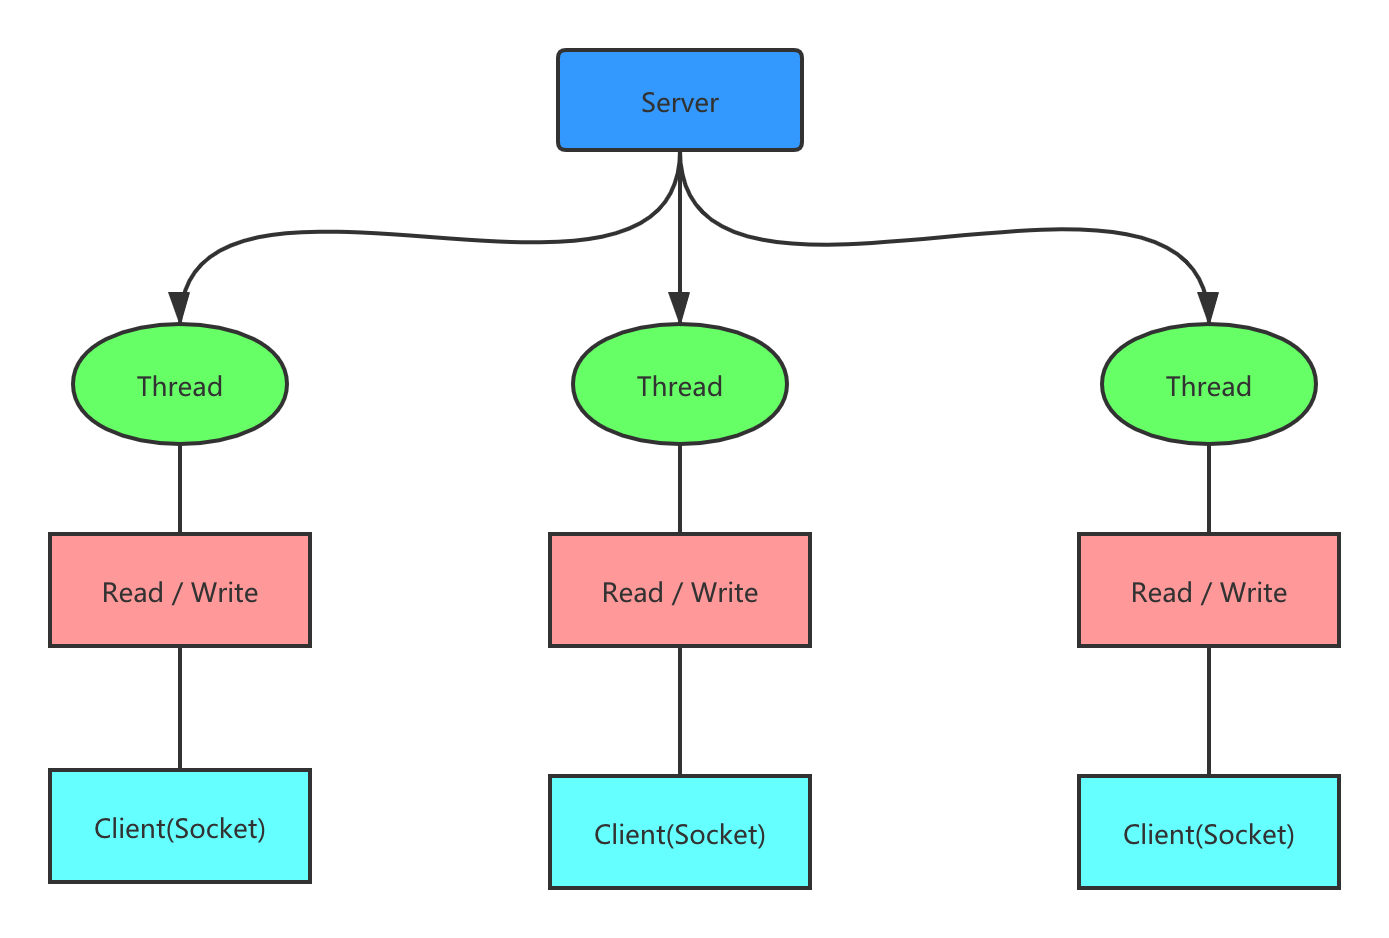
传统IO模型,同步阻塞,每个来自客户端的连接,服务端就专门启动一个线程进行处理,如果这个连接不做任何事情,会造成不必要的线程开销。
适用于连接数目小且固定的架构,这种方式对服务器资源要求比较高,并发局限于应用中,JDK1.4 以前的唯一选择,程序简单易理解。
💢实战demo
验证在BIO模型下,服务端中一个线程只能处理一个客户端的连接。
服务端代码,使用SocketChannel,监听9090端口。
java
import java.io.IOException;
import java.io.InputStream;
import java.net.ServerSocket;
import java.net.Socket;
import java.util.concurrent.ExecutorService;
import java.util.concurrent.Executors;

public class BIOServer {

    public static void main(String[] args) throws IOException {
        // 服务端监听端口
        try (ServerSocket serverSocket = new ServerSocket(9090)) {
            System.out.println("<<服务端>> 等待连接中...");
            while (true) {
                // 监听与此 Socket 建立的连接并接受它。该方法阻塞,直到建立连接。
                Socket socket = serverSocket.accept();
                System.out.printf("<<服务端>> 收到来自%s的连接\n", socket.getRemoteSocketAddress());
                handler(socket);
            }
        }
    }

    //编写一个handler方法,和客户端通讯
    public static void handler(Socket socket) throws IOException {
        byte[] bytes = new byte[1024];
        // 通过socket获取输入流
        InputStream inputStream = socket.getInputStream();
        // 循环的读取客户端发送的数据
        while (true) {
            int read = inputStream.read(bytes);
            if (read != -1) {
                String msg = new String(bytes, 0, read);
                System.out.printf("当前线程id = %s,线程名字=%s。", Thread.currentThread().getId(), Thread.currentThread().getName());
                System.out.printf("接受到来自%s的消息:", socket.getRemoteSocketAddress());
                System.out.println(msg);
            } else {
                System.out.printf("关闭和%s的连接\n", socket.getRemoteSocketAddress());
                break;
            }
        }
    }
}
客户端代码,使用Socket连接服务端。
java
import java.io.*;
import java.net.Socket;
import java.util.Scanner;

public class BIOClient {
    public static void main(String[] args) throws IOException {
        Socket socket = new Socket("localhost", 9090);
        System.out.printf("当前 <<客户端>> 地址为%s\n", socket.getLocalSocketAddress());
        System.out.print("请输入内容,发送到服务端 (输出"exit"时退出):");

        Scanner scanner = new Scanner(System.in);
        while(scanner.hasNext()) {
            String msg = scanner.nextLine();
            if ("exit".equalsIgnoreCase(msg)) {
                socket.close();
                break;
            }
            OutputStream outputStream = socket.getOutputStream();
            outputStream.write(msg.getBytes());
            System.out.print("请输入内容,发送到服务端 (输出"exit"时退出):");
        }
    }
}
测试:先启动服务端,再启动两个客户端,分别发送消息。
发现只有第一个客服端连接到服务端,其实这时第二个客户端已经建立连接,但是因为BIO模型,服务端只能处理一个连接,当关闭第一个客户端后,第二个客户端的消息就会马上发送到服务端了。


🌈NIO
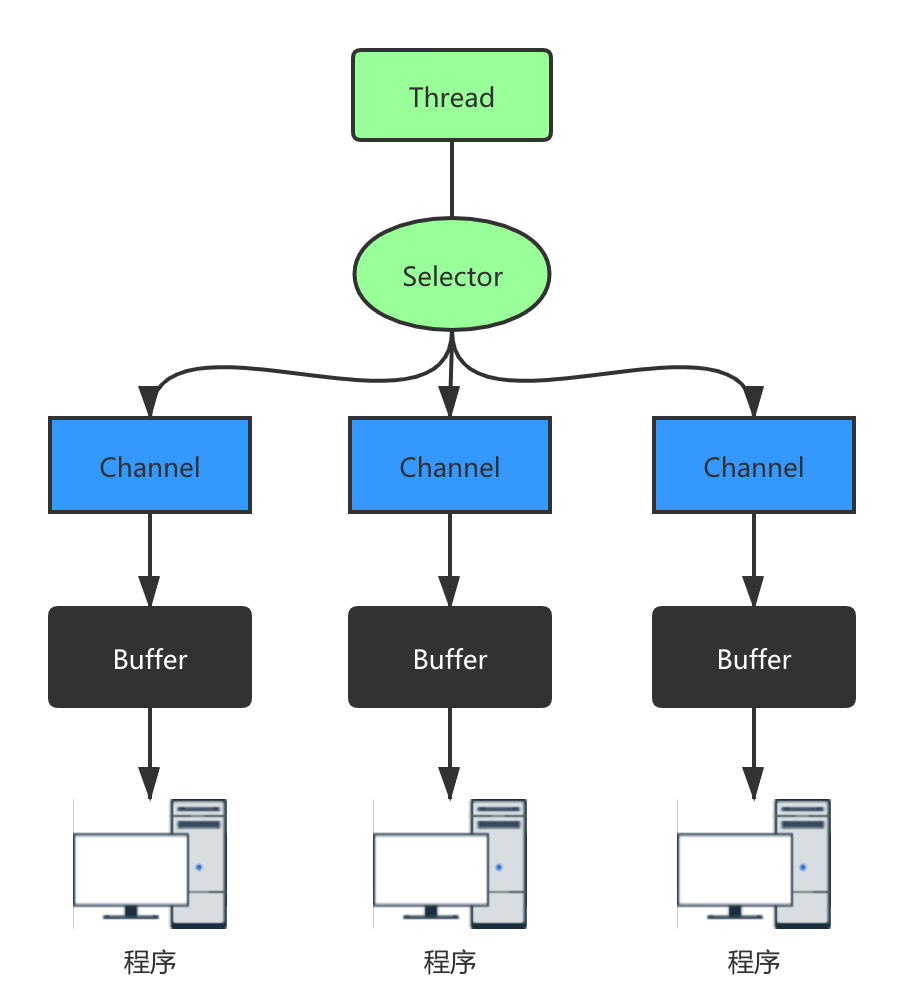
NIO的三大核心组件关系图

一个线程关联一个Selector。
一个Selector关联多个Channel,Selector根据不同的事件在各个Channel中切换。
Channel通过Buffer在服务端和客户端之间进行数据交换。
🏍Buffer
Buffer对象本质上是一个可读写数据的内存块,一个容器(数组)。
Buffer不同于BIO中流,BIO中同一个流只能进行写或者读的操作。但是Buffer既可以写入数据也可以读取数据
Buffer种类有以下几种,其中使用较多的是ByteBuffer

核心属性
java
// Invariants: mark <= position <= limit <= capacity
private int mark = -1;
private int position = 0;
private int limit;
private int capacity;- capacity:缓冲区的容量。通过构造函数赋予,一旦设置,无法更改
- limit :缓冲区的界限。位于limit 后的数据不可读写。缓冲区的限制不能为负,并且不能大于其容量
- position :下一个 读写位置的索引(类似PC)。缓冲区的位置不能为负,并且不能大于limit
- mark :记录当前position的值。position被改变后,可以通过调用reset() 方法恢复到mark的位置。
核心方法
put(T obj):插入数据,同时position往后移动。
flip():读写模式的切换。本质是改变核心属性的值。
get():读取缓存区中的一个值,同时position往后移动。
get(int index):读取指定位置的值,但是position不会变。
rewind():只在读模式下使用,恢复position、limit和capacity的值,变为进行get()前的值
clean():将缓冲区的属性恢复最初的状态,达到删除的效果,此时原数据还在,下次写会覆盖。
mark():将position的值保存到mark属性。
reset():将mark属性的值给position
compact():ByteBuffer类的方法。把position之前的数据清空,把剩余的数据往前移动。
🎗Channel
- Channel不同于BIO中流,Channel可以读写,但流只能读或只能写。
- Channel与Buffer紧密结合,数据总是从Channel读入Buffer,从Buffer写入Channel。
- 常见的通道类型包括FileChannel(用于文件I/O)、SocketChannel(用于网络I/O)和ServerSocketChannel(用于服务器端网络I/O)。
🎈Selector
Selector能够检测多个注册的Channel上是否有事件发生,如果有事件发生,便获取事件然后针对每个事件进行相应的处理。这样就可以只用一个单线程去管理多个Channel,也就是管理多个连接和请求。
核心方法
java
public abstract class Selector implements Closeable {
    // 创建一个Selector并返回
    public static Selector open() throws IOException;
    // Selector是否打开
    public abstract boolean isOpen();
    // 返回创建Selector的提供者
    public abstract SelectorProvider provider();
    // 返回的Selector的 key 集合
    public abstract Set<SelectionKey> keys();
    // 返回Selector选择过的key集合
    public abstract Set<SelectionKey> selectedKeys();
    // Selector立即执行选择操作,返回已选择的key的数量
    // 选择操作:对注册进入Selector中的Channel(准备进行IO操作)
    // 放到内部的一个集合中。
    public abstract int selectNow() throws IOException;
    // Selector阻塞执行选择操作,直到有可以选择的Channel
    // 或者阻塞时间超过timeout,才会返回。
    public abstract int select(long timeout) throws IOException;
    // Selector阻塞执行选择操作,直到有可以选择的Channel才会返回。
    public abstract int select() throws IOException;
    // 使尚未返回的第一个选择操作立即返回。
    public abstract Selector wakeup();
    // 关闭Selector
    public abstract void close() throws IOException;
}
🧨实战demo
验证在NIO模型下,服务端一个线程能处理多个客户端连接。
java
public class NIOServer {

    public static void main(String[] args) throws Exception {
        try(Selector selector = Selector.open();
            ServerSocketChannel serverSocketChannel = ServerSocketChannel.open()) {
            serverSocketChannel.bind(new InetSocketAddress(9090));
            serverSocketChannel.configureBlocking(false);
            serverSocketChannel.register(selector, SelectionKey.OP_ACCEPT);
            System.out.println("<<服务端>> 等待连接中...");
            while(true) {
                // (阻塞)选择已准备好进行IO操作的Channel对应的key集合
                int count = selector.select();
                if(count > 0) {
                    // 返回前面选择的key集合,select()必须在selectedKeys()之前调用,否则没有选择key,那么selectedKeys()就没有数据
                    Iterator<SelectionKey> iterator = selector.selectedKeys().iterator();
                    while(iterator.hasNext()) {
                        SelectionKey selectionKey = iterator.next();
                        iterator.remove();
                        // 测试key对应的Channel是否准备好接受一个新的Socket连接
                        if(selectionKey.isAcceptable()) {
                            // 拿到Socket连接
                            SocketChannel socketChannel = serverSocketChannel.accept();
                            socketChannel.configureBlocking(false);
                            // 注册进入Selector
                            socketChannel.register(selector, SelectionKey.OP_READ);
                            System.out.printf("<<服务端>> 收到来自%s的连接\n", socketChannel.getRemoteAddress());
                        } else if (selectionKey.isReadable()) { // 测试key的通道是否已准备好读取。
                            readData(selectionKey);
                        }
                    }
                }
            }
        }
    }

    private static void readData(SelectionKey selectionKey) throws IOException {
        //拿到key关联的SocketChannel
        SocketChannel socketChannel = (SocketChannel) selectionKey.channel();
        ByteBuffer byteBuffer = ByteBuffer.allocate(1024);
        // 把Channel中数据写入Buffer
        int count = socketChannel.read(byteBuffer);
        if(count > 0) {
            // 反转Buffer,切换Buffer的读写模式
            byteBuffer.flip();
            String msg = new String(byteBuffer.array(), 0, byteBuffer.limit());
            System.out.printf("当前线程id = %s,线程名字=%s。", Thread.currentThread().getId(), Thread.currentThread().getName());
            System.out.printf("接受到来自%s的消息:", socketChannel.getRemoteAddress());
            System.out.println(msg);
        } else if (count == -1) {
            System.out.printf("关闭和%s的连接\n", socketChannel.getRemoteAddress());
            selectionKey.cancel();
            socketChannel.close();
        }
    }
}
java
import java.io.IOException;
import java.net.InetSocketAddress;
import java.nio.ByteBuffer;
import java.nio.channels.SocketChannel;
import java.util.Scanner;

public class NIOClient {
    public static void main(String[] args) throws IOException {
        SocketChannel socketChannel = SocketChannel.open();
        socketChannel.connect(new InetSocketAddress("localhost", 9090));
        Scanner scanner = new Scanner(System.in);
        System.out.printf("当前 <<客户端>> 地址为%s\n", socketChannel.getLocalAddress());
        System.out.print("请输入内容,发送到服务端 (输出"exit"时退出):");
        while (scanner.hasNext()) {
            String msg = scanner.nextLine();
            if ("exit".equalsIgnoreCase(msg)) {
                socketChannel.close();
                break;
            }
            socketChannel.write(ByteBuffer.wrap(msg.getBytes()));
            System.out.print("请输入内容,发送到服务端 (输出"exit"时退出):");
        }
    }
}
测试:先启动服务端,再启动两个客户端,分别发送消息。
发现两个客户端可以同时连接到服务端,同时发送消息。


🎨粘包与半包
粘包:发送方在发送数据时,并不是一条一条地发送数据,而是将数据整合在一起,当数据达到一定的数量后再一起发送。这就会导致多条信息被放在一个缓冲区中被一起发送出去
半包:接收方的缓冲区的大小是有限的,当接收方的缓冲区满了以后,就需要将信息截断,等缓冲区空了以后再继续放入数据。这就会发生一段完整的数据最后被截断的现象