精品专题:
01.《C语言从不挂科到高绩点》课程详细笔记
https://blog.csdn.net/yueyehuguang/category_12753294.html?spm=1001.2014.3001.5482
02. 《SpringBoot详细教程》课程详细笔记
https://blog.csdn.net/yueyehuguang/category_12789841.html?spm=1001.2014.3001.5482
03.《SpringBoot电脑商城项目》课程详细笔记
https://blog.csdn.net/yueyehuguang/category_12752883.html?spm=1001.2014.3001.5482
04.《VUE3.0 核心教程》课程详细笔记
https://blog.csdn.net/yueyehuguang/category_12769996.html?spm=1001.2014.3001.5482
05. 《SSM详细教程》课程详细笔记
https://blog.csdn.net/yueyehuguang/category_12806942.html?spm=1001.2014.3001.5482
================================
|| 持续分享系列教程,关注一下不迷路 ||
|| 视频教程:墨轩大楼 ||
================================
📚 一、Rest风格简介
Rest风格是一种表现形式状态转换,它是一种软件架构风格,当我们想表示一个网络资源的时候,可以使用两种方式:
- 传统风格资源描述形式:
http://localhost/user/getById?id=1 查询id为1的用户信息
- Rest风格描述形式
传统方式一般是一个请求对应一种操作,这样做不仅麻烦,也不安全,因为会程序的人读取了请求URL地址,就大概知道该URL实现的是一个什么样的操作。
查看REST风格的描述,你会发现请求地址变的简单了,并且如果只看请求URL并不容易猜出该URL的具体功能。
REST的优点:隐藏资源的访问行为,无法通过地址得知对资源是何种操作,并且书写简单。
但是随之而来的就会有一个问题,一个相同的URL地址,即可以是新增也可以是修改或者查询,那么到底该如何区分请求到底是什么操作呢?
REST风格访问资源时使用行为动作区分对资源进行了何种操作:
http://localhost/users 查询全部用户信息 GET(查询)
http://localhost/users/1 查询指定用户信息 GET(查询)
http://localhost/users 添加用户信息 POST(新增/保存)
http://localhost/users 修改用户信息 PUT(修改/更新)
http://localhost/users/1 删除用户信息 DELETE(删除)
请求方式比较多,但是比较常用的有4种,分别是 GET、POST、PUT、DELETE,不同的请求方式代表不同的操作类型:
发送GET请求时做查询操作
发送POST请求时做新增操作
发送PUT请求时做修改操作
发送DELETE请求时做删除
但是需要注意的是,上面的内容仅仅是约定而不是规则,约定是可以打破的,所以称为REST规范而不是REST规则,这就好比变量的命名规范和命名规则一样。
REST提供了对应的架构方式,按照这种架构设计项目可以降低开发的复杂性,提高系统的可伸缩性。REST种规定GET/POST/PUT/DELETE针对的是查询/新增/修改/删除。
📚 二、Restful 入门案例
通常以REST风格对资源进行访问,我们称为Restful,下面我们以一个案例详细了解一下Restful。
🌾 新建项目,并在pom.xml中导入依赖
<dependency>
  <groupId>org.springframework</groupId>
  <artifactId>spring-webmvc</artifactId>
  <version>5.2.10.RELEASE</version>
</dependency>
<dependency>
  <groupId>com.fasterxml.jackson.core</groupId>
  <artifactId>jackson-databind</artifactId>
  <version>2.9.0</version>
</dependency>
<dependency>
  <groupId>org.projectlombok</groupId>
  <artifactId>lombok</artifactId>
  <version>RELEASE</version>
  <scope>compile</scope>
</dependency>
🌾 在项目的resources目录中新建springmvc.xml
<?xml version="1.0" encoding="UTF-8"?>
<beans xmlns="http://www.springframework.org/schema/beans"
       xmlns:xsi="http://www.w3.org/2001/XMLSchema-instance"
       xmlns:context="http://www.springframework.org/schema/context"
       xmlns:mvc="http://www.springframework.org/schema/task"
       xsi:schemaLocation="http://www.springframework.org/schema/beans http://www.springframework.org/schema/beans/spring-beans.xsd http://www.springframework.org/schema/context https://www.springframework.org/schema/context/spring-context.xsd http://www.springframework.org/schema/task http://www.springframework.org/schema/task/spring-task.xsd">

    <context:component-scan base-package="com.moxuan.mvc_restful.controller"></context:component-scan>
    <mvc:annotation-driven/>
    <!--    配置视图解析器-->
    <bean class="org.springframework.web.servlet.view.InternalResourceViewResolver">
        <!--        在/WEB-INF/view/ 目录下,寻找后缀为.jsp的文件-->
        <property name="prefix" value="/WEB-INF/view/"></property>
        <property name="suffix" value=".jsp"></property>
    </bean>
    <bean class="org.springframework.web.servlet.mvc.method.annotation.RequestMappingHandlerAdapter">
        <property name="messageConverters">
            <list>
                <bean class="org.springframework.http.converter.StringHttpMessageConverter"/>
                <bean class="org.springframework.http.converter.json.MappingJackson2HttpMessageConverter"/>
            </list>
        </property>
    </bean>


</beans>
🌾 配置web.xml
<?xml version="1.0" encoding="UTF-8"?>
<web-app xmlns="http://xmlns.jcp.org/xml/ns/javaee"
         xmlns:xsi="http://www.w3.org/2001/XMLSchema-instance"
         xsi:schemaLocation="http://xmlns.jcp.org/xml/ns/javaee http://xmlns.jcp.org/xml/ns/javaee/web-app_4_0.xsd"
         version="4.0">
    <servlet>
        <servlet-name>restful</servlet-name>
        <servlet-class>org.springframework.web.servlet.DispatcherServlet</servlet-class>
        <init-param>
            <param-name>contextConfigLocation</param-name>
            <param-value>classpath:springmvc.xml</param-value>
        </init-param>
    </servlet>
    <servlet-mapping>
        <servlet-name>restful</servlet-name>
        <url-pattern>/*</url-pattern>
    </servlet-mapping>

    <filter>
        <filter-name>code</filter-name>
        <filter-class>org.springframework.web.filter.CharacterEncodingFilter</filter-class>
        <init-param>
            <param-name>encoding</param-name>
            <param-value>utf-8</param-value>
        </init-param>
    </filter>
    <filter-mapping>
        <filter-name>code</filter-name>
        <url-pattern>/*</url-pattern>
    </filter-mapping>
</web-app>
🌾 实体类Hero
package com.moxuan.mvc_restful.pojo;

import lombok.AllArgsConstructor;
import lombok.Data;
import lombok.NoArgsConstructor;

@Data
    @NoArgsConstructor
    @AllArgsConstructor
    public class Hero {
        private Integer id;
        private String name;
        private int level;
        private String job;
    }
🌾 控制器Controller类
package com.moxuan.mvc_restful.controller;

import com.moxuan.mvc_restful.pojo.Hero;
import org.springframework.stereotype.Controller;
import org.springframework.web.bind.annotation.*;

@Controller
public class HeroController {
    @RequestMapping(value = "/heros",method = RequestMethod.POST)
    @ResponseBody
    public String save(@RequestBody Hero hero){
        System.out.println("hero save..." + hero);
        return "{'message':'hero save'}";
    }

    @RequestMapping(value = "/heros/{id}",method = RequestMethod.DELETE)
    @ResponseBody
    public String delete(@PathVariable Integer id){
        System.out.println("hero delete..." + id);
        return "{'message':'hero delete'}";
    }

    @RequestMapping(value = "/heros",method = RequestMethod.PUT)
    @ResponseBody
    public String update(@RequestBody Hero hero){
        System.out.println("hero update..." +hero);
        return "{'message':'hero update'}";
    }

    @RequestMapping(value = "/heros/{id}",method = RequestMethod.GET)
    @ResponseBody
    public String getById(@PathVariable Integer id){
        System.out.println("hero getById..." + id);
        return "{'message':'hero getById'}";
    }

    @RequestMapping(value = "/heros",method = RequestMethod.GET)
    @ResponseBody
    public String getAll(){
        System.out.println("hero getAll...");
        return "{'message':'hero getAll'}";
    }

}
✍️ 【笔 记】 关于@PathVariable,它的作用是绑定路径参数与处理器方法中的参数间的关系,要求路径参数名与方法中的参数名一样。
❓ 【面试题】@RequestBody、@RequestParam 、@PathVariable 都是用来接收参数的,它们之间的区别和应用分别是什么?
区别:
@RequestParam 用于接收url地址传参或表单传参,比如:/getUserById?id=1, 中的id值。
@RequestBody 用于接收Json格式的数据。
@PathVariable 用于接收路径参数,使用{参数名}描述路径参数,比如:/users/{id},中的id值
应用:
后期开发中,发送请求参数超过1个时,建议使用json格式,@RequestBody运用的会比较广泛。
如果发送非json格式数据,选用@RequestParam接收请求参数。
采用RESTful进行开发,当参数数量较少时,例如1个,可以采用@PathVariable接收请求路径变量,通常用于传递id值。
🌾打开PostMan进行测试
1️⃣ 测试新增数据
👀 首先设置content-type为application/json

👀 然后设置json格式的数据,然后以post方式发送请求:
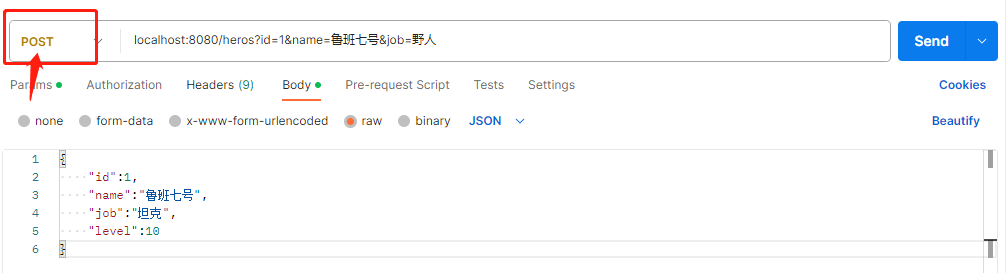
⚠️ 注意: 新增操作,需要发送Post请求
👀 运行结果:

2️⃣ 测试修改数据
👀 修改请求方式为PUT,发送请求
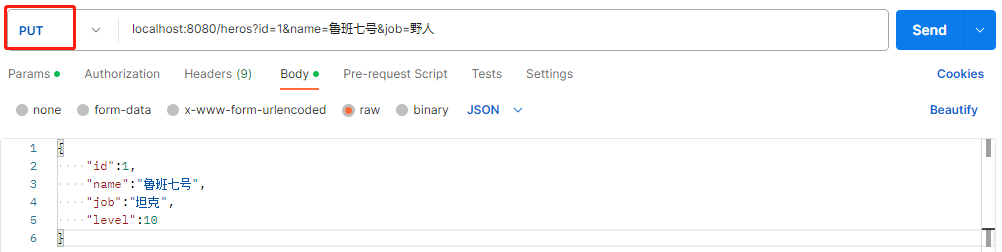
👀 测试结果,如下图所示:

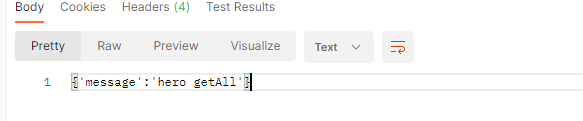
3️⃣ 测试查询数据
👀 修改请求方式为GET,发送请求

请求后面不带数据,表示查询所有的数据,测试结果:
👀 请求方式为GET,在地址后面添加1

请求后面携带的有一个1,表示查询id为1的数据,测试结果:
4️⃣ 测试删除数据
👀 修改请求方式为DELETE发送请求

测试结果如下:
📚 RESTful 快速开发
🌾 问题描述
前面我们使用了restful,可以看出避免了一些请求的外显,而且现在发送请求也相对之前来说简易一些。但是目前任然还存在一些麻烦点,如下图所示:
每个方法的@RequestMapping注解中都定义了访问路径 /heros, 重复性太高了。
每个方法的@RequestMapping注解中都要使用method属性定义请求方式,重复性太高了。
每个方法响应json都需要加上@ResponseBody注解,重复性太高。
🌾 解决方案
- 采用前面讲过的请求路径映射,在Controller类的上方统一加上@RequestMapping
- 使用@RestController 代替@Controller注解,@RestController=@Controller + @ResponseBody.
- 分别使用@PostMapping、@GetMapping、@PutMapping、@DeleteMapping 来替换@RequestMapping中的method设定
👇👇👇且看下面代码
package com.moxuan.mvc_restful.controller;

import com.moxuan.mvc_restful.pojo.Hero;
import org.springframework.web.bind.annotation.*;

/**
 * Created with IntelliJ IDEA.
 *
 * @Author: moxuan
 * @Date: 2023/08
 * @Description:
 */
@RestController
@RequestMapping("/heros")
public class HeroController {
//    @RequestMapping(value = "/heros",method = RequestMethod.POST)
//    @ResponseBody
    @PostMapping
    public String save(@RequestBody Hero hero){
        System.out.println("hero save..." + hero);
        return "{'message':'hero save'}";
    }

//    @RequestMapping(value = "/heros",method = RequestMethod.PUT)
//    @ResponseBody
    @PutMapping
    public String update(@RequestBody Hero hero){
        System.out.println("hero update..." +hero);
        return "{'message':'hero update'}";
    }

//    @RequestMapping(value = "/heros/{id}",method = RequestMethod.DELETE)
//    @ResponseBody
    @DeleteMapping("/{id}")
    public String delete(@PathVariable Integer id){
        System.out.println("hero delete..." + id);
        return "{'message':'hero delete'}";
    }

//    @RequestMapping(value = "/heros/{id}",method = RequestMethod.GET)
//    @ResponseBody
    @GetMapping("/{id}")
    public String getById(@PathVariable Integer id){
        System.out.println("hero getById..." + id);
        return "{'message':'hero getById'}";
    }

//    @RequestMapping(value = "/heros",method = RequestMethod.GET)
//    @ResponseBody
    @GetMapping
    public String getAll(){
        System.out.println("hero getAll...");
        return "{'message':'hero getAll'}";
    }

}
✍️ 【笔记】
@RestController
基于SpringMVC的RESTful开发控制器类,设置当前控制器类为RESTful风格,等同于@Controller与@ResponseBody两个注解的组合。
@GetMapping、@PostMapping、 @PutMapping 、 @DeleteMapping
设置当前控制器方法请求访问路径与请求动作,每一种对应一个请求动作,比如@GetMapping对应GET请求。
🌲 综合案例
使用SSM整合RESTful风格实现对英雄数据的增删改查,现在很多新项目都采用前后端分离的方式进行开发,前面在讲SSM整合的时候,我们已经使用过一般风格的方式整合了,这里我们采用前后端分离的方式整合RESTful风格。
🌿 数据表
SET FOREIGN_KEY_CHECKS=0;

-- ----------------------------
-- Table structure for `hero`
-- ----------------------------
DROP TABLE IF EXISTS `hero`;
CREATE TABLE `hero` (
  `id` int NOT NULL AUTO_INCREMENT,
  `hname` varchar(255) CHARACTER SET utf8 COLLATE utf8_general_ci DEFAULT NULL,
  `job` varchar(255) DEFAULT NULL,
  `level` int DEFAULT NULL,
  `sex` varchar(255) DEFAULT NULL,
  PRIMARY KEY (`id`)
) ENGINE=InnoDB AUTO_INCREMENT=14 DEFAULT CHARSET=utf8mb3;

-- ----------------------------
-- Records of hero
-- ----------------------------
INSERT INTO `hero` VALUES ('1', '夏侯惇', '战士', '2', '男');
INSERT INTO `hero` VALUES ('3', '甄姬', '法师', '2', '女');
INSERT INTO `hero` VALUES ('4', '安琪拉', '法师', '3', '女');
INSERT INTO `hero` VALUES ('5', '廉颇', '辅助', '1', '男');
INSERT INTO `hero` VALUES ('6', '张飞', '辅助', '1', '男');
INSERT INTO `hero` VALUES ('7', '后羿', '射手', '3', '男');
INSERT INTO `hero` VALUES ('8', '虞姬', '射手', '3', '女');
INSERT INTO `hero` VALUES ('9', '阿珂', '刺客', '3', '女');
INSERT INTO `hero` VALUES ('10', '孙悟空', '刺客', '3', '男');
INSERT INTO `hero` VALUES ('12', '王昭君', '法师', '3', '女');
INSERT INTO `hero` VALUES ('13', '王昭君', '法师', '3', '女');
🌿 搭建项目环境
🍁创建项目
- 按照下图所示建立项目结构,并导入配置文件,配置文件在本文档后续内容中获取:

-
导入SSM项目整合所需的依赖
org.springframework spring-context ${spring.version} org.springframework spring-jdbc ${spring.version} org.springframework spring-context-support ${spring.version} org.springframework spring-test ${spring.version} provided log4j log4j 1.2.17 org.aspectj aspectjrt 1.8.10 org.aspectj aspectjweaver 1.8.10 javax.servlet javax.servlet-api 3.1.0 provided org.springframework spring-webmvc ${spring.version} org.mybatis mybatis 3.2.2 org.mybatis mybatis-spring 1.2.2 mysql mysql-connector-java 8.0.25 com.alibaba druid 1.2.8 jstl jstl 1.2 commons-fileupload commons-fileupload 1.3.1 commons-io commons-io 2.4 commons-codec commons-codec 1.9 <dependency> <groupId>com.fasterxml.jackson.core</groupId> <artifactId>jackson-annotations</artifactId> <version>2.10.2</version> </dependency> <dependency> <groupId>com.fasterxml.jackson.core</groupId> <artifactId>jackson-databind</artifactId> <version>2.10.2</version> </dependency> <dependency> <groupId>com.fasterxml.jackson.core</groupId> <artifactId>jackson-core</artifactId> <version>2.10.2</version> </dependency> <dependency> <groupId>org.slf4j</groupId> <artifactId>slf4j-api</artifactId> <version>1.7.36</version> </dependency> <dependency> <groupId>org.slf4j</groupId> <artifactId>slf4j-log4j12</artifactId> <version>1.7.7</version> </dependency> <dependency> <groupId>org.projectlombok</groupId> <artifactId>lombok</artifactId> <version>RELEASE</version> <scope>compile</scope> </dependency> <dependency> <groupId>org.springframework</groupId> <artifactId>spring-web</artifactId> <version>5.3.29</version> </dependency> -
在resources中添加日志相关的配置文件log4j.properties
#定义LOG输出级别
log4j.rootLogger=INFO,Console,File
#定义日志输出目的地为控制台
log4j.appender.Console=org.apache.log4j.ConsoleAppender
log4j.appender.Console.Target=System.out
#可以灵活地指定日志输出格式,下面一行是指定具体的格式
log4j.appender.Console.layout = org.apache.log4j.PatternLayout
log4j.appender.Console.layout.ConversionPattern=[%c] - %m%n#文件大小到达指定尺寸的时候产生一个新的文件
log4j.appender.File = org.apache.log4j.RollingFileAppender
#指定输出目录(需要配一个绝对路径)
log4j.appender.File.File = c:/logs/ssm.log
#定义文件最大大小
log4j.appender.File.MaxFileSize = 10MB输出所以日志,如果换成DEBUG表示输出DEBUG以上级别日志
log4j.appender.File.Threshold = ALL
log4j.appender.File.layout = org.apache.log4j.PatternLayout
log4j.appender.File.layout.ConversionPattern =[%p] [%d{yyyy-MM-dd HH:mm:ss}][%c]%m%n
🍁日志组件
-
在config包中添加AOP日志切面ServiceLogAspect.java,代码如下:
package com.example.SSM_restful.config;
import org.aspectj.lang.JoinPoint;
import org.aspectj.lang.annotation.Aspect;
import org.aspectj.lang.annotation.Before;
import org.aspectj.lang.annotation.Pointcut;
import org.slf4j.Logger;
import org.slf4j.LoggerFactory;
import org.springframework.stereotype.Component;
import org.springframework.web.context.request.RequestContextHolder;
import org.springframework.web.context.request.ServletRequestAttributes;import javax.servlet.http.HttpServletRequest;
import java.text.SimpleDateFormat;
import java.util.Date;@Component
@Aspect
public class ServiceLogAspect {
// 日志记录员
private static final Logger logger = LoggerFactory.getLogger(ServiceLogAspect.class);@Pointcut("execution(* com.example.SSM_restful.service.*.*(..))") public void pointcut(){ } /** * 前置通知 * @param joinPoint */ @Before("pointcut()") public void before(JoinPoint joinPoint) { // 用户[IP 地址], 在某个时间访问了 [com.moxuan.SSM.service.xxx] ServletRequestAttributes attributes = (ServletRequestAttributes) RequestContextHolder.getRequestAttributes(); if (attributes == null) { return ; } // 获取请求 HttpServletRequest request = attributes.getRequest(); // 获取ip String ip = request.getRemoteHost(); // 获取系统当前时间 String time = new SimpleDateFormat("yyyy-MM-dd HH:mm:ss").format(new Date()); // 获取执行的方法 String target = joinPoint.getSignature().getDeclaringTypeName() + "." + joinPoint.getSignature().getName(); // 记录日志 logger.info(String.format("用户[%s], 在[%s], 访问了[%s].", ip, time, target)); }}
🌿 创建实体类
在entity包中新建实体类Hero,代码如下:
package com.example.SSM_restful.entity;

import lombok.AllArgsConstructor;
import lombok.Data;
import lombok.NoArgsConstructor;

@Data
@NoArgsConstructor
@AllArgsConstructor
public class Hero {
    private Integer id;
    private String hname;
    private String job;
    private Integer level;
    private String sex;
}
🌿 添加映射器
在dao包中新建HeroDao接口,作为映射器,代码如下:
package com.example.SSM_restful.dao;

@Repository
public interface HeroDao {

}
在resources目录下的mappers中新建数据库映射文件Hero.xml,代码如下:
<?xml version="1.0" encoding="UTF-8" ?>
<!DOCTYPE mapper
        PUBLIC "-//mybatis.org//DTD Mapper 3.0//EN"
        "http://mybatis.org/dtd/mybatis-3-mapper.dtd">
<!-- 此处的namespace需要对应上dao包中的数据操作接口-->
<mapper namespace="com.example.SSM_restful.dao.HeroDao">

</mapper>
🌿 添加配置文件
🍁Mybatis相关配置
在resources目录下新建一个mysql.properties,添加数据源相关配置,代码如下:
driver=com.mysql.cj.jdbc.Driver
url=jdbc:mysql://localhost:3306/study?useUnicode=true&characterEncoding=utf-8
username=root
password=123456
#定义初始连接数
initialSize=0
#定义最大连接数
maxActive=20
#定义最小空闲
minIdle=1
#定义最长等待时间
maxWait=60000
在resources目录中新建一个spring-mybatis.xml,配置数据源以及mybatis相关的配置,代码如下:
<?xml version="1.0" encoding="UTF-8"?>
<beans xmlns="http://www.springframework.org/schema/beans"
       xmlns:xsi="http://www.w3.org/2001/XMLSchema-instance"
       xmlns:context="http://www.springframework.org/schema/context"
       xmlns:utils="http://www.springframework.org/schema/util" xmlns:tx="http://www.springframework.org/schema/tx"
       xmlns:aop="http://www.springframework.org/schema/aop"
       xsi:schemaLocation="http://www.springframework.org/schema/beans http://www.springframework.org/schema/beans/spring-beans.xsd http://www.springframework.org/schema/context https://www.springframework.org/schema/context/spring-context.xsd http://www.springframework.org/schema/util https://www.springframework.org/schema/util/spring-util.xsd http://www.springframework.org/schema/tx http://www.springframework.org/schema/tx/spring-tx.xsd http://www.springframework.org/schema/aop https://www.springframework.org/schema/aop/spring-aop.xsd">
    <!-- 自动扫描的路径-->
    <context:component-scan base-package="com.example.SSM_restful"></context:component-scan>
    <!-- 引入配置文件
    classpath:只会到你指定的class路径中查找找文件;
    -->
    <utils:properties location="classpath*:mysql.properties" id="mysql"></utils:properties>

    <!-- 配置数据源-->
    <bean id="dataSource" class="com.alibaba.druid.pool.DruidDataSource">
        <!-- 配置数据库链接基本信息-->
        <property name="url" value="#{mysql.url}" />
        <property name="driverClassName" value="#{mysql.driver}"/>
        <property name="username" value="#{mysql.username}" />
        <property name="password" value="#{mysql.password}" />
        <!-- 初始化连接大小-->
        <property name="initialSize" value="#{mysql.initialSize}"/>
        <!-- 连接池最大数量-->
        <property name="maxActive" value="#{mysql.maxActive}"/>
        <!-- 连接池最小空闲 -->
        <property name="minIdle" value="#{mysql.minIdle}"/>
    </bean>

    <!-- Mapping 文件-->
    <!-- Spring 和mybatis完美整合,不需要mybatis的配置文件-->
    <bean id="sqlSessionFactory" class="org.mybatis.spring.SqlSessionFactoryBean">
        <property name="dataSource" ref="dataSource"/>
        <!-- 配置实体类的别名-->
        <property name="typeAliasesPackage" value="com.example.SSM_restful.entity"/>
        <!-- 自动扫描mapping.xml映射文件-->
        <property name="mapperLocations" value="classpath:mappers/*.xml"/>
    </bean>

    <!-- Dao 接口-->
    <bean class="org.mybatis.spring.mapper.MapperScannerConfigurer">
        <!-- 配置 Dao 接口所在的包名,Spring会自动查找其下的类-->
        <property name="basePackage" value="com.example.SSM_restful.dao"/>
        <property name="sqlSessionFactoryBeanName" value="sqlSessionFactory"/>
    </bean>

    <!-- (事务管理)transaction manager, use JtaTransactionManager for global tx -->
    <bean id="transactionManager" class="org.springframework.jdbc.datasource.DataSourceTransactionManager">
        <property name="dataSource" ref="dataSource" />
    </bean>

    <tx:annotation-driven transaction-manager="transactionManager" />
    <aop:config>
        <aop:pointcut expression="execution(* com.example.SSM_restful.service.*.*(..))" id="productServiceMethods" />
        <aop:advisor advice-ref="txAdvice" pointcut-ref="productServiceMethods" />
    </aop:config>
    <tx:advice id="txAdvice" transaction-manager="transactionManager">
        <tx:attributes>
            <tx:method name="save*" propagation="REQUIRED" />
            <tx:method name="delete*" propagation="REQUIRED" />
            <tx:method name="modify*" propagation="REQUIRED" />
            <tx:method name="insert*" propagation="REQUIRED" />
            <tx:method name="remove*" propagation="REQUIRED" />
            <tx:method name="update*" propagation="REQUIRED" />
            <tx:method name="find*" propagation="REQUIRED" read-only="true" />
            <tx:method name="get*" propagation="REQUIRED" read-only="true" />
            <tx:method name="*" />
        </tx:attributes>
    </tx:advice>
</beans>
🛎️注意:需要将配置文件中的一些路径修改成你自己项目的实际路径
-
自动扫描的路径
<context:component-scan base-package="com.example.SSM_restful"></context:component-scan>
-
数据源配置文件路径
<utils:properties location="classpath*:mysql.properties" id="mysql"></utils:properties>
-
实体类路径以及映射文件路径
-
自动扫描dao映射器接口的路径
-
事务管理中,service业务层的路径
<aop:pointcut expression="execution(* com.example.SSM_restful.service..(..))" id="productServiceMethods" />
🍁 添加springMvc相关配置
在resources目录下,新建spring-mvc.xml,添加关于web相关的配置,代码如下:
<?xml version="1.0" encoding="UTF-8"?>
<beans xmlns="http://www.springframework.org/schema/beans"
       xmlns:xsi="http://www.w3.org/2001/XMLSchema-instance"
       xmlns:context="http://www.springframework.org/schema/context"
       xmlns:anotation="http://www.springframework.org/schema/p" xmlns:mvc="http://www.springframework.org/schema/mvc"
       xmlns:aop="http://www.springframework.org/schema/aop"
       xsi:schemaLocation="http://www.springframework.org/schema/beans http://www.springframework.org/schema/beans/spring-beans.xsd http://www.springframework.org/schema/context https://www.springframework.org/schema/context/spring-context.xsd http://www.springframework.org/schema/mvc https://www.springframework.org/schema/mvc/spring-mvc.xsd http://www.springframework.org/schema/aop https://www.springframework.org/schema/aop/spring-aop.xsd">

    <!--自动扫描包路径,扫描@Controller控制器类-->
    <context:component-scan base-package="com.example.SSM_restful"/>
    <!-- 开启mvc注解扫描-->
    <mvc:annotation-driven/>

    <mvc:default-servlet-handler/>
    <!-- 开启对aop注解的支持-->
    <aop:aspectj-autoproxy/>
    <!--
        JSON 转换器
    -->
    <bean class="org.springframework.web.servlet.mvc.method.annotation.RequestMappingHandlerAdapter">
        <property name="messageConverters">
            <list>
                <bean class="org.springframework.http.converter.StringHttpMessageConverter"/>
                <bean class="org.springframework.http.converter.json.MappingJackson2HttpMessageConverter"/>
            </list>
        </property>
    </bean>

    <!-- 3.x version -->
    <!-- HandlerMapping 托管映射处理器 RequestMappingHandlerMapping -->
    <bean class="org.springframework.web.servlet.mvc.method.annotation.RequestMappingHandlerMapping"/>
    <!-- HandlerAdapter 托管适配处理器 RequestMappingHandlerAdapter-->
    <bean class="org.springframework.web.servlet.mvc.method.annotation.RequestMappingHandlerAdapter"/>
    <!-- 避免IE执行Ajax时,返回JSON出现下载文件-->
    <bean id="mappingJacksonHttpMessageConverter" class="org.springframework.http.converter.json.MappingJackson2HttpMessageConverter">
        <property name="supportedMediaTypes">
            <list>
<!--                防止后端返回json对象中文乱码-->
                <value>application/json;charset=utf-8</value>
                <value>text/html;charset=utf-8</value>
                <!-- application 可以在任意 form 表单里面 enctype 属性默认找到 -->
                <value>application/x-www-form-urlencoded</value>
            </list>
        </property>
    </bean>

    <!-- ViewResolver 托管视图解析器-->
    <bean class="org.springframework.web.servlet.view.InternalResourceViewResolver">
        <!--前缀-->
        <property name="prefix" value="/WEB-INF/jsp/"/>
        <!--后缀-->
        <property name="suffix" value=".jsp"/>

    </bean>

    <!-- 配置文件上传,如果没有使用文件上传可以不用配置,当然如果不配,那么配置文件中也不必引入上传组件包 -->
    <bean id="multipartResolver" class="org.springframework.web.multipart.commons.CommonsMultipartResolver">
        <!-- 默认编码 -->
        <property name="defaultEncoding" value="utf-8"/>
        <!-- 文件大小最大值 -->
        <property name="maxUploadSize" value="10485760000"/>
        <!-- 内存中的最大值 -->
        <property name="maxInMemorySize" value="40960"/>
    </bean>

</beans>
🛎️ 配置文件中需要注意的点:
- 开启自动扫描的包路径一定要是自己项目的实际路径
- Restful前后端分离,涉及了频繁的json访问以及json转换,我们添加了json相关的配置,可以帮我们自动进行转换。
- 视图解析器,由于是前后端分离,我们给前端只返回数据,可以不配置
- 文件上传的配置,本案例中不涉及,也可以不配置。
🍁 web.xml配置
在web.xml中配置DispatchcerServlet以及相关过滤器以及监听器等等,代码如下:
<?xml version="1.0" encoding="UTF-8"?>
<web-app xmlns="http://xmlns.jcp.org/xml/ns/javaee"
         xmlns:xsi="http://www.w3.org/2001/XMLSchema-instance"
         xsi:schemaLocation="http://xmlns.jcp.org/xml/ns/javaee http://xmlns.jcp.org/xml/ns/javaee/web-app_4_0.xsd"
         version="4.0">
    <context-param>
        <param-name>contextConfigLocation</param-name>
        <param-value>classpath:spring-mybatis.xml</param-value>
    </context-param>

    <!-- 配置编码过滤器-->
    <filter>
        <filter-name>encodingFilter</filter-name>
        <filter-class>org.springframework.web.filter.CharacterEncodingFilter</filter-class>
        <async-supported>true</async-supported>
        <init-param>
            <param-name>encoding</param-name>
            <param-value>UTF-8</param-value>
        </init-param>
    </filter>
    <filter-mapping>
        <filter-name>encodingFilter</filter-name>
        <url-pattern>/*</url-pattern>
    </filter-mapping>

    <!-- Spring 监听器-->
    <listener>
        <listener-class>org.springframework.web.context.ContextLoaderListener</listener-class>
    </listener>
    <!-- 防止Spring内存溢出监听器-->
    <listener>
        <listener-class>org.springframework.web.util.IntrospectorCleanupListener</listener-class>
    </listener>
    <!--  配置DispatcherServlet  -->
    <servlet>
        <servlet-name>SSM</servlet-name>
        <servlet-class>org.springframework.web.servlet.DispatcherServlet</servlet-class>
        <init-param>
            <param-name>contextConfigLocation</param-name>
            <param-value>classpath:spring-mvc.xml</param-value>
        </init-param>
        <load-on-startup>1</load-on-startup>
    </servlet>

    <servlet-mapping>
        <servlet-name>SSM</servlet-name>
        <url-pattern>/*</url-pattern>
    </servlet-mapping>
</web-app>
🌿 查询英雄列表
在entity包中新建一个Result类,用来封装后端给前端传输的数据,代码如下:
package com.example.SSM_restful.entity;

import lombok.Data;

/**
 * Created with IntelliJ IDEA.
 *
 * @Author: moxuan
 * @Date: 2023/08
 * @Description: 对返回数据进行统一封装
 */
@Data
public class Result {

    private int code;// 状态码
    private String msg;// 消息
    private Object data;// 数据源

    public static final int SUCCESS_CODE=200;
    public static final int ERROR_CODE=-1;
    public  static final String SUCCESS_MSG="请求成功";
    public  static final String ERROR_MSG="请求失败";

    public static Result success(){
        Result result = new Result();
        result.setCode(SUCCESS_CODE);
        result.setMsg(SUCCESS_MSG);
        return result;
    }
    public static Result error(){
        Result result = new Result();
        result.setCode(ERROR_CODE);
        result.setMsg(ERROR_MSG);
        return result;
    }


    public static Result sendResult(int code, String msg,Object obj){
        Result result =  new Result();
        result.setData(obj);
        result.setMsg(msg);
        result.setCode(code);
        return result;
    }

    public static Result sendResult(int code, String msg) {
        Result result =  new Result();
        result.setMsg(msg);
        result.setCode(code);
        return result;
    }
}
在controller包中新增HeroController,添加查询的方法,代码如下:
package com.example.SSM_restful.controller;

import com.example.SSM_restful.entity.Hero;
import com.example.SSM_restful.entity.Result;
import com.example.SSM_restful.service.HeroService;
import org.springframework.beans.factory.annotation.Autowired;
import org.springframework.web.bind.annotation.*;


import java.util.List;

@RestController
@RequestMapping("/hero")
@CrossOrigin("*") // 解决前后端分离项目跨域问题,
public class HeroController {

    @Autowired
    HeroService service;

    @GetMapping
    public Result heros(){
        Result result = service.getAllHeros();
        System.out.println(result);

        return result;
    }

}
注意:
- 查询请求使用的是@GetMapping
- 如果前端项目和后端项目不在同一个服务器,就会存在跨域问题,此时可以在Controller上方添加**@CrossOrigin("*")** ,来解决跨域问题。
在service包中新建HeroService接口,代码如下:
package com.example.SSM_restful.service;

import com.example.SSM_restful.entity.Hero;
import com.example.SSM_restful.entity.Result;

public interface HeroService {
    Result getAllHeros();
}
在service包中新建impl包,然后在其中新建一个HeroServiceImpl类去实现HeroService接口,代码如下:
package com.example.SSM_restful.service.impl;
import com.example.SSM_restful.dao.HeroDao;
import com.example.SSM_restful.entity.Hero;
import com.example.SSM_restful.entity.Result;
import com.example.SSM_restful.service.HeroService;
import org.springframework.beans.factory.annotation.Autowired;
import org.springframework.stereotype.Service;
import java.util.List;
@Service
public class HeroServiceImpl implements HeroService {
@Autowired
private HeroDao dao;
@Override
public Result getAllHeros() {
List<Hero> heroList = dao.findAllHeros();
if (heroList.size()==0){
return Result.sendResult(Result.ERROR_CODE,"未查询到数据");
}
return Result.sendResult(Result.SUCCESS_CODE,"操作成功",heroList);
}
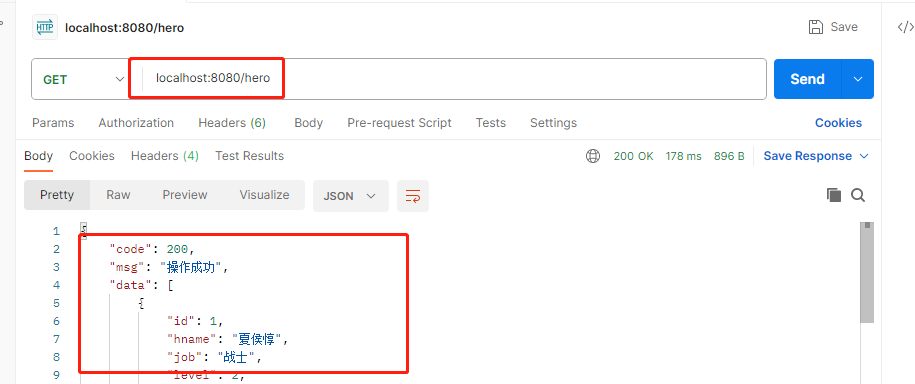
}在HeroDao中添加查询数据的方法,findAllHeros(),代码如下:
@Select("select * from hero")
List<Hero> findAllHeros();
启动服务器,打开postman进行测试:
🌿 根据id查询数据
接下来我们来看看,如果要查询id为1的英雄数据,按照restful风格的话,我们的地址就需要使用:http://localhost:8080/hero/1
在HeroController中添加处理根据id查询数据的请求方法,在请求的@GetMapping 中添加{id},然后使用@PathVariable获取请求中的参数值,代码如下:
@GetMapping("/{id}")
public Result getHeroByID(@PathVariable int id){
    Result result = service.getHero(id);
    return result;
}
在HeroServiceImpl中实现getHero方法,代码如下:
@Override
public Result getHero(int id) {
    Hero hero = dao.findHeroById(id);
    if(hero==null){
        return Result.sendResult(Result.ERROR_CODE,"未查询到数据");
    }
    return Result.sendResult(Result.SUCCESS_CODE,"操作成功",hero);
}
在HeroDao中添加findHeroById方法,代码如下:
@Select("select * from hero where id=#{id}")
Hero findHeroById(@Param("id") int id);
打开Postman进行测试:

🌿 添加英雄数据
-
做添加操作时,我们需要处理的请求是Post请求,我们在HeroController中添加对应的处理请求的方法,代码如下:
@PostMapping
public Result saveHero(Hero hero){
Result result = service.saveHero(hero);
return result;
} -
在业务层中,添加saveHero的实现方法,代码如下:
@Override
public Result saveHero(Hero hero) {
int num = dao.addUser(hero);
if(num==0){
return Result.sendResult(Result.ERROR_CODE,"添加数据失败");
}
return Result.sendResult(Result.SUCCESS_CODE,"成功添加数据");
} -
在HeroDao中添加对应的方法,代码如下:
@Insert("insert into hero (hname,job,level,sex) values(#{h.hname},#{h.job},#{h.level},#{h.sex})")
int addUser(@Param("h") Hero hero); -
打开postman进行测试:
🌿修改数据
-
做修改操作时,我们需要处理的请求是Put请求,我们在HeroController中添加对应的处理请求的方法,代码如下:
@PutMapping
public Result updateHero(Hero hero){
Result result = service.updateHero(hero);
return result;
} -
在业务层Service中添加对应的方法,代码如下:
@Override
public Result updateHero(Hero hero) {
int num = dao.updateHero(hero);
if(num==0){
return Result.sendResult(Result.ERROR_CODE,"修改数据失败");
}
return Result.sendResult(Result.SUCCESS_CODE,"成功修改数据");
} -
在HeroDao中添加对应的updateHero方法,代码如下:
@Update("update hero set " +
" hname=#{h.hname}," +
" job=#{h.job}," +
" level=#{h.level}," +
" sex=#{h.sex} " +
"where id=#{h.id}")
int updateHero(@Param("h") Hero hero); -
打开postman测试

🌿 删除数据
-
删除数据时,我们需要处理的请求是Delete请求,我们在HeroController中添加对应的方法,代码如下:
@DeleteMapping("/{id}")
public Result deleteHero(@PathVariable int id){
Result result = service.deleteHero(id);
return result;
} -
在业务层Service中添加对应的deleteHero方法,代码如下:
@Override
public Result deleteHero(int id) {
int num = dao.deleteHero(id);
if(num==0){
return Result.sendResult(Result.ERROR_CODE,"删除数据失败");
}
return Result.sendResult(Result.SUCCESS_CODE,"成功删除数据");
} -
在HeroDao中添加deleteHero方法,代码如下:
@Delete("delete from hero where id=#{id}")
int deleteHero(@Param("id") int id); -
打开Postman进行测试:

至此,案例中后端部分功能接口已经完毕,前端只需按照对应的接口要求发送请求和数据即可。