本次介绍分为3篇文章:
1:.Net 8 Web API CRUD 操作
.Net 8 Web API CRUD 操作-CSDN博客
2:在 .Net 8 API 中实现 Entity Framework 的 Code First 方法
https://blog.csdn.net/hefeng_aspnet/article/details/143229912
3:.NET 8 Web API 中的身份验证和授权
https://blog.csdn.net/hefeng_aspnet/article/details/143231987
参考文章:
1:Dot Net 8 Web API CRUD 操作
https://medium.com/@codewithankitsahu/net-8-web-api-crud-operations-125bb3083113
2:在 .Net 8 API 中实现 Entity Framework 的 Code First 方法
https://medium.com/@codewithankitsahu/implement-entity-framework-a-code-first-approach-in-net-8-api-80b06d219373
3:.NET 8 Web API 中的身份验证和授权
https://medium.com/@codewithankitsahu/authentication-and-authorization-in-net-8-web-api-94dda49516ee
介绍
在本文中,我们将讨论如何在 .NET 8 Web API 中实现身份验证和授权。这是 .Net 8 系列的延续,所以如果你是新手,请查看我之前的文章。
身份验证和授权代表着根本不同的功能。在本文中,我们将对这两者进行比较和对比,以展示它们如何以互补的方式保护应用程序。
验证
身份验证就是了解用户的身份。
例如
Alice 使用她的用户名和密码登录,服务器使用该密码对 Alice 进行身份验证。
授权
授权就是决定是否允许用户采取行动。
例如
Alice 有权限获取资源,但无权创建资源。
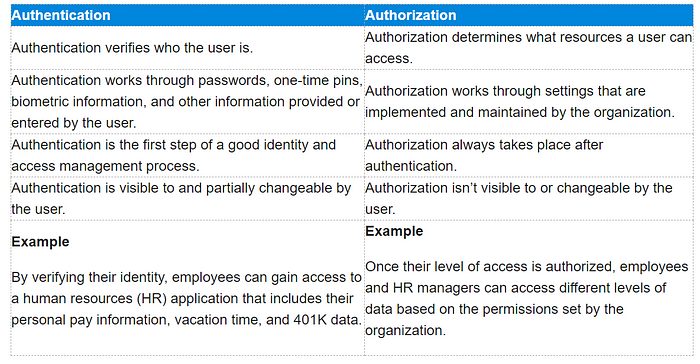
让我们开始在我们的应用程序中实现 Jwt Bearer 令牌。
步骤 1.安装 Microsoft.AspNetCore.Authentication.JwtBearer
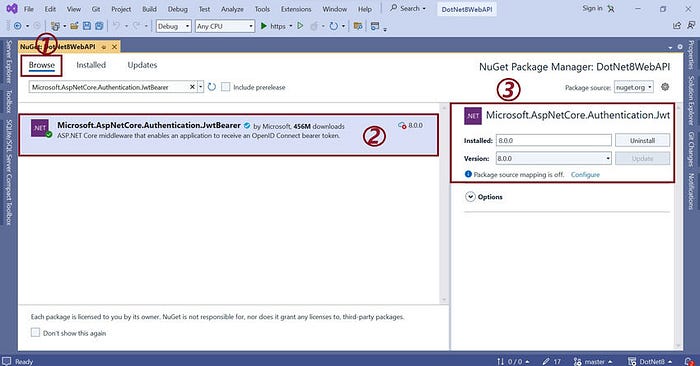
安装Microsoft.AspNetCore.Authentication.JwtBearer库以在我们的应用程序中实现 JWT 令牌。
为了这
- 前往 ne 获取包管理器。
- 在浏览选项卡中搜索"Microsoft.AspNetCore.Authentication.JwtBearer"。
- 选择适当的版本,然后单击"安装"按钮。
步骤2.添加Jwt中间件
在我们的应用中添加 Jwt 中间件。为此,请按照以下步骤操作。
- 在 API 解决方案中创建 Helpers 文件夹
- **添加一个名为"JwtMiddleware"**的类
- 添加JwtMiddleware构造函数并在构造函数中注入RequestDelegate和AppSettings。
using DotNet8WebAPI.Model;
using Microsoft.Extensions.Options;
namespace DotNet8WebAPI.Helpers
{
public class JwtMiddleware
{
private readonly RequestDelegate _next;
private readonly AppSettings _appSettings;
public JwtMiddleware(RequestDelegate next, IOptions<AppSettings> appSettings)
{
_next = next;
_appSettings = appSettings.Value;
}
}
}
- 实现Invoke方法
- 在invoke方法中,从当前请求中读取授权令牌并转发给 attachUserToContext 方法进行验证,提取用户信息并附加到当前请求。
using DotNet8WebAPI.Model;
using DotNet8WebAPI.Services;
using Microsoft.Extensions.Options;
using Microsoft.IdentityModel.Tokens;
using System.IdentityModel.Tokens.Jwt;
using System.Text;
namespace DotNet8WebAPI.Helpers
{
public class JwtMiddleware
{
private readonly RequestDelegate _next;
private readonly AppSettings _appSettings;
public JwtMiddleware(RequestDelegate next, IOptions<AppSettings> appSettings)
{
_next = next;
_appSettings = appSettings.Value;
}
public async Task Invoke(HttpContext context, IUserService userService)
{
var token = context.Request.Headers["Authorization"].FirstOrDefault()?.Split(" ").Last();
if (token != null)
await attachUserToContext(context, userService, token);
await _next(context);
}
private async Task attachUserToContext(HttpContext context, IUserService userService, string token)
{
try
{
var tokenHandler = new JwtSecurityTokenHandler();
var key = Encoding.ASCII.GetBytes(_appSettings.Secret);
tokenHandler.ValidateToken(token, new TokenValidationParameters
{
ValidateIssuerSigningKey = true,
IssuerSigningKey = new SymmetricSecurityKey(key),
ValidateIssuer = false,
ValidateAudience = false,
// set clock skew to zero so tokens expire exactly at token expiration time (instead of 5 minutes later)
ClockSkew = TimeSpan.Zero
}, out SecurityToken validatedToken);
var jwtToken = (JwtSecurityToken)validatedToken;
var userId = int.Parse(jwtToken.Claims.First(x => x.Type == "id").Value);
//Attach user to context on successful JWT validation
context.Items["User"] = await userService.GetById(userId);
}
catch
{
//Do nothing if JWT validation fails
// user is not attached to context so the request won't have access to secure routes
}
}
}
}
- 将我们的"JwtMiddleware"添加到我们的应用程序中
- 为此,请转到 Program.cs 并添加它。
app.UseMiddleware<JwtMiddleware>();<JwtMiddleware>();
步骤 3.实现 UserService
实现 UserService。我将帮助注册新用户。
using DotNet8WebAPI.Model;
namespace DotNet8WebAPI.Services
{
public interface IUserService
{
Task<AuthenticateResponse?> Authenticate(AuthenticateRequest model);
Task<IEnumerable<User>> GetAll();
Task<User?> GetById(int id);
Task<User?> AddAndUpdateUser(User userObj);
}
}
using DotNet8WebAPI.Model;
using Microsoft.EntityFrameworkCore;
using Microsoft.Extensions.Options;
using Microsoft.IdentityModel.Tokens;
using System.IdentityModel.Tokens.Jwt;
using System.Security.Claims;
using System.Text;
namespace DotNet8WebAPI.Services
{
public class UserService : IUserService
{
private readonly AppSettings _appSettings;
private readonly OurHeroDbContext db;
public UserService(IOptions<AppSettings> appSettings, OurHeroDbContext _db)
{
_appSettings = appSettings.Value;
db = _db;
}
public async Task<AuthenticateResponse?> Authenticate(AuthenticateRequest model)
{
var user = await db.Users.SingleOrDefaultAsync(x => x.Username == model.Username && x.Password == model.Password);
// return null if user not found
if (user == null) return null;
// authentication successful so generate jwt token
var token = await generateJwtToken(user);
return new AuthenticateResponse(user, token);
}
public async Task<IEnumerable<User>> GetAll()
{
return await db.Users.Where(x => x.isActive == true).ToListAsync();
}
public async Task<User?> GetById(int id)
{
return await db.Users.FirstOrDefaultAsync(x => x.Id == id);
}
public async Task<User?> AddAndUpdateUser(User userObj)
{
bool isSuccess = false;
if (userObj.Id > 0)
{
var obj = await db.Users.FirstOrDefaultAsync(c => c.Id == userObj.Id);
if (obj != null)
{
// obj.Address = userObj.Address;
obj.FirstName = userObj.FirstName;
obj.LastName = userObj.LastName;
db.Users.Update(obj);
isSuccess = await db.SaveChangesAsync() > 0;
}
}
else
{
await db.Users.AddAsync(userObj);
isSuccess = await db.SaveChangesAsync() > 0;
}
return isSuccess ? userObj: null;
}
// helper methods
private async Task<string> generateJwtToken(User user)
{
//Generate token that is valid for 7 days
var tokenHandler = new JwtSecurityTokenHandler();
var token = await Task.Run(() =>
{
var key = Encoding.ASCII.GetBytes(_appSettings.Secret);
var tokenDescriptor = new SecurityTokenDescriptor
{
Subject = new ClaimsIdentity(new[] { new Claim("id", user.Id.ToString()) }),
Expires = DateTime.UtcNow.AddDays(7),
SigningCredentials = new SigningCredentials(new SymmetricSecurityKey(key), SecurityAlgorithms.HmacSha256Signature)
};
return tokenHandler.CreateToken(tokenDescriptor);
});
return tokenHandler.WriteToken(token);
}
}
}
步骤 4. 添加相应的类模型
在模型文件夹内添加相应的类模型。
using System.Text.Json.Serialization;
namespace DotNet8WebAPI.Model
{
public class User
{
public int Id { get; set; }
public required string FirstName { get; set; }
public string LastName { get; set; }
public required string Username { get; set; }
JsonIgnore
public string Password { get; set; }
public bool isActive { get; set; }
}
}
using System.ComponentModel;
namespace DotNet8WebAPI.Model
{
public class AuthenticateRequest
{
DefaultValue("System")
public required string Username { get; set; }
DefaultValue("System")
public required string Password { get; set; }
}
}
namespace DotNet8WebAPI.Model
{
public class AuthenticateResponse
{
public int Id { get; set; }
public string FirstName { get; set; }
public string LastName { get; set; }
public string Username { get; set; }
public string Token { get; set; }
public AuthenticateResponse(User user, string token)
{
Id = user.Id;
FirstName = user.FirstName;
LastName = user.LastName;
Username = user.Username;
Token = token;
}
}
}
namespace DotNet8WebAPI.Model
{
public class AppSettings
{
public string Secret { get; set; } = string.Empty;
}
}
步骤 5. 转到 OurHeroDbContext 文件
转到 OurHeroDbContext 文件并将用户添加为 DBSet。
public DbSet<User> Users { get; set; }
using DotNet8WebAPI.Model;
using Microsoft.EntityFrameworkCore;
namespace DotNet8WebAPI
{
public class OurHeroDbContext : DbContext
{
public OurHeroDbContext(DbContextOptions<OurHeroDbContext> options) : base(options)
{
}
public DbSet<OurHero> OurHeros { get; set; }
public DbSet<User> Users { get; set; }
protected override void OnModelCreating(ModelBuilder modelBuilder)
{
modelBuilder.Entity<OurHero>().HasKey(x => x.Id);
modelBuilder.Entity<OurHero>().HasData(
new OurHero
{
Id = 1,
FirstName = "System",
LastName = "",
isActive = true,
}
);
modelBuilder.Entity<User>().HasData(
new User
{
Id = 1,
FirstName = "System",
LastName = "",
Username = "System",
Password = "System",
}
);
}
}
}
步骤 6.添加 JWT 密钥
在应用程序设置文件中添加 JWT Secret。
"AppSettings": {
"Secret": "THIS IS USED TO SIGN AND VERIFY JWT TOKENS, REPLACE IT WITH YOUR OWN SECRET, IT CAN BE ANY STRING"
},
{
"Logging": {
"LogLevel": {
"Default": "Information",
"Microsoft.AspNetCore": "Warning"
}
},
"AppSettings": {
"Secret": "THIS IS USED TO SIGN AND VERIFY JWT TOKENS, REPLACE IT WITH YOUR OWN SECRET, IT CAN BE ANY STRING"
},
"ConnectionStrings": {
"OurHeroConnectionString": "Data Source=LAPTOP-4TSM9SDC;Initial Catalog=OurHeroDB; Integrated Security=true;TrustServerCertificate=True;"
},
"AllowedHosts": "*"
}
步骤 7.注册 AppSettings 和 UserServices
在应用程序中注册AppSettings和UserServices。
转到 Program.cs 文件并注册我们的服务。
builder.Services.Configure<AppSettings>(builder.Configuration.GetSection("AppSettings"));
builder.Services.AddScoped<IUserService, UserService>();
步骤 8. 运行以下命令
运行以下命令来添加迁移并更新数据库。
- 运行add-migration [名称]
- 更新数据库
步骤 9.实现 AuthorizeAttribute
实现 AuthorizeAttribute 来保护我们并指向匿名用途。
- 在Helpers 文件夹中添加AuthorizeAttribute类。
- 此类与Attribute 和IAuthorizationFilter 的关联范围。
- 实现 OnAuthorization 方法。
using DotNet8WebAPI.Model;
using Microsoft.AspNetCore.Mvc.Filters;
using Microsoft.AspNetCore.Mvc;
namespace DotNet8WebAPI.Helpers
{
AttributeUsage(AttributeTargets.Class \| AttributeTargets.Method)
public class AuthorizeAttribute : Attribute, IAuthorizationFilter
{
public void OnAuthorization(AuthorizationFilterContext context)
{
var user = (User?)context.HttpContext.Items["User"];
if (user == null)
{
context.Result = new JsonResult(new { message = "Unauthorized" }) { StatusCode = StatusCodes.Status401Unauthorized };
}
}
}
}
步骤 10. 应用 AuthorizeAttribute
根据您的需求,在控制器级别或 Action 方法级别应用AuthorizeAttribute 。
using DotNet8WebAPI.Helpers;
using DotNet8WebAPI.Model;
using DotNet8WebAPI.Services;
using Microsoft.AspNetCore.Mvc;
namespace DotNet8WebAPI.Controllers
{
Route("api/\[controller\]")
ApiController\] // Controller level \[Authorize
public class OurHeroController : ControllerBase
{
private readonly IOurHeroService _heroService;
public OurHeroController(IOurHeroService heroService)
{
_heroService = heroService;
}
//[ApiController] // Action method level
HttpGet
public async Task<IActionResult> Get([FromQuery] bool? isActive = null)
{
var heros = await _heroService.GetAllHeros(isActive);
return Ok(heros);
}
HttpGet("{id}")
//[Route("{id}")] // /api/OurHero/:id
public async Task<IActionResult> Get(int id)
{
var hero = await _heroService.GetHerosByID(id);
if (hero == null)
{
return NotFound();
}
return Ok(hero);
}
HttpPost
public async Task<IActionResult> Post([FromBody] AddUpdateOurHero heroObject)
{
var hero = await _heroService.AddOurHero(heroObject);
if (hero == null)
{
return BadRequest();
}
return Ok(new
{
message = "Super Hero Created Successfully!!!",
id = hero!.Id
});
}
HttpPut
Route("{id}")
public async Task<IActionResult> Put([FromRoute] int id, [FromBody] AddUpdateOurHero heroObject)
{
var hero = await _heroService.UpdateOurHero(id, heroObject);
if (hero == null)
{
return NotFound();
}
return Ok(new
{
message = "Super Hero Updated Successfully!!!",
id = hero!.Id
});
}
HttpDelete
Route("{id}")
public async Task<IActionResult> Delete([FromRoute] int id)
{
if (!await _heroService.DeleteHerosByID(id))
{
return NotFound();
}
return Ok(new
{
message = "Super Hero Deleted Successfully!!!",
id = id
});
}
}
}
using DotNet8WebAPI.Helpers;
using DotNet8WebAPI.Model;
using DotNet8WebAPI.Services;
using Microsoft.AspNetCore.Mvc;
namespace DotNet8WebAPI.Controllers
{
Route("api/\[controller\]")\] // /api/Users \[ApiController
public class UsersController : ControllerBase
{
private IUserService _userService;
public UsersController(IUserService userService)
{
_userService = userService;
}
HttpPost("authenticate")
public async Task<IActionResult> Authenticate(AuthenticateRequest model)
{
var response = await _userService.Authenticate(model);
if (response == null)
return BadRequest(new { message = "Username or password is incorrect" });
return Ok(response);
}
// POST api/<CustomerController>
HttpPost
Authorize
public async Task<IActionResult> Post([FromBody] User userObj)
{
userObj.Id = 0;
return Ok(await _userService.AddAndUpdateUser(userObj));
}
// PUT api/<CustomerController>/5
HttpPut("{id}")
Authorize
public async Task<IActionResult> Put(int id, [FromBody] User userObj)
{
return Ok(await _userService.AddAndUpdateUser(userObj));
}
}
}
步骤11.API安全性
现在我们的 API 对于未经身份验证的用户来说是安全的。
但是如果您想使用 Swagger 测试我们的 API,那么我们需要接受 Bearer 令牌。
转到 Program.cs 文件并实现它。
builder.Services.AddSwaggerGen(swagger =>Services.AddSwaggerGen(swagger =>
{
//This is to generate the Default UI of Swagger Documentation
swagger.SwaggerDoc("v1", new OpenApiInfo
{
Version = "v1",
Title = "JWT Token Authentication API",
Description = ".NET 8 Web API"
});
// To Enable authorization using Swagger (JWT)
swagger.AddSecurityDefinition("Bearer", new OpenApiSecurityScheme()
{
Name = "Authorization",
Type = SecuritySchemeType.ApiKey,
Scheme = "Bearer",
BearerFormat = "JWT",
In = ParameterLocation.Header,
Description = "JWT Authorization header using the Bearer scheme. \r\n\r\n Enter 'Bearer' [space] and then your token in the text input below.\r\n\r\nExample: \"Bearer 12345abcdef\"",
});
swagger.AddSecurityRequirement(new OpenApiSecurityRequirement
{
{
new OpenApiSecurityScheme
{
Reference = new OpenApiReference
{
Type = ReferenceType.SecurityScheme,
Id = "Bearer"
}
},
new string[] {}
}
});
});
步骤 12. 运行 Web API
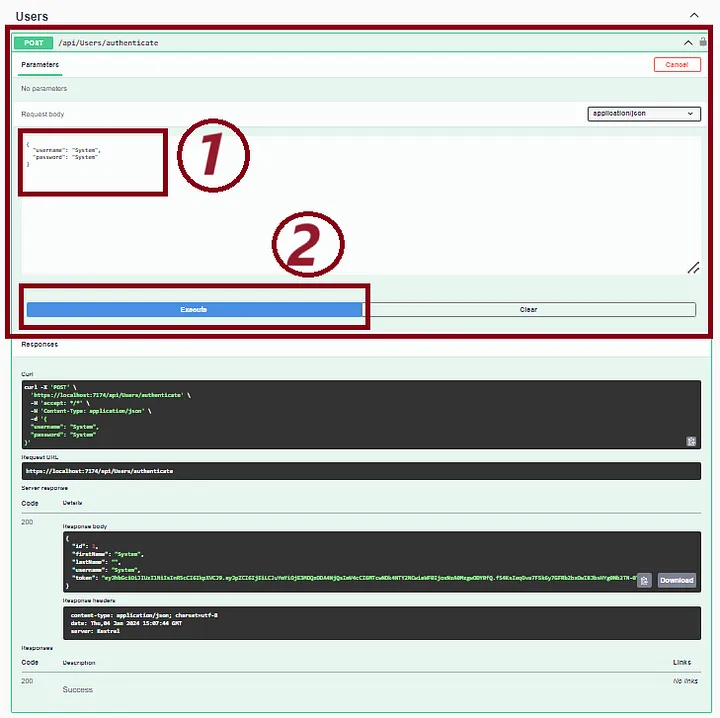
运行 Web API(按 F5)并调用**"/api/Users/authenticate"** API。
步骤 13.复制 JWT 令牌
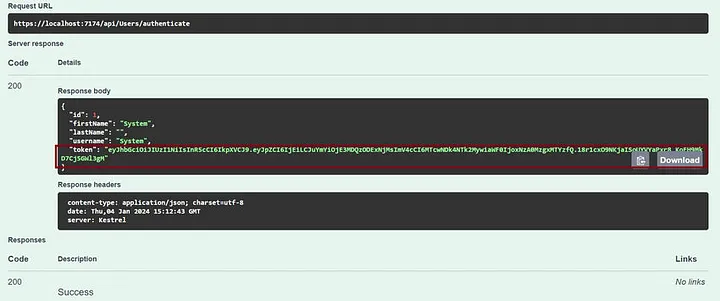
- 单击授权按钮,并在值部分提供令牌" Bearer <token> "。
- 然后点击授权按钮来验证 Web API。
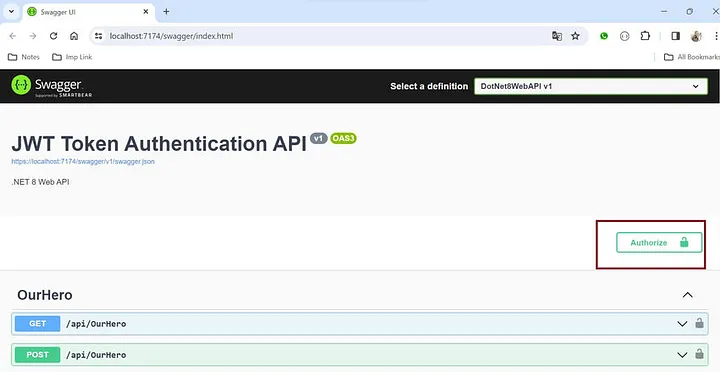
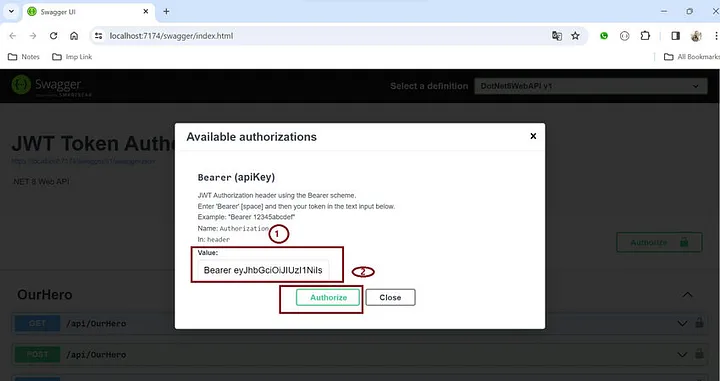
步骤 14. 调用"/api/OurHero" API
现在,如果您调用**"/api/OurHero"** API,它将起作用,但如果没有 JWT 令牌,它将抛出**401(未授权)**错误。
- 使用 JWT 令牌 --- 工作正常。
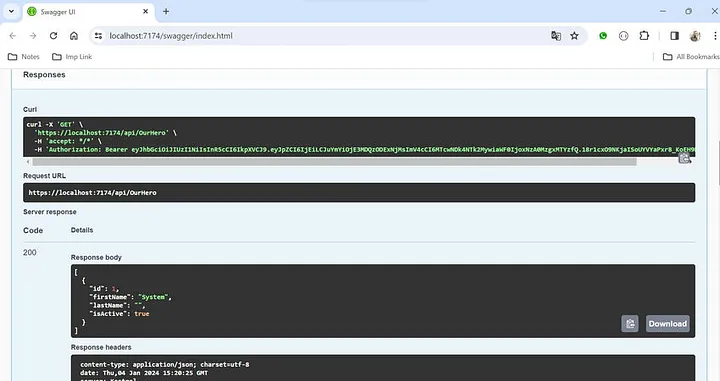
没有 JWT 令牌 --- 抛出401错误。
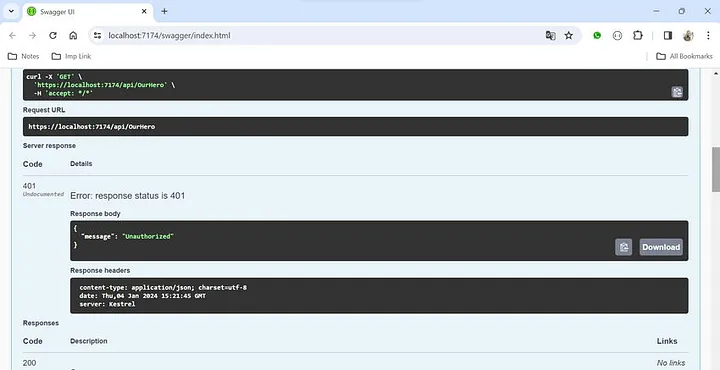
概括
就这样!您已经创建了一个完整的 .NET 8 Web API,用于使用内存数据库和 JWT 身份验证进行 CRUD 操作。您现在可以将此 API 集成到您的前端应用程序中。