课程链接:
课程笔记:参考一下笔记进行的内容补充.
https://files.cnblogs.com/files/henuliulei/Jenkins.zip?t=1696162767\&download=true
Jenkins
Jenkins,原名 Hudson,2011 年改为现在的名字。它是一个开源的实现持续集成的软件工具。
官方网站
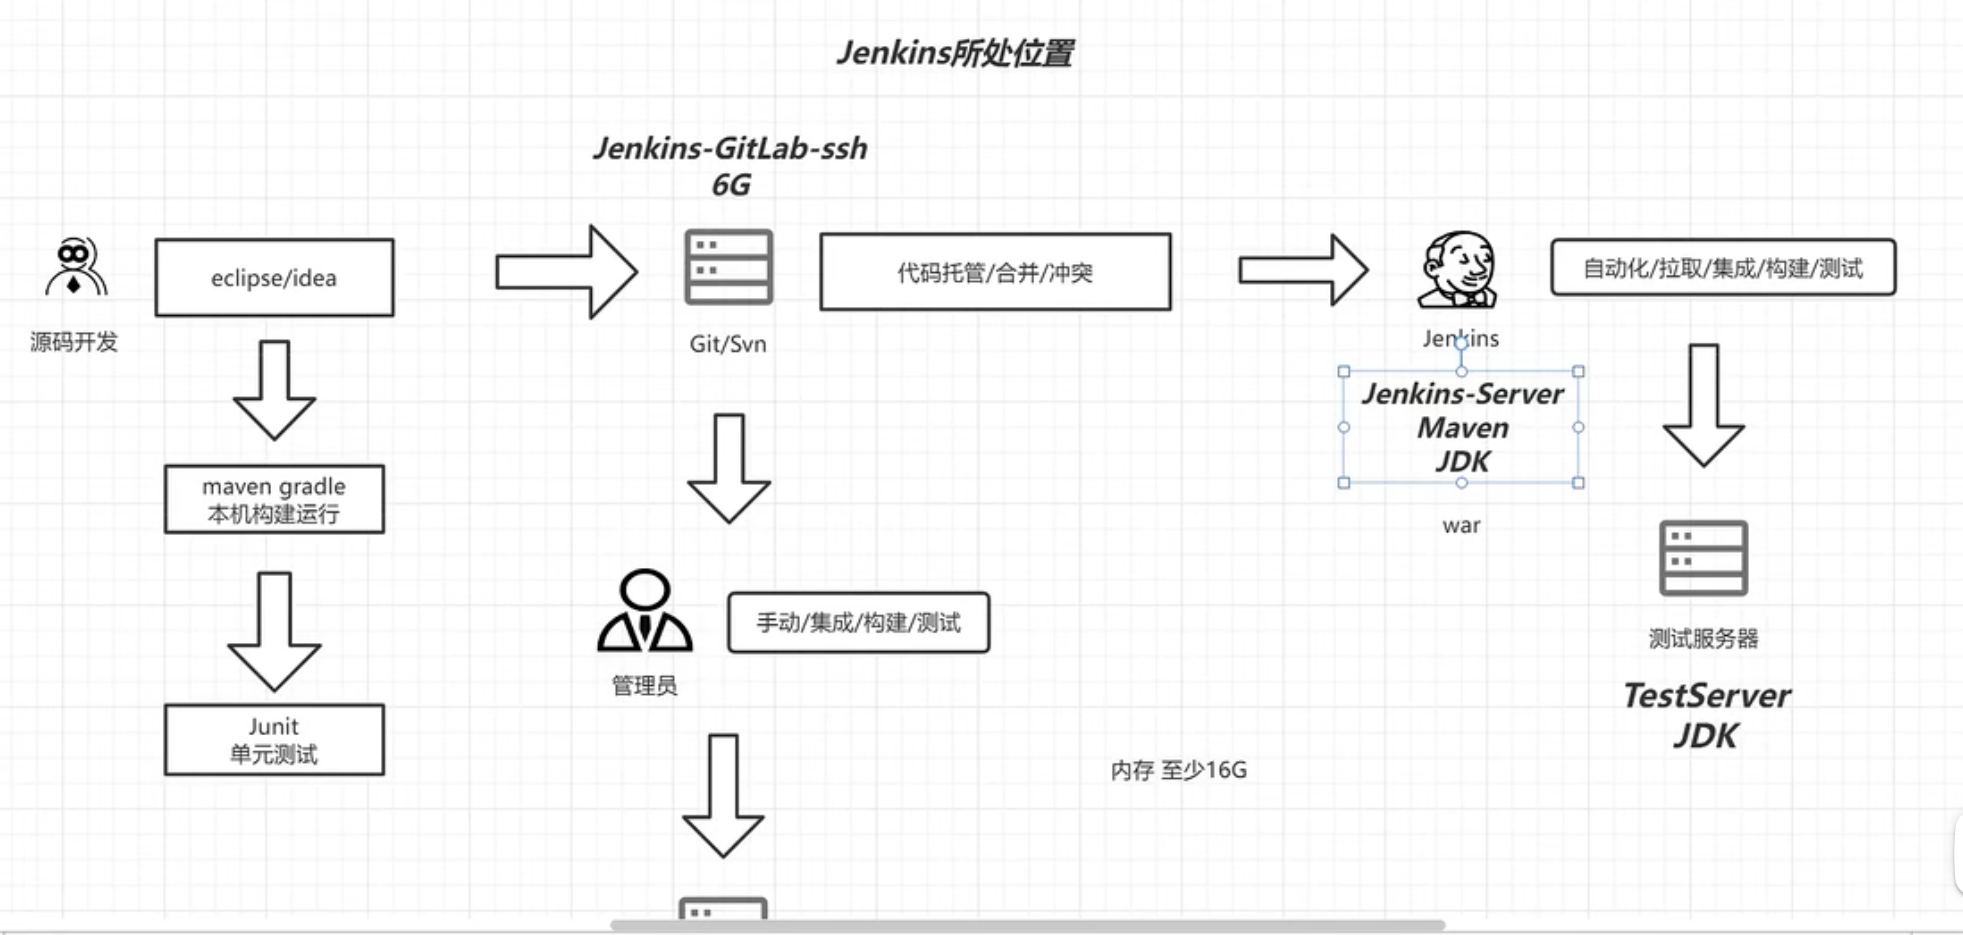
jenkins的作用如下图所示:自动去git上拉取代码,然后构建打包生成jar包,然后部署。实现持续集成CI,持续部署CD。
GitLab安装使用
官方网站:The most-comprehensive AI-powered DevSecOps platform | GitLab
安装所需最小配置
内存至少4G
在ssh下安装
官方安装文档:GitLab下载安装_GitLab安装和配置_GitLab最新中文官网免费版下载-极狐GitLab
1 安装依赖
Go
sudo yum install -y curl policycoreutils-python openssh-server perl
sudo systemctl enable sshd
sudo systemctl start sshd
2 配置镜像
Go
curl -fsSL https://packages.gitlab.cn/repository/raw/scripts/setup.sh | /bin/bash3 开始安装
Go
sudo EXTERNAL_URL="http://192.168.44.103" yum install -y gitlab-jh除非您在安装过程中指定了自定义密码,否则将随机生成一个密码并存储在 /etc/gitlab/initial_root_password 文件中(出于安全原因,24 小时后,此文件会被第一次 gitlab-ctl reconfigure 自动删除,因此若使用随机密码登录,建议安装成功初始登录成功之后,立即修改初始密码)。使用此密码和用户名 root 登录。
gitlab常用命令
Go
gitlab-ctl start                  # 启动所有 gitlab 组件;
gitlab-ctl stop                   # 停止所有 gitlab 组件;
gitlab-ctl restart                # 重启所有 gitlab 组件;
gitlab-ctl status                 # 查看服务状态;
gitlab-ctl reconfigure            # 启动服务;
vi /etc/gitlab/gitlab.rb         # 修改默认的配置文件;
gitlab-ctl tail # 查看日志;在docker下安装
安装所需最小配置
-
内存至少4G
-
系统内核至少在3.10以上
uname -r命令可查看系统内核版本
安装docker
- 更新yum源
yum update
- 安装依赖
Go
yum install -y yum-utils device-mapper-persistent-data lvm2- 添加镜像
Go
//国外镜像
yum-config-manager --add-repo https://download.docker.com/linux/centos/docker-ce.repo
//阿里镜像
https://mirrors.aliyun.com/docker-ce/linux/centos/gpg
yum-config-manager --add-repo http://mirrors.aliyun.com/docker-ce/linux/centos/docker-ce.repo- 查看源中可使用版本
Go
yum list docker-ce --showduplicates | sort -r- 安装指定版本
Go
yum install docker- 配置开机启动项
Go
systemctl start docker
systemctl enable docker
docker version
使用容器安装gitlab
1.添加容器
Go
docker run --detach \
  --hostname 192.168.44.103 \
  --publish 443:443 --publish 80:80 \
  --name gitlab \
  --restart always \
  --volume $GITLAB_HOME/config:/etc/gitlab:Z \
  --volume $GITLAB_HOME/logs:/var/log/gitlab:Z \
  --volume $GITLAB_HOME/data:/var/opt/gitlab:Z \
  --shm-size 256m \
  registry.gitlab.cn/omnibus/gitlab-jh:latest
2.启动容器
Go
docker start gitlab3.查看已存在的容器
Go
docker ps -a4.进入容器
Go
docker exec -it gitlab /bin/bash访问
当首次运行出现502错误的时候排查两个原因
-
虚拟机内存至少需要4g
-
稍微再等等刷新一下可能就好了
管理员账号登录
用户名:root
密码存在下面文件中,登录后需要改密码不然24小时之后会失效
Go
cat /etc/gitlab/initial_root_password
首次启动war包会在/root/.jenkins生成配置文件
待完全启动成功后 访问服务器8080端口完成配置
初始化后的密码:
Jenkins initial setup is required. An admin user has been created and a password generated.
Please use the following password to proceed to installation:
4e67bbe261da476abdc63c5b51311646
This may also be found at: /root/.jenkins/secrets/initialAdminPassword
密码文件使用后会自动删除Jenkins安装
官方文档介绍非常详细
安装需求
机器要求:
256 MB 内存,建议大于 512 MB
10 GB 的硬盘空间(用于 Jenkins 和 Docker 镜像)
需要安装以下软件:
Java 8 ( JRE 或者 JDK 都可以)
Docker (导航到网站顶部的Get Docker链接以访问适合您平台的Docker下载)
安装JDK
1 检索可用包
Go
yum search java|grep jdk2 安装
Go
yum install java-1.8.0-openjdkMaven安装
官网
Maven -- Welcome to Apache Maven
下载后复制到Jenkins所在服务器解压缩即可
Jenkins + Git + Maven 自动化部署配置
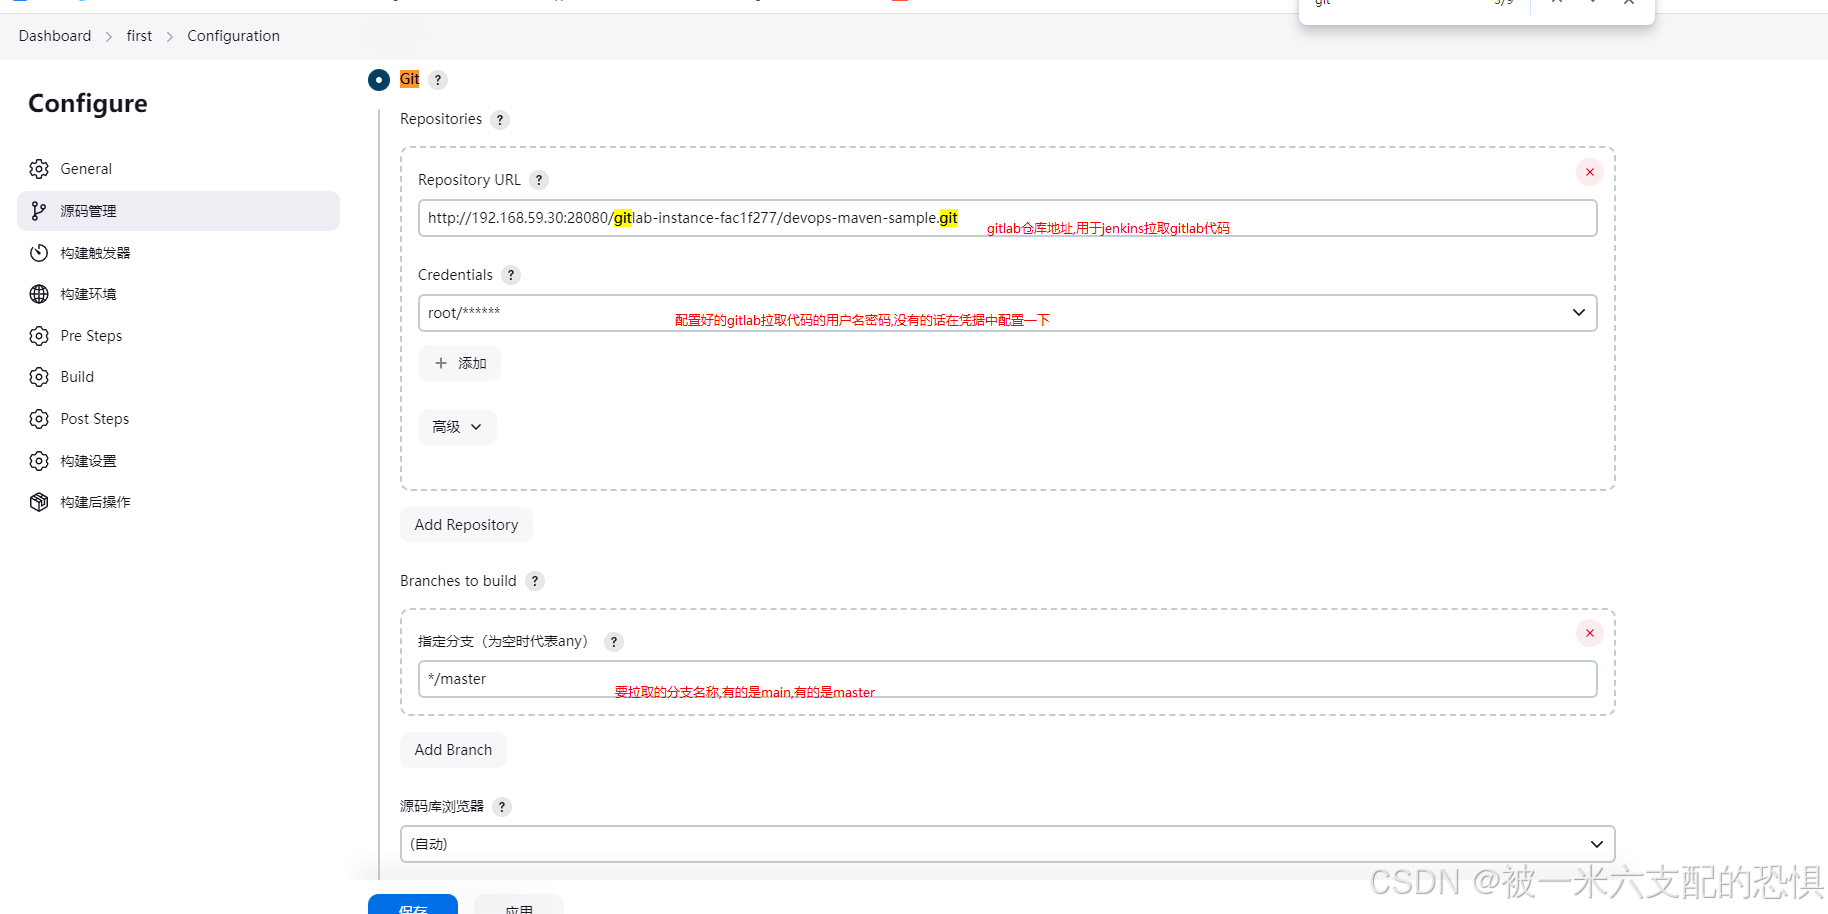
1 Git配置
2 Maven配置
jenkins安装maven
下载maven Maven -- Download Apache Maven 这里使用的是3.9.9
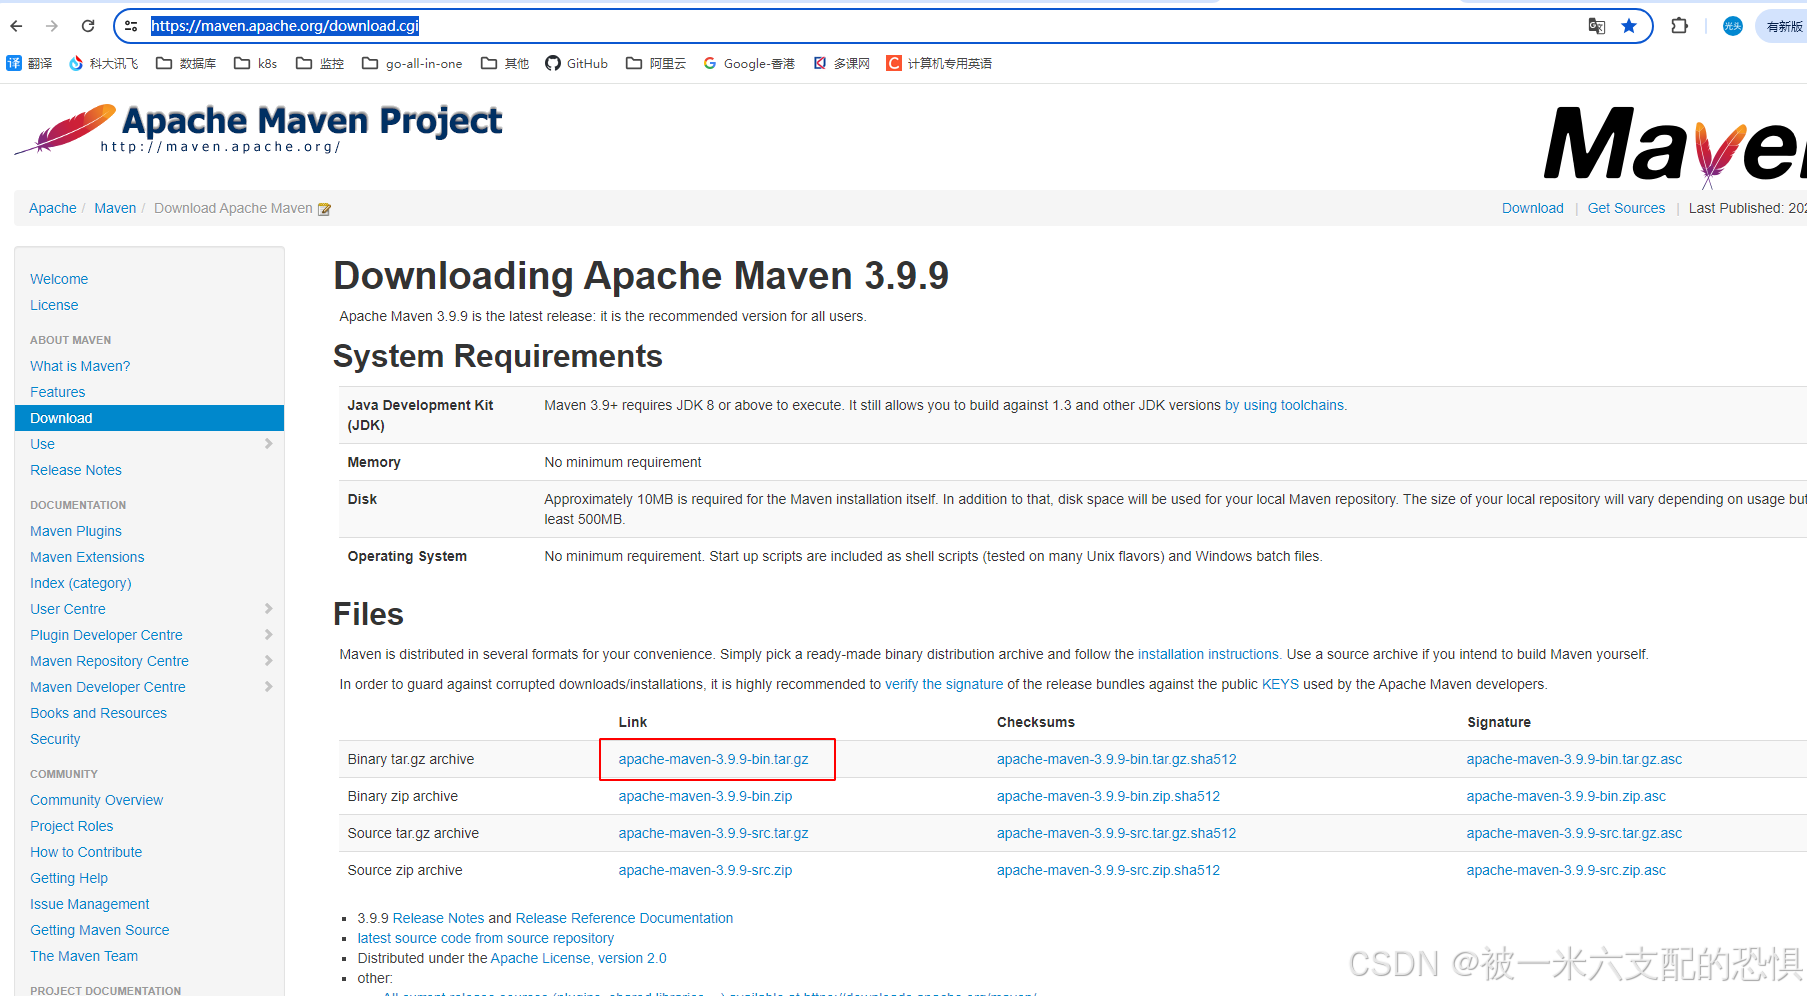
下载到本地,上传到jenkins服务器,
解压到 /usr/local/目录下
配置环境变量
Go
[root@jenkins /usr/local/maven-3.9.9]$vim /etc/profile

#文件最后追加maven家目录环境变量

export MAVEN_HOME=/usr/local/maven-3.9.9/
export PATH=${PATH}:${MAVEN_HOME}/bin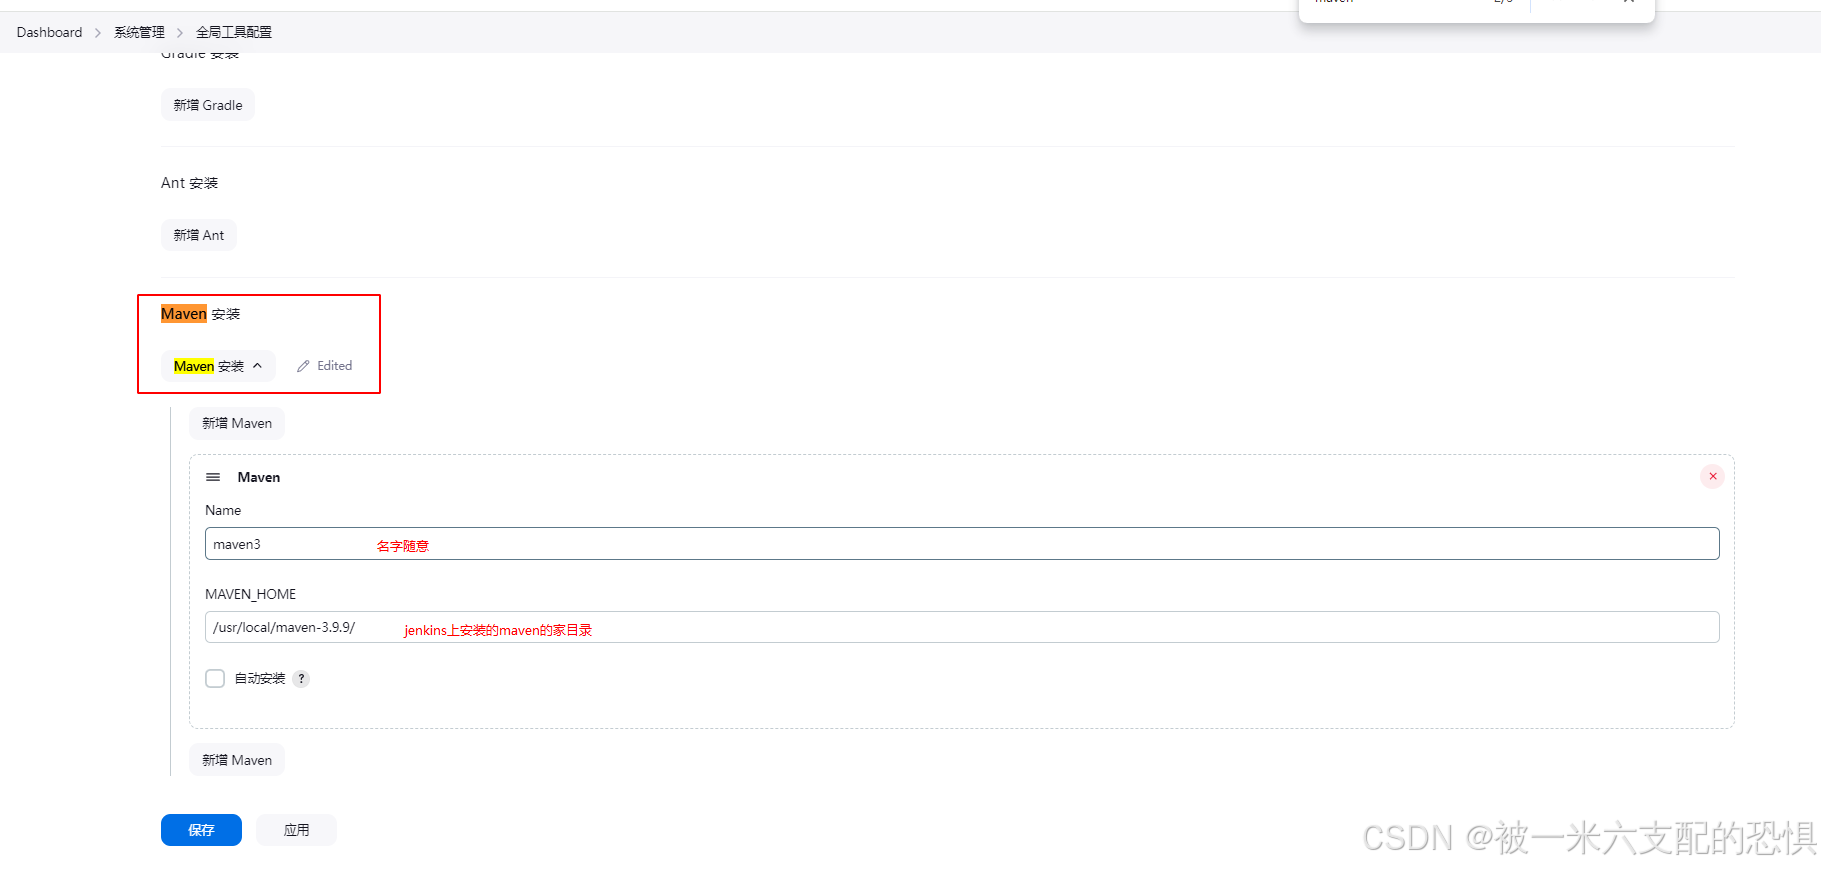
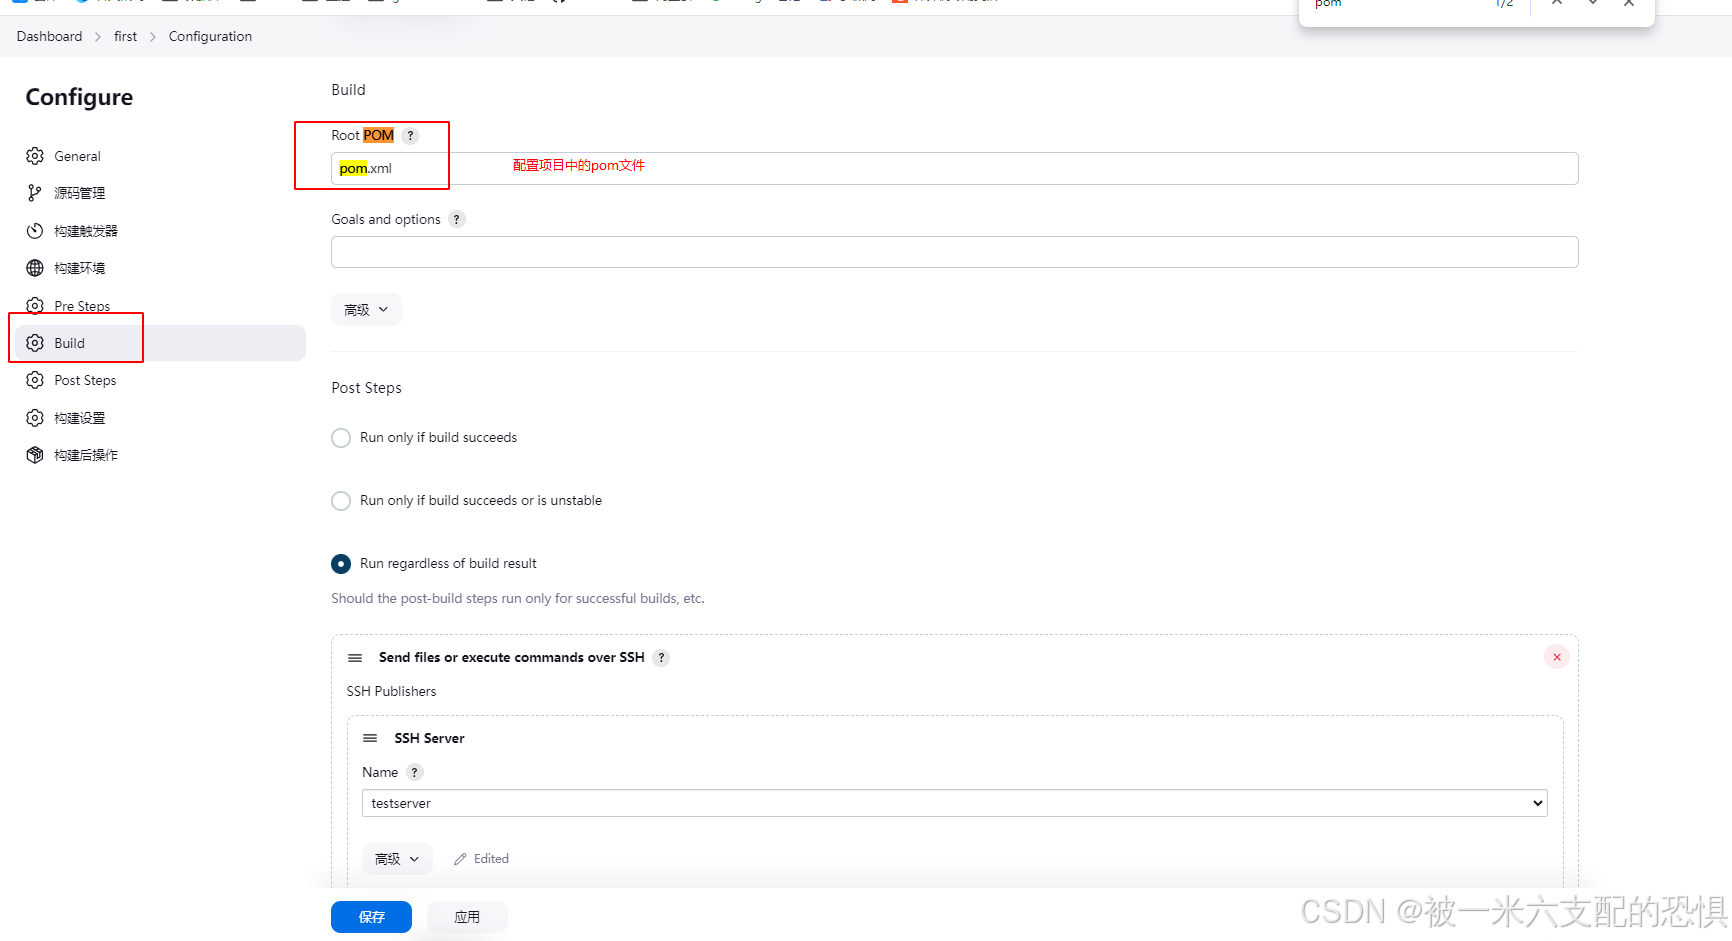
3 Pom.xml配置
git安装
jenkins服务器上安装git,用于拉取gitlab上的代码.
Go
yum install -y gitjavahome配置(可选)
安装java(可以使用rpm包直接安装)
rpm -ivh
通过readlink 命令找到java的家目录
Go
[root@jenkins /usr/lib/jvm/jdk-17.0.12-oracle-x64/bin]$readlink -f $(which java)
/usr/lib/jvm/jdk-17.0.12-oracle-x64/bin/java

这里的家目录是/usr/lib/jvm/jdk-17.0.12-oracle-x64安装java默认就包含所有的运行环境以及jvm,jdk,等.
如果是二进制解压安装,需要配置环境变量.这里不做解释.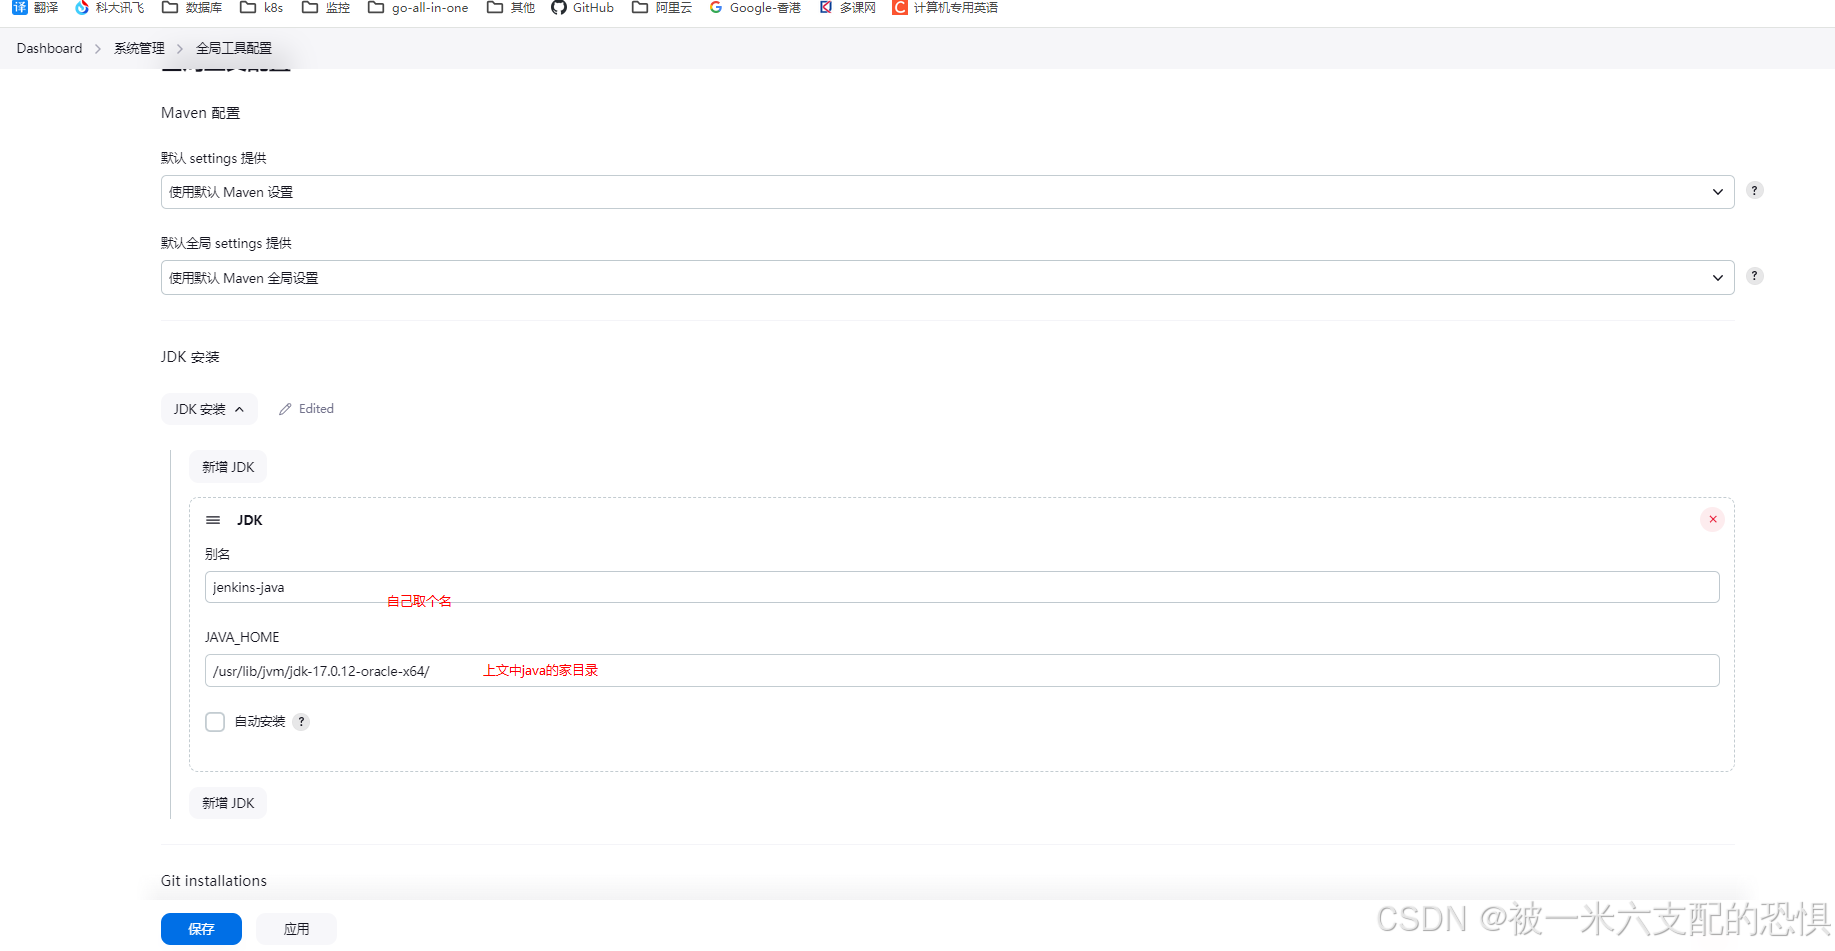
配置Maven阿里云镜像
XML
修改/usr/local/maven/conf/settings.xml
##这里找到maven配置文件,修改成国内源.

<?xml version="1.0" encoding="UTF-8"?>

<!--
Licensed to the Apache Software Foundation (ASF) under one
or more contributor license agreements.  See the NOTICE file
distributed with this work for additional information
regarding copyright ownership.  The ASF licenses this file
to you under the Apache License, Version 2.0 (the
"License"); you may not use this file except in compliance
with the License.  You may obtain a copy of the License at

    http://www.apache.org/licenses/LICENSE-2.0

Unless required by applicable law or agreed to in writing,
software distributed under the License is distributed on an
"AS IS" BASIS, WITHOUT WARRANTIES OR CONDITIONS OF ANY
KIND, either express or implied.  See the License for the
specific language governing permissions and limitations
under the License.
-->

<!--
 | This is the configuration file for Maven. It can be specified at two levels:
 |
 |  1. User Level. This settings.xml file provides configuration for a single user,
 |                 and is normally provided in ${user.home}/.m2/settings.xml.
 |
 |                 NOTE: This location can be overridden with the CLI option:
 |
 |                 -s /path/to/user/settings.xml
 |
 |  2. Global Level. This settings.xml file provides configuration for all Maven
 |                 users on a machine (assuming they're all using the same Maven
 |                 installation). It's normally provided in
 |                 ${maven.conf}/settings.xml.
 |
 |                 NOTE: This location can be overridden with the CLI option:
 |
 |                 -gs /path/to/global/settings.xml
 |
 | The sections in this sample file are intended to give you a running start at
 | getting the most out of your Maven installation. Where appropriate, the default
 | values (values used when the setting is not specified) are provided.
 |
 |-->
<settings xmlns="http://maven.apache.org/SETTINGS/1.0.0"
          xmlns:xsi="http://www.w3.org/2001/XMLSchema-instance"
          xsi:schemaLocation="http://maven.apache.org/SETTINGS/1.0.0 http://maven.apache.org/xsd/settings-1.0.0.xsd">
  <!-- localRepository
   | The path to the local repository maven will use to store artifacts.
   |
   | Default: ${user.home}/.m2/repository
  <localRepository>/path/to/local/repo</localRepository>
  -->
  <localRepository>${user.home}/.m2/repository</localRepository>
  <!-- interactiveMode
   | This will determine whether maven prompts you when it needs input. If set to false,
   | maven will use a sensible default value, perhaps based on some other setting, for
   | the parameter in question.
   |
   | Default: true
  <interactiveMode>true</interactiveMode>
  -->

  <!-- offline
   | Determines whether maven should attempt to connect to the network when executing a build.
   | This will have an effect on artifact downloads, artifact deployment, and others.
   |
   | Default: false
  <offline>false</offline>
  -->

  <!-- pluginGroups
   | This is a list of additional group identifiers that will be searched when resolving plugins by their prefix, i.e.
   | when invoking a command line like "mvn prefix:goal". Maven will automatically add the group identifiers
   | "org.apache.maven.plugins" and "org.codehaus.mojo" if these are not already contained in the list.
   |-->
  <pluginGroups>
    <!-- pluginGroup
     | Specifies a further group identifier to use for plugin lookup.
    <pluginGroup>com.your.plugins</pluginGroup>
    -->
    <pluginGroup>org.mortbay.jetty</pluginGroup>
  </pluginGroups>

  <!-- proxies
   | This is a list of proxies which can be used on this machine to connect to the network.
   | Unless otherwise specified (by system property or command-line switch), the first proxy
   | specification in this list marked as active will be used.
   |-->
  <proxies>
    <!-- proxy
     | Specification for one proxy, to be used in connecting to the network.
     |
    <proxy>
      <id>optional</id>
      <active>true</active>
      <protocol>http</protocol>
      <username>proxyuser</username>
      <password>proxypass</password>
      <host>proxy.host.net</host>
      <port>80</port>
      <nonProxyHosts>local.net|some.host.com</nonProxyHosts>
    </proxy>
    -->
  </proxies>

  <!-- servers
   | This is a list of authentication profiles, keyed by the server-id used within the system.
   | Authentication profiles can be used whenever maven must make a connection to a remote server.
   |-->
  <servers>
    <!-- server
     | Specifies the authentication information to use when connecting to a particular server, identified by
     | a unique name within the system (referred to by the 'id' attribute below).
     |
     | NOTE: You should either specify username/password OR privateKey/passphrase, since these pairings are
     |       used together.
     |
    <server>
      <id>deploymentRepo</id>
      <username>repouser</username>
      <password>repopwd</password>
    </server>
    -->

    <!-- Another sample, using keys to authenticate.
    <server>
      <id>siteServer</id>
      <privateKey>/path/to/private/key</privateKey>
      <passphrase>optional; leave empty if not used.</passphrase>
    </server>
    -->
    <server>
        <id>releases</id>
        <username>ali</username>
        <password>ali</password>
      </server>
      <server>
        <id>Snapshots</id>
        <username>ali</username>
        <password>ali</password>
      </server>
  </servers>

  <!-- mirrors
   | This is a list of mirrors to be used in downloading artifacts from remote repositories.
   |
   | It works like this: a POM may declare a repository to use in resolving certain artifacts.
   | However, this repository may have problems with heavy traffic at times, so people have mirrored
   | it to several places.
   |
   | That repository definition will have a unique id, so we can create a mirror reference for that
   | repository, to be used as an alternate download site. The mirror site will be the preferred
   | server for that repository.
   |-->
  <mirrors>
    <!-- mirror
     | Specifies a repository mirror site to use instead of a given repository. The repository that
     | this mirror serves has an ID that matches the mirrorOf element of this mirror. IDs are used
     | for inheritance and direct lookup purposes, and must be unique across the set of mirrors.
     |
    <mirror>
      <id>mirrorId</id>
      <mirrorOf>repositoryId</mirrorOf>
      <name>Human Readable Name for this Mirror.</name>
      <url>http://my.repository.com/repo/path</url>
    </mirror>
     -->
    <mirror>
      <!--This sends everything else to /public -->
      <id>nexus</id>
      <mirrorOf>*</mirrorOf>
      <url>http://maven.aliyun.com/nexus/content/groups/public/</url>
    </mirror>
    <mirror>
      <!--This is used to direct the public snapshots repo in the
          profile below over to a different nexus group -->
      <id>nexus-public-snapshots</id>
      <mirrorOf>public-snapshots</mirrorOf>
      <url>http://maven.aliyun.com/nexus/content/repositories/snapshots/</url>
    </mirror>
    <mirror>
      <!--This is used to direct the public snapshots repo in the
          profile below over to a different nexus group -->
      <id>nexus-public-snapshots1</id>
      <mirrorOf>public-snapshots1</mirrorOf>
      <url>https://artifacts.alfresco.com/nexus/content/repositories/public/</url>
    </mirror>
  </mirrors>

  <!-- profiles
   | This is a list of profiles which can be activated in a variety of ways, and which can modify
   | the build process. Profiles provided in the settings.xml are intended to provide local machine-
   | specific paths and repository locations which allow the build to work in the local environment.
   |
   | For example, if you have an integration testing plugin - like cactus - that needs to know where
   | your Tomcat instance is installed, you can provide a variable here such that the variable is
   | dereferenced during the build process to configure the cactus plugin.
   |
   | As noted above, profiles can be activated in a variety of ways. One way - the activeProfiles
   | section of this document (settings.xml) - will be discussed later. Another way essentially
   | relies on the detection of a system property, either matching a particular value for the property,
   | or merely testing its existence. Profiles can also be activated by JDK version prefix, where a
   | value of '1.4' might activate a profile when the build is executed on a JDK version of '1.4.2_07'.
   | Finally, the list of active profiles can be specified directly from the command line.
   |
   | NOTE: For profiles defined in the settings.xml, you are restricted to specifying only artifact
   |       repositories, plugin repositories, and free-form properties to be used as configuration
   |       variables for plugins in the POM.
   |
   |-->
   <profiles>
    <profile>
      <id>development</id>
      <repositories>
        <repository>
          <id>central</id>
          <url>http://central</url>
          <releases><enabled>true</enabled><updatePolicy>always</updatePolicy></releases>
          <snapshots><enabled>true</enabled><updatePolicy>always</updatePolicy></snapshots>
        </repository>
      </repositories>
     <pluginRepositories>
        <pluginRepository>
          <id>central</id>
          <url>http://central</url>
          <releases><enabled>true</enabled><updatePolicy>always</updatePolicy></releases>
          <snapshots><enabled>true</enabled><updatePolicy>always</updatePolicy></snapshots>
        </pluginRepository>
      </pluginRepositories>
    </profile>
    <profile>
      <!--this profile will allow snapshots to be searched when activated-->
      <id>public-snapshots</id>
      <repositories>
        <repository>
          <id>public-snapshots</id>
          <url>http://public-snapshots</url>
          <releases><enabled>false</enabled></releases>
          <snapshots><enabled>true</enabled><updatePolicy>always</updatePolicy></snapshots>
        </repository>
      </repositories>
     <pluginRepositories>
        <pluginRepository>
          <id>public-snapshots</id>
          <url>http://public-snapshots</url>
          <releases><enabled>false</enabled></releases>
          <snapshots><enabled>true</enabled><updatePolicy>always</updatePolicy></snapshots>
        </pluginRepository>
      </pluginRepositories>
    </profile>
  </profiles>

   <activeProfiles>
    <activeProfile>development</activeProfile>
    <activeProfile>public-snapshots</activeProfile>
   </activeProfiles>

  <!-- activeProfiles
   | List of profiles that are active for all builds.
   |
  <activeProfiles>
    <activeProfile>alwaysActiveProfile</activeProfile>
    <activeProfile>anotherAlwaysActiveProfile</activeProfile>
  </activeProfiles>
  -->
</settings>
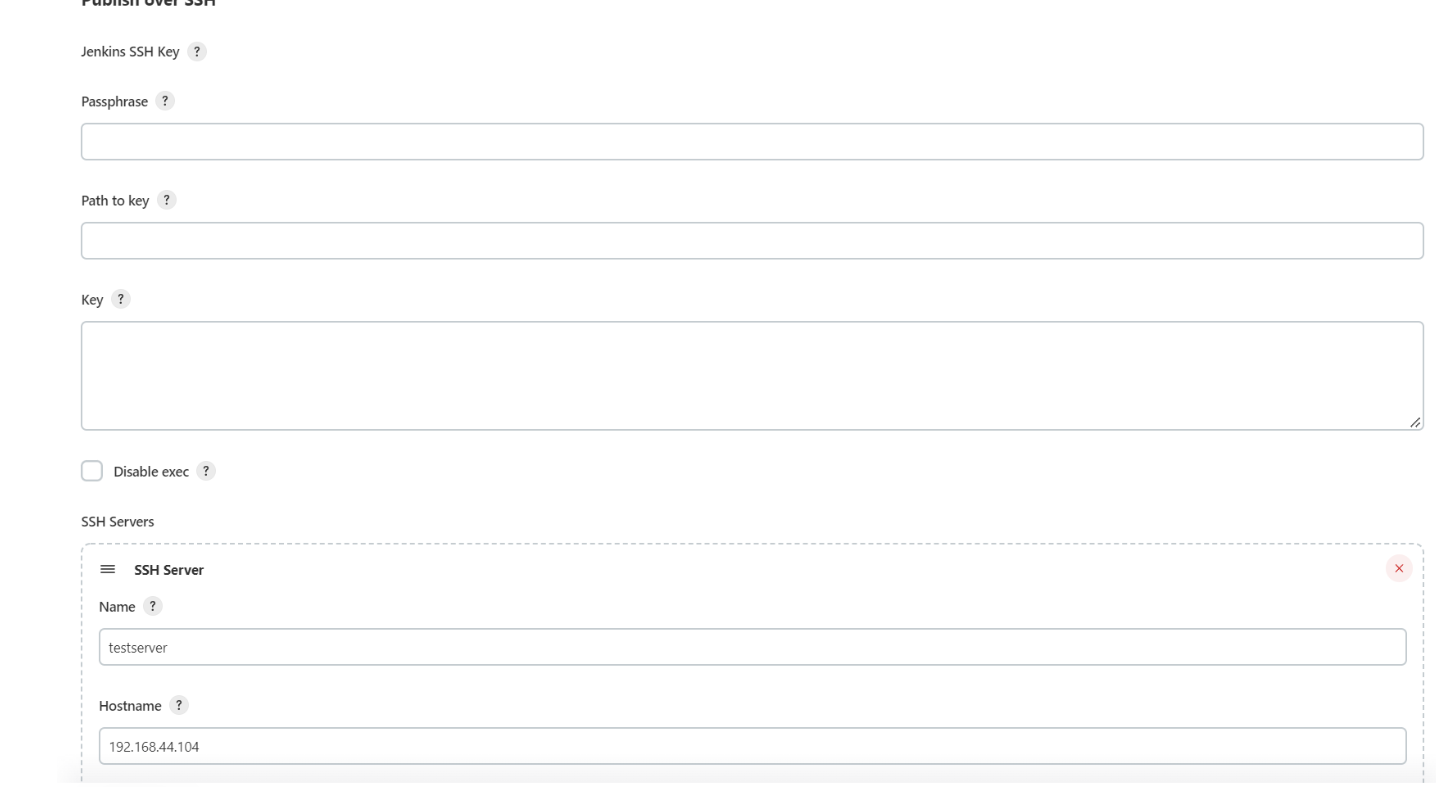
Jenkins会把拉取构建的jar包发送到指定的服务器上,此时需要指定要发送的服务器的位置,需要进行publish over ssh配置
1 安装插件
安装publish over ssh插件.
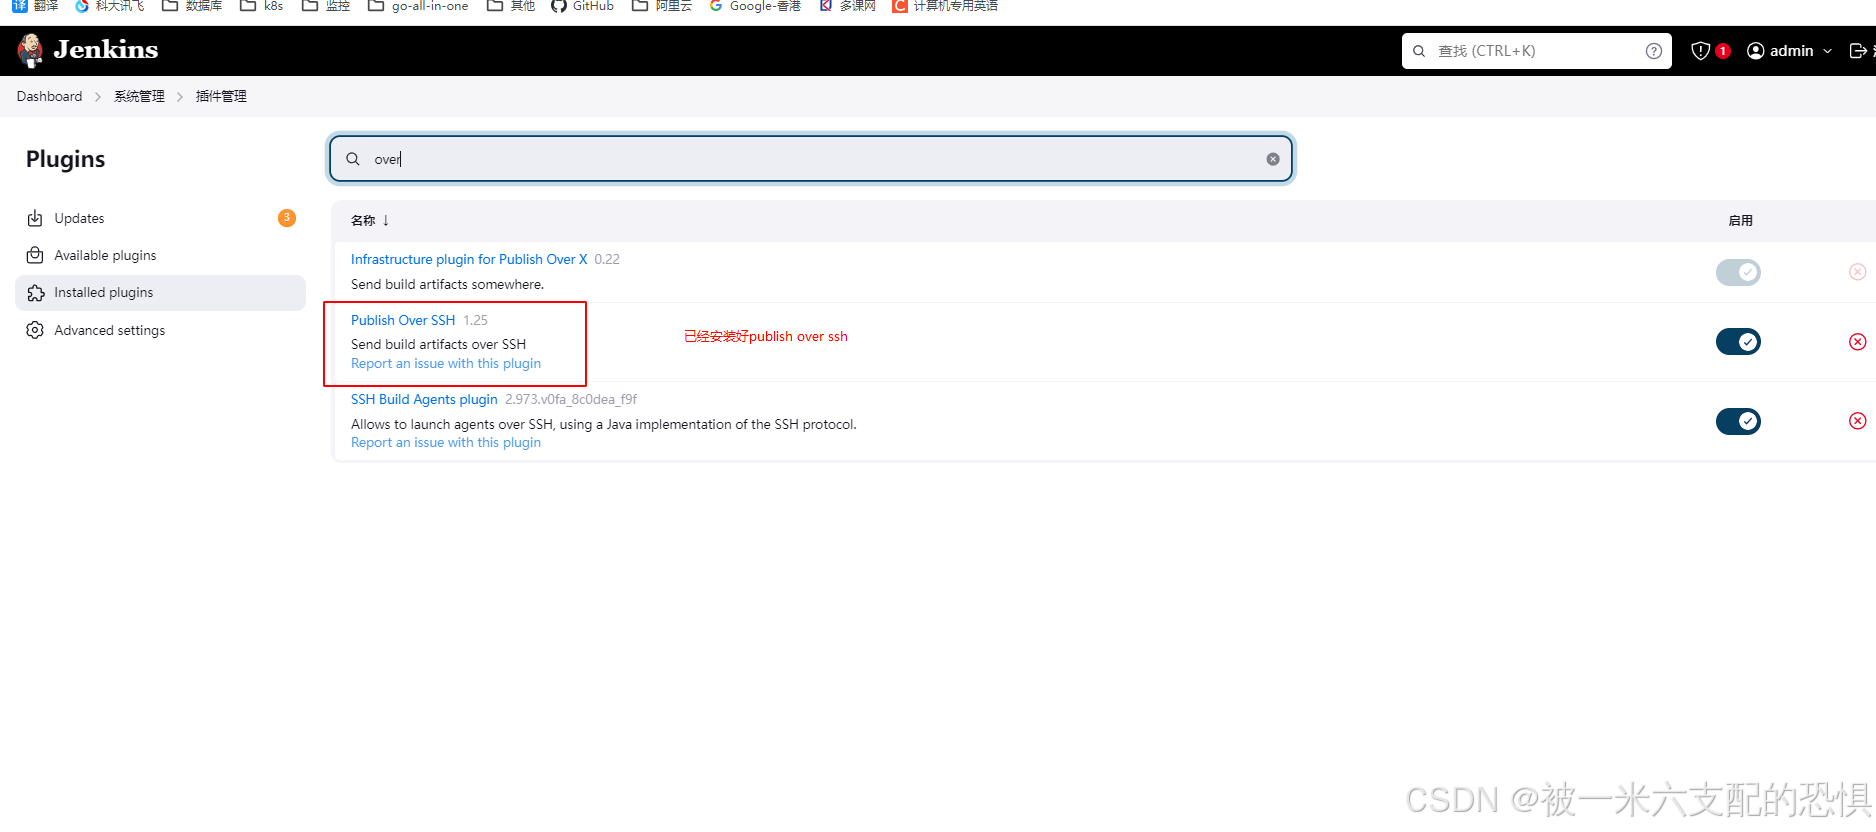
在Configure System菜单里 往下来
2 添加一台目标服务器
远程服务器配置
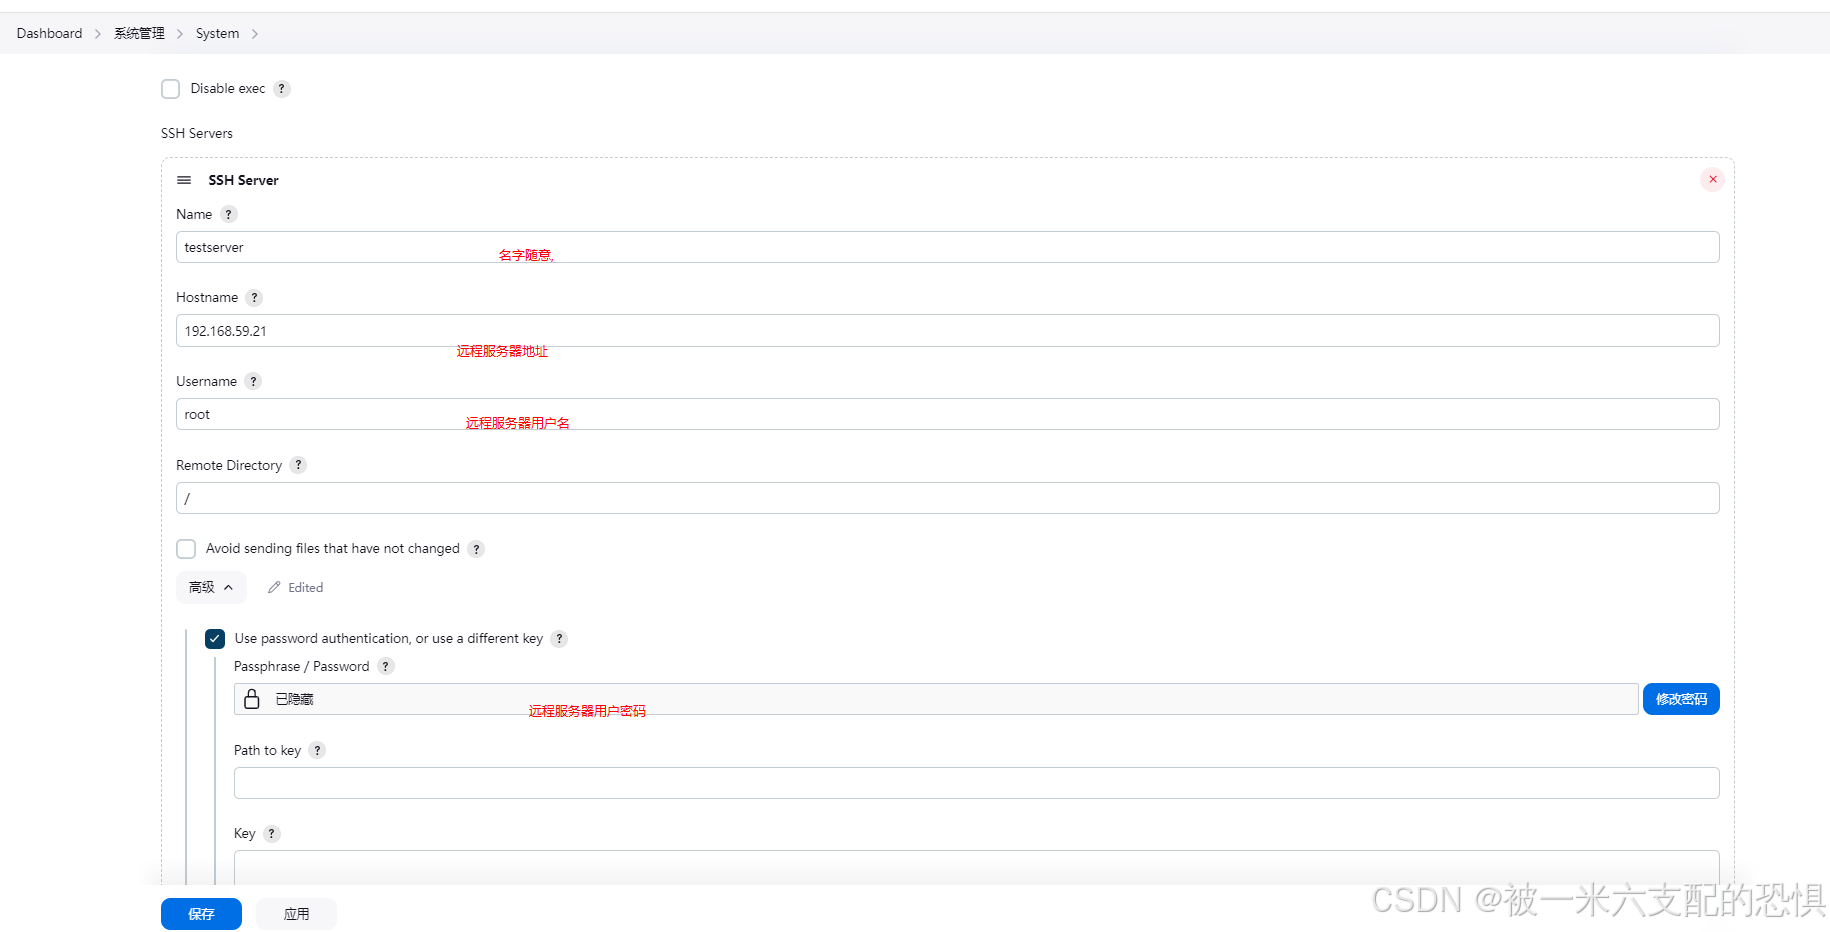
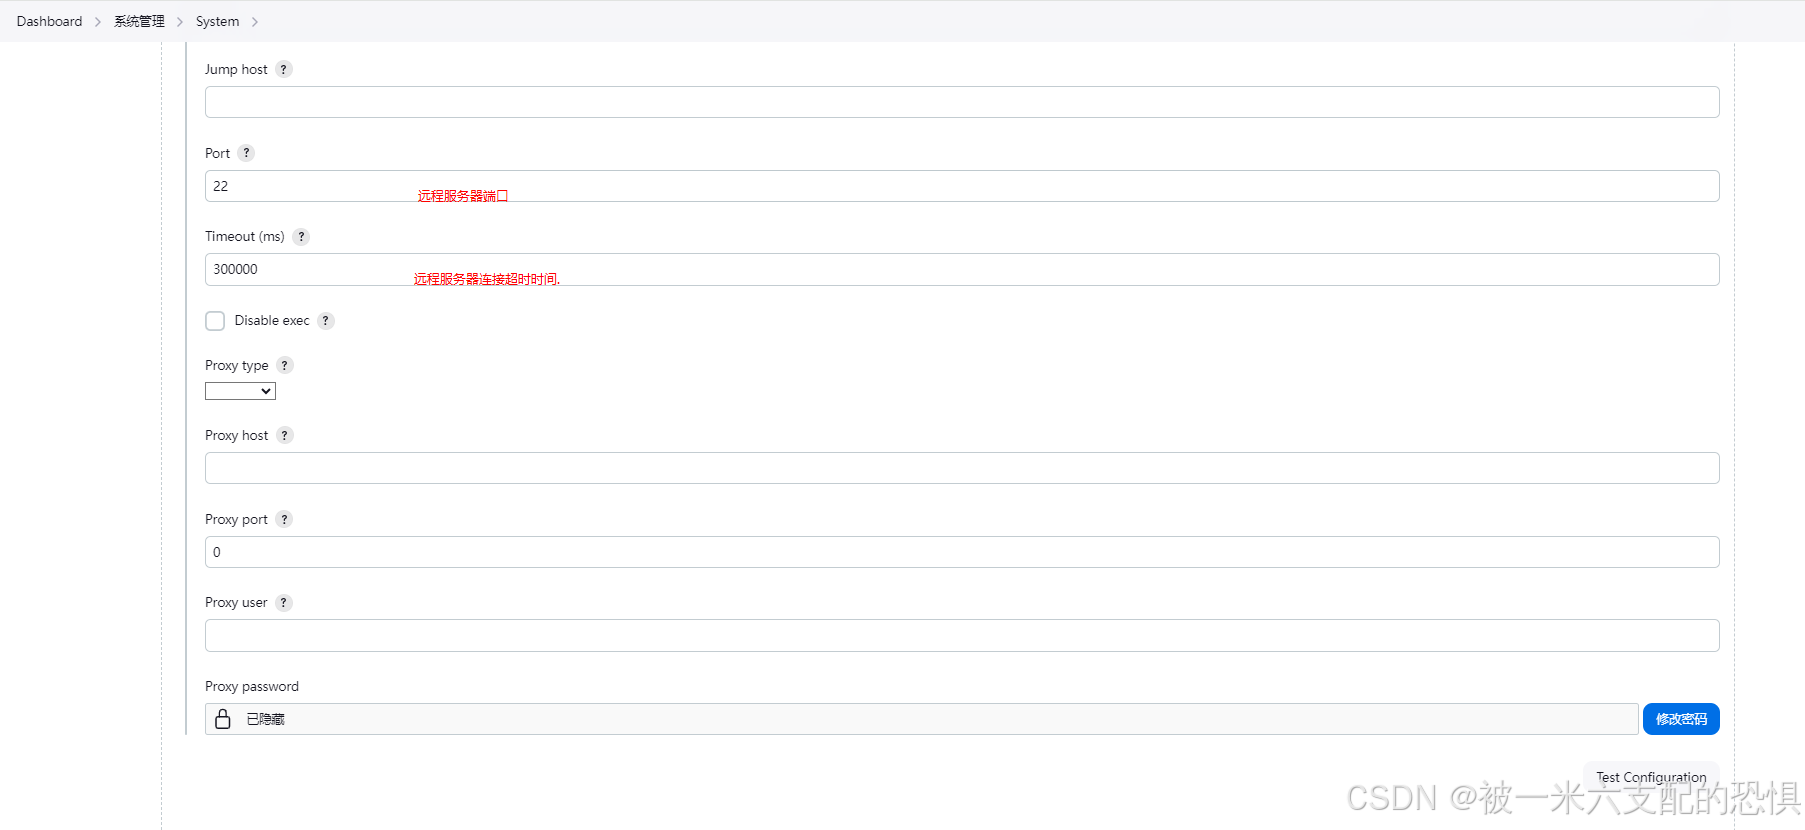
构建项目
下载maven插件

创建项目
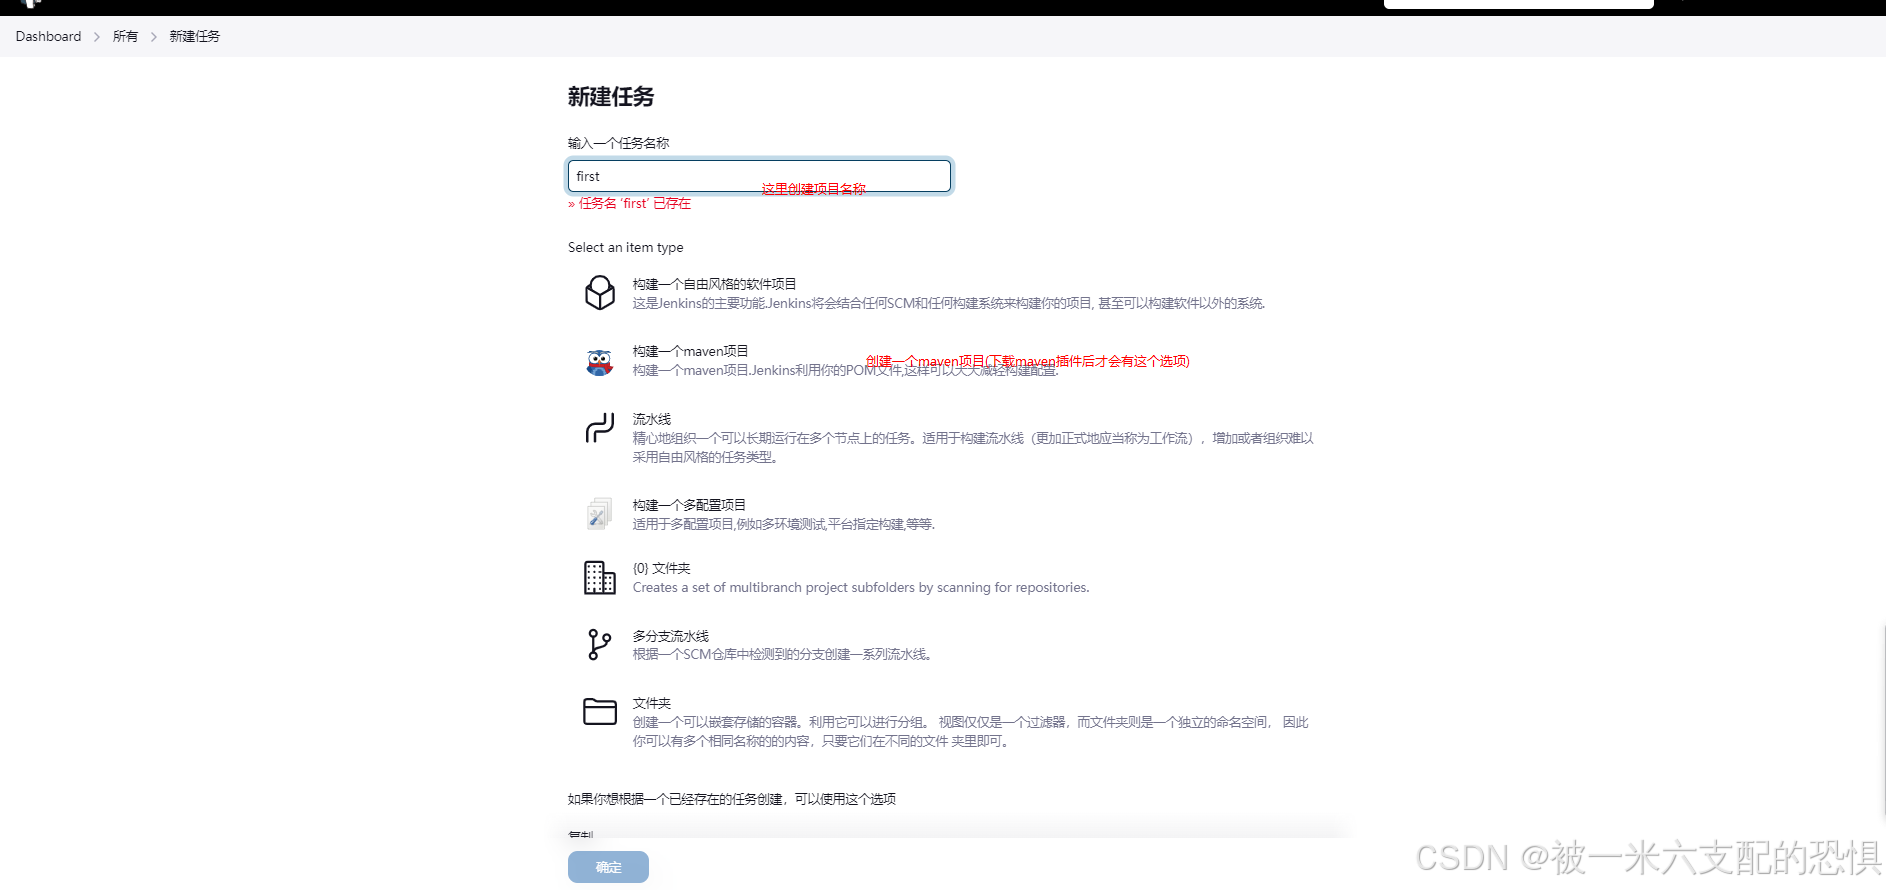
添加源码管理相关内容.
触构建触发器以及构建环境
运行前清理pre steps
构建项目前置操作.
配置杀死之前运行的进程(之前运行的服务,因为再次运行这个服务,端口会冲突,而且服务版本比较久,所以运行新的服务之前要杀死旧的进程和删除老文件)
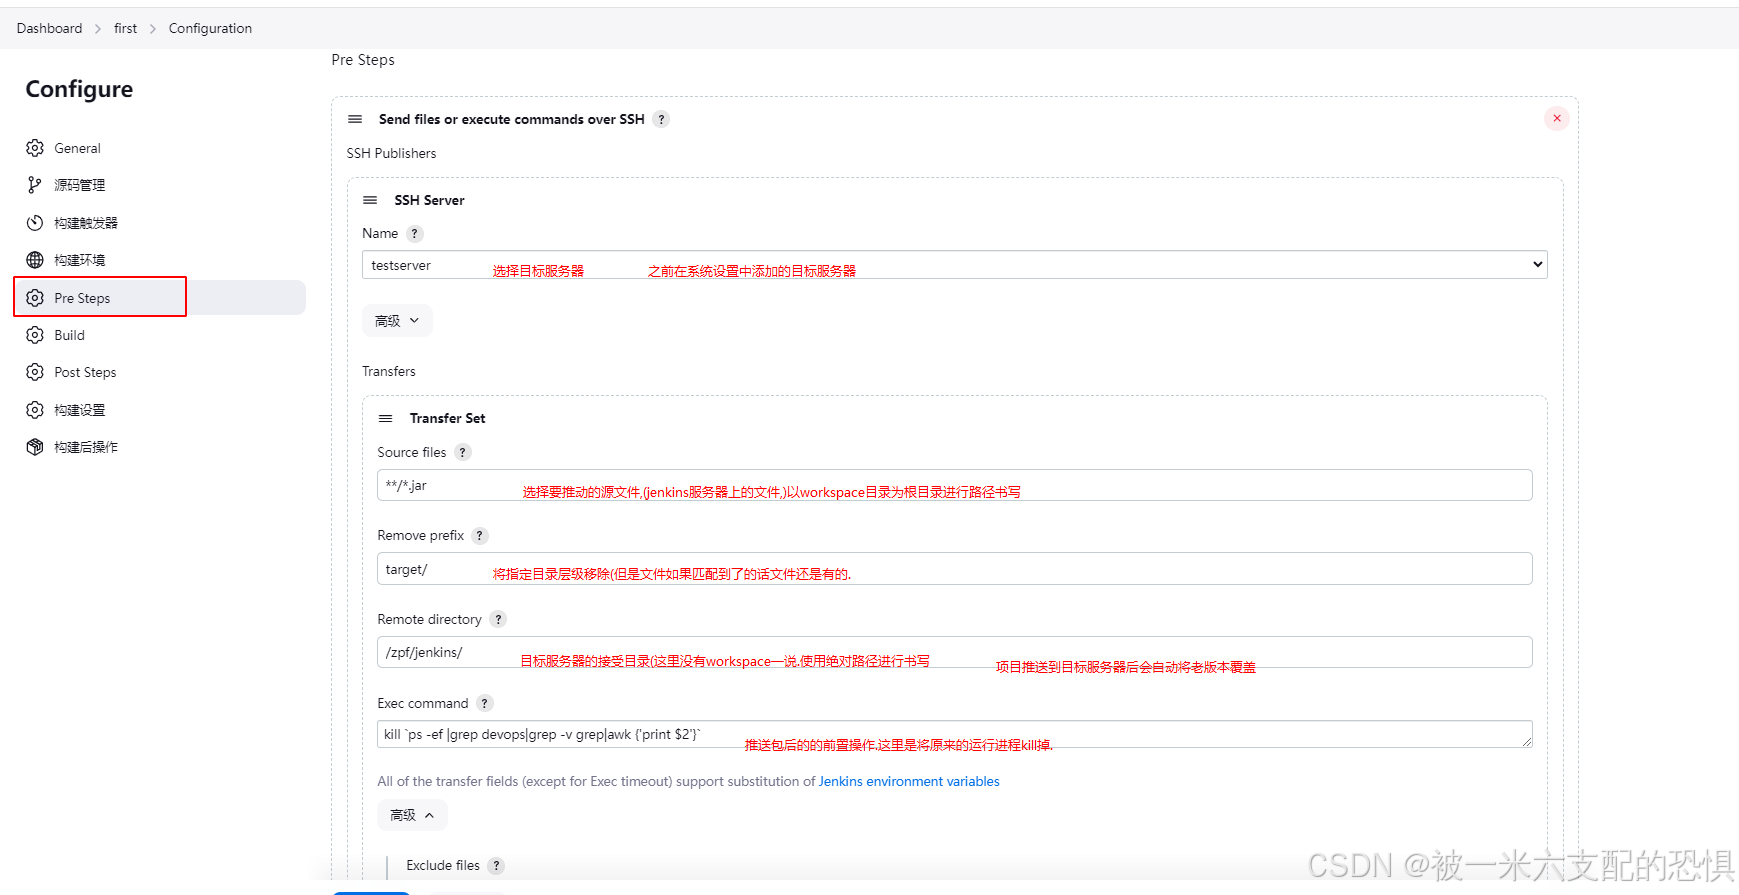
Build设置

后续构建post steps
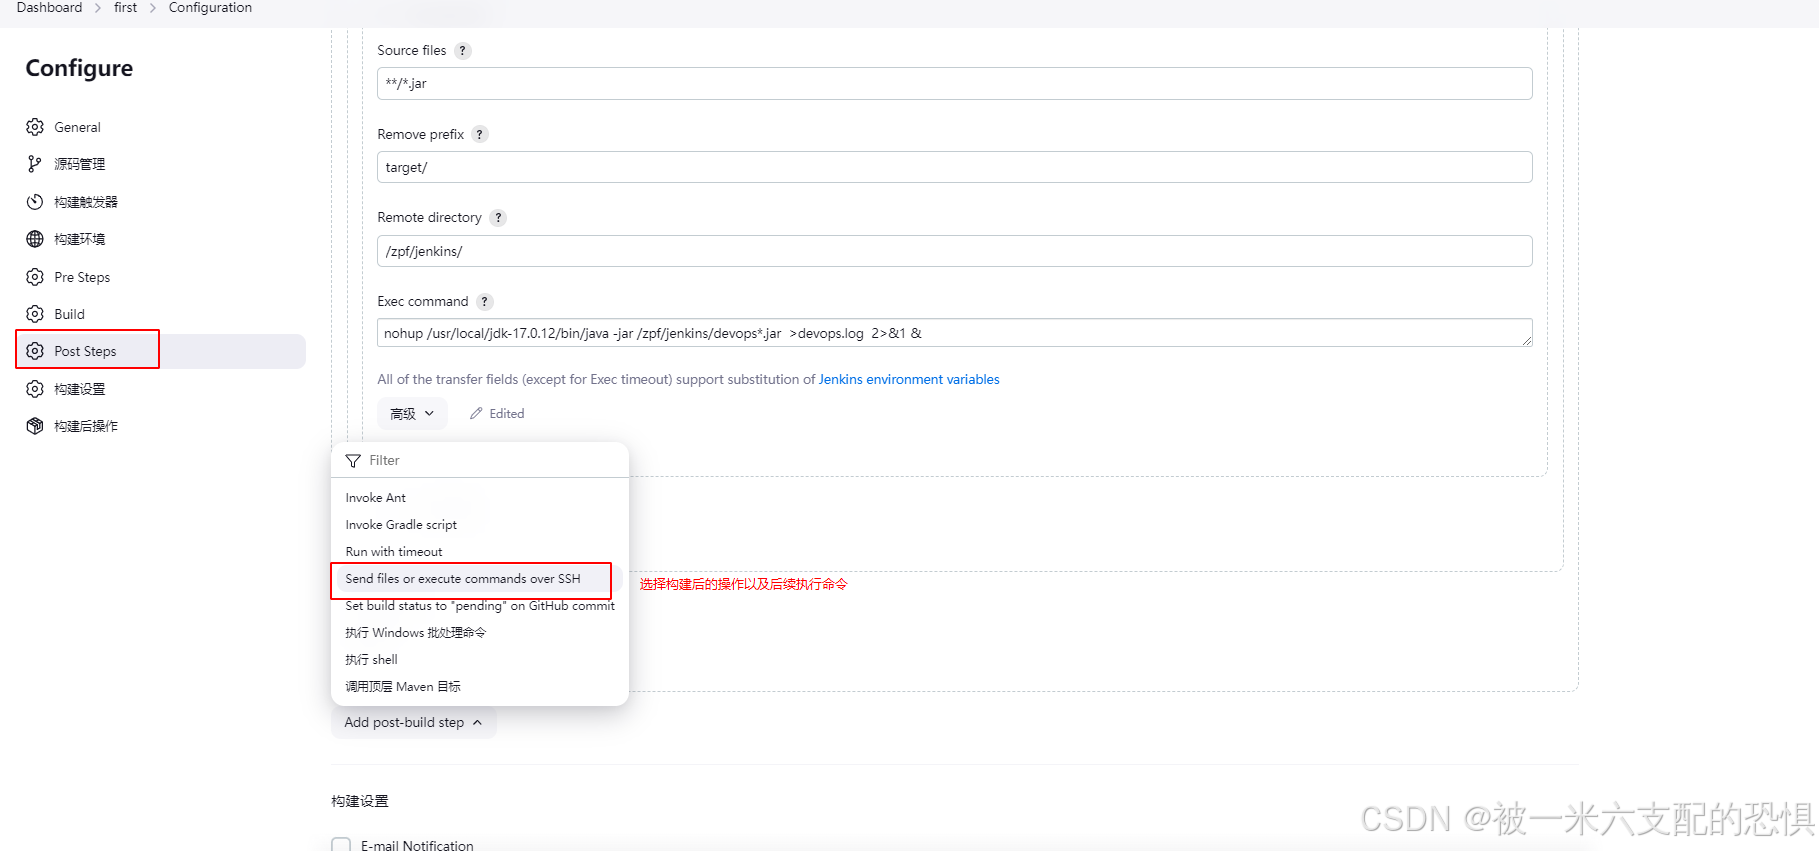
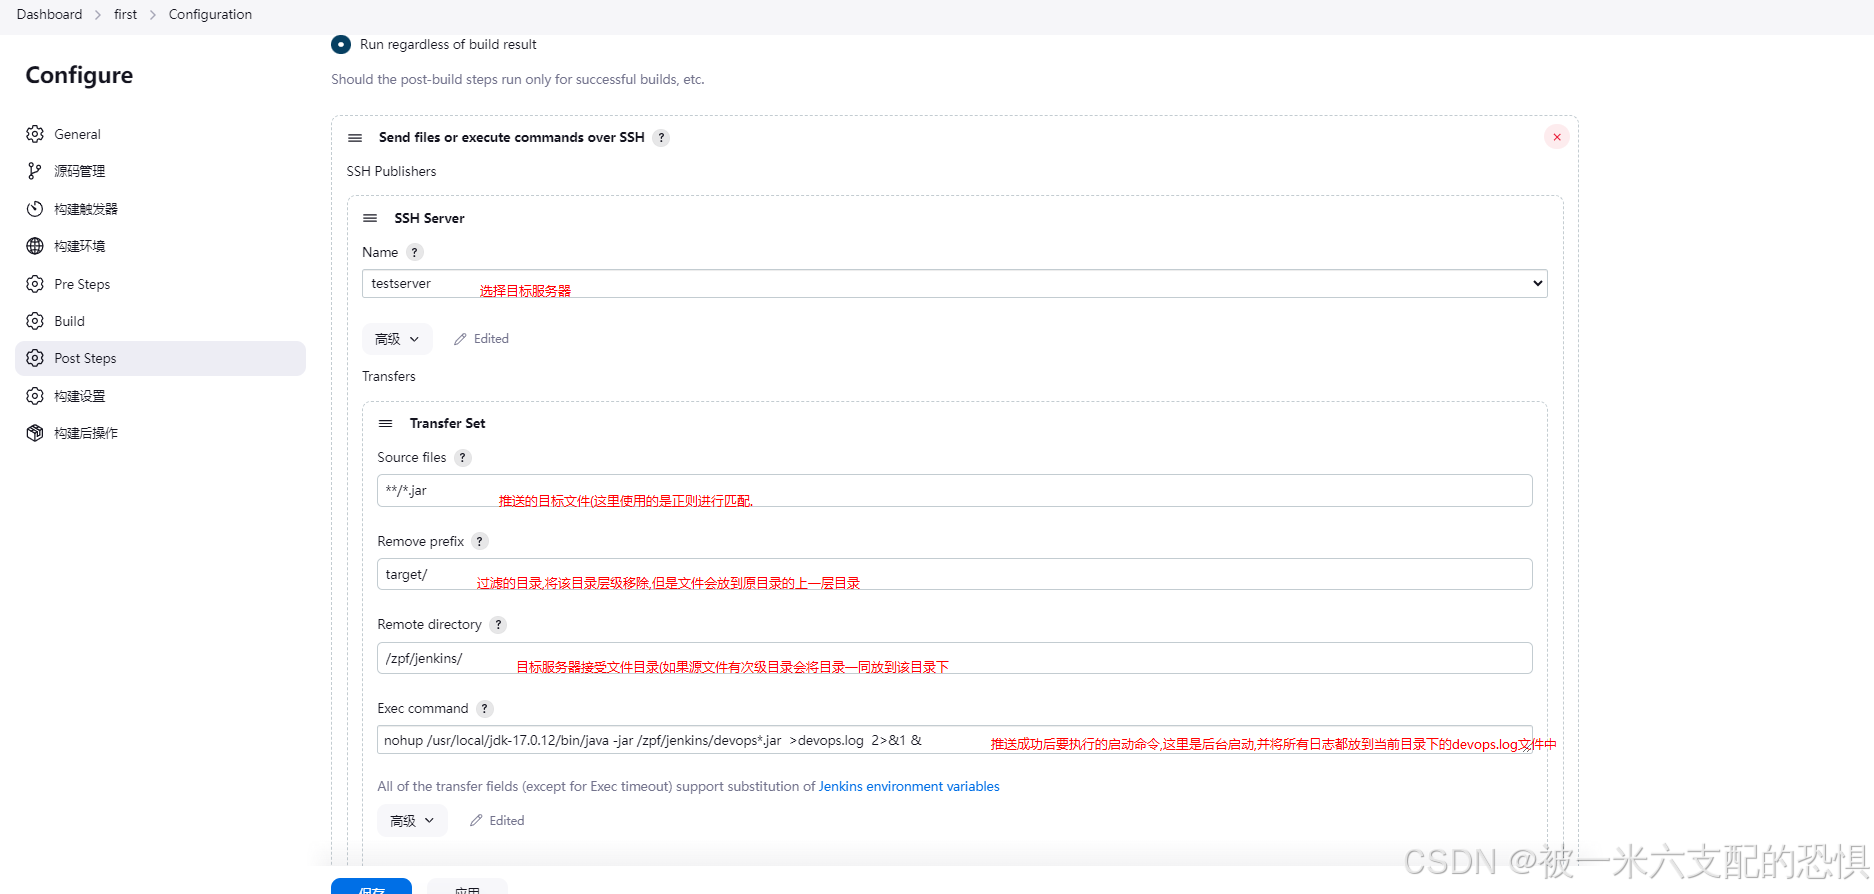
shell的日志输出 (上面已经说过了)
Go
nohup /usr/local/jdk-17.0.12/bin/java -jar /zpf/jenkins/devops*.jar >devops.log 2>&1 &这里说明一下.不知道是我环境变量配置有问题还是啥,没法直接使用jenkins调用远端java命令,所以我这里使用的是绝对路径.
超时机制
输出命令时一定要注意不要让窗口卡主,不然Jenkins会认为认为一直没完成\
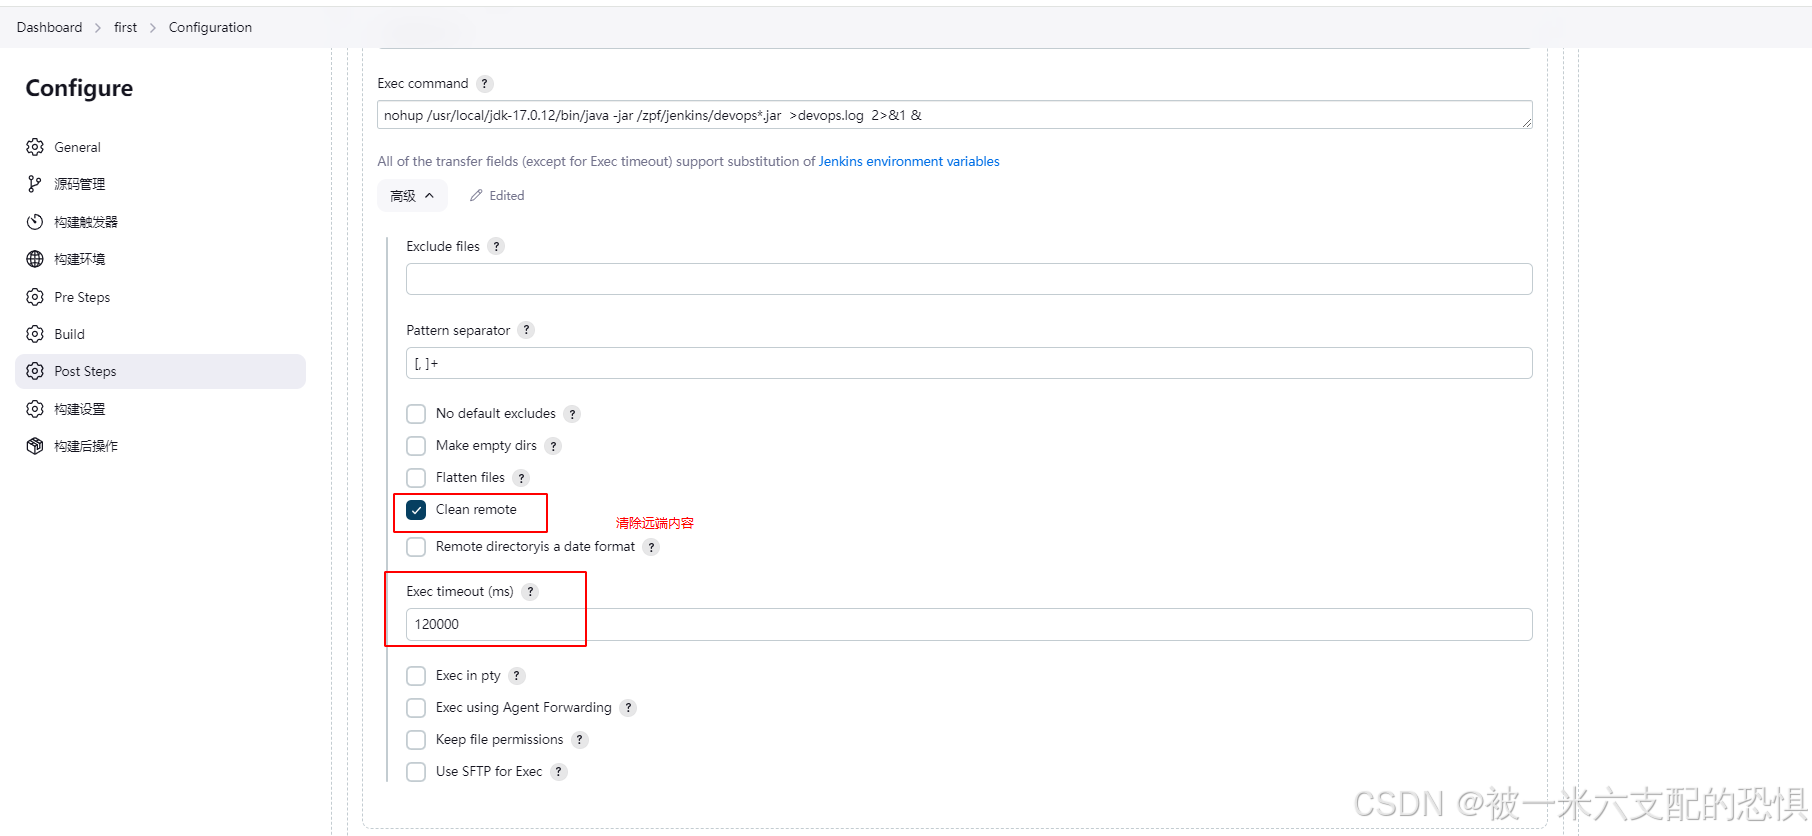
这里的exec timeout (ms) 是jenkins检测远端命令执行结果,
如果远端出现命令行未退出的情况会导致这个数值超时,
所以在设置启动命令的时候,以及项目较大的时候这个时间要注意设置为合理的值.
自动化构建(使用gitlab钩子)教程
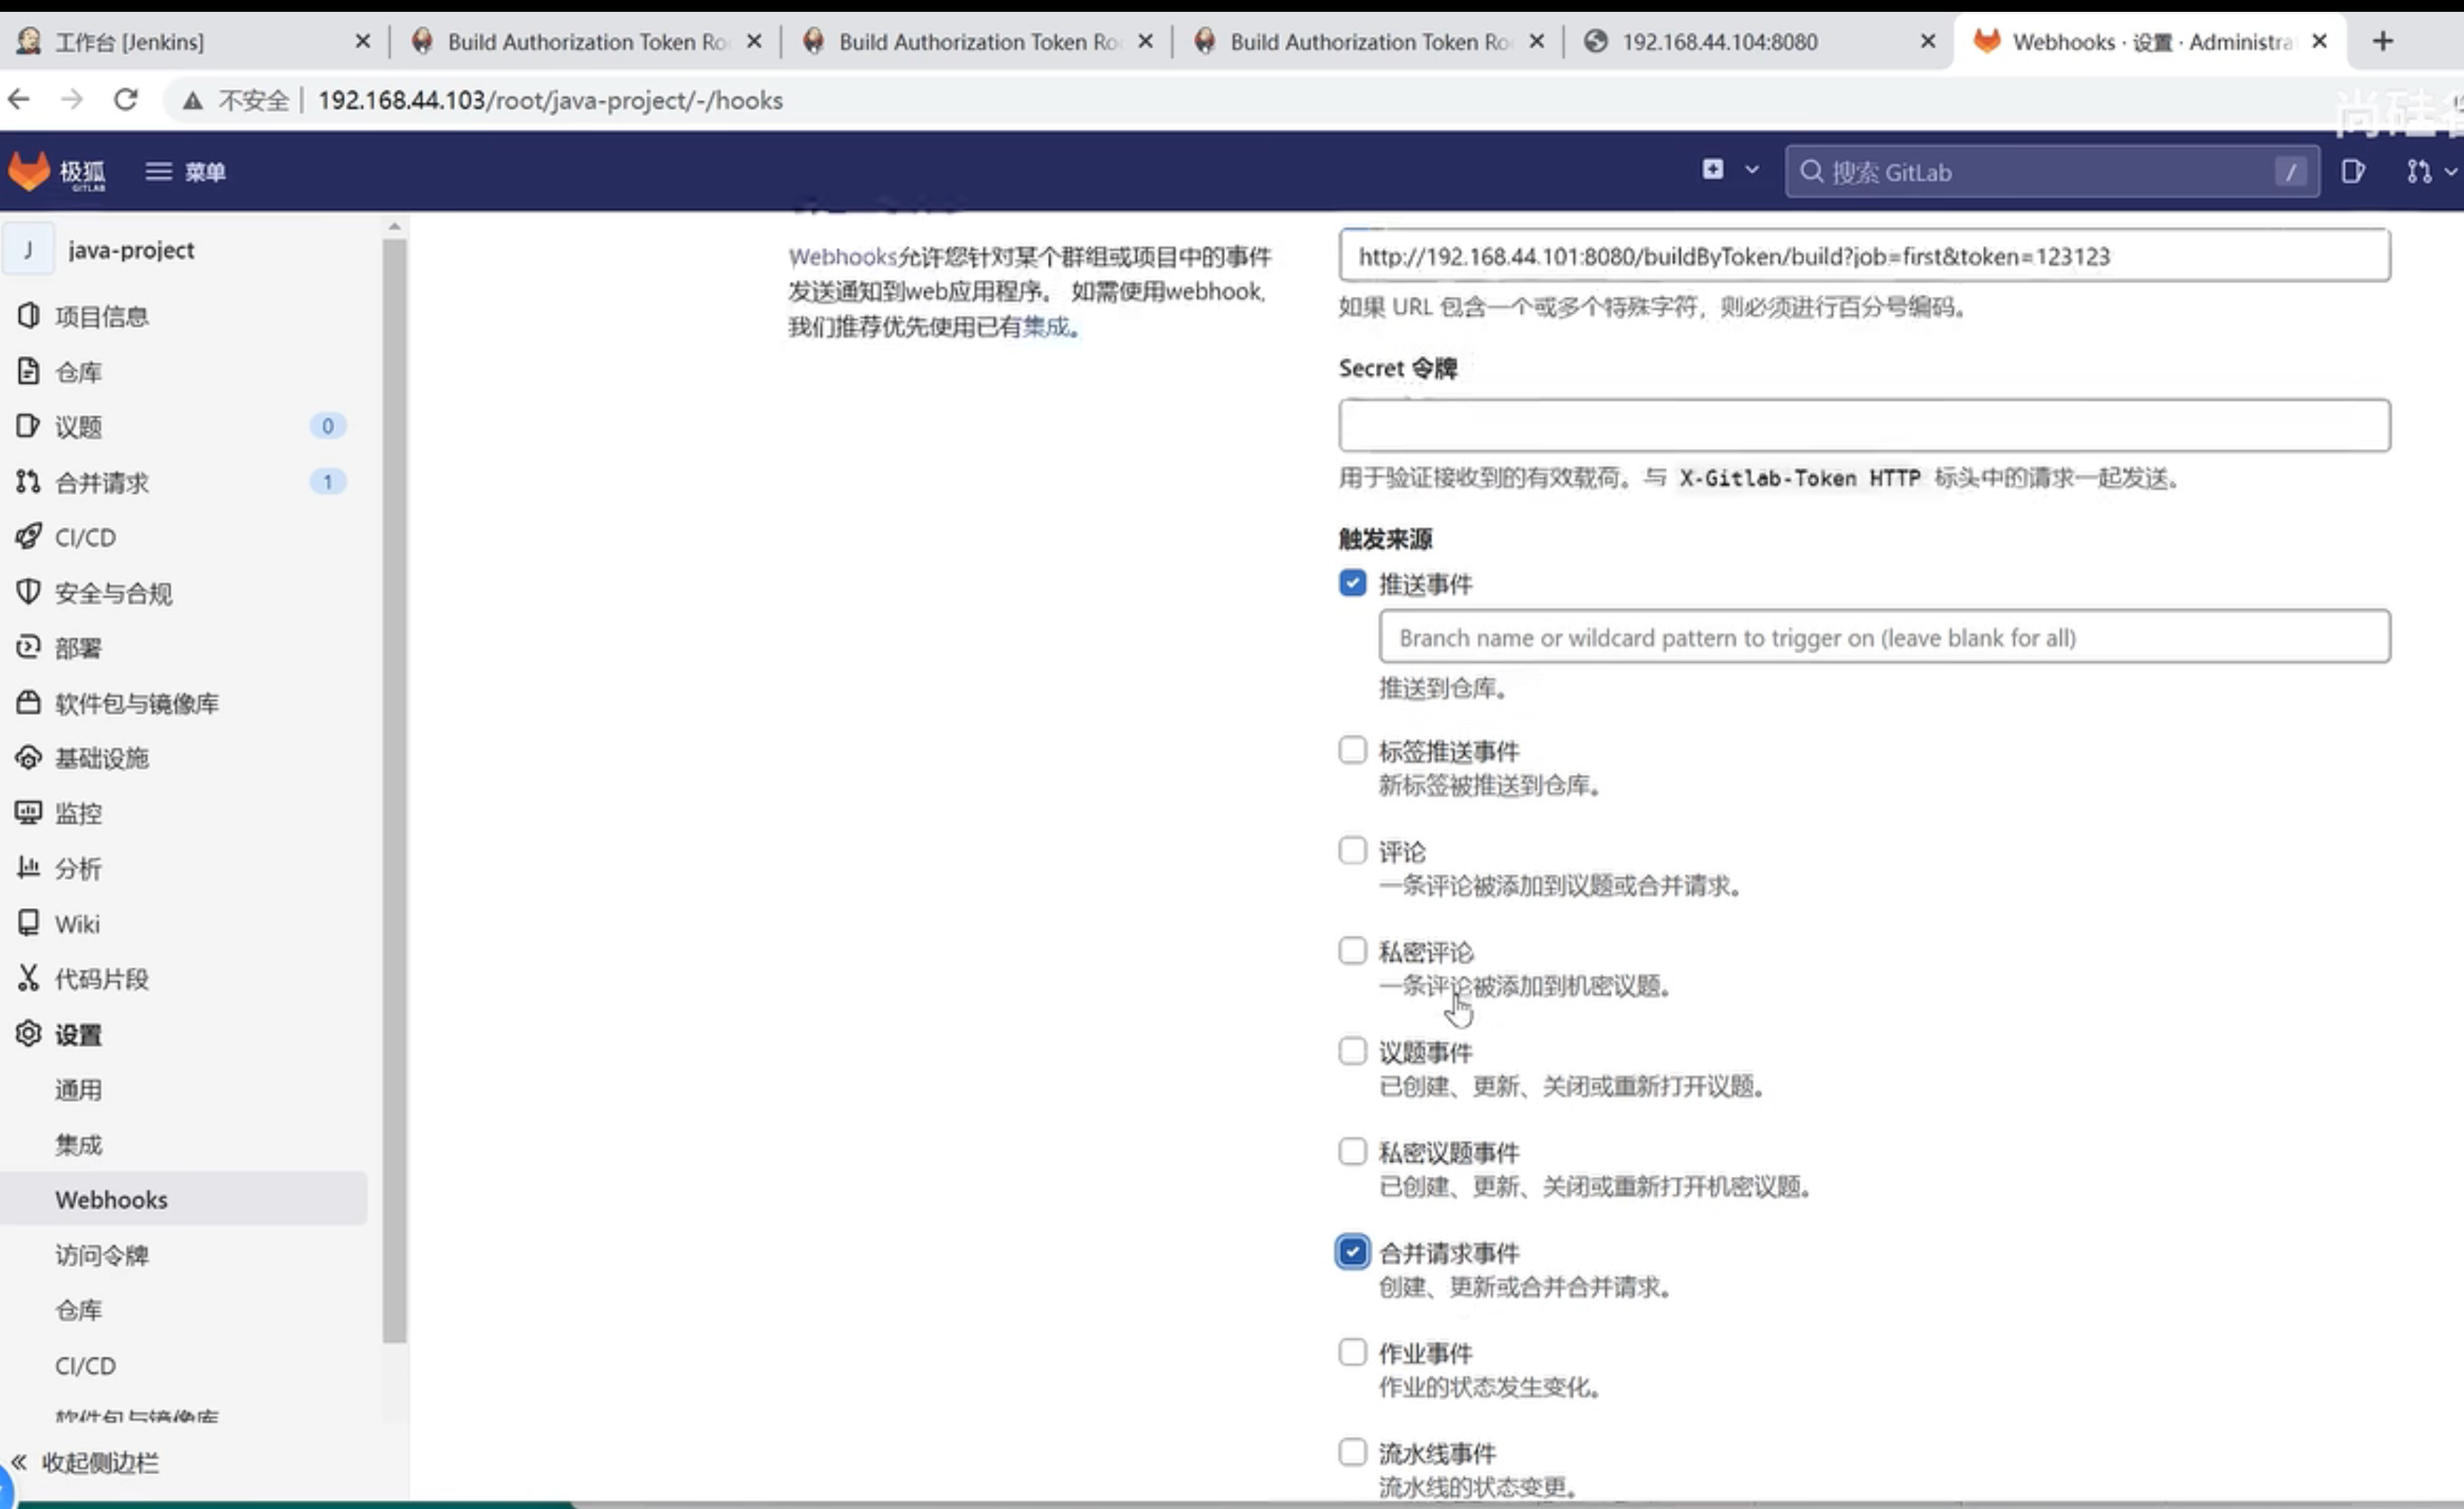
首先下载插件 Build Authorization Token Root 用于免认证token请求使用.

其次在触发构建的时候添加token操作(这个token自己指定,总长度不超过256都是可以.)

第三方构建时候将原本的url进行替换,根据实际情况进行替换即可.
Go
ENKINS_URL/job/first/build?token=TOKEN_NAME

连接内容替换成

buildByToken/build?job=NAME&token=SECRET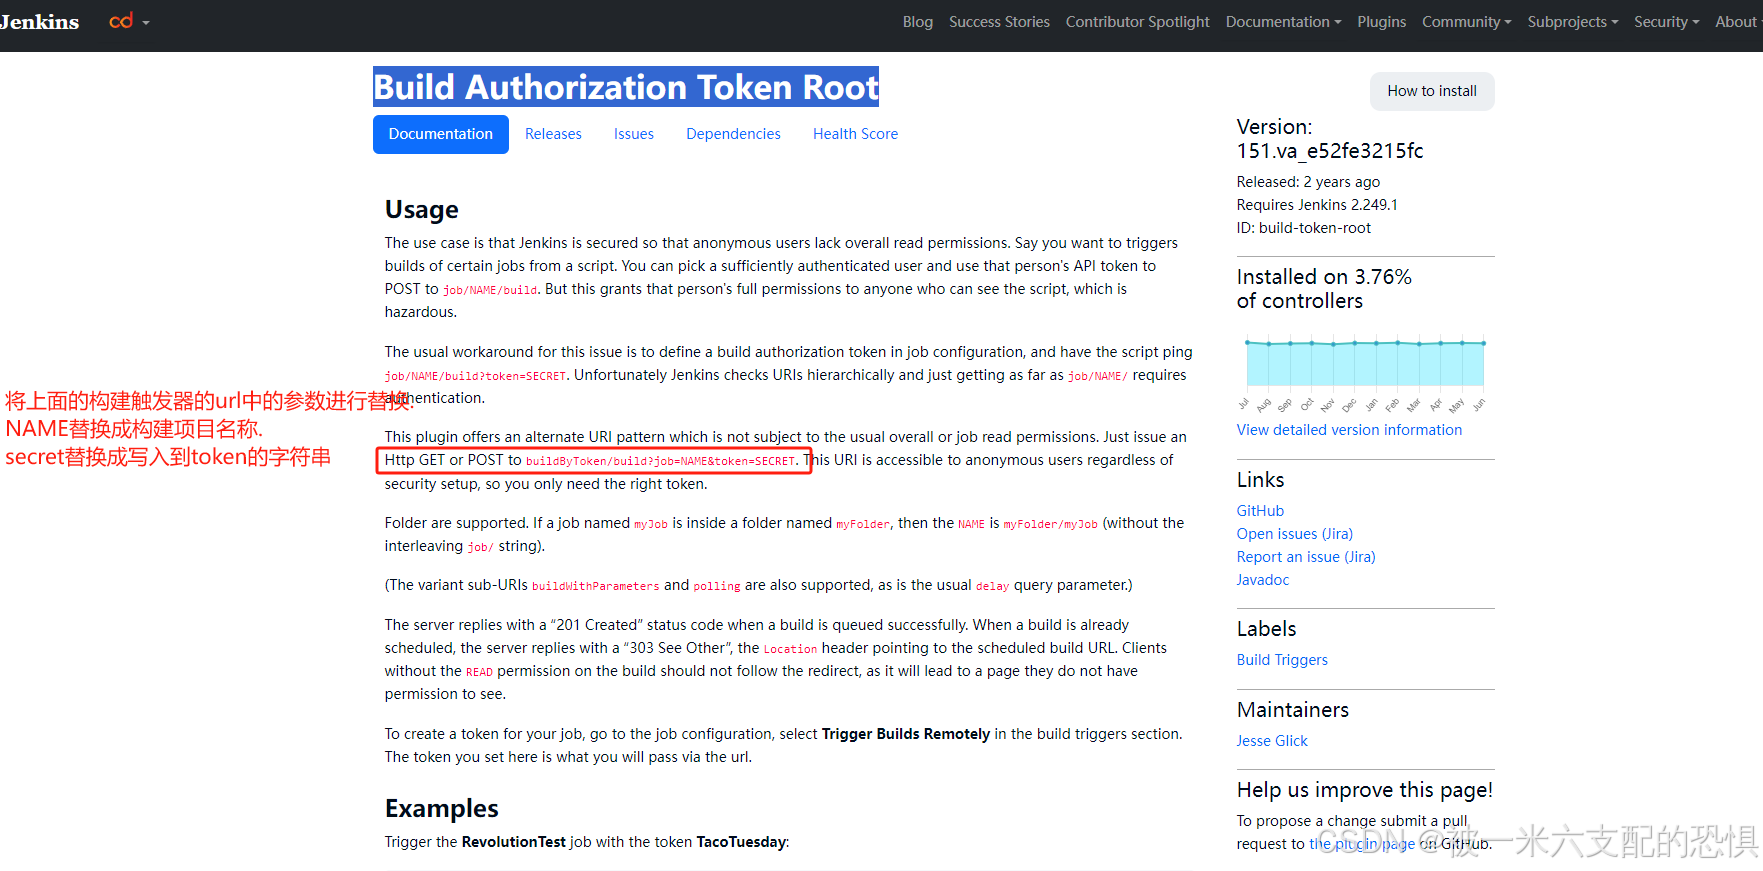
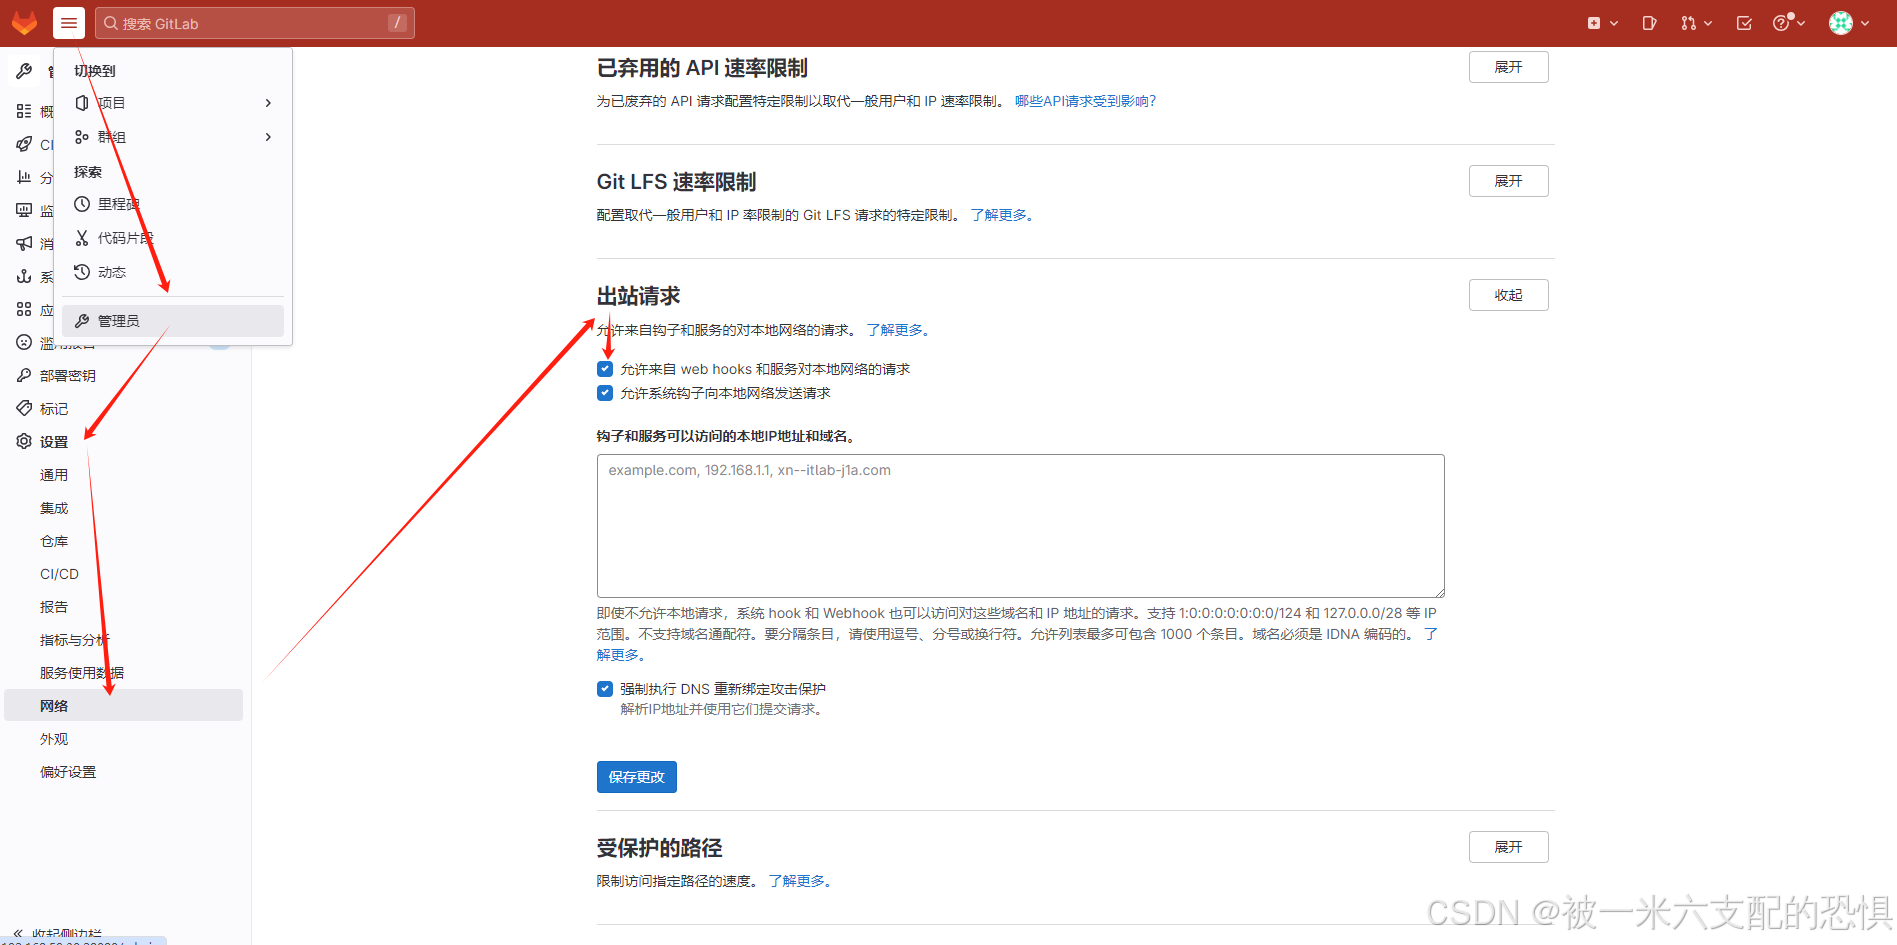
在我们的项目地址下配置钩子,配置webhook之前先配置出栈请求.
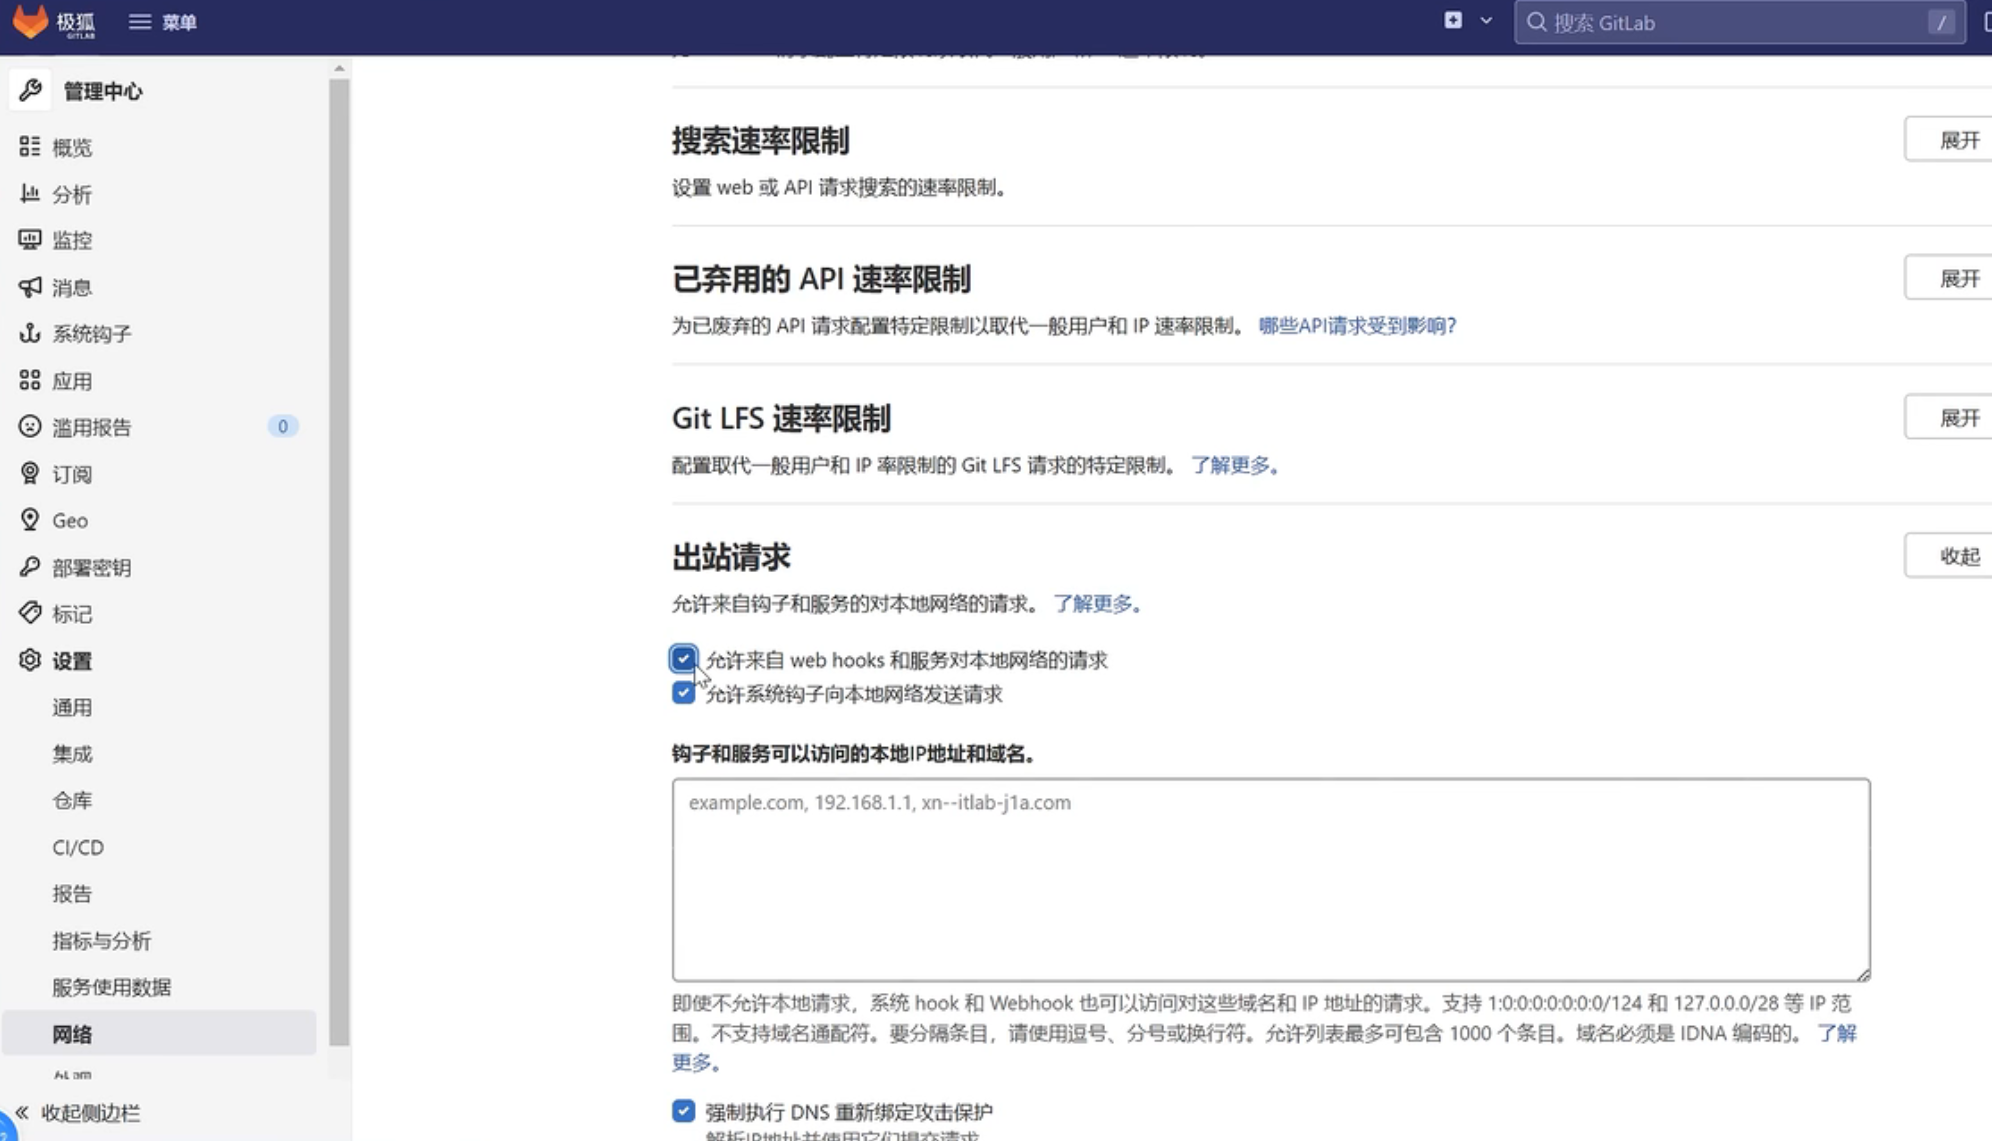
在gitlab上设置出栈请求,如果不配置的话无法添加ip地址类型的url.
配置钩子,URL.
设置支持对本地网络服务请求
此时,我们推送最新的代码,便可以触发项目自动构建。
教程如下
16-GitLab钩子自动构建项目_哔哩哔哩_bilibili

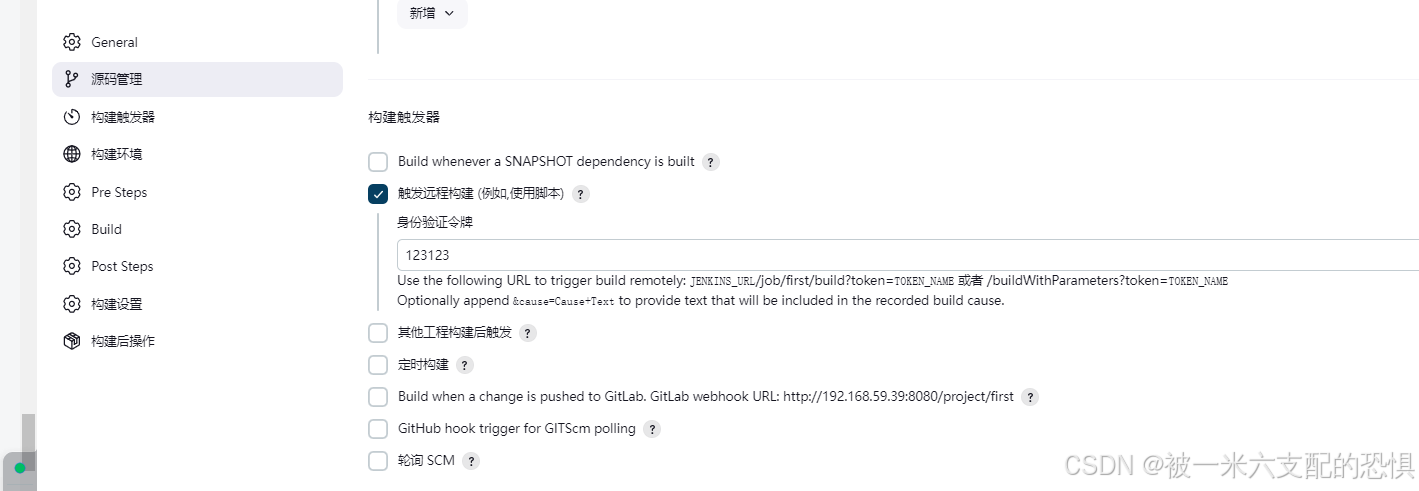
几种构建方式
-
快照依赖构建/Build whenever a SNAPSHOT dependency is built
- 当依赖的快照被构建时执行本job
-
触发远程构建 (例如,使用脚本)
- 远程调用本job的restapi时执行本job
-
job依赖构建/Build after other projects are built
- 当依赖的job被构建时执行本job
-
定时构建/Build periodically
- 使用cron表达式定时构建本job
-
向GitHub提交代码时触发Jenkins自动构建/GitHub hook trigger for GITScm polling
- Github-WebHook出发时构建本job
-
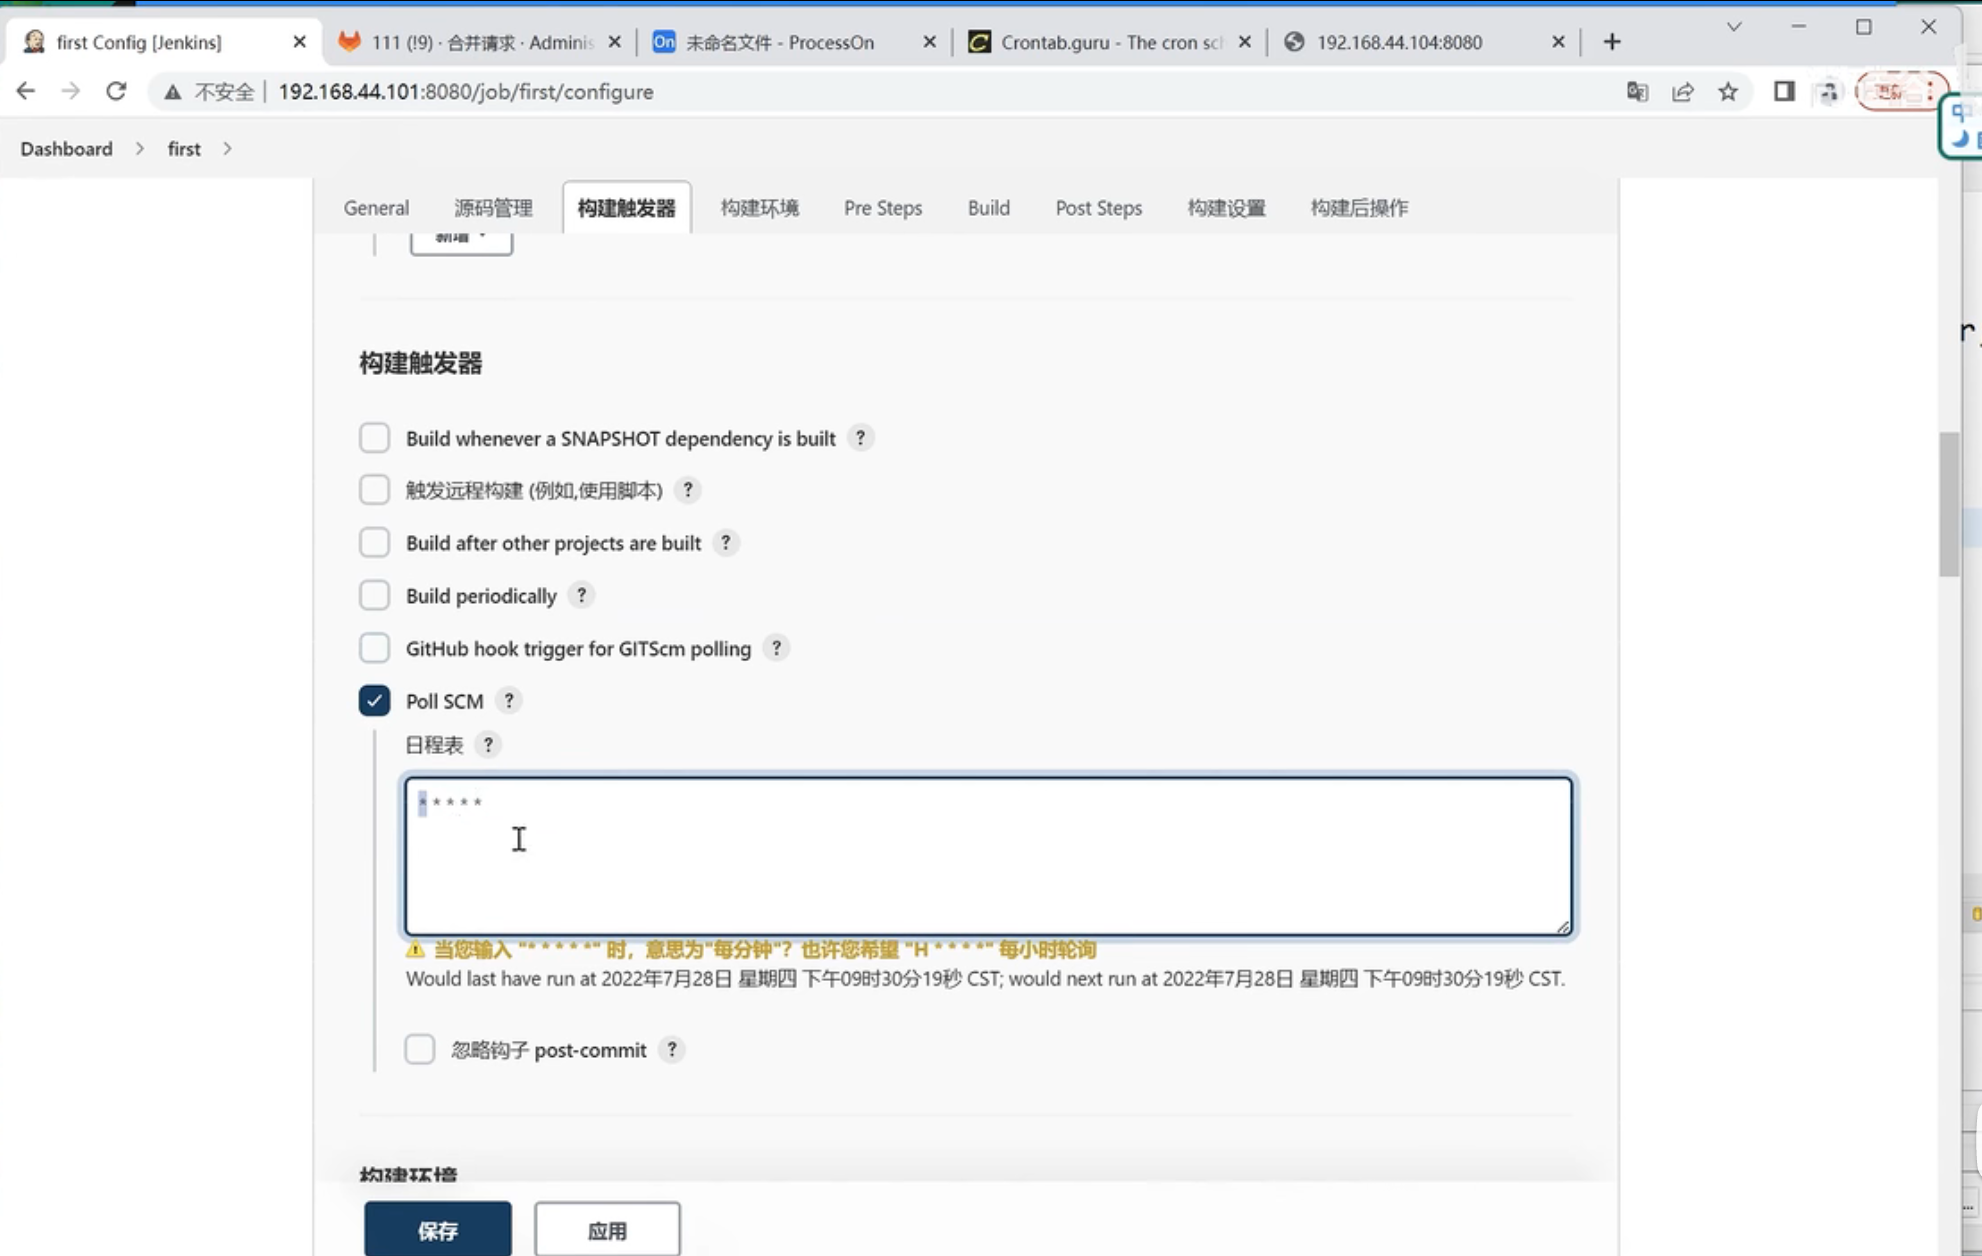
定期检查代码变更/Poll SCM
- 使用cron表达式定时检查代码变更,变更后构建本job
触发远程构建/gitlab上改动自动构建
代码改动自动可以使用gitlab的webhook回调钩子调起Jenkins的启动任务接口
在构建触发器中配置接口和token

定时构建
Jenkins cron表达式
标准cron
Jenkins cron不是标准的cron表达式
第一个 * 表示每个小时的第几分钟,取值0~59
H * * * *
H:每小时执行一次
第二颗 * 表示小时,取值0~23
* 15 * * * 表示每天下午3点
* 1 * * * 表示每天凌晨1点
第三颗 * 表示一个月的第几天,取值1~31
* 1 5 * * 表示每月5日凌晨1点
第四颗 * 表示第几月,取值1~12
* 15 5 1 * 表示每年几月执行
第五颗 * 表示一周中的第几天,取值0~7,其中0和7代表的都是周日
"/"
表示每隔多长时间,比如 */10 * * * * 表示 每隔10分钟
"H"
hash散列值,以job名取值,获取到以job名为入参的唯一值,相同名称值也相同,这个偏移量会和实际时间相加,获得一个真实的运行时间
意义在于:不同的项目在不同的时间运行,即使配置的值是一样的,比如 都是15 * * * * ,表示每个小时的第15分钟开始执行任务,那么会造成同一时间内在Jenkins中启动很多job,换成H/15 * * * *,那么在首次启动任务时,会有随机值参与进来,有的会在17分钟启动 有的会在19分钟启动,随后的启动时间也是这个值。这样就能错开相同cron值的任务执行了。
H的值也可以设置范围
H * * * *表示一小时内的任意时间
*/10 * * * *每10分钟
H/10 * * * *每10分钟,可能是7,17,27,起始时间hash,步长不变
45 3 * * 1-6 每个周一至周六,凌晨3点45 执行1次
45 3-5 * * 1-6 每个周一至周六,凌晨3点45 ,凌晨4点45,凌晨5点45 各执行1次
H(40-48) 3-5 * * 1-6 在40~48之间取值 其他同上
45 3-5/2 * * 1-6 每个周一至周六,凌晨3点45 ,凌晨5点45 各执行1次
45 0-6/2 * * 1-6 * * 1-6 0点开始,每间隔2小时执行一次 0:45、2:45、4:45
源码变更构建
使用Poll SCM 方式与Build periodically一样
会主动定期检查代码托管服务器上是否有变化,一旦发生变化执行job构建
测试报告邮件通知
下载插件,下载下面两个插件,用于邮件告警使用.

配置邮件发送者
首先获取到邮箱授权码,用于在第三方软件中登陆认证使用

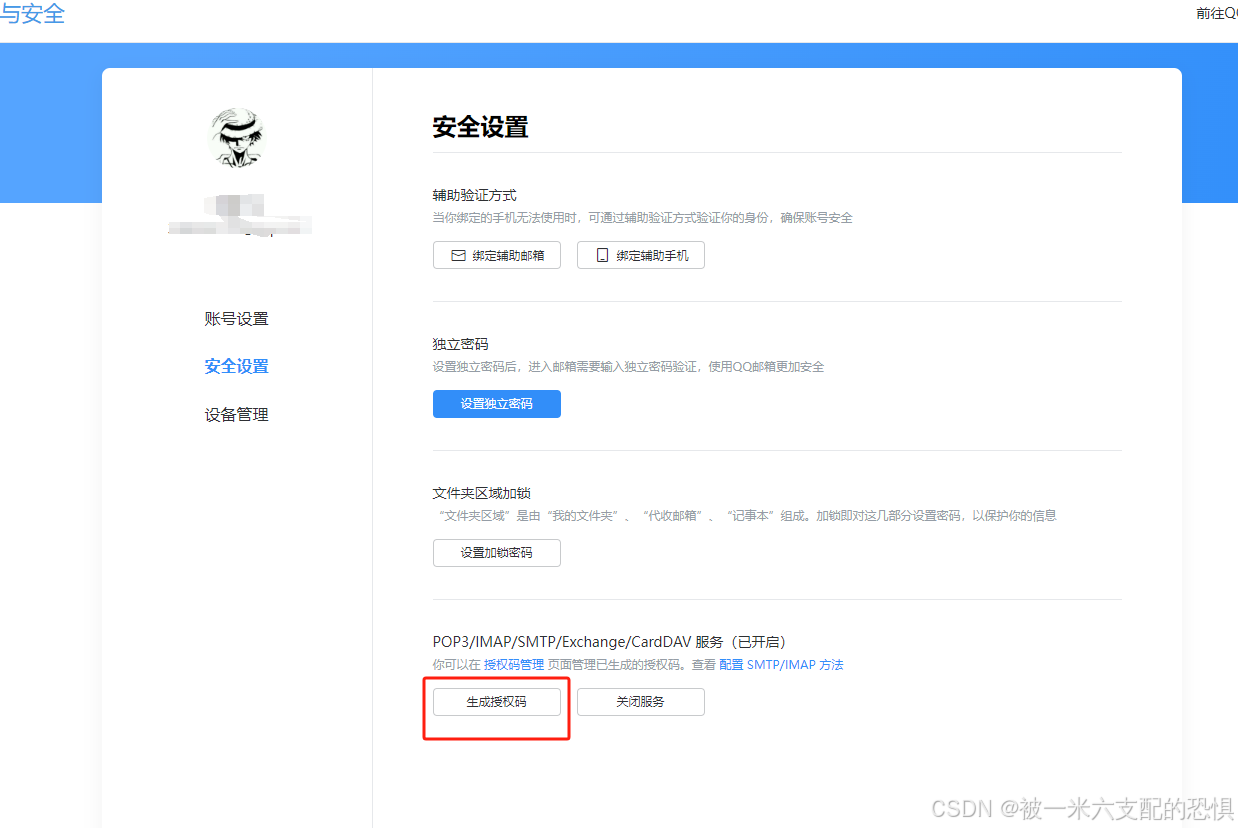
授权码生成后复制到一下,下面使用.
配置一个凭据
Dashboard-->系统管理-->凭据-->系统-->全局凭据 (unrestricted)
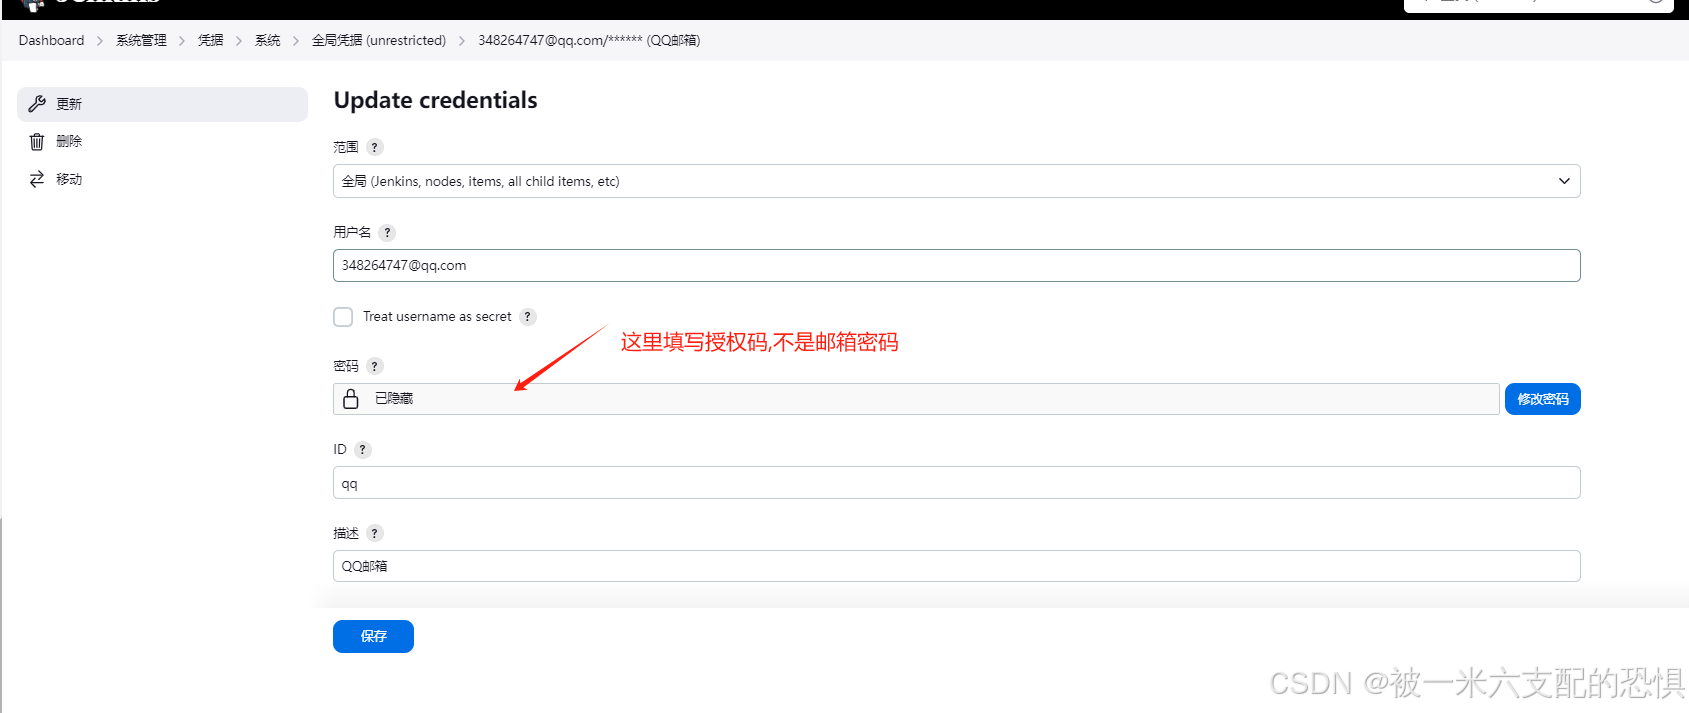
Dashboard-->系统管理-->System
Go
这里jenkins URL是jenkins服务器地址.

系统管理员邮件地址是发送邮件人员地址.
配置smtp服务器
Dashboard-->系统管理-->System
说明一下,SMTP端口参见邮件提供厂家的相关文档.这里使用的是腾讯的qq邮箱.地址如下.
https://wx.mail.qq.com/list/readtemplate?name=app_intro.html#/agreement/authorizationCode
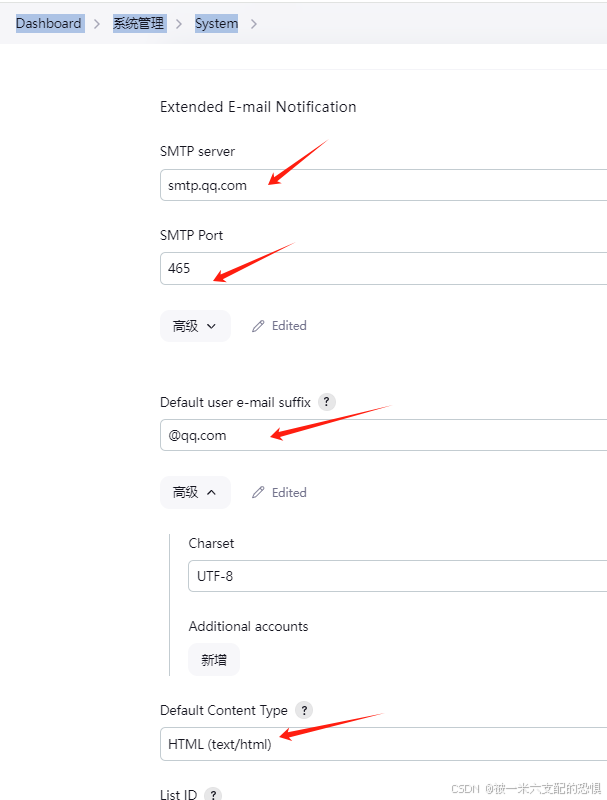
配置邮件通知服务器
Dashboard-->系统管理-->System
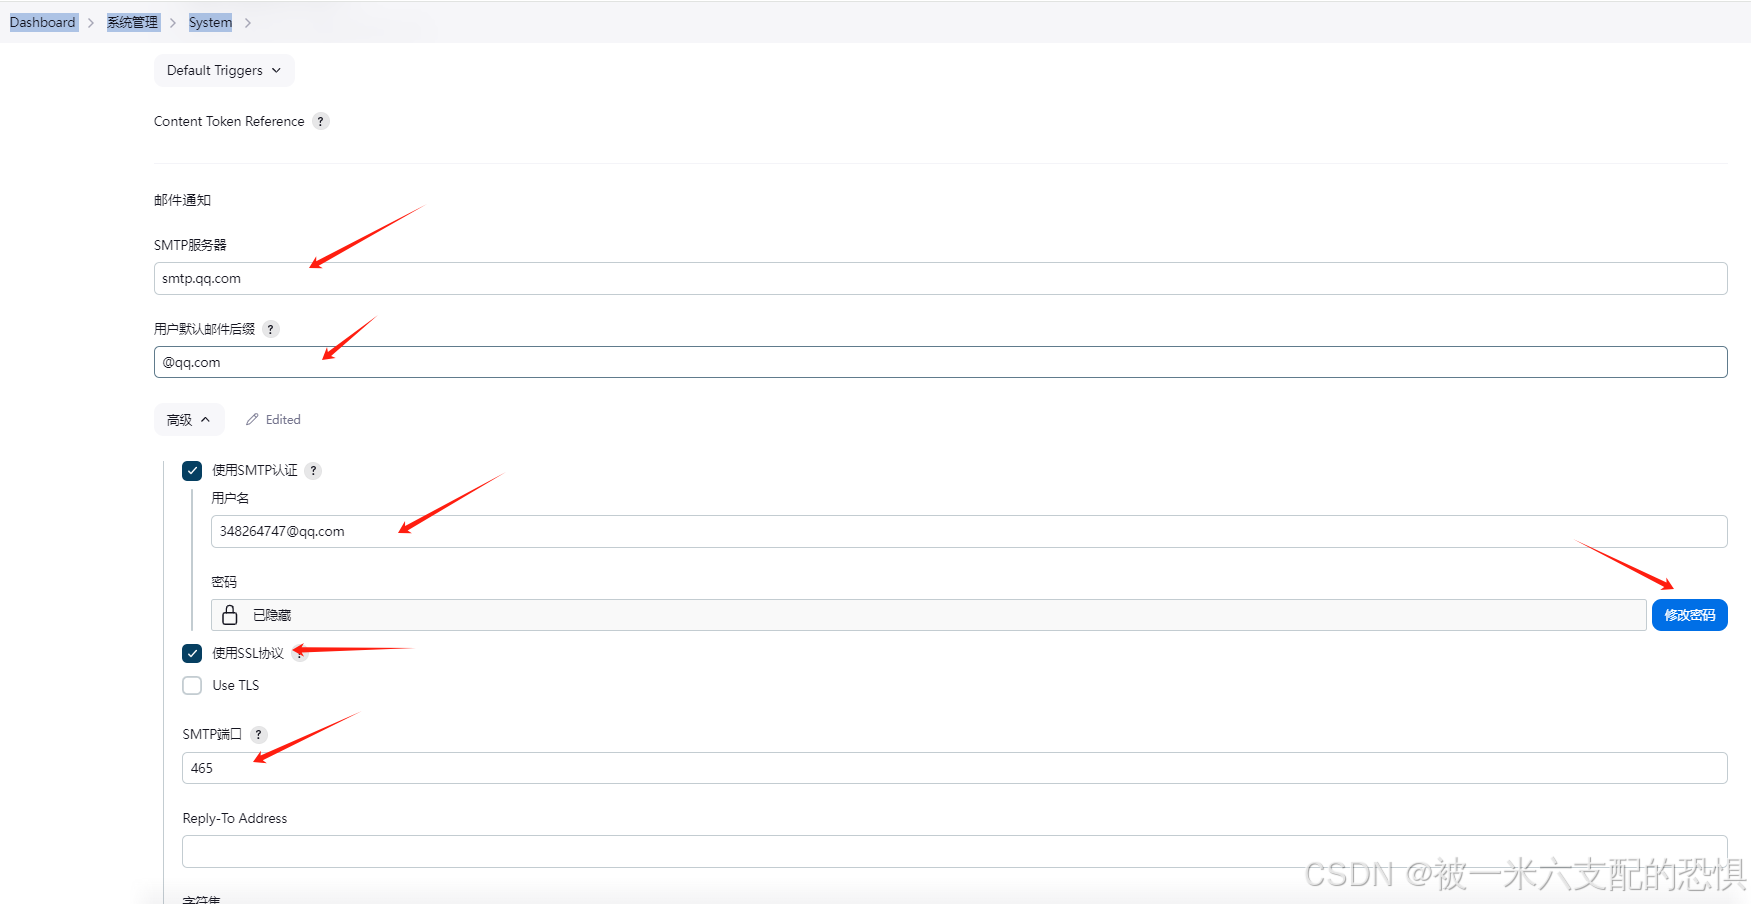
测试邮件发送是否成功
Dashboard-->系统管理-->System

进入项目配置邮件发送操作
Dashboard-->first-->Configuration-->构建后操作
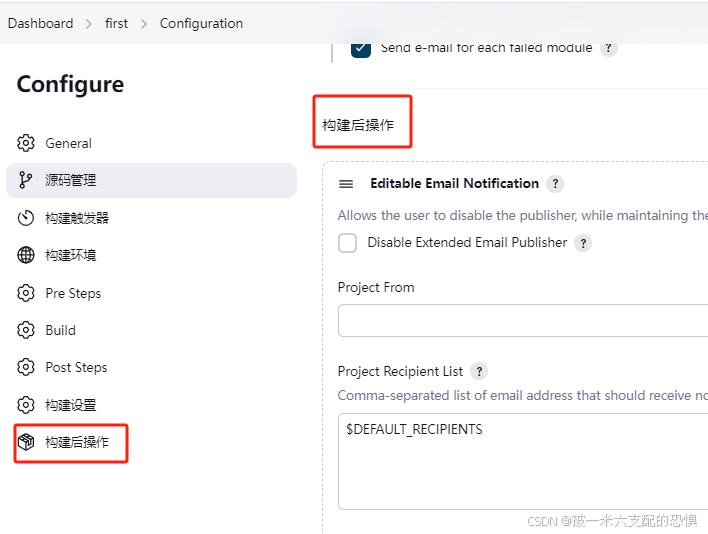
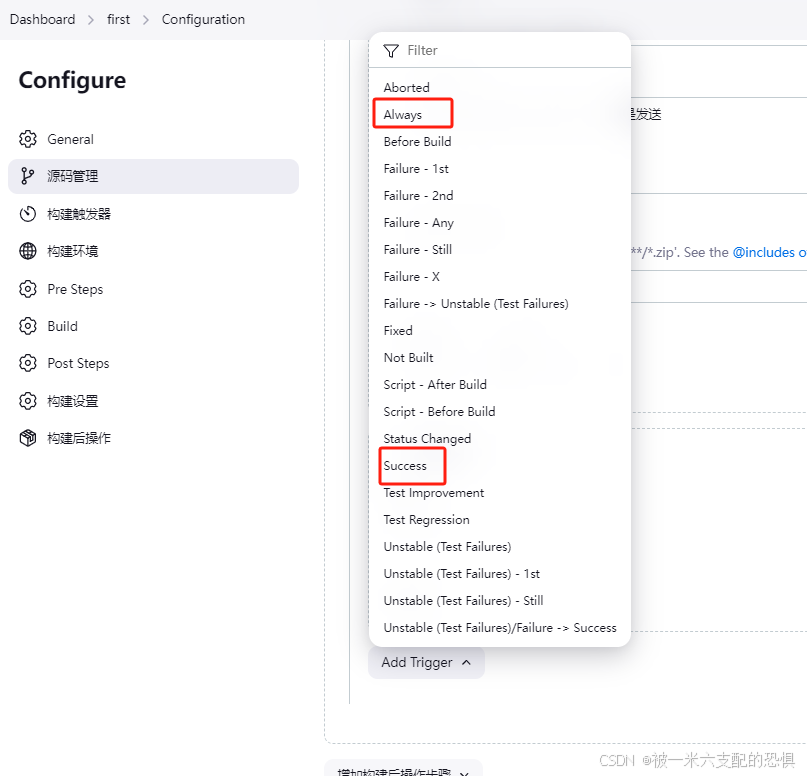
添加后续设置
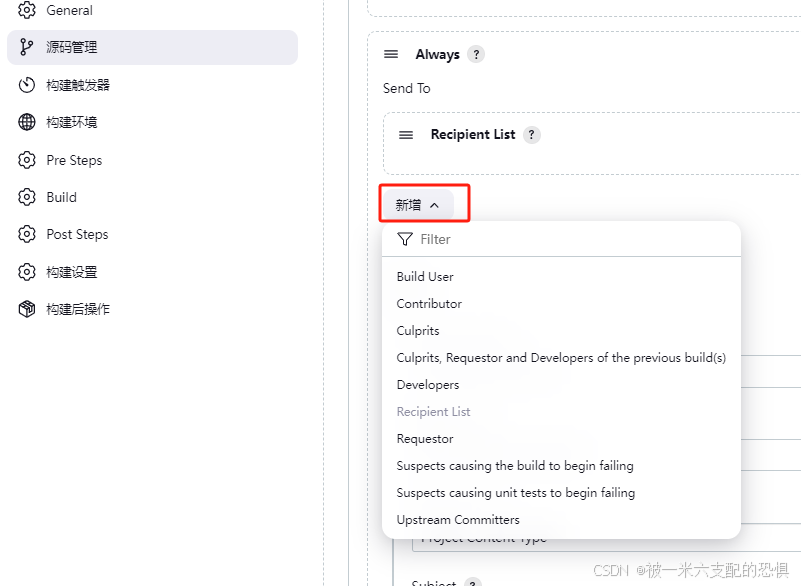
添加后续操作的tag,在这里添加的是Always,意思是无论如何都会发送邮件通知.
接收者用户组分类.
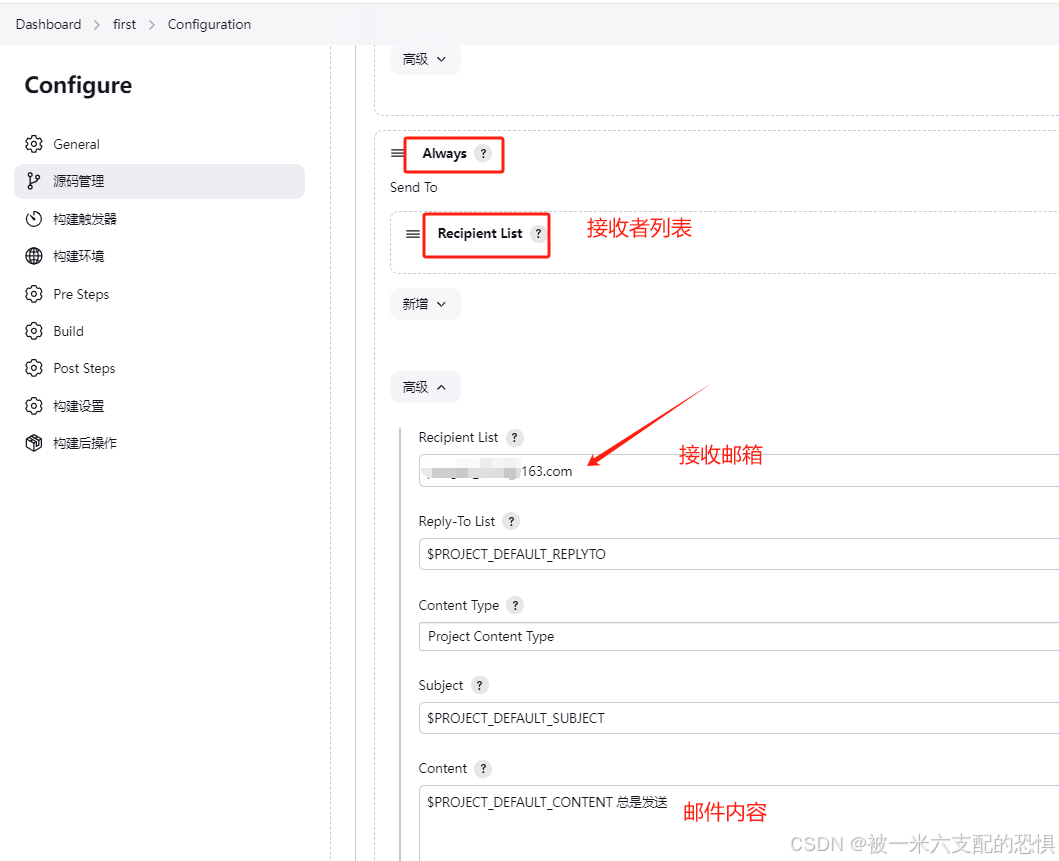
自动化部署到docker容器中
24-自动化部署构建Docker镜像运行jar_哔哩哔哩_bilibili
构建jar包到容器镜像中.前置操作.
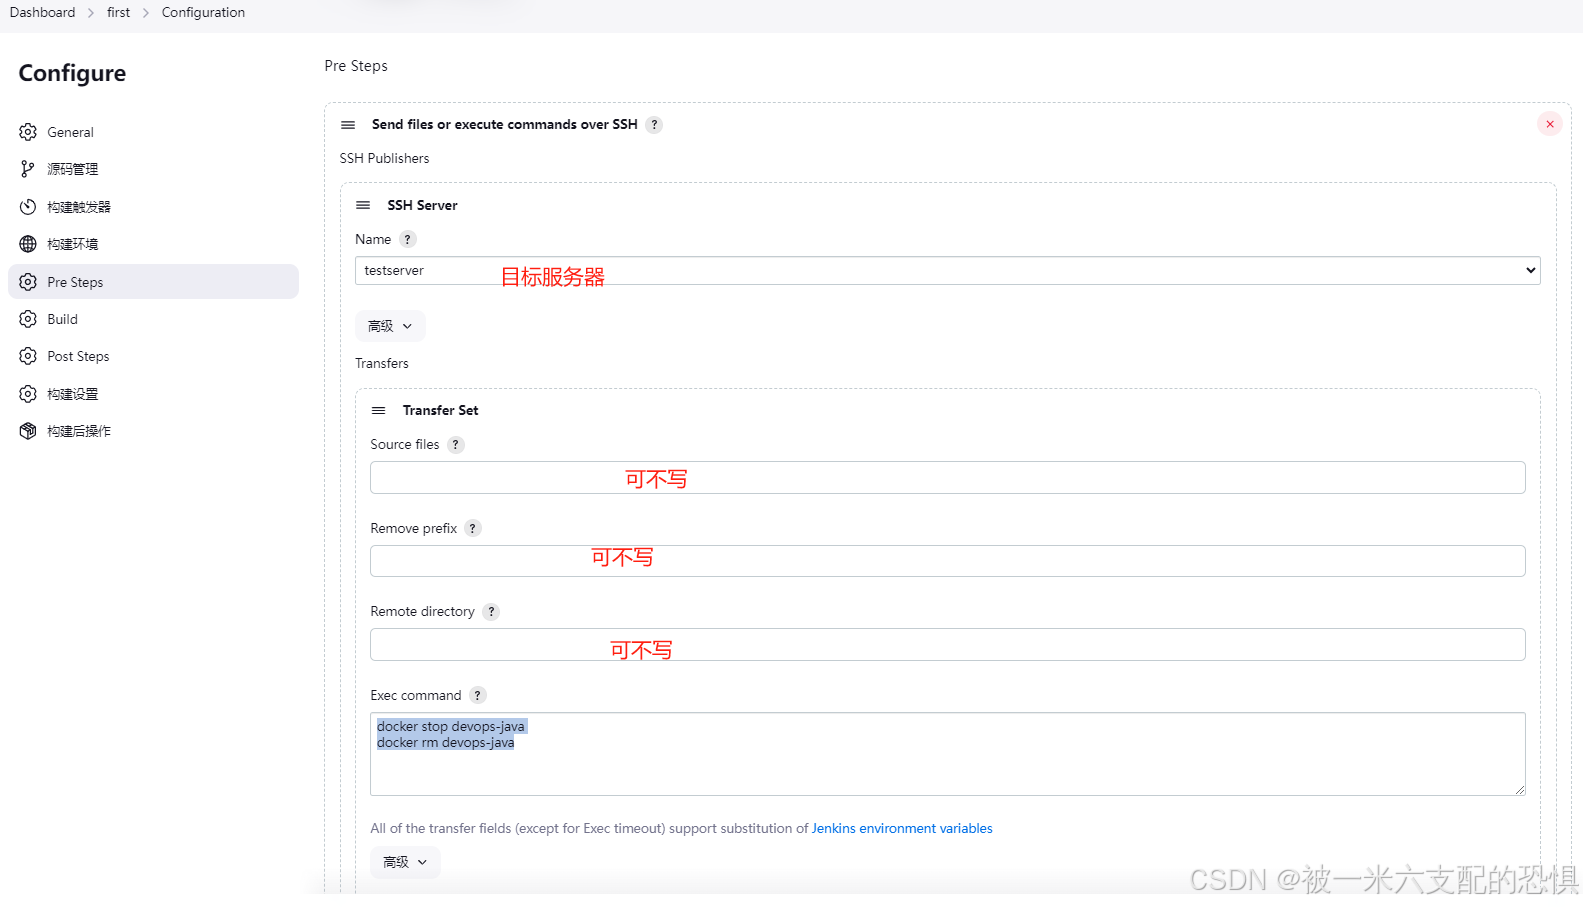
构建前命令
Go
停止容器,清理进程
docker stop devops-java
docker rm devops-java
中间的构建都是一样的,build构建的是jar包.
脚本dockerfile和代码一起上传
Go
#vim Dockerfile
FROM openjdk:17-jdk-alpine3.14

WORKDIR /home/app

COPY target/*.jar /home/app
ENV version v1.0.0
ENTRYPOINT java -jar *.jar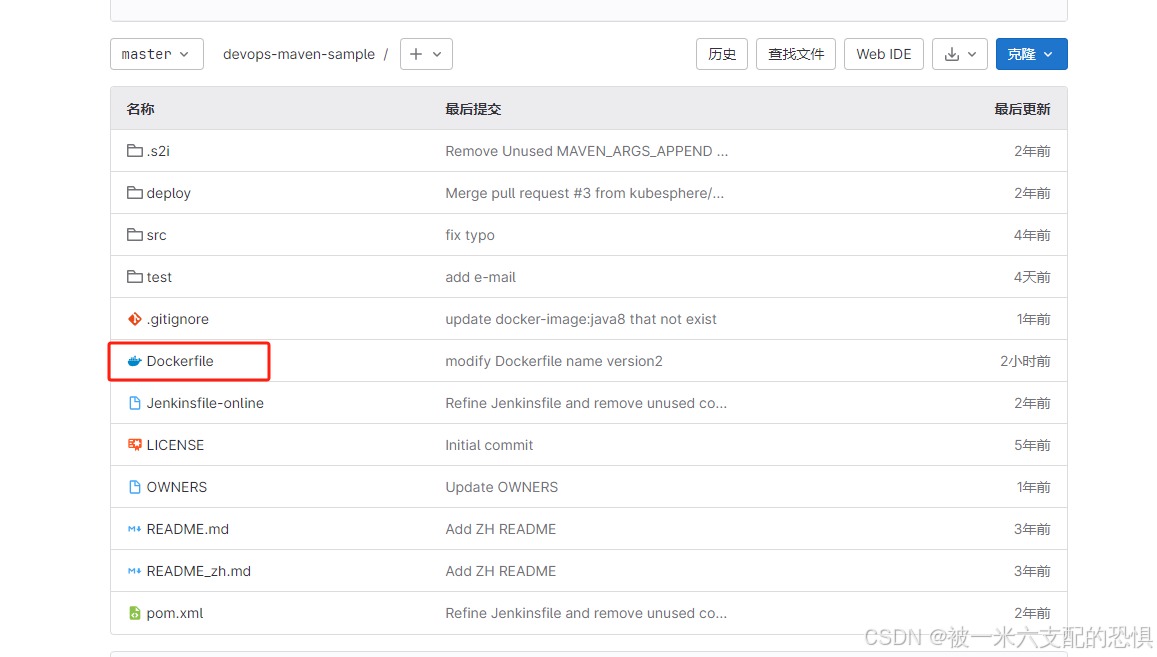
构建jar包后,jar包从构建服务器上传到测试运行服务器上,并将jar包构建成容器.
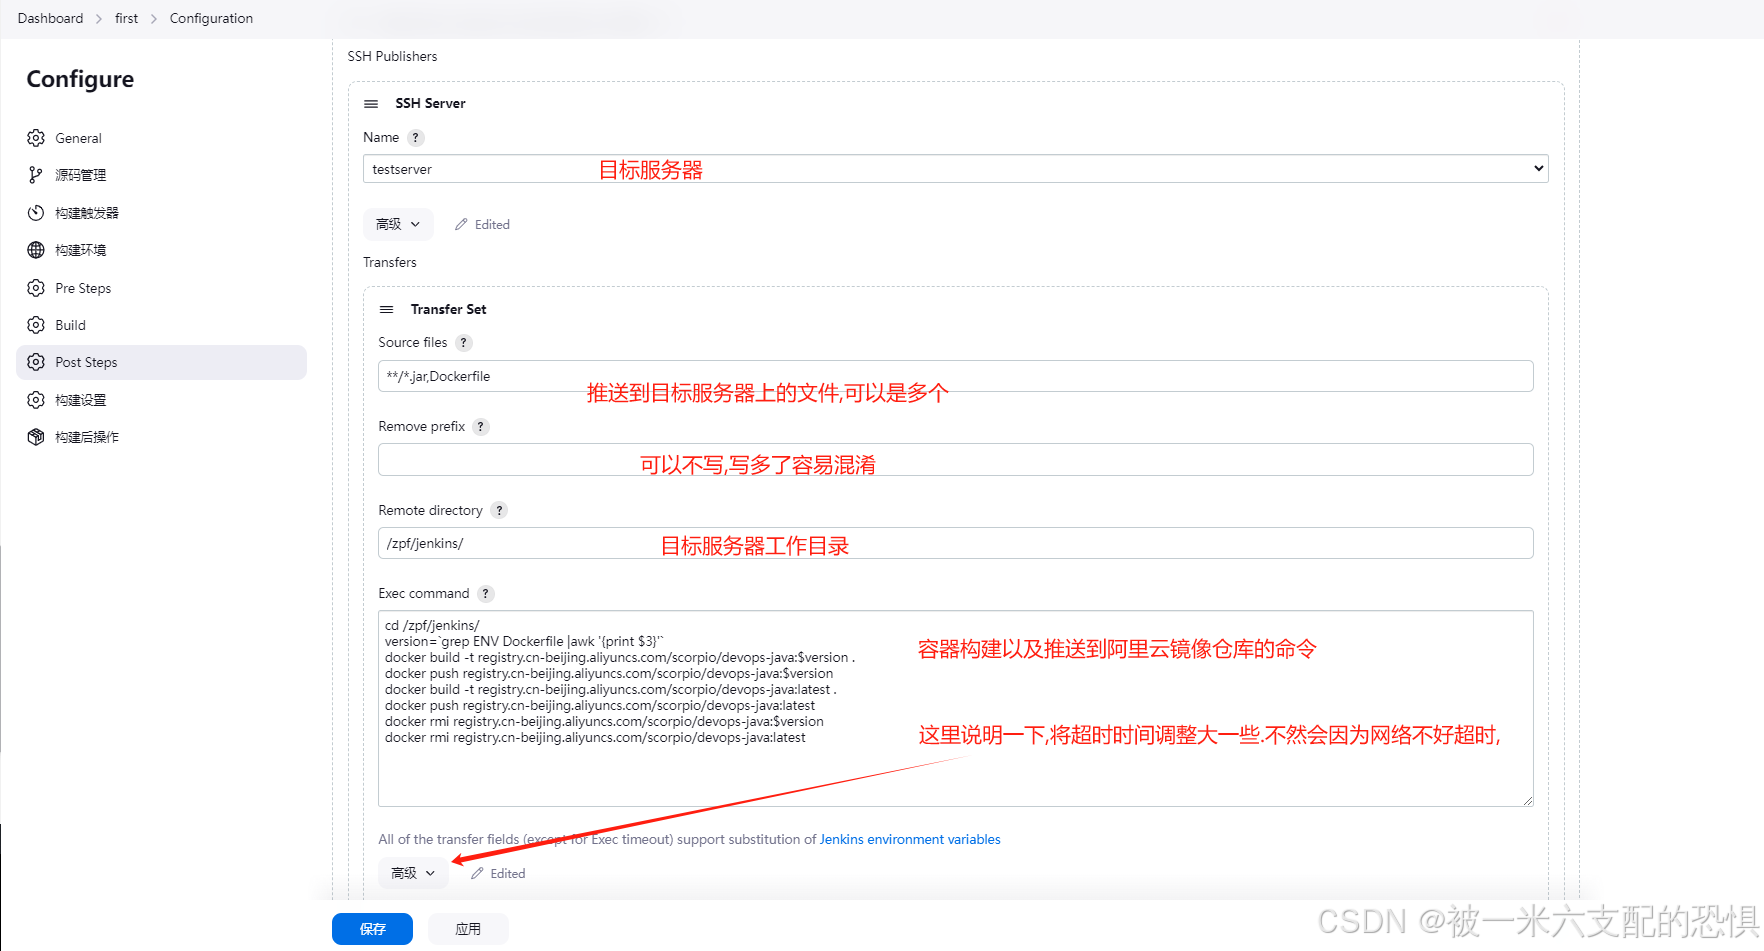
Go
cd /zpf/jenkins/
version=`grep ENV Dockerfile |awk '{print $3}'`
docker build -t registry.cn-beijing.aliyuncs.com/scorpio/devops-java:$version .
docker push registry.cn-beijing.aliyuncs.com/scorpio/devops-java:$version
docker build -t registry.cn-beijing.aliyuncs.com/scorpio/devops-java:latest .
docker push registry.cn-beijing.aliyuncs.com/scorpio/devops-java:latest
docker rmi registry.cn-beijing.aliyuncs.com/scorpio/devops-java:$version
docker rmi registry.cn-beijing.aliyuncs.com/scorpio/devops-java:latest
Jenkins集群/并发构建
集群化构建可以有效提升构建效率,尤其是团队项目比较多或是子项目比较多的时候,可以并发在多台机器上执行构建。
首先配置主节点与从节点之间的访问凭据
Go
配置路径;
Dashboard-->系统管理-->凭据-->系统-->全局凭据 (unrestricted)-->root/****** (服务器认证用户名密码)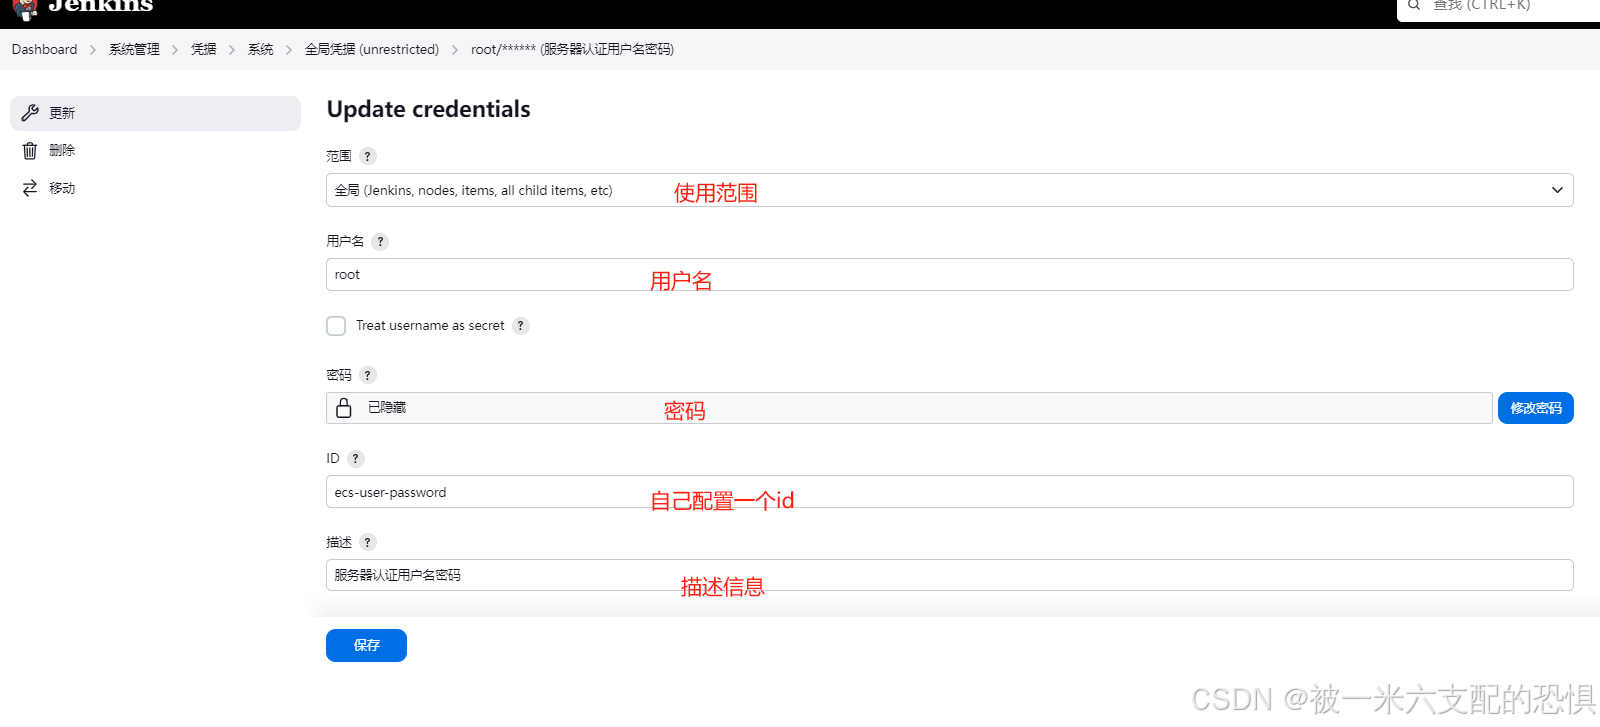
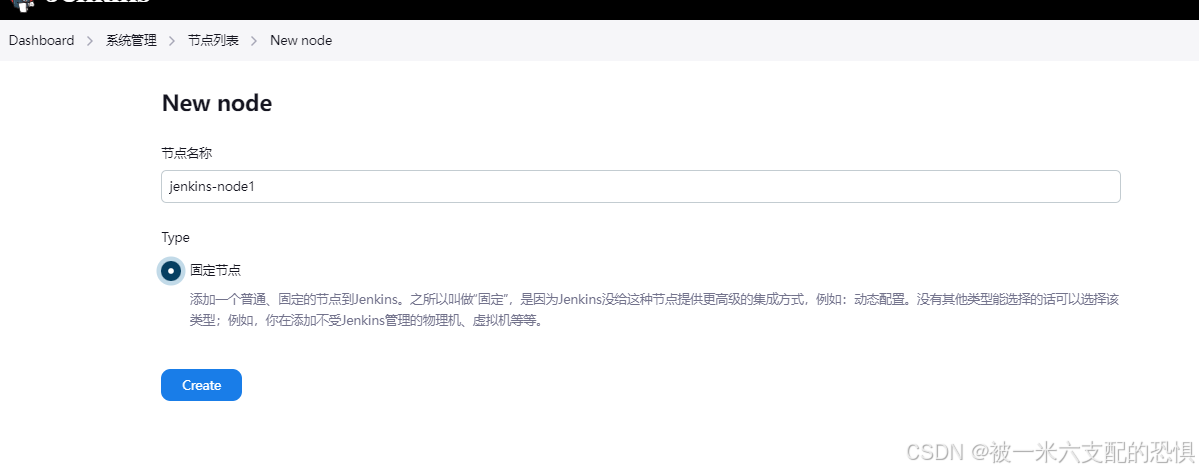
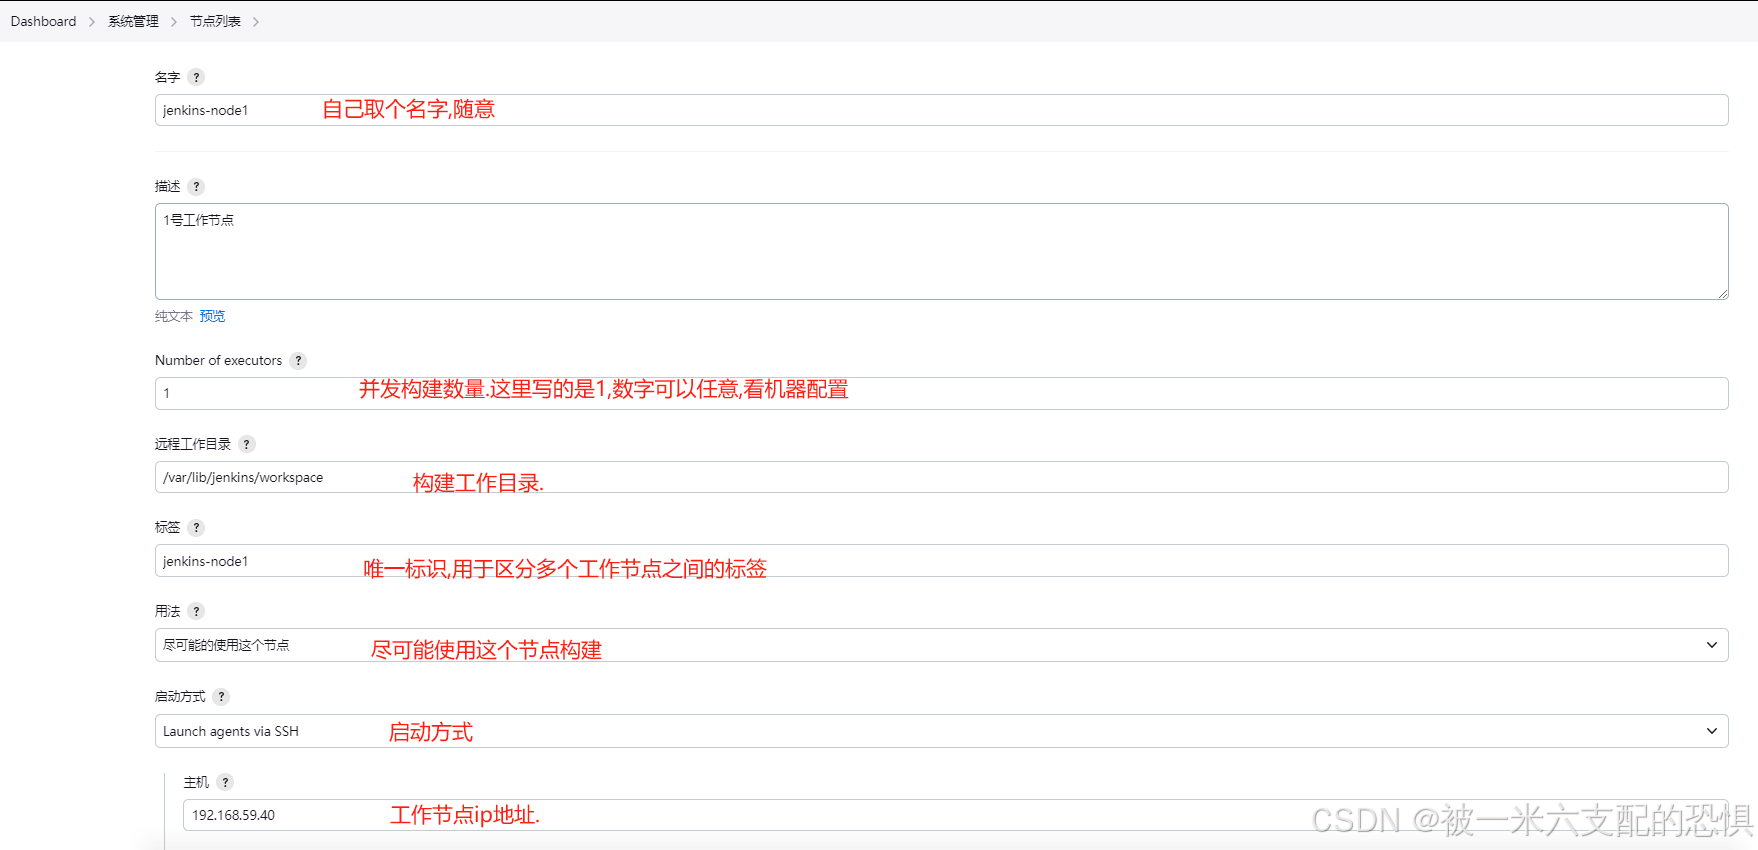
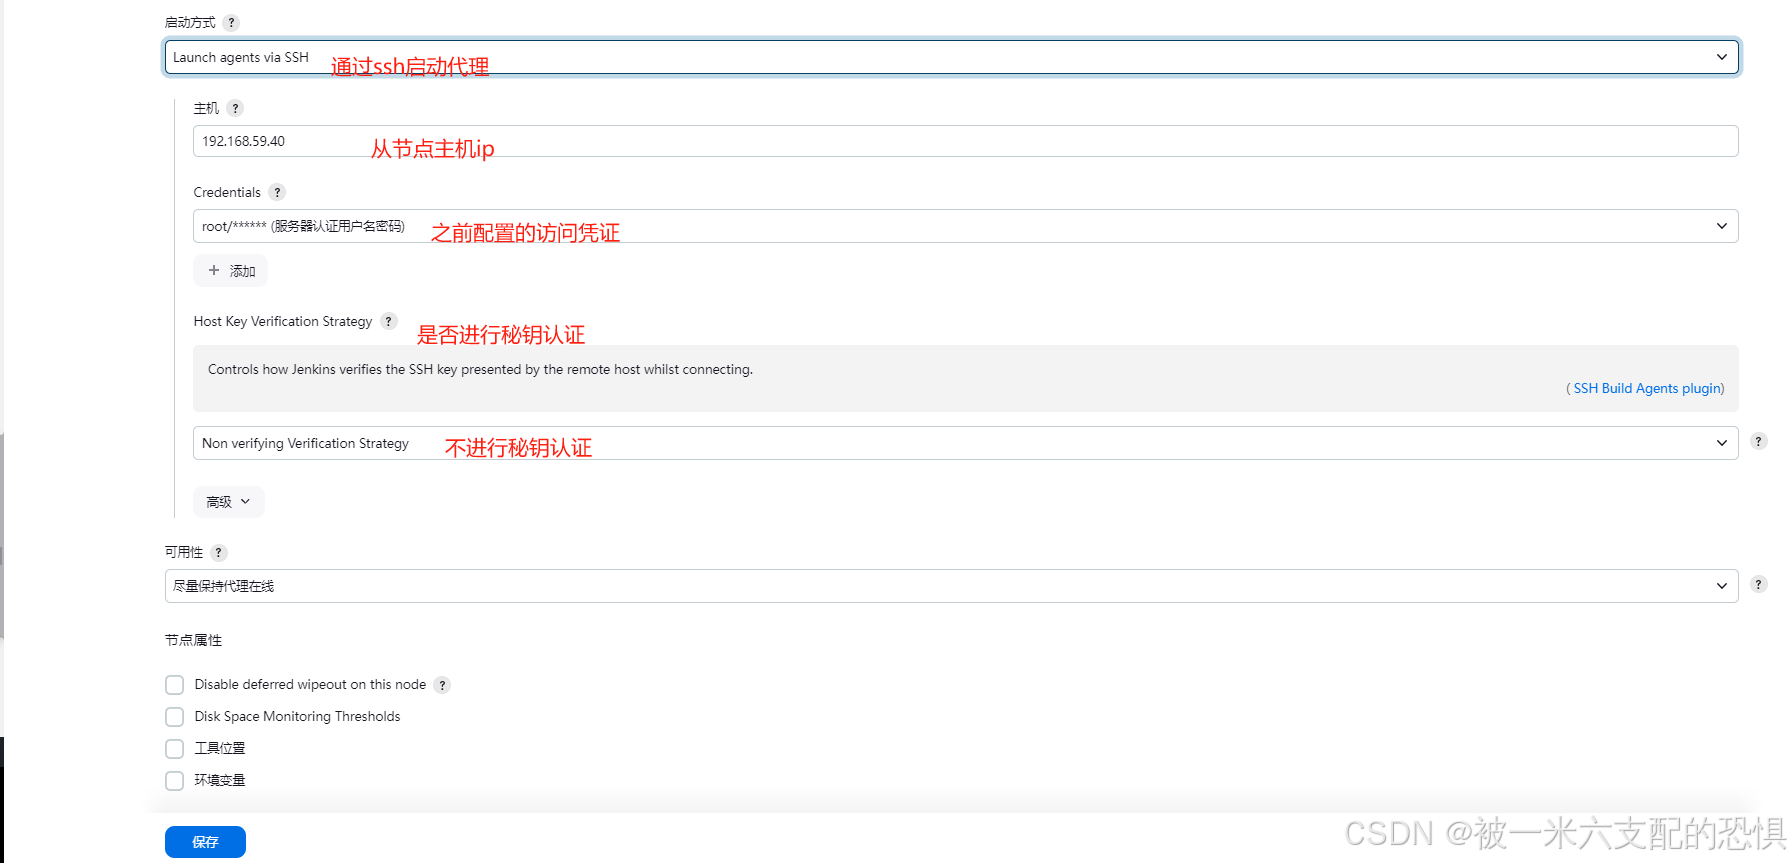
添加工作节点
因为从节点构建同样需要构建环境,所以基础环境可以用主节点复制即可.
Dashboard-->系统管理-->节点列表-->New node
验证工作节点是否加入到了集群

工作节点加入之后会在工作目录中床架创建两个文件

工作节点加入完成.

设置构建项目是否允许并发操作.
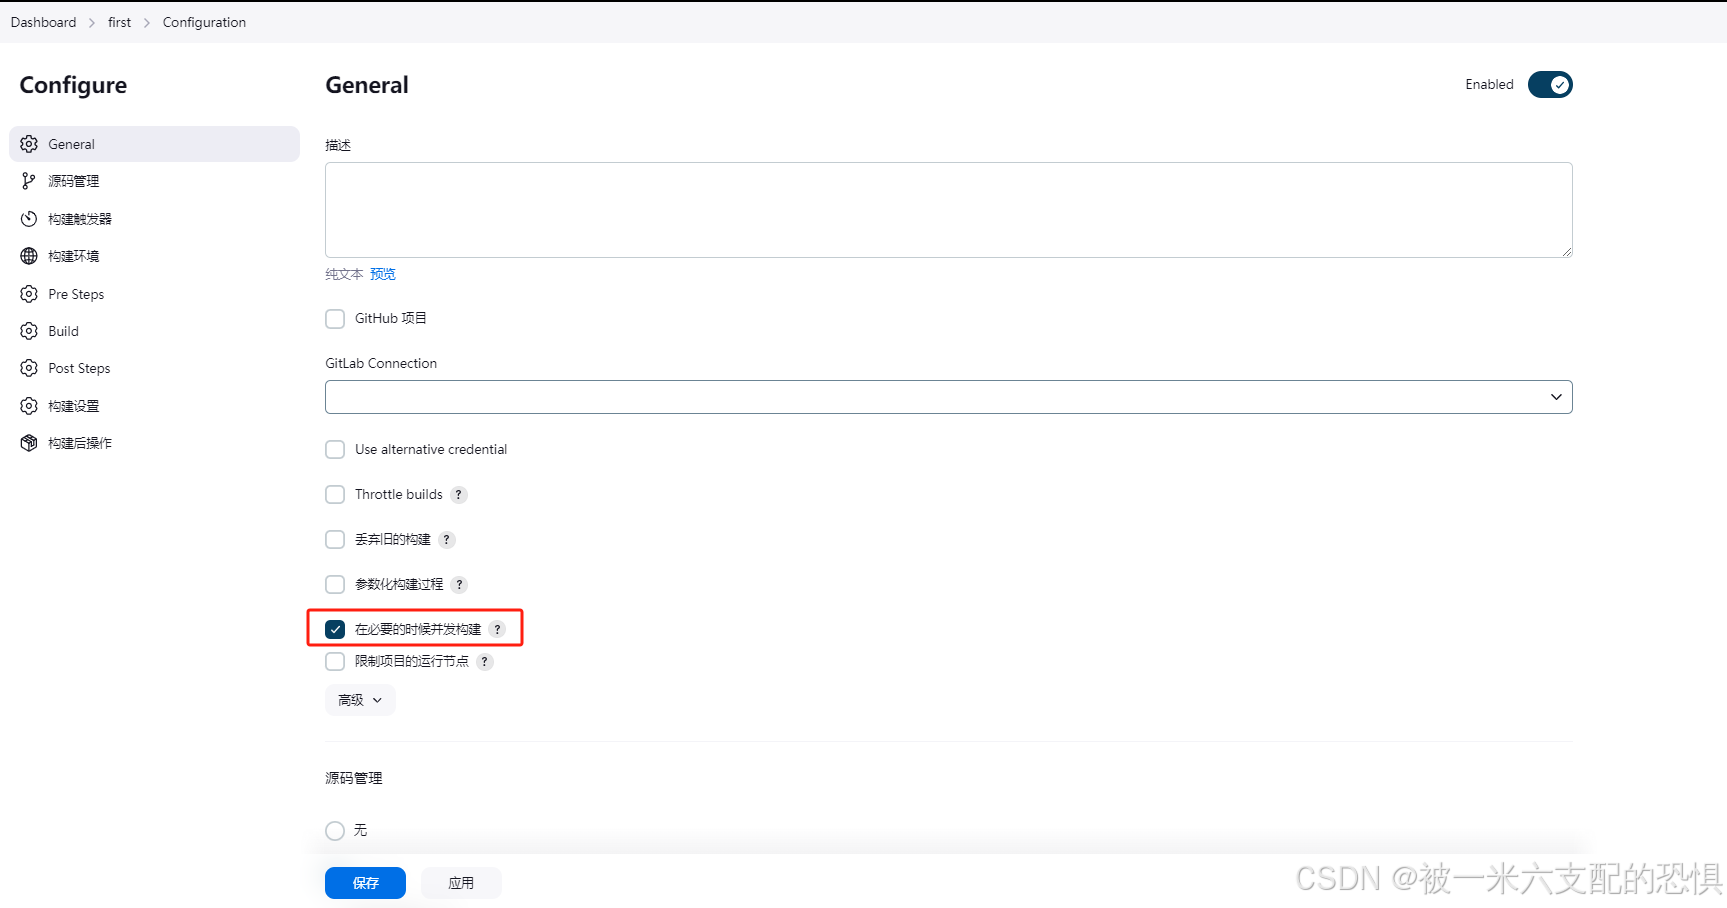
然后自己多点几次项目构建,看看能否分配到其他工作节点上即可.
---------到这里了---------
流水线 pipeline
流水线既能作为任务的本身,也能作为Jenkinsfile
使用流水线可以让我们的任务从ui手动操作,转换为代码化,像docker的dockerfile一样,从shell命令到配置文件,更适合大型项目,可以让团队其他开发者同时参与进来,同时也可以编辑开发Jenkinswebui不能完成的更复杂的构建逻辑,作为开发者可读性也更好。
完整语法
5个必备的组成部分
pipeline:整条流水线
agent:指定执行器
stages:所有阶段
stage:某一阶段,可有多个
steps:阶段内的每一步,可执行命令
测试脚本
基础框架

pipeline {
    agent any

    stages {
        stage('拉取代码') {
            steps {

                echo '拉取代码完成'

            }

        }
        stage('执行构建') {
            steps {
                echo '执行构建完成'


            }

        }
    }

    post {

        always {

            echo "完成"

        }

        failure {

            echo "失败"
        }
    }
}
阶段视图 Stage View
blue ocean可视化界面
全新的流水线控制ui,可重复执行某阶段代码
插件中心搜索blue ocean安装即可
post
流水线完成后可执行的任务
-
always 无论流水线或者阶段的完成状态。
-
changed 只有当流水线或者阶段完成状态与之前不同时。
-
failure 只有当流水线或者阶段状态为"failure"运行。
-
success 只有当流水线或者阶段状态为"success"运行。
-
unstable 只有当流水线或者阶段状态为"unstable"运行。例如:测试失败。
-
aborted 只有当流水线或者阶段状态为"aborted "运行。例如:手动取消。
agent
可以指定执行节点
label 指定运行job的节点标签
any 不指定,由Jenkins分配

pipeline {
    agent {
        node {
            label "jenkins-02"
        }

    }

    stages {
        stage('拉取代码') {
            steps {

                sh """
                    sleep 10

                   """

                echo '拉取代码完成'

            }

        }
        stage('执行构建') {
            steps {
                echo '执行构建完成'


            }

        }
    }

    post {

        always {

            echo "完成"

        }

        failure {

            echo "失败"
        }
    }
}
pipeline中执行自动化构建部署
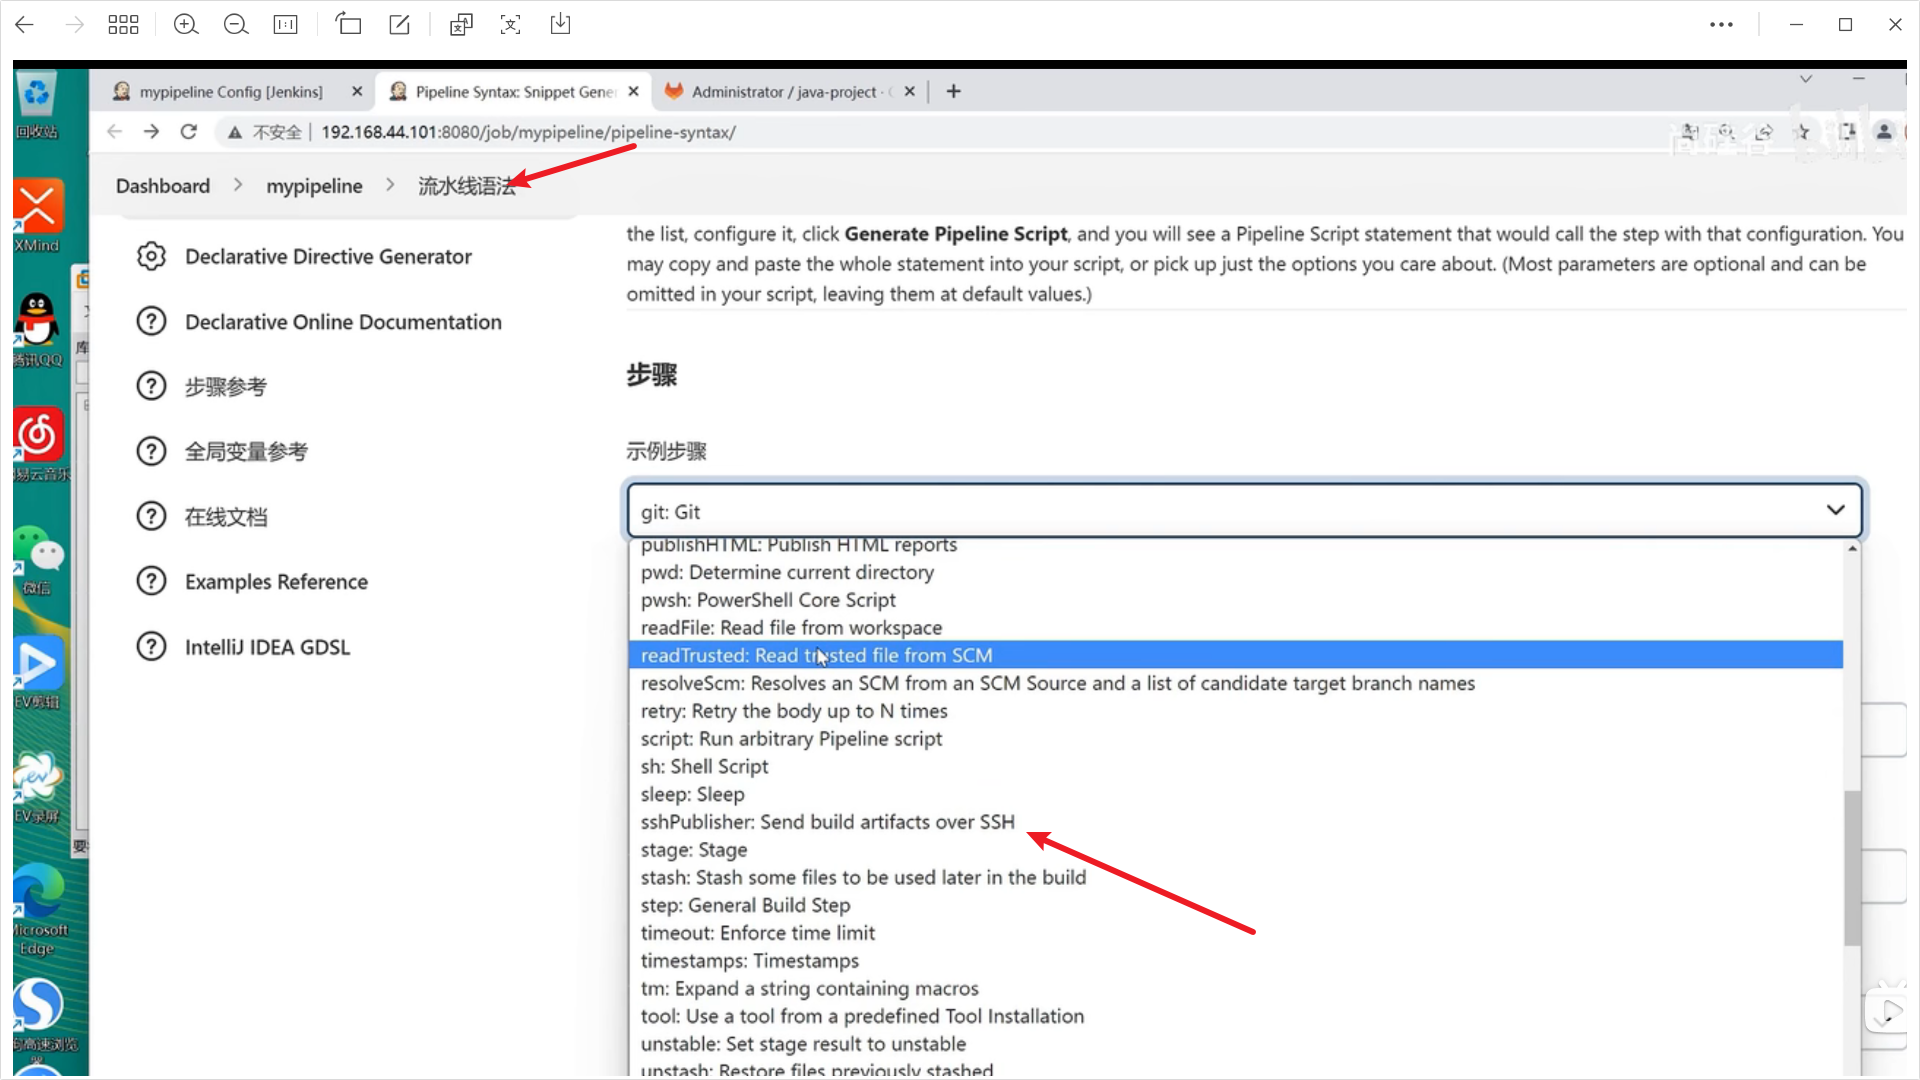

pipeline {
    agent any

    tools {

        maven "maven3"

    }
    stages {
        stage("拉取代码") {
            steps {


                git branch: 'main', credentialsId: 'gitlab', url: 'http://192.168.44.103/root/java-project.git'
                echo '拉取成功'
            }
        }

        stage("执行构建") {
            steps {

            //    sh "mvn --version"
                sh """
                cd demo-1

                mvn clean package
                """

                echo '构建完成'
            }

        }


        stage("clean test server"){

            steps{

sshPublisher(publishers: [sshPublisherDesc(configName: 'testserver', transfers: [sshTransfer(cleanRemote: false, excludes: '', execCommand: '''rm -rf *

docker stop demo
docker rm demo
docker rmi demo
''', execTimeout: 120000, flatten: false, makeEmptyDirs: false, noDefaultExcludes: false, patternSeparator: '[, ]+', remoteDirectory: '', remoteDirectorySDF: false, removePrefix: '', sourceFiles: '/root')], usePromotionTimestamp: false, useWorkspaceInPromotion: false, verbose: false)])
            }
        }


        stage("发送jar包到测试服务器") {
            steps {

                sshPublisher(publishers: [sshPublisherDesc(configName: 'testserver', transfers: [sshTransfer(cleanRemote: false, excludes: '', execCommand: '', execTimeout: 120000, flatten: false, makeEmptyDirs: false, noDefaultExcludes: false, patternSeparator: '[, ]+', remoteDirectory: '/jarfile', remoteDirectorySDF: false, removePrefix: 'demo-1/target', sourceFiles: '**/demo*.jar'), sshTransfer(cleanRemote: false, excludes: '', execCommand: '''docker build -t demo .
docker run -d -p 8080:8080 --name demo demo''', execTimeout: 120000, flatten: false, makeEmptyDirs: false, noDefaultExcludes: false, patternSeparator: '[, ]+', remoteDirectory: '/', remoteDirectorySDF: false, removePrefix: 'demo-1/docker', sourceFiles: 'demo-1/docker/dockerfile')], usePromotionTimestamp: false, useWorkspaceInPromotion: false, verbose: false)])


                echo 'jar send over!'
            }

        }

    }
}
声明式流水线
好处
-
更像是在Jenkins web ui中的操作
-
可读性比较高
-
可以使用blue ocean自动生成
-
支持语法检查
坏处
- 代码逻辑能力比脚本式弱,不能完成特别复杂的任务
脚本式流水线
好处
-
更少的代码和弱规范要求
-
更灵活的自定义代码操作
-
不受约束,可以构建特别复杂的工作流和流水线
坏处
-
读写对编程要求比较高
-
比声明式流水线代码更复杂