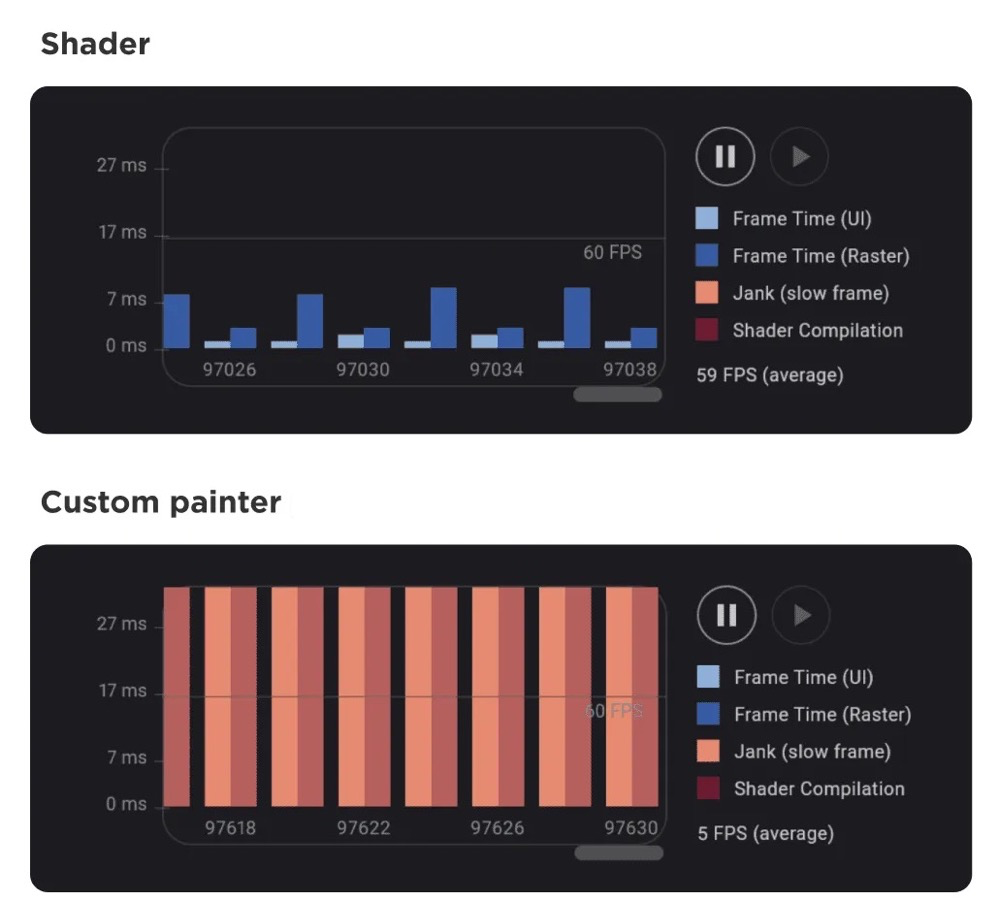
在之前的《不一样的思路实现炫酷 3D 翻页折叠动画》我们其实介绍过:如何使用 Shader 去实现一个 3D 的翻页效果,具体就是使用 Flutter 在 3.7 开始提供 Fragment Shader API ,因为每个像素都会过 Fragment Shader ,所以我们可以通过写一个 Fragment Shader 的 glsl 文件来处理图片的像素效果,例如下图这样的粒子化效果:

这个效果来自于 thanos_snap_effect ,它巧妙地采用了多种组合方式实现了 UI 的粒子化效果:
- 对当前控件进行截图
- 通过
OverlayPortal生成一个局部图层 - 使用 shader 在局部图层对截图进行粒子画动画

截图和 OverlayPortal 都是 Flutter 在 Dart 层面的 API 支持,而粒子化效果就确确实实需要用到 Shader 代码的实现,至于为什么需要用到 Shader,理由还是之前发过的性能对比:

另外 Flutter 默认对图片的 API 支持能力本来就比较弱
简单来说,Flutter 里加载和启用一个 Shader ,只需要:
- 通过
ui.FragmentProgram.fromAsset加载 glsl 文件 - 给 Shader 设置参数,参数是通过定义的顺序(0、1、2····)去设置,另外还可以通过同样方式,通过
setImageSampler设置图片 - 通过 canvas 绘制 Shader
dart
final ui.FragmentProgram program = _shaderCache[widget.shaderAsset] ??
    await ui.FragmentProgram.fromAsset(widget.shaderAsset);

final shader = program.fragmentShader();

·····

    shader.setFloat(0, size.width);
    shader.setFloat(1, size.height);
    shader.setFloat(2, currentTime.inMilliseconds.toDouble() / 1000.0);

		shader.setImageSampler(0, snapshotInfo.image);

    final Paint paint = Paint()..shader = shader;
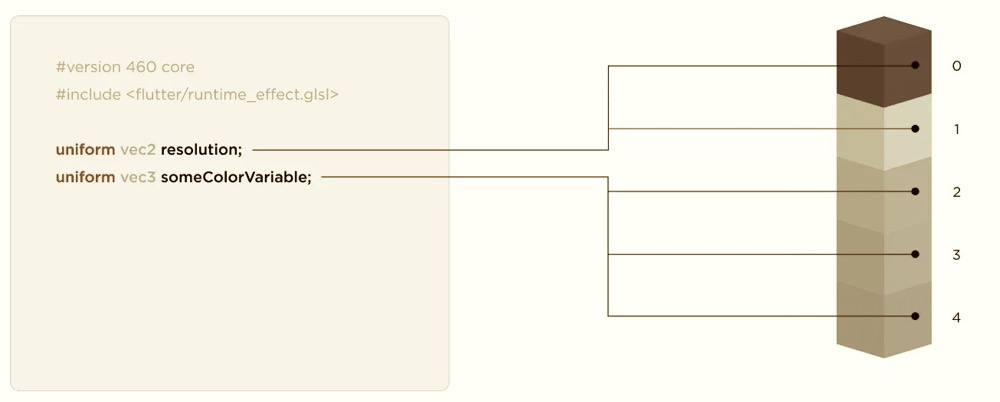
canvas.drawRect(Offset.zero & size, paint);参数的对应是按照顺序来决定,大概理解就是,vec2 就是两个 float 类型的值保存在了一起的意思,所以先声明的 vec2 resolution 就占据了索引 0 和 1 ,如下图所示,此时的 vec2 和 vec3 分了就占据了 0-1 和 2-4 的索引:

详细 Flutter Shader 基础教程,可见之前的 《Flutter 小技巧之不一样的思路实现炫酷 3D 翻页折叠动画》 或者张风捷特烈大佬的Flutter & GLSL系列: https://juejin.cn/post/7295948894328029193
接下来我们主要看粒子动画的完整代码,可以看到抛开注释之外,其实代码并不复杂,这也是因为对于 Fragment Shader 而言,每个像素都需要经过这段代码处理,所以在处理像素效果上天然就要比在 Dart 利索:
c
#version 460 core

#include<flutter/runtime_effect.glsl>

#define min_movement_angle -2.2
#define max_movement_angle -0.76
#define movement_angles_count 10
#define movement_angle_step (max_movement_angle - min_movement_angle) / movement_angles_count
#define pi 3.14159265359

// Current animation value, from 0.0 to 1.0.
uniform float animationValue;
uniform float particleLifetime;
uniform float fadeOutDuration;
uniform float particlesInRow;
uniform float particlesInColumn;
uniform float particleSpeed;
uniform vec2 uSize;
uniform sampler2D uImageTexture;

out vec4 fragColor;

float delayFromParticleCenterPos(float x)
{
    return (1. - particleLifetime)*x;
}

float delayFromColumnIndex(int i)
{
    return (1. - particleLifetime) * (i / (particlesInRow));
}

float randomAngle(int i)
{
    float randomValue = fract(sin(float(i) * 12.9898 + 78.233) * 43758.5453);
    return min_movement_angle + floor(randomValue * movement_angles_count) * movement_angle_step;
}

int calculateInitialParticleIndex(vec2 point, float angle, float animationValue, float particleWidth, float particleHeight)
{
    //  x0 value is calculated from the following equation:

    //  Given:
    //  x = x0 + t * cos(angle) * particle_speed
    //  t = animationValue - delay
    //  delay = (1 - particle_lifetime) * x0

    //  Getting the x0 from the equation:
    //  t = animationValue - (1 - particle_lifetime) * x0
    //  x = x0 + (animationValue - (1 - particle_lifetime) * x0) * cos(angle) * particle_speed
    //  x = x0 + animationValue * cos(angle) * particle_speed - (1 - particle_lifetime) * x0 * cos(angle) * particle_speed
    //  x = x0 - (1 - particle_lifetime) * x0 * cos(angle) * particle_speed + animationValue * cos(angle) * particle_speed
    //  x = x0 * (1 - (1 - particle_lifetime) * cos(angle) * particle_speed) + animationValue * cos(angle) * particle_speed
    //  x - animationValue * cos(angle) * particle_speed = x0 * (1 - (1 - particle_lifetime) * cos(angle) * particle_speed)
    //  x0 = (x - animationValue * cos(angle) * particle_speed) / (1 - (1 - particle_lifetime) * cos(angle) * particle_speed)

    float x0 = (point.x - animationValue * cos(angle) * particleSpeed) / (1. - (1. - particleLifetime) * cos(angle) * particleSpeed);
    float delay = delayFromParticleCenterPos(x0);
    float y0 = point.y - (animationValue - delay) * sin(angle) * particleSpeed;

    //  If particle is not yet moved, animationValue is less than delay, and particle moves to an opposite direction so we should calculate a particle index from the original point.

    // If the particle is supposed to move to the left, but it moves to the right (because of the reason above), return the original point particle index.
    if (angle <= - pi / 2 && point.x >= x0)
    {
        return (int(point.x / particleWidth) + int(point.y / particleHeight) * int(1 / particleWidth));
    }
    // If the particle is supposed to move to the right, but it moves to the left (because of the reason above), return the original point particle index.
    if (angle >= - pi / 2 && point.x < x0)
    {
        return (int(point.x / particleWidth) + int(point.y / particleHeight) * int(1 / particleWidth));
    }
    return int(x0 / particleWidth) + int(y0 / particleHeight) * int(1 / particleWidth);
}

void main()
{
    vec2 uv=FlutterFragCoord().xy / uSize.xy;

    float particleWidth = 1.0 / particlesInRow;
    float particleHeight = 1.0 / particlesInColumn;

    float particlesCount = (1 / particleWidth) * (1 / particleHeight);
    for (float searchMovementAngle = min_movement_angle; searchMovementAngle <= max_movement_angle; searchMovementAngle += movement_angle_step)
    {
        int i = calculateInitialParticleIndex(uv, searchMovementAngle, animationValue, particleWidth, particleHeight);
        if (i < 0 || i >= particlesCount)
        {
            continue;
        }
        float angle = randomAngle(i);
        vec2 particleCenterPos = vec2(mod(float(i), 1 / particleWidth) * particleWidth + particleWidth / 2, int(float(i) / (1 / particleWidth)) * particleHeight + particleHeight / 2);
        float delay = delayFromParticleCenterPos(particleCenterPos.x);
        float adjustedTime = max(0.0, animationValue - delay);
        vec2 zeroPointPixelPos = vec2(uv.x - adjustedTime * cos(angle) * particleSpeed, uv.y - adjustedTime * sin(angle) * particleSpeed);
        if (zeroPointPixelPos.x >= particleCenterPos.x - particleWidth / 2 && zeroPointPixelPos.x <= particleCenterPos.x + particleWidth / 2 &&
        zeroPointPixelPos.y >= particleCenterPos.y - particleHeight / 2 && zeroPointPixelPos.y <= particleCenterPos.y + particleHeight / 2)
        {
            vec4 zeroPointPixelColor = texture(uImageTexture, zeroPointPixelPos);
            float alpha = zeroPointPixelColor.a;
            float fadeOutLivetime = max(0.0, adjustedTime - (particleLifetime - fadeOutDuration));
            fragColor = zeroPointPixelColor * (1.0 - fadeOutLivetime / fadeOutDuration);
            return;
        }
    }

    fragColor = vec4(0.0, 0.0, 0.0, 0.0);
}
这里简单介绍这段代码的一些实现逻辑,首先就是角度,这部分代码直接定义了粒子移动的方向范围,可以移动的角度在 -2.2 ~ -0.76 之间:
c
#define min_movement_angle -2.2
#define max_movement_angle -0.76
#define movement_angles_count 10
#define movement_angle_step (max_movement_angle - min_movement_angle) / movement_angles_count
#define pi 3.14159265359
如果用 Dart 的 Canvas 来表示,可以看到大概就是如下图所示这样的角度,然后在这个范围内有 10 个方向可以"随机"选择:
dart
class AnglePainter extends CustomPainter {
  @override
  void paint(Canvas canvas, Size size) {
    final paint = Paint()
      ..color = Colors.black
      ..strokeWidth = 4;

    final center = Offset(size.width / 2, size.height / 2);
    final radius = 80.0;

    print("##### ${-2.2 / pi * 180}");

    final p1 = center;
    final p2 = Offset(center.dx + radius, center.dy);
    canvas.drawLine(p1, p2, paint);

    ///final angle = -126 * pi / 180; // Convert degrees to radians
    final angle = -2.2;
    final p3 = Offset(
        center.dx + radius * cos(angle), center.dy + radius * sin(angle));
    canvas.drawLine(p1, p3, paint);
  }

  @override
  bool shouldRepaint(covariant CustomPainter oldDelegate) {
    return false;
  }
}
接下来 main 里面的代码,这部分代码主要就是:
- 归一化坐标为 0-1
- 根据行列数计算出每一「块粒子」该有的大小
- 计算出粒子的总数
- 在可移动角度里寻找"适合"移动的方向
c
vec2 uv=FlutterFragCoord().xy / uSize.xy;

float particleWidth = 1.0 / particlesInRow;
float particleHeight = 1.0 / particlesInColumn;

float particlesCount = (1 / particleWidth) * (1 / particleHeight);
for (float searchMovementAngle = min_movement_angle; searchMovementAngle <= max_movement_angle; searchMovementAngle += movement_angle_step)
{
可以看到,glsl 里的代码很多都是浮点计算,因为浮点计算其实是 GPU 的强项
calculateInitialParticleIndex 这个函数主要是将当前像素归集到某个「粒子块」里,因为每个「粒子块」都是有具体大小,所以一个「粒子块」都是由「一批像素」组成,也就是需要根据当前「粒子块」的 index 去确定像素属于哪一个「粒子块」。
c
 int i = calculateInitialParticleIndex(uv, searchMovementAngle, animationValue, particleWidth, particleHeight);


int calculateInitialParticleIndex(vec2 point, float angle, float animationValue, float particleWidth, float particleHeight)
{
      //  x0 value is calculated from the following equation:

    //  Given:
    //  x = x0 + t * cos(angle) * particle_speed
    //  t = animationValue - delay
    //  delay = (1 - particle_lifetime) * x0

    //  Getting the x0 from the equation:
    //  t = animationValue - (1 - particle_lifetime) * x0
    //  x = x0 + (animationValue - (1 - particle_lifetime) * x0) * cos(angle) * particle_speed
    //  x = x0 + animationValue * cos(angle) * particle_speed - (1 - particle_lifetime) * x0 * cos(angle) * particle_speed
    //  x = x0 - (1 - particle_lifetime) * x0 * cos(angle) * particle_speed + animationValue * cos(angle) * particle_speed
    //  x = x0 * (1 - (1 - particle_lifetime) * cos(angle) * particle_speed) + animationValue * cos(angle) * particle_speed
    //  x - animationValue * cos(angle) * particle_speed = x0 * (1 - (1 - particle_lifetime) * cos(angle) * particle_speed)
    //  x0 = (x - animationValue * cos(angle) * particle_speed) / (1 - (1 - particle_lifetime) * cos(angle) * particle_speed)

    float x0 = (point.x - animationValue * cos(angle) * particleSpeed) / (1. - (1. - particleLifetime) * cos(angle) * particleSpeed);
    float delay = delayFromParticleCenterPos(x0);
    float y0 = point.y - (animationValue - delay) * sin(angle) * particleSpeed;
.
    if (angle <= - pi / 2 && point.x >= x0)
    {
        return (int(point.x / particleWidth) + int(point.y / particleHeight) * int(1 / particleWidth));
    }
    if (angle >= - pi / 2 && point.x < x0)
    {
        return (int(point.x / particleWidth) + int(point.y / particleHeight) * int(1 / particleWidth));
    }
    return int(x0 / particleWidth) + int(y0 / particleHeight) * int(1 / particleWidth);
}
另外这里是根据粒子移动的过的路径去反推出它原本的位置,从而再确定它原本属于哪个粒子块,因为在后续移动的时候,像素是:
- vec2 zeroPointPixelPos = vec2(uv.x - adjustedTime * cos(angle) * particleSpeed
- float adjustedTime = max(0.0, animationValue - delay);
- float delay = delayFromParticleCenterPos(particleCenterPos.x);
- delayFromParticleCenterPos = (1. - particleLifetime)*x;
所以进来的移动后的粒子像素,可以这个移动公式,如注释那样,反推出它原本的 x 和 y 位置,从而确定它最初的「粒子块 index」 。
另外这里做了 (angle <= - pi / 2 && point.x >= x0) 和 (angle >= - pi / 2 && point.x < x0) 的判断,也就是此时这些条件下,这些粒子本身属于并没有移动过,只需要按照原本计算其归属 index 就可以了。

如果没有上面两个 if 判断,那么在动画过程中就会是这样的效果,还没有移动的像素因为「归属块」不对,出现在了错误的位置:

剩下的就是正常测粒子移动还有透明化的效果:
- randomAngle 其实就是一个伪随机实现,他主要和「粒子块」归属的 index 有关系,同一个块(i)的移动角度是一致的
- particleCenterPos 是计算出粒子块的中心位置
- delayFromParticleCenterPos 其实就是根据粒子的生命周期时间 particleLifetime 结合位置去计算一个延迟,简单说就是根据 animationValue 的数值,还没有粒子化的像素块不移动
- zeroPointPixelPos 就是根据角度移动后 x 和 y 的位置
- 接下来就是确定移动后的像素位于粒子块
- 如果不在粒子块内的,就透明处理 vec4(0.0, 0.0, 0.0, 0.0);
c
        float angle = randomAngle(i);
        vec2 particleCenterPos = vec2(mod(float(i), 1 / particleWidth) * particleWidth + particleWidth / 2, int(float(i) / (1 / particleWidth)) * particleHeight + particleHeight / 2);
        float delay = delayFromParticleCenterPos(particleCenterPos.x);
        float adjustedTime = max(0.0, animationValue - delay);
        vec2 zeroPointPixelPos = vec2(uv.x - adjustedTime * cos(angle) * particleSpeed, uv.y - adjustedTime * sin(angle) * particleSpeed);
        if (zeroPointPixelPos.x >= particleCenterPos.x - particleWidth / 2 && zeroPointPixelPos.x <= particleCenterPos.x + particleWidth / 2 &&
        zeroPointPixelPos.y >= particleCenterPos.y - particleHeight / 2 && zeroPointPixelPos.y <= particleCenterPos.y + particleHeight / 2)
        {
            vec4 zeroPointPixelColor = texture(uImageTexture, zeroPointPixelPos);
            float alpha = zeroPointPixelColor.a;
            float fadeOutLivetime = max(0.0, adjustedTime - (particleLifetime - fadeOutDuration));
            fragColor = zeroPointPixelColor * (1.0 - fadeOutLivetime / fadeOutDuration);
            return;
        }

  fragColor = vec4(0.0, 0.0, 0.0, 0.0);
可以看到粒子化后的效果其实挺酷炫的,最终效果是对指定的 UI 进行粒子化动画,并且通过 OverlayPortal 做到页面内图层区分渲染,整体性能比起在 Dart 实现效果确实优秀不少:

其实很多已有的 glsl 效果都可以移植到 Flutter ,例如 shadertoy 上的各种效果,举个例子,shadertoy 上经典的 water shader 就可以通过修改移植到 Flutter :
c
uniform vec2 iResolution;
uniform float iTime;
uniform float SEA_HEIGHT;
vec2 iMouse = vec2(0);
out vec4 fragColor;

// Ported from https://www.shadertoy.com/view/Ms2SD1 to Flutter

const int NUM_STEPS = 8;
const float PI     = 3.141592;
const float EPSILON = 1e-3;
#define EPSILON_NRM (0.1 / iResolution.x)
#define AA

// sea
const int ITER_GEOMETRY = 3;
const int ITER_FRAGMENT = 5;
const float SEA_CHOPPY = 4.0;
const float SEA_SPEED = 0.8;
const float SEA_FREQ = 0.16;
const vec3 SEA_BASE = vec3(0.0,0.09,0.18);
const vec3 SEA_WATER_COLOR = vec3(0.8,0.9,0.6)*0.6;
#define SEA_TIME (1.0 + iTime * SEA_SPEED)
const mat2 octave_m = mat2(1.6,1.2,-1.2,1.6);

// math
mat3 fromEuler(vec3 ang) {
    vec2 a1 = vec2(sin(ang.x),cos(ang.x));
    vec2 a2 = vec2(sin(ang.y),cos(ang.y));
    vec2 a3 = vec2(sin(ang.z),cos(ang.z));
    mat3 m;
    m[0] = vec3(a1.y*a3.y+a1.x*a2.x*a3.x,a1.y*a2.x*a3.x+a3.y*a1.x,-a2.y*a3.x);
    m[1] = vec3(-a2.y*a1.x,a1.y*a2.y,a2.x);
    m[2] = vec3(a3.y*a1.x*a2.x+a1.y*a3.x,a1.x*a3.x-a1.y*a3.y*a2.x,a2.y*a3.y);
    return m;
}
float hash( vec2 p ) {
    float h = dot(p,vec2(127.1,311.7));
    return fract(sin(h)*43758.5453123);
}
float noise( in vec2 p ) {
    vec2 i = floor( p );
    vec2 f = fract( p );
    vec2 u = f*f*(3.0-2.0*f);
    return -1.0+2.0*mix( mix( hash( i + vec2(0.0,0.0) ),
                     hash( i + vec2(1.0,0.0) ), u.x),
                mix( hash( i + vec2(0.0,1.0) ),
                     hash( i + vec2(1.0,1.0) ), u.x), u.y);
}

// lighting
float diffuse(vec3 n,vec3 l,float p) {
    return pow(dot(n,l) * 0.4 + 0.6,p);
}
float specular(vec3 n,vec3 l,vec3 e,float s) {
    float nrm = (s + 8.0) / (PI * 8.0);
    return pow(max(dot(reflect(e,n),l),0.0),s) * nrm;
}

// sky
vec3 getSkyColor(vec3 e) {
    e.y = (max(e.y,0.0)*0.8+0.2)*0.8;
    return vec3(pow(1.0-e.y,2.0), 1.0-e.y, 0.6+(1.0-e.y)*0.4) * 1.1;
}

// sea
float sea_octave(vec2 uv, float choppy) {
    uv += noise(uv);
    vec2 wv = 1.0-abs(sin(uv));
    vec2 swv = abs(cos(uv));
    wv = mix(wv,swv,wv);
    return pow(1.0-pow(wv.x * wv.y,0.65),choppy);
}

float map(vec3 p) {
    float freq = SEA_FREQ;
    float amp = SEA_HEIGHT;
    float choppy = SEA_CHOPPY;
    vec2 uv = p.xz; uv.x *= 0.75;

    float d, h = 0.0;
    for(int i = 0; i < ITER_GEOMETRY; i++) {
        d = sea_octave((uv+SEA_TIME)*freq,choppy);
        d += sea_octave((uv-SEA_TIME)*freq,choppy);
        h += d * amp;
        uv *= octave_m; freq *= 1.9; amp *= 0.22;
        choppy = mix(choppy,1.0,0.2);
    }
    return p.y - h;
}

float map_detailed(vec3 p) {
    float freq = SEA_FREQ;
    float amp = SEA_HEIGHT;
    float choppy = SEA_CHOPPY;
    vec2 uv = p.xz; uv.x *= 0.75;

    float d, h = 0.0;
    for(int i = 0; i < ITER_FRAGMENT; i++) {
        d = sea_octave((uv+SEA_TIME)*freq,choppy);
        d += sea_octave((uv-SEA_TIME)*freq,choppy);
        h += d * amp;
        uv *= octave_m; freq *= 1.9; amp *= 0.22;
        choppy = mix(choppy,1.0,0.2);
    }
    return p.y - h;
}

vec3 getSeaColor(vec3 p, vec3 n, vec3 l, vec3 eye, vec3 dist) {
    float fresnel = clamp(1.0 - dot(n,-eye), 0.0, 1.0);
    fresnel = pow(fresnel,3.0) * 0.5;

    vec3 reflected = getSkyColor(reflect(eye,n));
    vec3 refracted = SEA_BASE + diffuse(n,l,80.0) * SEA_WATER_COLOR * 0.12;

    vec3 color = mix(refracted,reflected,fresnel);

    float atten = max(1.0 - dot(dist,dist) * 0.001, 0.0);
    color += SEA_WATER_COLOR * (p.y - SEA_HEIGHT) * 0.18 * atten;

    color += vec3(specular(n,l,eye,60.0));

    return color;
}

// tracing
vec3 getNormal(vec3 p, float eps) {
    vec3 n;
    n.y = map_detailed(p);
    n.x = map_detailed(vec3(p.x+eps,p.y,p.z)) - n.y;
    n.z = map_detailed(vec3(p.x,p.y,p.z+eps)) - n.y;
    n.y = eps;
    return normalize(n);
}

float heightMapTracing(vec3 ori, vec3 dir, out vec3 p) {
    float tm = 0.0;
    float tx = 1000.0;
    float hx = map(ori + dir * tx);
    if(hx > 0.0) {
        p = ori + dir * tx;
        return tx;
    }
    float hm = map(ori + dir * tm);
    float tmid = 0.0;
    for(int i = 0; i < NUM_STEPS; i++) {
        tmid = mix(tm,tx, hm/(hm-hx));
        p = ori + dir * tmid;
        float hmid = map(p);
       if(hmid < 0.0) {
            tx = tmid;
            hx = hmid;
        } else {
            tm = tmid;
            hm = hmid;
        }
    }
    return tmid;
}

vec3 getPixel(in vec2 coord, float time) {
    vec2 uv = coord / iResolution.xy;
    uv = uv * 2.0 - 1.0;
    uv.x *= iResolution.x / iResolution.y;

    // ray
    vec3 ang = vec3(sin(time*3.0)*0.1,sin(time)*0.2+0.3,time);
    vec3 ori = vec3(0.0,3.5,time*5.0);
    vec3 dir = normalize(vec3(uv.xy,-2.0)); dir.z += length(uv) * 0.14;
    dir = normalize(dir) * fromEuler(ang);

    // tracing
    vec3 p;
    heightMapTracing(ori,dir,p);
    vec3 dist = p - ori;
    vec3 n = getNormal(p, dot(dist,dist) * EPSILON_NRM);
    vec3 light = normalize(vec3(0.0,1.0,0.8));

    // color
    return mix(
        getSkyColor(dir),
        getSeaColor(p,n,light,dir,dist),
        pow(smoothstep(0.0,-0.02,dir.y),0.2));
}

void main() {
    float time = iTime * 0.3 + iMouse.x*0.01;

    vec3 color = getPixel(gl_FragCoord.xy, time);

    // post
    fragColor = vec4(pow(color,vec3(0.65)), 1.0);
}
还有在之前介绍过用纯 Dart 实现了《霓虹灯文本的「故障」效果的实现》 如下所示是纯 dart 代码的实现:

c
uniform vec2 iResolution;
uniform float iTime;
uniform sampler2D iChannel0;
out vec4 fragColor;

vec3 iMouse = vec3(0.0, 0.0, 0.0);

// change these values to 0.0 to turn off individual effects
float vertJerkOpt = 1.0;
float vertMovementOpt = 1.0;
float bottomStaticOpt = 1.0;
float scalinesOpt = 1.0;
float rgbOffsetOpt = 1.0;
float horzFuzzOpt = 1.0;

// Noise generation functions borrowed from:
// https://github.com/ashima/webgl-noise/blob/master/src/noise2D.glsl

vec3 mod289(vec3 x) {
  return x - floor(x * (1.0 / 289.0)) * 289.0;
}

vec2 mod289(vec2 x) {
  return x - floor(x * (1.0 / 289.0)) * 289.0;
}

vec3 permute(vec3 x) {
  return mod289(((x*34.0)+1.0)*x);
}

float snoise(vec2 v)
  {
  const vec4 C = vec4(0.211324865405187,  // (3.0-sqrt(3.0))/6.0
                      0.366025403784439,  // 0.5*(sqrt(3.0)-1.0)
                     -0.577350269189626,  // -1.0 + 2.0 * C.x
                      0.024390243902439); // 1.0 / 41.0
// First corner
  vec2 i  = floor(v + dot(v, C.yy) );
  vec2 x0 = v -   i + dot(i, C.xx);

// Other corners
  vec2 i1;
  //i1.x = step( x0.y, x0.x ); // x0.x > x0.y ? 1.0 : 0.0
  //i1.y = 1.0 - i1.x;
  i1 = (x0.x > x0.y) ? vec2(1.0, 0.0) : vec2(0.0, 1.0);
  // x0 = x0 - 0.0 + 0.0 * C.xx ;
  // x1 = x0 - i1 + 1.0 * C.xx ;
  // x2 = x0 - 1.0 + 2.0 * C.xx ;
  vec4 x12 = x0.xyxy + C.xxzz;
  x12.xy -= i1;

// Permutations
  i = mod289(i); // Avoid truncation effects in permutation
  vec3 p = permute( permute( i.y + vec3(0.0, i1.y, 1.0 ))
       + i.x + vec3(0.0, i1.x, 1.0 ));

  vec3 m = max(0.5 - vec3(dot(x0,x0), dot(x12.xy,x12.xy), dot(x12.zw,x12.zw)), 0.0);
  m = m*m ;
  m = m*m ;

// Gradients: 41 points uniformly over a line, mapped onto a diamond.
// The ring size 17*17 = 289 is close to a multiple of 41 (41*7 = 287)

  vec3 x = 2.0 * fract(p * C.www) - 1.0;
  vec3 h = abs(x) - 0.5;
  vec3 ox = floor(x + 0.5);
  vec3 a0 = x - ox;

// Normalise gradients implicitly by scaling m
// Approximation of: m *= inversesqrt( a0*a0 + h*h );
  m *= 1.79284291400159 - 0.85373472095314 * ( a0*a0 + h*h );

// Compute final noise value at P
  vec3 g;
  g.x  = a0.x  * x0.x  + h.x  * x0.y;
  g.yz = a0.yz * x12.xz + h.yz * x12.yw;
  return 130.0 * dot(m, g);
}

float staticV(vec2 uv) {
    float staticHeight = snoise(vec2(9.0,iTime*1.2+3.0))*0.3+5.0;
    float staticAmount = snoise(vec2(1.0,iTime*1.2-6.0))*0.1+0.3;
    float staticStrength = snoise(vec2(-9.75,iTime*0.6-3.0))*2.0+2.0;
    return (1.0-step(snoise(vec2(5.0*pow(iTime,2.0)+pow(uv.x*7.0,1.2),pow((mod(iTime,100.0)+100.0)*uv.y*0.3+3.0,staticHeight))),staticAmount))*staticStrength;
}


void main()
{

    vec2 uv =  gl_FragCoord.xy/iResolution.xy;

    float jerkOffset = (1.0-step(snoise(vec2(iTime*1.3,5.0)),0.8))*0.05;

    float fuzzOffset = snoise(vec2(iTime*15.0,uv.y*80.0))*0.003;
    float largeFuzzOffset = snoise(vec2(iTime*1.0,uv.y*25.0))*0.004;

    float vertMovementOn = (1.0-step(snoise(vec2(iTime*0.2,8.0)),0.4))*vertMovementOpt;
    float vertJerk = (1.0-step(snoise(vec2(iTime*1.5,5.0)),0.6))*vertJerkOpt;
    float vertJerk2 = (1.0-step(snoise(vec2(iTime*5.5,5.0)),0.2))*vertJerkOpt;
    float yOffset = abs(sin(iTime)*4.0)*vertMovementOn+vertJerk*vertJerk2*0.3;
    float y = mod(uv.y+yOffset,1.0);


    float xOffset = (fuzzOffset + largeFuzzOffset) * horzFuzzOpt;

    float staticVal = 0.0;

    for (float y = -1.0; y <= 1.0; y += 1.0) {
        float maxDist = 5.0/200.0;
        float dist = y/200.0;
        staticVal += staticV(vec2(uv.x,uv.y+dist))*(maxDist-abs(dist))*1.5;
    }

    staticVal *= bottomStaticOpt;

    float red  =   texture(   iChannel0,     vec2(uv.x + xOffset -0.01*rgbOffsetOpt,y)).r+staticVal;
    float green =  texture(   iChannel0,     vec2(uv.x + xOffset,     y)).g+staticVal;
    float blue     =  texture(   iChannel0,     vec2(uv.x + xOffset +0.01*rgbOffsetOpt,y)).b+staticVal;

    vec3 color = vec3(red,green,blue);
    float scanline = sin(uv.y*800.0)*0.04*scalinesOpt;
    color -= scanline;

    fragColor = vec4(color,1.0);
}
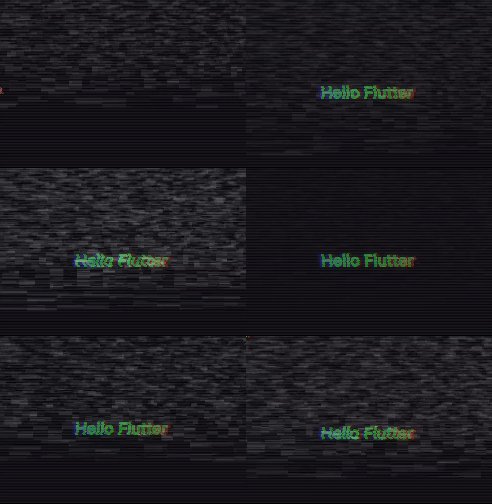
其实可以移植另外的 gl 实现,修改为 webgl-noise 上的 glsl 效果,如下图所示,可以看到修改后的文本有了不一样的「故障」效果:

最后,现在通过 flutter_shaders 就可以在 Flutter 很方便的接入各种 glsl 代码效果,只需要配置对应的属性,控制变量参数即可,当然 thanos_snap_effect 粒子效果的有趣之处,在于他结合了截图和 OverlayPortal 封装出一个更有意思的实现,所以可以看出来,其实 shader 在 Flutter 上还是有着需要玩法,这样看,更期待后续 Flutter GPU 的落地了。